Search the Community
Showing results for tags 'Trains'.
Found 157 results
-
My first try at building a wooden gondola. I'll build a few more versions before I go into production for my layout.
-
Video from the yearly model railroad exhibition in the danish city of Helsingør earlier this month. The LEGO contribution was done by our new (and smallish) train club, Togklodsen. Unfortunately I couldn’t participate but a lot of my trains did A rather spectacular crash occurs around the 12 minute mark
-
Unit Train Indexer use to position the cars in a Rotary Dump. Unit Train Indexer (Car Positioner) by Terry Akuna, on Flickr Indexer_Video by Terry Akuna, on Flickr
-
Functional Ramp and Autorack which can fit up to 6 Speed Champion cars. 65x10 Studs. Autorack_And_Ramp_06 by Terry Akuna, on FlickrAutorack_And_Ramp_01 by Terry Akuna, on Flickr
-

What would you like to see changed about my Casey Jr. project?
Modeltrainman posted a topic in LEGO Licensed
What would you like to see me do to my Casey Jr. project to encourage more supporters? What can I change, and where can I do better? https://ideas.lego.com/projects/8b153541-1956-42b7-bfec-a8f31755bc7e -

Lego Mindstorms EV3 Monorail
Hanso posted a topic in LEGO Technic, Mindstorms, Model Team and Scale Modeling
One of the policies within Sioux.NET on Track, is to change a build every three years. In other words, when a build has been part of a Lego World demo for three years, it should be replaced by a new one. For example, loading the train was first done by the container crane, now it is done by the delta crane. The same applies for the train: the first years, we controlled the train by an NXT, now it is controlled by an EV3. For the new layout, I am thinking of replacing the train by a monorail (and thus renaming the group to "Sioux.NET on Monotrack" ;-). I always use Youtube as inspiration. To see how others solved the typical problems you run into when building something. But I haven't seen a Lego Mindstorms monorail yet. The Lego Technic monorail created by "Osi" (click here for an example) is most nearby for what I have in mind, but it is not using Mindstorms inside. In other words, I will have to use my own imagination. What a pity ;-) I started with creating the track. This was my first attempt: Although it looks good (I was aiming at an open, industrial look), the curve is not smooth enough for a train: So, I made a second attempt: That looks much better. It was not easy to get the curve smooth AND find a brick with the right distance. This is how I managed to get this curve: A simple train (only proof of concept until now), runs easy through the curve: The next days I will continue building a motorized train (proto). Let me know what you think so far Merry Christmas! Regards, Hans -
I built this for my "Midiopolis" topic over in the Town forum, but I decided to mention it here as well. The wheels are part number 38799 which at the moment is only made in white and is decorated for use as a tea cup saucer for a Harry Potter minifig. Midiscale BR Class 08 Shunter Midiscale BNSF 2099 Locomotive Midiscale Small Oil Tanker Midiscale Chicago Metra Cheers.
-
After many years of dreams, reflections, planning (starting Winter 2011/12), testing (starting fall 2013) and finally building (starting spring 2014), this project has finally crossed the finish line - probably one of the world's most extreme and most challenging layouts for Lego Train 9V! An indescribable feeling, great satisfaction and relief - and what a fantastic experience! First some introductory remarks: This is not a "usual" but rather a conceptual layout with analogue power supply and -management, without landscapes and buildings (except one train station). A particularly sophisticated construction with four themes: a one-track vertical climb, two double-track climbing spirales, a double-track high-level track 2.16 m above floor level and a rail yard. The layout is intended for Lego trains equipped with standard Lego 9V train engines. It is built with standard Lego 9V rails and points, some of which are modified. So are all four 9V Train Speed Regulators. With the help of points, the layout can be segmented into four sections (Loop A - D) which make it possible to run four trains simultaneously, independent of each other, with up to ten engines each. However, this requires more hands... To avoid/prevent spontaneous decoupling, all my trains are equipped with super magnets. I also would like to take this opportunity and thank all of you who have contributed with support, valuable advice, and encouragement during all these years. Without all this help, this project would have remained just a dream. And this is how it looks like: More pictures, facts and videos will be added to the first entry of this thread Addendum # 1: Technical Data and Details: Track lengths: Total track length (incl.sidings and dead-ends): approx. 173 m Total "Tour" length (from start to start): approx. 105 m Loop A (High-level track 1/High-speed track): approx. 32 m Loop B (High-level track 2): approx. 29 m Loop C (Climbing-wall from level 85 to traverse on level 175): approx. 46 m Loop D (Level 50 and level 85): approx. 21 m Rails: 949 straight, 263 curved and 37 modified (4, 8, 10 and 12 straight) Points: 13 standard points (whereof 3 are operated electrically) 6 crossover points (4) 11 half-curve points (1) Track Design Program: Track Designer Application (R) version 2.0 by Matthew D. Bates (Matt's LEGO (R) Train Depot) Electrics/Electronics: 1 Power Supply Unit VOLTCRAFT EP-925, 3-15 V(DC), max. 25A 4 modified Train Speed Regulators (4548) with LM350T regulators, 3A diodes, outside heatsinks (with a thermal resistance of 1.9 K/W), mini-fans and digital thermometers to measure temperatures inside the boxes 4 Control-boxes to operate 12 points electrically. The boxes are equipped with "memory-sticks" to memorize the position of each point since these are out of reach and sight. 12 PF Medium engines mounted on the electrically operated points 52 Power connections to rails 1 Control-box to selectively turn on/turn off 11 power connections Approximately 1000 m cable whereof approx. 850 m RK cable 1.5 square mm Märklin pins and sleeves 1 LED strand (4 m) with dimmer 1 IR-thermometer to measure heatsink temperatures Construction: 7 levels: Rail yard level (50 cm above floor level) Train station level (85) U-curve level 1 (115) U-curve level 2 (145) U-curve level 3 (175) Eaves level (195) Top-level (216) Max. gradient: 83 per thousand (The gradients are built in such a way that all trains can manage to get uphill and downhill with adhesion, i.e. without cogwheels). Min. clearance: approx. 12 cm Train shelves: Shelf system: Algot (IKEA) 15 train shelves type A (102x11x1.6 cm), 8 straight/shelf 27 train shelves type B (166x11x2 cm), 13 straight/shelf 12 train shelves type C (217x11x2 cm), 17 straight/shelf all train shelves are strengthened with 22x45 mm wood strips All in all 54 train shelves with a total length of 86 m (678 straight) and 108 railway buffers 2 "Trains-in-Transit" (TIT) Trolleys (Algot) Room dimensions: 5.5 x 7.3 m Occupied floor space (incl. train shelves): approx. 9 square m Construction materials: Wood (45x45 mm) and wood strips (22x42 mm) MDF boards (6 and 10 mm) Glass shelves (6 mm) Polycarbonate strips (3 mm) and rivets Cable conduits Steel cords (3 mm) with wire locks Perforated plates and angle irons Cable ditches and cabling towards cable terminal Cable terminal Power supply unit and cable terminal box Control center Addendum # 2: More pictures with some of my MOCs Glacier Express with Matterhorn in the background Trans Europ Express (TEE) "Rheingold" and TEE-VT 11.5 in alpine environment Swiss "Crocodile" (10183) with heavy RhB cargo transport in the steepest part of the entire track - a gradient of 83 permille! "Uppsalapendeln" in the midst of the Swiss Alps - imagine if this were for real .... Emerald Night on its way up to the mountains Track Cleaning Train at Knivsta Station - ready for new missions Track Maintenance Train on its way for a new mission Addendum #2A: Train shelves "Trains-in-Transit" (TIT) Trolleys with two Maersk and one TTX Train section(s) ready for transit Addendum #3: Videos https://www.youtube.com/watch?v=47CqLOQKGLM&t=10s
-
Hi My name is Stephan Niks from the Netherlands and new here. At the moment very busy. but in the near future I will post my designs here for discussion My interest: trains, modulars and LEGO ideas
-
Resurrection of some old 12v tracks (powering new trains)
Unfinished_Projects posted a topic in LEGO Train Tech
Hello, I'm creating this write-up to share my experience buying and operating a set of old 12v track in the US. I had been wanting some 12v track and motors since I was in middle school (and I'm in college right now, so yes my tastes in Lego have always been old and expensive haha) but hadn't found the right lot until about a week ago. I managed to score the following lot on ebay for a good price: It is a decent amount of stuff, but some key things are missing: motor (the blue one in picture is 4.5v and doesn't work), transformer, and the piece for connecting to the track. My goal was to have an operating train for as cheaply as possible. Hopefully these ideas can help someone else out who wants to make use of older track without spending a fortune. FOR PURISTS: I handled all of these missing components in an unorthodox way that includes modification of vintage parts, so consider yourself warned Motor: Instead of buying original 12v motors, which are only available for crazy amounts of money on bricklink, I chose to use @bricks n bolts method of picking up track power and using it to drive PF motors (https://www.eurobricks.com/forum/index.php?/forums/topic/63535-mod-7745-to-use-the-pf-motor-still-on-12v-track/ I know it was a little while ago, but thank you @bricks n bolts for sharing! ) The process of cutting down the pins was pretty straightforward. I used a dremel with a cutoff wheel to make the initial cut and a sanding wheel to finish things up. If anyone attempts to do this, try to keep the pin cool, as I melted the plastic a bit on one of my pick-ups. I also ended up cutting off the curved section of one pick-up, to accommodate for the magnet assembly. Connecting to track: To connect to the track, I simply soldered some wire to the little tabs on the bottom of the rail. The correct part for connecting to these blue rails isn't that expensive on bricklink...if you don't factor in overseas shipping. Transformer: Since I live in the US, using an original transformer would require a converter (I had no luck finding the 110v version on bricklink or ebay). I originally thought of using a model train transformer of some kind, but wasn't sure so I asked here on the train tech. @dr_spock suggested a cheap DC motor controller and a generic 12v DC wall adapter (Thanks! ). This ended up working perfectly, and was quite cheap. Only downside is no reverse, but I'm ok with that for how much I spent. Final Result: With everything together I swapped out one of the motors on my Powered Boxcar (https://www.eurobricks.com/forum/index.php?/forums/topic/169681-moc-powered-boxcar-power-functions/) with the completed pick-up bogie and turned on the speed controller. It worked perfectly! I now have a functioning 12v loop that powers my newer trains! I do however have to watch out that I don't over-power the PF stuff. I suppose I could have used a 9v power adapter, but I'm leaving room for a 7740 that I hope will join my collection if I find a good deal ^These last 2 are videos, you just have to click on them There's a few more pictures of this project here if interested: https://flic.kr/s/aHskR5KZX3 Thanks for looking! Unfinished_Projects -
12v blue era remote points voltage and disassembly?
Unfinished_Projects posted a topic in LEGO Train Tech
Hello, I bought some blue era remote points in rough shape, that need to be opened and repaired. Has anyone attempted this before? Is there any tips or tricks I should know about? Also, I do not own an original transformer, so I will be using a generic power supply for these. Will 12v DC work, or do I need higher voltage? Thanks, Unfinished_Projects -
Hello, I have 4.5v train motor (https://www.bricklink.com/v2/catalog/catalogitem.page?P=bb07pb01&name=Electric, Motor 4.5V Type A 12 x 4 x 4 with 4.5V stamped on front&category=[Electric, Motor]#T=C) that needs wheels. I have access to a 3D printer and 3D modeling software/knowledge. My question is, does anyone have dimensions for "wheel2a" ?(https://www.bricklink.com/v2/catalog/catalogitem.page?P=wheel2a&name=Train Wheel Spoked for Motor&category=[Wheel]#T=C) I would like to try to make something that goes into this motor and gives it a technic axle, or just recreate the wheel (either all plastic, or using purchased metal rod). Unfinished_Projects
-
PLS I DON'T KNOW HOW TO PUT THE LXF.FILE HELP ME! anyway, this is basically a modified version of the lego 7938 Go check my LDD video about the wagon
-

Instructions from the Getting Started With LEGO Trains book
JECook1997 posted a topic in LEGO Train Tech
Hello everybody Does anyone here have the book 'Getting Started with LEGO Trains' by Jacob Mckee from 2003? If so, Would they be able to post a PDF of the instructions and parts list for the reefer boxcar? I've seen pictures of it and would love to build one myself but paying $60 for the book is a no go. Also, if the other instructions were posted this thread could be a good reference for anyone else who would like to build the other models from the book. Thanks in advance -
Hi dear friends! I want to present you one of my latests MOCs. Despite de hate ofsome to the one piece nose of the last City Passanger train, I must say I really love it. I've owned several other passanger trains and have decided to keep this as hte High Speed Train for my layout. Yet, as in all LEGO trains, Ifound it to be a little "short", so I decided to build a couple of additional cars for it. My first intention was to build a Club Car, taking as reference the one released for the Metroliner (4547 - http://brickset.com/...4547-1/Club-Car ) and an additional car as the one that came with the set. But, destininy had it's own intetions.... The Bricklink seller made an error when sending my order and, instead of a 24 studs base, he sent a 28 studs one! Since I live in Argentina, and getting pieces here is really a mess, I decided my best option was to try to extend de car whith the pieces I had available in my collection, rather that waiting for the correct base to arrive. No more words on these, so staright to the images. Hope you like them! Club Car: Extended Car: And lastly, a couple of videos of the full train running! <iframe width="560" height="315" src="https://www.youtube....ed/fiNkw9kMqOQ" frameborder="0" allowfullscreen></iframe> <iframe width="560" height="315" src="https://www.youtube....ed/vOB8uYfuMkk" frameborder="0" allowfullscreen></iframe> P.S: I would also like to invite you to follow the topic of my city layout. It has plenty of train stuff in it, so you might be interested ( http://www.eurobrick...opic=107070&hl= )! Cheers to all, and as always, comments are appreciated!
-
Hi, so my LUG is considering building a new train layout for a train museum that hosts us. The Layout we have their now uses 9v Tracks, because we have set it up so that the tracks are powered for X amount of time by a button press. However, the 9v Tracks are ancient, and the trains we have on them struggle to pull even two cars. I don't know if it's because of the layout's size, as it is quite large. (20'x8' or so) So, I suggested we switch to RC track, and use some sort of power functions trains. My LUG though, isn't convinced about this, as they're worried about the batteries wearing out, and having it so that a button can be pressed to start the trains. So my questions are the following: Say we use Power functions trains. How long do the batteries last, if the train is running for a while? We come to the museum every weekend, but the museum is open all week. With power functions, is there a way to set it up so a button can be pressed to run the trains for X amount of time? I'm thinking Mindstorms, or something, but I don't know. We're also not purists, if that helps. Does anyone have examples of such a layout? If anyone has any questions, feel free to ask below. Thanks!
-
I'm trying to drag a very good builder of trains to EB and everything related to railway construction, pavlo, which lives in the Russian Lego forum. I obtained permission from him, I will now publish his works here. They are valuable in that they cover a diverse railroad park of the USSR / Russia, the work is done in the same style and at different scales (in 6, 8 and 10 widths), have an LDD file, and those who wish can collect these, modelism in the part of railway. Let me know if you are interested. Thanks in advance. First of all, a picture with several of his works. Gradually I will replenish this topic with new models from pavlo
-
Hiya, I'm assembling my 2 x 10027 Train Engine Sheds ready to sell and I've run into an odd problem. Brickset's inventory says it contains the new stone greys while Peeron says it's the old greys. I tried to narrow it down by assessing whether I had the correct baseplates, tracks and other unique parts in the right colours which lead me to believe Peeron is correct and this 2003 set was on the cusp of 'greygate' but if someone could check their set and confirm which greys it uses, I'd be very grateful. Were there any sets that contained a mix of both out of interest? Thanks, Alex
-
I've decided to make a set of Southern Railway (ish) 7 wide (ish) freight wagons and a loco to go with, and to that end, I wanted something fairly simple to model while I get the hand of 7 wide building (so far, it's a b******d). I've selected the Maunsell Q class 0-6-0 tender engines and so far, it's all going OK (after a lot of farting around getting the footplate to match along the whole engine without fouling the driving wheels). The Prototype. Progress so far. Unfortunately, I'm really having some issues with the boiler. I've tried using the 4 wide round parts, but there seems to be no obvious way to connect them to the front and back without some ugly gaps and too many compromises. Do you guys have any suggestions as to how I could make that work? Alternatively, I'm gonna try the 5 stud wide cheese wedge built boiler I've seen online, but I'm not entirely sold on that either. Also, does anybody have a suggestion on 2 similar methods to build a boiler I could combine to show the slightly wider smokebox?
-
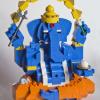
This is my DIY LED lights on a budget. White 5mm LEDs are 2 cents each and resistors are 4 cents each on eBay. A large spool of wire-wrap wire costs around $5-7. Do-It-Yourself LEGO LED Light by dr_spock_888, on Flickr I tapped into the 9V and GND lines of the IR Receiver for power. Note this will void your warranty. Do so at your own risk. I fed the wires through the pin holes on the receiver. No drilling or cutting needed. I sandwiched the LED between two Technic 1x2 bricks. The 5mm sized LEDs fit right in the Technic hole. I decided to try wire-wrapping instead of soldering. It might be easier to disassemble later on. The LED turns on when the battery pack is turned on. It makes a good reminder to turn off the battery pack when done playing. Little Yellow Locomotive by dr_spock_888, on Flickr The hard part was calculating what size resistor to use to limit the current to the LED. Too much current will blow the LED. Tools used were small Philip head (+) screwdriver, wire cutter & stripper, soldering iron, wire-wrap tool, and tweezers. Plus a multimeter to verify polarity.
-
Its time to start thinking about Brickworld Chicago 2018 is only 4 months away. What topics would most interest you for the Train Round Table? Here are just a few possibilities... or suggest one - Third Party tracks options for wide curves, turnouts, metal rails (Like BrickTracks, 4D Bricks, ME Models, etc) ? - The new Lego Power Functions 2.0 standard ? - Third Party power options (like PFX Brick, S-Brick, etc) ? - Building Narrow Gauge ( using either narrow gauge or new Roller Coaster track ) ? - Rechargeable battery options (alternatives to the Lego LIPO battery) - BMW
-
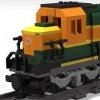
Hello, I always wanted to have a LEGO train as a kid and in (I think) 2008 I bought 7897 passenger train. But because I always wanted cargo train and as I have nicer looking 60051 I decided to rebuild 7897. I tried few times to find any inspiration as the 7897 has specific train base (6x30) but I started to believe that nobody wanted to "play" with it and couldn't find any MOCs. So I tried to create some kind of clone of BNSF loco, but let me say that it is the beginning I hope :) Anyway I am sharing my progress so far and would love to see your creations/modifications to either my creature or your own with 7897 train base. Pls, feel free to download LDD file and modify it. https://www.dropbox.com/s/ryrniph1evketqi/my train white no trainbase.lxf?dl=0 Looking fwd to see your MOCs
-
Hi everyone, I recently was holding my Horizon express train and noticed something. The cars (so not the engine) were very light, even so if I didn't know better, would think there weren't a lot of pieces involved. I had the 2006 High speed passenger train 7897 and noticed also that the car was very, very light. Same with the other two recent passenger trains, and the passenger car from the Emerald Night. On the other hand, as a kid a friend of mine had some cars of the Santa Fe Super Chief, and they were kinda heavy (in my memory that is) compared to my own 7897. Looking up the instructions of some of the older trains I also noticed it almost seems more pieces were involved. I'm kinda sad by this, since I think the cars of a train are just as important as the main engine of it. So my question is, does anyone who owns several trains of several eras also notice the difference in wheigt between the passenger cars? And what does that mean for you?
-
Hello everyone, I've been enjoying Eurobricks for a while, and I'm always amazed at the great MOCs, MODs, useful news and information here. So thank you all, and I look forward to seeing you around the forums. Doom2099
-

How could I provide power and/or data coupling between train cars?
TK2241 posted a topic in LEGO Train Tech
Hello all, I'm trying to find a way to create a power/data coupling between train cars that can be connected/disconnected like the car coupling magnets. Has anyone done anything like this? Background: This is so that I can supply power and control to LED lights (and maybe other devices) in the cars being pulled behind the engine, which will provide the power and control unit (Arduino based MCU) I've tried using a micro USB magnetic connector, but they are too bulky and don't flex easily enough for this. I'd love to find out if anyone has engineered anything similar. Thanks in advance! Arlo


.thumb.jpg.2433326db10f4abc8b62808c9f079544.jpg)