Search the Community
Showing results for tags 'Trailer'.
Found 91 results
-
Travel down memory lane to the 1960s in a single-axle Airstream Bambi RV! I even managed to add an interior, despite its small size!
-
Ever wondered what a large scale caravan would look like? Here, I've made one that has pretty awesome features! Here's the interior! First, there's the kitchen with a cupboard, drawers, microwave oven, 2-burner cooktop and a radio! 2-person bed with quilt! I still need to know how I could make a fridge/freezer that can store a lot of food! Luxurious Dining Suite with 2 upholstered chairs, coffee mugs & fruit bowl! Folding Entry Steps! The drawbar. Here, there's 2 gas bottles, jockey wheel, safety chains and even a security lock on the coupler! The sunshade on the kitchen window can be closed for travel! The shutters on the front & back can be opened & closed too! The entry door can also be opened! Waste Water Pipe Interchangeable Number Plates, depending on which Australian state you live in! (I live in South Australia!) Stabilizer Jacks Those new 'Flat Tile 1x1 Half Circle' (Part #24246) pieces make nice trailer lights! Number Plate Light Here's the food! Additional Features: Two Spare Wheels Removable Roof Opening Side Windows Outside Light Now if only there was going to be a car that could go perfectly with the caravan... Maybe a Holden Kingswood or Belmont Wagon! Thanks for reading!
-
My fourth and final entry for the 2016 MOCathalon. Built for the County Fair category. The build features a fully functional ride, ice cream trailer with interior, ring toss game-stand, and a popcorn vendor. Plus lots of people enjoying the fair. See the ride in action here: Lots more pictures here: Link Thanks for looking, C&C appreciated
-

Trailer for Lucios Tractor Truck
ScooterBoy posted a topic in LEGO Technic, Mindstorms, Model Team and Scale Modeling
Hi there, after 12 months of hard work the building instruction for the lowboy trailer - compatible to lucios tractor truck - is finished. More informations here: http://www.technicdi...e=37&modell=370 Hope you enjoy it! Kind regards, Matthias -
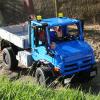
[MOC] historical logging trailer for Unimog U411
Pat-Ard posted a topic in LEGO Technic, Mindstorms, Model Team and Scale Modeling
Hi folks, something new - hm, no, historical ;) I made a histrical logging trailer, those were/are used here in southern germany. They are quite simple, but effective :) Oh, and here a small video which shows how the logs are loaded... Have fun... -
[MOC] Forestry wagon for Unimogs
Pat-Ard posted a topic in LEGO Technic, Mindstorms, Model Team and Scale Modeling
Hi folks, some days ago I finished a new MOC. It's a forestry wagon, those are/were often used by lumbermen here in southern Germany. The lumbermen took their breaks in... The wagon itself is mostly classic build but fits the Unimog quite well - I think ;) Some pictures: And a small video.... Hope you like it, have fun... -
Less than a month away in a galaxy near us all comes the next installment to the star wars saga! This is my own trailer for The Force Awakens. Star Wars The Force Awakens Lego Trailer by AJV777, on Flickr Thanks to Lord Blako for letting me use his awesome Kylo Ren Saber sound fx https://www.youtube....BlakoSaberFonts and to SGTBizarro for Music from the official trailer without sound fx https://www.youtube....user/SGTBizarro Hope you all like and stay tuned for more! :D
-
 I'm not really a regular truck builder, but I like to think of new systems that do not exist in real life yet but that do improve the life of, for example, truck drivers. When something like a big tarmac machine has to drive onto a trailer to go to the next building site, the slope of the trailer should be very small. That small slope is nowadays achieved by making very large ramps that fold up vertically for transport, causing massive air resistance and therefore unnecessary fuel consumption. A way to make these ramps shorter is to decrease the bed height, because that asks for smaller vertical ramps. The second option is making the wheels below the bed smaller. But decreasing the wheel diameter increases the rolling resistance. Another way to solve the problem is placing the bed betweeen the wheels, so that it can be much lower, but that limits the cargo width: the tarmac machine can never be wider than the bed width, which is not handy if truckdriver x has to transport many different tarmac machines. Read the rest of the story and how I solved these problems with my my DAF CF with 3-axle trailer on http://mocpages.com/moc.php/421622 Or watch the video here: To give an idea of the model, I have posted one photo below, the others can be found on http://www.brickshel...ry.cgi?f=560197 in a better resolution.[/font][/size]
 -
 INSTRUCTIONS: https://www.dropbox.com/s/3juzujlb27fqpgw/remorque_5571.rar?dl=0 I have been looking for a 5571 at the right price for a long time, and i finally found one. I have also been collecting parts for the trailer pictured above. To my knowledge, and according to my source of the instructions, nobody has ever built this trailer before. In this thread I will share my progress on building them both. After waiting over a month for my 5571 to arrive from Germany to the US, it finally came yesterday: I found the instructions for the trailer here: http://www.eurobrick...1 Unfortunately the post is several years old, but I messaged the original poster and I was lucky enough for him to respond with the instructions! The trailer is going to be huge, and requires 1628 parts, with 122 unique parts/colors. The instructions I was sent were actually a series of images, and I had to try and find all the correct part numbers on rebrickable before placing my orders. This was a long task and it took quite some time: After much time manipulating different inventories from sellers on bricklink, I placed all my orders and parts have started to arrive! The 1x2 tiles with the grille pattern seem to be pretty rare. They only came in one set many years ago, and I got very lucky finding sellers with enough of them when I placed my orders. I think I am now the only person with 18 of them. I am waiting on 3 more orders before I get started on the build. I will keep this post updated
 -

Mercedes Arocs Trailer
Kman860 posted a topic in LEGO Technic, Mindstorms, Model Team and Scale Modeling
Has anyone done a trailer for the Arocs yet? I've seen one or two, but they're just a copy of the back half of the arocs itself. I want to know if anyone has done a box trailer or lowboy, especially considering it has an obvious trailer hitch built in. -

[MOC] Low loader trailer
kevstechnic posted a topic in LEGO Technic, Mindstorms, Model Team and Scale Modeling
This trailer is the first MOC I have developed. It is not based on any real trailer. It is fairly large but not very complicated as I am fairly new to lego and still developing my skills. A key challenge was buoilding the deck so that it was rigid enough to take a significant load without sagging. After a number of rebuilds it can now easily hold quite large models such as 42030 Volvo loader with hardly any sag. Sorry but it seems I have to use links for pictures as I can't attached any more files. Trailer picture is at : http://www.brickshel...y.cgi?i=6287700 The trailer has parking wheels to support the front end when not attached to a towing vehicle. These were tricky to design so that they worked, held enough weight and retracted with a very low profile. End result is simple and works quite well. Picture of underside wheels in the lowered position is : http://www.brickshel...y.cgi?i=6287507 I have produced a full LDD file for instructions. There were three small items that LDD would not allow me to connect how I did on the actual trailer becasue they don;t line up perfectly the way LDD requires. LDD file is at : http://www.brickshel...ler_full_v1.lxf If I can work out how to put the actual pictures here, I will update this topic with them. -
[MOC] camper trailer
kevstechnic posted a topic in LEGO Technic, Mindstorms, Model Team and Scale Modeling
I was inspired by building the excellent Toyota FJ40 model designed by rm8 which can be found elswhere in this forum (at http://www.eurobrick...howtopic=103380). I developed a mod for the FJ40 to place the battery on the roof rack so that the interior is not too packed (and you can see the rear seats). Then I decided to build a camper trailer in the same colour scheme to go with it. This is what the whole thing looks like: The trailer has a parking wheel that is retracted when hitched to the FJ40 and lowered when stand alone. A removable pin structure holds it in either the retracted or lowered position. Picture of trailer standing alone with parking wheel lowered is : http://www.brickshel...y.cgi?i=6287054 The roof of the trailer sits on locating pins and can be removed. This is to allow further development into a working pop-top camper trailer. LDD for trailer is : http://www.brickshel...ailer_whole.lxf -
[MOC] Scale Lowbed Trailer
Pat-Ard posted a topic in LEGO Technic, Mindstorms, Model Team and Scale Modeling
Hi folks, yes, I did it again. And no it ISN'T a Unimog :) But hey, it's trailer for it ;) Since all my models are in the same scale (nearly 1/12.5) the trailer has to be too... The model is a four axle lowbed...Overall length is 1100mm the bed is 115 studs long and 25 studs wide. Part count round about 2.500 parts. I got major help with the base and rear ramps by efferman - thanks again :) Enough words - pictures: LDD version: WIP pictures: And now the final model: Video will follow when the temperatures are lower... Have fun watching... Pat -
Perhaps the new theme park needs a better transport which can maneuver in the city, right? Based on my previous truck design, I did this for moving the raptors. The tractor section has a turret that can be used for any emergency cases like dinosaur escape, and now raptor transport can go through the city without problem! Hope you enjoy this :) thanks!
-

[Failed MOC] Truck and Trailer
Rishab N posted a topic in LEGO Technic, Mindstorms, Model Team and Scale Modeling
Just wanted to share my failed MOC. It's a truck with trailer. The truck had rear wheel drive through 2 XL motors and was steered by an M motor with clutch. It also had front lights controlled by a switch in the rear. I never was really a fan of the truck's looks ,especially my makeshift wheel arches made from panels, and I lost interest in building it. On the other hand I was very satisfied with the trailer. It was finished unlike the truck and looked quite smooth to me and had pneumatic legs which worked well. It also had a pair of lights in the rear which connected to the truck's switch with a long extension wire. The back of the trailer didn't look too great either. It also had a bit of sag which can be expected from something this long Here's both of them together. It was quite long, the trailer alone was about the length of 42009 Thanks for reading and hopefully my next MOC will succeed and be far more interesting than this -
Hello guys! I came up with a nice idea, let's see if it starts to fly or not... ;) What I had in mind was to create an awesome Lego-animation trailer about the Thrawn-trilogy (Heir to the Empire) that would be released slightly before the official Episode VII -movie in celebration of the new Star Wars -movie. The thing is that to make it to be awesome, all of the cutscenes should contain only MOCs. Also it should have many frames per second to make a smooth appearance. This apparently sounds very difficult and workful and so it is. Actually there is no one on the Earth I guess that would have all the necessary MOCs for the effort. So what I propose is to make this trailer as a team work. There are many highly skilled builders that have made some fabulous scenes or vehicles of the Thrawn-trilogy already. And of course the ones that could still build one scene in due time, but not all. If enough enthusiastic persons would agree to make this, all it would take would be to animate a very short clip or two by each individual from the scene they have built. You know what they are like in real trailers, something like less than 5 to 10 seconds maximum and cut to the next shot. Of course, there are a couple of key persons that should put here some more effort. - One would be the director (not me) that should have some experience on animating and leading projects. The director should also hold contact to the builders. - Script writer. I can help with this, but in such a big community, maybe here is someone with some professional experience actually? - A semi-professional editor would do good, too, because there should be some vehicles flying around. Then we would need the MOC-builders. Luckily as I said we already have some and I know here are many super talented builders/animators so this shouldn't be impossible. A couple of examples I know: Thrawn's Command Room http://www.eurobrick...howtopic=107447 Hyllyard in Myrkr http://www.mocpages.com/moc.php/402528 Cloning Chamber in Mount Tantiss http://www.eurobrick...pic=101238&st=0 Vehicles: X-Wing, Imperial Shuttle, TIE-Interceptor, Speeder Bike, AT-ST, Probe Droid http://www.brickshel...gi?f=543035&n=0 Vehicle: Y-Wing http://www.eurobrick...showtopic=84780 So, what do you think? Do we have the necessary enthusiasm and are there persons for this project in this forum? If there is something you would like to do, make a post beneath and let's see if this can actually work or not... ;D Personally I can help to make contacts with the people. And I can also provide a busy supply of detailed MOC vehicles. Imperial Star Destroyer and AT-AT on the way as next. -Samppu
-

[VIDEO] BIONICLE: Mask of Light Trailer (G2)
The Phantom Terror posted a topic in LEGO Action Figures
Hey guys. I've been working on something over the weekend and I'd like to keep it to myself and bask in its awesomeness share it with you. So here we go. Embedding isn't working. So here's the -

Review: 42008 Service Truck B-Model
mostlytechnic posted a topic in LEGO Technic, Mindstorms, Model Team and Scale Modeling
Lego 42008 Service Truck (B-Model) Thanks to EuroBricks for making this review possible! As I looked at the recent Technic sets, this was one that I thought looked interesting, but not enough to buy. So when the opportunity to review it came up, I jumped! The main model is a European-style heavy tow truck with pneumatics and motors, so that's pretty cool. But what about the B-model? It's a claw truck with a trailer. We've seen similar models from Lego before (we had the 9397 Logging Truck [though no trailer on that one], 8049 Tractor with Trailer, and we could stretch to the 8110 Unimog and 8258 Crane Truck as well). So how does this compare, since it's a B Model? (If you'd like to see my review of the main model, it's right over here) Name: Service Truck Set Number: 42008 Pieces: 1276 Price: $129.99 Minifigs: n/a Theme: Technic Year of Release: 2013 Links: Bricklink Peeron Brickset The Back of the Box The back of the box shows the B model for us. The instructions are online only, not printed, but that's normal. It seems to have a lot of functionality for a B model but is very similar to many other Technic sets with a claw arm and trailer. The Build, 1 Following the instructions on screen (not my preferred way to build, although at least the quality was decent on this set) we get the frame of the truck to start. The Build, 2 Now the back wall of the cab is partially installed, as well as most of the steering system in place. It's simpler than the main model, since there's only 1 steered axle this time. You can also see some of the weird design bits due to it being a B model, such as the exposed pin on the connector being used to brace the right angle in the steering. You can't see it, but actually BOTH pins of that connector are unused. The Build, 3 The cab's made a lot of progress. You can see a few more oddities, like the white license plate stickered beam that's mostly hidden. I probably should have turned it around, but oh well. (the manual doesn't show stickers on the B model). (and yes, I hadn't found one of the grey grill pieces, but I was tired of digging through the parts. I found it later and put it on) The Build, 4 Now the cab is done. It's ok. Not great, but ok. There's weird color things going on due to the part limitations, and the doors feel too recessed, and the "winch" on the front is just an excuse to use those pieces up. (and yes, I did it backwards in this photo. The cable should hang down the inside rather than the outside to make the ratchet work correctly) The Build, 5 The chassis has also been extended backwards. The rear axles are visible, as are the starting points for the crane, rear stabilizers, and lots of other pins waiting to be built upon. The Build, 6 Time for a gearbox. Looks like we'll have the central input shaft going to 3 outputs. The Build, 7 The gearbox slips into the frame and we get to connect up the outputs. As in the main model, we have a powered air compressor (the black and grey cylinder right in the center) plus, so far, an output going back through a couple u-joints to that vertical crane connection we saw in the last photo. The third output hasn't been used yet. The Build, 8 A whole layer has been added to the back of the truck. The third output from the gearbox now runs back to the outriggers. The colors all seem haphazard. It's understandable, but does make it obvious this wasn't the main model. The Build, 9 Those "wings" sticking out behind the cab turned out to be the battery mounts. Simple and effective, and it's unusual to see a horizontal battery box behind the cab like that. Also unusual, there's that mini-LA at an angle to rotate the crane. Lego has used linear methods (LAs or pneumatics) to rotate things before, but it's unusual. Since the main model didn't have a turntable, this is an alternate way of making a "powered" swiveling base. The Build, 10 That's a very unusual boom setup there. And seriously, an axle with a bush on it as a manual control for rotation? The whole setup is just weird and slapdash. I hope it at least works well... The Truck, Finished Here's the final truck. It functions, but it's got some issues. The pneumatic hoses are too stiff and since they come horizontally across the red beam, they keep the claw from hanging as freely as it should. And again, the controls are awkward. There's the manual rotation control on the left, the pneumatic control on top, and the gearbox controls on both sides. Too many levers in too many places. The the rear outriggers... they're there, but barely. The Truck, Reaching Out Here's the full reach of the crane. It'll reach the ground barely, and can rotate to the sides. It's not really enough to reach into the trailer though, if the trailer is connected behind the truck. To do any work, you need to park the truck between the load and the trailer. There are a bunch of beams left over you could use as a load, but the claw doesn't grab them very well. The Build, 11 Time for the trailer. A basic frame to start - axles for the single set of wheels, a "hitch" up front, and a manual leg that can come down. The Build, 12 Here's the start of the tipping setup. That is a weird linkage from the mini-LA to make the trailer tip sideways. And again, a bush as a knob to manually control it. The Trailer, Finished The previous frame mounts to the trailer and a bunch of panels fill out the trailer. Too bad there's random stickers all over. Guess it gives it a "distressed" look? The Trailer, Tipped That's as far as it tips, but it's enough to get the job done. The Conclusion So, what's my conclusion on this model? It's meh. The build is ok, the functions are ok, but the final thing feels definitely B and not main model material. The colors are random, the stickers are in the way, and the functions just feel haphazard.I'd recommend building it first so there's no stickers and you can see it for a day or two, and then take it apart and build the main model and leave that one built. It's much better than the B. The Ratings Value: 10/10 - It's so close to the famous 10 cents a part mark, and there's so many useful parts. Lots of panels, PF, pneumatics, so it's solid. Design: 4/10 - Haphazard colors, stickers from the main model, etc. Minifigs: n/a - Playability: 6/10 - It's got some functionality, but the controls are awkward and it doesn't actually pick things up well. The reach of the boom is short as well. Parts: 10/10 - It's got both pneumatics and PF, plus if you want green Technic, it's the only place to go. It's the only source of 1x7 beams, the best source for 1x9 and 1x13 beams, and the only current(ish) source for green panels. Overall: 5/10 - Ok to make once, but then build the main model since it's much better. -

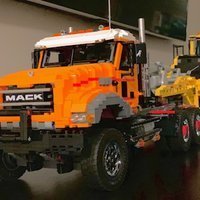
Little American Truck
Appie posted a topic in LEGO Technic, Mindstorms, Model Team and Scale Modeling
Here's another small creation I spend some time on the past few weeks. A small American truck: I had a few wishes before I made this model. - Had to be 7 studs wide. - Had to use these tires, because they are the only tire size I know of that have good looking "truck (double) wheels" for the rear axles and good looking single tires for the front wheels. - Small fake engine - Maximum steering range possible - Steering controlled from the 5th wheel (why will become obvious later) - Openable doors and interior I got this in the model, though some are not the most pretty. Especially the wheelarches at the front are a bit big. First of all, making the wheel arch a full stud lower would touch the wheels. Lowering it half a stud is something I didn't even really look into, because I am getting pretty tired of the "half stud issue" that plagues pretty much all my models The rear part of the wheelarch is that far behind the wheel due to the steering mechanism. There is space to move it 1 stud closer to the front wheel, but I wouldn't know how to fix it in place while still keeping room for the steering rack. Considering I have alot of "old Technic" parts I used some vintage steering solutions for this model combined with modern parts. On the other hand though I do kind of like this wheelarch, because it reminds me of the wheelarches of old cars I could have settled for a smaller steering angle, but I didn't want to. I also had to keep the steering solution low due to the fake L4 engine above it A known concept for a small engine that I crammed in here. The hood is open for 2 reasons: I like to see stuff moving and because the hood would otherwise be too high for the model. I tried to mimic a curved top on the hood by have it go from 2 to 3 studs. I did have a desire to make a openable hood, but I couldn't figure out a way to make that structurally sound. Openable doors and an interior. The chairs are actually linked to the red triangular half liftarms on the outside keeping them (and the chairs) at that angle. The belly shot, which also provides another look at the steering That 8T gear is actually connected to a 16T idler gear on the steering axle to transfer it to another 8T gear going to the L4 engine. The truck is only driven from the 2 left rear wheels, since I can't fit a diff in this scale I figured this was the next best thing to still keep a nice steering angle. As you can see the outer ring of the small turntable, the "5th wheel", is connected to a black bevel gear which controls the steering. The reason for the axle in the centre of the small turntable is for the trailer. The trailer is a loaded with liftarms, that's partially because I only had 2x 3x11 panels from my 42029 and because of the white line on the truck which I continued on the trailer. The white line on the truck was actually an afterthought. The truck was completely red before, but that looked rather dull imo so messing around with some lines I decided this pattern on the truck was a nice break from all the red. This isn't just a trailer. This is a trailer that gives the truck RC possibilties. This was another wish I had for the model. I wanted to build a truck that was a non PF model on its own, yet had the option of being remote controlled with a trailer. The small turntable was an obvious choice for me because with that the truck on its own looks like it has a pretty decent looking 5th wheel which also allows to be used as a control to steer the vehicle. It also allowed me to have 2 functions (drive and steer) crammed into one spot on the model. I didn't want to see universal joints at the rear of the trailer going to the truck for steering, because that has been done and I don't like the look of that, so it had to go through the 5th wheel. The black bevel gear at the front of the trailer is to secure the steering of the 8T gear. Of course the trailer turns as well, but since steering is done with a M motor you're basically "re-adjusting" steering every step of the turn. The length of the trailer is based on what "felt right". This meant that I had plenty of space in the trailer for all the stuff. I got pretty lazy and just used some universal joints to link the motors I also made a very small video of the model (battery of phone ran out ) I couldn't make a video of the model going in reverse. It does some gear grinding then. Something I can't seem to really fix, because Lego decided to make a square hole in the small turntable instead of a round one, which I could have used to secure that drive axle on the 2.5 stud high rear chassis some more. Considering I don't like driving it in reverse anyway (I am not a master of turning with a trailer ), I am just going to leave it. -

[WIP] Lego Technic House moving truck and trailer
Kiwi_Builder posted a topic in LEGO Technic, Mindstorms, Model Team and Scale Modeling
I am currently most of the way through my latest project to build a large Technic house moving truck and trailer. I had also been wanting to build a Scania T143m, I have never actually seen one in real life but their 'lack of curves' without better terms has always attracted me to them. I have currently got the truck built with the trailer a few hours' work away. The truck is RC with 3 functions; XL motor for drive, servo motor for steering and 2 L motors for a sliding turntable. There is also a flashing light mechanism that automatically turns on when the battery box is started. The XL motor is geared down to increase torque and decrease speed, so far the only main problem I have encountered is the drivetrains gearing is prone to slipping from the resistance put up when pulling the trailer. I have braced the gearing from the top, bottom and one side, so if anyone could give me help on how to stop that happening would be much appreciated. The truck is 50cm X 18.5cm, has 58 light pieces and weighs 2 kilograms. While I have been MOCing for many years now this is my first post on EB. I have put some photos up on Bricksafe: http://bricksafe.com/pages/Kiwi_Builder/Technic/house%20moving%20truck I will hopefully have a video up in the next few days. All feedback is appreciated, Adam (Kiwi_Builder). -

Brick Flick: THE HOBBIT: Battle of the Five Armies Teaser - Lego Versi
Legostudio01 posted a topic in Brick Flicks & Comics
Hi there, Only a few days left until the last Hobbit film starts playing in theaters - in the meantime enjoy this LEGO remake of the teaser trailer coproduced with Dominik from Rainlight Animations (http://tinyurl.com/lt65jj3)! We really hope you like it and appreciate feedback :) -
This was made for my new video that was made in 22 hours. In the photo I included the original plate in the top left corner. Alot of the fx I added in was a rust texture for the speeder along with dust and some color correction. Alot of the parts in the speeder came from the Hulkbuster suit I made for an Avengers video awhile back. If you would like to check out the speeder in action here's the video below. Thanks for looking and may the force be with you!
-
After a non-stop 22 hours of work, I proudly present my version of the full first Star Wars The Force Awakens teaser trailer in glorious LEGO. 4 hours to shoot more than 1500 frames of animation at 29.97 FPS. 3 hours to build the landscapes and ships/vehicles. Topped off with 15 hours to add the finishing touches that will blow your mind away! Subscribe for new films. If you enjoyed this one you're certain to enjoy next month's film (An original film, 9 months in the making). Plus follow the DC/MARVEL crossover series that will continue to unfold over the next few months. youtube.com/subscription_center?add_user=legogalactus Like and Follow the Facebook page for the latest updates! https://www.facebook...lFeature?ref=hl Thanks for watching!
-

[MT] Experimental Agricultural Equipment
JGW3000 posted a topic in LEGO Technic, Mindstorms, Model Team and Scale Modeling
I've been playing around with this for some time, in LDD only so far. Borrowed some ideas off of prior LEGO sets. It is an experimental agricultural soil treatment machine, designed to produce steam on-board, and then inject it into the soil, while tilling. Similar devices are available commercially in Germany and Italy, but so far none of them are suitable for US agricultural purposes. This one has propane fuel tanks on the tractor, and a hose reel to connect to water tankers off to the side. We were going to build something similar, but then the whole concept got tossed in favor of an autonomous 4-wheeled platform, with no driver, just RC control. For the MT contest, I'll modify and add brick built details to the tractor and finish off the trailer. Functions will include HOG steering, driven PTO connected to the tiller, which can raise and lower. Since PF are not allowed, the steam generator will be non-functional Right now its at 75 x 17 studs, so will need some work to get to the correct size. I'd appreciate any feed back as to suitability to mod to MT standards, or should I work on something else? -
[MINI] Truck with Trailer and Wheel Loader
Appie posted a topic in LEGO Technic, Mindstorms, Model Team and Scale Modeling
I like to present my Mini for the contest, it is a truck with trailer and a wheel loader: After finishing my little dump truck last week I came up with this idea instead of trying to cut down the parts of the little dump truck from 350 or so to 200. And to be honest I am glad I went with this idea. Was alot of fun and it provided alot of challenges, but I got everything in the model that I wanted with exactly 200 parts. A total of 9 functions (10 if you count adjustable seats in the truck) I managed to put in this entry. One function actually shares his with another and came to be by chance actually. I didn't plan it, it just happened when I placed a part for which all I had to do was turn it around to make it even more functional, but more about that later. Allow me to go over each part seperately: 1. The truck with a total of 97 parts. Could be a considered a "Mini" on its own I suppose. It has the following functions: - HoG steering - Rear suspension - Fifth wheel lock 2LegoOrNot2Lego actually inspired me for the fifth wheel with the version he has on his awesome US Truck T1 MkII. I wanted that on my little truck, but I had to do it on a much smaller scale so I didn't fully look at how his worked, just knew it had rubber bands. My fifth wheel requires a little manual assistance to function (don't have to open them this far to get the trailer in there). Trailer uses a technic crankshaft to lock into the fifth wheel And this is how it looks attached. The suspension on this model is actually an improved version of the one I made for my little dump truck. Originally the truck for this had a 5 stud wide chassis like the little dump truck, but after making the wheel loader this 7 stud wide body looked too big in scale (and had a wooping 135 parts). So I made a 5 stud wide truck, which means I had to refine the suspension from the little dump truck from 5 studs to 3 studs. This was a challenge, but making the centre of the rear chassis from connectors instead of liftarms made my day. But Appie this truck is 6 studs wide? Yes, the 5 stud wide truck looked too slim so I tried a 6 stud wide body while keeping the chassis 3 studs wide for a better look (works better with the tires too in my opinion). 2. The wheel loader with a total of 57 parts It has the following functions: - Articulated steering through gear on top of the cabine - Bucket lift through control at the rear - Bucket tilt with hinge Added bonus for me personally is that it uses less parts than Lego's smallest technic loader, but this one can steer Can't wait to see how it looks besides the 42030 3. The trailer with 46 parts. This was a real challenge. Before even starting this I remade the truck like 3 times to get the parts down to what it is now. I took apart the wheel loader for the same reason, but 46 parts is what I had to work with and I managed to get the functions in that I wanted to. Though they are a little simple in execution (as in: very direct), but that also happens in "Mini" Lego sets, so I guess it fits It has the following functions - Ramp that can be lowered - Stand that can be lowered - And the double function: the stand also functions as a lock for keeping the wheel loader in place during transit. The ramp at the end provides this feature a little too of course, but the stand really locks it into place, it can't move at all. I call it "the hook" Let me explain the hook with some pictures. This is how the stand would be during transit. When the stand is deployed the wheel loader can move a little, but is quickly stopped by the ramp at the end, so no crazy stuff will happen when standing still The wheel loader has an open space behind its front axle, the 2x4 liftarm fits perfectly in this space. Here you can see how it looks on the model: Thank you for your time and I hope you all like it. Big thank you to Eurobricks for this fun contest. It's alot of pictures, hope you don't mind. I like showing stuff Photo of the parts will follow soon (will have to disassemble it first).