Search the Community
Showing results for tags 'Tank'.
Found 237 results
-

Renault FT-17 Instructions
Tommy Styrvoky posted a topic in LEGO Technic, Mindstorms, Model Team and Scale Modeling
A couple years ago I built a Renault FT-17 for the Model Team contest. During the contest I created my first Ldraw model, this model was rather flawed, as lots of parts were misaligned, and lots of duplicate parts were present. I had received lots of feedback from people asking if a LDD or PDF format instructions were available, as it is becoming one of my most popular videos. At the time I had little experience with Lpub, so I didn't know where to begin with the PDF instructions. Earlier this month I received others having more interest in obtaining PDF instructions. So I began the process of fixing the model, there were lots of flaws with misalignments, duplicate parts, and even areas that hadn't been updated to represent the final version of the model. Since I am at college I began to work on the model, and convert it into further logical steps to rebuild the model. This process involved disassembling the model and ordering the steps backwards. I then decided to import the model into Blender and create a short animation to showcase all of the functions. This animation allows me to show all of the detailed internals with better lighting than I could in real life, though to render this 39 second animation it took around 60 hours. If only OpenCL rendering worked on my Mac... I also decided to make a proper trench for the Renault... in 4K, another 2 hour rendering process. I thoroughly enjoyed building this model in real life, now everyone as the instructions to have one for themselves. Enjoy, Tommy Styrvoky Rebrickable page Lego Renault FT-17 by Tommy Styrvoky, on Flickr Lego Renault FT-17 by Tommy Styrvoky, on Flickr Lego Renault FT-17 Test Render by Tommy Styrvoky, on Flickr Lego Renault FT-17 Test Render by Tommy Styrvoky, on Flickr FT-17 internals render by Tommy Styrvoky, on Flickr -
The Scorpion ABS (armoured battle station) is a mobile ground unit with a frontal plasma cannon and a super heavy rail gun turret. Created to carry a squad of marines in to any situation and form a heavily defended position behind enemy lines but with the capabilities of a tank and apc rolled in to one. Inspired by Crimso Giger and his contagious building and by his theme moth Febrovery. In transport mode with the main armament stowed The Scorpion can carry a squad of 6 and requires a 2 man crew consisting of a driver/engineer and a gunner/strategic operations manager Thick ablative armour shrouds a hardened plastanium core minimising both the impact from beam weapons and high velocity missiles. Unlike most ground units the Scorpion creates an adaptive energy shroud as a first line of shielding this further reduces the chance of being susceptible to supersonic projectiles and sneak attacks. Armed with a forward firing plasma cannon and its quad lance rail cannon the Scorpion is as well armed as it is guarded. With its main armament of a quad lance rail cannon, capable of launching rounds at hypersonic speeds with pinpoint accuracy, this Scorpion certainly has a sting in its tail.
-
What is the best tank's width ? As you know, I am interested in tank and you can see my tests on this thread, http://www.eurobricks.com/forum/index.php?showtopic=119844 During my tests, I found that the more the tank's width was big, the less the track goes out of his lane during a turn on a spot. I have the intuition that when the track follows a large circle, the friction caused by ripage is less. I guess this is because of the shorter distance of the extremities of the track and the perimeter of the circle. But how to prove it? I will like to make a video on the subject, but I have not done great studies and I'm afraid to say stupid things. Could someone explain this without too much math? Thank you in advance.
-
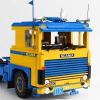
Good Evening All, What happens when you smash your 60098 red cargo train into a vintage 7725 then rebuild it as one train? I have been trying to work out what to do with my new 60098 red cargo locomotive as it is just not, well, how can I put this kindly? Coal fired enough. It was a great little loco but those curved red 2x2s on the roof were crying out to be turned into a red 0-4-0 saddle tank engine! I used the same basic layout as my dark blue engine but gave her a sturdier (in appearance but not structurally) smoke box, new bunker and static side rods. The side rods are a compromise as I need her to run reliably at Brickexpo in Canberra in July. The added benefit is that this is all unmodified bricks (this time)! After Brickexpo I will look at moving side rods… Fans of 7777 may identify the culprit wielding the spanner. Thank you to Bricksmith, Rail Co, Paperballpark and Chromeknight for giving me the motivation to complete this project. It would be great to have all our little shunters running together one day but I fear they are all a shade too geographically dispersed. Sorry Modified 60098 With Lowered Roof and Extra Train Weights. It is time to become a steam engine... by Canvas Rails, on Flickr Sorry Modified 60098 With Lowered Roof and Extra Train Weights. It is time to become a steam engine... by Canvas Rails, on Flickr Lego Power Functions 0-4-0 saddle tank steam locomotive in red by Canvas Rails, on Flickr Lego Power Functions 0-4-0 saddle tank steam locomotive in red by Canvas Rails, on Flickr Lego Power Functions 0-4-0 saddle tank steam locomotive in red by Canvas Rails, on Flickr Lego Power Functions 0-4-0 saddle tank steam locomotive in red by Canvas Rails, on Flickr Lego Power Functions 0-4-0 saddle tank steam locomotive in red by Canvas Rails, on Flickr Lego Power Functions 0-4-0 saddle tank steam locomotive in red by Canvas Rails, on Flickr Lego Power Functions 0-4-0 saddle tank steam locomotive in red by Canvas Rails, on Flickr Lego Power Functions 0-4-0 saddle tank steam locomotive in red by Canvas Rails, on Flickr As always, more photos on Flickr Suggestions for improvements are most welcome and I have plenty of time to make modifications
-

Can Any one help me mod my 8098 Clone Turbo Tank (Clone Wars)
shrak posted a topic in LEGO Star Wars
So can any one give me some ideas of what I should do to modify my set. I would like to keep some what the way it is as it is modeled after the version seen in season 2 of star Wars the Clone Wars Holocron Heist. It would also be nice if they could be done medium to minimal requirement of pieces as I would be using the spare pieces I have already not going to go and buy new pieces just to mod it. Thanks to all who can help me! -
Hello, this Space Tank is a "small class" unit inspired by WWI English tank Mark I. Colors and style are clearly based on LEGO Classic Space series. Named "Blue Bull" due to the stocky shape, it's equipped with a huge long-range gun and with a little gun machine right below the rotating turret. I particularly like the loader's hatch and the details featured both on the turret and the side. The crew is composed by 3 crewmen: the commander, the driver and the gunner. Here the Tank is at the maintenance hangar where the staff is taking care of it after a moon mission. Below the Space Tank in plain sight Even if Classic Space is not my comfort zone of building, and some friends of mine were surprised seeing this new build, I like this theme since I was a little boy. Moreover having in stock a lot of CS pieces pushed me to build the tank and the space hangar. It has been really funny building this MOC and for sure won't be alone for a long time. The forklift is based on Alban Nanty one. More pics and info on my flickr photostream. All the best and happy building! Andrea - Norton74
-
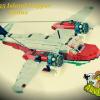
Breastforce is a team of 6 Transformers from Japanese Transformers: Victory Series, with the ability to merge into a super robot named Liokaiser. Each member has a minion of sorts that can be deployed from their chest. These robotic beast minions can become hand held weapons to their respective masters too. Team members: - Leozack transform into Tomcat fighter jet, partnered with Lionbreast. - Guyhawk, an MiG fighter jet, partnered with Hawkbreast. - Hellbat, a Dassault Rafale fighter jet, partnered with Komoribreast. - Drillhorn, the drill tank , partnered with Hornbreast. - Jallguar, the Baja buggy, partnered with Jaguarbreast. - Killbison, the Gepard anti-aircraft tank, partnered with Bisonbreast. I actually spent weeks in deep thoughts on how to make this work (how each limb combine with each other sturdily with articulations to boot) before I started this project last Dec. The efforts were incredibly tedious (especially Jallguar and Leozack) yet rewarding. I shall use this thread to update more reveals in the coming weeks, and of course... the combined mode. I'm almost done with all of them (99%) except the combiner head. This one needs delicate treatment and I'm taking my own sweet time here. KILLBISON In my quest to fulfil last year's vow of building a Transformers combiner , Killbison is actually the last MOC I started work on (from the team of 6 breastforce members). This is because I have difficulty finding the needed brown parts , Just like his original toy, Killbison transforms into a Gepard Tank (below) with 2 turrets. But the original toy has 4 tank treads instead of 2 like in many typical real world tanks. I choose to follow the latter. Trivia > Initially this MOC was suposed to be a "remold" of Drillhorn I started much earlier, but Drillhorn's drill tank mode is chunky looking. I decided to build Killbison from scratch using a new transformation method. > When I started building this guy about 2 months ago, I used many black parts as a placeholder.In the quest to procure more brown parts quickly (this means not from ordering online), My routine scout in a mall yielded me Mixadel (A Mixel set) . This set has 4x c-clips I needed to complete this MOC. What a stroke of luck! > Some sacrifices were made for the robot mode aesthetics to ensure Killbison form a sturdy looking combiner leg. (one example is the robot arms with bland design facing outwards) For more photos of his "killer" antics and poses (and my "killer" writeups on how he came to being), do pay a visit to blog below! alanyuppie.blogspot.com/2016/03/lego-killbison-from-breastforce-team_19.html TRANSFORMATION Like most of my TransforMOCs from recent years, transformation from vehicle to robot mode doesn't require taking off parts.
-

Lego – Funny little tank in a Mars field #7
oracid posted a topic in LEGO Technic, Mindstorms, Model Team and Scale Modeling
10 minutes, it is very long, but I promise you that you will not be disappointed by this latest video of my little series. For those who are interested, they can see the "making off" of the full series here: http://www.eurobricks.com/forum/index.php?showtopic=119844 -
How to make a turret turn and elevate?
Geekman9097 posted a topic in LEGO Technic, Mindstorms, Model Team and Scale Modeling
AMX turret.lxf I've been working on a model of an AMX 13 105 light tank, and decided to take a break from the hull to work on the turret. The attached file is my LDD progress, because for some reason i prefer working digitally before I start putting stuff together. My first problem is that this turret works by elevating the entire gun carriage, including the autoloader box at the back. My second problem is that this is a small turret. 5x7, so I can't put a motor in there. To help with this, I have a gear in the center that pushes the entire carriage up and down against the side mounts. Now I need to figure out how to put the side mounts on a turntable, so that they can turn. My third problem is that mock mounted on a turn table, I can't find a way to turn the gear to move the turret. Any ideas? Blueprints I'm using: http://www.the-blueprints.com/blueprints-depot/tanks/tanks-a/amx-13-105mm-1.png, -
LEGO - Tank climber test
oracid posted a topic in LEGO Technic, Mindstorms, Model Team and Scale Modeling
By searching solutions for tank can climb stairs, I decided to do video series on the subject. Here is the first video that shows the environment and a solution with elastics and also shows the importance of the length of the tank. Thank you for your comments. -
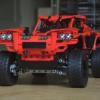
[MOC] M1A2 Abrams Main Battle Tank (RC)
Tommy Styrvoky posted a topic in LEGO Technic, Mindstorms, Model Team and Scale Modeling
Lego M1A2 Abrams Main Battle Tank (RC) by Tommy Styrvoky, on Flickr Well this model is a major change compared to my older MOCs. This Is my first Modern Main Battle tank that I have built. There are several reasons why I decided to build a MBT. Most modern vehicles have a much larger space between the tracks/ have smaller tracks. This allows me to mount XL motors closer together, so I used this extra space to mount 4 coupled XL motors. ( 2 coupled with 1:1 ratio to each of the tracks) With the remaining space in the hull, there is 2 AA battery boxes mounted in front and behind the turret ring. There are 2 sets of PF led lights mounted in the front hull and the tail lights. 3 IR receivers are mounted above the XL motors in the rear of the hull. There is a single L motor mounted in the hull to traverse the turret. The turntable features a coupling that allows me to remove the turret from the hull for getting loose pieces that fell in there maintenance. The suspension is torsion bars on 12 of the 14 road wheels, as on the last road wheel there was clearance issues for torsion bars, and the rear of the vehicle had a majority of the weight bearing on it, nearly collapsing the suspension, and causing the rear of the vehicle to sit lower. The front most torsion bar fixing point is as tight to the side of the hull wall, as there is lots of weight there too. The turret of the MBT is rather large, but slightly taller than it should be, as the turret houses the massive Technic driving ring firing mechanism inside of it. This model was based off of the mechanism of my ISU-152, and uses the newer Technic driving ring to eliminate the issues with the clutch gear disengaging because of too much strain of the rack under load of rubber bands. This new mechanism seems to be much more robust and durable, I was able to apply enough force on the bolt to stall the L motor, so I decided to use only a single rubber band, rather than 2 that would stall the L motor. I was able to create a Ldraw model of this and used that to animate it in Blender, this better shows the internals and their operation. This was a fun process, as I had to determine the rotations per frame for each gear. The shooting mechanism features a M motor to elevate the gun slightly, as there isn't much room for the gun to move in the turret. I think this model is one of my most impressive so far, it's not incredibly complex, but it's powerful and impressive. This year there will be a lot of different vehicles built, such as some halftracks, a 6x6 armored car, and maybe a AT-TE from Star Wars. Enjoy, Tommy Styrvoky Lego M1A2 Abrams Main Battle Tank (RC) by Tommy Styrvoky, on Flickr Lego M1A2 Abrams Main Battle Tank (RC) by Tommy Styrvoky, on Flickr Lego M1A2 Abrams Main Battle Tank (RC) by Tommy Styrvoky, on Flickr Lego M1A2 Abrams Main Battle Tank (RC) by Tommy Styrvoky, on Flickr Lego M1A2 Abrams Main Battle Tank (RC) by Tommy Styrvoky, on Flickr Render 1 by Tommy Styrvoky, on Flickr Cutaway by Tommy Styrvoky, on Flickr Lego M1A2 Abrams Main Battle Tank (RC) by Tommy Styrvoky, on Flickr Lego M1A2 Abrams Main Battle Tank (RC) by Tommy Styrvoky, on Flickr Lego M1A2 Abrams Main Battle Tank (RC) by Tommy Styrvoky, on Flickr Lego M1A2 Abrams Main Battle Tank (RC) by Tommy Styrvoky, on Flickr Lego M1A2 Abrams Main Battle Tank (RC) by Tommy Styrvoky, on Flickr Lego M1A2 Abrams Main Battle Tank (RC) by Tommy Styrvoky, on Flickr Lego M1A2 Abrams Main Battle Tank (RC) by Tommy Styrvoky, on Flickr Lego M1A2 Abrams Main Battle Tank (RC) by Tommy Styrvoky, on Flickr Lego M1A2 Abrams Main Battle Tank (RC) by Tommy Styrvoky, on Flickr Lego M1A2 Abrams Main Battle Tank (RC) by Tommy Styrvoky, on Flickr turret back by Tommy Styrvoky, on Flickr turret facing by Tommy Styrvoky, on Flickr back of turret by Tommy Styrvoky, on Flickr Teaser by Tommy Styrvoky, on Flickr Teaser by Tommy Styrvoky, on Flickr -

MINDSTORMS TANK : Holds up to 80KG
Burf2000 posted a topic in LEGO Technic, Mindstorms, Model Team and Scale Modeling
I built a new ride on vehicle for Brick 2015 at London Excel. It was super popular and I am so tired now (3 day event, 20,000 + people) Uses 10 NTX's 22 motors, rotacaster 125mm wheels! Made in 5 evenings powered by RedBull -
There have been a couple of projects this year that have been a long time in the making. I have been happy to clean out The Queue over the past couple of months. This is a MOC of the most widely produced tank of all time. The T-54/T-55 series of tanks has its roots connecting back to the T-34 of WWII. This MOC represents the T-55a version, produced from about 1979 onwards. Basically, it means I got to build the AA gun on the top. Much more is at Thirdwigg.com. A video may be found .Features: Working left and right tracks, PF L, 1:1 Turret rotation, infinite rotation Gun elevation Suspension for all ten wheels Removable paneling And the right. The rear. Sorry about the single dark grey tile. The top of the turret. The snot work was fun. The internals. You can see the battery box, the turret mechanism, and the drive motors. The suspension is running down each side.
-
[MOC] Panther Ausf. G early 1/35 (RC)
Tommy Styrvoky posted a topic in LEGO Technic, Mindstorms, Model Team and Scale Modeling
Lego Panther 1/35 (RC) by Tommy Styrvoky, on Flickr The main purpose of this model is to build the most compact Lego tank with the Power functions system. The model is only 6 studs wide, the minimum width for having independently driven tracks. The model lacks a rotating turret, as the IR receiver is mounted in the turret. It was a fun model to design, as it was rather small, this made some interesting challenges for designing the suspension of it. The suspension consists of bogies, and each bogie is interlinked and suspended at 2 points, one in front of the M motors and one behind it. This allows the suspension to act like the torsion bars of the actual Panther. The model is very close in size to the 1/35 Tamiya Panther model that I have built. Even if the model had a Sbrick, and 2 micro motors, there wouldn't be enough space for a traversing turret/turret elevation. This will be my last MOC for this year, as I have finals coming up next week. Enjoy, I have some really cool models planed for next year/christmas break. Here's the Ldraw model used for the animations http://www.bricksafe... drivetrain.ldr Lego Panther 1/35 (RC) by Tommy Styrvoky, on Flickr Lego Panther 1/35 (RC) by Tommy Styrvoky, on Flickr Comparison with 1/35 Tamiya Panther Ausf. G early version Lego Panther 1/35 (RC) by Tommy Styrvoky, on Flickr Lego Panther 1/35 (RC) by Tommy Styrvoky, on Flickr Comparison with minifigure. Lego Panther 1/35 (RC) by Tommy Styrvoky, on Flickr Lego Panther 1/35 (RC) by Tommy Styrvoky, on Flickr Lego Panther 1/35 (RC) by Tommy Styrvoky, on Flickr Lego Panther 1/35 (RC) by Tommy Styrvoky, on Flickr Lego Panther 1/35 (RC) by Tommy Styrvoky, on Flickr -
Hey folks, I'd like to present one of my older but still awesome MOCs: Challenger II MBT Challenger II British MBT by Joshua, on Flickr Overhead view: Challenger II British MBT by Joshua, on Flickr Rear view: Challenger II British MBT by Joshua, on Flickr ------------------------------------------------------------------------------------------------------------ The FV4034 Challenger 2 is a British main battle tank (MBT) in service with the armies of the United Kingdom and Oman. It was designed and built by the British company Vickers Defence Systems (now known as BAE Systems Land & Armaments). Vickers Defence Systems began to develop a successor to Challenger 1 as a private venture in 1986. A £90 million deal for a demonstrator vehicle was finalised in January 1989. In June 1991, the Ministry of Defence placed a £520 million order for 140 vehicles, with a further 268 ordered in 1994. Production began in 1993 and the unit's tanks were delivered in July 1994, replacing the Challenger 1. The tank entered service with the British Army in 1998, with the last delivered in 2002. It is expected to remain in service until 2035. The Army of Oman ordered 18 Challenger 2s in 1993 and a further 20 tanks in November 1997. The Challenger 2 is an extensive redesign of the Challenger 1. Although the hull and automotive components seem similar, they are of a newer design and build than those of the Challenger 1 and fewer than 5% of components are interchangeable. The tank's drive system provides a 550 km range, with a maximum road speed of 59 km/h. It has a four-man crew. The Challenger 2 is equipped with a 120-millimetre (4.7 in) 55-calibre long L30A1 tank gun, the successor to the L11 gun used on the Chieftain and Challenger 1. Uniquely among NATO main battle tank armament, the L30A1 is rifled, because the British Army continues to place a premium on the use of high explosive squash head (HESH) rounds in addition to armour-piercing fin-stabilized discarding-sabot armour-piercing rounds. The Challenger 2 is also armed with a L94A1 EX-34 7.62 mm chain gun and a 7.62 mm L37A2 (GPMG) machine gun. Forty nine main armament rounds and 4,200 rounds of 7.62 mm ammunition are carried. The Challenger 2 is considered to be one of the best protected tanks in the world. The turret and hull are protected with second generation Chobham armour (also known as Dorchester). However, on one occasion, in August 2006, during the post-invasion stage of the Iraq War 2003 an RPG-29 was fired at a Challenger 2 that was climbing over a ramp, the front underside hull armour of the tank which was not augmented with an ERA package was damaged, the tank subsequently returned to base under its own power and was quickly repaired and back on duty the following day. As a result, the ERA package was replaced with a Dorchester block and the steel underbelly lined with armour as part of the 'Streetfighter' upgrade as a direct response to this incident. To date, the only time the tank has ever been seriously damaged during operations, was by another Challenger 2 in a 'blue on blue' (friendly fire) incident. It has seen operational service in Bosnia, Kosovo and Iraq. ----------------------------------------------------------------------------- From Wikipedia article --------------------------------------- I've had this for awhile, but since I'm new to EB, only just got around to posting them here. This is the best Lego rendition of a Chally that I've ever found online, so I'm actually very proud of this model. The green-and-gray camo one was built as a Christmas present for my younger brother, who likes the Challenger alot. Hope you all like it! Cheers, Joshua
-
[MOC] AMX 13 75 (RC)
Tommy Styrvoky posted a topic in LEGO Technic, Mindstorms, Model Team and Scale Modeling
Lego AMX 13 75 (RC) by Tommy Styrvoky, on Flickr I present my latest model, the French AMX 13 75. This is a rather unusual tank because of the turret design. The turret is called a oscillating turret, as the entire gun/turret elevates as a whole. This allows for mounting of a larger caliber gun in a smaller turret. The AMX 13 also features a autoloader system that loads a round from a revolving magazine. I had attempted to replicate the autoloader in the vehicle, but there wasn't enough space to mount in the turret. The entire model's hull is filled with power functions elements, and suspension components I had several cases where the wires were packed in next to gears.... that ended somewhat badly. A few minor scuffs and one case of a wire being exposed, but they still work fine. The suspension is similar to my GW tiger's, as it uses Lego springs instead of torsion bars, the width of the inner hull is mostly 10 studs, and 8 studs wide by the suspension though most of the model is 10 studs wide. This created challenges for mounting components, I had to mount the drive motors at a angle, and the mechanisms for the turret had to be very compact. The gun elevation is controlled by a small linear actuator at the turntable, and the entire turret is a mess of different technic connections to allow for SNOT work on the outside. I am pleased with how well this model turned out for being built in under 3 days during a small break from college. One thing I wish I could have changed would be if there was a slightly larger road wheels (around 4.5 studs in diameter). Enjoy, Tommy Styrvoky Lego AMX 13 75 (RC) by Tommy Styrvoky, on Flickr Lego AMX 13 75 (RC) by Tommy Styrvoky, on Flickr Lego AMX 13 75 (RC) by Tommy Styrvoky, on Flickr Lego AMX 13 75 (RC) by Tommy Styrvoky, on Flickr Lego AMX 13 75 (RC) by Tommy Styrvoky, on Flickr Lego AMX 13 75 (RC) by Tommy Styrvoky, on Flickr Lego AMX 13 75 (RC) by Tommy Styrvoky, on Flickr Lego AMX 13 75 (RC) by Tommy Styrvoky, on Flickr Lego AMX 13 75 (RC) by Tommy Styrvoky, on Flickr Lego AMX 13 75 (RC) by Tommy Styrvoky, on Flickr Lego AMX 13 75 (RC) by Tommy Styrvoky, on Flickr Lego AMX 13 75 (RC) by Tommy Styrvoky, on Flickr Lego AMX 13 75 (RC) by Tommy Styrvoky, on Flickr -
Here are three alternate models for Marvel sets: S.H.I.E.L.D. jetpack from the 76036 Carnage’s Shield Sky Attack set Hydra tank using two of the 76017 Captain America vs. Hydra sets And a bit more compact version of the Hulk Buster armor using only parts from the 76031 Hulk Buster Smash set ..jg
-
Sector: A04 Tags: Military, Vehicle, Spaceship, Land Vehicle Begin Log: I travel over the surface of Mynderis in the new M.A.N.T.I.S. Fly Class Flyer, searching for the "special package" I'm supposed to pick up. I've found it! Switching from Fly mode to Raven mode for landing. Secured the M.A.N.T.I.S. Tank. I'll drill around the perimeter until a driver reports in. Some back and front detailing. I've found a quiet lava spring to drill into. Group shot: End Log This was my first attempt at more detailed vehicles and landscapes. I'm very happy with how the tank's cockpit function turned out, how much detail I packed in, and how complicated a build it was. It's hard to see them, but I've even added a few car fenders/bumpers to the tank. Comments welcome!
-
Location: D04 - Terrial Minor Tags: MANTIS, piracy, vehicle Job: Driver Start Log: After a rather uneventful mission on C04, I got another more exciting assignment: capturing some Kawashita vehicles and equipment. I even had the help of the drones I'd previously confiscated from Octan hands, though now they have a much more suitable paint job. They were pretty thrilled to receive an actual combat mission, and get to drive some sweet new MANTIS rigs: The MANTIS bulldozer/tank features a spinning cockpit, and opening cargo bay; the MANTIS hovercraft features hinging sections, the MANTIS motorcycle features an opening rollcage; and the Kawashita cargo truck features a working tailgate. See more pictures here: http://www.brickbuilt.org/?p=1999
-
[MOC] M4 Sherman Crab tank (RC)
Tommy Styrvoky posted a topic in LEGO Technic, Mindstorms, Model Team and Scale Modeling
Lego M4 Sherman Crab (RC) by Tommy Styrvoky, on Flickr Finally after 2 months of work, I present my latest model, a 1/18th replica of a M4 Sherman with a mine clearing flail. This model is one of my most complex models I have built. It houses 7 Power functions motors (2XL, 2L, 2M, 1 servo), 3 IR receivers, and a 8878 rechargeable battery. Photo of real vehicle with flail in operation Design of model This vehicle has been a dream of mine to replicate a M4 Sherman ever since I began building tanks. There was a lot of planning over the past year to the design of this, there are different components from other tanks of mine that I combined to build a ultimate version of a Sherman. There is little space left inside, as the transmission, electronic clutch braking mechanism, and flail components take up all of the lower hull space, there was little space for the turret's mechanisms to be routed into it. The gun's elevation is controlled by a mini linear actuator that is located below the turntable and rests on top of the mechanism that shifts the gears for the transmission, and elevates/depresses the flail. The first Sherman I built was my 3rd tank of a larger scale, it was designed to replicate a British version of the Sherman, the Sherman Firefly. It was flawed in several locations, but I wasn't pleased with certain components of it, the suspension was inaccurate for the early version of the Sherman, as it uses VVSS(vertical volute spring suspension). My model had HVSS (horizontal volute spring suspension), this version of suspension is only used on later variants of the M4A3E8 Sherman(vehicle used in Fury). I attempted to build another version of a Sherman in the fall of last year, but it suffered from the same issue, the suspension was incorrect in size, I decided to scrap the project and build other vehicles instead until I found a better, more accurate solution. I decided to use the Torsion bars from the Hetzer, as it would provide the proper angle for the suspension swing arms, and be low profile, so the hull could mount the Transmission from my Tiger I. The transmission takes up nearly the entire 3/4 of the lower hull of the vehicle, it fits between 10 studs of free space, and has 2 gear ratios, a 1:2084, and a 1:1.3474. The remaining space of the lower hull is taken up by the electronic clutch braking mechanism (this creates the effect of the real steering mechanism of the M4 Sherman, to steer one track's power is diverted to the other track, and the unpowered track is braked). The space behind that is for the 8878 rechargeable battery. Another complex component for the Sherman is the turret and the transmission housing cover, these pieces have a complex shape to them, and are both round. The transmission housing cover is situated at the front of the vehicle, where the final drives interface with the transmission. It took 5 revisions of it to cover the knob gears behind it, and retain the proper shape. The turret was difficult too, but I broke it up into 4 different shapes that could be replicated in bricks and be combined to produce the proper round shape. Those components being the sides, top, mantlet, and rear bustle. The sides and bustle were the most difficult to replicate, as the bustle has a complex protrusion off of the back of the turret that is used to house the radio. The sides were difficult as they had to slope upwards to to roof of the turret. Sherman Firefly from over 2 years ago The current model isn't entirely perfect, the major imperfections being the height of the center portion of the hull, and turret size. The hull is 2 studs too tall, as it needs to mount the flail's L motor for power, and the main axle that powers the flail's Linear actuators has to have a directional change. The turret is slightly too tall, but this was to compensate for the height of the hull, it looked too small, and the mini linear actuator made it taller. If a standard version of a M4 Sherman would be built, it wouldn't have these issues, because of the internals, though I am pleased with how it looks, it could still be improved. History The Sherman crab was designed to clear minefields the Allies would encounter during the Normandy landings, there are several other Flail vehicles used too, but I chose the Sherman variant.I will spare the remaining bits, as this post is getting long, more information here if anyone is interested in the history of it. http://www.dday-over...g/crab_tank.htm Photos Lego M4 Sherman Crab (RC) by Tommy Styrvoky, on Flickr As some may know I will have college coming this fall, so this will be my last MOC for a long time, I am uncertain if I will have time to build something large over any breaks, though there is LDD and Ldraw , it isn't the same as working with real bricks. I do have big plans for next summer, as I suspect that will be the next time I can work on a model.... 1/15 MAUS... but more information on that come in a couple weeks. -

[MOC] T34-85 WWII Soviet Tank
legomarat posted a topic in LEGO Technic, Mindstorms, Model Team and Scale Modeling
I prepared this model for Brickworld Chicago couple weeks ago. It is quite playable on a table, and was a great show material. I build a slope with books and make it go up and down. The winter livery was due to limitation of available Lego pieces. However few stickers I made are based on my memories of a monument I saw in Russia, rather than pictures online. The model has 4 motors and Sbrick for smartphone control. RC functions: drive left and right track, turret rotation and gun elevation. Also the model features authentic Christie suspension. Video on youtube -
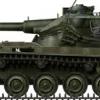
With much of its design based off the M1 Abrams tank, the JG-95 also has some interesting additions that are unique to its design. The light wheel use, the front slope armor turret, and powerful engines all help to make this tank extremely efficient in all types of terrain. Hope you all enjoy.
-
Universal carrier (RC) & instructions
Tommy Styrvoky posted a topic in LEGO Technic, Mindstorms, Model Team and Scale Modeling
Lego Universal carrier by Tommy Styrvoky, on Flickr Well this Isn't a tank, but I thought It would be a cool addition to the collection of armored vehicles that I have built. The primary reasoning behind building this model is to test a electronic clutch braking system, I originally attempted to mount a system that would use the two front road wheels to warp the tracks, then eventually the tracks would brake on the respective side to turn, this concept sort of worked, but it had numerous failures with the tracks skipping off of the sprocket. So I simplified it and it only uses the electronic clutch breaking with the servo motor to disable power to the motor on the side that one wants to turn. This system works well and allows for rapid changes in direction. The suspension on the model is interesting, as it acts like a pendular bogie with a soft suspension. The 2 L motors provide a quick means of propulsion, and the final drive ratios can be changed , as it is a 1:1 on the model, but can be interchanged for a higher reduction, or overdrive ratio. I am surprised I managed to keep the model under 1000 pieces, but there could be more detail in the interior, so I will leave the detailing up to the builder, as this vehicle was used in many different configurations, even the Germans used captured versions of this with a 20mm Flak gun on it. Instructions http://rebrickable.com/mocs/TommyStyrvoky/universal-carrier Lego Universal carrier by Tommy Styrvoky, on Flickr Lego Universal carrier by Tommy Styrvoky, on Flickr Lego Universal carrier by Tommy Styrvoky, on Flickr Lego Universal carrier by Tommy Styrvoky, on Flickr Lego Universal carrier by Tommy Styrvoky, on Flickr Lego Universal carrier by Tommy Styrvoky, on Flickr Lego Universal carrier by Tommy Styrvoky, on Flickr Lego Universal carrier by Tommy Styrvoky, on Flickr Lego Universal carrier by Tommy Styrvoky, on Flickr Lego Universal carrier by Tommy Styrvoky, on Flickr -
Modular future combat drone
Samolot posted a topic in LEGO Technic, Mindstorms, Model Team and Scale Modeling
I present my latest work, this time in the style of science fiction. Universal Combat drone. It is a futuristic tracked combat drone . Thanks to the open design of the chassis has the ability to install modules for various combat purposes . Depending on the situation on the battlefield can be quickly fitted with an appropriate module and sent to fight. Changing the module requires only the removal of the four pins and disconnect the electrical plug at the rear of the chassis. The first version of which I developed is 42 missile launcher Inspired by the Russian " Grad " . In preparation I have a tank destroyer with a barrel gyro stabilized .But I also think about the version with radar and anti-aircraft . weight 2.6 KG length 48 studs full gallery http://www.brickshel...ry.cgi?f=555673 Movie -
Hi This is my new lego tank based on the "jagdpanzer" of the german army at WW2 is very easy to build and with imagination yo can move it beocuse it has no weels but Im glad onn the size and that it can have on the interior 3 minifig And here is a youtube video where I show it more in details Enjoy My FLickr