Search the Community
Showing results for tags 'Suspension'.
Found 156 results
-
[HELP] 11 Stud Wide Front Suspension
JJ2 posted a topic in LEGO Technic, Mindstorms, Model Team and Scale Modeling
Hello, one of my projects need a 11 stud wide independent front suspension (just the suspension not the wheels) with servo steering but with using only the new~ suspension parts found in the snowmobile. I was wondering if any of you can help me with a design because I am stumped. It is not supposed to be driven. Thank you! -
Hello all, i want to show you an smaller version of the lego technic 42043, the Mercedes Benz Arocs 3245, built in Lego City scale, this truck has various functions, the crane can move just like the technic version, and the bed can tilt, there are also 2 outriggers, the truck has full suspension in all the axles using rubber parts, i couldnt make the front grille because its too complex for a model this size (there is supposed to be an sticker), i hope you like it, any suggestion is well received. more at my brickshelf gallery
-

US style three axle log trailer "Trailer Tr3 MkII"
2LegoOrNot2Lego... posted a topic in LEGO Technic, Mindstorms, Model Team and Scale Modeling
My latest release, a log trailer with three axles of which the last one is liftable. It comes in two color schemes to match both "US Truck T1 MkII" and "US Truck T2 MkII". Model "Trailer Tr3 MkII” is build with LEGO® in scale 1:17,5 and motorized using LEGO® Power Functions. It is not build after a specific brand or type of trailer. This build represents a three axle log trailer with liftable third axle. The trailer features: solid axle suspension on all axles, one set of lights, kingpin, remotely controlled landing gear and parking break, remotely controlled liftable third axle that simultaneously extends or retracts the rear impact guard and this model has many details. This newly designed and engineered trailer utilizes the same suspension as US Truck T2 MkII which uses LEGO® rubber belts and LEGO® rubber axle connectors. This model is another custom design by Ingmar Spijkhoven AKA 2LegoOrNot2Lego that comes with building instructions and inventory/parts list! You can build it yourself! To do so you can buy the Building Instructions. Early in the building process you will see what it is that you are building. You will be very excited from the moment you start the build of "Trailer Tr3 MkII" till you finish it with a total number of parts of about 1000 pieces. Simultaneously with lifting the third axle the rear impact guard is retracted. So with the third axle down the rear impact guard is fully extended, this to increase safety when hauling loads. Unloaded the total length of the combination is reduced with the third axle lifted and the rear impact guard in. As with most log trailers this model has so called bolsters or bunks. Those are the U shaped frames on top of the trailers chassis. Bolsters are obviously necessary to keep the logs in place. Even though the bolsters on this specific model are fixed they can easily be re-located if wanted. The number of six can also be altered to your own needs. Give this trailer the setup you want it to have. Cheers, Ingmar Spijkhoven -

[WIP][TTC2015] Mercedes 2045 challenge
Zerobricks posted a topic in LEGO Technic, Mindstorms, Model Team and Scale Modeling
I decided to also try the Mercedes 2045 challenge, and here's what I made so far in LDD. Its a very compact drive indepent suspension with pushrod suspension...the truck will be 4WD More info and updates soon... -

Weird Suspension Idea
Rishab N posted a topic in LEGO Technic, Mindstorms, Model Team and Scale Modeling
So today one of my new pens broke and while looking at it I just thought of an odd idea: What if I took the spring out of the pen and used it in Legos? Usually I'm a purist for these types of things albeit not a very strict one as the only things i hate are cutting and gluing, but I just had to try this. It proved to be easier said than done as the spring was very tightly placed inside the pen and it refused to budge. I eventually had to use a hammer to crack the pen and take the spring out. Once i got it out I threaded it onto an axle which proved to be a snug fit, but it worked. I made a basic suspension similar to the one in Dikkie Klijn's Mclaren. (Sorry for pic quality used my phone) This worked reasonably well. I also put it on a regular suspension piece Here it is compared to a normal hard suspension piece. It's a bit softer than that, but unfortunatley I don't have any softer springs to compare it to. I just thought it was an interesting idea. If any of you want to try it, here's the pen I used http://www.amazon.co...t/dp/B001GAOTSW Not really cheap so I wouldn't recommend purposely breaking any new pens for this. I'd love to see if there are other pen springs that could work too. Thanks for reading and back to being a sort of purist -
Trailer Tr1 MkII reefer trailer with instructions
2LegoOrNot2Lego... posted a topic in LEGO Technic, Mindstorms, Model Team and Scale Modeling
In the last couple of weeks I have, amongst other projects, been working on the rerelease of Trailer Tr1. Here it is this latest project: Model "Trailer Tr1 MkII type T1" is build with LEGO® in scale 1:17,5 and motorized using LEGO® Power Functions. It is not build after a specific brand or type of trailer. This build represents a two axle reefer (refrigerated) trailer with tandem axle slider. The trailer features: solid axle suspension on all axles, three sets of lights, a kingpin, remotely controlled landing gear and parking break, remotely controlled tandem axle slider, and many details. Scale: 1:17,5 Length: 826 mm Weight: 2,78 kg Parts: 1730 It’s color scheme matches that of „Truck T1 MkII” extremely well and so does its aerodynamic looks. The trailer’s weight is reduced by a light weight constructions of both the walls and roof and also by reducing it’s frame. The „container” is strong enough by itself so the frame is only used to attach necessities. These include the tandem axle slider, Power Functions and landing gear. Within a couple of weeks two more editions of this very same trailer will be available. First will be type T2 that fits the color scheme of „Truck T2 MkII” just perfect. The third edition, type Tx will have standard "factory" colors to fit any other truck model available or is to be combined with your own truck design. What is particularly new to this model is the avoidance of the hard to get Black Technic Steering Arm Small (BrickLink ID 6571). The newly designed rear axle now uses another part instead which will be available for many years! To adjust the weight on different axle groups the trailer’s tandem axle group can slide along the trailer. The tandem axle group can be moved forwards and backwards to put the axles where the weight is best distributed. With this the distance between the kingpin and the axle group can be altered. This is referred to as the trailer wheelbase. The longer the trailer wheelbase, the less maneuverable the truck-trailer combination. This model is another custom design that comes with building instructions and inventory/parts list! Early in the building process you will see what it is that you are building. You will be very excited from the moment you start the build of "Trailer Tr1 MkII" till you finish it with about 230 different parts totaling 1730 pieces. Cheers, Ingmar Spijkhoven -
US Truck T2 MkII with instructions (US Truck T2 revised)
2LegoOrNot2Lego... posted a topic in LEGO Technic, Mindstorms, Model Team and Scale Modeling
It has been a while since I have been on this forum. To be honest forums are not really my thing, I loose track... Never the less do I like to share my latest creation. It is an older model completely revised. Because I really felt doing so, but also to create instructions. So I did, please have fun reading this. Share you thoughts on it and when you feel like doing so please build it yourself some day!!! Cheers, Ingmar Spijkhoven To start with a little history on how this model was designed and developed in the first place and how US Truck T2 evolved into US Truck T2 MkII. Back in 2008 I started building US Truck T2 after I had finally managed to build a very sufficient and realistic suspension system. From the very beginning of building MOCs I always tried to implement as many realistic features as possible. For example both version I and II of US Truck T2 features full solid axle suspension, Ackerman steering, realistic and working fifth wheel, openable hood, PF drive, PF steering and PF lights. With the chassis still evolving, but good enough to start building the model itself a couple of decisions had to be made: A) First of all I choose not to build a specific brand or type of truck. What I knew is that it had to be a typical US style truck. Because of my love for work trucks brochures available at Kenworth.com became my main inspiration source. B) What scale to build in is another obvious quest when building models in general and also for building LEGO® models. Since most work trucks have a little bigger and heavier wheels my favorite scale for building models became scale of 1:17,5 because this suites me best. C) I had to figure out what color scheme would work best for model US Truck T2. Why exactly I can't recall but the chassis ended up Red and I still love it. With the color of the chassis pointed to Red I could move on to the colors of the body work. D) Searching the Internet for inspiration on this build I noticed that Red and White is a nice color combination. Trying a couple of colors to combine with this evolving color scheme I ended up with Blue. Since not all parts I needed were available in Blue back then I came up with the use of Dark Blue. Because of so many improvements I thought it would be so nice to rebuild this creation. Rebuilding this MOC made me decide to name this updated version US Truck T2 MkII (it is based on US Truck T2, but revised in so many ways). Thinking about the rebuild, not yet started, made me realize that it would also be amazing to make building instructions available for it as well! The process of creating instructions basically forced me to completely revise and rebuild it. So in the looks it is not even changed that much but to get the build going with the instructions as guideline I had to change so many things. Because of this process this new version is way much better and therefore very nice to build. The finished build of US Truck T2 back in March 2009 was basically a result of all the effort I had put in this realistic suspension system. For this suspension to work I did a lot of research, trial and error and engineering. One major problem I noticed was the quite large size of Technic® Shock Absorber 6.5L. There was no way I could jam six of these into a chassis that is only four studs wide together everything else that should be in there. Quite rapidly I came up with the idea of using Rubber Belts instead. So I came up with a lever constructions. Normally a spring is pushed in and comes back, but a rubber belt is stretched and comes back. In the build of US Truck T2 MkII I replaced the hard to get Sand Blue colored parts by Dark Blue ones. Back in 2009 part 30357 Plate Round Corner 3 x 3 wasn't available in either Blue or Dark Blue. These colors I did prefer back then with the build of US Truck T2. This forced me to use this part in the less common color Sand Blue. Even though this was a switch that worked out very well I prefer not to use this color. Mainly because parts in this color are hard to get. So now that these parts are available I had the chance to give US Truck T2 MkII the initial color scheme I came up with for the first build. A part that I have been looking out to for so many many years is finally available. The LEGO® Power Functions® Servo enables the opportunity to create a much more realistic steering system for US Truck T2 MkII. Aligned with the trucks chassis the Servo is sitting inside of the cabin right behind the modeled engine. Since the movement of the Servo needs to be converted 90 degrees a challenge occurred. Luckily we still have this older LEGO® part 4143 Technic Gear 14 Tooth Bevel. Because the Servo requires less space US Truck T2 MkII is equipped with a modeled engine. Because of some parts I needed to build this engine that are only available in Light Bluish Gray this became the engines color. Searching the web for inspiration I noticed Detroit Diesel has some very nice power sources available. Doing some research made me choose to build the DD15. Modeling this engine was very satisfying. A small object to build but to give a realistic look still a lot of parts are used to build it. What is the use of a modeled engine if it is invisible. Like with the early version this revised model has an openable hood. For inspiration I used the Kenworth C500 PDF brochure. One picture shows a truck with a opened hood and shows really nice how a part of the fenders is attached to the cabin. So this part of the fenders stays in place when the bonnet is opened, I really love this concept. One other major improvement is the battery box accessibility as well as the location of the on/off switch. To make this achievable for as many builders as possible I sticked to the battery box with 6x AA batteries. With the original US Truck T2 to replace the batteries the entire roof had to be removed together with the sleepers back side. For the on/off switch I installed a complex mechanism that needed small doors to operate the switch. As complex as it sounds it really was and I was never happy with this solution. The roof of US Truck T2 MkII now has a hatch to access the battery box and the on/off switch. Besides decorative purposes these bars are supposed to support the roof, which they didn't! Thanks to digitalizing my model with BrickSmith I noticed/discovered a much better solution. Besides that it looks less fragile this new window frame really became supportive. When TLC released LEGO® Power Functions® IR Speed Remote Control Unit item number 64227 I was really excited about it. First build also used a XL Motor to drive but with the use of Power Functions Remote Control Unit item #58122c01 one has to be very careful. US Truck T2 MkII has less gear reduction and is therefore quite a bid faster then its predecessor. To give you an idea how the instructions look like here is a preview. Creating these instructions both quick progress on your build as well as each step being easy to understand the same time were very important. Early in the building process you will see what is happening, what it is that you are building. You will be very excited from the moment you start this build till you finish the build of US Truck T2 MkII with a total number of parts of about 1800 pieces. To achieve this a lot of floating items are used, with added arrows to show where these items are suppose to be. Together with a lot of so called call outs (the smaller windows within a step that shows the assembling of a smaller sub part of the build) together with multi part steps the build will be in a flow. Check mocplans for the instructions and rebrickable for the parts list! -

[MOC] 10x6 Foden Crane Truck W. Extending Trailer
Kiwi_Builder posted a topic in LEGO Technic, Mindstorms, Model Team and Scale Modeling
Hey all, My latest MOC is modeled off of a 10x6 Foden S108 crane truck tractor unit run by Mackenzie Transport of Auckland. There are some differences between the real truck and my MOC such as their trucks are white but mine was made in red due to parts constraints and the other difference being that the original Palfinger truck mounted crane on the truck has a five-stage extension on it but my version only has two-stage extension because that was the most I could have before the crane arm became too large and out of proportion. Photos of the original truck can be found here: https://www.flickr.c...ith/6161598123/ MOC's Features: HOG steering Live axle suspension on the rear axles Pneumatically controlled pendular suspension on the front axles Stabilizers Locking turntable Tilting cab with straight six piston engine under the cab Full interior of cab with suspended seats Motorized truck mounted crane with two-stage extension Custom stickers LED running lights The combination with everything expanded This photo is one of my favourites and shows the custom stickers of badging and the original number plate from the truck The truck on its own Everyone's favourite photo, the under shot This photo shows the controls for the crane (the PF switches) along with the switch and pump for the front air suspension The engine without the cab attached The interior The mechanism for seat suspension LED running lights Now for the trailer, a three axle extending trombone trailer. It has full independent suspension, landing gear and of course an extending deck. The trailer extends 29 studs, bringing it to a total deck length of 122 studs/97.6CM. Trailer when extended with lattice boom load Trailer when retracted Trailer suspension system Underside when extended Underside when retracted Another photo of the combination Statistics: Total length with trailer extended: 173 studs/138CM Length of truck: 77 studs/61.6CM Width: 19 studs/15.2CM Height: Truck weight: 2.4KG Trailer weight: 0.8KG Load weight: 0.2KG Pieces count: 4000 +/- Time to build: 60+ hours This is the first time I have used a white background instead of no background and I am very pleased with the results and will definitely do it again. As always more photos can be found on my Bricksafe and for the first time, a video can be found on my YouTube channel! I hope you enjoy my MOC as much as I do Bricksafe: http://bricksafe.com...e/completed-moc YouTube: https://www.youtube....876u7IUZPRGhwrQ -
Small front independent suspension with drive
gsia17 posted a topic in LEGO Technic, Mindstorms, Model Team and Scale Modeling
Hi! Soon, I'll show to you new little rally car with rear independent suspension and rear drive. But rally car must be AWD, so I build small front suspension *cardan has free lift under load without stoppes I'm going to build audi quattro or toyota celica with this system. May be you have another ideas for it? -

[HELP] Pushrod Suspension
Corvette3 posted a topic in LEGO Technic, Mindstorms, Model Team and Scale Modeling
So i was browsing some Traxxas RC cars, and noticed the Summit had an interesting setup for suspension. Its very unique from what types I've seen before, so i thought, is it possible with Technic? I've seen you guys make some pretty amazing setups, but i cant imagine what kind of parts you could use to make this and does it have a name? i thought i knew but forgot. -

[MOC] CAT 586C Site Prep Tractor
Thirdwigg posted a topic in LEGO Technic, Mindstorms, Model Team and Scale Modeling
It has been a little quiet in Thirdwiggville for the past couple of months, but some projects are finally being completed. I present my next MOC the CAT 586C Site Prep Tractor. More information can be found at thirdwigg.com. The MOC features: Four wheel Drive Steering Rear Pendular Suspension I3 Fake Motor Cooling Fans Working Mulcher Drum Mulcher Lift and Tilt Mulcher Guide Bar Mulcher Entry Gate Rear Winch Opening Engine Hatches Opening Driver Doors See video .The driveline is here. And a view of that rump. Two more MOC coming in July stay tuned. -
[HELP] Suspension for Tri-drive
Kiwi_Builder posted a topic in LEGO Technic, Mindstorms, Model Team and Scale Modeling
Hey all, I am currently in the middle of doing a complete overhaul of the chassis on my WIP (http://www.eurobricks.com/forum/index.php?showtopic=109478) and I am considering adding full suspension to the model along with making it manual instead of RC. The only problem is that I can't find any good suspension designs for three driven axles with dual wheels in the 1:17 (19 studs wide) scale. I have searched all through the axle collection thread and various other locations and come up with nothing, if anyone can give me a good design or point me in the right direction I would appreciate it. This suspension needs to be compact and without many uncommon parts, with the ability to have the three axles still close to each other due to the fact that it is a tractor unit so it can't be too long. If I don't see a good suspension system and I can't come up with one on my own then I will have to scrap the idea of suspension completely, thanks in advance to anyone who can find a good design. -

[EV3] Super Stadium Truck – Motorized Short Course Vehicle
DamonMM2000 posted a topic in LEGO Technic, Mindstorms, Model Team and Scale Modeling
This is a large short-course style stadium truck built with Lego Mindstorms Ev3. It features independent rear suspension and a front live axle with steering. One Medium Motor controls the steering, and one Large Motor drives the rear wheels. It also uses the InfraRed Sensor for Remote Control. The reasons I used only one motor in this model are: 1. I was attempting to reduce weight, 2. The chassis of the truck is even studs wide, not odd; not allowing a very easy placement of two motors, 3. This vehicle was built as a test vehicle for the new 4-stud wide differential I got a while back but never used until now. The drawbacks of this truck are: 1. One motor does not exert nearly enough power, 2. The old-type differential makes it impossible to not use more gears in order to transfer the power, 3. All the gears used decreases efficiency massively, 4. The rear independent suspension worsens performance, 5. A 3:5 gear ratio was used (a 1:3 would have been better), 6. The truck is very large, bulky, and heavier than most other robots that I have built. I extremely apologize for the audio/video sync issues, I have no idea why the video turned out that way. Music: http://www.bensound.com [] Extra pictures coming soon! [] -
 Hi, Forget 41999, just look at this beauty build by Madoca! The best middle scale I have ever see!:) Perfect! Sorry Madoca, if you wanna post it by yourself...cant wait to share my emotions:))) instruction is here: https://plus.google.com/photos/117021167471864977943/albums/5901503914497924817/5901958760391507362?partnerid=gplp0&pid=5901958760391507362&oid=117021167471864977943
 -
[MOC] Mercedes G-Class SWB
Teo LEGO Technic posted a topic in LEGO Technic, Mindstorms, Model Team and Scale Modeling
Hello everyone, Here's my newest MOC, a Mercedes G-Class. After months of hard work, and bugs and fixes, it's finally finished. It was built to incorporate all of the best elements of high-torque gearing with a compact bodywork. It features: -Drive - 2 x XL, geared 4.5 : 1 -Steering - 1 x Servo -Lights - 6 x LED with hidden switch -Suspension - pendular A video showing all features: Pictures: -

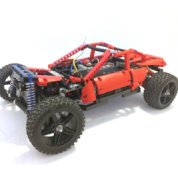
MOC The Red Pitbull Terrier
MajklSpajkl posted a topic in LEGO Technic, Mindstorms, Model Team and Scale Modeling
Hi! It's been quite a while since I managed to put something together and even longer since I managed to put it "on paper". I'd like to present you my latest, and already an old MOC, may it rest in pieces, The Red Pitbull Terrier! At first, this one was supposed to be my noble steed for the unfortunately canceled winter trial truck (kinda) competition organised by our national LUG. Stressed out due cancelation, this horsey grew bigger and fatter than it was ment to be for the actual race. I admit, it is rather fugly, but it was a lot of fun to build and drive also. I am especially happy about how did the suspension come out - the tracks adapt(ed) to the surface very smoothly and there is no bending of the road wheels towards the outside. Thanks to our EB colleague Kelkschiz and his I learned, that what I've built is called a Christie tank suspension . As a keen eye will certainly notice, I used the small shock absorbers with normal springs. Only when I put the cab on, I learned that the front road wheels had to be suspended on hard springs, because the weight of the cabin was pulling the whole truck's front down. My intention was, to build the tracks like a module with spring inside this module, which would then be attached to the hull. After several trial and error iterations, I abandoned that idea, because I didn't manage to eleminate the bending of the road wheels towards the sides of the truck. I ended up attaching each road wheel one after another, kinda like stitching and prepared me quite some "fun" for disassembly As for the hull, I thought I managed to seal the bottom and the sides of it quite well, but that damn half melted snow reached every dark corner of that ogre anyway! As you can see on the photo below, I decided that this puppy should run on four PF XL motors, with all sprocket wheels driven. The motors were geared down just a bit (12/20 -> 1/1.67). I really recommend those "new" wheel hubs for mounting the sprocket wheels - they hold as Kragle and I don't recall the tracks ever slipping of them, as it seems it often happens when sprocket wheels are mounted on axles only, as they tend to bend. As you can see, I built some kind of a gutter for the tracks , so that no return wheels were needed. That two stud wide gutter in combination with the mudguards also kept the tracks tucked in nice, preventing them to slip off. Some transversal girders were also used to make both sides of the suspension sturdier. A nice, warm pit remained in the center of the hull for two AAA battery boxes. Two sets of 63 tracks were used. The motors were connected in pairs, each pair to its own V2 IR receiver. The receivers were placed under the hood of the cab, therefore a fake cooling fan. Although the tracks tend to slip, I decided not to mount any transversal ribs on them and went for a tight fit with the muguards. So here it is, with some accessories to make it look badass - at least that was my intention . Final dimensions are approximately W/L/H = 48/25/26 studs. Weight: 2.3 kilos. Two sets of PF LED lights were used, each powered by one of the BB's, so they were lit all the time. I tried to make the cab look a bit like the older tracked trucks that goooooogle provided me with. I had those transclear dome pieces for a while so I tried them out as a bulb for the lights. I still can't say whether I like the outcome or not. Can someone please explain why would somebody need turn signals in the middle of Syberia??? I sure can't say :laugh: ! The cab was somewhat fun to build because it starts with even width and ends with odd. Lately I really like Technic creations to be manned, so there are my three brave soldiers, kicking winter and bora in the face! I hope you like it, otherwise feel free to rip me apart P.S.: Yes, there is . I was, again, foolish enough to edit the video along with music that is under copyright, so the actual music you'll be hearing is just barely coherent with the cuts... I recommend listening to the "original" music which should be in the video, but it got shot down due forementioned world of legal stuff etc... I provided the link at the begining of the video. I must also add, that this baby was named after that song...I hope this little naivity of mine won't degrade your opinion on this build.Cheers, miha P.P.S.: I hope my "hero-doesn't-go-pro" didn't make any of you sick because of all the shaking... My fair lady provided me her LG G3, which I abused on this torture tool Thx baby. -

portal axle realistic steering
intellimode posted a topic in LEGO Technic, Mindstorms, Model Team and Scale Modeling
Hallo! I'm using Lego Digital Designer for a few days in order to create a driven, steered and individually suspended portal axle with a realistic pivot point. But I failed to combine all aspects. My endurance has expired. So, is there anyone who wants to accept the challenge and solves this problem. I would be grateful about a lxf-file. Thanks! -
Multilink Steering with Suspension
TheNextLegoDesinger posted a topic in LEGO Technic, Mindstorms, Model Team and Scale Modeling
Hy the video of Sariel inspired me. He said that it was difficult to make suspension on it. At that moment i came with the idea to use indepent suspension. this is what came out of the idea. DSC_0005_3[1] by thenextlegodesinger, on Flickr[/img] thanks PS: could Mods put the pictures and video's in topic?( I tried but it didn't work) -

RC Muscle Car Chassis
z3_2drive posted a topic in LEGO Technic, Mindstorms, Model Team and Scale Modeling
I haven't posted any of my own content recently due to lack of time and ideas, but about a month ago my last attempt at a high speed vehicle was sitting on my desk, partially disassembled, when I got a spark in my mind and I knew exactly what to do. Previously I made multiple failed attempts at making a complex independent suspension work, but I couldn't get a practical result without modifying parts, which I wanted to avoid. So this time around I went for a solid axle with 4 link suspension. I spent a long time building and rebuilding the car until I got a balance of power, weight, and strength that I was happy with. Apart from a couple pieces I forgot to add here and there, this is the final build: I could have gone for lower weight, but the reinforcements were necessary to bring the chassis flex to a minimum, letting the suspension do its job. The car barely bottoms out under full compression, but I doubt this will happen out on the road. The higher clearance and lack of u-joints should reduce the risk of damaging parts. The rear wheels are driven by two buggy motors each, acting as an electronic differential. Since the motors are DC motors, this system will never be perfect, but it's as good as it gets. The only modified lego pieces on this build are the pneumatic cylinders (now act as dampened shocks) and the wheelhubs (made by nicjasno at LPEpower ) The front suspension is independent multilink, my own blend of various ideas I got from nicjasno's Standard servo steering. I lubricated the large ball joints on the upper 'wishbones' to reduce friction. Nice and smooth underside, which also adds to the structural rigidity (note the numerous pins) Another look at the multilink setup in action I've already tested this model on the road, and it performs very well, but I won't be making a video until I receive an order of 4 brand new custom wheel hubs, as the current set have experienced some serious wear and tear over the past year thanks to my punishing tests If you are new or aren't familiar with my previous projects, this chassis is powered by a near 12 volt battery and a 3rd party RC system that I made work with Lego motors. Multiple people have asked why I don't build bodywork for any of these large scale vehicles, and to be honest, I really enjoy building the chassis, while bodywork is...meh. I could get better with practice, but I simply don't want to spend time perfecting a body, and the extra weight would reduce the play factor, unless I become a wizard with flex axles . I think this model is the ultimate balance of speed, moderate realism, and weight, (within my building style) so I don't see myself making anything new soon with my other hobbies and work taking up most of my time. Special thanks to nicjasno for the tips on the front suspension, and for making the LPEpower parts/show. Feel free to leave any comments/criticisms/ideas for a new project. Enjoy! -

Pnemuatic/Adjustable Suspension?
__________________________ posted a topic in LEGO Technic, Mindstorms, Model Team and Scale Modeling
Hi EB community, I'm pimping out 10220 and I want to use adjustable suspension. The only solution I heard about was pneumatic suspension. I've investigated this, and I still don't understand exactly how it works. I've even asked respectable Technic FOLs like Sariel (http://sariel.pl/) and received derogatory and offensive remarks. Can anyone explain if there's any better way to remotely adjust suspension on an RC Lego Model-Team style 10220 set? Also, if pneumatic's the best answer, how exactly does it work? I would appreciate any constructive feedback. Thanks! In exchange, I've attached what I think is my modded version of 10220, with some pretty mods. (Let me know if it's the original set file.) 10220_volkswagen_t1_camper_van.lxf -
[WIP] RC MAN SL202
Kiwi_Builder posted a topic in LEGO Technic, Mindstorms, Model Team and Scale Modeling
Hey all, I have been working on an MAN SL202 in the Redbus NZ paint scheme: This model has full suspension including an auto-kneeling function where when the front door is opened the front left air suspension is lowered. I have built most of the chassis and the front and rear suspension, but as you will see the front suspension needs a complete overhaul due to steering problems. Time to stop rambling on and give you some images Air hoses are for the kneeling. Rear view. Front view of front suspension, not the left side wheel is over-rotating when steering and causes the wheel to lock at a right angle to the chassis and stopping forward movement. When it is able to drive the steering is at a bad angle when straight and this causes a large amount of resistance. When the steering is turned the geometry is way off and causes major sledging and resistance. The front axle when kneeling. The pump and RC switch for the suspension lowering and raising. Rear suspension design. Rear suspension's range of movement. Chassis view. So as you can see the project is coming along nicely but the front axle suspension needs a complete overhaul so any designs that work well would be greatly appreciated These photos and more can be found in a bigger size on my Bricksafe: http://bricksafe.com/pages/Kiwi_Builder/Technic. -
[MOC] Cadillac ATS SuperSedan
Thirdwigg posted a topic in LEGO Technic, Mindstorms, Model Team and Scale Modeling
So it took me a while but the Cadillac ATS is finally done. Much more at thirdwigg.com Here are some pictures: Features: opening hood opening trunk four opening doors opening glove box working rear center armrest 6 Speed manual transmission with single pivot point limited slip differential rear independent suspension with increasing negative camber front independent suspension with increasing negative camber, kingpin inclination, and ackerman geometry a full size spare tire three interchangeable engine options to meet your needs or budget Video is . Enjoy. -

Compact Independent Suspension with Servo Steering
1nxtmonster posted a topic in LEGO Technic, Mindstorms, Model Team and Scale Modeling
A little video showing a suspension concept: The suspension is tatra-style, not double wishbone. But it is simple and works well enough for my needs. Uses the lego rubber pieces in the place of shock absorbers to save space, and can be built onto a servo motor with as little hassle as possible. I am pleased that the pivot points are all aligned such that the wheels do not steer themselves when the suspension is actuated. Overall a neat concept that I hope to incorporate into my future small-scale MOCs. -
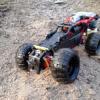
Behold, six-wide steering based on Mixels joints! I am upgrading my fleet of Lego Xterras with this neat technique that I thought up early last week. For more info, see them here: http://www.eurobrick...topic=90846&hl= So, it's pretty straightforward: Technic friction ball/pin connector and Mixels 1x2 socket plates. On the Super Xterra, retaining the solid axle articulation! See below. On the regular Xterra, which is based on the Great Vehicle build style, there's much less room to move and the effect is very subtle. The joints have enough friction to stay wherever they're set. Again, subtle effect with a semi-standard City build due to lack of clearance, but it can steer! Utilizing the other axis, the Mixel joints coupled with the solid axle in the rear give a pretty convincing impression of independent suspension. The steering effect really shines when your vehicle is lifted to the heavens: Somebody needs an alignment! Oh dear. (another very convincing independent suspension effect :p) And coupled with some extra articulation... The one downside I've found is that, due to the friciton pins, the articulated wheels don't spin very freely (though it's advantageous for posing). Enjoy, and spread the word!
-
Audi 80 Quattro Rally
Epic Technic posted a topic in LEGO Technic, Mindstorms, Model Team and Scale Modeling
Back in August I was inspired by gsia17's Citroen Saxo preview to build a rally car.Sadly I don't have a buggy motor so I made the next best thing, a large scale model of the best rally car in the history of man kind, the Audi 80 Quattro Rally. This was my hardest build yet; it had many firsts for me. I used the 42000 Grand Prix's hubs for the double wishbone independent suspension on all wheels. I had trouble making the front suspension, steering, and power transfer with a differential so I made it hard coupled. I used CV joints with the 42000 steered hubs for the front which makes it have a terrible steering angle. Some pictures: A preview video is on my YouTube channel but I am editing the main video right now. I will update this post tomorrow and/or in days to come. Thank You, Epic Technic Please give comments, I want to know how to improve and what did well! :)