Search the Community
Showing results for tags 'SBrick'.
Found 171 results
-

Lego Technic Suzuki Jimny Trial & Trophy customs
filsawgood posted a topic in LEGO Technic, Mindstorms, Model Team and Scale Modeling
Hello! Today I am pleased to present to the general public of the two brothers - Lego Technic Suzuki Jimny Trial Custom and Lego Technic Suzuki Jimny Trophy Custom. They are united, above all, not just a long name, but also a common chassis, all-wheel drive and compact size. I was inspired to build a Suzuki Jimny sample 2001-2010 years. They are often prepared to take part in various off-road competitions, and that I thought - why not? And that's what came out of it. Enjoy ;) Models are made in the off-road style, and have all its attributes - extra lights, safety railings, stingers high clearance More photos and building instructions you can find on my lego technic blog here -

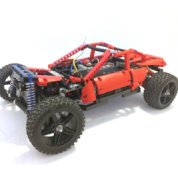
[MOC] Baja Trophy Truck with SBrick
Madoca 1977 posted a topic in LEGO Technic, Mindstorms, Model Team and Scale Modeling
Hello everyone! My new creation is a big scale Baja Truck. For the first time, I used two SBricks for better control. Weight is 1920g. It is almost the same as gsia17's awesome Trophy Truck. Since I do not have RC buggy motor, I had to build it using PF motors. Honestly body color is not the best. I just have many red #3 connectors and wanted to use white 19L softaxles. I think it is easier to build it in all white. And using stickers will make it look better. (Though that's not my way:) This Truck is powered by two 8878 rechargeable battery boxes, and propelled by four L motors geared 1:1. Two for each side of rear wheel. Left side of drivetrain is connected to fake V8 engine. Steered by Servo motor, which is connected to steering wheel. Two pairs of LEDs are put behind the front lights. Adding more LED for roof light bar is possible. I tried to make suspension movement like real Trophy Truck. Front module including independent suspension is connected to main chassis at positive caster angle. Rear suspension is solid axle with long trailing arms. Front suspension travel is about 5 studs long, and rear is 7 studs. It was challenging to achieve proper driving speed on bumpy ground using PF motors. The result was not the best, but was acceptable to me. Sbricks did their job so well. As expected, some parts in drivetrain got worn. Especially knob wheels. While I was shooting the video for two hours, they did not affected driving performance. So far they just made noise which is heard in the video. But someday they will certainly be damaged too much and need to exchange. EDIT: I have fixed the problem of knob wheels. Improved drivetrain doesn't damage any gears. :thumbup: Building instructions and more pictures: https://photos.google.com/collections Rebrickable: https://rebrickable....uck-with-sbrick I hope you like it! -
[MOC] M8 Greyhound 6x6 Armored Car
Tommy Styrvoky posted a topic in LEGO Technic, Mindstorms, Model Team and Scale Modeling
Lego M8 Greyhound 6x6 Armored car (SBrick) by Tommy Styrvoky, on Flickr This model was a rather interesting challenge to build, as the independent suspension took up a majority of the internal space. It features all-wheel drive with differentials, traversing turret, and gun elevation. mounting the m motors for the turret was the most challenging part of this build, as they are placed in-between the first and second axle. This is also my first model to use an Sbrick to control it. Lego M8 Greyhound 6x6 Armored car (SBrick) by Tommy Styrvoky, on Flickr Lego M8 Greyhound 6x6 Armored car (SBrick) by Tommy Styrvoky, on Flickr Lego M8 Greyhound 6x6 Armored car (SBrick) by Tommy Styrvoky, on Flickr Lego M8 Greyhound 6x6 Armored car (SBrick) by Tommy Styrvoky, on Flickr Lego M8 Greyhound 6x6 Armored car (SBrick) by Tommy Styrvoky, on Flickr Lego M8 Greyhound 6x6 Armored car (SBrick) by Tommy Styrvoky, on Flickr Lego M8 Greyhound 6x6 Armored car (SBrick) by Tommy Styrvoky, on Flickr Lego M8 Greyhound 6x6 Armored car (SBrick) by Tommy Styrvoky, on Flickr -

[MOC] Mazda Race Car with SBrick
KevinMoo posted a topic in LEGO Technic, Mindstorms, Model Team and Scale Modeling
EDIT: Building Instructions Available: HERE ________ I’m a big fan of Japanese cars, mostly because of its reliability. In the city I live in, there is a car factory which manufactures some models of Toyota and Mazda cars for the Chinese market. Among them is the Mazda 6 Atenza, the latest model of Mazda 6 series. (via Internet) I like this car a lot. A family sedan beautifully shaped like a supercar. Also you can choose hatchback or wagon configuration, but you don’t see a two-door race car model in this series. So I decided to build one out of LEGO. After a long winter, now I present you my latest MOC: A Mazda Race Car with SBrick. This project started with this iconic front grille. I don’t have a concept of the overall scale for this MOC, everything was decided by the scale of the grille. Ironically, I didn’t realize part 32192 in LBG is rare until the prototype is finished in LDD, and I don’t have a single one of it. Finally got my hands on it after quite a long time. Let’s have a look at a video first. (4K @ 30 FPS, watching in full screen is recommended) Weight: 1130g Dimensions: 350mm (L) x 160mm (W) x 127mm (H) Parts count: 1390 pcs Working headlights / taillights Servo motor cable has to go between the two seats due to length concerns, otherwise I can put more details in that area. A tiny fake engine for a tiny space. I must say I’m not a big fan of soft axles and I don’t use them too much. But they look great when used to shape wheel arches. The car is heavy towards the back, so rear suspension looks kind of weird. It gets the job done, though. Drivetrain is quite simple. Also you could find some inspirations from Madoca’s Supercar and Corvette. :thumbup: More photos: Building instructions is on the way. It will be available very soon. SBrick can be easily replaced by PF IR receiver. Enjoy and stay tuned! -

[WIP] Grave Digger
AxeSlash posted a topic in LEGO Technic, Mindstorms, Model Team and Scale Modeling
I've been lurking here for a while but have never been satisfied with any of my MOCs enough to post them here. The nearest I came was an MLRS that worked well but looked rubbish :P Anyway, I'm in the process of designing a Grave Digger monster truck replica (approx 1:15 ish scale). Features: - 4 wheel drive - 4 wheel steering - Steering modes: 2-wheel, 4-wheel, crab - 4-link, very long travel suspension - Suspension travel is also to scale. Almost. - All motors contained in the chassis (no servo-on-axle affairs) - SBrick control - Tyres from a Tamiya Lunchbox I'm designing this in Sketchup and rendering with the Twilight Render (free) plugin. Note that I've drawn all the pieces myself, and they're all drawn to have a low polygon count so that my machine doesn't croak to a halt. Some of the pieces aren't very accurate atm (e.g. the XL motors). So far, I think I've got the chassis designed: And here's a couple of closeups: Issues I can foresee so far: - Friction from so many knob wheels - Bump steer (but I don't want to sacrifice suspension travel by putting the servo on the axle) - Not sure whether having the steering upside down like that will have any negative effects. - Not sure if I can get all of the parts in green that I want Can anyone see any other potential issues with this design (before I start putting in BL orders)? Thanks -

Ultra Small Forklift - Muravi
mahjqa posted a topic in LEGO Technic, Mindstorms, Model Team and Scale Modeling
So I prefer to build small. I managed to miniaturize all the functionality of a standard forklift (driving, lifting, tilting) into a chassis only 11 studs wide. One of the advantages this offered me (among better strength, speed and maneuverability) is that I was able to build an entire warehouse to muck about in. This wasn't always the plan. I thought I'd just build two or three containers to show off its functionality, and that would be it. Then, the Android Sbrick app crashed and burned (or at least, it did on my phone) and it took two months for them to update the thing into relative functionality again. So I had plenty of time to build some scenery. For the enthusiasts; I've uploaded a LXF file to Vayamenda.com so you can tinker with it. (By the way, if you're a person who has built a forklift, could you link me to a picture of your forklift in this view? https://www.flickr.com/photos/28134808@N02/26063611241/ I'm very curious to see how it's scaled relative to other people's MOCs.) -
[TIP] using RC motors with Sbrick
JJ2 posted a topic in LEGO Technic, Mindstorms, Model Team and Scale Modeling
Hello, I have discovered that when using Sbrick you can bridge ports and have double amperage and double power cutoff. I think this might be useful for MOC's but please give me your opinion. IMG_0385 by JJ2Sam, on Flickr The black 9v wire represents where the RC motor will connect. Thanks -
SBricks & Trains - Second test runs with Stadler FLIRTs
Ashi Valkoinen posted a topic in LEGO Train Tech
Previous tests with description of how SBrick should be mounter in trains and how it can be used from smart devices, please refer to this thread: http://www.eurobrick...howtopic=115885 After equipping my red Stadler FLIRT EMU (415-001) with SBrick and testing it on different events I decided to put the SmartBrick inside my blue (415-061) Stadler FLIRT EMU as well. The two 9V train motors had been removed and two PF train motors (each attached previously to a 9V one) remained in the trains. The basic idea from switching from 9V to SBrick was that the two Stadler FLIRT units with 8 train motors together needed a really high current to move, and after several tries with paralell speed regulators and more power supplies connected to 9V loops it became obvious for me that making 7 kg of trains consisting of two invidual EMUs run is not sustainable on longer time period, and I can't expect other LUG members to supply me with all those extra cables and custom 230V AC->10V DC adapters under their part of layouts. Other issue was that voltage in 9V tracks depended how far the 9V train motor from power supply was, so synchronising the speed of my two FLIRTs seemed impossible. The two PF-train motors driven from SBricks can deal with the 3.5 kg weight of each FLIRT train, however they really slowed down on sharp turns and points. Each train can run around 3 hours with 6 pieces of 2100 mAh VARTA AA rechargeable batteries. For synchronised run I needed to design a new SBrick profile on designer.sbrick.com, where a slider drived both trains' SBricks' driving output (actually output "D" in my MOCs). After setting up the right polarity (done in profile settings, the two EMUs started into opposite direction for first try) they started to run, the magnet couplers hold them together and there were no problems on straight track segments. Problems started to appear in curves, the rear train, running still on straights was faster than the first one slowed down in curves, so it simply pushed the first one through the coupling causing derailment of the last bogie of the first train. Unfortunately it seems that two PF train motors are not enough to keep up the speed in curves, however with careful driving and slowing down in time the derailment can be avoided. Also rechargeable batteries should be approx in the same condition, a train with fresh or stronger batteries will be faster, however they have approx. the same weight and number of train motors. These derailments and problems (I almost couldn't run coupled FLIRTS on points, the first train leaving the point become faster and decoupled from the rear one) are caused by the not satisfying number of train motors and maybe failures of my train couplings, I'm working on them by now :) , equipping FLIRTs with a third PF-train motor for less slow-downs and a stronger, technic-parts containing coupling system (but still keeping magnets for easy to play experience) Also I need to put EMUs front/tail lights for ends "A" and "B" to different outputs - I can't reach the small polarity reversal bricks to turn off lights between units (see Fig.1. for details). Fortunately SBrick has four outputs - now two for front/tail lights, one for driving and one for indoor lights are being used. Fig.1. Polarity reversal brick to turn off front/tail lights manually on my EMU when the end is connected to other EMU. Not very playable when the train is in the middle of they layout. And let see how the application worked for me. I used a HTC One M8 mobile with the latest application and latest firmwares on my SBricks. Problem 1.: You are not allowed since version 1.6 for Anroid to attach an SBrick port to more sliders or buttons. Therefore when I start to operate Stadler FLIRTS simultanously, I have to first exit from the profile wich allowed to run them separetely (with two driving sliders) then load a profile with one slider for synchron run. It's such a pity that only one slider or button can handle a function. Problem 2.: derived from problem one, application crashed when I tried to reconnect to the two SBricks with a new profile. I don't really now how informatics and programming works, but crashes happened only on the first day of exhibition (7th of April), for the remaining three days they magically disappeared. Problem 3.: Connection lost. It happened quite often, at least three-four times in 10 minutes time gap. When running two trains synchronised and the first stops due to disconnect,well, derailments and broken couplers were the results. Also while App tries to reconnect, the profile screen gets darkened (see Fig.2.) and while it is darkened, you can't handle your outputs - even while the other, connected train is running. The only way to stop if reconnect not happening in short period of time is to exit from the profile. I couldn't figure out the cause of these disconnects, they appeared both while trains were running together, trains were running separately or one or two of them were just staying somewhere with turned on lights only. Fig.2.: One Sbrick disconnected, but other working - and if set to run, still running. Photo is just illustration, taken of different phone and with second SBrick in my Bombardier Talent EMU previously. A short video of the FLIRTs running together with SBrick: Conclusions: Pros +Playability for first - I liked to have my trains run together, controlling both of them with the same slider, then decouple them and let them run on their own way. +Four outputs on one SBrick - I need them more then ever. Increases level of playability. +SBricks can be hidden - no visual contact needed and high range of control - a very needed advantage for bigger layouts. +Not SBricks's Pro, but my FLIRTs now can run on non-9V track as well, ME-models R102s really tempting for smoother run, while I spared 4 of 9V train motors for other MOCs. Cons: -Once it was available to drive an output from different buttons and sliders, it is needed when you need your train solo and synchron run as well. (Or a non-train application - turn sign of car can be driven separately, but when signing warn or get stucked you need to blink them synchronised.) -Still too many disconnect problems, when two SBricks connected to a profile, can't stop non-disconnecting one. (I know, disconnects vary with different type of phones and phone operation systems and it should be hard to write the code which works fine on every device.) -Slider's 80% still not moving a train - not only my heavy ones but any train driven with SBricks. Voltage output function for trains applications should be changed. Please note, this review was focused on the coupled run and my needs, previous review focused more on how to use SBricks. I hope you find useful informations here when you plan to run your locos, motor units together to pull a heavy freight train or carry more passangers in your LEGO-City! My experiences also had been sent to SBrick developer team. -
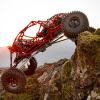
[MOC] “ShowTime” Crawler with Red Tubular Body
SevenStuds posted a topic in LEGO Technic, Mindstorms, Model Team and Scale Modeling
This MOC is inspired by Tim Cameron's 700HP rig called "ShowTime". A one-off custom built rig made specifically for "Southern style Rock Bouncing" events. These machines are all about insane horsepower, near impossible climbs and pure strength. The chassis design uses over 60m of steel tubing as is often criticized as being ugly and "excessive", but the design is exactly what keeps this rig together after repeated crashes, rolls and torque-driven rock bouncing. The LEGO version is made to closely resemble the original at 1:10. It features a powerful driving and climbing ability from 4 XL motors, geared 1:3. It uses 2 SBricks for control and, just like the original, it includes 4 wheel drive, 4 wheel steering and 4 link suspension. During the outdoor driving, the MOC was very enjoyable to drive. Let's start with the video: Control: 2 SBricks Drive: 4 XL (1 independent motor per wheel) Gearing: 1:3 Steering: 1 Servo (4 wheel steering) Batteries: 2 AAA battery boxes Length: 60 studs Width: 30 studs Height: 28 studs Ground clearance: 6 studs Weight: 1.6kg (with batteries) Tires: Interco IROK 1.55″ from RC4WD The 3'rd party tires gave very good climbing traction over rock and loose dirt. The motors had no problem with torque. It was only the batteries that lost power very quickly with the high drain setup and the cold weather. The suspension could also benefit from harder springs in the front as the center of gravity is placed between the front tires and seats. The tires performed beyond expectation on the climbs, but did put strain on the single servo motor. The tread pattern having grip on the sides also makes them grip the body if there is not enough clearance provided when they reach steering lock position. The biggest challenge in this build were the axles. 4 wheel drive and 4 wheel steering was a requirement, as well as a look that resembled the original. After several attempts to include the motors in the chassis, a compromise was made to have 1 L motor directly driving each wheel. This gave the "compact" look I was looking for but performance was disastrous. After finishing the build, I decided to restart the axles using 1 XL motor per wheel and a portal hub with 1:3 gearing. The results in the end gave good clearance and enough torque to overcome some steep rocky climbs. The most exciting part of the build was the fully tubular body, in red! Since I didn't want to convert the colour scheme to blue, grey or black, I had to find 3'rd party hoses compatible with LEGO. The build ended using 3.5m of hoses, all cut to standard LEGO lengths. All the hose connections as well as the rest of the build was made using 100% LEGO parts. Hope you like it. Feel free to comment or ask questions! Thanks, Mik -
[WIP] M8 Greyhound 6x6 Armored car (RC)
Tommy Styrvoky posted a topic in LEGO Technic, Mindstorms, Model Team and Scale Modeling
I have always wanted to build a 8x8 or 6x6, I recently acquired 10 62.4x20 tires, so now I can get to building a multi-axle vehicle. I also purchased a Sbrick, this will allow me to control my models at a greater distance outside. So I wanted my first model with a Sbrick to be special. The M8 Greyhound is a light armored car, that is mainly for scouting roles and mounts a 37 mm gun for supporting fire. When designing the drivetrain, I wanted a functional suspension system, and differentials. I attempted to replicate the real setup with staggered differentials, but this failed as there wasn't enough space, so I was forced to use a similar axle setup of the Arocs, as this is rather compact, but because of the height of lego springs, this made it very difficult to mound more than one L motor. I initially wanted this to be powered by two L motors, with a 1:1 ratio between the driveshaft and the differentials. Because of the height of the suspension, the roof of the engine deck will be very close to the top of where the shock absorbers are mounted. This has created a very interesting challenge, The low profile of the vehicle severely limits the area where I can mount power function elements. My progress over my short easter break is shown in the images below, I won't be able to continue progress on this model until the end of April, as that is when college is finished. Real vehicle Lego M8 Greyhound 6x6 Armored car WIP (RC) by Tommy Styrvoky, on Flickr Lego M8 Greyhound 6x6 Armored car WIP (RC) by Tommy Styrvoky, on Flickr Lego M8 Greyhound 6x6 Armored car WIP (RC) by Tommy Styrvoky, on Flickr Lego M8 Greyhound 6x6 Armored car WIP (RC) by Tommy Styrvoky, on Flickr Lego M8 Greyhound 6x6 Armored car WIP (RC) by Tommy Styrvoky, on Flickr Lego M8 Greyhound 6x6 Armored car WIP (RC) by Tommy Styrvoky, on Flickr Lego M8 Greyhound 6x6 Armored car WIP (RC) by Tommy Styrvoky, on Flickr -
Black Rat Rod with custom battery
JJ2 posted a topic in LEGO Technic, Mindstorms, Model Team and Scale Modeling
Hello, I have been building with Lego technic and power functions for about 2 years now and like many others have discovered that the 7.2v of 6 rechargeable batteries is sometimes not enough for some creations. One day I found a old TYCO RC for free, looked at the battery and saw,"9.6v" I thought "SCORE!" and started making a adapter for it. I made this "Rat Rod" to test out how the extra 2.4v effected fast models. So enough talking here are the pics IMG_6020 by JJ2Sam, on Flickr IMG_6021 by JJ2Sam, on Flickr It uses: . Servo for steering. . 2 L-motors geared 3:1 for drive. . and obviously 1 custom battery "Box" The car was literately built around the Sbrick and has almost no open space in the chassis and it is very rigid for how small it is. The steering is regular rack and pinion and the L-motors were coupled together because there was sadly no room for a differential. I have not measured the top speed but I think it is around 6-10mph on a full charge. When I built the bodywork I tried to make it look tough and powerful almost like an armored bank vehicle. The battery almost took up all the space on the top so I had no room even to make a rough interior. I am not at all happy about the hood because of the steep angle and gaps but this was built just to test out the battery not to win a beauty award IMG_6024 by JJ2Sam, on Flickr Almost forgot the most important picture. Here's the video All pictures and more are on my Flickr account LINK Thank you for reading -

Hello! I am new. (And I need some help, please!)
sir_launcelot posted a topic in Hello! My name is...
How to Motorize the Mars Rover I am looking for some suggestions. My daughter is building the Mars Rover set (go here for the details: http://www.eurobricks.com/forum/index.php?showtopic=98222) for a presentation at school and I told her I would help make it operate by remote control with one of the power function kits. Problem is that it is a lot more complex than I thought. (I have no experience at the expert level building. (No building the rover is not part of the project, she is doing it as an additional part of her presentation on Rovers). I think I can maybe get it moving with a remote, receiver and simple motor attached to one wheel, but I do not have any idea how to do the steering and don’t know how to move any of the other functions (camera, antenna, robotic arm). see So, to steer, I use a servo? How do I operate the other things, more servos? And to move things slowly, do I need complex gearing? (I was looking at the SBrick which might work. I saw a few designed steering racks and chassis on Ebay, some simple, some pretty complex. Would I be better off buying another set that has a chassis and steering and drive designed to work with motors and then build it and adapt the Rover to it? Any suggestions to help me figure out what I need to do and what to buy to easily make this work would be much appreciated. Thanks! -
Hello, I noticed that the performance of the original 9398 was not very good so I decided to do this mod including 5 motors. IMG_0086 by JJ2Sam, on Flickr I kept the body original and suspension except shock placement and drive and did extend the wheelbase but kept the original width. The suspension has about ~45* of flex and is responsibly soft and responsive to bumps. I used 2 XL motors in the back, 2 L motors in the front and replaced the servo motor with a M-motor for steering and added 1 pair of headlights. IMG_0116 by JJ2Sam, on Flickr IMG_0117 by JJ2Sam, on Flickr The front axle has a kingpin incline making the wheel pivot near the inside of the wheel making it easier to steer and makes it have less stress on the steering motor. You may be wondering about the use of 2 different motors in the dive chain causing problems in speed differences but your worries can be put to rest because a L motor geared 12/20 is almost the same as 1 XL. IMG_0121 by JJ2Sam, on Flickr Thank you for reading-watching! More pictures on my flickr https://www.flickr.c...6592@N04/albums
-
 Hi all. I'm asking for some advices from experts. I am into lego technic "standard" constructions from a few years, now I want to enter in the world of modding and make some custom creations. I love electric models, speed and the "mechanical engineering" behind LTechnic. I also know the existence of SBrick and I love the idea and I want to support them. Then i think that a good start can be the motorization of an existing model, adapting it to power function, engine, steering and SBrick. I am thinking about buying the 42037 Off Roader or maybe the 42039 LeMans Race Car. I have an old (10-15 years old) offroader, I can disassemble it and get some parts from it, mabye. So I think I'm going to buy: - SBrick - XL Engine (I know it's a bit overpowered but I want to create a speedy car and reuse the engine for future creations) - Servomotor - Power Functions - 42037: Formula Off Roader OR 42039: 24 Hours Race Car Is it a good way to start? I need something else important?
 -

(MOC) ZIL E134 Mad Max/Steam Punk Design-Truck + Instructions
Berghain89 posted a topic in LEGO Technic, Mindstorms, Model Team and Scale Modeling
Hey, i would love to share my latest Creation with you guys. Its been a while since my last MOC, but i took the time to build something cool. It is definitely one of my best so far. And for the first time i decided to provide detailed instruction for this MOC. What are the functions of the ZlL E134 Truck: First of all, i used 2x SBricks and 2x 88000 Battery Packs. 2 XL Motos for propulsion 2 L Motors for steering 1 M Motor for gear change (2 speed transmission) 1 LED on the roof (there is a lot of space to use more LED) a working 12 Zylinder Fake Engine behind the cabin. 2965 Parts , about 3,4 Kg. There is still room for improvements. Under the hood is enough space to put in what ever you want. The whole Bodywork can be removed very easy. (modular design) But as always, a short video can show you the Model in action. Instruction: https://rebrickable....nkmad-max-desig Thanks to Madoka for the inspiration with his Tatra 813 Truck. Great work as always. -

[MOC] Nooteboom 8 Axle Semi Trailer
JaapTechnic posted a topic in LEGO Technic, Mindstorms, Model Team and Scale Modeling
LEGO Mercedes-Benz Actros 4160 SLT With Nooteboom MCO 121 by Jaap Kroon, on Flickr LEGO Mercedes-Benz Actros 4160 SLT With Nooteboom MCO 121 by Jaap Kroon, on Flickr After years making prototypes of steered trailers, we, JaapTechnic and LiftingBricks, finally made it to create a system to make a semi trailer with automated steering axles. This system uses the angular displacement of the fifth wheel to steer the axles. This all happens with pure LEGO powerfunctions. In the following video you can watch this system in action. In the video are the following models presented: Nooteboom MCO 121 semi trailer Mercedes-Benz Actros 4160 SLT Volkswagen Transporter T5 escort van Liebherr LTM 11200-9.1 build by LiftingBricks For the Nooteboom and Mercedes are building instructions available. The Volkswagen van will be digitalised for instructions end 2015, begin 2016. Nooteboom 8 axle semi trailer Functions: Lights 7 automatic steered axles by PF servos Length: 113cm (153cm extended) Parts: 2768 Mercedes-Benz Actros 4160 SLT Functions: Lights; front bumper and warning lights 2 steered axles by PF servo 2 driven axles by XL motor SBrick Length: 46cm Parts: 2722 Volkswagen Transporter T5 Functions: Lights; 24 LifeLites LEDs with customised circuitboard Frontwheel steering by PF servo Rear wheel driven by L motor SBrick Length: 32,5cm Parts: unknown Volkswagen Transporter T5 stuck in the sand by Jaap Kroon, on Flickr Lego volkswagen transporter t5 interior (WIP) by Jaap Kroon, on Flickr LEGO Mercedes-Benz Actros 4160 SLT With Nooteboom MCO 121 by Jaap Kroon, on Flickr LEGO Mercedes-Benz Actros 4160 SLT With Nooteboom MCO 121 by Jaap Kroon, on Flickr -
Lego Technic Desert Fox buggy
filsawgood posted a topic in LEGO Technic, Mindstorms, Model Team and Scale Modeling
Hi everybody! I want to share with you my new work. I love the buggy and I want to develop this area, so I would like to hear your opinion about what I did. Meet - Desert Fox More information and photos here -
Lego Technic Subaru Forester
filsawgood posted a topic in LEGO Technic, Mindstorms, Model Team and Scale Modeling
Hi everyone! Today I want to share my new creation - Lego Technic Subaru Forester Specifications: SBrick for remote control 2 L motors on four wheel drive Servo motor on steering LED lights Small battery box Boxer engine Fully functional body More detailed model can be found in my blog -
Dear all Train Tech guys, Thanks to the kindness of SBrick team I got two SBrick units for some testing - one of them was built into my LEGO MÁV Stadler FLIRT electric motor unit, another one into my LEGO MÁV Siemens Taurus electric locomotive. We tried as well to install SBrick between 9V Train Speed regulator and a loop of 9V track, where usual 9V-based trams were running. Fig.1. TFOL driving SBrick-controlled Stadler FLIRT on our layout. 1. SBrick installation For first, a quick overview for those, who don’t know, how SBrick works. If you are familiar with the smart brick, you surely can skip this chapter. To imagine SBrick it is the easiest to think about a normal LEGO Power Functions IR Receiver with four outputs, more channels and without the restriction of the infrared technology - with other words your smartphone or device doesn’t need “visual” contact to the receiver unit, thanks to the bluetooth connection. Also it works surely fine within the range of 50 metres, but by good circumstances it works from 100 metres as well. Other great advantage, that SBrick’s current limitation is 3 Ampers per output, while PF IR receiver has 800 mA - better choice if you want to run something heavier then avarage 6W trains. Fig.2. The SmartBrick unit. (Photo taken from sbrick.com.) SBrick could be powered with normal LEGO battery boxes or LiPo rechargeable battery with a Power Function extension cable. It is also possible to power SBrick from old 9V battery boxes or even a 9V Train Speed Regulator, using the 9V/PF end of the extension cable. In this case you should check, if the little green light on SBrick is on - depending on polarity the SBrick is enpowered, or nothing happens. You can plug on your train motors, lights, other PF motors on the SBrick’s four outputs. Next step is to design your remote control interface for your device. To do this, you need to be registered on social.sbrick.com, then go to designer.sbrick.com to create your profiles. The profile designer works in most of the web browsers properly, you can add sliders, joysticks and buttons to it. It is really advised to fill the “name” field in setting - later you need to know, which slider do what when configuring SBrick. Sliders work like old RC Train Remote control, joystick is an advanced slider, buttons works like turn on and off. For all controllers you can configure maximum output - if you want to limit your train’s maximum speed, quite easy to do, setting a value lower then 1 to maximum output. Also you can set up, if the controller will reset to zero or not, when you stop touching the screen of your device. You can set background for your controller, you can change the design of the sliders, joysticks and buttons - we have dozen of previously created ones, but you can use also own-designed images as well. Fig.3. My profiles designed for event TEMOFESZT 2015. Upper one manages three SBricks at the same time, a tram line with a slider, the ferris-wheel with a button (0.3 maximum output) and two other sliders my FLIRT train. Theoretically, if your screen is big enough, you can manage 16 SBricks and 64 funtions at the same time from the same device - perfect tool to operate a whole layout. After the profile is done, you should connect your MOC to your device. To do this, you need the SBrick application (or for quick play SBrick Tester application). Create a new Creation in SBrick application, turn on SBrick in your MOC, add SBrick to your creation and download your profile to your device. Then click connected SBrick (or SBricks) in your Creations menu, and pair sliders and buttons (if you named them before, it is easier :) ) to the outputs (A,B,C,D) of the SBrick in your MOC. After doing this, click the profile in the app you made for your MOC, and start playing :) 2. SBrick & Stadler FLIRT Surely most of you know this creation. It is my 8 stud wide electric motor unit, the original train manufactured by the swiss Stadler company. The LEGO train’s weight is around 3,5 kg-s, previously it was driven by two 9V train motors and two PF train motors, connected to 9V ones. The train also has front-tail lights (using modded PF leds, described in RailBricks #9) and interior lights - three functions to operate. Fig.4. Cables and cables - all of my train’s funtions connected to the SBrick unit. The bigger battery box (which never turns off) grants continiouos availability until the batteries die. As before, I sacrificed the toilette part of the interior to install electric parts - the big AA battery box powers the SBrick unit, and functions are mounted on the outputs. I had a small issue here with the design of the SBrick - if you plug more than one PF cables on the lower (C,D) outputs, it will be inpossible to plug any to A and B. So if you have to plug more than one on some output, you should put them on A and B, or if three output needs more than one plugs, you should insert an additional extension cable first to lower one C and D, and then plug your needed cable ends to the extension cable. In the train now boogie 2 and 4 are driven - 9V train motors are removed, and normal train wheels replaced them at boogie 1 and 5. The third (middle) boogie is unpowered as well. Operating the train is quite easy, if you learn, how to use your touchscreen properly. Since I have direction dependent front-tail lights, I named on my profile (refer to Fig.3) the two ends of my train “A” and “B”, just like the real thing. When starting, I always turn on lights for first, and later if I press the same direction of driving slider, the train will start into the direction of three white lights on it’s front. This could be especially important, when you have a layout where trains are running not only around on one loop, but they direction can be changed at wye-s, and you can’t exactly remember, which end is which on your fully symmetric train or loco. Fig.5. Wye-s designed by Bill Ward. Perfect way to get lost, where your train will depart when you touch the screen, or even turn the PF remote control around. Operation time was fine - the SBrick unit doesn’t take more power than the PF receiver unit, with the pack of AA rechargeable batteries I operated my train for a full day (exhibiton was opened between 10 am and 6 pm), the train was running for 2,5-3 hours before powered down, and it wasn’t turned off for all the day. Also I tested the train at home for continouos running - after 15-20 mins the PF-train motors got too hot and and train stopped, while SBricks temperature raised from 36-38 °C to 44-46 °C. (You can get voltage and temperature data using the SBrick tester application.) The SBrick unit works fine - I doubted it will manage my quite heavy train (compared to avarage trains built by AFOLs), but it served really good - the more problems I had with the software part. The SBrick application written for Android have several problems - not serious ones, but quite annoying. Connection problems Sometimes the application can’t reconnect to the SBrick. It happens when you exit from the driving screen from your smartphone or tablet (in this case the connection will be dropped automatically), and then you turn on again your controller - it starts to reconnect, then askes if SBrick is powered. This connection issue may happen if you connect your MOC from an another device while the first device is disconnected - until you are connected to the MOC with the second device, you can’t reconnect with the first one. The reconnection problem happened when the second device got disconnected as well. Also using the SBrick and SBrick tester applications from the same device can lead to this reconnection problem. Fortunately, all outputs of the SBrick are resetted to zero when you device loses connection with your train, so no accidents may happen. Fixing connection problems As I experienced, restarting SBrick application helps in most of the cases. If this doesn’t help, in your creation’s menu you should remove the SBrick, then add it again, reconfigure it, and it will work. Application crashes Smartbirck application crashed for dozen times during the three days - mostly when attempting to reconnect. Slider problem Basically I used “slider”-s to drive my trains. I don’t exactly know, how the software part of the sliders are written, but the first 80% of the length of the slider from zero (middle) point is quite useless in train operations. After reaching 80%, the train starts slowly moving, but it is really hard to set up the train speed properly on the remaining 20% length of the slider bar. As far as I know a totally new application for SBrick is under contruction, so the output function for the sliders and joysticks will be redesigned in the near future to avoid this problem, and hopefully previously mentioned connection problems and crashes will disappear as well. 3. SBrick & Siemens Taurus locomotive During the summer event of Kockajáték Club I installed one the SBricks to my Siemens Taurus locomotive. The loco works with two Power Function train motors, connected to the old RC train base - SBrick was placed on the output of the train base, so to turn it on for first I needed to give maximum power from the train base. Check this video of the locomotive pulling cars, and controlled from a distance. With this locomotive we made also some fun tests with the train guys hanging around - we put ten of our 8W, 58-64 stud long coaches on the locomotive to pull them. When the magnet coupling didn’t fail (with careful driving) the SBrick unit (and the two PF train motors) could pull all the cars, but the SmartBrick got really hot in less than 5 minutes - we reached the 90 °C temperature easily, and the SBrick got shut down by temperature protection. After couple of seconds it cooled down, and the smartphone reconnected to it. The whole weight of the pulled train was around 11 kilograms. 4. Controlling traditional 9V lines with SmartBrick Using an SBrick doesn’t mean you have to give up your 9V trains, tracks and motors. Get a 9V speed regulator, put SBrick on its output with a PF extension cable, and use the same cable to enpower the 9V loop, putting the dark bluish gray end on the Smartbrick and the light bluish gray end to the part you connect to the 9V tracks. Turn on speed regulator to maximum, put a 9V train on the loop - and now your 9V creation could be controlled from everywhere in a 50 metres radius circle, not just from the speed regulator. Putting more sliders connected to more loops will give you the oppourtunity to controll all your layout from the same place, while you don’t need tons of 9V extension cables to put every speed regulator at the same place. SBrick is even a powerful tool when you don’t have loops, just sections isolated from each other, like analogous model railway - every section could be controlled as described by loops. If you motorise switches with PF motors and connect them to SBrick, you can manage almost everything only using your touchscreen. 5. Conclusions SBrick is a powerful device to make your LEGO trains work with minor issues. The greatest advantage of SBrick that you need no vision to the receiver unit and you can controll your trains from a great distance - no more runaway trains thanks to the limitations of PF IR receiver. SBricks is also compatible with older 9V-based stuff - those who doesn’t want to switch to the newest LEGO train system can use it as well. The current limitation allows you to make really big and heavy trains to run - which is almost impossible when using original PF IR receiver. On the other hand - one SBrick unit is quite expensive, one brick costs £40 and taxes. However this price is not that high if you compare the possibilities to the possibilities what three PF IR receivers can give you for the same amount of money. Current SBrick application has minor issues as well, crashes and disconnects are quite annoying, and the application won’t work propely on all Android-based smart devices. For final words, I really advise to everyone who is into trains, especially at big shows to make a try with SmartBrick. Running only one train with your phone or controlling a whole layout with one screen - the decision is up to you. Video of the functions described above:
-

[MOC] Spookydoo!
MajorAlvega posted a topic in LEGO Technic, Mindstorms, Model Team and Scale Modeling
Hello! This was my Halloween MOC. It uses a SBrick to control 4 functions: - White light - Ultra-violet light - Fog - Minifigs rotation The white light uses a regular LEGO Power Functions Light pair. One LED is inside the pumpkin at front, the other one is bellow the floor, pointing up. The ultra-violet ("black") light uses 3 home made Power Functions UV pairs, with UV LEDs. I'm using a rectifier bridge and two 100 Ohm resistors to drive the LEDs, a circuit identical to LEGO PF Light pair. 2 pairs (4 LEDs) light 4 torches in the left and right walls. I put the LED inside a technic 1x1 brick with hole, behind the trans-neon-orange flame to hide it (black light sources are also blue light sources). Some UV passes trough, not much but I complete it with another pair (2 LEDs) bellow the floor, pointing up. There is a fifth torch in the back wall, without UV LED behind but still glowing a bit, like the spider in the left corner. The fog cames from an home made fog generator. It uses a kantal wire to heat glycerole/glyrecin, like the smoke generators used in in model trains as also most e-cigs. Has a silica wick that takes the glycerin from a small tank, enough for more than 30 minutes of work. The fog is not spreading allover the MOC as I intended. I might add a small fan later. Finally the minifigs rotation uses an old 9V micro-motor. No gears so it turns to fast :( Everything is powered from a LEGO Power Functions LiPo. You can see most of the electronics in this photo of the base while being assembled: -
With the wonderful weather we're having, and the very shiny new boat hull that Lego released, the time has come again to desperately try to keep all the electronics dry. To keep the weight low, I kept the decoration a bit sparse. (Also, massively recycled from Naida's Epic Adventure Ship) For storage and convenience, everything that sticks below the waterline can be removed with the two 3-length pins with bush in the back. More pictures can be found here. If you want to tinker with it, there's an LXF file here. Lego's new boat hull is very stable, and can even handle some small waves. It also provides a neat storage compartment that allows the electronics to be mounted as low as possible to increase stability. Using an Sbrick was very convenient. As I was filming in the full sun, on a very reflective water surface, PF's own infrared signals would be practically useless. Also, it can handle the load of the RC motor a lot better than the regular PF receiver. And if we're thanking third party hardware suppliers; I'm really happy with my waterproof Gopro thingie. It was great fun recording everything down below. By the way, does anyone know what kind of fish I happened to catch on camera?
-

[MOC] Lego Carrot Crawler
PunkTacoNYC posted a topic in LEGO Technic, Mindstorms, Model Team and Scale Modeling
Hey, this is my first post on Eurobricks so if there is anything that I am doing incorrectly in this post, please let me know. I am presenting my Rock Crawler, or more specifically, my Carrot Crawler. Features: -Triangulated 4-link suspension using the Lego soft shock absorbers. -One PF XL motor per axle (a total of two), each geared down 1:2.779. -Custom portal hubs for each wheel. -Ackerman Steering with slight caster angle powered by PF M motor geared down 1:3.333 including a worm gear. -Rechargeable LiPo battery box as power source. -Controlled by a SBrick and an iPhone 6. -RC4WD 1.9" Super Swamper crawler tires. This has been a work in progress for a long time and I feel that it is finally polished enough to showcase on the Eurobricks community. My plans for fixing and editing this crawler (Some of which, I have already begun working on) include: -Building a better chassis (the angled pieces on top of it don't REALLY fit, but I made them fit! ) -Eliminate gear slippage caused by the perpendicular bevel gears. -Mount the XL motors parallel to the axles which would both eliminate gear slippage and provide more ground clearance. Here is a picture: And here is a video: Please give my any suggestions for my post and more importantly, my crawler! Thanks -
[MOC] T34-85 WWII Soviet Tank
legomarat posted a topic in LEGO Technic, Mindstorms, Model Team and Scale Modeling
I prepared this model for Brickworld Chicago couple weeks ago. It is quite playable on a table, and was a great show material. I build a slope with books and make it go up and down. The winter livery was due to limitation of available Lego pieces. However few stickers I made are based on my memories of a monument I saw in Russia, rather than pictures online. The model has 4 motors and Sbrick for smartphone control. RC functions: drive left and right track, turret rotation and gun elevation. Also the model features authentic Christie suspension. Video on youtube -
My first MOC in far too long! It will be a Katipo spider, the NZ version of the Black Widow. Now on Rebrickable! Functions: Left legs - L motor Right legs - L motor Winch ("silk") - XL motor Jaws - M motor WIP shot: Final model! Katipo - 3/4 view by bachaddict, on Flickr Katipo - top view by bachaddict, on Flickr
-
[WIP] Automatic train turntable (and other things)
MajorAlvega posted a topic in LEGO Technic, Mindstorms, Model Team and Scale Modeling
Hello. This is about trains but I think it's more appropriate to post it here under Mindstorms theme. My LUG (PLUG, from Portugal) train fellows have been developing their own modular standard (MFL) for our exihibitions. Since it defines a 6-brick height above the table surface there is plenty of space under the tracks to hide motors, gears and gadgets. That idea attracted me so I decided to try MFL. First I rebuilt a motorized track switch I was already using with WeDO and then decided to also try a turntable and then... well, you know :) At this stage, this is my setup: - a Mindstorms EV3 running ev3dev (Debian linux) to control everything - a wi-fi USB dongle (not essential but allows me to use my laptop as a console, much more easier this way) - a bluetooth 4.0 USB dongle to control the SBrick-based trains - an EV3 ultrasonic sensor to sense when the train reaches the middle of the turntable - an EV3 touch sensor to sense each time the turntable completes a 180º turn - two Power Functions lights (with a NXT-9V adapter) to signal the movement of the turntable and the control of the train - one USB RFID reader to sense/identify the trains - one LEGO WeDO to control the two track switches (one Power Functions M motor under each) Each train has: - a SBrick (will try IR later) - a RFID tag The train is brought to the RFID sensor where the EV3 recognizes the train (green lights start blinking) and tries to establish a bluetooth BLE connection to the SBrick (green lights keep ON). Then the EV3 takes control and sends the trains to the turntable, using the ultrasonic sensor to prevent collision against the end of the turntable. When the turntable starts turning, the red lights blink (and a claxon sound plays, but its not used in the video). There is also a touch sensor under the end of the track that senses when the turntable completes each 180º turn. Then the EV3 sends the train back to the starting point, using the RFID sensor to detect the train. The bluetooth connection is dropped and now the train is available for manual control. The EV3 is ready for another train. For a near future I plan to give good use to the track switches (only one is motorized but the second will follow soon). I also want to try a method I saw here at Eurobricks to separate the train engine from the wagons. This way the train engine could drop the wagons, revert direction at the turntable, move along the left path and pick the wagons again. To be honest, the turntable still needs some adjustments - sucess rate is ~1/3, sometimes the train slips when moving in, sometimes when moving out.