Search the Community
Showing results for tags 'Power functions'.
Found 368 results
-

Difference in PF battery boxes?
Terrasher posted a topic in LEGO Technic, Mindstorms, Model Team and Scale Modeling
Hello, Technic, Mindstorms & Model Team people. I asked this question over at the Town forum (I'm trying to motorize some Fairground sets), but I think it might be better suited for his forum. Is there a difference between the technic-styled battery box (the one with the two sliding DBG panels for the battries) and the system-styled one? I only own technic-styled battery boxes, and I don't know if the system boxes give the motors different speeds or what. I already know there's an expensive system battery box that lets you regulate the speed, but I'd rather regulate the speed by using different cog sizes than shell out around 70CAD for a battery box. -
Hi, I don't own any of the fairground sets, but I'll be adding a couple to my collection pretty soon and want to motorize them. I own the power functions battery boxes that are better suited for Technic sets. Is there a difference between this battery box and the system one that shows up in the new Rollercoaster video? I don't know if the speed of the motors will be different depending on what battery box is used.
-
If anyone can help me out, will this work? Motorization by Henrik Lorentzen, on Flickr I am working on a large steam engine now and trying to find a way to motorize it. Do you think this will work, will add some more support to the technic cross axles, but the gearing? L-motor. I plan on putting another L-motor using the same technique on of the other wheels. But I want to check with some experts before I test this on a real build.
-
 A wifi remote control for Lego is coming soon...
 -
hello decided to start my BR Class 08 project and when sourcing parts I came across my PF powered wagon. I am planning in putting all the PF components into the Class 08 body, but having this push it around might be a good option while I sort out the mechanics for the 6 wheels. (PF train motor only has 4 wheels) Anyways for anyone interested heres my PF wagon and pushing my "Ruby Night"
-
This is my DIY LED lights on a budget. White 5mm LEDs are 2 cents each and resistors are 4 cents each on eBay. A large spool of wire-wrap wire costs around $5-7. Do-It-Yourself LEGO LED Light by dr_spock_888, on Flickr I tapped into the 9V and GND lines of the IR Receiver for power. Note this will void your warranty. Do so at your own risk. I fed the wires through the pin holes on the receiver. No drilling or cutting needed. I sandwiched the LED between two Technic 1x2 bricks. The 5mm sized LEDs fit right in the Technic hole. I decided to try wire-wrapping instead of soldering. It might be easier to disassemble later on. The LED turns on when the battery pack is turned on. It makes a good reminder to turn off the battery pack when done playing. Little Yellow Locomotive by dr_spock_888, on Flickr The hard part was calculating what size resistor to use to limit the current to the LED. Too much current will blow the LED. Tools used were small Philip head (+) screwdriver, wire cutter & stripper, soldering iron, wire-wrap tool, and tweezers. Plus a multimeter to verify polarity.
-
E-100 super heavy tank
Tommy Styrvoky posted a topic in LEGO Technic, Mindstorms, Model Team and Scale Modeling
Lego RC E-100 super heavy tank by Tommy Styrvoky, on Flickr I have been busy with my latest model, the WWII German prototype vehicle E-100. This one being my second rendition of it since 4 years ago, when I started building MOCs. This one is smaller and greatly improved scale accuracy. more information and photos on my blog. http://tommystyrvoky.blogspot.com/2018/02/e-100-super-heavy-tank.html instructions https://www.rebrickable.com/mocs/MOC-13061/TommyStyrvoky/rc-e-100-super-heavy-tank/#comments The process of rendering all of the animations for this video took some time, as I rendered all of this on my laptop, the end result, each frame requiring about 5 minutes at only 720p , and well there are a few thousand frames rendered for the animations, and I also completely redid my channel outro with the new PBR shaders from Meccabricks. Lego RC E-100 super heavy tank by Tommy Styrvoky, on Flickr And after all of that time rendering I realized that I forgot to include the second turret hatch... This is probably one of my most accurate vehicles so far, given the constraints of lego, and the mechanical challenges. Though I am still striving to do better in the future. Lego RC E-100 super heavy tank by Tommy Styrvoky, on Flickr and a comparison with blueprints from the real one. E-100 Blueprint overlay by Tommy Styrvoky, on Flickr -
For those who are interested, I put together a review and Lepin vs LEGO comparison on my blog. Details are here.
-
Hi all, I'd like to show you a little thing I made 6 years ago for my daughter...and then became unused on the shelf since it was "retired" by Duplo trains. It was a sort of DB E69, used to transport frogs and penguins (all made with Lego Basic sets instructions). After she saw the real 7720 she liked the whole set. So I created a newer "clone" of the 7720 locomotive. This weekend I decided to revamp it a bit to make it work again. So I modified the roof, the handrails, the pantograph (which now is very similar to swiss ones) and made it a bit more "studless". The battery car is now blue instead of Yellow. It was - and still is - powered by a Medium PF motor, since it was not Infrared controlled and the standard PF train motor was too fast. Instead of IR receiver, it kept a "vintage" solution to be started. I used the PF lever the same way the 7720 used the red lever on battery box car. The IR receiver can be put inside the battery car if needed. As you can see, I have the same 7720 inverters placed on PF track...and the result is the following (sorry for the video quality, the phone cannot do better than this). The cat likes this "reversing" feature a lot! Next steps: two long two axles wagons resembling the 7720 ones, and the white doors on blue wagon created in SNOT mode (or a simple sticker, if I fail ) It is a silly train, but I hope you like it!
-

FT's Technic corner - MAN TGS 6x4 with bucket gripper
functionalTechnic posted a topic in LEGO Technic, Mindstorms, Model Team and Scale Modeling
Hi everyone, Finally, I have finished a project which I was building since last September. It is the scale model of the Intrac 2011 snow blower which is/was often used in the swiss alps by the army and other communal parties. It was the aim to create another working snow blower after the success of the snow blower from last winter. The blower is powered by three buggy-motors which are all controlled by a separate Sbrick. Each track is driven by two PF XL motors. The snow blower shoot direction is controlled by two 9-volt micro motors and the height of the snow blower by one PF L motor. As power source I used two Buwizz as battery or a custom lipo battery. After a certain time in the cold I had the replace the Buwizz with the custom lipo battery. Cheers FT -
Here is a sneak peak of one of my biggest projects up to date: Project started with a new type of a gearbox, which uses only two toothgears at any time in order to transfer power from motors efficient to the wheels: Here are a few specs of the model: Length cca. 80cm when folded Width cca. 30cm Height cca. 25cm Weight cca. 4,5 cm Dual rear live axles in the back independent suspension in front 4 electrically controlled gears + 1 additional electro-pneumatically controlled gear Working towing arm in the back capable of lifting weights of over 1kg Dynamic lights All functions controlled by 3 Sbricks Currently we have snow here and I can't shoot a video as planned I will post more info as soon as I manage to take more photos and a video.
-

Lego Technic Vagabond Sports Car MOC
TmoneyTechnic posted a topic in LEGO Technic, Mindstorms, Model Team and Scale Modeling
To be honest this video was supposed to be my video releasing a new version of the RC Car with Sbrick along with some instructions. However, after a request for a build battle by LEGO Technic Mastermind, I have decided to postpone that video, but that will happen sometime in the future. In the meantime, I have made a rear-wheel drive sports car with an opening hood, small-cylinder V8 engine, functional headlights and taillights with PF LEDs, full independent suspension on all four wheels, a steered front axle with toe in (steered by a PF servo), and a four speed manual gearbox driven by 4 PF L-motors. To control all the powered functions, I have used two Sbricks, each connected to their own AAA battery box. I have not much else to say, just enjoy the video and photos below. -

MOD - 12 volt wheels with axle hole for Power Functions motor
Paperinik77pk posted a topic in LEGO Train Tech
Hi all, since 7777 book came out, I've always wanted to integrate Trains and Technic worlds. Back in the 80's the problem was the complete lack of train wheels with a Technic axle hole. It was solved with RC trains a lot of years later. Therefore, I can convert a 9v train to PF without too many problems (aesthetically speaking). But for 12V trains it is different. Wheels are made in a specific way, they have the hole for connecting rods, they're more "fat" than RC/PF wheels. Frankly, I do not like 12V trains converted to 9V/PF standard bogies. But I like the PF motor, its speed, the possibility to increase speed gradually...and the fact it keeps the central hole for third wheel. So, in these years I repaired a lot of 12V motors...and some were really in bad shape. Look at the right wheel, it is completely destroyed inside. So I decided to try to implement my solution to connect standard, intact 12V wheels to technic axleholes (which I do not list here, since it was not satisfying). First, I got a standard Technic bush, and cut it a bit. Then I put it inside the damaged wheel hole. It fits fine, but needs to be glued. Once glued, it is time for some testing. The 6-long axle goes right in - but the red ring coming out from the wheel is too thick. So I prepared another wheel (gray bush). This time I cut the bush a bit shorter and fits right. The 5.5 axle is perfect , so I'll need to cut two 6-long axles to the right lenght. And this is the result - this is my 7740 no°3, totally converted to PF. It works fine, but as you all can imagine, it is all made by hand and bushes are not machinery-centered. Therefore the locomotive is not stable as I would like. For the moment, better than nothing! -

Lego brick 60th birthday build
kbalage posted a topic in LEGO Technic, Mindstorms, Model Team and Scale Modeling
The Lego brick turned 60 years old, so I thought I need to celebrate it with a fun little Technic creation. Nomen est omen - I created a racing brick :) I wanted to have a brick built cover first but I quicky realised that I do not have enough system bricks of the same color to create the studs. Then I found my son's lunchbox, and things escalated quickly :) This was just a very quick build yesterday evening, nothing special inside - 2 geared up L motors driving the rear wheels through a differential, Servo for steering, V2 receiver and a rechargeable battery box. Wanted to stick to original Lego PF components this time :) It's a fun little ride, might refine it later on. This is how it looks like without the cover: -
When I drive my trains, I find that when trying to slow them down as they come around a curve I often end up stopping them instead. Some time ago, I saw a post (maybe here, maybe not) that showed how to add a structure to the remote (8885) to provide better control, but now I can't find it. Can anyone help?
-

[MOC] The Dual crane Pipe Transporter
Superkoala posted a topic in LEGO Technic, Mindstorms, Model Team and Scale Modeling
Today I present you the Dual-crane Pipe Transporter, a vehicle that came directly out of my mind. I mean, in my remain, I never seen a +real+ vehicle like this one. This kind of vehicle could actually been used on construction site of oilfield for the transport, the tracks allow a low ground pressure and good traction so it is suitable for every environment. The full review with all images are avialble at superk-technic.com/pipetransporter. I based the design of the Transporter on two vehicles from my Idea collection. The lateral reach stacker Meclift ML5016SR (on my to-do list for 2018) and a classical side loading container trainer similar to what has been released in the Mack Anthem 42078 set. The Dual Crane Pipe Transporter is a tracked vehicle equipped with a large flatbed to transport pipe of long loads, a dual articulated crane, 4 outriggers, a sliding cabin for improved view and a counterweight. The Power functions elements used in this MOC: 2 PF-L for propulsion (1 per track) 1 PF-M for the crane main structure w/ linear actuator 1 PF-M for crane articulation w/ mini linear actuator 1 PF-M for outriggers w/ 1 mini-LA per outrigger 1 PF-M for winches 1 battery box used as counterweight Plus 2 SBricks Bluetooth controllers. Thank you for reading. -

Power Functions - Help with motors?
Shadow_ninja714 posted a topic in LEGO Technic, Mindstorms, Model Team and Scale Modeling
I've searched for an answer to this for a long time, and I'm hoping I can get some help here. I'm working on a Technic car that uses PF motors to be a mobile vehicle. However, I've found time and time again that the model ends up being just too slow for my liking (if anyone has owned the 4x4 Crawler set, you know what I mean by slow). I own 2 L-Motors, 5 M-Motors, 1 XL-Motor. My question is: How do I make the model have faster speed without it looking like a skeleton car, and also, does adding additional motors increase power? For example, if I gear together 4 M-Motors so that they all end up on one drive axle, is their power combined? -
Hey guys, For the last few weeks I've been working on something that I have never seen done before. I was inspired by Jkbrickworks kinetic contraptions so I decided to make my own, kinetic, motorized AT-AT Walker. This build has just over 600 parts and took me about 12 hours to build, most of which was in getting the moving mechanism to work :) I have made instructions for it and you can get them here: https://www.ebay.ca/itm/222759462918?ssPageName=STRK:MESELX:IT&_trksid=p3984.m1555.l2649 The instructions and renderings are for my 2nd version (Much better) and the video is of my 1st version, just so you don't get confused but the only changes are some colors :) I hope you like my moc and any feedback would be great! Thanks, MM
-
Lego RC Car with Sbrick
TmoneyTechnic posted a topic in LEGO Technic, Mindstorms, Model Team and Scale Modeling
Here's a little something I've been working on for a while now, mainly because I just didn't have time to edit the video. Instructions should come out late 2017 to early 2018. The video link is below, and some pictures after that!! Before anyone else asks, I fixed the steering, it was something purely wrong with my configured profiles settings for the Sbrick, but no one could have known that ;) Enjoy! -
After some days of "try and error", I finally have a first motorized working version of the Joker Manor's Roller Coaster https://www.youtube.com/watch?v=Dc0vSOunDqY Here you are a picture of the modification: Of course there is room for improvement, but actually it works quite well. Now I have to do some make-up
-
[MOC] 6x6 Tracked, Articulated, Flatbed
Superkoala posted a topic in LEGO Technic, Mindstorms, Model Team and Scale Modeling
Some month ago, I found a random image of what looks like an exploration truck. As i did not have enough info on the real machine it was impossible to use it as reference, so, some choice have been made: Mini size : not enough part to build something big when I started (other stuff in progress and cancelled since, that's why) A classical front wheel steering would have been possible, but very fragile due to the size of the vehicle. And I will need a pivot + linear actuator system for a future project, so it was a good opportunity to use it. No differential, because size matters. Suspension if possible Tracks, of course. The full album is available on FlickR. Power function part used : 1x PF-M for Steering trough mini Linear Actuator 1x PF-M for AWD propulsion without differential IR receptor Rechargeable battery Cabin is reaaaaaly ugly. One day I will be able to make cool design. Unfortunately/fortunately, after I had finished this little boi, I found a new picture of the real vehicle. But not searching with "arctic/exploration truck", I had all wrong since the beginning. This thing is actually an Oilfield flatbed truck: the Cossack from ATK: Guess what ? It will soon be a real thing. Bigger, with some function. Best regards -

On the Future of Power Functions
JopieK posted a topic in LEGO Technic, Mindstorms, Model Team and Scale Modeling
Our German speaking friends of 1000steine have started a discussion on the Future of power functions (Original link, In German) The reasoning is as follows: - Power functions is now 10 years old - The newest sets including the Mack don't include PF - Bluetooth (4.x/5) seems to be the way to go seeing the success of SBricks While I don't think LEGO has a good replacement for PF at this moment and also don't see how LEGO Booster or WeDo (the latter uses PF in fact of course) would replace it, but I also see that those new sets lack PF. Any people that know more and are not under NDA by TLG? B.t.w. to add some more possible fuel to the discussion: at the Medica (Compamed) conference in Düsseldorf I have spoken several times with the two companies that co-produce Power Functions for LEGO, they weren't there last week (last year they still were though!). -
My kid wanted a trolley for his Lego City. I am into 4-studs wide cars and modular mocs, no idea how to begin this en devour. After a few failed attempts, I turned to this section of the forum. I found Solitary Dark's MOC of the San Francisco Trolley. His MOC was the basis for the chassis on this one. This is made out of bricks we have on hand. I plan to make modifications to the cabin, the windows make it look more like a boat than a trolley. My boy's tall order was to motorized the MOC. I manage to squeeze in the Power Functions I.R. into the cabin. The battery pack can also be mounted but it would stick out of the cabin. So I modified this one to run on 9v rechargeable Lithium Ion battery. I stumbled on a number of threads in this section regarding this topic so I went ahead and soldered one end of a PF cable to a connector for a 9v battery I made the thing modular for easy access to the PF components. It also makes changing the appearance of the train easy. Hope you guys like it, like I said, this is my first attempt. Appreciate all the contents in this forum. Here are more pictures: Here's a short video of the Trolley on the move.
-
Finally getting around to posting some of these... I've been doing a bunch of small projects this year that I don't feel warranty their own thread, so this thread is going to be a home for said small projects. PRR MP54 Some years ago I built a set of PRR P54 coaches to go with my PRR T1. At the time I thought a fun future project would be to convert the cars to MP54 spec - the EMU version of the same car. Well, the future is now! Over the past few years I've been trying to build trains using all of various the LEGO motors, and the PF train motor was still on my hit list. I don't like the PF train motor that much because it doesn't have any low-speed torque, and the wheel spacing hasn't been correct for anything I've made so far. Recently I remembered about the MP54, and I thought it would be the perfect application - fast and doesn't need a lot of torque. Here is one of the original P54s as built: And here is the MP54 conversion: Of course the main difference is that there is a battery box, receiver, and motor in the MP54, but I've also updated the original model over the years, most noticeably by slowly collecting all the frames and glass. Other minor changes include the addition of headlights and a more vanilla bogie design to match the PF motor frames. Of course you want to see it go: I was really entertained by how fast it goes! Usually I prefer gearing down such that you get more torque and less speed, but watching this zip along is a fun change of pace. The pulling power isn't actually all that bad either, but as expected, you need to be going pretty fast before the PF train motor is generating any torque. One more interesting thing is that I'm actually using BBB wheels on the PF motor instead of the usual tyred wheels. I originally tried with the official wheels, but I due to the low torque I felt like it was really bogging down in the corners, so I tried the BBBs. This is a much smoother configuration, and it doesn't feel like I'm losing all that much grip. It can definitely pull at least the other two P54s and maybe another car or two. Okay, more to come soon. Hopefully.
-
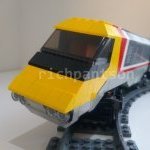
The legendary durability of the 928 M.C.V.P created a storage and personnel problem for OrionBlu as replacement parts already in production vastly outpaced the need. The stockpile of parts meant there was no room for replacement or production parts for other new vehicles or spacecraft. OrionBlu decided to use the overrun of replacement parts to build additional M.C.V.Ps, but with a standard crew of 4, the new M.C.V.P would need to wait months to recruit and train new crew. In order to counteract these issues, OrionBlu redesigned the crew compartment of the Maverick to house only a single pilot with the additional space converted to house an enhanced shield generator and two Omega class super computers used to automate the functions of the other crew members of the M.C.V.P. This single crew version of the M.C.V.P was officially called the Mono Mega Core Vehicle Platform, of M.M.C.V.P, but the official name was not favored by field personnel who dubbed the vehicle the "Maverick". ================================================== The Maverick is slightly bigger than the M.C.V.P "Classic"- with the Maverick is on the bottom. The Maverick also has a full suite of lights! This build also has power functions and complete SBrick remote control! Check out the video of the Maverick in action!