Search the Community
Showing results for tags 'Power functions'.
Found 368 results
-
 Welcome to Feel Good Island! This is your Captain DoubleBU speaking. Thank you for chosing Air "Feel Good Island" for your trip. We're ready for take-off in about 10 minutes, so please switch off your mobile phones and fasten your seat belts. During your flight with us you can experience and enjoy the following features: - Power Functions as well as (switchable) manual mode - Many rotating/moving elements - Detailed environment (with some Easter Eggs) for nice display - Also a stable and heavy structure for heavy play - Accessible battery box withoutdisassembling the whole island, completely hidden inside the structure - A landing mode, optionally with or without the specially designed tensegrity stand. - A tensegrity stand that very stably supports the island in a floating position but also allows you to easily pick it up for play. For further information please refer to our brochures "Feel Good Island" or "Tensegrity Stand" right in front of you. Thank you very much for your attention and I wish you a pleasant flight...!
 -

Mindstorms EV3+ Power Functions
Newest_Tech320 posted a topic in LEGO Technic, Mindstorms, Model Team and Scale Modeling
Does anyone know of an app or application that works with the old ev3 Mindstorms and technic power functions? -
Hello My first post here. Found some posts regarding the comparison of Powered Up (PU) and Power Functions (PF), but it was rather related to Technic. Couldn't find any similar for trains. So I am considering to buy 60198 Lego Cargo Train which is powered by Powered Up. However, I read here about PU system that it is inferior to PF system, as considering it in LEGO Technic. So how it is in the Trains department? As far as I see: PF for trains has remote IR intutitive controller with two knobs; for A channel and B channel with max. 8 trains to control (with 4 controllers). Additionally battery box and seperated IR recevier is needed. PU has bluetooth remote controller, so clunky smartphone control can be omitted? But is PU remote controller in any point inferior to older PF controller? PU battery box has embedd bt receiver so less space is needed inside the locomotive, so it seems its better (less flexible though?) Coming back to 60198 buying consideration; I saw some offers of used PF systems for trains (separated or with a locomotive), but they are quite pricey: 55 EU for control set, and 100EU with control+locomotive (from 60052 or 7939 set). So is it better to buy this new set with PU or invest into older used (but better?) PF sets? Kind regards
-
.thumb.gif.ad7c8d88b264ee812194946c07404504.gif)
Power Functions V2 receiver not in new sets?
mocbuild101 posted a topic in LEGO Technic, Mindstorms, Model Team and Scale Modeling
While looking to buy a PF V2 receiver (58123bc01) I realized that it is only in 9398 and 41999 (both 4x4 crawlers), but is not in later sets like 42030 and 42065. I have been confused by this because I thought that it was suppose to replace the old receiver (58123c01). One thing I thought was that the insides were changed but they didn't have V2 printing, but why I don't know. Hopefully someone knows what's going on! -
 Hi everyone, I've finished trying to RC my 42043 and it seems that the PF L motor has issues providing sufficient power to drive the set? I obtained instructions from the creator of this video (https://www.youtube.com/watch?v=BpP_05uxKqs&t=22s&ab_channel=PawełWojnarowski) and also checked PPUNG DADDY's 42043 RC video (https://www.youtube.com/watch?v=O8easq7ueIo&ab_channel=PPUNGDADDY(뿡대디)-LEGOTECHNICRC), both used an L motor with no problems. Here's a video of the issue: https://youtu.be/J8P13WLPzN8. As you can see in the video, the motor loses power after driving for some time, eventually being unable to drive at all. The problem is worsened when I try to drive and steer at the same time, it's almost impossible to drive and turn. I have tried swapping the tyres around, changing batteries, trying a V1 and V2 IR receiver, switching positions of the motor and servo cables, and using a new L motor. But the problem still persists. Here's a photo of the L motor: Could it be because of excess friction introduced in the rear axles during construction? Because I noticed when I lifted up the rear axles, the motor spins the wheels at its standard rpm, BUT only 1 wheel on each axle spins, the other is stationary. Then when the wheels contact the floor, the motor suddenly seems to struggle with driving the thing. Hence I was thinking could it be that I built the differential too "tightly"? Appreciate any help from the technic experts in this forum, thanks in advance!
 -

[MOC] Remote controlled 4-speed AWD gearbox
harriedegroot posted a topic in LEGO Technic, Mindstorms, Model Team and Scale Modeling
A compact sequential heavy-duty 4 speed remote controlled AWD gearbox Each gear of this remote controlled gearbox approximately doubles the speed of the previous. The output shaft contains an integrated lockable differential for AWD. See the video for a WORKING DEMO | FREE INSTRUCTIONS below. GEAR RATIOS 1st 6:1 2nd 3.3:1 3rd 1.8:1 4th 1:1 FEATURES compact remote controllable sequential gearbox 4 transmission speeds evenly distributed gear ratios differential output (AWD) differential lock single rotary catch many mounting points no half studs INSTRUCTIONS [PDF] https://bricksafe.com/files/hdegroot/remote-controlled-4-speed-awd-gearbox---with-perfect-gear-ratios/remote-controlled-4speed-awd-gearbox-with-differential-lock.pdf [3D MODEL] https://bricksafe.com/files/hdegroot/remote-controlled-4-speed-awd-gearbox---with-perfect-gear-ratios/remote-controlled-4speed-awd-gearbox-with-differential-lock.io REBRICKABLE: https://rebrickable.com/mocs/MOC-83457/hdegroot/remote-controlled-4-speed-awd-gearbox-with-perfect-gear-ratios BRICKLINK: https://www.bricklink.com/v3/studio/design.page?idModel=244834 -

New app for Lego Power Functions(BETA-Test) Android
PF Remote posted a topic in LEGO Technic, Mindstorms, Model Team and Scale Modeling
Hey guys, some time ago, I have coded an app for controlling Lego PF using the IR diode of your Android phone. It didn't really work well, but since this time I have learned a lot about programming and made a new app for you. It is a BETA version, but I hope that there will be no issues with it. Before installing this app please google whether your phone has an IR blaster, this app won't work on devices without an IR blaster (physically not possible). The channelswitch is not working right now, but I will add this feature soon. I would be happy about some feedback from you! APK: https://drive.google.com/file/d/1R9LNj8mhx34Bkn0A7t8wN3RFn3g6LDQC/view?usp=sharing (do not wonder this app doesn't have an icon yet! When you have an idea for it, let me know!) Screenshots: -

[MOD] 76139 1989 Batmobile - Motorized with all functions
recklessGlitch posted a topic in LEGO Licensed
Hey folks, another Motorization: all Functions of the 1989 Batmobile (LEGO 76139) RC controlled - yep the Batman again... Without sacrificing any of the nice details: Cockpit is still there, steering wheel works, just all motor driven and I motorized the guns and the roof and even made a tailored sbrick profile. Building instructions: Motorized LEGO 1989 Batmobile on rebrickable Driven by 2 LEGO Power Functions L-Motors (1:1 transmission) steered by a LEGO Power Functions Servo Motor guns engaged/disengaged by Motor roof opened/closed by Motor special Sbrick profile with programmig and grafics included a lot of space for up to 2 battery boxes/control hubs easily reachable under the trunk hatch (details on my rebrickable MOC page) Watch a Review of my motorized 1989 Batmobile on youtube: The Batmobile from Tim Burton's Batman 1989 with Michael Keaton is definitely one of the coolest, it's not as funky as the 1960s TV version and not as tank as the Nolan version but in my opinion it's simply a beaute! The 1989 Batmobile is using over 3,300 pieces, and over 60cm long. I added a few hundred bricks, mainly LEGO Technic and reused some others. So I ended up with over 3500 parts and (batteries included) almost 3.5 kg. That's heavy! So I needed a powerfull drive. I was thinking about the buggy motors but these are large and I wanted to put the batteries into the trunk. So i went for a pair of LEGO Power Functions L-Motors. These are some of the strongest LEGO motors and very small and efficient for their power and speed. The 1989 Batmobile is sleak and lies very deep on the road so it is geometrically impossible to move up any small hills (or even carpets). It will get stuck with its floor height of less then a brick. So it will only drive on a flat surface anyway. So it can be build for speed instead of torque power which the 1:1 transmission of the two L-Motors will do: It's a speed build, literally. One reason to put the batteries into the trunk was, to reach it easily for changing/recharging or simply switching on. Another reason was, to not put them into the beautifull cockpit with its nice self opening windshield - self opening? Yes, now it is motor driven ofcourse. And you hardly see the mechanics on the floor. Okay, the Batman minifigure included is way too small for the car but I found a Batman LEGO LED light, that fits into the car. Just be carefull when closing the cockpit to not get stuck. Slide-open is no problem. The car’s turbine exhaust by the way does not drive the machine guns anymore (it does in the original) because now a motor engages them. So I could make the jet exhaust it look like a real jet engine - the only exterior I changed. To make the two machine guns hidden, under the hood pop up, just press a button now. The Batmobile comes with nice little Bat emblems printed on the wheel rim - try not to lose them while driving, they are rare parts. The set of specially designed tyres for the front wheels is steered in a very specific geometry. I took care to keep that working the exact same way because it works very well for steering. The Build was complicated, took me weeks to get it right. I didnt want to change the exterior and as few as possible from the cockpit. You shouldnt see the opening mechanics. And I wanted to have all the features working, even the steering wheel (though steering is handled by a servo motor now) Every time I thought I got it, something else made problems, untill finally it all worked out. You can skip the trial and error (and breaking old LEGO gears) part: I made instructions and made them easily readable, so you can have it speed build in no time. I believe everyone should be able to build a LEGO set and try to make my instructions like that. Now it's hard to say, which one is the best batmobile motorization I ever made: The Lego 76139 1989 UCS Batmobile has more functions: motor driven MGs and a motor driven roof, the remote controlled motorized Lego 76023 UCS Tumbler I modded however has a full steerable front suspension for the independen wheels. my special Sbrick profile with some automated scripts is included I even made a cable layout for the power functions cables and extentions if you ended down here you may also be interested in or -
You can find a sneak preview od the 3D printed sample on our IG: https://www.instagram.com/p/CLAKIt3B0PG/ Performance is around 10% faster RPM and torque compared to the 5292 motor (cca 20% more power). The polyfuse protection will be increased from 0,9 A to around 1,35 A - still testing the balance between performance and longetivity. Improved attachment possiblities, everything fits as it should in the studless building system The final version color will be between LGB and DBG. It will come with a 30 cm long PF cable plug, so it's compatible with BuWizz 2.0 and PF. Preorder here: https://buwizz.com/shop/buwizz-motor/ More info when it becomes available.
-

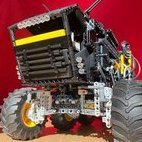
[WIP] [Mod] 42109 w/Power Functions
johnnym posted a topic in LEGO Technic, Mindstorms, Model Team and Scale Modeling
Hi there as nobody else yet presented a PF mod of the 42109 car (@ozacek?), I gave it a try yesterday afternoon/evening and did a quick & dirty PF mod. The result is a replica that's not totally identical in all details but comes very close to the original from the outside with considerable changes on the chassis. Differences: * Very obvious, the colors, but that was not important for the intended task. Initially I wanted to build it in red and black, but soon switched to orange and black and later just ignored the colors to save time when searching the needed parts - I have two many models built ATM and hence am low on some essential parts in the initially desired colors. The upcoming digital model(s) will use (a) more pleasing color combination(s). * The beam connecting both sides of the cockpit was moved 1 stud forward and was constructed differently to hold the PF AA battery box in place * As I couldn't find a position for the PF Servo motor that is low enough that the hood can be closed as much as in the original 42109, I used a 1 x 9 bent liftarm to fix the hood at an elevated position, imitating the look of a huge hood scoop. This way the hood is kept shut very tightly btw. * I used curved 11 x 3 panels with 2 pin holes for the side skirts, as I find them visually more pleasing then what was used in the original 42109. * The chassis is somewhat different: Instead of 11 x 7 frames I used 7 x 5 frames as I don't have 11 x 7 frames yet; 8L axles with stop for each rear wheel - so the axles can't be pulled out, but the wheels can still get loose, though I haven't seen this yet during driving and some other minor differences. The car doesn't use a differential but drives each rear wheel with a single PF L motor. Power Functions parts used: * 2 x PF L motor * 1 x PF Servo motor * 1 x PF IR V2 receiver - optional (not needed with BuWizz) * 1 x PF IR remote control - optional (not needed with BuWizz) * 1 x PF AA battery box - optional (not needed with BuWizz) [* 1 x PF control switch - actually not really needed, if the drive lines are set up in a way that both PF L motors can run in the same direction (not needed with BuWizz)] I.e. the PF equipment that came with the 9398 - not that I have one. Enough talking/writing, here are three shots, digital model(s) will come later: Using a BuWizz instead of the PF remote control equipment saves a lot of space and weight and will make this car faster. So far I haven't used it with fresh AA batteries but only with used AA batteries and a BuWizz and even in normal mode the car seems to be quicker, not to speak of fast and ludicrous modes, where the wheels start slipping on carpet and laminate floor when going backwards at full speed in fast mode or both ways at full speed in ludicrous mode. -

BuWizz Small car competition
Zerobricks posted a topic in LEGO Technic, Mindstorms, Model Team and Scale Modeling
RULES Build a body on the top of the predefined chassis. Instructions can be found here: http://bit.ly/Competition_instuctions You may extend or retract the cassis by 2 studs and change the type of wheels. Any other changes to the chassis are not allowed. You are only allowed to use unmodified Lego bricks and a BuWizz, no gluing or such allowed. You may use third party rubber bands or strings. Each participant is judged in for the following: 1. Aesthetics – the model with the best-looking body 2. Most epic stunts performed – a jump, drift, crash, chase, etc… Try your best to set up and record the most epic video of your creation. Contest voting will be held at here Eurobricks forums, each user can assign points to 6 competitors using the following formula: Contestant 1 : 10 points Contestant 2 : 6 points Contestant 3 : 4 points Contestant 4 : 3 points Contestant 5 : 2 points Contestant 6 : 1 points Competition start: 10.09.2018 Competition END: 20.10.2018 31.10.2018, 23:59 CET PRIZES: 1 st prize: 3 x BuWiz 2 nd prize: 2 x BuWiz 3 rd prize: 1 x BuWiz -

[MOC] FREIGHTLINER FLA 9664 [2020]
Michael217 posted a topic in LEGO Technic, Mindstorms, Model Team and Scale Modeling
Welcome to my garage LEGO!!! Hello! My name is Michael. I'm a Builder from Russia, I love muscle cars! But today I present you this epic American truck!!! Length 58cm, Width 23.5 cm, Height 34cm , Weight 4kg Description: -2 XL motor for drive -L motor for steering and steering wheel -1M Motor for cab lift -2 Small power supply -Detailed interior -Led headlights -Doors and hatches open -Semi-automatic coupling Instagram: https://www.instagram.com/lego_muscle_garage/ Join my group in VK: https://vk.com/legomusclegarage All photos on the link: https://bricksafe.com/pages/Michael217/freightliner-fla-9664 Enjoy your viewing! Rate, comment! Thanks!) -
[MOC] HONDA ACTY 1983 Dragster [2020]
Michael217 posted a topic in LEGO Technic, Mindstorms, Model Team and Scale Modeling
HONDA ACTY 1983 Dragster The inspiration for creating such an unusual hybrid was the car of a blogger from YouTube) Description: -1 Buggy motor -Servo motor for steering and steering wheel -Small power supply -Detailed interior All the photos on the link: https://bricksafe.com/pages/Michael217/honda-acty-1983 Instagram: https://www.instagram.com/lego_muscle_garage/ Join my group in VK: https://vk.com/legomusclegarage -
App for controlling Lego Power Functions 1.0 New Version BETA
PF Remote posted a topic in General LEGO Discussion
Hi,I thought about making an App for controlling Lego Power Functions 1.0(not PU). And now I am done with programming this app, without any programming knowledge. In the next updates I am going to make a PU remote too, so you can combine different Lego Sets and I want to make a Mini Jack IR Blaster Support for smartphones, that hadn t an IR blaster built in. Right now the App is only for devices with built in IR blaster. I know there was an App before for controlling Lego Power Functions, but this app had some features that weren t pretty good. This is also one of the reasons why I made this kind of App. Please open the Play Store Link on your smartphone.Link for the App: -

[MOC] "Snowball" rc car
syclone posted a topic in LEGO Technic, Mindstorms, Model Team and Scale Modeling
Small rc car based off a design I came up in LDD 2 years ago (link, now with (in my eyes) slightly improved looks. Not a top-speed record breaker, a powerful tug-of-war winner vs a car, but a fun little thing to drive around. Originally everything came together off the fact that I wanted to drive the space wheels with a motor, everything else just came around. 2x m-motors w/ 1:2.084 final gear ratio and uses tank steering. To archieve small size a PF receiver with a Ni-MH 8'4V 20R8H format battery (the typical square 9v ones), which is quite underpowered (the cell might be dead too as it has been just lying around for a year or so). Probably can be BuWizz-ed with some drivetrain and body mods. I guess could also use one of those train controller blocks from PU/C+ (?) line if you've only got that system. lxf-file: download Video and a few pictures (same as from video slideshow) below. Mandatory belly shot: Cya! -

Custom RC Semi-Tractor truck
CrazyKreations posted a topic in LEGO Technic, Mindstorms, Model Team and Scale Modeling
Hello Eurobricker's I just wanted to show you one of my latest builds. Its an RC semi truck that has the ROOF based on a Scania Crew-cab! Love it or hate it here it is. Features Differential in the rear. Opening doors Spacious Cabin Detailed Interior Full RC L Motor and an M motor Working 5th wheel Easily removable battery box. Love it or hate it there it is. Please give me some feedback, I haven't made instructions yet as I don't know if anyone will be interested in building it! -

PF lights two studs wide
Rebel_Lego posted a topic in LEGO Technic, Mindstorms, Model Team and Scale Modeling
Hello everyone, I have purchased a lego power functions led light on Bricklink, to light up my 42043 MB Arocs. On real life trucks you often see that the rear lights are ‘double’. I modified the rear bumper of the Arocs to create this ‘double’ lights. But, the Lego LED light has only one light bulb for every side, so it will not shine trough two holes of a technic liftarm. Anyone any ideas how to achieve this? -

MiniZip - Compact and Cheap Power for your Lego Creations!
1nxtmonster posted a topic in LEGO Technic, Mindstorms, Model Team and Scale Modeling
Hi guys! I'm thrilled to release MiniZip; the adapter that lets you power your lego creations from a 9 volt battery! I am releasing it on Kickstarter to cover the production costs, and I need your help to do so! You can see the full project here: https://www.kickstar...-lego-creations Here's a video about it: Thank you for your support! -

Can I finally program power functions?
AI toothbrush posted a topic in LEGO Technic, Mindstorms, Model Team and Scale Modeling
So I bought an rcx 2.0 and have some power functions extension cables that can also convert between PF and 9v. If I would connect PF to an rcx would it work? -
motorized, Lego 76023 Tumbler, Remote Controlled Batmobile with power functions
recklessGlitch posted a topic in LEGO Licensed
Hi folks, I made a motorization for the good old big Batman Tumbler, if youre interested, seems to be the only one out there, the instructions and details are here. full front suspension with moving swing arms (those big things in the front that hold the wheels, like in the movies) Power Functions servo motor steering system, nicely hidden so you won't see it through the windows or in the front what's more powerful than an L-engine and faster than a XL-engine? Right, two L-engines! This motorisation retrofit is fun! Differential for the back axle, with those big wheels you will need it all gears run stable, no cracking suspension for the back axis using springs of the same size as those pseudo springs from the original set a retractable roof (no separate roof parts like in the original) a few other small modifications to make it look a bit closer to the original and make it more sturdy not to lose parts while working very stable frame -

Battery box over-current protection bypass
finhudson posted a topic in LEGO Technic, Mindstorms, Model Team and Scale Modeling
Performing this modification will allow you to draw more current from your battery box. I tested the maximum current before the modification at 0.3A and the maximum current after at 6A. I have often found the over current protection built into the power functions battery boxes to be set a bit too low, for example, it is very limiting when using RC buggy motors. I opened up a battery box to see how easy the over-current protection would be to bypass, and it turned out to be very easy. My method is shown below: (Warning: performing the following modification will void the warranty of your battery box. Do not draw high currents for long periods of time because it may lead to overheating.) (I will not be responsible if you try it and break something) 1) Open up the battery box to gain access to the circuit board Remove the screws, then use a screwdriver to begin to pry out the battery holder, once it is about 5mm out, push in the plug on the top, and then fully remove the battery holder. 2) Prepare the electronics tools for bypassing the over current protection You will need: A soldering iron, solder, wire cutters, wire strippers and tweezers. A helping hands tool is optional but it helps. 3)Bypass the over-current protection This step is much simpler than it sounds, all you need to do is solder a wire over the polyfuse on the circuit board. First you need to locate the polyfuse, as shown in the image below The polyfuse rapidly increases in resistance when a high current passes through it. This is how the over-current protection works: when a high current passes through the polyfuse, the increase in resistance causes the current to drop back down again. To bypass the polyfuse, all you need to do is solder a wire across it. First you need to tin the wire so it can be soldered more easily. With some solder on the tip of your iron, heat up the wire from the back. Apply solder to the wire from the front and you will see the stands of wire absorb some of the solder. Now tin the other end of the wire and move onto the next step. Now all you need to do is solder the wire over the polyfuse. Use tweezers to hold the tinned end of the wire on one side of the polyfuse, then heat it up with the soldering iron to reflow the solder joint. Repeat this with the other end of the wire to achieve a result like in the picture below: 4) Reassemble the battery box and you are done! Notes: Do not embark on this project if you do not trust your soldering skills, soldering irons get very hot and could easily burn you. If the switch does not move after the battery box is reassembled, open it up again, remove the piece of wire, and replace it with a thinner one so that is does not jam against the switch. -
[MOC] All-Terrain Winter Expedition Vehicle
teetertater posted a topic in LEGO Technic, Mindstorms, Model Team and Scale Modeling
Hello EB! I'd like to humbly show this remote control (PF) winter expedition vehicle (MOC). Featuring 4 independently driven tracks with a unique steering system. More explanation below and in my YouTube video. It has many issues that I'm not willing to spend more time to fix, but I've learned a lot from the process, which will help improve my future MOCs. If I was to start from scratch here's what I would change: Put motors closer to driven axles Split drivelines into either front/back or single motor per tread less complicated steering system Use a different type of suspension instead of pendular raise the height of the driven sprocket instead of extending driveline with gears reduce weight with panels vs lifttarms (I didn't have any at the time of building) Never use an Adder again, or if I really have to then use the old-style 24t differentials Work more on the cabin/exterior design A sizeable portion of the issues stemmed from the weight, which is something I didn't expect! I ordered some parts to allow me to finish the frame, and added design elements in the meantime. The design elements were pretty much the difference between being-able-to-carry-its-own-weight and not. The MOC is already disassembled, but I'll be happy to hear feedback and suggestions! -
Hi All, I'm new to this forum, and new to the Lego RC train world. I have just started collecting this range with my son (who's 5) so this is mostly about me.... :) In all seriousness, he is over the moon with these trains and the sets in general and we have 3 already (60051, 60197 and 60198). I'm looking for some expert guidance as to the best and most cost effective way to be able to remotely control/motorise the switch tracks (points). Having done some research online, I see there are many ways, although i haven't found a definitive step by step guide yet. It would be good to get some valuable feedback and guidance from someone who has been through this process if possible (i.e method and functionality vs cost and practicality). Appreciate the time spent reading my post and any feedback received. James.
-
My latest creation, Galaxy Cliff Lighthouse, reflects a desire to create an autobiographical MOC to share joy and pain non-verbally. It was inspired aesthetically by Split Rock Lighthouse on Lake Superior, thematically by Voyage of Life (1842) by Thomas Cole, and structurally by Obelisk Overpass, Boulder Dam, plus an early draft of River Wheel (featuring pirate ship gondolas rather than lumber). In fact, the 96 x 96-stud plot vacated by the dismantled River Wheel fed my drive to combine structures absent from my Lego city—a bridge, dam, and Ferris wheel. As you may imagine from the photos, a hilltop lighthouse teeters over an ocean, beneath a collection of galaxies spiraling through the nighttime sky, while a shooting star passes overhead. The light and dark figurative sailboats represent positive and negative memories, while the logarithmic spiral of galaxies in the sky is reflected in the earth below by the failed attempt of humankind to overcome the nature of life itself. Stats 26400 pieces 75 lbs (34 kg) Footprint: 96 or 128 square studs Volume: 156 x 156 x 176 studs Timeline Phase 1 Idea conceived: January 2020 Digital design: 8 weeks total Wheel: 2 weeks Lighthouse: 2 weeks Bridge: 2 days Cliff: 4 weeks Shipping: 13 weeks Building: 2 weeks Phase 2 Digital design revision: 1 week Shipping: 4* weeks Building: ongoing *Multiple international part orders in October never did arrive and had to be repurchased domestically. For more, follow me on flickr, instagram, or ideas.
-
.thumb.jpeg.bf849dde081326724141a48f3f7b3ad2.jpeg)
Help Me Save Power Functions!
thic_trains posted a topic in LEGO Technic, Mindstorms, Model Team and Scale Modeling
Hello. I have some sad news. Lego is retiring the power functions system. I need your guyses help to sign my petition by January 1st! we need 100 signatures. here is the link for the petition! here is the petition.