Search the Community
Showing results for tags 'Power functions'.
Found 368 results
-

[MOC] Compact Convertible
Hedgie posted a topic in LEGO Technic, Mindstorms, Model Team and Scale Modeling
Here is my latest MOC: I tried to cram as many features as possible into a car that's still only 17 studs wide (20 if you count the mirrors). They are: full independent suspension steering (including rotating steering wheel) driving (including fake engine) 2-speed windshield wipers convertible top easily removable batterybox The drivetrain lacks a differential, 2 L-motors are used for drive instead. The servo motor does the steering and 2 M-motors operate the windshield wipers and the roof. I plan to create building instructions in the future as I did for my other MOCs. For now, there is only this video. EDIT: The building instructions are now available from http://rebrickable.c...act-convertible EDIT 2: This MOC is now on Lego Ideas. Please visit the project page and support it! -

Batteryless Power Functions
Captainowie posted a topic in LEGO Technic, Mindstorms, Model Team and Scale Modeling
Hello all. I have seen plenty of places on the Internet where people have hotwired their LEGO battery boxes and hooked them up to a laboratory power supply. I have also seen plenty of places where people have converted an old PC power supply into a cheap laboratory power supply. However, I've not seen anywhere on the Internet where people have done both. So I did it myself. Details here http://www.lugnet.com/~2801/PowerSupply Questions, comments, queries or concerns? -
Hello all I was just wondering if I could connect an RC unit with 2 RC motors using 2 power functions extension wires?
-
Power Functions Servo Motor malfunctioning
Hedgie posted a topic in LEGO Technic, Mindstorms, Model Team and Scale Modeling
I believe I have a faulty Power Functions Servo Motor. Sometimes it just doesn't work, regerdless which batterybox or IR receiver I connect it to. When I wiggle the cable a little, especially near the connection to the motor, it starts to work again. I think there's a bad connection between the cable and the motor or (invisible) damage inside the cable. What should I do? Do I have a guarantee? I have hardly ever used the motor. Should I contact Lego by letter/email/phonecall? Or should I go back to the store? I don't have the receipt of my 9398 anymore. Thanks for any suggestions. -
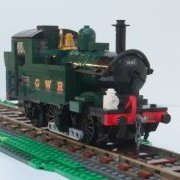
Hi, over the weekend, I started work on building my new Lego LNER 4472 Flying Scotsman Steam Locomotive, as the final order from Bricklink arrived on Saturday, it took me a couple of hours to build the model, I had already built the chassis couple of weeks before The Lego LNER 4472 Flying Scotsman model is 19.5 inches long, 2.5 inches wide, just under 4 inches high, the front and rear lights on the Lego LNER 4472 Flying Scotsman work, two bricks behind the rear lights had to be modified to allow the power function lights to be used, the large train wheels are XL Big Ben Wheels The model just needs some extra details like pipes, lining, and lettering to be added, the wheels have to be dye green and other details to finish the model. I have taken new photos of my Lego LNER 4472 Flying Scotsman Steam Locomotive, including some other parts Couple of images showing closeup of the wheel hubs A Image of couple of modified Lego 1x2 Panels with Lego white headlights bricks A image showing the power function lights fitting into the modified Lego 1x2 Panels with Lego white headlights bricks a couple of images of the Power Functions Battery (AAA type) in the tender, show the wires packed around the battery box, Couple of Images showing the wire connections between the locomotive and tender A couple of Images showing the tender including the Lego Coal Pile (Lego 1x1 Black Plates) A couple of images showing the rear and front lights working, the second image is darker as the front lights don't show up well in bright light when on A image of the Flying Scotsman Tender with its wheel arrangement
-
Hey folks! Well, some years ago I designed a model of an LMS (London Midland and Scottish Railway) Ivatt Class 2MT 2-6-2T engine designed in LDD. So one week ago I changed the livery to the one that was really used and reduced bricks (it just has about 580 for that detailed model). Furthermore I tried to incorporate Power Functions. There is enough room for them, the PF Small motor will definitely fit, but I'll try it with the PF Large motor first. Here is the design from LDD: Here is a pic where you see the PF components: I have built some of the model in real bricks, I just don't have all the parts yet( at least in the right color), though I nearly finished one side: The trailing wheels all clear nicely in curves. I also designed a model of the BR 9F 'Evening Star' which could be operated with Power Functions or 9v in the tender, maybe I will try my hands on that one sometime: I hope you enjoyed it, I will update the thread when it's more finished.
-

[HELP] RC Car with Two Motors
Commander Smith posted a topic in LEGO Technic, Mindstorms, Model Team and Scale Modeling
Hi! I know that these "I don't know what to build" topics are kind of annoying, but I have no idea how to build an r/c car with functional steering. I want to have it be 2wd. Thanks! -
Power Functions Motor Question
Commander Smith posted a topic in LEGO Technic, Mindstorms, Model Team and Scale Modeling
An order from Lego came in today, and I equipped my 42006 with 8293 and put two L-motors controlling the treads. Remote Control will come later. My question is: If you turn a PF motor manually, will that damage it? -
Fast RC crawler - 4XL motor
Tamas Juhasz posted a topic in LEGO Technic, Mindstorms, Model Team and Scale Modeling
Hi! I made a few crawlers until now, and I wanted to create something new, with more fun. So I decided to add a lot of power in a lightweight chassis to be the crawler fast, but also capable. My goal was to make the most simple and effective Lego rock crawler: http://www.brickshel...ry.cgi?f=538615 I used a flexible frame as suspension, this helps to keep it lighter, there is no need for a lot of parts to create a 4 link or other suspension. As you can see below in the video, this "suspension" also works well on terrain. Has LiPo battery, and V2 IR receiver. There are two receivers, two XL motor is connected to each, there are 4 XL motors in total. After the motor's output, a 24:12 gearing (deceleration) is built in, so the wheel spins about 85 rpm, which allows to reach 1,7 km/h. The wheelbase-width ratio is similar to real RC crawlers. I tried to add a big ground clearance, there was no problem with it. It's an advantage of this flexible chassis, there is nothing under the middle of the vehicle. The wheels are RC4WD 1,9" Rock Crusher XT's, their weight helps a lot of the stabilization of the vehicle. The XL motors are placed low, they also help to have a better center of gravity. I added a simple body, with more crawler-like look, than in my previous crawlers. Steering: One M motor steers the two XL motors in the front axle. These motors are connected to mini turntables to be more stable and robust. The steering ratio is 5:1. http://www.brickshel...16_1280x960.jpg I used strong pins from 8842 to make stronger connections in the axles. All the motors and the main parts are connected together with these: Weight: 1105 g. I don't know yet the number of pieces, but it can be about 200. A 720p video: Most interesting parts: 01:11 ; 01:37 ; 03:16 What do you think? -
The very first Train MOC I did was a very small 0-4-0 Pannier Tank engine with Power Functions. It's ok, but fitting PF into it kinda threw the proportions off a bit, so I wanted to do a proper one which looked a bit more realistic in shape. So I set to work on one which was, and built it from the various different colour pieces I had, before placing an order for the parts in needed in specific colours. However, I couldn't decide on which colour scheme to have it in, whether to have the top half of it in Black or Dark Red. Eventually, I decided to do two of them, one in each colour. After placing nine Bricklink orders and an order with Big Ben Bricks in America for his Medium Driver wheels, I received all the orders this week, and built them both over the past couple of evenings. The Dark Red one has PF integrated into it, while the Black one can fit PF but doesn't yet have it, instead having brick-built 'placeholders' for the PF gubbins. I'm also waiting on a custom order from America for 13-long connecting rods, which should finish them off nicely. If anyone on here is in the UK, they will be on display (along with my other train MOCs) at the Bradford Brick Show on 8th/9th Feb, and at the Yorkshire Brick Show on 22nd/23rd Feb. So without further ado, to the pictures. Can you spot the differences?
-
Ketchup & Mayonnaise Factory Hi, Lego funs -- I built this Factory (machine) for my grandchildren Filip & Laura to have more fun in preparing their small Christmas ham and cheese sandwiches with spread of ketchup or mayonnaise, as they like. As you can guess, there is a lot of fun, although they eat (and play) 60 minutes longer (but eat more). A short video will be posted in a day Mladen. And two action shoots: - http://bricksafe.com...orkan/K&M56.jpg - http://bricksafe.com...orkan/K&M57.jpg
-

Boxer's PF Electric System Upgrades
Boxerlego posted a topic in LEGO Technic, Mindstorms, Model Team and Scale Modeling
Hi, I'm going to be posting all my current electrical modifications for the PF system here and present everything like a guide manual and provide schematic, data sheets, and a parts list. I've been doing a lot of research on electronics lately and been making great progress on it all and decide to start posting what is going on here along with my successes and failures at developing this. I've been contemplatingseveral ideas as how to build this and will be going to demonstrate how to do several things such as convert the IR communication link to 433MHz RF and transmit a possible total of 4 channels out of one antenna and much more. This topic is not only about building off the existing Lego PF electric system, It will contain a basic understanding about the electrical components and look at all the different ideas that can be implemented as to how everything all works together from everything between the batteries to the motors to the controls. One of my main goals here is to up the scale at which models can be built and powered effectively by one or two motors. One of my longest going disputes is determining a proper battery pack to power my motors. From the very beginning my original idea was to have a 18v battery pack powering a 18v motor. However, awhile back I showed how to upgrade the XL motor with a motor that functions on voltages ranging from 8v up to 16v, so now I'm deciding between either using 12v or 15v battery pack to power the motor. Choosing a battery can be expensive and understanding the battery's voltage range is very critical for the circuit to work properly. There is a bunch of choices here as to what the battery powering the motors should be. I've been thinking on either using a Li-po battery or Li-ion or just continuing on using AA batteries. The next part of the circuit that is between the motor and the battery is the H bridge motor driver. This is the most critical aspect of the circuit as towards allowing the battery current to the motor and that current is dependent on several factors such as input voltage and temperature. There are several types of transistor out there and it is recommended to have a proper transistor in respect to the device you want to power. By looking at the data sheet it shows that the motor at maximum efficiency current 0.71a and the stall current 5.56a at 12v so here it can be establish that the transistor should be able to handle 10a if two of these motors were to stall simultaneously. The transistor I am using here are know as MOSFETs and the part number on the transistor is IRF540 and the the other one is IRF9540. That is my first H bridge I put together and there is definitely a range of improvements that can be done here. Now in order to power the H bridge to dive the motor is done by the 9v IR receiver motor connection. There are several ways I've gone about powering the 9v PF receiver from a higher voltage source such as 15v. In the picture below I use a voltage divider which is able to drop the voltage down to a usable voltage supply for the 9v receiver and the amount of current is drastically reduced to the 9v receiver, you will not be able to drive a micro motor with it but you will be able to power the H bridge, One of the main advantage here is using the high 9 volt supply out of the 9v receiver because the transistor is primarily a voltage driven device and that means more current for the motor. The main part of the upgrade is converting the IR signal to a RF signal. The remote control part of the modification is very easy and does not require much to do, I am almost done with this part. In the pictures below shows the only modification I made so far for the antenna. The benefits here is have a strong base for the antenna to collapse on. It was tricky process to get the antenna screw in that 3mm hole I made, I had to take out the battery metal connection tab on the controller and pass the screw through the battery holder opening in order to insert the screw in there. Now for the main part in converting the IR signal to a RF signal on the receiver end. While the RF transmitter can handle voltages up to 12v the RF receiver must require a smooth constant voltage around at 3v which can be tricky to do if your using a total supply voltage around 15v, 12v, or even 9v. Instead of using a voltage divider to drop the voltage down to 3v for the RF receiver, I'm going to use a voltage regulator and the reason behind this is the battery voltage will drop when the motors begin to rotate and that will cause a drop in battery supply voltage and the voltage divider will fluctuate in response of this. A voltage regulator will hold a steady supply voltage to the receiver so no matter what the demand voltage is on the battery you wont lose connection with the RF receiver. However, one of the big disadvantages about the voltage regulators is that it converts a lot that energy to heat especially when it is working off a large voltage supply like a 15v battery. So the next option is to isolate the RF receiver voltage supply from the motors voltage supply and there are numerous benefits behind this, the most notable on the list is no modification has to be done to the Lego IR receiver so any version of the IR receive will work with this RF receiver unit. To accomplish this I will work off the infrared communication and connect with the PF IR receiver by a IR emitter that is apart of the RF receiver unit and separate the RF receiver voltage supply that way. Another advantage behind this is more current for the motor. Also the circuit could be replaced with a fiber-optic communication link for the same results. By using the IR link to transmit data signal from the RF receiver to the IR receiver you could theoretically control multiple IR receiver units with just one infrared signal. Now the RF receiver will be able to output 4 data signals and each data signal can be assigned each there own channel. Not only will the RF transmitter and receiver will be able to communicate a potential of 4 data signals out one antenna, it will also have the ability to code the RF signal 256 ways. I will post more when I finish testing everything. -
Lego technic electric function switch - max. 24 motors to control
Tamas Juhasz posted a topic in LEGO Technic, Mindstorms, Model Team and Scale Modeling
Hello! I had an idea nowadays how to control a lot of PF motors without very complex and space requiring mechanical switch: http://www.brickshel...ry.cgi?f=537994 The conception is simple: I used only electric components to switch between the motors. There is two receiver blocks, each contains 3 receivers. The fourth receiver has the swicthing motor, and the 13th motor can be connected to the other output. So the system in the pictures can be control easily 12 + 1 motors. One advantage is that the switching itself is very fast. If you connect two switching motors to the 4th receiver, you can use 24 motors. Indicator LEDs are recommended, so you always can see, which block (=which functions) are switched on. The blocks can be switched on individually, because the controller motor(s) pushes the battery box's on/off button. To control 13 motors, you need 7 receivers, 3 battery boxes, and 1 M motors. To control 24 motors, you need 13 receivers, 5 battery boxes and 2 M motors. I don't think the amount of PF parts is a problem. If somebody makes a huge moc with so many motors and functions, then 7 or 13 receivers and 3-5 battery boxes aren't so much in money and requiring space. A lot of builders are still have these. More pictures: Video: Hope you like it. Edit1: I forget to say, you can't switch off the receivers through PF switches. At the beginning, I thought at switches and one BB, but it's simply doesn't works. Each block needs a battery box, the receivers can only switched off with them. -
Hey Guys, Currently purchasing parts for my first project (more on that later), but starting plan the next one. I am looking to build a narrow gauge steam locomotive and railway with the Indiana Jones track. I am looking at a classic 4-6-0 ten-wheeler, similar to the Lone Ranger Constitution but scaled more to narrow gauge. Ala Walter E. Disney: or more like Tweetsie No. 12: To scale to narrow gauge on the 3-wide IJ track I wanted to use 50254 for the leading truck wheels and three sets of 55423 for the drivers. My issue is gearing the drivers while still making it look like a steamer on the outside. I am aware of Space2310's bogie, but was trying to keep the outside a little less clunky and just having a driver rod with something like 32065 or custom Zephyr rods. So I am asking for your help to design a 3 axle narrow gauge PF bogie, hopefully internally framed. The center axle probably has to be floating to contend with the 3-wide sharp curved IJ track... Any bogie gurus out there?!
-

Lego TECHNIC Trial Truck
NXT45 posted a topic in LEGO Technic, Mindstorms, Model Team and Scale Modeling
Hi guys! I am new here so I wanted to show you my trial truck! http://nxt45.files.wordpress.com/2013/11/img_0705.jpg Full description & YouTube video on my blog: http://nxt45.wordpre...go-trial-truck/ (how do you post YouTube videos?) As always Happy building! NXT45 -

42005 Monster Truck - Motorized and RC
Splat posted a topic in LEGO Technic, Mindstorms, Model Team and Scale Modeling
I would like to present my motorized and remote controlled (IR) version of this year's Monster Truck set (42005). My first goal was to keep the overall look and dimensions the same as the official model: The wheels, chassis and body are in the same positions, Only the axles, inner workings, and battery box have changed. My second goal was to somehow get the vehicle to have both steering and 4WD: As you can see above, I achieved the steering by making the entire front and rear axles turn via the use of gear racks and 6L links, while the drive goes through the ball joints, differentials, and portal hubs. Steering is handled by a PF Servo Motor, while drive is handled by a PF L motor. It is powered by a PF Rechargeable Battery, and a PF IR Receiver V2. My third goal was to increase the vehicles clearance as much as possible: And my last goal was to maintain a good amount of articulation: I had to modify the suspension attachment to allow an extra degree of movement to allow the suspension to operate smoothly. It runs quite well over small obstacles, however it is very top-heavy, so it does roll over quite easily. This isn't helped by the fact that as it turns, it leans outwards (opposite to how a skateboard works). Here are the parts (guts) that I had to remove from the original model: All pictures can be clicked on for larger versions at Brickshelf (once moderated). Here are some more pics: And last but not least, here is a link to the LDraw file: 42005_motorized_monster_truck.mpd Overall I am pleased that I was able to get this motorized given that there was only a small space to work with, and the model is very sturdy. I hope you like my motorized and RC 42005 Monster Truck. Any and all feedback/constructive criticism welcome. Edit: I have submitted this MOC to Rebrickable. Edit: I have created a quick video: Sorry about the audio quality - it was a very windy day! -
I've spent the evening building a Pannier Tank Engine. it doesn't run, as I haven't put an IR receiver or battery box inside it yet (I'd have to take them out of my Constitution train), but there are 'dummy' ones in there which I built out of bricks so I had something to work around. It's sat on top of the PF train motor (I removed my Constitution tender from the motor temporarily) to see if it would sit on it well, which I think it does. In the second photo you can see how it's meant to sit on it, and how most of the body is basically built onto the (dummy) battery box. There should be enough space for all the wires... What do people think? Can you see any potential issues or problems? Looking at it now, I'll probably lower the roof by one plate, and I might replace the windows with something else. I'll probably do other stuff to it as well, but for an evening's work, I'm quite pleased.
-

EV3 IR Beacon (remote) and PF IR Remote
le60head posted a topic in LEGO Technic, Mindstorms, Model Team and Scale Modeling
Hello! Recently i discovered that both the Mindstorms EV3 beacon and the PF IR Remote are interchangeable. Here are some explanations: I was very happy to know that the EV3 Retail Kit comes with a Infrared remote(beacon), which can be used as a remote control for your robots. That's pretty handy if you want to build robots that interact with humans. By accident, i found out that the IR Beacon and PF remote are interchangeable for use with both the MS EV3 and PF systems! I tried it, and they both work with the Mindstorms EV3 IR Sensor and the Power Functions IR Receiver! Seems that the IR signals they produce are the same ( escept for the beacon mode button on the Mindstorms remote). The conclusion is that they can both be used to control EV3 and Power Functions models. Some time ago i read that the RCX can be used to SEND IR signals to the PF IR Receiver. That probably takes more knowledge than i currently have. This lead me to the following question: Can the Mindstorms EV3 Sensor can do the same? Is it able to send IR messages to other devices? For example, is it possible for an EV3 robot, using the Infrared Sensor, to send signals to a Power Functions IR Receiver? In this way you can expand the motor limit (4) with an external battery pack and an IR Receiver. I hope someone has information on that matter! (Solved! the EV3 IR sensor cannot be used to send IR signals to PF receivers and such ...) Thank you in advance! -
I have a few older 12v motors which I'm thinking of running via a custom PF cable. In principle this is not a problem - assuming PWM at 9v then it means the 12v motor will never reach it's maximum RPM. However I'm wondering what would be the effect of supplying the IR receiver with a higher voltage (say 11v lipo). 1. Does the IR receiver still limit the maximum PWM output to 9v? 2. Is the IR receiver likely to blow or have a shorter lifetime at these slightly higher voltages? Note all my IR receivers are the v1 type - I know that v2 would allow more power to be drawn from the batteries - and hence might handle 12v motors better. But since I don't expect to power two 12v motors from one battery pack I'm not too worried Thanks for any hints or tips
-

Worth the cost to get into 9V now, with a huge investment in PF?
Locutis posted a topic in LEGO Train Tech
I have a substantial (in my view) investment into Power Functions trains and track. I currently have about 12 modern PF trains, and about 100 feet of plastic PF track. I have many remotes, motors, etc. Our group, MBLug, just finished our second display show (my first), and I was very "envious" of many of the electric trains. In addition, I had to borrow track to go through my section as I do not own any 9v track. My section was 16' long, with 2 rail runs through it. My question is simple: Is it worth it to now go back and buy some 9v trains, track, and accessories even though I have this significant PF investment? I'm a purest to a point (I will bricklink build something that is difficult/impossible to get), and would consider getting pieces to build a Santa Fe or BNSF or Metroliner without making them 9V, or buying them and converting to PF. Should I convert my PF trains to 9v, and pickup some older 9v trains and track, or should I buy older 9v trains (without the track/etc.) and convert them to PF? The only problem is, by staying "modern", I'm kept out of the displays. My trains are all battery-operated, and the LUG show co-ordinators insist on 9v only, which means none of my fantastic trains can be put on display at a show here unless I convert to 9V (which I currently have no means to do). What's your opinion? How have you or your LUG handled the (no longer recent) transition from 9v to PF? Locutis -

[MOC] Huge NXT Ball Machine
Purple Geek posted a topic in LEGO Technic, Mindstorms, Model Team and Scale Modeling
This LEGO ball machine was constructed using 10 motors and thousands of bricks. Its 14 balls move continually through the machine, taking approximately two minutes to complete a lap. Two Mindstorms NXT bricks control the green lift, blue lift and ball counter. A combination of Power Functions and traditional 9V motors drive the remaining lifts. The machine is built entirely from LEGO -- even the balls are LEGO parts. Width: 63.5 inches Depth: 24 inches Height: 30 inches A video showing the machine in action is available on YouTube: Let me know what you think! Ben -

[HELP] Power Functions BT Receiver
codefox421 posted a topic in LEGO Technic, Mindstorms, Model Team and Scale Modeling
I've put together an open source solution for controlling Power Functions using Bluetooth. Back when I started this, I had heard of the upcore, but it promised to be expensive and do a lot more than necessary. (Now that project doesn't even seem to exist anymore.) I've designed more of a 1:1 replacement for the standard PF IR receiver. Go here to find all the delicious source files: https://github.com/Btbricks Reading the readme can help in getting started: https://github.com/BTbricks/brickster-bluetooth-receiver/blob/master/README.md Here is a video of a very early prototype: I've built an Android app that looks just like the Power Functions remotes: I'd love to hear your thoughts about different app designs that could be useful. The cost per device is about $26. Everything squeezes into the inside of a theoretical 3x4 brick. I'm working on designing an enclosure (read: flashy plastic box), so please tell me what you would be looking for in terms of how it integrates with other LEGO bricks. Thanks! P.S. I'm trying to keep things licensed under an MIT license as much as possible. It is the most open of open source licenses! P.P.S. This topic is maybe inadequately named now. -
RC Liebherr LTM 1090 mobile crane (62 mm wheels)
Tamas Juhasz posted a topic in LEGO Technic, Mindstorms, Model Team and Scale Modeling
Hello! I'm finished with uploading and lot of work, you can see one of my biggest and most complex moc. I always loved mobile cranes, so I decided to make a Liebherr LTM 1090 with medium sized (62,4 mm) wheels: folder with bigger pictures: http://www.brickshel...ry.cgi?f=533546 big montage: http://www.brickshel...90-62mm/002.jpg boom: http://www.brickshel...ry.cgi?f=533548 details: http://www.brickshel...ry.cgi?f=533547 About the mobile crane: Every function is remote controlled: - driving (1 XL motor) - steering (1 M motor) - outriggers outcoming and legs moving (1 pneumatic circuit with rubber band "control", 1 M motor for pneu switch) - upper structure rotating - boom raising - boom extension - winch (hook) - compressor for making pressure - front lights (together with driving (and steering with "turn signals") ) After outriggers, these functions are working also with one M motor, or directly from the receiver's output. Dimensions: Length: 610 mm Width: 135 mm Height: 211 mm Scale: 1:20,5 Dimensions with raised and extended boom: Length: 1235 mm Height: 1260 mm Other dates: Number of pieces: 3433 Weight: 3460 g Building time: 23 days Speed: first gear: 0,14 km/h second gear: 0,23 km/h third gear: 0,38 km/h fourth gear: 0,55 km/h Maximum boom extension: DETAILS: Flashing light in the back (made with two light brick, but one is covered with that black piece): Lights: Exhaust: Instrument panel: Manometer (for seeing the outrigger's pressure) and gearbox (manual) cover (the dkbluishgray one): You can use the airtnak in the pneumatic system, or not, depends on these two pneu valves: http://www.brickshel...90-62mm/024.jpg Truck The truck part is an 8x8x8 driven construction ( http://www.brickshel...y.cgi?i=5936235 ), with a manual gearbox and One Xl motor for drive. The outriggers are working with pneumatic, as can be seen in the pictures, one motor with pneu valve is enough for control, because the backward movement is done with rubber bands. The pneumatic system is enough strong to pull out the rubber bands and lift the mobile crane's own weight. http://www.brickshel...y.cgi?i=5936260 - I simply wanted to try out this solution (the original also has also a clyinder to push out the legs). It doesn't works 100%, sometimes a little help is needed to came back. The motorized pneu valve isn't my idea, I saearched a lot to find the designer, but it wasn't success. A compressor makes pressure in the aritank (or directly to the legs, see the description above), then the valves can be opened or closed. The PF system has 8 channels overall, so some functions are together with other ones, like the front lights with steering. One PF led is for light. Crane part (upper structure) The most important in this part is the strenghtening in the turntable, I made it with 4 pulleys, and 2 mm width rubber bands (O rings): http://www.brickshel...y.cgi?i=5936256 Works, well, in extended state the boom doesn't deforms the structure. The 4 pneumatic cylinder can raise the quite heavy (3 section) boom, but not in extended state (as most of the originals). The whole boom can be extended up to 1260 mm height. The backward movement is done with strings, not with gravity, it's more reliable. One small Li-Po battery can power the machine, this black button is for power on/off: http://www.brickshel...y.cgi?i=5936219 http://www.brickshel...90-62mm/004.jpg - you can switch after the operator's cabin with the dkblgray pneu switch to raise the cabin in angle or not (done with one little pneu cylinder). This video can tell more than me, it took me a time to make it, but it's necessary for this model: Hope you like it. Maybe I didn't write everything, feel free to ask, if something isn't clear. -
Hi In my first posting i want to show you a little MOC from last year. It's a small PF scissor lift. Last week i made some photos in the garden. Here's a short video of it: That's it, i hope you like it. Greets from Germany, Heiko
-
My recent build is this suburban passenger train. It is not a replica of any real rolling stock, though the design and livery are roughly based on UK train operator South West Trains. The train is an electric multiple unit, consisting of three units. A driver's cab is located at both ends of the train. Unlike the model mentioned above which draws electricity from third rail this train picks it up from overhead line. The train is 96 studs long. Counting also the bumpers and coupling magnets which protrude slightly beyond the construction, the entire length is 99 studs. The driver's cab is virtually completely snoted. Actually this technique left a slight aesthetic flaw – cutouts at the end of the roof above the cabin. Front end The interior of the front car with segregated driver's cab. The same design is employed in the rear car, with the only difference being the fourth passenger seat which is missing here beacause of the placement of the battery box. Though the train appears to be supplied with energy from external source it still needs some standard PF components for independent motion. The IR receiver and battery box are placed in two different cars which allows easier masking of the compoments and better utilization of the passenger compartments. The motor is placed under the middle car. The interior of the middle car The pantograph is not completely my invention but I used the design that has already appeared in some creations here on Eurobricks.