Search the Community
Showing results for tags 'Power functions'.
Found 368 results
-

9V motor issues - replace or convert to Power Functions?
Tannerman posted a topic in LEGO Train Tech
Long time reader, first time poster. So back in 2002 I picked up 4535 LEGO Express Deluxe to run around our Christmas tree. It features a 10205 My Own Train engine and tender with 9V motor and light package. I typically only run it around the holidays (after cleaning all the track, etc), but over the past few years I've been having issues with the motor. This year I'm noticing that it just runs for awhile... and then stops, almost as if its overheating or something. If I wait a while (5-10 minutes), the motor seems to work once again. My gut is that the motor is giving out on me finally, but wanted to confirm with those in the know. That said, if my 9V motor is failing, I'm looking at affordable next steps -- and also trying to keep a 4-year-old boy pretty happy. Do I suck up secondary market prices and buy another 9V motor or do I make the jump to Power Functions? If the latter, then I don't know really where to start regarding what I'd need to purchase from BrickLink, etc. Any help or advice would be appreciated (Also, if anyone has successfully converted this engine/tender combo to PF, I'm all ears). Thanks in advance! - Steve -

[TUTORIAL] 6 wheel power functions wheel set on 7725 (cutters option)
Dread Pirate Rob posted a topic in LEGO Train Tech
Government Warning: Lego Bricks were harmed in the making of this tutorial. Good evening! I recently converted my 7725 to Power Functions because I don't have a 7740 to convert to power functions. It just didn't look right on four wheels and I could not fit a technic mechanism and M motor in there... So I present the cutters guide to 6 wheel bogies. (If someone has already done this please let me know so that I can give them credit, I didn't turn up any results like this when doing a Google) 6 wheel Lego power functions motor on 7725 by Canvas Rails, on Flickr 6 wheel Lego power functions motor on 7725 by Canvas Rails, on Flickr 6 wheel Lego power functions motor on 7725 by Canvas Rails, on Flickr 6 wheel Lego power functions motor on 7725 by Canvas Rails, on Flickr 6 wheel Lego power functions motor on 7725 by Canvas Rails, on Flickr 6 wheel Lego power functions motor on 7725 by Canvas Rails, on Flickr 6 wheel Lego power functions motor on 7725 by Canvas Rails, on Flickr 6 wheel Lego power functions motor on 7725 by Canvas Rails, on Flickr Power functions 7725. by Canvas Rails, on Flickr Purists, please note, the lance was already broken by a careless child so I am recycling, not abusing a perfectly good piece (The 1.5 pin was just an innocent bystander. Sorry). The trick is to get the cut as close to the short end of the 1.5 pin as you can without compromising the structural integrity of the short end. You will know what I mean if you get it in the wrong spot. The effect is similar to the burning tyre rolling past Indiana Jones. Does anyone have a solution that does not involve a knife? -
Hi all. I'm currently working on a new lego room and loft space and wondering what long term project to start I've had thoughts of the wisbeach and Upwell tramway rekindled. I've always planned a loft railway and this seems like a great prototype for a lego model. Reasonable flat... plenty of character and features on a 'small' scale. I've seen numerous lego versions of 'Toby' the tram and mavis but I'd want them powered. Last time I did lego trains was the 9 system. Could you tell/show me how the newer power functions is set up in the smallest possible space please? I'd love to see your small engines and diesel and find out how you squeeze everything in. Am i right in thinking there's 4 parts... the ir reciever and controller, motor and battery box? I will of course show my progress shortly! For those not familiar with the tramway I found this great little website: http://www.lner.info/co/GER/wisbech/wisbech.php
-

[MOC] Spookydoo!
MajorAlvega posted a topic in LEGO Technic, Mindstorms, Model Team and Scale Modeling
Hello! This was my Halloween MOC. It uses a SBrick to control 4 functions: - White light - Ultra-violet light - Fog - Minifigs rotation The white light uses a regular LEGO Power Functions Light pair. One LED is inside the pumpkin at front, the other one is bellow the floor, pointing up. The ultra-violet ("black") light uses 3 home made Power Functions UV pairs, with UV LEDs. I'm using a rectifier bridge and two 100 Ohm resistors to drive the LEDs, a circuit identical to LEGO PF Light pair. 2 pairs (4 LEDs) light 4 torches in the left and right walls. I put the LED inside a technic 1x1 brick with hole, behind the trans-neon-orange flame to hide it (black light sources are also blue light sources). Some UV passes trough, not much but I complete it with another pair (2 LEDs) bellow the floor, pointing up. There is a fifth torch in the back wall, without UV LED behind but still glowing a bit, like the spider in the left corner. The fog cames from an home made fog generator. It uses a kantal wire to heat glycerole/glyrecin, like the smoke generators used in in model trains as also most e-cigs. Has a silica wick that takes the glycerin from a small tank, enough for more than 30 minutes of work. The fog is not spreading allover the MOC as I intended. I might add a small fan later. Finally the minifigs rotation uses an old 9V micro-motor. No gears so it turns to fast :( Everything is powered from a LEGO Power Functions LiPo. You can see most of the electronics in this photo of the base while being assembled: -
Boxcab Shunter Hi guys, I've just finished a new Power Functions boxcab locomotive. I hope you guys like it. It was my first ever Power Functions MOC and I think it came out quite well. Here are the specs length: 16 bricks (with couplings) hight: 11 plates colour: yellow motor: PF train motor battery box: AAA weight: 314,1 gram But without further ado, Here are some pictures of it! Front view side view Motor How I hid the battery box And how I hid the reciever the only problem is that it doesn't have any wagons... And I have zero idea about what to build for it. I thought about some giant boat trailer or a flatbed but I scrapped those ideas. Bye
-

Liebherr LTM 1130-5.1 Scale 1:15
Nick Barrett posted a topic in LEGO Technic, Mindstorms, Model Team and Scale Modeling
A fully motorized and remote control model, sized to suit the old 1980s rubber tyres. 10 Motors, 4 IR receivers, 2 battery boxes. 9kg. Maximum height 2.8 metres Liebherr LTM1130-5.1 in 1:15 Scale by Nick Barrett, on Flickr Functions: Progressive rate steering on 1st, 2nd and 5th axles, powered by L motor. Last axle countersteers. The in-cab steering wheel is connected. Drive by 2 x XL motors on 3rd and 4th axles, and I-6 fake engine. Live axle suspension on all axles Four synchronized stabilisers, powered by L motor with gearbox to switch between extending and lowering. They lock in place when fully down. Slewing of superstructure by L motor. Boom Luffing - XL motor Boom Extension (four sections) by 2 x XL motors Hoist - L motor with gearbox to change speed according to load. Tilting operator's cab, powered by M motor. Liebherr LTM1130-5.1 in 1:15 Scale by Nick Barrett, on Flickr Liebherr LTM1130-5.1 in 1:15 Scale by Nick Barrett, on Flickr Liebherr LTM1130-5.1 in 1:15 Scale by Nick Barrett, on Flickr Displayed at The Great Western Brick Show 2015, before appearing online here. Liebherr LTM1130-5.1 in 1:15 Scale by Nick Barrett, on Flickr -

Small scale truck trial
Zerobricks posted a topic in LEGO Technic, Mindstorms, Model Team and Scale Modeling
Since the new Arocs relased with new suspension parts and a great idea for the rear axle I was thinking, why not also make small scale truck trial machines/races with 62,4mm wheels as a reference point. I think this translates to roughly 1:13 scale. Because this is a smaller scale the models should be easier to build with less parts and more structualy rigid I think a max of 2 x XL, 3x L or 4x M motors should be enough at this scale... What do you guys think? Wanna debate, maybe even set up some guidelines and build something? P.S. click here for some axle ideas at this scale -
[WIP][TTC2015] Mercedes 2045 challenge
Zerobricks posted a topic in LEGO Technic, Mindstorms, Model Team and Scale Modeling
I decided to also try the Mercedes 2045 challenge, and here's what I made so far in LDD. Its a very compact drive indepent suspension with pushrod suspension...the truck will be 4WD More info and updates soon... -
A British Rail Class 08 Diesel shunter, motorised with power functions BR 7 by Golem Lord, on Flickr BR 8 by Golem Lord, on Flickr BR 3 by Golem Lord, on Flickr BR 1 by Golem Lord, on Flickr Easy removal of roof to access on/off switch. Please comment below!
-

Mercedes W123 Coupé
roxXx5 posted a topic in LEGO Technic, Mindstorms, Model Team and Scale Modeling
Hello fellow brickers, today i want to introduce you into a new MOC i've started to build at the beginning of august. It's a Mercedes W123 coupé. The reason for me to build this car was one of my co-workers drives one and every once in a while he takes me for a ride in this beauty. But enough about the story behind. Here are some technical features. Power Functions: - 2L-motors for driving - 1M-motor for steering - 1M-motor for shifting gears Drivetrain and suspension: - fully independend suspension - ackermann geometry - kingpin inclination - casterangle - 3-Speed gearbox - RWD with differential - working straight 4 fake engine - working steering wheel Bodywork: - openable doors, bonnet and trunk I tried to upload at least 2 more pictures here but it won't let me do this.... so here is a link to mocpages for you: http://www.mocpages.com/moc.php/419387 Thank you all for watching. Rolf -
[WIP] [TC8] 8x8 off road crane
Zerobricks posted a topic in LEGO Technic, Mindstorms, Model Team and Scale Modeling
So as soon as I heard about the new contest, I knew I wanted a different crane as the normal mobile ones... A quick google search for off road crane inspired me as soon as I saw this picture: More info here: http://www.ww.mainpu...ifting/6196.htm Yes, its an 8x8 off road crane with massive tyres, suspension and what-not. After fiddling in LDD and real life I came up with front suspension: As you can see, its inspired by 42043's rear axle assemby, but upgraded: - with all wheel drive - portal axles, - improved steering system - longer, harder shock absorbers - can carry A LOT of weight The steering system is my own idea (as far as i know), by using different handle and steering arms length I get different steering angles: Another thing I built are the outriggers. Because this is an off road truck, the outriggers need to be high enough not to bump into terrain, yet they have to lower enough to do their job. This is why they extend at an angle: The outriggers may look rather thin and weak, but the fact is the 13L beam and 13L rack are in a sandwich which cannot be seperated, so they can carry lot of weight, as long as you dont bend them sideways too much. Here is how the front suspension and outriggers look like together: And I already started working on the rear axle... You can see its simpler than front axle, it has more support, and its very solid. There are a total of 10 points holding the rear axle assembly: - 4x Springs - 4x Longitudal links with rubber bricks with limited longitudal movement (you need a bit of movement in order for axles to flex sideways) - 2x Panhard links which keep the axles from loosely moving sideways Also notice the drive axle on the left, thats for the fake motor drive. More info soon... -
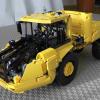
[MOC] - Volvo A25d 4x4
deAraujo posted a topic in LEGO Technic, Mindstorms, Model Team and Scale Modeling
Hi everyone, I would like to present you my new creation, the Volvo A25d 4x4 remote controlled. The functions and characteristics are: -4x4 drivetrain powered by one XL motor; -Steering is achieved with a medium motor and one small linear actuator; -Tipper bed controlled by pneumatic and compressor by another medium motor; -Full articullated and big ground clearance. I am very happy with the way I found for the mechanism regarding the tipper bed in which it is only required one motor to operate simultaneously and synchronously the compressor and the pneumatic switch. Since there is a differential between the two, when the motor starts, the power goes to the easier side which is the pneumatic switch. When the switch reaches its end, then the power goes to the compressor. The same is true the other way around. This mechanism is realy helpfull when trying to reach dificult and/or distant places from the battery box because you have the advantage of the lenght of the pneumatic tubes. The link to all the images is here: http://www.brickshel...ry.cgi?f=558887 Meanwhile, I am editing a short video to show you these functions. I hope you like it. -
This is a tutorial detailing how to modify a LEGO 9V train motor so that it may be powered independently of the track. This effort is part of a larger project inspired by Thorsten Benter’s article in Railbricks Issue 7 titled “PF and 9V Trains: The Best of Both Worlds”. Step 1) Open the 9V motor. This has been covered elsewhere, so it should suffice to say you carefully remove the 12 tabs holding the bottom cover on with an xacto blade or something similar. There is enough friction to hold the bottom cover in place later even without the tabs. Step 2) Remove all internal parts. Ignore the fact that I took this photo after completing step 3. Step 3) Use a rotary tool with a cutoff disk to bisect the metal strips in the top of the motor enclosure. These strips are exposed in the top studs, and we will later use them to pull power from the track and apply power to the motor. Very important: Be sure to apply NO PRESSURE when using the rotary tool. Instead, just lightly touch the spinning cutoff disk against the metal strip, and let the tool do the work. It will take some time, so be patient and careful. If you apply pressure, the metal strips will heat up and deform the plastic. If the plastic deforms, it will be impossible to interface with LEGO bricks and PCB adapters (like the one in the upper-right corner of the picture). Keep it light and easy. You will thank yourself later when you haven’t ruined your motor’s plastic housing. Step 4) Desolder the metal pieces from the electric motor. I don’t have a picture of this exact step because I used the electric motor from a Power Functions train motor. If replacing the 9V motor with a Power Functions motor, open up the PF train motor using a T6 bit, remove the electric motor, and desolder it from the wires. Step 5) Solder a short length of wire to each tab on the electric motor (do this outside the housing to avoid accidently melting it). I used 32 gauge DCC decoder wire, but you can use whatever you have that will fit inside the motor. Reassemble the motor with exception of the wheels and the bottom cover. Step 6) Attach the wires to the outermost halves of the metal strips; the innermost halves are connected to the wheels through the wipers. I used a silver epoxy for this. I chose silver epoxy for two reasons: 1) I didn’t want to risk melting the studs by soldering the wires to the metal strips, and 2) silver epoxy has a lower resistance than graphite epoxy. Step 7) Reinstall the wheels and make sure everything is running smoothly. This would also be a good time to lubricate the gears if you want to. Make sure you don’t get any lubricant on the electrical parts! Press the bottom cover onto what remains of the tabs, and you’re done! If you ever want to run the motor directly from track power, simply use a PCB adapter with a loopback connector or connect a LEGO wire (9V or light gray end of PF). This is what a PCB adapter looks like when installed on the motor. (I’ve updated the design since taking the previous photo.) And here is a connector leading up to the electronics (currently just a Power Functions battery box, soon to include a Bluetooth receiver) in my Horizon Express. The connector plugs into the PCB adapter. The PCB adapter is attached to the electrical studs on the motor. And the motor is pinned to the bottom plate of the locomotive. Now I can charge the battery in my train without taking it off the track, run it indefinitely on a mixed metal and plastic layout, and have non-line-of-sight control when I add the Bluetooth receiver. It really is the best of both worlds!
-
Hi guys, I have been trying to make some trains (generally diesel) and a problem that I have always found is powering. for a steam locomotive this is usually pretty simple because of the lack of articulation but wel, bogies are articulated and motors are mounted in the build itself. my question was, how does gearing react to this? and what is the handiest for compact solutions? vertical or horizontal? with vertical you get this: lego 6L train bogie by alterlegotechnic, on Flickr how could something like this be used in a locomotive? would the motor stick loosely in the chassis and what about a vertical motor like this (http://www.brickshel...16/cam06194.jpg) will there happen something in corners? like that the would go faster or some? and with Horizontal you get this Iowa Pacific SLRG 515/518 Mechanics by wildchicken_13, on Flickr how can gearing do this? i mean the rotating bogie, what happens to the gears in it? obviously could 2 M motors be needed for a small train (around 4 cars) or will it fail? I heard something about a V2 receiver? I have a V1 (I think) and that a normal one won't be able to give enough power to both? What is better? XL or M? when will a XL be needed? so in one sentence: vertical or horizontal? what happens to gearing and what is easier when using normal motors?
-
[MOC] Power Functions Saddle Tank Shunter in Dark Blue
Dread Pirate Rob posted a topic in LEGO Train Tech
The awesome tank engine Dutchiedoughnut is assembling inspired me to get stuck into my next project. I destroyed my new dark blue Creator Jet but used the wonderful parts to put together my first Saddle Tank 0-4-0 shunter. Lights by Canvas Rails, on Flickr The Details: Freelance design, there is no DB prototype as far as I am aware (The DB doors were the last ones I had) 6 wide chassis, 7 wide at the saddle tank. All power functions components on board Two working lights Minifig driver (I cheated a bit here, he has no legs on account of the extreme cable situation in the cab) 0-4-0 wheel arrangement of standard Lego wheels fitted directly to a train motor Cranks for the side rods have been kragled to improve reliability at exhibitions Cranks have also been shortened (sorry purists) to work on 12v track geometry Power button activated by pressing the sand dome PF receiver is in the bunker with 1x1 round plate coal LEGO Power Functions Saddle Tank Locomotive in Dark Blue by Canvas Rails, on Flickr LEGO Power Functions Saddle Tank Locomotive in Dark Blue by Canvas Rails, on Flickr LEGO Power Functions Saddle Tank Locomotive in Dark Blue by Canvas Rails, on Flickr LEGO Power Functions Saddle Tank Locomotive in Dark Blue by Canvas Rails, on Flickr I really love this dark blue but it does not photograph well with my lighting setup. The colour in the first photo is closest to how it looks in real life. Does anyone have any suggestions for photographing dark blue? I am considering Bricklinking some more 1x1 dark blue bricks for the cab but then again the black is a nice contrast and is growing on me. I would be most interested in your thoughts. Cheers, Rob -
This is a CSX EMD 70 train that I designed one day. I chose the CSX one mostly because I liked the coloring. There are several other MOCs of this train around the internet, but they mostly use 9V, and I wanted to do one that ran on Power Functions. Thanks for looking at my MOC!
-
Hi All, I'm starting to run some train layouts and wondered why idle/standby times are one the different battery boxes? 1: The Rechargeable box/8878: - what is the 'turn off' time? It seems to turn itself off after some time.. 15, 20 minutes? 2: Standby times expected? Anyone know how much power is used by the IR receiver or the SBrick if the box is left on? Both for the 8878 and the 8881 AA-Technic box? If I hook it up with a IR Receiver and leave it on, how many hours should I expect it to be idle if the motors is not running? Thanks in advance,
-

[MOC] LEGO Brick Separator Grass Trimmer
dr_spock posted a topic in LEGO Technic, Mindstorms, Model Team and Scale Modeling
Do you have a young child who likes to help you cut the lawn? Do you have more brick separators than you know what to do with? Why not make child size toy weed whacker? LEGO Brick Separator Grass Trimmer by dr_spock_888, on Flickr Powered by one AAA battery box and XL motor. The brick separators are not sharp and will not cut a child's toes or fingers. Safety glasses should be worn. Created for Flickr's Separator Anxiety https://www.flickr.c...ps/2840637@N21/ -
Hello All! This is one of my favorite Useless creations I have ever built As you can see it is a couch on steroids with tanks treads Top view Back view Bottom view Sort of side view Let me tell you some days you just need to take a break Or have a party Homers Favorite ride! Looks like Sariels Hamster has evil plans for this Video thank you for reading!
-

[MOC]Tow Truck
legosamigos posted a topic in LEGO Technic, Mindstorms, Model Team and Scale Modeling
Hello Eurobrickers! Today I would like to show you a tow truck. Few months ago I`ve started to build my tow truck and finally I finished it, does it mean, I finished earlier, but I had to prepare a video. I wanted to use the in my tow truck, but unfortunately, I had to resign. The tow truck is full motorized and it has 3 lockers for equipment on each side, working fake 8 V engine and above all, the main functions of the tug, and so drive, steering, outriggers, winch, towing arm with folding and rotating fork and a tower with a sliding and lifting the boom. In the lockers there are some tools, spare wheel, 2 battery boxes, 2 fire extinguishers and arrows warning. I built also a Hot Rod, so will be 2 MOCes in one. And then I had to rebuild the tow truck, does it mean, I added a fairing and... ...I extended forks. before and after Dimensions: Length: 75 cm Width: 20 cm Height: 22 cm Max. heigt with with extended boom: 77 cm Weight: but I think it is heavier Face to face with 8285 set and compare with 8285 i MOD 9397 set Power Functions: drive - XL motor steering - M motor outriggers - M motor lifting boom - L motor extension boom - M motor towing arm - M motor wheel lift - M motor winch - M motor 4 x IR remote control 4 x IR receiver 2 x battery box 3 x extension wire (20 cm) Full Brickshelf gallery, Bricksafe gallery Sorry for a long video ;) -

Battery box over-current protection bypass
finhudson posted a topic in LEGO Technic, Mindstorms, Model Team and Scale Modeling
Performing this modification will allow you to draw more current from your battery box. I tested the maximum current before the modification at 0.3A and the maximum current after at 6A. I have often found the over current protection built into the power functions battery boxes to be set a bit too low, for example, it is very limiting when using RC buggy motors. I opened up a battery box to see how easy the over-current protection would be to bypass, and it turned out to be very easy. My method is shown below: (Warning: performing the following modification will void the warranty of your battery box. Do not draw high currents for long periods of time because it may lead to overheating.) (I will not be responsible if you try it and break something) 1) Open up the battery box to gain access to the circuit board Remove the screws, then use a screwdriver to begin to pry out the battery holder, once it is about 5mm out, push in the plug on the top, and then fully remove the battery holder. 2) Prepare the electronics tools for bypassing the over current protection You will need: A soldering iron, solder, wire cutters, wire strippers and tweezers. A helping hands tool is optional but it helps. 3)Bypass the over-current protection This step is much simpler than it sounds, all you need to do is solder a wire over the polyfuse on the circuit board. First you need to locate the polyfuse, as shown in the image below The polyfuse rapidly increases in resistance when a high current passes through it. This is how the over-current protection works: when a high current passes through the polyfuse, the increase in resistance causes the current to drop back down again. To bypass the polyfuse, all you need to do is solder a wire across it. First you need to tin the wire so it can be soldered more easily. With some solder on the tip of your iron, heat up the wire from the back. Apply solder to the wire from the front and you will see the stands of wire absorb some of the solder. Now tin the other end of the wire and move onto the next step. Now all you need to do is solder the wire over the polyfuse. Use tweezers to hold the tinned end of the wire on one side of the polyfuse, then heat it up with the soldering iron to reflow the solder joint. Repeat this with the other end of the wire to achieve a result like in the picture below: 4) Reassemble the battery box and you are done! Notes: Do not embark on this project if you do not trust your soldering skills, soldering irons get very hot and could easily burn you. If the switch does not move after the battery box is reassembled, open it up again, remove the piece of wire, and replace it with a thinner one so that is does not jam against the switch. -
Cheap Low Latency Power Functions Controller With Bluetooth
finhudson posted a topic in LEGO Technic, Mindstorms, Model Team and Scale Modeling
I've created an Arduino shield to control Lego Power Functions: An Arduino is a small, programmable microcontroller with lots of I/O (input/output) pins. It can be programmed from a computer, and it can interface with various devices. An Arduino shield is a circuit board that mounts onto the top of an Arduino to give it extra functionality. It is powered from a Power Functions plug, and has 3 channels that can be controlled via bluetooth, or programmed with the Arduino. See the kickstarter for more info: http://kck.st/1KqXFFV, and if you want one, please consider backing it. I will post some images of it in various models if you guys like it. What are your opinions on it, or do you have any improvements to suggest? -
I have started work on a new project 'for the kids':) We do not have enough space for a loop of track but I do have an excellent long wall with no windows. Tüblingen is an entirely fictional Swabian railway station near the Black Forrest in Germany. The subject was chosen because black steam engines with red frames were such an icon for so many years. The simple brief I am working to is: Create the trains I wanted when I was their age. It is all 6 wide power functions however it has a distinctly grey era feel to it, because, well, that's what I wanted so it must be what they want. I started with a 7828 train station because I still think it is the most fun station to play with, and added an island platform and foot bridge so that it can serve three lines. There is a 7838 freight shed but when I tried to mod it, it began to look more like Benny's luxury condo development than a piece of railway infrastructure. As such, the freight shed remains a work in progress. Enough from me, to the photos... Stock station with my power functions tribute to the famous 182. P5199154 by Canvas Rails, on Flickr The foot bridge in place. What was it with the 80s and no hand rails on stairs? by Canvas Rails, on Flickr With trains. by Canvas Rails, on Flickr The next update should be the goods shed and crane, then the engine shed and locomotive depot. I hope you like it. Rob
-
I'm happy to present to you my first modular building. I have put it on Ideas too, so if you like it, please support: https://ideas.lego.com/projects/106103. edit: It is now available on Rebrickable Some time ago my daughter got this Duplo set from her aunt: http://brickset.com/...ative-Ice-Cream That got me thinking I could use one of these cones for my own purposes, especially since my little one was very interested in throwing bricks across the room, instead of proper play (or maybe that was proper play ;) ). Anyway I borrowed four bricks from her (I honestly intend to give those back to her) and thought it would be nice to make a big advert out of this ice cream and make it rotate. Such an Ice Cream Parlor should have nice clientele drawn by this big sign of what's inside :) So power functions was a must. But since I was to integrate PF info a modular, why not go further and add some lights too? When I was young (long time ago...) I always liked things that moved and had lights :P so you can call it late compensation :P Later on I will present it module by module, but if you want to have a quick look at it in action, here's a video: Ok, so let's start with a view of all the modules separately: And now let's talk about the ground floor: As you can see, on the right there is the ice cream parlor with seating available inside and at the back of the building. You can buy ice cream, lemonade, donuts and coffee. The staff is taken from the Ice Cream Machine set :) I'm happy with the bench - it gave me some headache, but I wanted to have something distinctive. The lamp is also different to typical one, but it's nothing special. On the left there is an entrance to the owner's apartment. There is also a small storage room for bike. The top of it is removable for easier access, but you can get the bike in and out through the door (but it's tricky). Ok, now - the heart of the modular - the Power Functions module: All electronic components are here. That is: 1 Rechargeable battery 2 switches 3 sets of PF lights (so 6 sources of lights total) 1 M motor Of course apart from that there are also all the technic components to make it work. The motor is running the Duplo brick with a 1:9 reduction. The lights are provided for the ice cream parlor (4 of them), entrance to the staircase (1) and the apartment (1 for the table lamp seen above). My idea was to be able to control lights and motor separately, that's why I have 2 switches here. Look closely at the picture above. There are two holes for technic axles above. The one on the left is for access to the switch controlling the motor (advert). The hole on the right allows access to the switch controlling all the lights. Those go on/off simultaneously. You can't have just part of them on. That would require even more switches and there is simply no room for that. It's crammed inside already. Now, have a look at the bottom of this module where all the lights can be seen and the front of this module, which allows access to the rechargeable battery in case you need to recharge it (power cord access). Through the holes in the front section you can turn the battery on/off and change the voltage too. Now, the last two modules are the roof and the apartment of the owner. It's not much room inside - the advert required quite some space already, but it's cosy :P As you have seen already this apartment get light from the lamp on the table, which is actually part of the Power Functions module. Yes, I know the TV is kind of useless on that wall, but... hey, he wanted a TV so I gave him one :P So, how do you operate this thing? With a KEY :) and last, but not least - two pictures of it with lights on, and ambient lights off: Full gallery is available on my Bicksafe: http://www.bricksafe...ce_Cream_Parlor I hope you enjoyed this little presentation. Please consider support on Ideas: https://ideas.lego.com/projects/106103
-
EDIT: This model has gone through a lot of revisions over the years and much of the info in this thread is outdated. This video shows the latest version and provides a link to instructions on Rebrickable: