Search the Community
Showing results for tags 'Photography'.
Found 31 results
-
Hi there everyone, Whenever I travel, I usually bring a handful of minifigs along and take pictures of them in their "natural habitats." In January I had the chance to travel to Las Vegas, and each day I went hiking in the surrounding desert. Here are some of the better pictures that I took, including Indiana Jones, Prince of Persia, Collectible Minifigs and more. Check out the entire Flickr gallery for even more photos as well as larger versions of the pictures you see here. Also, if you haven't seen my other Minifig Adventures, check out the following Flickr sets: Minifigures at Point Lobos, California Minifigures in Hawaii Indiana Jones in Costa Rica Please let me know what you think of these photos! Thanks for your time. Inky
-
For the first time ever YOU have the opportunity to contribute to a Eurobricks Forum Skin! We need dozens of Minifig photos for the exciting and innovative banner! We’re looking for: Photographers with a good camera and a wide range of LEGO Pirate minifigures Image Editors with the skill to remove backgrounds from photos You can DO BOTH but you'll need to audition for both! Your rewards for helping: Access to an exclusive hidden forum in which you will be amongst the first to witness this revolutionary new forum skin! An acknowledgement - everybody's whose work is selected will be fully credited. If you're a professional you can even include your website URL and contact details. A commemorative tag - the more you quality images you contribute, the more valuable tag you receive. BUT BEWARE! We'll place a voodoo curse on anybody who contributes a substandard effort, and trust us when we say you don't want to be wearing that tag!Learn more about the tag benefits. How to audition Read the information below so you understand exactly what is required. Ask any questions you have in this thread. When you are ready to submit, please do so in the Special Project Auditions - Submissions thread. What we’re looking for… Minifigures from LEGO setsPirates, Soldiers (blue coats), Imperial Guards (red coats), Islanders (natives), Imperial Armada (conquistadors), Pirates II (released in 2009-2010) and Disney’s Pirates of the Caribbean. Custom MinifiguresThe Dutch, Portuguese, East India Trading Company, Colonisation of Central America, undead pirates, etc. Mesoamerican CivilisationsAztec, Maya, Inca, Olmec, Toltec, etc. What we’re NOT looking for… Sigfigs or avatarsit wouldn’t be fair to permanently feature somebody’s forum identity over others. 4+/Jackstone Pirates setsthose oversized pirates which were released in 2004. Although their accessories may work with standard SYSTEM Pirate minfigures. Pirates from outside the CaribbeanVikings, Space Pirates, Steampunk, Medieval Pirates, Barbary Corsairs, etc. Minfigs & Elements from Imitation/Counterfeit or Competing BrandsThe minifigures and pieces you use MUST be authentic LEGO, with the exception of elements from custom LEGO manufacturers such Brickarms, Brickforge, Citizen Brick, etc. These are acceptable. The blasted Rules The photography must be decent!We will NOT accept low resolution images nor include images which contain artefacts (graininess), aliasing (jagged edges), chromatic aberration (colour fringing), focal defects (blurriness), mismatched impedance (ghosting), oversaturation or any noticeable visual distortion. The image editing must be decent!We will not accept images if the background hasn't been cleanly removed. Each minifigure and any accessories must have a smooth edge with no obvious trace of the background remaining. DO NOT use Microsoft Paint! Edited Images MUST HAVE alpha transparencyThe background must be transparent in PNG format with an 8 bit alpha channel. NO transparent GIFs will be accepted! The minifigure/LEGO elements MUST be shown entirely within the photoPlease do not submit photos with minifigures/elements which cannot be fully seen. E.g. peaking in from the side or from the waist up. If they were to be added to the banner, whatever part(s) aren't visible would simply look cut off in the banner. The minfigure(s) must isolated against a neutral coloured backgroundBackgrounds with multiple colours can be a lot more challenging to edit. The background will need to be manually removed and this is much easier if it contrasts with the minifgure and is a constant colour. You may however, remove the background yourself, but be sure to save the image as a 32bit PNG file to ensure it retains its transparency. No lighting techniques or harsh shadowsPlease photograph your minfigure(s) in consistent lighting. No watermarks, logos, signatures or other brandingPlease ensure your photos are free from visual distractions. No Background Spill“Spill” is the term used in film and photography when a background colour reflects onto a foreground element. For example: a minifigure photographed against a blue background has traces of blue along its boundary. No flash highlights These are when the flash reflects off the minifigure causing white highlights or shines. Nothing too crude or offensive!Keep your minifigure’s anitcs clever and tactful. Our decision is finalWe decide which minifigures and edited images will appear in the skin and how they will be arranged. Acknowledgement Everybody who contributes minifigure photography will receive an acknowledgement in Announcement Thread when the skin is complete. Upon request additional information can be included such your website, Deviant Art account, Facebook Page or other contact details. Agreement By submitting photos you've taken or images you've edited you grant us permission to use them in anyway we see fit (relating to the Forum Skin), for an indefinite period of time without compensation, remuneration or reward.
-

New Pirate Forum Skin – Photos for Editors without Photos
Mister Phes posted a topic in LEGO Pirates
For the first time ever YOU have the opportunity to contribute to a Eurobricks Forum Skin! We’re looking for a wide range of LEGO Pirate minifigures in an assortment of entertaining poses. So, if you have an interesting minifigure or three, post photos of them in this thread. What we're currently looking for is minifigures in poses grouped according to their Pirate sub-theme, I.e. Pirates (1989-1991, 1992-1995 & 1996-1997), Soldiers, Imperial Guards, Islanders, Imperial Armada , Pirates II and Disney’s Pirates of the Caribbean. What we’re looking for… Minifigures from LEGO setsPirates, Soldiers (blue coats), Imperial Guards (red coats), Islanders (natives), Imperial Armada (conquistadors), Pirates II (released in 2009-2010) and Disney’s Pirates of the Caribbean. Custom MinifiguresThe Dutch, Portuguese, East India Trading Company, Colonisation of Central America, undead pirates, etc. Mesoamerican CivilisationsAztec, Maya, Inca, Olmec, Toltec, etc. What we’re NOT looking for… Sigfigs or avatarsit wouldn’t be fair to permanently feature somebody’s forum identity. 4+/Jackstone Pirates setsthose oversized pirates which were released in 2004. Although their accessories may work with standard SYSTEM Pirate minfigures. Pirates from outside the CaribbeanVikings, Space Pirates, Steampunk, Medieval Pirates, Barbary Corsairs, etc. Minfigs & Elements from Imitation/Counterfeit or Competing BrandsThe minifigures and pieces you use MUST be authentic LEGO, with the exception of elements from custom LEGO manufacturers such Brickarms, Brickforge, Citizen Brick, etc. These are acceptable. The blasted Rules The photography must be decent!We will NOT accept low resolution images nor include images which contain artefacts (graininess), aliasing (jagged edges), chromatic aberration (colour fringing), focal defects (blurriness), mismatched impedance (ghosting), oversaturation or any noticeable visual distortion. The minifigure/LEGO elements MUST be shown entirely within the photoPlease do not submit photos with minifigures/elements which cannot be fully seen. E.g. peaking in from the side or from the waist up. If they were to be added to the banner, whatever part(s) aren't visible would simply look cut off in the banner. No lighting techniques or harsh shadowsPlease photograph your minfigure(s) in consistent lighting. The minfigure(s) must isolated against a neutral coloured backgroundThe background will need to be manually removed and this is much easier if it contrasts with the minifgure and is a constant colour. You may however, remove the background yourself, but be sure to save the image as a 32bit PNG file to ensure it retains its transparency. No watermarks, logos, signatures or other brandingPlease ensure your photos are free from visual distractions. No Background Spill“Spill” is the term used in film and photography when a background colour reflects onto a foreground element. For example: a minifigure photographed against a blue background has traces of blue along its boundary. No flash highlights These are when the flash reflects off the minifigure causing white highlights or shines. Nothing too crude or offensive!Keep your minifigure’s anitcs clever and tactful. Our decision is finalWe decide which minifigures will appear in the skin and how they will be arranged. Acknowledgement Everybody who contributes minifigure photography will receive an acknowledgement in Announcement Thread when the skin is complete. Upon request additional information can be included such your website, Deviant Art account, Facebook Page or other contact details. Agreement By submitting photos you grant us permission to use them in anyway we see fit (relating to the Forum Skin), for an indefinite period of time without expectation or requirement of compensation, remuneration or reward. -
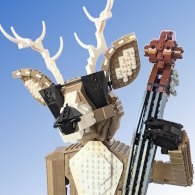
Low Light Photography and Practical Light Effects Advanced Photography Lesson Warning, this is not for the faint of heart, many of these results can be done by simple photoshopping, and it might be much faster. But do you get a better result? That's up to you, but I'm believe if you can do it for real, it looks that much more real (or even surreal). Much like how Lord of the Rings looks so fantastic is cause so many of the grand shots of castles and landscape were just that - actual shots of (large) miniatures and real locations, not computer generated effects. This also probably doesn't apply much to stop motion films, as the normalization process to get all your shots to be consistent may make even the most patient film maker go crazy. So to you, the comic creator (or simply photographer), I write this tutorial. How to create cool looking pictures and effects by taking a really good photo. Background/Streetcred Let me preface and admit that I am not a photographer, I have never studied photography, and while I'm somewhat familiar with the concepts and science - I am by no means an expert. What I am is lazy - I know the bare minimum to get cool pictures. I have been told I have a great 'eye' for shots, I might not know the science behind why, but I know what's cool when I see it. I also used to spend a lot of time doing night photography - I used to love wandering around with a tripod taking random pictures at night. Especially during fog: So what does that make me? I would say I have practical experience. I have a bag of tried and true tricks that have historically worked for me. The object of this tutorial is not to talk about the theory of low light LEGO photography, but to share my practical tips and a layman's how-to guide to shoot in the dark. Lighting Overview Before going in depth different ways to light (or lack thereof) your build, there are roughly 5 types of lighting strategies I will cover: Ambient light - This is the amount of light in the room anywhere from bright, to low to even none. Embedded light - lights that originate within your actual build. Directional or Spotlight - using an additional light source to provide light to a specific area of the build Special lighting - using coloured lights to change the mood of the picture. Black Lighting - special case of special lighting, with glowing results! More on these later! Your Build Wait, build? I thought we were talking about how to shoot and using fancy light? Well we are, but before you photograph your build, you have to build it! And before you build it you have to PLAN on how to build it. This is probably one of the more important keys to low-light LEGO Photography. You have to build your MOC to suit what method you may use. If you're going to use embedded lights, well you have to put them in ahead of time! Do you have small lights? or big lights? You obviously can't put a massive light into a micro, but you could put in small lights with wires hanging out (to Photoshop out later). Or if you're going to use black-lights, well you need to use one of the LEGO elements that glow! Other things to think about when you're building - which angle(s) will you be shooting from? Do you need to hide wiring? or even where the lights will be. Do you want to actually see the LED/Light bulb? or do you want it hidden/away from view? Don't forget that if you're shooting at really low light, even the weakest light will wash out all your other details - so light placement will be key. As you start off, remember: patience. This will take time for you to set up, to photograph correctly, and often rebuilding to get things 'just right'. Required items. Before you start there are few things you need to have, and know how use. Mandatory: Patience This is the most important thing to have. It takes time to set up, it takes many shoots, and it can be frustrating. So have patience and just know that it will look cool in the end. Camera! Most cameras, even the smaller pocket cameras have the ability to set the shutter speed - which is the amount of time your camera 'takes a picture'. This will become important, as the darker the room, the longer picture you need to take. Some cameras will have a "M" or Manual setting that lets you configure the shutter speed, as well as FStop (or aperture and other fun things). Alternatively you might have a "S" (Shutter priority) setting that controls just that, and the rest are automatically. Note that the FStop is also useful for certain effects (see DoF tutorial). If your camera doesn't have a "M" setting or "S" setting your best bet is "night time" or "stars" setting - that's the camera's setting for low light, not the best, but it can do in a pinch. Tripod! If you have ever tried to take a picture without a flash in a dark place, you'll know why you need a tripod. Simply put, our hands aren't steady enough to hold a camera to take shots in the dark. Even braced against something we vibrate the camera too much and it becomes blurry (unless you're into that). Any tripod will do, it doesn't have to be super fancy, or honestly you could use a stack of books, it just makes it harder to reposition and set up. But for me, I have cheap ball joint tripod that lets me quickly rotating the camera and change angles. Optional Light sources Depending on how you're going to light your build, you may need external light sources, you can use your standard lights, LED's, flashlight, laser pointers, black-lights IR from remote controls, whatever creates light that is visible to a camera. Try different things for different effects! Light Tent Ironic eh? But a light tent is still useful. The purpose of a light tent is to disburse light over your build, this rule still applies, you're just not applying AS much light. Lighting Explained I will now go through each of the different lighting techniques. Of course for maximum fun you could apply several of these techniques together to create a master piece! Ambient light This is the easiest and most important trick that you need to master. Simply put: turn down/off the light. This by itself isn't usually overly useful - if you set your camera right it is almost the same as taking a picture with the lights on. The key hear is to change the shutter speed of your camera to take a longer exposure picture. A regular picture is around 1/60 of a second. If you dim the lights, your picture might be 1 second or longer. Why this is so important is when you start using the other lighting tricks. You do this to make the OTHER lights seem brighter than they really are. So a very dimly lit fireplace, using normal room lights is barely noticeable turn off the room lights and set the shutter for 5 seconds and it becomes a roaring fire. Knowing how to set the shutter speed is also useful for every day MOC taking pictures. Many people prefer to take the MOC's outside to shoot, the sun provides extremely bright light. But if you know how to set your shutter speed accordingly you don't need to wait for a sunny day! I routinely use long shutter speeds even when I have my large photography lights and light tent... Embedded light I hope you were paying attention to the build section. Cause if you've gotten here without adding lights inside, it maybe too late Generally there are two types of lights that can add within a build: Small LED's such as the Power Function lights or third party Lifelites. Larger less specialized lights can also be used - these are far cheaper than the above and work far better lighting up large areas - downside is you need a lot of space to hide these. An example of a build that uses a standard LEGO light brick (in the hallway): An example of a build using cheap LEDs: Of course you can start combining tricks - such as lowering the ambient light level so that we maximize the lighting effect, the same temple, with lowered ambient light: Note how changing the ambient light changes the entire image feel. In a large enough layout you could even use a combination of smaller specialize LED's and cheaper ones, like here: The inner ring of the station is lit up by LED light bars that from dollar store. The rest are light bricks, and Lifelites. The key to photographing embedded lights is to do a proper light balance - between the ambient light and the embedded light. Here is an example where the embedded light is actually TOO bright relative to the ambient condition: I turned down the embedded light (switched from wall mount to battery power): Better! Now you can see that if I retook the second picture with a longer exposure, it'd be just about right. But the first shot, if I decreased the shutter speed (faster picture) it would be too dark, and the light would still be too bright, so I would have to turn up the ambient light to compensate. Black-Light My favorite trick is probably the Black-Light, it gives such a fantastic glow to an otherwise flat picture. Though not all pieces glow - mainly the trans-neon colours. Some pieces that you wouldn't think glow, actually do, take a black-light and go over some of your pieces, you'd be surprised When you build a black-light MOC - you should think about where and how the black light will be situated and where the camera will be. Another fun trick is to build chunk of the build in a clear brick - so that the black light goes THROUGH your build (see title images), or alternatively situate the light UNDER your build: The black light is actually sitting under a glass table, and there are 8x8 grill plates under each vat and a pile of neon orange dots and pieces to create the glow. Pro Tip: Get a good black-light. Stay away from the ones that fit in the light bulbs, they're rubbish (usually), get a good old fashioned tube one, they're by far the best. Directional or Spotlight Another trick is to shine a light on specific parts of a build. This obviously should be done in conjunction with low ambient light. You can use this to flush out or highlight the subject of your build, while not not ruining the lighting effect behind it. Here, because I had the gate glowing from black light I didn't want to wreak the feel by lighting it up too much. But I wanted to make sure the ship is the subject. So I took a little LED flashlight and lit up the ship. Pro Tip: When you shine a spotlight, make sure the light doesn't hit anything else! light up and away from your build whenever possible. The other method is using harsh light in one direction to forcibly create shadows. Not overly useful, but it can create some stark pictures. This entire build is light-bley but you can clearly make out the details. Special lighting Last but not least you can use some special coloured lights - like black light, or simply coloured filtered in front of lights. In the past I have used trans coloured LEGO pieces in front of a flash light to add a glow to a build. Or you could even prop up a laser pointer to create some pew pew pew action! One of my most ambitious shoots include all of these: This shot included every trick here, except black-light. It took me several nights to get this particular picture, by the end there was a entire procedure that took 60 seconds per attempt to align all the tricks: Laser pointer (not too long otherwise it over-saturates), No ambient light - pure darkness. Spotlight - to shine the ship and highlight the space marines Special light- the background (white backdrop) was actually lit with a light trans red plates to create a sunset type feel. Pro Tip - another way to change up the feel of your picture without changing the actual light, is changing the "AWB" or Auto White Balance of your camera settings (what your camera 'thinks' is white. An incorrectly set AWB can be useful, but most of the time annoying Conclusion So there you have it. Every single one of my tricks. It's not the easiest thing to do, but it's not really that hard either. The key is patience. Take the time to experiment and try new things. Assignment Use the skills you have learned here to produce a low-light photograph of your scene. Size doesn't matter, but ambiance does. Create a new thread in the Academy titled Student Enrollment: Low Light Photography to post your work.
-
Working with LEGO has always been fun, but LEGO is shiny and more often than not, there is glare from a light source when we photograph them. There are several ways to remedy this. One option is to place the lamp in a different location so the light reflected is hidden from the lens of the camera. Another option I've heard of is to use pencil erasers to dull the shiny brick. The least invasive way to remove glare from your set is through a circular polarizer. What is a Circular Polarizer? A circular polarizer (CPL) is a filter that only allows a certain angle of light to pass through it. Here are two articles that go into depth of the physics behind a polarizer. To put it very simply, scattered light passes through the filter and either the vertical or horizontal band of light will pass through. The angle of which the source light hits your object is important, and usually a 45 degree angle to the object will get you the best results. Most circular polarizers are also Neutral Density filters (filters that darken the shot without affecting color) and are usually graded to stop down an image by 2 stops. So if you have an f/stop of 4 on your lens, it will result in an f/stop of 8. You will need to add more light if it makes the scene too dark. A CPL will not completely remove a glare, depending on the angle and strength of the light, but it will cut it down a lot. This is the circular polarizer I used for this topic. I had a better one (which had a smoother rotating ring), but that got stolen . These things range from $6 to $200. The one I used is from the lower end. The price doesn't affect the effect, but you'd probably get a better quality, longer lasting product going for a medium to high range polarizer. A side view of the polarizer. Here you can see that this is a two piece filter, one that screws onto the lens and the other that can rotate freely, changing the angle of light that passes through. Here are some photos of the circular polarizer in use with LEGO pieces. The first picture is to demonstrate how much light is cut out from the neutral density aspect of the filter And now it's not over-exposed. The next two pictures will demonstrate how well the CPL removes glare from LEGO pieces As you can see in the above pictures, the glare on the eyes and nose, as well on the side of the black body, has been removed significantly. You can also see that the glare on the seams of the LEGO bricks and around the studs on the floor has also been removed. Two more examples: In the previous examples, I showed you how the CPL worked with figures and objects. In this next example, I'm using the very shiny bricks in the background. Straight on, like in the previous pictures, provided little effect in removing the glare. Changing the angle of the set, with the source light directly in front produces a dramatic effect in removing the glare. I've recorded a video of the CPL in action so that you can see exactly is happening when the filter is rotated. Take note of the frog, the eye of the panda, the handlebars of the motorcycle (and the blue plastic of it, as well), and the minifigure's hair, head, and leg. The back wall and LEGO studs are also affected, but not as much as the other pieces. Like I noted in the above example, the reflections in the back wall are hardly removed by the CPL, which you can clearly see my hands rotating the CPL on the camera lens. Sorry for the shakiness. VIDEO In conclusion, the CPL is not a necessary part of your photography set up, but it does help reduce unwanted glare/reflections on your set. Without the glare, the LEGO pieces are no longer washed out and have more contrast. Obviously, not every camera will have a CPL that will fit on it. There are other ways to attach a CPL to the camera and different types of CPL's (like a square plastic gel, like the polarized lenses of 3D glasses). Just holding it with your hand will work just as well,. One last interesting tid-bit about the polarizer: If you put two CPLs in front of each other, it is possible to completely block out light.
-
Controlling Depth of Field What is Depth Of Field? Depth of Field (DOF) is the depth in front of and behind your focus target that is also in acceptable focus. A shallow DOF means that there is very little distance in front or behind the target that is in focus, deep DOF means there is a lot of distance in front and behind the target that is also in focus. Another thing to keep in mind is that DOF is slightly shallower in front of the target (toward the camera) then it is behind the target (away from the camera). For some real in-depth information, see the entry on Wikipedia. Prerequisites (things we will not be covering) Know how to use your camera and it's available manual settings. Know how to choose what you want to focus on or use manual focus. Know how to set up your lighting for the effect you want. Why should I care about DOF in my comic or film? Controlling the DOF is controlling what is in focus in your photo. The items that are in focus are the ones the viewer will (obviously) focus on. Keeping unimportant items blurred will keep your frame cleaner and less confusing for the viewer. All images shot with Canon G9 on manual, macro mode, no flash, ISO 80. Focus point is always the face of the motorcycle cop-zombie. Camera was not moved between shots, but the first two shots were cropped to match the general field-of-view of the third photo. Aperture: f/8 Shutter: 1/10 second Aperture: f/2.8 Shutter: 1/60 second Aperture: f/3.2 Shutter: 1/60 second Additionally, the background zombies were moved back (~3 inches) and the zoom was used. How do I control the DOF? What does Aperture have to do with it? Not only the depth of field, but also the amount of blurring your out of focus areas will have can both be controlled by adjusting the aperture or f/stop of your lens. The wider open your aperture is, the shallower the depth of field will become, and also the more blurred the out-of-focus areas will be. What does Focal Length have to do with it? The more you magnify your subject, the shallower your depth of field will be. What this means is that the longer your lens' focal length, the shallower your depth of field. It is very difficult, for example, to get a deep DOF using a 100mm lens and, inversely, to get a shallow DOF using a 24mm lens. Of course, it is all relative to the actual magnification of your subject and the distance between the lens and the subject. What does Shutter Speed and ISO have to do with it? Absolutely nothing. Shutter speed is the amount of time the shutter is open and letting light hit the sensor. ISO is the light sensitivity setting of the sensor. Can I fake DOF control? As great as DOF control is, we are limited by the gear we have available. Luckily there are ways to "cheat" so that our end product comes out looking the way we want. Blurring in post production One of the most common solutions suggested is to blur areas you want blurred after you take the photo, using software such as Gimp or Photoshop. This can be an effective solution, but it is not something I recommend. For most folks, the image will end up looking edited and unnatural (because it is). Another reason to avoid this method is the time involved. If it takes you an hour to edit one photo, how long does that add up to when you are working on a film? Hint: there are 15 to 30 images per second for a film. Stretching the set With a lot of small cameras, the problem we run into most is that everything is in focus. For most scenes we want shallow DOF but these small lenses don't do it so well. We can fake it by expanding the set and then zooming in. The lengthening of the set will mean that even with a deep DOF we can have our background out of focus. Utilizing the optical effect of zoom compression, by zooming in, can in turn compress the set so that it appears to be not so stretched out. This is the method I recommend because you only need to set it up once for each scene and shoot as many photos as you want to, no extra editing time in post. Assignments For these assignments you will be posting images. Be sure to keep your images at or below the 800x600 pixels limit, I'd like them all to be at least 640x480 though. Assignment 1 Create a small scene with foreground, middle-ground, and background. Your focus target will be an item in the middle-ground. Keep the same target and angle for each photo, preferably the same focal length too, if this is possible with your camera. If you are having trouble with this, take an overhead photo of your set and post it in your student thread, I will help you out with some tips. Submit three images for grading: 1. ONLY your target in focus (shallow DOF) 2. Foreground AND Middle-ground in focus (mid DOF) 3. Everything in focus (deep DOF) Once this assignment is passed, move on to Assignment 2 for final grading. Example Assignment 2 (final) Using the skills learned above, create a 4 to 6 panel comic that imparts a story to the reader WITHOUT using any text call-outs or speech bubbles. Use post-production techniques sparingly, this assignment is about controlling the Depth-of-Field to convey the message, not about text and special effects. You can move the camera and objects in the scene just like any comic production. In your submission, use the spoiler tag to describe what is going on in the comic. If the idea came across in the photos you pass, otherwise you'll be given changes and information as to why the task didn't quite work. Example Image is a link to a super-sized version. More sizes on Flickr You can see the actual stage setup on Flickr