Search the Community
Showing results for tags 'PF'.
Found 253 results
-
Hello all fellow train folks, today I have another MOC but it isn't a train, it is a track piece that we haven't been able to get in 10 years. Here it is more info to follow. 1). It has to be the same size as previous tracks. 2). It would need to use minimal parts and be easy to construct. 3). It would need to be as quiet as possible or be as quiet as standard Lego tracks when the train rolls over it. 4). It would have to be stable and would not fall apart in use. I hope you all enjoy my MOC and this track piece. I you feel inclined constructive criticism is always welcome! If you thought It was brilliant you can support it here: https://ideas.lego.com/projects/131973
-

[MOC] Ropa EuroTiger 8V-4 XL Sugarbeet Harvester
BondemandClausen posted a topic in LEGO Technic, Mindstorms, Model Team and Scale Modeling
Hi all EuroBrick members. More News: A new and extended video is uploaded, for a better view on the functionality of the model. See below in this message: And even more news: Pics with original logos from ROPA. See below in this message: I guess its time for me to go public with a little MOC i have been working on the last 3 winters. I have come so far with it, that it is time for your competent and critical eyes to see it. My MOC is inspired by my work as a farmer in the southern Denmark, where sugar beets are a big crop, with a huge influence on the whole area, concerning jobs, and manufacturing sugar. This is a selfpropelled sugarbeet harvester, Ropa euroTiger V8-4 XL See here for more info on the original: www.ropa-maschinenbau.de/product/de XL is an description, for a 9 row harvester, where a transport wagon belongs to the lifting and leaf topping unit. We don't have a 9 row harvester here in Denmark as far as i know, but the XL model is mainly sold in the Eastern Europe, Russia and Northern America. My sugar beets are harvested by a contracter, who has a 6 row harvester. My model is in approximate scale 1:15 til 1:13 Specifications: Transportposition with transportwagon: Working Position Length: 141 cm Length 94 cm Width: 23 cm Width 29 cm Height: 30 cm Heigth: 38 cm Weight 8,4 kg The model is equipped with following electric components: 5 IR recievers, attached to 4 batteryboxes, with Lithium Ion batteries, for longer durability, and less weight. Engines for lifting and cleaning: 1 L-Motor to drive the lifting unit and leaf topper, 1 M-Motor to drive the conveying belt under the front axle, roulettes, og and the conveying belt around the machinen. 1 Micro motor to drive the auger in the beet tank. Is controlled by a speedcontroller, for variable speed. Motors for driving momentum: 2 XL motors for 1. og 2. axle 1 L- motor for 3. axle. Controlled through two separate IR recievers, each connected to two different batteryboxes, to avoid the overheating of the fuse in the batteybox. A speed controller is controlling the speed. Motors for steering: 1 M-motor for the articulated steering in front. 1 servomotor for the 2 rear axles, controlled by a speed controller, so the steering point kan be hold permanent in steps. Normal steering left and right, and dogwalk is options, like the original. Motors for folding/ unfolding the unloading elevator: 1 M- motor for folding/ unfolding the outer part of the elevator. 2 M-motors for lifting/ lowering the elevator. Conveyors: 1 L-Motor to drive the two conveyors in the beet tank, and the conveyor on the elevator. Engine hausing: 1 L- motor for driving the 4 double pneumatic pump, and the impotant V8'er. 1 servomotor for controlling a pneumatic valve, to lift/lowering the lifting unit in front. Light so far: 4x2 PF Light at the top of the cabin 1x2 PF Light in the front 1x2 PF Light at the back of the harvester. 1X2 PF light at the back of the transport wagon. Additional ligtht is planned when the LUG bulk order arrives, 9x2 PF light around the machine for work light. There are two normal IR- controllers, and two IR speed controllers, to control the big show: Pneumatic System: There is a pressure controlled switch, that stops the motor activating the pneumatic pump, when the pressure level reach a certain level. There is also three manuel Pneumatic valves: One to lift the leaf topper, making it able to hang on the transport wagon. One to lift/ lowering the conveying belt around the machine, from transport to working positiontank One to lift and lowering the safety guard, on both side of the conveying belt, and the auger in the beet I have uploaded HD pics on brickshelf.com. Try the Link http://www.brickshel...ry.cgi?f=526354 Breaking News: Video of the Machinery More news: Extended video. Even More news: Pics with original logos from Ropa: http://www.brickshelf.com/cgi-bin/gallery.cgi?f=531136 A special varm thanks, to my sweet wife, who has filmed and edited these videos. All the best from BondemandClausen. :-) -

[C-Model][MOC] 42008 Bus
Samer posted a topic in LEGO Technic, Mindstorms, Model Team and Scale Modeling
All of a sudden while at work, this idea came to me and I got so interested. Objectives: Bus as 42008 C Model Good looking as much as I can include bus details as much as I can pneumatic door and baggage driven by pump compressor motorized drive as a 3rd function (what else a bus has to offer?) manual steering easily removable battery Parts: approximately 930 parts out of 1276 Build time: around 3 weeks Limitations C Model, hence no parts outside 42008 allowed 42008 presents the folloing challenges: not enough lift arms to build a floor in the passenger area managing the available quantities of Green and Red beams to build the bus body and make a good choice where green and where red goes. weak pneumatics I'm new and this is my 1st serious try, I only built 42008 before this. In general I'm satisfied by the end product. Next are things I think could be better: hiding the pneumatic hoses, got lazy at that. sliding baggage door, (couldn't figure out how to do that) more sturdy/smooth steering two doors rather than one using the white gear I may try to enhance this later (as a free MOC), but for now I will go to build some car sets to learn more about vehicle functions. I will start with 42029. Thank you for having a look. Remaining parts (around 340) -
[MOC] Mark 1 VW Golf GTI
marceriusLV posted a topic in LEGO Technic, Mindstorms, Model Team and Scale Modeling
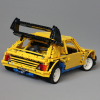
Hi! Wanted to share my latest RC car. So here it goes: Built for fun and for use in Latlug events. I used Nico71 Honda Civic chassis as a base, small modifications here and there (different placement of shock absorbers, reinforced servo motor with more brackets). The goal was to make something similar to Mark 1 VW Golf GTI Hope you like it :) More pictures here -
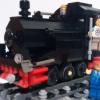
[ MOC gallery] I am proud to present my take on the small train that was the first modern streamliner. Built in 1934, numbered 9900 and originally simply called the Zephyr (the last name in passenger comfort). After its success it was quickly joined by many more Zephyr's and was soon renamed the Pioneer Zephyr. There are many great articles on this historic train, e.g., here (note the PDF schematics that were incredibly helpful); here; and here. The Zephyr was the first lightweight train set, the first (or one of the first?) diesel electric powered trains, and the first stainless steel train. It was small and light, consisting of a motorcar that was a combination engine and RPO, then a combined express/coach, and a coach observation car. The entire train was articulated, with shared trucks between each pair of cars. I sought to reproduce the as delivered version of the train set. Several substantial changes were made over the first few years of the train's long life, including the addition of a 4th car (or 3rd car if you consider the motorcar a locomotive) and a large Mars light on the front and rear of the train. As such, my model might differ in appearance from many photos of the train after the changes were made. The train has been restored and is on display at the Museum of Science and Industry in Chicago, IL, USA. Another three of these train sets were built for the Burlington route, and the nearly identical Flying Yankee for the B&M. But enough history for now, first a quick image of the train itself, Look at all of those round curves... The nose was a challenge- how to get the rounded and sloped front. The above photo shows my solution. I would have liked to have gotten a little more slope, maybe one plate where I'm currently using half plate steps, but that would have only worked if there were curved sloped bricks of just the right shape/size. I was pleased with how well I was able to capture the distinctive air vents above the cab (including the small gap between the two vents, with room for the headlight), and also how I was able to get the right topographical shape from the rectangular slope bricks for the transition from the front to the top curves. At the end of the engine compartment is an abrupt narrowing and slow drop in height (again at half plate tall steps) to the roof of the cars. The photo also shows the IR receiver not so eloquently hidden. Some of the other shots show a "cap" built over the receiver. That was for the show this past weekend (which I'll post more about after uploading photos), and at this show, 10 ft away from where my trains were running, there were four stations for kids to run lego city train sets, with IR controllers and all. The cap blocked most of the IR, but you could still operate the train from 2 ft away. With that success, I rebuilt it again this morning and put the IR receiver completely under the 1x3 curved slopes so that it is now completely hidden. Again, it will hear the IR receiver from 2 ft away. I'll post photos of that update soon, but that will send the entire folder back for Brick Shelf moderation and I don't want to do that right now. Below the car you can see the skirting on the powered truck and along the body. This feature of the prototype also made it easy to hide a black PF train motor while blending it in with the model (similarly on the trucks, using standard PF train wheels in black, but more on that in a moment). Also of note are the doors with a half plate recess, the brick built mail catch, and custom decals using fonts from RailFonts.com The above shot shows a side view of the motorcar. The stark light does not do the step down in the roof justice. It looks much better with overhead lighting (as seen in some of the other shots). The above thumbnails show how I did the connections between cars. As noted above, the skirting on the wheels covers plain black PF train wheel sets. I got the idea for the 4x4 curves for the diaphragms from Swoofty's SP cars. The configuration in the photos is designed to run on R88 or better curves. The lenght of the cars lead to too extreme swings on R44 curves and the outer corners will knock together. However, with a quick rebuild of the trucks to add one stud separation, she will run fine on R44 tracks. Here is the middle car. The doors were another challenge to get the half plate offset with the profile bricks, and then quick turn from studs up to studs sideways. All sorts of fast brickwork in the intervening 6 stud width of the train. Needless to say, my brain is still hurting a bit from all of the hoops to get the offsets working. Although none of the photos show it, the coach windows offer a clear view across the train. Here's a shot of the observation car. More half plate offset doors, skirting, etc. The rounded observation end was another challenge... ... I started with my basic design from the North Coast Limited. I made a few quick improvements- the NCL had 1 brick tall windows on the sides and so I had to make the observation windows either 2.5 plates tall or 5 plates tall. The Pioneer Zephyr has 5 plate tall windows to help emphasize the small size of the prototype, which then made the transition to the snotted windows on the curved section a lot easier. But I also faced a challenge. The NCL uses a curved winshield to transition from the 1x3 curved bricks of the roof to the curves of the rear of the train. I did not have enough height to fit that same piece on the Zephyr. So I wound up using a wedge plate design to again capture the topographical form of the curved section. It works from a distance at least. Here's a shot of the train from the inside of a R108 curve... ... and a shot at speed at the show this past weekend. Note the bulb over the IR receiver (which as noted above, has since been smoothed over and the IR receiver can no longer be seen from the outside (I'll post those photos in a week or two). If that isn't enough, you can find more photos here in the full gallery. Comments, questions, suggestions, etc. are welcome...
-
Tonight I've modified my Horizon Express, to fit two rechargable battery boxes, two IR receivers, and two motors into one cab. It's rather heavy now... I do still need to put a #8869 Polarity Switch in there though, to get the motors running in the same direction. (I don't have one yet). It'll be a tight fit, but I'm pretty confident it'll go in. I had to pretty much gut the interior of the train in order to fit everything in. Although the outside looks superficially similar, it's actually quite different in places. Can you spot the changes?
-
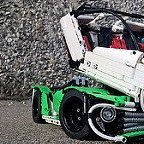
 As some of you may know LEGO is running a Technic Building Competition with Mercedes-Benz. I was looking forward to participate and it took me a while to understand what future truck would look like. Initial idea of building truck driven by both front and back axles was quite simple to implement. Two L-motors have been used for that. Steering is performed by Servo motor and truck is controlled remotely. Fun fact - chassis without aerodynamic cover is somewhat reversible and can be used up side down. Final model is very sturdy thanks to slick and strong body. Unfortunately, due to selected width rear axle is somewhat less reliable and has gear grinding upon start but drives normally afterwards. This is something wasn't possible to completely solve having double wheels per each side. [/url] Below you can check my vision of a truck in year 2045: Few more pictures can be found on my Flickr Stats: 2 L-motors for propulsion Servo motor for steering Small non-rechargeable battery box 44 studs long 17 studs wide 24 studs tall weights 1098g. no suspension
 -

Using two PF (Rechargeable) Battery Boxes with one IR Receiver?
Paperballpark posted a topic in LEGO Train Tech
Hi all, I'm wondering if anyone knows whether this is possible? I need to power a long train, which will need two train motors to pull it. The only problem with this is that it'll probably drain the battery box in about half the normal time, so I'm wondering if it's possible to connect both motors to an IR Receiver, then connect that to one battery box, and connect that battery box to a second one (using an extension cable mounted between the first battery box and the cable from the IR Receiver)? I assume it would work, as it would then be drawing power from both battery boxes, but I'm not an electrical engineer, so can't be certain. Thanks! -
Boxcab Shunter Hi guys, I've just finished a new Power Functions boxcab locomotive. I hope you guys like it. It was my first ever Power Functions MOC and I think it came out quite well. Here are the specs length: 16 bricks (with couplings) hight: 11 plates colour: yellow motor: PF train motor battery box: AAA weight: 314,1 gram But without further ado, Here are some pictures of it! Front view side view Motor How I hid the battery box And how I hid the reciever the only problem is that it doesn't have any wagons... And I have zero idea about what to build for it. I thought about some giant boat trailer or a flatbed but I scrapped those ideas. Bye
-

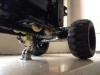
[MOC/WIP] Small-scale RC car
FvdB posted a topic in LEGO Technic, Mindstorms, Model Team and Scale Modeling
Hi all, This is my first post here, I'm not sure if the way I shared my pics works well. I've built a small-scale RC car, based on the 43.2x22ZR tires. My goal was to create a car at that scale, and still have full RC and suspension. The minimum width is determined by the differential and the steering pieces I used. I wanted the back wheels to connect to the rear axle through that double bush, so pulling at the wheels wouldn't mess up the gears in the differential. I have small kids, so the car needs to be sturdy. The result is the work attached. More pics can be found in this album: http://imgur.com/a/dw8jx. The springs I used are a little too soft. Since the car is not finished, this is not yet a big problem for the live axle, but the front already doesn't bounce up all the way because of the weight and position of the servo. I think I'm going to have to replace the grey springs with yellow ones. The steering wheel turns with the servo, but because I used the Arocs-mechanism for steering (no rack), the servo only has to turn a little bit. And this little bit is almost completely lost in the play of the two universal joints. I'm usually quite bad at building bodywork. I think this car should be a mustang-type, because of the current shape of the front, and because I based the rear axle on a Mustang. I've left plenty of opportunities to connect the bodywork, and I plan on making it easily removable. I've yet to think about which of my battery boxes I will use, so that will have some impact on the bodywork as well. Any remarks are appreciated. Filip -
Hello everyone! It's me again and I'm coming with a new project :) Great Ball Contraption has been always fascinating to me. And few weeks ago I decided to start building my own layout. In this topic I will be showing you the progress on my GBC. Here is the first module - the elevator: Watch the video to see how it works: I'm now working on another module with NXT :)
-
Hi guys, I have been trying to make some trains (generally diesel) and a problem that I have always found is powering. for a steam locomotive this is usually pretty simple because of the lack of articulation but wel, bogies are articulated and motors are mounted in the build itself. my question was, how does gearing react to this? and what is the handiest for compact solutions? vertical or horizontal? with vertical you get this: lego 6L train bogie by alterlegotechnic, on Flickr how could something like this be used in a locomotive? would the motor stick loosely in the chassis and what about a vertical motor like this (http://www.brickshel...16/cam06194.jpg) will there happen something in corners? like that the would go faster or some? and with Horizontal you get this Iowa Pacific SLRG 515/518 Mechanics by wildchicken_13, on Flickr how can gearing do this? i mean the rotating bogie, what happens to the gears in it? obviously could 2 M motors be needed for a small train (around 4 cars) or will it fail? I heard something about a V2 receiver? I have a V1 (I think) and that a normal one won't be able to give enough power to both? What is better? XL or M? when will a XL be needed? so in one sentence: vertical or horizontal? what happens to gearing and what is easier when using normal motors?
-

LDraw PF medium motor - crashes LDView?
djm posted a topic in Digital LEGO: Tools, Techniques, and Projects
I'm in the process of creating the build instructions for Akiyuki's Cup-to-Cup GBC module (refer to this forum post). I appear to have encountered an issue with the LDraw PF Medium motor, which is causing LDView to crash. I'm wondering whether someone would be willing to take a couple of minutes to run the following simple test to see whether they see the same behaviour and post their outcome of the test. Obviously the real build instructions are more complex than just a medium motor! I have simply distilled the build instructions down to the point to identify the part that appears to be causing the issue. My machine is running Vista (Business), SP2 Build 6002. 1) Use MLCAD to create an ldr file that contains only a PK medium motor (part # 58120). 2) Open the ldr file from step 1 in LDView. A screenshot of mine is show below: 3) Exit from LDView. It is at this point that I am seeing LDView crash: Any feedback will be appreciated. Regards, David -
Hey guys! I don't do very many MOCs but I do like to do them when I have the time. This time around I wanted to do something that I have not done before, 1. being I have never done a steam engine and 2. a train that does not use a conventional train motor bogie, I would have to build by own and it couldn't be exposed. Keeping that in mind I dove in and started building, this is not based on any train in particular which gave me some freedom on what I could put in. I also wanted to keep some of the classic LEGO train style in my model along with some newer styles. So the only thing to say is Enjoy and constructive criticism is encouraged! MOC 0-6-0 Steam Engine. by Rail Co, on Flickr The main classic element is the 45 degree slopes for the boiler, honestly I love the shape and I am glad I implemented it. MOC 0-6-0 Steam Engine by Rail Co, on Flickr IMG_20150625_183803639 by Rail Co, on Flickr IMG_20150625_184207431 by Rail Co, on Flickr The whistle is made up of gold and silver 1x1 stud pieces The boiler uses A black minifigure head and a round 1x1 piece used for dumbbells in the Collectable minifigure series. I was able to find a chrome piece which looked good on the engine and I really like that. IMG_20150625_183926425 by Rail Co, on Flickr The Medium motor is hidden inside the boiler and behind the 2 side tanks on the engine making completely hidden from view on the outside I hope you like the train if you would like to see another view just ask. Enjoy! -RailCo
-
6x6 Offroad Truck "Modular"
D3K posted a topic in LEGO Technic, Mindstorms, Model Team and Scale Modeling
UPDATE: Rebrickable truck chassis Rebrickable dump bed attachment Truck chassis instructions Dump bed attachment instructions Hi! I want to present my latest MOC, a 6x6 Offroad type European style truck with PF. I have been working on this longer than any previous MOC, slowly improving and perfecting things here and there, and can finally say I am finished with the base model! Oh, and also, the instructions took quite a while to perfect! Firstly I want to say thank you to Alasdair Ryan, Efferman and Blakbird for reviewing my instructions and providing valuable feedback! Special thanks to Alasdair for helping me with some LPub issues I couldn't figure out on my own! So, a little introduction: The idea behind this MOC is to make a sturdy and powerful PF chassis with advanced drivetrain and suspension on all axles. Further I wanted it to be highly adaptable when it comes to equipment to be placed on the back of it, thereby providing people with a good chassis onto which they can mount their own MOCs, and allowing myself the time to develop and publish different implementations to the model in the future. The features of the model are: -6x6 drivetrain powered by two XL motors -Steering via a worm gear, powered by one M motor -Lockable central differential (manual) -Live axle suspension on all three axles -PF "Expansion Bay" to easily integrate up to two more remote controlled PF motors -Working V8 engine Non technical features: -Rack to mount a 9V/AAA/LiPo batterybox in the cabin (for lights, etc) -Openable doors -Lower steps for the crew pivot up if hitting an obstacle -Tiltable cabin -Semi-detailed interior (including gear stick, coffee cups and some instruments) -Manual winch in the front For a lot of WIP photos, renders and high res pictures of the finished model, please visit the appropriate BrickSafe folder Firstly I'll show you a couple of pictures of the internals: The final gear ration result in a fairly low speed, but tons of torque (maybe a little too much, as some U-joints have experienced). Due to the high torque, I saw myself forced to modify the central differential, as I wanted the truck to have some actual offroad capabilities. Let it be known though, that for driving on the floor (both wooden and carpet) this is not necessary at all. Then some more actual pictures of the physical model In the above picture you can see the small 9V batterybox I placed in the cabin to provide power for the blinking roof lights. Also some of the way too long wiring I had to use, as I don't have short ones. There are certain differences to my model compared to the one in the instructions, most notably the rear lights and the roof of the cabin. This is due to me lacking the proper pieces, so it looks a little bit off in the pictures. The obligatory underside shot. Here you can see most of the mechanical side of the drivetrain It's a bit difficult to get good pictures of the suspension working.. The PF Expansion Bay. As you can see the two channels are free, and there is room for a lot of wiring. You can also see the dual white clutch gears used for the steering. It makes it powerful and fast, while still preventing the M-motor from stalling. On the other side is the space taken by the lever to engage the diff lock. I originally had an RC function for this, but it turned out a little unreliable due to the M-motor driving itself back a little after stalling. Also, it took up unnecessary space. Shot of the driver's side interior of the cabin. The cabin tilts forward to allow access to the batterybox... Which can then easily be removed. Here you can also see the V8 and the "fake gearbox" with shift lever and cup holder A shot of the rear of the vehicle, meant to show the available space for additions. Okay, that about sums it up. A couple of notes: I initally wanted to have independent front suspension, but this, together with a lockable central diff took up way too much space. Designing the front axle was a real pain, as it had to be very low to not interfere with the engine. This meant the steering motor had to be placed on the chassis. I first tried to use the servo motor, but it took up too much room. The solution I ended up with is as good as it gets given the parameters I had to work with, although it does have a little slack But it works great! Like I said This is supposed to be a modular build, and I am in the process of developing said modules now. Firstly is a picture of three different LA systems that are all more or less "drop in" additions to the model (you need to remove some of the transverse 7L axles seen in the above picture). The one to the left is used for a side tipping bed, which you can see in the next picture. The other two are to be used with for example standard tipping beds or other modules This is a WIP side tipping bed, using the two small LA setup shown above. It is a bit short maybe, but that is to give room for a rear attachment, like a Palfinger style crane, or a material handler claw, like in the picture below: As you can probably see, this is just a modified version of the Unimog 8110 crane, but with a claw (a la 42006) and an extendable boom. It is manual. EDIT: Also; yay or nay regarding the stickers (from 42025) on the cabin in the above picture? I am also going to make a compressor unit that can fit underneath the bed at the cost of the tipping function. Lastly, here is a taste of the instructions, which you can download here It is currently pending approval at Rebrickable (posted last night, so should hopefully not be too long). In the mean time, here is the parts list And here is the LDD model for those interested (a couple of pieces couldn't be properly attached) So thanks for taking the time to read all this, I hope you like the model, and that some of you will be building it yourselves. If you do, please come back here and post your impressions, along with a picture or two of your build! As always, comments, criticism etc etc are very welcome EDIT 2: The truck is built in white in the instructions, so most white parts can be substituted for any other colour. Also, as I note in the introduction of the instructions, most LBG and DBG thin and normal liftarms are used in the chassis, and can be substituted for other colours. The colours are used to make the instructions as clear as possible -
Hey everyone! Been fiddling around in LDD for a few days now, and finally have something decent enough to post. I am working on this project with the intention of proposing it on Lego Ideas, however I would much rather know what you all think first!! This project started as an attempt to place PF components into a model of a Midland 4F. The end result imho looks... boxy and generic to say the least, but that may end up being a good thing...? The dimensions in studs are: 34 long by 10 1/3 tall by about 7 wide, not including the side rods. Front: Midland 4F(v3) by Nick Jackson, on Flickr Back: Midland 4F(v3)2 by Nick Jackson, on Flickr The colored cables are: red= receiver, green= motor, yellow= lights. Below is a close-up of the frame setup. I REALLY like how this turned out, because: 1) it has space to mount an L motor! 2) I can change gear ratios from 5/3 (speed) to 3/5 (torque) manually! Midland 4F(v3)3 by Nick Jackson, on Flickr Please give me some feedback, all are appreciated!
-
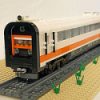
Dear all EB users, From MTRkustoms Railworks we have the honor of presenting the RENFE 446 Cercanias Electric units, This train has an import significant for me as is the train where i pass a lot of time in my life in my daily travel to work. 446 series was a specially designed train to provide a proximity service in the early 80s and the previous series, the 440s were insufficient for the huge amount of passengers in the big cities of Spain. This units have 2400kW of power and a maximum speed of 100km/h. both side driving units and 3 pairs of doors in each car MODEL SPECS Lenght: 180 studs / 144cm Wide: 7 wide Height: 11 bricks (13 bricks with raised phantograph) Weight: 2200g Others: Turns in R40 but looks awful, much better in R104 or smooth curves. Comparison with real model More pictures Chassis and 9v-PF connection (this model have a 9v motor connected to a PF motor in order to take current from 9v rails and increase the power and traction with no more expensive 9v motors) This train in 90s was frequently vandalized, so this is my personal tribute with a full graffiti side More pics and full resolution pics in Flickr Album Enjoy it
-
Here's my work in progress for the Sbrick contest. The plan to build this was actually before the contest was announced, but I didn't actually start building until januari, just had a rough draft in my head until then. I usuallly don't post WIP stuff, but since I solved the problems I had with this build (and there were many, but more on that later), I feel confident enough to post a little about it. It has the following functions: 2x L motor for drive (and steering obviously ) 2x M motor for the arms The M motors will also fulfill another role, but I am keeping that as a surprise for now. I tried to "hide" the 2 IR recievers in Wall-E's front. He has a display there too where the black tops of the recievers pop, though it isn't as wide as this and the battery meter suffered a little because of it. Of course with an Sbrick you can make a proper display, but I think this works pretty well for a purist As you can see I still need to make a neck and a head, but the groundwork inside is ready to build that so I don't expect much problems with it (yes, I totally jinxed myself). Also, the white wheels in the tracks are temporary. I ordered grey ones from BL, which already shipped and I hope to recieve them some time next week. A little glimpse of the insides: You can also see Jeroen Ottens' awesome little microphones. Why did I used those? The regular ball pins or balls with axle would touch and block each other if both M motors run, these do not. Besides cramming in 1 batterybox, 2 IR recievers, 2 L motors and 2 M Motors I also used a gearbox based on this principle: I found this type of gearbox while looking around on the web trying to figure out what would be cool (and compact) to use in my model. No need for me to come up with my own gearbox when there are so many good ones online after all I chose this one because it meant I could always control 5-6 functions without knowing which gear was selected in the gearbox, which adds to the playability imo. I am aware there alot of Lego Wall-E's out there, ALOT. I know, I saw most of them when looking around And of course the Lego Ideas Wall-E that is incoming. Though that guy needs to explain to me how 5L tracks fit in a 10L wide body when Wall-E wants to transform into a box. I do think however I made a Wall-E that's different than most, for the simple reason it is build 90-95% from studless Technic. All others either have Technic bricks combined with Sytem bricks or are build from System bricks. It wasn't a goal to design a studless Wall-E though, it just came to be during the build and I tried to solve stuff as much as possible with studless Technic since then while still looking clean. Though I am unsure if this studless approach works for the hands, perhaps I should make them from System bricks. The hands do function like Wall-E's real hands though and can be set in fixed positions thanks to friction pins and 3L axles with stop. For the top cover I didn't want to add another layer of liftarms since it felt "too high" for the scale of the model, but I couldn't used thin liftarms either unless I wanted a swiss cheese look for the top, so I went with Syetem tiles to provide a clean smooth top. I actually wanted to make a transforming Wall-E but still have drive and moveable arms and whatnot, but I simply can't build that at this scale (*looks at all that PF blocking the places where the tracks and head would need to go in to be a Wall-E box*). Speaking of scale, I took a little bit of liberty with that. Simple example: 5L tracks, 13L wide body. Which makes technical sense to me when looking at his transformation in the movie (I watched it again for "research" before I actually started this build ). 13L wide body means 1L for the sides and 1L for inbetween the 5L tracks, those spaces are there in the movie so they are there in my model. I also wanted the rear wheels in the tracks to be a little bigger. I even considered Unimog rims, but those don't play nice with tracks. I am open for suggestions for bigger rims that play nice with tracks, though I do consider these to be ok (hence why I ordered them in grey ). Fun fact: every (and I mean EVERY!) part has been at least rebuild two times. I think I even took the rear cover apart about 8 times, the centre 3 times, arm mechanisms 4 times, tracks have been rebuild 4 times. Though the last track revision was simply to scale it up with bigger rear rims, since I had smaller ones in there first which looked too small with the rest of the model. All other revisions were basically reinforcing the structure to prevent any gear slips. I solved the last of those gear slips today and the model is very rigid now and works perfectly. Sorry for the quality of the pictures, it's dark outside Hope you guys like it so far. More to come.
-
RC MajklSpajkl's Dawnbreaker by PKW
PKW posted a topic in LEGO Technic, Mindstorms, Model Team and Scale Modeling
Hi to all! Proud to present you my latest MOC… ops, sorry, my latest MOD! First I have to thank MajklSpajkl that made an awesome MOC, but he has also made my work possible, so I decided to put some link to his creation: original topic, (where you can find instructions)second here is my MOD: important pieces I've add: -lipo BB (same size of the AAA one) -M motor -L motor -receiver -16M axle (EDIT ) -yellow shocks -U-joint I built this in more or less 30 minutes but it is a really funny creation! is has also a particular return-to-center steering based on an old force: GRAVITY! how it works it is simple (hope I can explain it as simple as it is ahaha): the car has an high caster angle, this angle auto-center the wheels while running forward, I've put the M motor directly linked to the steering 5,5 axle and it works well! in fact when the motor move the steering it forces the mechanism so when you release the command this elastic force make the motor turning back more or less at the center, it is not important that it is perfectly centered, because the high play of the steering make the caster angle center it with more accuracy :3 here are some photos (it has different colors because i've not built it from the two original set) -
Well another month another MOC! This is actually my first non-steam loco MOC, and, as far as I know, the first Lego model of this loco as well. Produced between 1950 and 1953, the RF-16 was an early diesel electric locomotive built by the soon to be extinct Baldwin Locomotive Works. While the RF-16 is typically synonymous with Baldwin's awesome "sharknose" trim (the main reason I wanted to model this loco), the styling had already been used on the earlier DR-6-4-20 and DR 4-4-15. 160 RF-16s served on the B&O, NYC, and PRR for about 10 to 15 years, though two units were running on the D&H up into the late 70s, and I believe the pair are still stored on some shortline in the boonies today. I've ordered parts to build at least one unit in a PRR black with pinstripe livery (the pinstripe and livery will probably be a sticker) - I would have really liked to do dark red with pinstripes, but dark red doesn't come on nearly enough parts. The part I'm least happy about is the windshield; Lego just doesn't have the resolution and doesn't make anything in the right shape to capture that funny windshield shape. From the start this unit was designed to run on PF unlike my T1 tender where the PF was kind of an afterthough. I've got two M motors geared 1:1 powered by the big battery box. The grate at the rear of the loco is a ladder such that you can shoot PF signals to the receiver behind it. And finally you can see some of the shenanigans used in the sharknose. Since I didn't have to mess with a complicated articulated chassis as in a steam loco, I haven't actually built any of this in brick, so it'll be interesting to see what happens when parts come. EDIT: Instructions for this model are now for sale on Rebrickable: https://rebrickable.com/mocs/MOC-47470/NonsenseWars/148-baldwin-rf-16-sharknose
-
HZ 2041 (in fact HŽ 2041, as "Hrvatske željeznice", Croatian Railroads) or Djuran (Đuran) Train Engine as a nick name is diesel-electric engine dating from early 1960 from Croatian Đuro Đaković Factory and Franch Brissonneau et Lotz (registered in former YU as JŽ 642). According to data from www.zeljeznice.net, today there are 28 working engines in Croatia in two colors: red and blue. This is a model of red Djuran: ( http://www.bricksafe...an/DSC06438.JPG in high resolution) ...and this is a photo of the working (real) one captured in summer 2014 by Laurus (http://www.zeljeznice.net/forum/index.php?/topic/11180-hz-2041-jz-642-dhuran/page-13; photo published with permission of the author): Model is fully working powered by standard Lego 88002 motor and PF with working lights in the front and in the back of the engine. Djuran is mostly used as cargo train engine and for that reason (and for more fun for grandchildren, as well) this model is accompanied with five boxcars in the same color scheme. Hope you like it. Comments and suggestions appreciated Some more photos with one not very perfect video follow. (hi-res: http://www.bricksafe...an/DSC06437.JPG) (hi-res: http://www.bricksafe...an/DSC06433.JPG) (http://www.bricksafe...an/DSC06441.JPG) And the short video of cargo train:
-

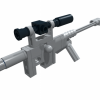
[WIP] 18 Volt Drill Master LEGO conversion
Boxerlego posted a topic in LEGO Technic, Mindstorms, Model Team and Scale Modeling
18 Volt Drill Master LEGO conversion [WIP] BY Boxerlego Introduction Hi, This is my latest LEGO custom motor project but its not the only one I'm working on I just bought this 18v drill today for the intention of modifying it for LEGO use. My previous drill motor project I only modify an old 18V drill motor to fit with LEGO but this time around I've a new 18V drill motor with a fresh 18 volt battery pack and I'm going to try to fit with LEGO. The nice thing about this is I got that power drill with an 18v battery pack along with charger for a great deal of $16, the original sale price was $35. My first 18v drill motor project had tons of problems to over come and for a long time at first the motor was not even able to be power with LEGO 9V PF system. This was a major problem for me and ultimately I didn't quite know enough on how to drive a DC motors with electronics. So I moved on to my next motor project which was a stepper motor and was more efficient that it could be driven with the LEGO V1 PF system. This was a good step up but it wasn't quite as powerful as the drill motor can be. It didn't take long for me to figure out how to drive a motor with electronics, there are lots of good YouTube videos out there that got me started but ultimately how to properly drive this 18v drill motor with LEGO was still far from perfect. My first motor driver had several mistakes however LEGO was able to still make it work but still those problems needed to be understood and corrected so I can make improvements and make it work better. I will spare all the details here and I will just say that in 2014 I learned tons about how to properly drive motors and more efficiently. Which brings me to my other motor project the upgraded XL motor I'm working on, which is reaching the final stages and that is building the motor driver. This motor driver here for the XL motor MOD is absolutely the best one I made yet. You wont believe what I was able to with this motor driver or maybe you will . I will just say that this motor driver here I made works from the regular 7-9 volts the LEGO Battery box can supply but however the XL motor mod has a switching DC power supply that can step up the 7-9 volts from the battery box to 12 volts for this XL motor mod to work off of. Overall this topic will mainly be about the 18v drill motor LEGO conversion so to start it off I want to show a video time line of some my previous projects with my first drill motor. Video Time Line Think this is either going to work or not please feel free to comment on the matter. I hope everything works out well -
LEGO fighting robots that play soccer
PKW posted a topic in LEGO Technic, Mindstorms, Model Team and Scale Modeling
Hi to all! waiting to the sun to film the RC Dawnbreaker I've edited and posted an old video that I've made to test my battle bots: crab and scorpion. During the video me and my cousin were talking in italian but don't worry: i've added some subtitles just to translate our wisecracks ;) Some stats about the robots: GRANCHIO (crab) weight: 900g weapons: claws motors: 2 XL(wheels) 2L(claws) strengths: 4x4, can keep the ball weaknesses: (hardly) flippable SCORPIONE(scorpion) weight: 900g weapons: flipping arm motors: 2 M (wheels) 1 L (reloading winch) 1 old 9V (gearbox) strenghts: atomic-like powerful weapon, defensive/offensive weapon weaknesses: hard to control (really), low traction enjoy the video (likes and comments are welcome if you like it ;) ) -
[MOC] Mercedes G-Class SWB
Teo LEGO Technic posted a topic in LEGO Technic, Mindstorms, Model Team and Scale Modeling
Hello everyone, Here's my newest MOC, a Mercedes G-Class. After months of hard work, and bugs and fixes, it's finally finished. It was built to incorporate all of the best elements of high-torque gearing with a compact bodywork. It features: -Drive - 2 x XL, geared 4.5 : 1 -Steering - 1 x Servo -Lights - 6 x LED with hidden switch -Suspension - pendular A video showing all features: Pictures: -
Hey everyone! I've finally decided to start my own thread, rather than piggy-back someone else's. Frankly, I need help with this: https://www.flickr.c...157643245649484 I'm trying my hand at remaking the classic 7760, with full PF components (lights too!) for a while now, but have hit a wall. The problem lies with the cab windows, and my current solution looks terrible in real bricks... So, I threw together an LDD moc up of what I currently have, and earnestly hope that you can provide me with something insightful! http://www.brickshel...ry.cgi?f=554681 Thanks in advance, ~M_slug357~