Search the Community
Showing results for tags 'PF'.
Found 253 results
-
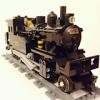
Shortly after jtlan's CNJ1000, I set out to make a small PF boxcab of my own! I think like many of the earliest diesel electric locomotives in the US, the A6 had its beginnings in the Kaufman Act of the 1920s, which banned steam locomotives from operating in New York City. PRR built three A6 class two-axled switchers (3905-3907), one of which was repowered and reclassified A6B (3907), all of which operated in various New York yards between the late 1920s and late 1950s. Here is a picture of the lone A6B with some B1s up for scrap in 1961: This projext actually started out as one of those B1s, but along the way we found engineering drawings for the A6/B, and I was able to cram the drivetrain I'd designed for the B1 into the smaller body of the A6B. The unit is 24 studs long between couplers and has about 400 parts. The power comes from an AAA battery pack driving the old 9v geared motor. Not surprisingly the most difficult part of this model was figuring out how to position the battery pack, the geared motor, and that darn PF receiver inside the scaled dimensions of the loco. There weren't *that* many potential combinations of fit, but I had to go through a couple. In the end it's actually pretty tight given that the face of the receiver is already at the same height as the top of the curved slopes that make up the sides of the roof. The transmission is as simple as I could possibly make it: just 8-tooth gears meshed into 24-tooth crowns. You could actually speed this up by using 12 and 20 tooth bevels, but I prefer to go slower and have more pulling power - I want to be able to use the most worn out AAAs floating around and still go somewhere. Consequently the loco is *really* slow, but I'll call that a feature. Otherwise, the build is pretty straightforward, but I did try to make the top easily removable. My only real beef with this implementation is that the L drivers are slightly too big and the 1x1 tanks slightly too small. The receiption is also not amazing due to the positioning of the receiver, but it could be worse. There's a flap in the roof to access the power button. I have no idea what the big tank in the back is for. Someone enlighten me. More pics Bonus material #1: I tried my hand at "weathering" the unit by changing some of the brick colors, but I couldn't really get a combination with which I was happy: Bonus material #2: LDD of the B1 that I didn't finish. Pantographs are a pain. EDIT: Instructions now available for sale on Rebrickable: https://rebrickable.com/mocs/MOC-76470/NonsenseWars/148-pennsylvania-railroad-a6b-v2-powered-up/#details
-

[MOC] PF Buggy 2
Madoca 1977 posted a topic in LEGO Technic, Mindstorms, Model Team and Scale Modeling
Hello everyone, After finishing Corvette, I built simple RC buggy. It is lighter, faster and more agile than my preceding buggy. Weight is 590g. Total 312 parts. Video: Building instructions and more pictures:https://plus.google....64977943/albums Rebrickable:http://rebrickable.com/mocs/Madoca1977/pf-buggy-2 The performance is not as good as RC buggy motor models... But I enjoyed the buggy driving over obstacles at a good speed. -
Hello! I am new member here and I wanted to share my ultimate MOC so far: More than a year I am planing, building, disassembling Toolcat 5600. Why so long? I want to make it functional, completely RC. Some time ago I ordered few S-Bricks, that changed everything I had in my mind, so I still have only chassis and some body work lines to understand how big it will turn out. My Toolcat will have: 1) RC drive, no gearbox (I think I will not be able to fit one in) 2) RC steering with different steering modes 3) 4x4 4) Independent suspension 5) RC dump bed 6) RC front jib 7) 3 point hitch in back 8) On board compressed air distribution system (autovalves) 9) Pneumatic and PTO connection points for auxiliary units 10) Quick release system for fast front attachment change 11) Few attachments to play with I do not promise to end it soon but I will keep posting progress reports. If you are interested or have some questions please feel free to post. I will post some pictures soon ;)
-

Lego working warning lights
Timtechnic12 posted a topic in LEGO Technic, Mindstorms, Model Team and Scale Modeling
Hello, I'm Tim. I'm new to EB. I had an idea to make working warning lights with only non rare lego bricks. So i came up with this idea: http://www.youtube.com/watch?v=0GAaL5OIw7M I hope you liked it, Tim -
[MOC][MINI] 6x6x4 with live axles
PKW posted a topic in LEGO Technic, Mindstorms, Model Team and Scale Modeling
Just start this topic with a picture, it is full of hint about how I want To build my MOC (and I hope i success) What are them? :D -
Most efficient/creative use of PF components in small locos.
Srbandrews posted a topic in LEGO Train Tech
Hi all, Apologies if something like this has been done already, but I couldn't find anything quite like it. I thought it might be a good idea to start a thread to share ideas about the best ways of squeezing Power Functions into small spaces. I occasionaly come across images where I think 'oh, that's a good way of fitting that in' but usually I've stumbled across it by chance and the reference is never there when I need it. So if you have any images of your own MOCs, or somebody elses (try to give credit of course), share them here. As a start, I found this video by a youtube user names Zanthera quite useful in the past, but tenders can make things a lot easier for steam loco builders: Anyone know of any really clever tank engines or small shunters? -
Hey all, I'm finally getting around to sharing one of my latest MOCs, a Norfolk and Western GE U30B. The U30B is a four-axle second-gen diesel-electric locomotive produced between 1966 and 1975. 296 units were built for 12 railroads, of which 110 went to the N&W. With the U30B I wanted to make a "no compromises" Power Functions locomotive. I felt that my first three Pf implementations had gotten progressively better, but that they all still suffered from what I considered various compromises like not being able to change gear ratios or not being able to easily replace batteries. The no compromises loco would have to hit these checkboxes: good PF visibility easy to change batteries high structural integrity max traction/power for given form factor ability to use different PF motors/change them ability to use different gear ratios/change them Given these constraints, I chose the N&W U30B because it was one of the last modern diesels to have 1) a high short hood, which I really like, and 2) 4-axle trucks which are more easy to make with more structural integrity than 6-axle trucks. Those being said, U30Bs for other railroads were built with low short hoods, and the 6-axle U30C was twice as popular as the U30B. After a few months of on and off development and construction, this loco was completed in February, just in time for locomotive power testing! At my usual scale of 15" per stud, the 1100 part loco is 8-wide and a whopping 51-long from magnet face to magnet face - the longest I've ever made. The construction isn't really anything to write home about: like my HH1000, most of the model is studs up with large tiled plates forming the detail on the sides. The handrails are made of a third-party tubing, which isn't quite as good as flex, but orders of magnitude cheaper. There is one slightly clever bit where the roof has been raised by 1LU in order to not have a ridge between the "plate with bow" and the "roof tile" and said 1LU gap is filled with a bracket: But the real question is: how does it fair with regard to my original requirements? The PF receiver sits at the end of the loco with the dome exposed - I consider this generally the best case for PF; reception from the front isn't quite as good as it could be, but I'd rather have that than the top of the receiver sticking up further. As with my previous two PF diesels, I have used the big AA battery box in order to get the most amount of energy into the loco without going to a custom power source. This drives two L motors - the biggest motors you can fit in a 5-wide body - connected to a V2 receiver. The battery box is secured by two "crossaxle 3M with knobs". Pulling off the sides (which are connected with about 6 studs) and pulling out these pins allows the box to drop out the bottom. Similar to a Real modern diesel, most of the structural integrity is in the frame (blue), which is just a big mesh of big plates. Furthermore, the battery box is mounted to a set of technic beams (green) which rests on the gearboxes (yellow): the weight prevents the gearboxes (which are just studded together) from coming apart when a lot of torque is applied. But those L-motors are pinned into the gearboxes with a pattern (red) such that M motors would also work! And E motors! And I have left enough space and connection such that the old geared motor with the appropriate extra reduction could also be used (I think). Finally, the motors are oriented such that the drivetrain has an extra stage (green) where gears of different sizes can be used and the gear ratio changed. This screencap shows 3:1, but in practice I have been using 5:3 with the 20-tooth and 12-tooth bevels, which I find to be a better balance between speed and torque. EDIT: Instructions now available for sale on Rebrickable: https://rebrickable.com/mocs/MOC-84533/NonsenseWars/148-general-electric-u30b-v21-power-functions/#details
-
A midscale trial jeep
Appie posted a topic in LEGO Technic, Mindstorms, Model Team and Scale Modeling
Here's a creation I put together in a couple of evenings after Wall-E to enter in a trial contest at a LUG meeting: The contest had a few rules: - Use the 62.4 Lego tires (which do look a little small for the height on this model) - Make it 17-20 studs wide - Use 1 IR reciever - Use 1 or 2 motors for drive - 1 motor for steering Everything else was pretty much free game. It features quite a load of "stolen" ideas: - Zblj's little portal hubs (thanks for that nice idea, though I should brace them more since they can get seperated a little under force as I found out at the trial) - Snipe's limited slip diffs with rubber bands (though obviously more people used this idea, I am not sure who used it "first", I only know I saw Snipe's post first. Either way: thanks) - TLG's 9398 steering setup (which I only made a little smaller) While I know diffs aren't a good idea on trial trucks, I refused to have no diffs in my model. So I looked at other options, came across something called "torsen diffs" but I couldn't fit them in a 20 stud wide vehicle with portal hubs (21 is the best I got). Then I came across this idea for a sort of limited slip diff, which worked pretty well at the trial. You can also see the steering axle has some free play (and 2 bevel gears) so the steering would still work when the suspension is at an angle. On a rare occassion, under force the bevel gears would skip on the gear rack since on the other end are 2 universal joints, so bracing isn't the best at it could be. Also given the fact that due to the suspension the steering axle's range of motion isn't even fully utilized I could have probably braced it in the given space, but I didn't find out until the trial that this actually needed some better bracing Trying to keep the weight low and balanced I learned that a battery loaded AAA battery box is about equal in weight to a XL motor and servo motor. So having the 2 motors on one side and the battery box on the other seemed like a good idea.The XL motor ended up with a gear reduction of 1:7. Which means it certainly isn't the fastest, but it runs up a steep hill until it would simply fall on his back before gears would grind. Gears did grind however at the trial, but that was partially due to lack of skill from the driver and especailly one very annoying (yet awesome, because it proved to be the most challenging) obstacle After I had a functional chassis, I pretty much slammed a body on top of that with a little interior. I didn't have much time left before the meeting to make it really fancy. In hindsight I would have probably made it a little bit lower and cover more of the chassis, but I still think it turned out all right The guy who organized the trial at the meeting said we had to keep a space open on the model for a 2x4 tile. He made these nice 2x4 tiles with a custom print. Of course you would like a video, but at home I don't have much obstacles suited for "trial". However at the meeting, the guy who organized it made a video, but he hasn't released it yet. I hope to see it soon so I can link it here -
Hello This creation isn't that new anymore, however after publishing pictures on brickshelf and flickr, I think it's time to present this train here in this forum. The prototype was the RAe TEE II 1053 which is today a historic train and was used on the TEE-Network some decades ago. The train consists of 6 cars: two cab cars, two coach cars, a dining car and a motor car. This train only had first class seats and was (or maybe still is) one of the most luxurious trains of the swiss federal railway SBB. The four passenger cars in my model have each 13 seats, in the dining car there is enough place for eight passengers. The passenger cars have gender seperated toilets, the women toilet even featured a make-up table. I tried to make it look like theres a mirror in this toilet room, since there is very limited space on creating something like that. Well, now let's continue with the pictures. Cab car by StefanEris, on Flickr Cab car front by StefanEris, on Flickr Toilet by StefanEris, on Flickr Dining car interior by StefanEris, on Flickr The whole train by StefanEris, on Flickr And here is a picture of the real train: RAe TEE II in Zurich by StefanEris, on Flickr The front of the train was quite a challenge to build and I still want to make some improvements, however the parts I need don't exist (yet) in dark red. There are more pictures on flickr if you are intersted. I also have a video there:https://www.flickr.c...157633185923370 Thanks for looking and reading, critics and comments are welcome! Regards Stefan
-
Recently, I came across an idea, originally by Leo Dorst, on a method to make a crossover track with standard Lego pieces. Seeing as original crossover tracks are rather expensive on Bricklink, and there is no real equivalent in terms of current Power Functions track parts, such a thing might be useful. His original sketches: From these pictures, it was fairly easy to recreate in LDD, then translate into real bricks. But, there was a problem. As it is, this design does not align with the geometry of the existing Lego track. But, the solution was fairly simple, which was to extend the cross 4 studs in every direction, as seen in my rendition. Now, the cross has exactly the same dimensions as the original, and can be used exactly the same way. All that was left to do was test it. I created a figure 8 shape using the pieces I had, and made a simple train run with Power Functions. It worked, although there are some traction problems when the engine is being started in the crossing. But, it is not a big problem, and it could be remedied by putting rubber bands on the PF train wheels for extra traction. .LXF file:http://www.brickshelf.com/gallery/saberwing2/Ideas/LeoDorst/rail_crossing.lxf I hope you all find this useful, especially those of you who don't want to use the other method, which involves cutting up parts.
-
Presenting my hi-rail exacavator. It is a fun little creation I put together for an upcoming LUG meeting at train themed brewery. It is driven by the rubber tires mounted to a PF train motor. The battery box and IR receiver are located in the high side gondola. It is made to stand up to children playing with it. I got the inspiration from a picture of the LEGO display at LEGO World. A designer took the 4203 set and put it on rails. I don't think he/she used a train motor since his/her wheels are spaced much further apart. He/she also used a box car with draw bar. I think a gondola would make more sense to pair with an excavator to dump material into. Hi-rail Excavator by dr_spock_888, on Flickr Here it is running on some tracks: I morphed it from this originally:
-
Hello! Let’s start with a little introduction. About one and a half years ago, - thank to my growing daughter, who started to play with Lego – my dark age ended. Bought the 9395. I was amazed. New parts, interesting building technics... at least for me. The journey begun... I’m rather ’reader’ type, so not posting too much, but reading the forum almost every day. Working on a project, since last autumn, and when this contest came, I decided to build something (something different) Simply I could not choose, what to build. Another super car/excavator/ truck/tank/crane? No. There will be a lot of them. This train of thought led to the idea, that I should build something, what not going anywhere. Still not easy, but fortunately it came into my mind. Let it be a whirligig. Decided. So, my contest entry is a technic whirligig. Functions: 1. Rotating superstructure. (L motor, speed control with train remote a) 2. Main arm rising/lowering (XL motor - standart remote a) 3. Secondary arm moving ( L motor, - standart remote b) 4. Basket rotating (M motor - speed control with train remote b) It's still in progress. I received the last parts today. Hope that willl be ready till the deadline. Pictures at the weekend.
-
Howdy folks :) With the help of my children, I got back to Lego about a year ago, started to buy massively and then found my true purpose in life, Technic! ROLUG was a great help to me and I began to build various cars for local TT contests, then I found Eurobricks and I participated in the Bionicle contest, as well. Now, I consider myself a newbie in Technic and I mostly adapt existing models to my liking, but since recently I started to build my own MOCs from scratch. What I want to show you guys is my latest creation, an arctic exploration vehicle based on the famous Thunderbirds show, namely The Mole, in my own interpretation. This is my 2nd attempt at this, my first was ok for showing-off but could not actually move well on snow (lol), so now I am rebuilding it, with performance in mind. I am basically building a high-profile tank with a huge drill in the front and another cool function which I prefer to keep secret, until it's working as I want. My personal goal is to drive it head on into a snow bank and to pass through it like butter! (we can all dream, no?) See the photos below and let me know what you think. Any suggestion or comment is welcomed, thank you all for watching. If you are curious to see more photos and also what I have built so far, feel free to head over to my Flickr page. Enjoy :) https://www.flickr.c...th/16439896211/
-
Hello. I have long had a desire to make the Tumbler, but unfortunately did not have the details. Now, with parts the time and desire, I immediately set to work. The main objective was to create a small model which could go. The drive two L-motor with gear 1:2. The steering servo motor. That's all. Thank you for your attention. Your Sicil. Sorry for my bad english.
-
This is my new MOC ! It is a fast buggy inspired by this one : Specifications : 2L motors for the propulsion 1 servomotor for the direction 4 tires (awesome !) More photos are coming !
-
[TC6] Walking Dragline
Epic Technic posted a topic in LEGO Technic, Mindstorms, Model Team and Scale Modeling
Hi guys I am working on a massive walking dragline. If you don't know what a dragline is, they are usually used for coal, oil, and tar mining above the surface. Mine will have a gearbox for switching functions which will use an L motor, an XL motor for lifting the main boom and for rotating the structure. It will have an L motor for the drag rope and for one of the feet, finally another L motor for the hoist rope and for the other foot. I have already completed the main boom. I cannot upload any pictures of it yet because I am on vacation skiing without my LEGO, you will all need to wait until Sunday or Saturday. :( If you don't know what a dragline is, well look it up!! -
For a while, I've been interested in trying to squeeze PF into a small british style steam locomotive. I'd played around with several ideas in my head but couldn't for some time land on a design that looked good. Eventually, I found an image of an Andrew Barclay 0-4-0ST shunter that had slightly more squared-off tanks than the usual short saddle tank locos. I decided that was the route to go down and set about putting a plan together, and here is the result: There's not really very much to say about it. It's somewhat shorter in appearance than the prototype, party because that seems to have become my style, but practically because, on such a short wheelbase, there is a limit to the overhang you can have at the front and back for cornering purposes. I plan on refining it, of course, so any comments are more than welcome. EDIT: Short video of it working and a self-indulgent snap of my steam locos built so far: Power Functions Steam Shunter by Srbandrews, on Flickr
-

new power funtions parts
9v system posted a topic in LEGO Technic, Mindstorms, Model Team and Scale Modeling
hi guys what new pf parts do you want to see in the future as im interested to know what you think will be made next. -
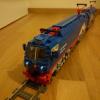
Hello My Friends! New MOC, replica of two Brothers :) LEGO - CP2001 CP2064 by SergioBatista, on Flickr CP2000 Series CP2050 Series I Made Also a primary version of CP2000 with another color scheme LEGO - CP2001 by SergioBatista, on Flickr
-
 Hello! INTRO: I am new on this forum but not new to legos. It's been almost two decades since I played with legos (as a kid) and recently decided to invest in several sets (42009, 8110, and 9398) to get some parts to work with. My next step is getting all the power functions I may ever need to build something cool. Let me define "cool" because my goal is make this a hobby where I make my own creations (I think MOC is the name?). I love the idea of remote controlled functions and planning to buy a whole lot of PF parts from lego directly. However, I am still struggling to understand what I will need... Hoping someone with knowledge on the subject of PF can break the parts down for me. How do the PF components interact? Power unit / Motors: How many motors / components can you hook-up and draw power from one power unit? The power unit is 9V - so if its possible to hook-up 2 motors, each motor will be operating at 1/2 the normal power & speed vs when you hook up just 1 motor? How long does the power unit last say if you hook up 1 large motor and let it run until it dies? Any other limitations / things I need to know about the power unit? Cables / Switches: I noticed there are extension cables and switches you can buy - these are only for convenience purposes? My understanding is the switch allows you to control the power source from another location. IR Remote / Receiver: This is the newest part of legos to me (aside from mindstorms) - how do these work exactly? The IR receiver has 4 channels - does this mean you can have a maximum of 4 IR receivers (and thus control a maximum of 4 motors)? One IR remote can switch between all 4 channels - is there any reason to get multiple remotes? Is there ANY reason to get more than 4 IR receivers for the purpose of building ONE custom model?... so having a 5th IR receiver on one model is basically useless?.. please correct me if I'm wrong! As far as remotes, I notice there are 2 types: IR Remote Control IR Speed Remote Contros What is the difference between these two remotes?? Are both necessary for someone interested in building various controllable functions into a model? Are both remotes V2 and work with the IR receiver (which is also V2)? My understanding of the two remotes is this: The basic IR Remote controls power source On/Off and rotation direction. The speed IR Remote controls power source On/Off, rotation direction as well as rotation speed (slow,med,fast) As far as getting these PFs, my plan is this (please let me know if I am missing something or getting too many receivers/remotes): buy 4 IR receivers buy 2 basic remotes and 1 speed remote buy 2-3 switches and extra cables buy any additional motors I may ever need Sorry this post is so long! I am hoping I can close all the gaps in my understanding of PF components in one thread. Thanks so much, -Emilyan
 -
[MOC] Yellow race car
marceriusLV posted a topic in LEGO Technic, Mindstorms, Model Team and Scale Modeling
My first attempt to build a race car. Shape is OK, maybe front is a little bit ugly :D Built in one evening for Latlug event in Limbaži. For rear wheel arches I used cut SMC TU 4x2mm hose. I did not hide battery box because this car was intended to drive around in exposition room. Battery box change is fast :) Features: Drive - L motor Steering - M motor Return to center steering I like how rear part of a car turned out. Kids had fun, they loved to drive around with it. Also to crash... Front is fragile and holds to the chassis only with two pins. I think that explains everything. Same story about the front axle. Only two pins holds it to the chassis so after a crash usually it was broken too. Steering system and front axle: I have short video about it in Flickr More photos here Cheers! -
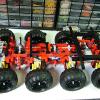
This is my first RC MOC. Built for small event in May 2014. Specs: 4x4 3 differentials Drive - XL motor Steering - M motor Pneumatic suspension on both axles Autovalve + compressor - M motor Dumping - M motor PF lights Work in progress: Design of the rear part was rushed, so there was room for improvements. Rear pneumatic suspension worked bad. Thanks to TGBDZ for helping with bodywork and dump bed. And for fun you can check it in action in 2 part video Part 1 Part 2 More pictures here
-
 If you do, what will it have to look like? Should it be modular and per cylinder, or per engine type (inline, flat, V)? Should it come in at least three block sizes or three power levels? If you don't, why not? Will a need for a sophisticated transmission render it pretty useless, or will cost come into play? Is it gonna be impractical to even make one, even with the promise of SO MUCH POWAH? Keep it clean, guys, I'm just genuinely curious with what you think about such a part.
 -
Note: This only includes WIP pictures as the final pictures got deleted. After months of silence, I have finally finished. The Soul Sucker Weekend Racer. Version 1.0 An overly ambitious project using most of my parts, time and mental stability. It has PF M motor x3 (2x for drive, 1x for steering), receiver x1. The idea of this was to have a removable body, engine, transmission, seats, and rear end. I realized during the build that i was in over my head, but kept going, and got burned out half way, dragging out to the finish. More at https://www.bricksafe.com/pages/weavil/2014/weekend-racer and https://brickshelf.com/cgi-bin/gallery.cgi?f=546161
-
I saw too many Yellow Alsthom NS1800, so i decide to make the most original machine running on beatifull Holland wanna play Chezzzzz? :P 9v or PF LEGO - HSL1832 by SergioBatista, on Flickr real one https://flic.kr/p/eXW4Jj