Search the Community
Showing results for tags 'PF'.
Found 252 results
-
Hi there, I'd like to present a MOC I've been working on from time to time since a few months: It's a small RC buggy, something I'm missing from Lego: Pictures show the V2 model. An interactive 360° view of the V1 model (with different rear axle) is available here: http://pub.clusterd.net/lego/technic/mocs/buggy/ Steering: PF Servo motor Propulsion: PF L motor (geared up 28z => 20z => 12z which is good enough to drive on office carpet and short distances on thicker carpets with fresh batteries, it works great on smooth surfaces; 36z => 12z => 12z also works, but requires more power and works best on a smooth surface; RWD) I initially used it with a AAA battery box and V2 IR receiver (not shown in the V2 pictures above, where it will be fixed to the rear spoiler, the V1 model had it at a slightly different location), but the AA battery box also fits - though it looks not as good due to different mount points, and it will also be heavier then. I assume it will also work with the LiPo box and SBrick and I can - since a few weeks - confirm that it also works with a BuWizz, but then it's more something for outdoor areas, as it gets pretty quick in fast and ludicrous modes. I created the main chassis of the V1 model of this buggy during a long evening/night and added most of the body parts the following day or days, don't remember exactly. The stickers are from the 8048 set and IMO fit the buggy theme great. Steering is also from 8048. It's fun to drive around and it can also take some hits. I took inspiration (mainly for the rear shock mounting and general setup) and motivation (I wanted to have something about as small as this) mainly from this video on YT: ...and some other videos about small RC buggies. The creator's buggy itself is also roughly based on the MOC (video and instructions for V1 model) of someone else. Instead of (re)building this one, I created my own - also because I didn't have a Buggy motor at that time. I also created a V3 model. It's slightly bigger, has front lights (using PF LEDs) and uses bigger wheels but shows some deficiencies of the design: The rear axle tends to tear itself apart in this model on rough surfaces, making the gears slip. I assume this is due to the bigger wheels used in the V3 model. I use some additional axles with stop and bushes now to hold the rear axle together for a longer time. I assume this maybe could be fixed by using a frame around the two axle holes that shouldn't move apart. When doing tight turns the V3 also lifts one of the front wheels - the one on the same side as the gear that sits on the drive axle. If someone has a good explanation for this, I'd be grateful. I suspect the softer shocks compared to V2.
-

[ Movie ] "Excavengers" battle (PF vs Control+)
cyberdyne systems posted a topic in LEGO Technic, Mindstorms, Model Team and Scale Modeling
Soon after I've got my 42100, I decided to use it for making something epic and funny. So, after a month of work I've made this "movie" which tells a story about the last battle between old and new. Don't take it too serious, just have fun! P.S. Moral of the story is that the winner hasn't won at all. Cos' all the fallen gained an ability to be revived into different models and live forever, but the winner will stay useless and untouched. :) -

Brickorea Power racing competition
msk6003 posted a topic in LEGO Technic, Mindstorms, Model Team and Scale Modeling
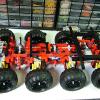
Last year, korea did lego exhibition called "Brickorea 2019". And we had a race as a sub-event. Rule One car for one person Can possable use just lego set. not only moc. Any shape allowed If model can move forward. width is limited to max 30cm(circuit width is 50cm). no limit in length. If model use PF system, only 2 channel is allowed per car. Sbrick, Buwizz, and other none-lego motor or batterybox is not allowed. 9V buggy motor and other remote contol system before PF is not allowed. If model use PU or C+ as control method, driver can use brickcontroller2 for contol. Ranking method Racing(racing time) 50% design(voted by competition participant) 50% Circuit rayout. It was a round trip course. not normal racing circuit. All yellow cone is obstacle. That charactor in middle of course is not obstacle. Originally is obstacle but removed. All cone sticked use tape. Even fastiest car chash to cone with full speed it is safe. Car list 1st winner. msk6003(me!)'s 'Porterleghini Muerlcierlago' Original is Hyundai's porter truck. One picture is worth a thousand words. Type - PF Used - 2 Train motor, 1 Servo motor 2nd winner. Fried Kim(새우튀김무영 in korean)'s 'White gold' Type - Powered up Used - 2 PU M motor 3rd winner. Bluebox(파란상자 in korean)'s 'Ladybug chased by wasp' Wheel on front bumper is working as roller for following track wall. Type - Powered up Used - 2 PU M motor Design winner. Nomingi(노민기 in korean)'s 'Lizard' This model is 'walking' with 4 leg. Even can't moving properly but enough for attracting other people. Type - Control + Used - 2 C+ XL motor Crescent_cho(초월 in korean) This car is originally designed for soccer competition but it canceld. Type - Powered up Used - 2 PU M motor Byeolgom(별에서온곰돌 in korean)'s 'Slapdash' Type - Powered up Used - 2 PU M motor ParticleS's 'Two wheel' He bought 76112 batmobile but want to try something different. Type - Powered up Used - 2 PU M motor Ggureogi(꾸러기 in korean)'s 'Banggu-cha' This is 42070 which converted to old korean-style disinfection car. Smoke from car is mini humidifier. Type - PF Used - 1 XL motor, 1 M motor Rumix(루믹스 in korean) Type - PF Used - 1 L motor, 1 Servo motor. Olive(올리브 in korean)'s 'I like bath' This is pretty fast and very good-looking car. Type - PF Used - 1 L motor, 1 Servo motor Macgyver(맥가이버 in korean) Type - PF Used - 2 L motor Hyung Jun Jin(육포공장 in korean)'s 'Artist Jin's secret dietary life' He is korean lego community 'Brickinside' 's lego ambassador. Type - PF Used - 2 L motor Vant(반트 in korean) That QR coad is linked to his instagram. He is normally create lego art but doing first try to technic this time. Type - Control + Used - 1 C+ XL motor, 1 C+ L motor Car under this sentence is made by korea technic team 'DASAN'. First 3 car is body changed 42099. Onepeace(원피스 in korean) Type - Control+ Used - 2 C+ XL motor, 1 C+ L motor Kimkamza(신봉동찐감자 in korean)'s 'Kamza car' Type - Control+ Used - 2 C+ XL motor, 1 C+ L motor Love like spring rain(사랑봄비 in korean) Type - Control+ Used - 2 C+ XL motor, 1 C+ L motor Kwonsu Shin(소원희인아빠 in korean)'s 'Dumper' Type - PF Used - 1 XL motor, 1 Servo motor, 1 L motor for dump function Kwonsu Shin's junior Type - PF Used - 2 L motor ETC Picture with all participant and there own car. Top low(from left to right) Wani kim(competition host and main admin of Brickinside), Rumix, Macgyver, Olive, Vant, Crescent_cho, Onepeace, ParticleS, Love like spring rain, Kimkamza Bottom low(from left to right) Kwonsu Shin, Byeolgom, Ggureogi, Hyung Jun Jin, msk6003, Fried Kim, Bluebox, Nomingi Top 3 winner with there own car and aword. msk6003(1st), Fried Kim(2nd), Bluebox(3rd) -
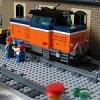
Hello! This is my first design which modelling a real one. (to have some fun: free to guess, what was the original) Width: 7 studs and 1 plate, Length : 50 studs Drive: 2 PF m motor. (3 axle bogies, 2 driven) First step: final version (?) of the base with some details:
-
Hi everyone. I was wondering if anyone has any experience with taking a 9v battery plug and joining it with a PF wire. Just like this MiniZip. Any suggestions, tutorials, or discussion is much appreciated. Thanks.
-
A few of you, e.g. @Toastie regretted we removed the PF connectors from our Power Brick for the control buttons. To overcome that modification, we just released a small PF power box that allows you to run your PF devices from the power grid; you no longer need a PF battery box and replace / recharge batteries. We tried to keep it as simple and small as possible. There are two PF connectors; they both provide 9V power (GND and 9V pin) and full motor power (C1 and C2 pin): one connector provides clockwise motor power, the other counterclockwise motor power. You can control the motor power by adding an IR receiver and use your PF remotes. You can connect multiple motors spinning in the same direction by stacking the PF cables. It comes with an 9V/2A power adapter. We can provide the adapter with a US, EU, UK or AU plug. You can see it in action on the video below: It's currently available in our US/International webshop, it's going to become available in our European bricklink shop in the near future. Let us know what you think!
-
Hello everyone! Here's my version of a suspended monorail train, hope you'll enjoy it I'm introducing it here because this forum has been quite helpful to me while building this, especially for the doors design. To see more of it please head to this page: http://www.moc-pages.com/moc.php/423851 You can see hi-res pictures and a short video here: https://www.flickr.com/photos/23071566@N02/sets/72157663217856521 Cheers!
-

[WIP] 42110 MOD by Romashkaman
romashkaman posted a topic in LEGO Technic, Mindstorms, Model Team and Scale Modeling
Hello all! I know, there already exists a topic about 42110 MODs. But, considering I plan to rebuild the whole car (except exterior) - it really would be better to separate my posts in a new topic (I agree with @Nazgarot). So, for now, I just copy what I posted in 42110 - Land Rover Defender - MODs and Improvements. The actual progress is: - completed front part of the frame (it's stiff enough even without any other part of the body attached): - McPherson suspension and front differential module mounts on that frame and is easily detachable (also McPherson struts include new cv-joints from 42099): - front suspension is built with caster and KPI angles: - engine is built from 4 PF XL-motors coupled together (output gear ratio is 20:36), also it's equipped with one-way clutch (it's built years ago by @nicjasno): - given that drive shaft of the engine has half-stud offset in vertical direction, here is an "offset remover": All modules assembled look like this: And, of course, a video of the short test: This module has some little issues (at first, I need to improve stiffness of the suspension's struts - under load they bend a little bit inward, but it doesn't affect all the process of a drive), but it has a really stiff frame and it's a good start point. You can find more photos on Flickr. About the question why I decided to use XL-motors: XL-s have the biggest torque among all Lego motors (according to the @Philo's page). Buggy-motor has higher rpms, but lower torque (and it's much more expensive and bigger than XL). It's not good choice for heavy vehicles. L-motors are more compact, but, again, if you compare torque/rpm ratio among all of the motors - XLs are the best imho. I tested this setup (4 XLs) two years ago at local fest: This model hadn't any gearbox and was pretty heavy. But, as you can see, the car accelerated easily, than acceleration stopped and speed was constant - only because of low max RPMs of the XLs. Theese motors have very good potential even without gearbox. L-motors are too weak for such acceleration of heavy models. Considering I plan to add a gearbox to this rebuilt Defender - it has to be fast and powerfull)) -
 Let me introduce my latest build: Truck with concrete pump Introduction I got the inspiration for this kind of truck very long ago from this spectacular build from Waler: http://www.brickshelf.com/cgi-bin/gallery.cgi?f=558238 . It was one of the first builds I saw when my dark age ended and I kept returning to it ever since. I knew I had to build my own when the time is right. I tried it once already (not published) in smaller scale 3 years ago but I wasn't skilled enough, the scale was wrong and I lacked the parts. I hope it is better this time. I also knew that I want to build it with very different features, Waller's truck if fully RC and I have found out that I prefer single motor and gearbox and steering and drive. IMGP5397 Features & build The list of features I wanted to implement were clear from the begining - full suspension, one motor for 6 functions, 3-section pneumatic arm, gearbox with two way switches and modular build. I wanted similar build/experience like Arocs so I have borrowed few features from it, most important is the way how the 3 modules (front axles with cabin and "crane", central gearbox, rear axles) are connected together. So I took the size of the gear box and its attachment points from Arocs and made my own one within the limits. Later I had to drop the 6th output that was supposed to drive some sort of lever ("pump") inside of the hopper because of complexity. The first iteration of the gearbox was quite fine, but it struggled when the long outriggers were hood on it because I have used clutch gear before the whole gearbox. That was major flaw so I had rebuild it again (almost) from scratch and even managed to add second penumatic pump to it. Each function is proteced either by white clutch gear, rubber band or LA clutch. The gearbox is powered by one L-motor which is powerfull enough to drive everything. Concrete pump gearbox There are two switches on either side between the axles, on right there is switch for spreading outriggers and extending front ones, on left there is switch for lowering them and for pneumatic pump. Switch for arm rotation is under the turntable. The X-style outriggeres are as close to each other as possible. The problem is that the gears for the 4 mLA that spread outriggers have to turn in opposite direction on left/right side AND in opposite direction on front/rear side as well. You can probably see more from picture above. IMGP5404 IMGP5401 Rear axles are build in similar way like on arocs, the difference is that the springs are serured much better and there is build-in 1:3 reduction. Front axles are live axles with ackerman geometry and different steering angle. I'm really happy how they turned out, the spring is mounted to lower suspension arm so I was left with more space on chasis. The steering angle is very high at the cost of force required to steer. It is necessary to drive by one hand and steer by other one, the model is very heavy and steering at place is not very convenient. Rear axles are connected to V8 engine under the cabin. IMGP5414 The cabin can tilt to reveal engine. there are two seats (of course in blue), dahsboard, gear stick and two pedals inside. I have also added screen wipers and all mirrors. Arm is 3 sections. This was real science to make it as long as possible and light so the pistons can lift it. I have moved the pistons that operate 2nd and third section to opposite direction of the arm. This prooved very effective as it allowed me to make both sections at least 10 studs longer. I also wanted tubbing as nice as possible and thick tube for concrete as well. IMGP5406 IMGP5409 Full gallery: https://flic.kr/s/aHskUypnbW Video Instructions Yea, they are on the way
 -
We got our control buttons out! You can see them in action in the video below. We got a fair amount of feedback on our initial design of the control buttons. One to the main requests that came up was the possibility to use the buttons in combination with our nControl™ software. That was not part of the initial plan and the buttons were not designed for that. However, there are indeed applications where it makes sense to link the buttons to the software. Now that we have a web interface this would, for example, allow you to control the layout with the buttons but monitor it on a tablet. As such we decided to redesign the control buttons so the same buttons can be used: in a stand-alone way like our initial design in combination with nControl™ through a WiFi or USB link with the computer running the software (the buttons are ready for that, but the WiFi/USB brick still have to be finalized) Another major question was how many buttons could be linked into a control panel. The limiting factor is the power consumption of the buttons and that’s tricky because the power consumption depends on the type of button and how it’s used. The original power brick also had two PF1.0 connectors but as The LEGO Group is moving towards PF2.0/PU that doesn’t make much sense anymore. As such we redesigned the power brick: remove the PF1.0 connectors add a power sensor that drives a variable color LED. The color of the LED will change in function of the power consumption: green > red > red blinking. The following bricks / buttons are currently available: power brick servo motor control button for switches, boom barrier, decouplers, monorail switches. light control button for traffic lights and level crossing lights. The next step will be to create: WiFi Brick or USB brick to link the control panel with nControl™ a ‘Throttle Button’ to pilot the trains. This would control the trains through nControl™ and support our WiFi controller, LEGO PU controller and SBrick. Let us know what you think!
-

[MOC] RC Small Red Roadster
syclone posted a topic in LEGO Technic, Mindstorms, Model Team and Scale Modeling
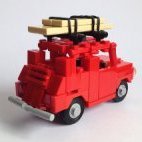
Welp, back onto 1/15 scale Made this little thingy in about 12 hours after Madoca's small supercar popped up in my YT recommended. BRICKSHELF (whenever uploaded) As with my Mini Nitro Menace, this year's Corvette wheelbase was taken as a base - should be compatible with the transporter truck - and so the build began. Of course, drive&steering has been done a million times already so this needed a cherry on top - the roof was what I was looking for. Making a chassis was dead easy with the slim wheels and by motorising each rear wheel independently, the need for a differential was eliminated. Thanks to the placement of the BuWizz in between the rear wheels, steering and roof motors could now populate the central tunnel and be hidden under the black 3x11 curved panels giving the interior a "cleaner" look. Now, bodywork ain't my strongest point, but I wanted it to be ferrari RED. This meant working with a very small inventory (for me) most of which you can see on the car Of course ricer butterfly doors were made to make it look cooler than it is. Have a nice weekend, Cya) -
MOC: Vossloh style "DSB" locomotive with remote decoupling
Selander posted a topic in LEGO Train Tech
As regular readers of this forum well know, I have an interest in onboard remote decoupling, see for example my (old) article in Railbricks. Recently I updated the decoupling bogie design to be more mechanically robust, to have wheels with lower rolling resistance and (hopefully) to look better. With the deoupling bogie ready I needed a new locomotive to try it in....so I designed a new locomotive around the bits and pieces needed…. This time I decided to make a build solely with bricks already "in stock"....hence not the normal shopping rounds on bricklink. I found the german Vossloh locomotives and liked their light grey / green livery which also matched my available bricks and elements. The green cab really cried for white decals so I used some Danish DSB that I already had….. But DSB + Vossloh is not a combination from real-life, as far as I know, so please see this as a product of my own imagination… The locomotive is quite full of PF Components: Battery box, IR receiver, M-motor + gearing for driving the mini actuator plus a regular train motor for propulsion. -
[MOC] RC 4x4 Pickup N2
syclone posted a topic in LEGO Technic, Mindstorms, Model Team and Scale Modeling
Good Day everyone! After completing MPATEV-01 (video&LDD file coming soon) and not able to progress on Saber, decided to build something from my bucket list. And there was 8258 B. After a somewhat boring build process the final result was not very satisfying, so my first idea was to motorise it. However keeping the model as it is would be extremely boring, so the whole chassis and rear part were dismantled, leaving only the front, bonnet and hoods . Next a 4X4 (AWD probably but you've been clickbaited mwahahah ) with open diffs was made. No reduction from the XL motor but the one in-between driveshaft and diffs. On front there are two gray (old gray - undetermined type) springs and on the rear a leaf axle out of 9l links (idea by ZBLJ). Of course that horrendously enormous fake motor was kicked out and substituted with a cute mini V8. Interior is as crude as the original but now with even less foot space and a switch under the dashboard. Steering through M motor and hockey spring combo, M motor-powered winch controlled with the LBG connector on dashboard. For power I opted for a "classic" PF receiver and custom wired 9V battery neatly fixed with a net in the bed. Overall not the best performance but it's quick yet (relatively) powerful. Front winch is detacheable to improve climbing angle (approximately 50 degrees maximum). I haven't named it a MOD because most of it was made from zero, and the N2 is because this is a successor to one of my early RC MOCs - pickup N1 https://www.eurobricks.com/forum/index.php?/forums/topic/127500-moc-4x4-off-road-pickup-n1/ (my imitation of 9398 as I couldn't afford one and still can't) LDD file DOWNLOAD Video: (sorry it's 30° outside, batteries died and I ain't frying myself 2 times for some offroading outside ) Have a nice weekend, Cya later! -
[MOC] 6x4 PF Dump Truck
D3K posted a topic in LEGO Technic, Mindstorms, Model Team and Scale Modeling
I present my latest MOC, a 6x4 Dump Truck: Click pictures for highres, or visit the BrickSafe folder if you want to It is based off of the chassis I made for my 8x4 Recovery Truck last year, but obviously has lost an axle, and been adopted for remote control with Power Functions. It features: -Drive with two XL-motors -Steering with Servo-motor -Independent suspension on front axle -Live axle suspension on rear axles -Dumpable bed with one M-motor and two LAs -Openable cabin -Openable doors -V6 engine driven from both rear axles, via a lockavle central differential -PF LEDs up front -PF LED reversing lights I found a sloution to steer the rear axle, using a turntable and a linkage to the servo motor, combined with pendular suspension, but it had too much slack, and wobbled all over the place, so I ditched it. I also made a mechanism to lift and lock the rearmost axle, but that to turned out less than satisfactory, so I ditched that as well Pictures! There you can see the red lever above the XL-motor, that engages the central diff The bed is quite spacious I was unsure if the M-motor would be sufficient to tip the bed, but it turned out very well, and it has no problem, even with some load! Close up of the tipping LAs. The driving rinf you can see above the rearmost axle is from the locking mechanism I tried to make, that didn't work. I then forgot to take it out Here the cabin is tilted forward. The battery box is held in a solid structure behind the cabin, as you can see. The servo for steering is placed vertically just below the battery box. Close-up of the V6 engine, including "twin turbochargers" The side panels taken off the battery box compartment, shows the wiring and placement of the servo At the front of the bed, we have a spare wheel, and some tools ...for when you need to change a tyre (obviously) The rear axles with left wheels removed for better view. You can also see where the tipping LAs are attached And of course, the under belly shot An LDD representation of the drive line. Green is where the power from the two XLs come from, purple is the axle to the engine, cyan and orange are axles 2 and 3 respectively. All in all I am pretty pleased with the result, as I've been wanting to build this for a long time! Hope to make a video of it in the not too distant future! I will also perfect the LDD model, make it available for those who want it, and post it on rebrickable. I might even make instructions for it, if I fin the time, and can get LDraw to work again -
Finally getting around to posting some of these... I've been doing a bunch of small projects this year that I don't feel warranty their own thread, so this thread is going to be a home for said small projects. PRR MP54 Some years ago I built a set of PRR P54 coaches to go with my PRR T1. At the time I thought a fun future project would be to convert the cars to MP54 spec - the EMU version of the same car. Well, the future is now! Over the past few years I've been trying to build trains using all of various the LEGO motors, and the PF train motor was still on my hit list. I don't like the PF train motor that much because it doesn't have any low-speed torque, and the wheel spacing hasn't been correct for anything I've made so far. Recently I remembered about the MP54, and I thought it would be the perfect application - fast and doesn't need a lot of torque. Here is one of the original P54s as built: And here is the MP54 conversion: Of course the main difference is that there is a battery box, receiver, and motor in the MP54, but I've also updated the original model over the years, most noticeably by slowly collecting all the frames and glass. Other minor changes include the addition of headlights and a more vanilla bogie design to match the PF motor frames. Of course you want to see it go: I was really entertained by how fast it goes! Usually I prefer gearing down such that you get more torque and less speed, but watching this zip along is a fun change of pace. The pulling power isn't actually all that bad either, but as expected, you need to be going pretty fast before the PF train motor is generating any torque. One more interesting thing is that I'm actually using BBB wheels on the PF motor instead of the usual tyred wheels. I originally tried with the official wheels, but I due to the low torque I felt like it was really bogging down in the corners, so I tried the BBBs. This is a much smoother configuration, and it doesn't feel like I'm losing all that much grip. It can definitely pull at least the other two P54s and maybe another car or two. Okay, more to come soon. Hopefully.
-
Hi, I would like to share my minifig-scaled remote controlled truck. It's completely made of LEGO parts and features not only driving and steering, but also working head- and rearlights (trailer only). The driving motor is a PF medium one, located at the back of the trailer but actually powering one of the truck's rear wheels. The other wheel can rotate free, therefore creating a "differential gear" effect, allowing very narrow turn circles. Steering is done by 9V micro motor, sitting at the back of the driver. Battery box and PF receiver are placed in the trailer. There is also a short video of it "in action" on my flickr page. best regards, cubo
-
I was looking at that thread about compact PF solutions, and I thought about posting this MOC. The Alco HH series is a line of very early diesel-electric switchers (made in 'Murrika of course) produced between 1931 and 1940 after which it was succeeded by the much more well-know S series. The HH1000 was the 1000HP variant of the HH series of which 34 were produced between 1939 and 1940. Because other companies' color schemes were more difficult to implement, my HH1000 carries that of Union Pacific. UP owned exactly one HH1000, numbered 1251, which it acquired from the Mount Hood Railway in the late 60s. It was probably retired not long after. The most difficult part of the prototype to implement in Lego was by far the cab. Ideally the columns at the corners of the cab would be something like 2LU x 2LU, but that is pretty much impossible in Lego. After much fiddling I was able to get 2LU gaps in the back, but the cab is too long by about a stud to accomodate 5LU columns from the side. You'll notice the PF receiver sticking out of the center window. To me the main feature of this loco is that it is the perfect shape to cram two M motors, the AA battery box, and the reciever into a body 30 studs long. The receiver is actually just floating because that's the only orientation that works. The tractive effort is a little less than what I was able to get out of the RF-16, a combination I think of less weight and shorter bogies, but for practical purposes it'll basically pull anything reasonable - just slowly. As far as I can tell having a gear ratio other than 1:1 is more or less impossible here. This model has been about 85% complete for the past month or two, mainly for testing, but I'm about to BL the remaining parts, so it should get done soon!
-
 Dear LEGO® Train Fans, (You can found a german translation here.) We’re planning a new event for lego train fans, who want to be different then other lego train exhibitions and so we're proud to present the “Bauspielbahn 2019” in Schkeuditz, a town next to Leipzig, Germany. Schkeuditz is next to the Leipzig airport and it’s easily accessible via the Autobahn A9 and A14. "We" - these are a handful of lego train fans from leipzig. In last five years we were part of a lot of lego and model train exhibitions all over germany. But now it's time to cook our own soup and we want to make some different like other train shows. the 'Bauspielbahn 2019' will take place from 14th to 16th June and is primarily intended as a event for LEGO railway fans to get to know each other, assemble a huge common layout and to play together. The exhibition will be open for the public on 15th and 16th . Welcome is the entire range from 4.5V to the new Powered up, from the more classical station to the shrill fantasy landscape. As a single model or contribution to the common layout. For the joint layout, the assembly is planned for Thursday (13th), single layouts/mocs can be build up on Thu or Fri. Over the days, we’ll do sightseeing, have barbecue in the evening (depending on the weather) and introduce every tourist trap in Leipzig to you. You can camp on the enclosed grounds or park a caravan there (toilet on the premises available, shower unfortunately not); Hotels in different price categories are available in Schkeuditz, we are happy to help you with addresses. Please don’t hesitate to ask questions, should any occur. Invitation to a Train Enthusiasts Weekend From 14.06. to 16.06.2019 Goal We would like to use the weekend to assemble a common train layout, with LEGO fans from everywhere contributing their modules. Anyone can take part, as long as the segments meet the requirements listed below. A prior registration is necessary to enable us to plan the layout of the railway. Any kind of modules with e.g. train stations, connection tracks or just regular tracks, landscapes etc are welcome. (Maybe you know the modelrailroad - Meetings like FREMO - or others.) pictures are from our lastest exhibitions. but the layout of the get-together-weekend / Bauspielbahn 2019" will look some different, of course. Location We have gained the opportunity to use the Historic Tram Depot Schkeuditz as fitting venue to assemble our modules. It’s not just its history that makes the old depot a fitting location, but also its size. The available hall area is about 1000 m2 and well lit by skylights. Exhibition The event will be open to the public during the weekend. Aside from spectating the traffic on the main installation, visitors will also be able to see single exhibits with models or segments that couldn’t be integrated. Common layout We will be contributing multiple segments to combine with yours for a large installation with diverse train routes. Modules that fit our specifications would be appreciated, but are not necessary. The detailed methods of construction and basic requirements will be published during the next few weeks. However, segments with differing designs can still be utilized. The main routes of the common layout will consist of 9V tracks, operated with the classic speed regulators. Multiple electrically separated routes are planned, to allow for power supply for the individual modules and to enable the simultaneous operation of multiple trains. Non-electrified tracks can, depending on the available amount, be used for connection tracks or individual routes. The same applies to 12V tracks. Differing types of tracks could also be connected via train stations. Every module of the collaborative layout will require at least one track with possible connections to other modules, ideally on multiple sides. Exceptions are welcome, but need to be agreed upon on an individual basis. However, the final layout can only be determined after all participants have registered. Individual modules and installations. Any model related to trains is welcome and can be displayed on additional tables. Registration Participants can register with their name and a short model/modular description until Sunday, 31.03.2019 at eisenbahner@lbrick.de. We reserve the right of admission. To allow for the best possible planning we require specific information from you. After initial registration we will send you a form for the specifics of your modules. Please fill it with all the information about your contributions and send it back to us. I hope we will see us in June. Michael / MTM
 -

MOD - 8416 Fork-lift Motorized & RC
Chilekesh posted a topic in LEGO Technic, Mindstorms, Model Team and Scale Modeling
Hi everyone, Here's my modification of 8416, fully motorized and remote controlled. An additional function is the working & tilting steering wheel. The PF elements used are: - 1 M-motor for driving - 1 Servo motor for steering - 1 M-motor for lifting - 1 M-motor for tilting the lifting assembly. - 2 IR receivers - 1 Rechargeable battery box Rebrickable: http://rebrickable.com/mocs/Chilekesh/8416-fork-lift-motorized-rc Bricksafe: http://bricksafe.com/pages/Chilekesh/8416-motorized (*.lxf file can be downloaded here). Any suggestions on improvements are very welcome. Happy building! -
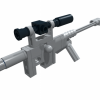
My second creation I just have for you to show today, simultaneously my private second place in workshop achievements, the 6-axis manipulator. The robot is a successor of older humanoid's arm. It was made mainly due to one reason: I want to design an arm that has wide range of movements, because his predecessor was shame of it. Moreover, a goal for near future is to make the arm (finally) programmable, perhaps with using of non-Lego components... But a model you see is still pure fully Technic-themed robot prototype that looks better than works : Arm, similarly to my other creations was presented at a bit of places in Poland's exhibitions or events for robotic and engineering enthusiasts. It has been appreciated at "Diamonds Explorers" foundation for talented students' innovative ideas. Technically, it contains of 5 motors (only because one had been broken during tests), 3 IR receivers and 3 battery boxes (a pair as a counterweight). Features 3 primary and 3 additionaly axes of movement and a pneumatic gripper that reminds me well one Toys Story scene... So, let's watch the video featuring an egg as 3-eyed alien mascot: Some photos: PS: I'm still working on next version...
-

Robbie - Your Friend Robot
Psor posted a topic in LEGO Technic, Mindstorms, Model Team and Scale Modeling
A spontaneuosly built creation, somewhat as a result of good purchase for electric elements I've done almost 2 years ago. Then I just was made a tracked machine, at one forum named after "the wallie on roids", due to obvious similarity to one of Pixar's characters. So, ladies and gentlemen, I have a pleasure to present you... Robbie - the human-friendly robot (at least in theory :)). The robot is fully based on Technic theme elements and Power Functions electric system that consists of a total of 10 motors, 5 IR receivers and 2 battery boxes. All of this makes the model relatively heavy - over 2.2 kg. It features clever and easily RC controlled arms and independently propelled tracks. Luckily, I had taken some videos during work in progress, so you can see how much it was changing over the building phases: Traction tests featuring my slippers: And finally working shown to the world at one of small displays: And that's all. Sadly, I don't have so many photos this time, but I hope you liked it :) -
Backstory: Ever since I emerged from my dark age I was mesmerized by Designer Han’s models – especially dragline excavator. I like all kind of excavators so I was slowly gathering pieces for it to buy instructions and build it. I have realized over the time that building from instructions is not entertaining for me and that I can build almost anything if I have the drive (and parts). I still admire Han’s models, but I know that I would be disappointed because of his design choices. Don’t get me wrong – I still like his work, but I don’t want to build it anymore. Long story short – I wanted my own dragline excavator with truck transport. Preparations: First of all I had to pick a reference machine, in this case Sennebogen HD 670 tracked crane. Why this one? Sennebogen because it is not very known and because of this fantastic die cast model: http://www.cranesetc.co.uk/library/rosreviews/203/203review.htm . Such models are very good because you can see the machine from a lot of angles and you can replicate small details from them more easily. The model is however 690HD and I have picked smaller 70 ton 670HD. This is because of whole concept with transport truck. The scale is dictated by wheels, in this case by wheels on truck and wheels on excavator as well. Since TLG is making only two wheels for tracked vehicles it is simple choice. With bigger tracked wheels the scale is 21,5:1, meaning that 49,5mm tires for truck are perfect fit. 690HD with the same wheels would be closer to 23:1 and we do not have truck wheels for this scale. Features: Undercarriage Real crawlers have either retractable tracks or dismount them completely when transported. In order to achieve that I had to place all motors to superstructure and use single battery box. As you can see from datasheet, the tracks can be retracted so they are not wider than body. To replicate it I have built it in such way that both tracks are very easily detachable from central piece that can be swapped for narrow one. Replacing this central piece doesn’t take more than few minutes, it is only necessary to take apart two liftarms on each side as seen in the picture. Another stud or two narrower tracks would be probably better, but I would certainly lose the ability to swap it easily. All four wheels are driven by two shafts from superstructure connected to M motors; final ratio is 9,265:1. Wide track Narrow track IMGP5236 Superstructure The superstructure holds six motors (4x M-motor and 2x L-motor) – two M motors are for tracks, 1x M motor is for slewing via worm gear on turntable (56:1) and rest are for winches. Slewing gave me quite a headache because of the desired gear ratio. The real machine can rotate up to 4 revolutions per minute so I wanted to replicate that. In the end the only viable solution was to use older turntable driven by worn gear without further gear reductions. I use train PF remote to start and stop smoothly. The usage of older turntable meant I had to shorten boom because of its less stability as it bends significantly more than new type. The A frame is fixed – the boom is raised by pulling floating pulleys with attached ropes. Bigger machines uses movable A frame where the angle between A frame and boom is fixed. The A frame can be folded down when the crawler is transported. A frame is Pythagorean triplet with beams length 29-21-20. There are 3 winches for boom raising, bucket lifting and bucket drag. All three are equally geared 5:1. Counterweight is detachable as on real machine, it of course holds standard Technic battery box. Cabin features opening doors and foldable walkway. IMGP5220 IMGP5222 Ready for work side by side Boom Booms on real machines are made out of several truss elements bolted together. There is usually lower boom section that stays on crawler when transported, then are intermediate sections in various lengths (2,9m, 5,7, and 11,2m) and then headpiece section. I wanted to replicate this kind of boom so I focused on correct shape of each section and size as well. This mean that the lower boom section is pyramid-shape: 5x1 studs wide at crawler side and 9x9 studs at opposite end. I guess not all connections on it are TLG legal, but everything fits nicely without any stress and thanks to it truss-like constructions it is very sturdy. The same principle follows at intermediate section, in my case the shortest one (2920 mm => 17 studs). Boom ends with headpiece that is quite similar to lower section but ends with two pulleys. They are of course not real pulleys as TLG doesn’t make anything free-spinning in that size but size was more important to me. The drawback of such modular boom is its weight; it is almost double the weight of boom that would be built in one piece so I had to stay low with total length. There are also two pulleys serving as fairlead so the rope dragging the bucket goes to winch from top, the fairlead pulleys are mounted on lever so they stay in same position regardless of boom angle. Headpiece side comparsion boom Bucket It is brick-build and its size is only guessed from pictures and its volume, I was unable to find any datasheets with buckets. Bucket Greebling, look and difficulties As usually I pay a lot of attention to greebling like railings, mirrors, cabin shape, lights and other small details. I really had fun with this model as it is quite packed with it. The biggest obstacle during the build was constant lack of parts. Together with truck and low-loader it is reaching 4000 pieces and I was even running low on both 2l and 3l pins once. I had selected yellow color at the start, green would be certainly better for Sennebogen, but I already had some yellow parts and green technic is very expensive. Beside that I have seen pictures of Sennebogen machines in various colors like yellow, red and blue, so I think it is fine. The whole internal build is very symmetric; the only asymmetric is gearing on left side for slewing and gearing on right for drag winch. IMGP5223 Playability Honestly, playability sucks. There is one important feature of real dragline omitted – free fall winches. Without it you can place bucket too close and drag it only few centimeters. Grabbing anything with the bucket is also very difficult. Drive and slew works very well though. Truck The truck is very loosely based on this real counterpart: http://www.ditzj.de/html/en/trucks/scania/wiesbr500.html i.e. 8x4 tractor with short wheelbase, 2 steered axles, high cabin and tower behind it. It is driven by L-motor and servo is used for steering. Both steerable axles use the same configuration like in my previous truck – 5l steering arms and hubs with 3 ball joints. There is of course Ackermann steering and different angle on both axles. Rear axles are connected to fake V6 engine. Cabin features two seats, IR receiver between them and steering wheel. Whole cabin can tilt to reveal engine. Gear ratio from L motor is 7:1 because it is meant to haul quite a lot of weight. The truck can be easily modified to low cabin version as the high roof is only held by four pins. The tower is too high then so it is replaced with bare battery box. The whole truck is quite heavy on front and it have sometimes trouble with driving when it is without load so it is possible to add ballast box on its fifth wheel. There is also coupling for draw ball trailer, but it is not meant for pulling. I think the most difficult part of design was not to copy my previous truck. The cabin is still quite similar, I’m aware of that, but in the end I’m happy with other small details that makes it different – flags on front, mud flaps, detachable roof, etc. IMGP5248 IMGP5249 Working fake engine Low cabin Ballast box Low-loader Low loader with detachable gooseneck is based on Motomat’s trailer because in the end you realize there is only one viable way how to build it – two technic beams with plates between. A little challenge was how to mount wheels without using single axle for both sides. The frame between wheels can be only 4 studs wide meaning the axle can be supported by 2 studs. I have used 8L axle with stop supported by thin liftarms. In the end the wheels are supported enough, they can rotate freely and you can take them apart without axle. IMGP5260 Lowloader with detachable gooseneck Instructions I have made instructions for dragline and truck as well. Lowloader will follow soon. Both will appear on Rebrickable soon, I will add link here later. Due to amount of work it took I will sell instructions for dragline for 10€ and truck for 5€. Lowloader will be free as it is not something trully mine. Both instructions are as usually PDF generated by LPub3D. Especially the dragline is compressed into as few steps as possible, with only 115 pages (~2400 parts), so if you don't like TLG instructions for beeing too easy this might be something for you. Dragline rebrickable link: https://rebrickable.com/mocs/MOC-17193/Ivan_M/dragline-excavator/#parts Video & gallery Whole gallery is here: https://flic.kr/s/aHskDJiTT8 And one crappy video for end:
-
[MOC] Swingloader Mark Two
D3K posted a topic in LEGO Technic, Mindstorms, Model Team and Scale Modeling
After I built my first big MOC construction vehicle, this attempt at a different kind of loader, some nine months ago (boy, time sure flies), I've been wanting to redesign it, implementing techniques and mechanisms I have learned since then, to make a better functioning, better looking, more professional build, without cutting so many corners as I did the last time. So without further ado, I present to you THE SWINGLOADER (mk II) Firstly, I had a pretty good idea in my head of how to make the setup with the PF motors, and stack the four functions I wanted on top of each other in as small a space as possible. This is the first try, which turned out okay, but neede some minor redesign during the course of the project: In the final version the top two motors are PF-L motors, that operate the lifting an tipping of the bucket (axles 2 and 3 from the top). The two lower motors are PF-M. One controls the two small LA's for turning the machine, and the other controls the turning of the digger (uppermost axle) The lowermost axle is of course the drive axle, driven by a PF-XL motor (not in this picture) Anyway, here is a couple of detailed model images and explanations: The first two shows pretty much every axle, gear, actuator and motor in the model (yes, the two top motors are IRL PF-L motors) This is the final setup I used, and as far as I can tell, is completely accurate to the final model. Here follows some pics of the individual functions First, the drivetrain and steering: The portal axle reduction gives it a nice and slow speed, but it can be increased both there, and from the motor and down to the axle. The twin small LA's gives it a nice and accurate steering (thanks again, jorgeopesi ), although I would have liked it a bit faster Also, I managed to implement a simple mechanism for a functional sttering wheel : It turns ~90 degrees to either side as the loader articulates Next up is a representation of all the three functions that go to the front: Swinging: Lifting: Tipping: And after all that was figured out, I just needed to build a shell around the thing and but on some wheels! So here it is as it stands today: TA-DAAAA: As you can see, I opted for a much smaller type loader, more akin to the ones you see on construction sites in the city and stuff, and maybe closer to the real SwingLoader brand of swinging loaders It might from the above picture seem like there is a lot of free space from the front of the loader to the bucket.. ...but this is why it has to be like that: This time around, finding a working linkage geometry didn't take nearly as long as last time (even though the entire digger is built from scratch). As you can see on the next picture, it really does tip nicely when on top The battery compartment opens like this, for easy battery replacement: And the doors open up like this, to reveal a IR-receiver/uncomfortable seat for the driver. Second to last, here is the mandatory under belly shot, nothing to fancy about it ...except for the fact that I now see I forgot to put in two 3L friction pins to attach the two yellow 3x5 L-shaped liftarms And maybe the setup for of the rear pendular suspension! I almost forgot about that Making it with two small turntables makes it extremely strong, both when it comes to supporting weight, and stress in the longitudinal direction! This is actually a key factor to the rigidity of the entire rear of the loader! :thumbup: And lastly (well almost, anyway), the tiny tiny tiny detail that makes me loose my sleep: The transmission of power to the lower axle here, as you can see, happens via a part that doesn't exist. That is the 24 tooth end of a 4L differential, that I had to sever from the rest of its body, to keep the lowermost gear from coming ever so slightly in contact with the small LA's when the loader is turning to either extreme. The setup works almost as smoothly with these replaced by 16 tooth gears, but just not quite... So to sum it all up: -Driven 4WD by PF-XL motor -Steered by PF-M motor, via two small LA's -Turning of the digger by PF-M motor, worm gear on turntable -Lifting by PF-L motor, via two LA's -Tipping by PF-L motor, via one LA -Sixth channel open for powered accessories (you can see the output in the last image) -Easy access battery box through openable engine cover -Strong pendular suspension on the rear axle -Four PF-LED lights -Openable doors to the operator's cabin -Adjustable mirrors -Unfortunately no PF-seatbelts for the driver this time All in all I am very pleased with the result, and will try to make a video as soon as possible to show off the functions! And as a final feature, I built a crane attachment, similar to the ones I've seen in pictures like this: Here it is, folded as compactly as possible: And here it is fully extended: As you can maybe spot from the above image, the crane and loader is ready to accept a powered winch somewhere, but I haven't gotten around to designing one that is easy on the eye. This is the reason I put the output from the sixth channel in the cabin, for future additions. And here it is lifting a sort of I-beam: Pheew There you have it! I think I covered most of it, but feel free to post questions, critisism, praise and suggestions on improvements! As I mentioned, I will do my best to make a video of it in action! Thanks! -
 Hello, I present you my latest model: Starting from the 42053 set, I decided to add some improvements and make it remote controlled with linear actuators and PF. The undercarriage is very similar to the original, with manual functions. Main mods are double wheels, and some aesthetic adjustments. The Power functions components are located in the upper-structure, except one motor which is in the boom. 1M motor for rotation of the upper-structure 1XL motor for the main boom 1M motor for the third section of the boom 1M motor for the bucket There is also a fake linear actuator to adjust the second section of the boom. I used this solution because this adjustable boom is more common in the real EW160E. Changeable buckets with quick-coupler: Access to the battery box: Power button with easy access: More photos: Video coming soon!!
 -

MOD - 12 volt wheels with axle hole for Power Functions motor
Paperinik77pk posted a topic in LEGO Train Tech
Hi all, since 7777 book came out, I've always wanted to integrate Trains and Technic worlds. Back in the 80's the problem was the complete lack of train wheels with a Technic axle hole. It was solved with RC trains a lot of years later. Therefore, I can convert a 9v train to PF without too many problems (aesthetically speaking). But for 12V trains it is different. Wheels are made in a specific way, they have the hole for connecting rods, they're more "fat" than RC/PF wheels. Frankly, I do not like 12V trains converted to 9V/PF standard bogies. But I like the PF motor, its speed, the possibility to increase speed gradually...and the fact it keeps the central hole for third wheel. So, in these years I repaired a lot of 12V motors...and some were really in bad shape. Look at the right wheel, it is completely destroyed inside. So I decided to try to implement my solution to connect standard, intact 12V wheels to technic axleholes (which I do not list here, since it was not satisfying). First, I got a standard Technic bush, and cut it a bit. Then I put it inside the damaged wheel hole. It fits fine, but needs to be glued. Once glued, it is time for some testing. The 6-long axle goes right in - but the red ring coming out from the wheel is too thick. So I prepared another wheel (gray bush). This time I cut the bush a bit shorter and fits right. The 5.5 axle is perfect , so I'll need to cut two 6-long axles to the right lenght. And this is the result - this is my 7740 no°3, totally converted to PF. It works fine, but as you all can imagine, it is all made by hand and bushes are not machinery-centered. Therefore the locomotive is not stable as I would like. For the moment, better than nothing!