Search the Community
Showing results for tags 'PF'.
Found 253 results
-

[MOC] RC 4x4 Pickup N2
syclone posted a topic in LEGO Technic, Mindstorms, Model Team and Scale Modeling
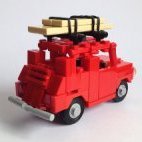
Good Day everyone! After completing MPATEV-01 (video&LDD file coming soon) and not able to progress on Saber, decided to build something from my bucket list. And there was 8258 B. After a somewhat boring build process the final result was not very satisfying, so my first idea was to motorise it. However keeping the model as it is would be extremely boring, so the whole chassis and rear part were dismantled, leaving only the front, bonnet and hoods . Next a 4X4 (AWD probably but you've been clickbaited mwahahah ) with open diffs was made. No reduction from the XL motor but the one in-between driveshaft and diffs. On front there are two gray (old gray - undetermined type) springs and on the rear a leaf axle out of 9l links (idea by ZBLJ). Of course that horrendously enormous fake motor was kicked out and substituted with a cute mini V8. Interior is as crude as the original but now with even less foot space and a switch under the dashboard. Steering through M motor and hockey spring combo, M motor-powered winch controlled with the LBG connector on dashboard. For power I opted for a "classic" PF receiver and custom wired 9V battery neatly fixed with a net in the bed. Overall not the best performance but it's quick yet (relatively) powerful. Front winch is detacheable to improve climbing angle (approximately 50 degrees maximum). I haven't named it a MOD because most of it was made from zero, and the N2 is because this is a successor to one of my early RC MOCs - pickup N1 https://www.eurobricks.com/forum/index.php?/forums/topic/127500-moc-4x4-off-road-pickup-n1/ (my imitation of 9398 as I couldn't afford one and still can't) LDD file DOWNLOAD Video: (sorry it's 30° outside, batteries died and I ain't frying myself 2 times for some offroading outside ) Have a nice weekend, Cya later! -
[MOC] Airbus Eurocopter EC135 (Police helicopter)
T Lego posted a topic in LEGO Technic, Mindstorms, Model Team and Scale Modeling
Hi everyone, I would like to present my latest creation to you: A lego technic helicopter inspired by the Eurocopter EC135, in particular the police version. The eurocopter is an iconic helicopter which is widely used by police, fire and ambulance services and for executive transport worldwide. In fact I see these fly over my city almost every day The model presented here is not a very identical copy of the real machine, because I always like to be a bit free with the styling. As a matter of fact this model is in the end more of a display model than something to play with. When I started this project I aimed for a relatively small and compact package with some PF comonents inside and A goodlooking bodywork. I think I found the right ballance between panels flex axles and connectors. - Dimensions: 47x13x22 Studs -Weight: 750 g -Rotor span: 47 studs -White and Dark Azure collor scheme -easy accessible PF AAA battery box -Motorized main rotor and tail rotor powered by a PF M motor -Clutch gears for safety -Tiltable rotor blades powered by a PF M motor -Controlled using a standard PF remote controller Designing the tail (rotor) was probaly the biggest nightmare of this model. All the curved shapes and angles made it very hard to put it together. On top of that, a driven axle had to be placed inside as well. The solotion regarding the tail rotor I came up with was to use a rubber band. I tried using gears as well but it turned out too bulky and very ugly. Another challenge was the Dark Azure collor scheme. Not many parts are available in this collor so that was a huge limitation as well, but in the end it looks much better then most other collors would on this model. And at last a shot together with my Audi RS1 which, despite being built in different scales, look very nice on the shelf next to each other. Also special thanks to everyone here on the forum who helped me with the design on my WIP topic. I won't make instructions for this model, but for my current WIP I will. Comments, feedback and questions are as usual highly appreciated! -
MOC: Vossloh style "DSB" locomotive with remote decoupling
Selander posted a topic in LEGO Train Tech
As regular readers of this forum well know, I have an interest in onboard remote decoupling, see for example my (old) article in Railbricks. Recently I updated the decoupling bogie design to be more mechanically robust, to have wheels with lower rolling resistance and (hopefully) to look better. With the deoupling bogie ready I needed a new locomotive to try it in....so I designed a new locomotive around the bits and pieces needed…. This time I decided to make a build solely with bricks already "in stock"....hence not the normal shopping rounds on bricklink. I found the german Vossloh locomotives and liked their light grey / green livery which also matched my available bricks and elements. The green cab really cried for white decals so I used some Danish DSB that I already had….. But DSB + Vossloh is not a combination from real-life, as far as I know, so please see this as a product of my own imagination… The locomotive is quite full of PF Components: Battery box, IR receiver, M-motor + gearing for driving the mini actuator plus a regular train motor for propulsion. -
 Let me introduce my latest build: Truck with concrete pump Introduction I got the inspiration for this kind of truck very long ago from this spectacular build from Waler: http://www.brickshelf.com/cgi-bin/gallery.cgi?f=558238 . It was one of the first builds I saw when my dark age ended and I kept returning to it ever since. I knew I had to build my own when the time is right. I tried it once already (not published) in smaller scale 3 years ago but I wasn't skilled enough, the scale was wrong and I lacked the parts. I hope it is better this time. I also knew that I want to build it with very different features, Waller's truck if fully RC and I have found out that I prefer single motor and gearbox and steering and drive. IMGP5397 Features & build The list of features I wanted to implement were clear from the begining - full suspension, one motor for 6 functions, 3-section pneumatic arm, gearbox with two way switches and modular build. I wanted similar build/experience like Arocs so I have borrowed few features from it, most important is the way how the 3 modules (front axles with cabin and "crane", central gearbox, rear axles) are connected together. So I took the size of the gear box and its attachment points from Arocs and made my own one within the limits. Later I had to drop the 6th output that was supposed to drive some sort of lever ("pump") inside of the hopper because of complexity. The first iteration of the gearbox was quite fine, but it struggled when the long outriggers were hood on it because I have used clutch gear before the whole gearbox. That was major flaw so I had rebuild it again (almost) from scratch and even managed to add second penumatic pump to it. Each function is proteced either by white clutch gear, rubber band or LA clutch. The gearbox is powered by one L-motor which is powerfull enough to drive everything. Concrete pump gearbox There are two switches on either side between the axles, on right there is switch for spreading outriggers and extending front ones, on left there is switch for lowering them and for pneumatic pump. Switch for arm rotation is under the turntable. The X-style outriggeres are as close to each other as possible. The problem is that the gears for the 4 mLA that spread outriggers have to turn in opposite direction on left/right side AND in opposite direction on front/rear side as well. You can probably see more from picture above. IMGP5404 IMGP5401 Rear axles are build in similar way like on arocs, the difference is that the springs are serured much better and there is build-in 1:3 reduction. Front axles are live axles with ackerman geometry and different steering angle. I'm really happy how they turned out, the spring is mounted to lower suspension arm so I was left with more space on chasis. The steering angle is very high at the cost of force required to steer. It is necessary to drive by one hand and steer by other one, the model is very heavy and steering at place is not very convenient. Rear axles are connected to V8 engine under the cabin. IMGP5414 The cabin can tilt to reveal engine. there are two seats (of course in blue), dahsboard, gear stick and two pedals inside. I have also added screen wipers and all mirrors. Arm is 3 sections. This was real science to make it as long as possible and light so the pistons can lift it. I have moved the pistons that operate 2nd and third section to opposite direction of the arm. This prooved very effective as it allowed me to make both sections at least 10 studs longer. I also wanted tubbing as nice as possible and thick tube for concrete as well. IMGP5406 IMGP5409 Full gallery: https://flic.kr/s/aHskUypnbW Video Instructions Yea, they are on the way
 -
 Dear LEGO® Train Fans, (You can found a german translation here.) We’re planning a new event for lego train fans, who want to be different then other lego train exhibitions and so we're proud to present the “Bauspielbahn 2019” in Schkeuditz, a town next to Leipzig, Germany. Schkeuditz is next to the Leipzig airport and it’s easily accessible via the Autobahn A9 and A14. "We" - these are a handful of lego train fans from leipzig. In last five years we were part of a lot of lego and model train exhibitions all over germany. But now it's time to cook our own soup and we want to make some different like other train shows. the 'Bauspielbahn 2019' will take place from 14th to 16th June and is primarily intended as a event for LEGO railway fans to get to know each other, assemble a huge common layout and to play together. The exhibition will be open for the public on 15th and 16th . Welcome is the entire range from 4.5V to the new Powered up, from the more classical station to the shrill fantasy landscape. As a single model or contribution to the common layout. For the joint layout, the assembly is planned for Thursday (13th), single layouts/mocs can be build up on Thu or Fri. Over the days, we’ll do sightseeing, have barbecue in the evening (depending on the weather) and introduce every tourist trap in Leipzig to you. You can camp on the enclosed grounds or park a caravan there (toilet on the premises available, shower unfortunately not); Hotels in different price categories are available in Schkeuditz, we are happy to help you with addresses. Please don’t hesitate to ask questions, should any occur. Invitation to a Train Enthusiasts Weekend From 14.06. to 16.06.2019 Goal We would like to use the weekend to assemble a common train layout, with LEGO fans from everywhere contributing their modules. Anyone can take part, as long as the segments meet the requirements listed below. A prior registration is necessary to enable us to plan the layout of the railway. Any kind of modules with e.g. train stations, connection tracks or just regular tracks, landscapes etc are welcome. (Maybe you know the modelrailroad - Meetings like FREMO - or others.) pictures are from our lastest exhibitions. but the layout of the get-together-weekend / Bauspielbahn 2019" will look some different, of course. Location We have gained the opportunity to use the Historic Tram Depot Schkeuditz as fitting venue to assemble our modules. It’s not just its history that makes the old depot a fitting location, but also its size. The available hall area is about 1000 m2 and well lit by skylights. Exhibition The event will be open to the public during the weekend. Aside from spectating the traffic on the main installation, visitors will also be able to see single exhibits with models or segments that couldn’t be integrated. Common layout We will be contributing multiple segments to combine with yours for a large installation with diverse train routes. Modules that fit our specifications would be appreciated, but are not necessary. The detailed methods of construction and basic requirements will be published during the next few weeks. However, segments with differing designs can still be utilized. The main routes of the common layout will consist of 9V tracks, operated with the classic speed regulators. Multiple electrically separated routes are planned, to allow for power supply for the individual modules and to enable the simultaneous operation of multiple trains. Non-electrified tracks can, depending on the available amount, be used for connection tracks or individual routes. The same applies to 12V tracks. Differing types of tracks could also be connected via train stations. Every module of the collaborative layout will require at least one track with possible connections to other modules, ideally on multiple sides. Exceptions are welcome, but need to be agreed upon on an individual basis. However, the final layout can only be determined after all participants have registered. Individual modules and installations. Any model related to trains is welcome and can be displayed on additional tables. Registration Participants can register with their name and a short model/modular description until Sunday, 31.03.2019 at eisenbahner@lbrick.de. We reserve the right of admission. To allow for the best possible planning we require specific information from you. After initial registration we will send you a form for the specifics of your modules. Please fill it with all the information about your contributions and send it back to us. I hope we will see us in June. Michael / MTM
 -

Robbie - Your Friend Robot
Psor posted a topic in LEGO Technic, Mindstorms, Model Team and Scale Modeling
A spontaneuosly built creation, somewhat as a result of good purchase for electric elements I've done almost 2 years ago. Then I just was made a tracked machine, at one forum named after "the wallie on roids", due to obvious similarity to one of Pixar's characters. So, ladies and gentlemen, I have a pleasure to present you... Robbie - the human-friendly robot (at least in theory :)). The robot is fully based on Technic theme elements and Power Functions electric system that consists of a total of 10 motors, 5 IR receivers and 2 battery boxes. All of this makes the model relatively heavy - over 2.2 kg. It features clever and easily RC controlled arms and independently propelled tracks. Luckily, I had taken some videos during work in progress, so you can see how much it was changing over the building phases: Traction tests featuring my slippers: And finally working shown to the world at one of small displays: And that's all. Sadly, I don't have so many photos this time, but I hope you liked it :) -
My second creation I just have for you to show today, simultaneously my private second place in workshop achievements, the 6-axis manipulator. The robot is a successor of older humanoid's arm. It was made mainly due to one reason: I want to design an arm that has wide range of movements, because his predecessor was shame of it. Moreover, a goal for near future is to make the arm (finally) programmable, perhaps with using of non-Lego components... But a model you see is still pure fully Technic-themed robot prototype that looks better than works : Arm, similarly to my other creations was presented at a bit of places in Poland's exhibitions or events for robotic and engineering enthusiasts. It has been appreciated at "Diamonds Explorers" foundation for talented students' innovative ideas. Technically, it contains of 5 motors (only because one had been broken during tests), 3 IR receivers and 3 battery boxes (a pair as a counterweight). Features 3 primary and 3 additionaly axes of movement and a pneumatic gripper that reminds me well one Toys Story scene... So, let's watch the video featuring an egg as 3-eyed alien mascot: Some photos: PS: I'm still working on next version...
-

[MOC] The fireplace - kinetic model
romashkaman posted a topic in LEGO Technic, Mindstorms, Model Team and Scale Modeling
Hello all around here! I'd like to present you one of my latest MOCs - "The fireplace". More photos: https://flic.kr/s/aHsmxKvMeC PF: 1 x 88000 batbox 2 x pair of LEDs 1 x M-motor Features: - "burning flame" effect; - easy access to batbox; - easy changeable back-walls; - base's module structure. You can find BI here: rebrickable Thanks for watching!) -
I know there is a lot of buzz about Chineese clones nowadays, but this is not a clonning brand and the product is very different from BuWizz, only sharing its form factor with it. I have discussed it with @Jim and he gave me permission to make this topic. Please refrain from meaningless post that you hate anything from China and that you wouldn't buy this. Thank you I have stumbled across a very interesting piece of hardware recenty - rechargable battery with four motor outputs AND remote controller - CADA remote control. The most interesting feature is indeed dedicated controller, unlike buwizz/sbrick there is no need for smart phone. I guess video (taken by František Hajdekr) is better than words: I can only say FINALLY, the need for smart phone is what makes buwizz/sbrick unusable for me, I just want plain controller, ready in 1 second and recharchable battery. The biggest question is of course what kind of hardware is inside the BB. The only info is that the battery inside is Li-ion, no info about capacity. I'm also very interested in motor controlling chip. I don't expect it will be comparable in power with BuWizz, I expect it to be better verision of LEGO Li-pol battery. So if there is anyone here who already purchased it and is willing to open it to give us some details, I would appreciate it.
-
Backstory: Ever since I emerged from my dark age I was mesmerized by Designer Han’s models – especially dragline excavator. I like all kind of excavators so I was slowly gathering pieces for it to buy instructions and build it. I have realized over the time that building from instructions is not entertaining for me and that I can build almost anything if I have the drive (and parts). I still admire Han’s models, but I know that I would be disappointed because of his design choices. Don’t get me wrong – I still like his work, but I don’t want to build it anymore. Long story short – I wanted my own dragline excavator with truck transport. Preparations: First of all I had to pick a reference machine, in this case Sennebogen HD 670 tracked crane. Why this one? Sennebogen because it is not very known and because of this fantastic die cast model: http://www.cranesetc.co.uk/library/rosreviews/203/203review.htm . Such models are very good because you can see the machine from a lot of angles and you can replicate small details from them more easily. The model is however 690HD and I have picked smaller 70 ton 670HD. This is because of whole concept with transport truck. The scale is dictated by wheels, in this case by wheels on truck and wheels on excavator as well. Since TLG is making only two wheels for tracked vehicles it is simple choice. With bigger tracked wheels the scale is 21,5:1, meaning that 49,5mm tires for truck are perfect fit. 690HD with the same wheels would be closer to 23:1 and we do not have truck wheels for this scale. Features: Undercarriage Real crawlers have either retractable tracks or dismount them completely when transported. In order to achieve that I had to place all motors to superstructure and use single battery box. As you can see from datasheet, the tracks can be retracted so they are not wider than body. To replicate it I have built it in such way that both tracks are very easily detachable from central piece that can be swapped for narrow one. Replacing this central piece doesn’t take more than few minutes, it is only necessary to take apart two liftarms on each side as seen in the picture. Another stud or two narrower tracks would be probably better, but I would certainly lose the ability to swap it easily. All four wheels are driven by two shafts from superstructure connected to M motors; final ratio is 9,265:1. Wide track Narrow track IMGP5236 Superstructure The superstructure holds six motors (4x M-motor and 2x L-motor) – two M motors are for tracks, 1x M motor is for slewing via worm gear on turntable (56:1) and rest are for winches. Slewing gave me quite a headache because of the desired gear ratio. The real machine can rotate up to 4 revolutions per minute so I wanted to replicate that. In the end the only viable solution was to use older turntable driven by worn gear without further gear reductions. I use train PF remote to start and stop smoothly. The usage of older turntable meant I had to shorten boom because of its less stability as it bends significantly more than new type. The A frame is fixed – the boom is raised by pulling floating pulleys with attached ropes. Bigger machines uses movable A frame where the angle between A frame and boom is fixed. The A frame can be folded down when the crawler is transported. A frame is Pythagorean triplet with beams length 29-21-20. There are 3 winches for boom raising, bucket lifting and bucket drag. All three are equally geared 5:1. Counterweight is detachable as on real machine, it of course holds standard Technic battery box. Cabin features opening doors and foldable walkway. IMGP5220 IMGP5222 Ready for work side by side Boom Booms on real machines are made out of several truss elements bolted together. There is usually lower boom section that stays on crawler when transported, then are intermediate sections in various lengths (2,9m, 5,7, and 11,2m) and then headpiece section. I wanted to replicate this kind of boom so I focused on correct shape of each section and size as well. This mean that the lower boom section is pyramid-shape: 5x1 studs wide at crawler side and 9x9 studs at opposite end. I guess not all connections on it are TLG legal, but everything fits nicely without any stress and thanks to it truss-like constructions it is very sturdy. The same principle follows at intermediate section, in my case the shortest one (2920 mm => 17 studs). Boom ends with headpiece that is quite similar to lower section but ends with two pulleys. They are of course not real pulleys as TLG doesn’t make anything free-spinning in that size but size was more important to me. The drawback of such modular boom is its weight; it is almost double the weight of boom that would be built in one piece so I had to stay low with total length. There are also two pulleys serving as fairlead so the rope dragging the bucket goes to winch from top, the fairlead pulleys are mounted on lever so they stay in same position regardless of boom angle. Headpiece side comparsion boom Bucket It is brick-build and its size is only guessed from pictures and its volume, I was unable to find any datasheets with buckets. Bucket Greebling, look and difficulties As usually I pay a lot of attention to greebling like railings, mirrors, cabin shape, lights and other small details. I really had fun with this model as it is quite packed with it. The biggest obstacle during the build was constant lack of parts. Together with truck and low-loader it is reaching 4000 pieces and I was even running low on both 2l and 3l pins once. I had selected yellow color at the start, green would be certainly better for Sennebogen, but I already had some yellow parts and green technic is very expensive. Beside that I have seen pictures of Sennebogen machines in various colors like yellow, red and blue, so I think it is fine. The whole internal build is very symmetric; the only asymmetric is gearing on left side for slewing and gearing on right for drag winch. IMGP5223 Playability Honestly, playability sucks. There is one important feature of real dragline omitted – free fall winches. Without it you can place bucket too close and drag it only few centimeters. Grabbing anything with the bucket is also very difficult. Drive and slew works very well though. Truck The truck is very loosely based on this real counterpart: http://www.ditzj.de/html/en/trucks/scania/wiesbr500.html i.e. 8x4 tractor with short wheelbase, 2 steered axles, high cabin and tower behind it. It is driven by L-motor and servo is used for steering. Both steerable axles use the same configuration like in my previous truck – 5l steering arms and hubs with 3 ball joints. There is of course Ackermann steering and different angle on both axles. Rear axles are connected to fake V6 engine. Cabin features two seats, IR receiver between them and steering wheel. Whole cabin can tilt to reveal engine. Gear ratio from L motor is 7:1 because it is meant to haul quite a lot of weight. The truck can be easily modified to low cabin version as the high roof is only held by four pins. The tower is too high then so it is replaced with bare battery box. The whole truck is quite heavy on front and it have sometimes trouble with driving when it is without load so it is possible to add ballast box on its fifth wheel. There is also coupling for draw ball trailer, but it is not meant for pulling. I think the most difficult part of design was not to copy my previous truck. The cabin is still quite similar, I’m aware of that, but in the end I’m happy with other small details that makes it different – flags on front, mud flaps, detachable roof, etc. IMGP5248 IMGP5249 Working fake engine Low cabin Ballast box Low-loader Low loader with detachable gooseneck is based on Motomat’s trailer because in the end you realize there is only one viable way how to build it – two technic beams with plates between. A little challenge was how to mount wheels without using single axle for both sides. The frame between wheels can be only 4 studs wide meaning the axle can be supported by 2 studs. I have used 8L axle with stop supported by thin liftarms. In the end the wheels are supported enough, they can rotate freely and you can take them apart without axle. IMGP5260 Lowloader with detachable gooseneck Instructions I have made instructions for dragline and truck as well. Lowloader will follow soon. Both will appear on Rebrickable soon, I will add link here later. Due to amount of work it took I will sell instructions for dragline for 10€ and truck for 5€. Lowloader will be free as it is not something trully mine. Both instructions are as usually PDF generated by LPub3D. Especially the dragline is compressed into as few steps as possible, with only 115 pages (~2400 parts), so if you don't like TLG instructions for beeing too easy this might be something for you. Dragline rebrickable link: https://rebrickable.com/mocs/MOC-17193/Ivan_M/dragline-excavator/#parts Video & gallery Whole gallery is here: https://flic.kr/s/aHskDJiTT8 And one crappy video for end:
-
Book Review (Review by Thorsten Benter) Almost a year has passed since initial publication of this book. There are a number of on-line reviews available – this one on EB seems to come in a bit late. Well, I don’t think so, in contrast. This book is a comprehensive how-to-build-a-train resource rather than a compilation of what is out there. And this sets the book aside from so many others. It will be up-to-date as long as The LEGO Company produces bricks and sets. Plus, with the arrival of the Powered Up system, more space becomes available inside the train body as compared to comparable PF functionality: The dedicated receiver becomes obsolete and no line of sight is required for communication creating some additional space – space for sophisticated building techniques! This books tells you everything you need to know about the historical LEGO train theme development at TLG, about scales and widths, about pivot points, microstriping, SNOTing and offsetting, and so much more with relevance to train building! (Note: A PDF copy of this review with higher resolution pictures will be shortly available at Holger’s website) Summary: A must-have for every LEGO train fan, for people entertaining the idea of getting into LEGO trains, and for people who still don’t know that they will become train fans after reading the book Superb photography of LEGO models, outstanding renders of CAD models In-depth analysis and assessment of the different LEGO train eras Demonstration and teaching of advanced building and design skills My personal LEGO book score: 10/10 About the book: Author: Holger Matthes Published: Oct. 2017 by No Starch Press Inc., San Francisco, CA, USA. Hardcover, 135 pages + 90(+) pages reserved for 4 full building instructions (ICE train, gondola car, Swiss Crocodile, and a vintage passenger coach), 150+ most relevant and educational figures (excluding the beautiful chapter openers or page breakers as well as the set building instructions), 20+ tables including bulleted lists. ISBN: 1-59327-819-5 Price: € 14 (Kindle edition, Amazon); € 23 (Print edition, Amazon) both as of 9-2018. $ 19 (ebook only), $ 25 (ebook and print edition, nostarch.com) both as of 9-2018. The present English edition published by No Starch Press is based on the initial German edition “LEGO Eisenbahn – Konzepte und Techniken für realistische Modelle”, which was originally published by dpunkt Verlag Heidelberg, ISBN: 978-3-86490-355-7. The initial German edition of the book based on Holger’s manuscript composed in 2015/16 caught the attention of foreign publishers: It began with the present English edition in 2017. It then took a bit longer until the Chinese publisher “Posts & Telecom Press” (who has already published a bunch of LEGO books written by fans) very recently released the Chinese version: http://www.ptpress.com.cn/shopping/buy?bookId=0ed0cd68-ca59-41fc-9bf9-193b06089996 (ISBN: 978-7-115-48419-2): After publication in 2017, No Starch Press’ English version became the reference for further translations. In summer 2018, the Spanish (“LEGO TRENES”; LEGO TRENES https://www.amazon.es/TRENES-Libros-Singulares-Holger-Matthes/dp/8441540179) and the Italian (“TRENI LEGO”; https://www.amazon.it/Treni-Lego-colori-Holger-Matthes/dp/8868956411) editions became available. And the Russian version is on its way (sorry, Holger couldn’t tell me any further information about its availability): (Note that the Russian cover on the right is purely made up by me – Google translator says the Cyrillic headline reads “in preparation” – but who knows …) About the author Holger Matthes is a hobbyist who has been building with LEGO since 2000. He was involved in the creation of various official LEGO projects such as the Hobby Train set #10183 and frequently presents his models and gives workshops at LEGO exhibitions worldwide [copied from Amazon website]. Table of content of the book (short version) Part 1: Overview and history Introduction A history of LEGO trains Part 2: Building your own train models (My own creations – MOCs) Basic principles Designing your own models Case studies in design Part 3: Building instructions A note on the included building instructions Appended to the body of the book, you’ll find four high quality and carefully composed instructions in addition to two free online instructions: Inter-City Express (ICE; driving and trailer cars, PF motorization, windshield designs) Gondola car Swiss electric Be 6/6 “Crocodile” Vintage passenger car Steam Engine BR 10 (as bonus online available at http://holgermatthes.de/bricks/en/br10.php) Steam Engine BR 80 (as bonus online available at http://holgermatthes.de/bricks/en/br80.php) There is further information available online. Holger directs you to https://www.nostarch.com/legotrains; but most of the very valuable stuff is actually hosted on his website. I highly recommend to visit his site: http://www.holgermatthes.de/bricks/en/index.php. You will find a wealth of background information, tips&tricks, how-to, and much more. The Book Let’s face it: Almost one year after initial publication, Holger still sets the stage with this book for LEGO train fans. It will be tough to get it much further; not on 135 pages (not counting the instructions pages), not with regard to the topics covered, not with regard to the width of the audience addressed. This book provides diverse perspectives on the art of building LEGO trains, coaches, and rolling stock – and is at the same time always determined, focused, and addresses most relevant “issues”. Train builders repeatedly face tough challenges: A train is not a building, which simply resides in all its beauty; rather trains are work horses – either hauling heavy cargo loads or endless passenger coaches, or switching rolling stock for hours and hours in a train show – or on your personal layout. At the same time, a LEGO train is “beautiful” and “esthetic” in the recognition of a train fan - as a building is for City fans. However, to be able to render real trains into LEGO models, regardless on the scale used, requires some serious knowledge about the myriads of LEGO bricks available, about advanced building techniques, and even electrical wiring skills. There simply isn’t much space in a LEGO train. Space as in “Space … is big. Really big. You just won't believe how vastly, hugely, mind-bogglingly big it is. I mean, you may think it's a long way down the road to the chemist's, but that's just peanuts to space.” [Douglas Adams, The Hitchhikers Guide to the Galaxy, 1979]. It is usually >extremely< packed inside a LEGO train model, particularly when electrifying it. Shaping the outer appearance with advanced building methods such as SNOT or angled and carefully secured pieces usually eats up all the space inside the hull. And lastly: Trains need to be sturdy. They not only haul heavy loads – they also have to run endless distances on track – in the best case on long stretches of straight track and smooth curves, here and there a bit bumpy – in the worst case negotiating endless and sharply bent curves and switch points in complex rail yards. This is exactly what Holger addresses in his book: How to achieve a sturdy, reliable, and at the same time esthetic and beautiful train. And we should just get it straight from the very beginning: Stickers are frequently recognized as the “icing on the cake”. And this is certainly true. BUT: Believe it or not, you can also legally “build” tiny lines, sloped coloring, narrowly split windows and much more when using advanced building techniques! And that sets aside this book from so many postings, building instructions, and other resources: Holger shows us how to accomplish “brick-built stickering” by using the endless variety of bricks and plates to build streamlined and nicely accentuated and smooth surfaces – rather than using the bulky, essentially non-LEGO-philosophy-but-by-TLG-released ICE #55768 nose with stickers attached all over it … There is so much more in the book. This is what I am trying to highlight in the following. Holger’s book is a must for us all: Beginners, advanced builders, as well as Train Tech gurus! And those who believe that they already are. One more thing to add: Photography and CAD image rendering. Or: A picture is worth a thousand words. Holger says: “The biggest thank you goes out to my old friend and master photographer Andy Bahler, without whose pictures this book would have been useless. His commitment, night after night, was above and beyond expectation …” The pictures are spectacular – you will notice right away. Organization of the book There are three parts in this book, although there is no such explicit assignment in the table of contents. Holger tells us on page 2 though: “The first part of the book gives an overview of LEGO trains over the different eras, covers some history, and answers questions about how to combine old LEGO trains from the attic with today’s kits. The second part of the book is about building your own LEGO train models, also known as My Own Creations (MOCs). Using my many years of experience building LEGO models, I’ll show you how to create proper train models, covering both the possibilities and the limitations. Finally, the book ends with step-by-step building instructions for several models.” Usually, the table of content is a good starting point for the organization analysis. However, this book is extremely focused and self-contained in each of the chapters of the three parts. This is very helpful (and also very different from other books), as the LEGO universe, including train worlds, is as diverse as it possibly gets. The number of pieces alone currently available through TLC’s official channels such as LEGO sets, PaB, and LEGO stores – or even more so – through the uncountable BrickLink stores around the globe is truly mind-boggling. Well, it is not only the sheer number, but more so the endless combinations possible – and what you achieve with such. Chances are: One gets rapidly lost and a little frustrated. Exactly this is NOT happening when “reading” this book. OK. We do it differently – as it seems appropriate for a “different” book: We walk through, as the very nice and focused organization of the book simply allows that. Part 1 “INTRODUCTION Decades ago, the toy designers at LEGO likely never imagined how durable their work would be. Today, parents can dust off their childhood LEGO trains and play together with their children who have just received their first brand-new LEGO train set. And fans of all ages can revive older sets and parts to create entirely new models.” In order to prevent such an almost natural “disorientation” or lost in parts and ways to connect them, in part one the book begins with a review of on-line resources. Information-, instruction-, and brick-availability-wise. Holger lists only the most relevant internet locations. Start here and progress further on your own. It makes your building life so much easier. As with every printed book, online references may become outdated at some point in time. Holger names thus only most reliable web portals, which will most probably exist for a long time. “A HISTORY OF LEGO TRAINS Let’s explore the evolution of the LEGO train systems from the earliest set to the present.” Next, there is a historical review of which type of train system was available at what time defining an era. This is rather significant. First of all, this approach results in a theme classification rather than a temporal evolution of sets: The blue, grey, 9V, RC, and PF era. As the pieces from different areas are naturally largely interchangeable (otherwise it would not be LEGO!), you may mix them as you see fit. Nevertheless, each era has a certain typical appearance – if you want to capture that, you need to know what was going on during that particular era. As an example, people in love with the grey (12 V) era often capture the look and feel of that time – for example studs everywhere, not many curved bricks/diverse slopes (as they were not available at that time) – rather limited colors schemes, black, red, and yellow ... The reader learns what has been produced when and in what color scheme. There is also ample of information on the technical features of each era – it appears as if the author is deeply involved and well connected in the LEGO train community – all the way up to participate in the design of selected sets. Holger shares his knowledge with the reader – always in a concise and focused way. It is pointed out that Holger is not even attempting to compile a complete list of sets available within the different eras – in contrast, he is summarizing the unique era characteristics and features. He focuses on power sources, tracks (including switches and crossings), and other elements (wheels, baseplates, in addition to unique features, such as trucks, couplings and buffers). The grey (12 V) era sections stands out of course, as this was the most diverse and most creative train theme ever (IMHO, of course!). Here you will find an – again unique – compilation of “remote-controlled accessories”, “windows and doors”, “light bricks”, “weighted bricks” … What I personally find extremely useful – and it must have been a considerable effort – is i) a summary table, listing the most important features of each era, and ii) Holger’s evaluation of these features he headlines as “Seen from today’s perspective”. Even long-time and experienced train enthusiasts will surely find valuable information in this chapter! Part 2 “BASIC PRINCIPLES Let’s dive into the world of LEGO elements and explore the endless ways to connect them.” Now that one knows the individual features of the different eras, Holger opens part two of the book with a compilation of relevant LEGO pieces for train building. It is really surprising how many there are! I have built trains myself – seeing all the various elements nicely grouped and organized makes it so much easier to get an overview of individual pieces, select the ones you may want to try out – and compare them to other options. This section is extremely helpful when you start off with a new model – or when you want to overhaul an already existing train. In the following section, Holger introduces typical train specific building techniques (although you can use many of them throughout the entire LEGO universe!). And is not surprising that there are eleven dedicated pages on SNOTing and fractional-plate offsetting in all three dimensions. These are the most crucial techniques when shaping the look of a train. SNOT (studs not on top) is a powerful technique and has become very popular among train fans. Originally rather restricted to a few elements, which allowed to “reverse” the building order, the LEGO Company has released a broad variety of SNOT elements over time. These are of course also shown in the preceding chapter on relevant LEGO train pieces. I’d say that this chapter is extremely important for beginners and of great interest to experts as there are various approaches shown side-by-side. At least for me this chapter is highly inspiring. The same is true for plate offsetting, i.e., building with only one half stud or even less displacement off the stud grid. First, the look of a train becomes much smoother even when not using curved bricks; secondly, this technique allows you to literally “build” colored surfaces with fine structures and even thin stripes (called microstriping). Without using stickers that is … Ever used minifig guns to create pantographs? Or ice skates as door handles? No? Well – Holger shows you! “DESIGNING YOUR OWN MODELS You might be wondering if you’re ready to begin making your own models. Which train should you build? Maybe you should start with the commuter train that takes you to work every day, or a freight train? And who hasn’t dreamed of a beautiful steam engine in LEGO?” Now we are getting down to business. The following two chapters of part 2 are not about “building a train” – they are about “how to do it right”. We are talking about scaling and modeling rather than “pushing along”. Before Holger goes into details though, he points out the importance of thoroughly choosing a scale. This is an extremely important decision to be made when attempting to model a real-world train. How much detailing is required? How much abstraction is allowed? Citing Holger again (page 73): “Building a recognizable model isn’t about scaling every part exactly, although proportion matters. Intentionally omitting some details or exaggerating others is usually necessary. Scale modeling with LEGO is a bit like drawing a caricature: the end result may not be an exact likeness, but it is recognizable and undeniable.” We learn about model scales (1, L, O, HO …), alternative approaches (scaling by wheel size) as well as choosing a model width (6-, 7-, 8-stud-wide). Don’t mix these up – almost any scale may be used for any track width! There are so many diverse examples here on EB. Holger narrows the scope of widths covered in his book to 6 - 8 stud wide (see cover page of the book), as these are the widths most builders choose – in addition to the official 6-wide LEGO models. He discusses the advantages and downsides of each of these widths in detail. A very important aspect when designing and building a LEGO train – regardless of the model scale – is the official LEGO track geometry. Maximum distances of fixed axles, alleviation of this rather restricted distance using articulated single trucks (a theme repeatedly discussed here on EB), sliding middle axles in three axle trucks – you will find all the answers in this book. When it comes to attaching cars to each other – even more design aspects have to be considered, which are all discussed: Pivot points vs car distance, additional pivot points to reduce car distance, the effect of pivot points on design issues, to name a few. And then: Steam engine design: 7 full pages! As far as I am concerned, steam engines are the most challenging models to render in LEGO. To say it with Anthony Sava’s words: “I'd buy a set with a steam engine in it, but I have little interest in buying a box on wheels.” (EB Forum, April 2nd 2018). Holger shows us all the challenges and caveats. The remaining sections in this chapter are: Power and Control, discussing mostly the implementation of PF elements, Modeling Details, and Track Design and Layout. Again, extremely valuable information and guides are given. One comment on third party suppliers: At the time of writing this book, both SBrick controllers (as a replacement for PF receivers, featuring wireless Bluetooth connectivity) as well as ME Models (as a supplier of wider radii curves) were actively present on the market. As of now (i.e., August 2018) though, the new LEGO Powered Up system introduced lately makes SBricks for trains almost obsolete – and Me Models have gone out of business some time ago. There are a good number of very good 3rd party alternatives for additional track pieces – large curve radii, complex switch point geometries to name only a few. They come as superb injection molded pieces which are almost indistinguishable from original LEGO track, as well as 3D printed varieties. I believe that a book of the format Holger has chosen simply does have to deal in-depth with such developments as they are much more volatile than almost any LEGO product. Taking aside the LEGO RC interim solution of course. But again, Holger gives a full account of why RC happened at all and why its lifetime was even shorter than that of many 3rd party small businesses. I really enjoyed this section very much. Regarding very recent developments by TLG naturally not covered in the book (the original German manuscript was written in 2015/16): The introduction of the Powered Up system leaves much more space within a train engine so that all the building tips and tricks provided in Holger’s book become even more intriguing! It appears as we can even more freely combine advanced power/remote control options with the present advanced building instructions. Which makes this book even more valuable! “CASE STUDIES IN DESIGN Armed with the tools and knowledge about LEGO modeling covered in the previous chapters, we’ll now take a closer look at the actual design process using some of my own builds as a guide.” This chapter needs to be explored – interpreted – by yourself. This is – as far as I am concerned – the heart of the book. Here you will learn how to begin designing a model. I find this part the most difficult: How to begin – looking at the all the bricks, plates, slopes, clips, there are so many of them … so we should take this to our heart: “Designing a model is a creative and personal process: there’s no right or wrong way to build a successful model. The guidelines in this section are meant to get you started. You’ll certainly develop your own strategies along the way.” Along with: Decide on a scale and choose the width: 6-, 7-, or 8-wide? Decide how the train will be powered and what type of track it’ll run on. Choose a target audience: should it be a realistic, recognizable model, or are play functions more important? You will notice: This is about >you<! Nevertheless, you will also learn a lot in this chapter. Holger has chosen a regional express train (Bombardier double deck train), a powerful electric locomotive (Siemens Vectron engine), and a (well, Holger is German after all …) steam engine (BR 10) as case studies. This is a very clever selection – as the techniques he shows apply to almost every engine I am aware of – including American diesels as well as American steamers … or all the various European trains, Emanuele (EB member LT12V) is currently presenting here on EB … And finally … Part 3 “BUILDING INSTRUCTIONS! Get inspired with these step-by-step instructions for building an Inter-City Express, a simple gondola, a Swiss Electric Locomotive Be 6/8 “Crocodile,” a vintage passenger car, and a steam engine.” From page 136 to 227 you will find first class, high(est)-quality building instructions for the above referenced models. There is nothing more to add. As said: This book is a must … Play Well! @Jim Thank you very much Jim for giving me the opportunity of writing this review for EB - it was a great pleasure. And for sending me this wonderful book! @HoMa Thank you Holger for writing this book. And for all the additional information you gave me when writing this review and for your comments! Thanks for reading, Thorsten
-
Hi, I would like to share my minifig-scaled remote controlled truck. It's completely made of LEGO parts and features not only driving and steering, but also working head- and rearlights (trailer only). The driving motor is a PF medium one, located at the back of the trailer but actually powering one of the truck's rear wheels. The other wheel can rotate free, therefore creating a "differential gear" effect, allowing very narrow turn circles. Steering is done by 9V micro motor, sitting at the back of the driver. Battery box and PF receiver are placed in the trailer. There is also a short video of it "in action" on my flickr page. best regards, cubo
-
 Hello, I present you my latest model: Starting from the 42053 set, I decided to add some improvements and make it remote controlled with linear actuators and PF. The undercarriage is very similar to the original, with manual functions. Main mods are double wheels, and some aesthetic adjustments. The Power functions components are located in the upper-structure, except one motor which is in the boom. 1M motor for rotation of the upper-structure 1XL motor for the main boom 1M motor for the third section of the boom 1M motor for the bucket There is also a fake linear actuator to adjust the second section of the boom. I used this solution because this adjustable boom is more common in the real EW160E. Changeable buckets with quick-coupler: Access to the battery box: Power button with easy access: More photos: Video coming soon!!
 -
So I ran into a problem I couldn't solve on my own but reduced the possible error to the PF train motor. I have three, differently colored, but in dimensions and structure identical Stadler FLIRT electric motor units built from LEGO bricks. All three of them are powered with SBrick, using three PF train motors under each train. Here they are: I noticed that the yellow-green one runs slower than the other two, the speed difference on the same level of SBrick slider is very noticable, and there is a speed level when the yellow stops, but the other two runs on multiple curves and points with no problems. For first I thought that it could be the failure of the oldest SBrick in my yellow train, but when I replaced it with a new one, nothing happened. I measured output voltage on the output reserved for train motors, but it was just fine, only 0,02V less than the actualy batteries had. Than I replaced train motors, all three to brand new ones and the train became even slower. Than I replaced all PF extension wires between battery box and train motors, still runs slower. I measured the weight of the train, but they are 3882 and 3814 grams, the difference is only 68 grams (the yellow-green is heavier)., this is no explanation for the speed difference. Than I put the new train motors under the red one and it became slow as well. It is also noticable that a train with new motors is harder to push by hand than the train with older ones. So, my question is, did TLC change something in the internal gearing and other properties of the LEGO train motor? Neither Bricklink, not Brickset knows about the difference (if there is any), and the PF train motors has no production year printed on them, just "(C) 2005 The LEGO Group" on the bottom and a four digit code at one end, like XX JX, where XX is a two digit number, J seems constant (I checked 10 train motors), and the X after "J" seems increasing with time (my oldest motors have J0, J1 or J2, while newer ones have J4, J5, J6 underneath). The XX digit seems totally random. So does anyone know about any change in the inside parts of the PF train motor and could you advise me a method to select the faster ones?
-
Hi all, I'd like to show you a little thing I made 6 years ago for my daughter...and then became unused on the shelf since it was "retired" by Duplo trains. It was a sort of DB E69, used to transport frogs and penguins (all made with Lego Basic sets instructions). After she saw the real 7720 she liked the whole set. So I created a newer "clone" of the 7720 locomotive. This weekend I decided to revamp it a bit to make it work again. So I modified the roof, the handrails, the pantograph (which now is very similar to swiss ones) and made it a bit more "studless". The battery car is now blue instead of Yellow. It was - and still is - powered by a Medium PF motor, since it was not Infrared controlled and the standard PF train motor was too fast. Instead of IR receiver, it kept a "vintage" solution to be started. I used the PF lever the same way the 7720 used the red lever on battery box car. The IR receiver can be put inside the battery car if needed. As you can see, I have the same 7720 inverters placed on PF track...and the result is the following (sorry for the video quality, the phone cannot do better than this). The cat likes this "reversing" feature a lot! Next steps: two long two axles wagons resembling the 7720 ones, and the white doors on blue wagon created in SNOT mode (or a simple sticker, if I fail ) It is a silly train, but I hope you like it!
-

Powering PF from AC; any advice?
fred67 posted a topic in LEGO Technic, Mindstorms, Model Team and Scale Modeling
So I know that, in this forum, most of you are concerned with mobile models that require a battery to use, but I also figured this would be the best forum to ask these questions as the people here seem more likely to know about stuff like this. In order to not have to build around a battery box, I've been using 9v batteries and one of these: And it occurred to me that, for my table top PF builds (in this case a track switcher for trains, or an elevator in a building), I could have an AC power adapter wired to a PF connector. So I'd buy a PF extension, cut it in half, and connect it to these: https://smile.amazon.com/gp/product/B01GPQZ4EE/ (female adapter cables) and https://smile.amazon.com/gp/product/B012VQ5A7S/ (9v DC Adapter, 1000mA with 5 male plugs) I could instead get a 500mA adapter, but I figure AAA are 1000mA, and have been using the AAA battery box). -

[Poll] Power Functions 2.0: receiver or no receiver?
Trekkie99 posted a topic in LEGO Technic, Mindstorms, Model Team and Scale Modeling
What's your opinion on Power Functions 2.0, and the potential that we may or may not have a separate receiver unit for the new system? Do you want a separate receiver unit like what we have currently, or do you want a combo unit composing of both a receiver unit and a battery box? Also, how important is a separate receiver unit to you? (Shoot. It appears the poll isn't working.) My personal opinion is the following. 1: Sort of. 2: Sort of. 3: Sort of necessary. -

MOD - 12 volt wheels with axle hole for Power Functions motor
Paperinik77pk posted a topic in LEGO Train Tech
Hi all, since 7777 book came out, I've always wanted to integrate Trains and Technic worlds. Back in the 80's the problem was the complete lack of train wheels with a Technic axle hole. It was solved with RC trains a lot of years later. Therefore, I can convert a 9v train to PF without too many problems (aesthetically speaking). But for 12V trains it is different. Wheels are made in a specific way, they have the hole for connecting rods, they're more "fat" than RC/PF wheels. Frankly, I do not like 12V trains converted to 9V/PF standard bogies. But I like the PF motor, its speed, the possibility to increase speed gradually...and the fact it keeps the central hole for third wheel. So, in these years I repaired a lot of 12V motors...and some were really in bad shape. Look at the right wheel, it is completely destroyed inside. So I decided to try to implement my solution to connect standard, intact 12V wheels to technic axleholes (which I do not list here, since it was not satisfying). First, I got a standard Technic bush, and cut it a bit. Then I put it inside the damaged wheel hole. It fits fine, but needs to be glued. Once glued, it is time for some testing. The 6-long axle goes right in - but the red ring coming out from the wheel is too thick. So I prepared another wheel (gray bush). This time I cut the bush a bit shorter and fits right. The 5.5 axle is perfect , so I'll need to cut two 6-long axles to the right lenght. And this is the result - this is my 7740 no°3, totally converted to PF. It works fine, but as you all can imagine, it is all made by hand and bushes are not machinery-centered. Therefore the locomotive is not stable as I would like. For the moment, better than nothing! -

Drive Train for Heavy Treaded Vehicle
mxp posted a topic in LEGO Technic, Mindstorms, Model Team and Scale Modeling
Hi Everyone, I have a pretty heavy model that I would like to put on treads. The final model will probably weigh something around 12-15kg. The model is also supposed to move at a certain speed (around 10cm per second). As a result I think I will need to combine several PF XL motors to get the necessary torque and speed. In my opinion I have 2 options: Option 1: Adders + Subtractor I would connect several PF XL motors via adders for torque and then a subtractor for steering. I think I would need to heavily (9:1) gear up each motor before the differentials because the small 12 tooth bevel gears in the differentials (for adders and subtractor) don't handle torque very well. So I would first gear up and then, behind the subtractor gear down, so that I get more torque again. Advantage: Model can go straight (thanks to the subtractor); No hard-coupling (motors won't suffer) Disadvantage: A lot of power from the motors gets lost because there are so many gears. I'm not sure how fast lego gears and axles can spin for a long time without breaking (PF XL motor 200rpm with 9:1 gear up = 1800rpm) Option 2: Several PF XL motors on each tread I would have multiple sprocket wheals for each tread that is driven by a PF XL motor. Advantage: Simpler construction; less power loss Disadvantage: Hard-coupled motors (coupled through the tread links); model never goes straight because all motors won't turn at exactly the same speed. My question is, do any of you have experience with very heavy treaded models? What's the best way to drive them? (so that they can go straight) How many PF XL motors would I roughly need for a 12-15kg model? Thanks for your help and let me know if my description of the problem doesn't make sense :) -
Mobile Crawler Trencher (MOC)
Aventador2004 posted a topic in LEGO Technic, Mindstorms, Model Team and Scale Modeling
Edit, repaired post. Wow, how far i have come... **WARNING LONG POST** One of my largest creations yet: the Mobile Crawler Trencher! My goals: Reliable, kid friendly structure Easily carried Battery and motor (AA and M motor) Tracked, very slow and powerful Clutch gear (24z) and a reversible gearbox. Kid friendly speed, not enough to hurt (it makes it easy to stop, so it wont trench any hard things) Easily removable battery I am happy to say, all goals were accomplished. I believe 3 full days were spent constructing it, then i tinkered to get it just right. I got three opinions on it, all were positive so far, i hope you enjoy looking or commenting on it. I will not post a picture of any other trenchers, because i didn't take much inspiration from them. The features: Motorized: 2 function, reversible gearbox Driving tracks (forward only (1:15 gears) Bucket trenching spikes + sifters M motor geared 1:3 through a clutch gear (24z) Others: Guardrails Driver area (Left side) Lifting or lowering the bucket wheel Well, now the interesting part of all. Easily seen operator areas. Control area. Battery removal and reversible gearbox. Enjoy your day, or post away! -

[MOC] Security camera
blaz62 posted a topic in LEGO Technic, Mindstorms, Model Team and Scale Modeling
Hello everyone Today I will show you my new creation, security camera. This is a little different creation. It is build from 99% Lego bricks. Only non Lego part are phone (Sony Xperia S), camera (Sony HDR AZ-1) and batteries. Camera is powered by 2 M motor, one for rotation and one for tilt. Phone and camera are connected via Wi-Fi. VIDEO: -
[VIDEO] Trenbrick 2017 RENFE R104 Circuit + Narrow Gauge
mtrkustoms posted a topic in LEGO Train Tech
Hi to all, Here is a short video of the last event I participate with All spanish replicas of Renfe from Aitoruco and myself. 2 diferent loops with r104 custom curves (printed by blastem), 20Bps cable bridge (Designed by Sheppo), R104 trains (designed by Aitoruco and MTRkustoms) and also working narrow gauge (by MTRkustoms) Enjoy it -
Finally getting around to posting some of these... I've been doing a bunch of small projects this year that I don't feel warranty their own thread, so this thread is going to be a home for said small projects. PRR MP54 Some years ago I built a set of PRR P54 coaches to go with my PRR T1. At the time I thought a fun future project would be to convert the cars to MP54 spec - the EMU version of the same car. Well, the future is now! Over the past few years I've been trying to build trains using all of various the LEGO motors, and the PF train motor was still on my hit list. I don't like the PF train motor that much because it doesn't have any low-speed torque, and the wheel spacing hasn't been correct for anything I've made so far. Recently I remembered about the MP54, and I thought it would be the perfect application - fast and doesn't need a lot of torque. Here is one of the original P54s as built: And here is the MP54 conversion: Of course the main difference is that there is a battery box, receiver, and motor in the MP54, but I've also updated the original model over the years, most noticeably by slowly collecting all the frames and glass. Other minor changes include the addition of headlights and a more vanilla bogie design to match the PF motor frames. Of course you want to see it go: I was really entertained by how fast it goes! Usually I prefer gearing down such that you get more torque and less speed, but watching this zip along is a fun change of pace. The pulling power isn't actually all that bad either, but as expected, you need to be going pretty fast before the PF train motor is generating any torque. One more interesting thing is that I'm actually using BBB wheels on the PF motor instead of the usual tyred wheels. I originally tried with the official wheels, but I due to the low torque I felt like it was really bogging down in the corners, so I tried the BBBs. This is a much smoother configuration, and it doesn't feel like I'm losing all that much grip. It can definitely pull at least the other two P54s and maybe another car or two. Okay, more to come soon. Hopefully.
-

Mini Dumper with BuWizz
teflon posted a topic in LEGO Technic, Mindstorms, Model Team and Scale Modeling
I had a long conversation with Roni of BuWizz fame about desirable vehicles used with his invention. Apart from electrifying large Lego technic vehicles, we were thinking about producing a simple and low-part-number vehicle, which can be quickly build and used. Well, this was the intention, however I was not very successful with this. I mean, it's not a problem regarding dimensions etc., but more of a general shape. My cars look like something from another world but not in a good sense. So, please Sariel and other well established builders, perhaps you could just skip this presentation:-) But then I have spotted Mini Mining Truck in 42055 and it seemed cute (perhaps I am a bit biased towards large models but small technic models are generally quite nice and full of features). Therefore I decided to motorized it. At first I've tried with Lego components but found out there is no room. Then I decided to use BuWizz, since allowed a bit smaller footprint. However, the truck kept growing in size. I have motorized the propulsion (I wanted to add the differential, however it kept the truck to slip while navigating rough terrain), steering and raising/lowering the dump. In addition I have also put in some lights, however BuWizz application at this moment does not support switches (hint, hint) so using lights is a bit of a drag. There are several issues I did not addressed properly: single back wheels (not enough room at this scale), not uniform color (lack of parts), cabin missing (I used the space for cables) etc. I have rebuild the d*mn thing at least 10 times but I guess this just speaks about my inability to do great technic job. Nevertheless, the truck moves and it's quite fun to play with. And I guess this is one of the main features. -
BMW vision M power
9 fingers posted a topic in LEGO Technic, Mindstorms, Model Team and Scale Modeling
Hello everyone. After a very long time, I would like to present you my new creation. Its a BMW vision M power. As you will see later, the vehicle has no special features, since from the very beginning, the idea of building was primarily in the design and form of the car. The idea was of a typical character in the BMW style. A kind of prestigious futuristic retro sports style with recognizable BMW lines. PF components are: - 2 L motors for drive - 1 servo motor for steering with funtcional steering wheel - 1 M motor for 3 speed linear gearbox. It was the worst decision and design in my life for this gearbox.When I built and tested, it all seemed to work wery good.Now it is finished and definitely a total breakdown. After eight months of building this car, I simply do not go all over and repair it all. There is no chance. - 2 V2 recievers - 1 big batery box Some pictures. And my favorite photo. And the video. Thanx for watching. Best regards, Valter