Search the Community
Showing results for tags 'Mod'.
Found 466 results
-
Hello everyone, 40448 is a pretty nice set, but I don't like it doesn't have functional doors. So I modified it to have a functional hood, doors, and trunk. Now the minifigures can get back the surfing board to surfing. The instruction is listed in my video. Welcome to take a look :)
-

Lego 42123 McLaren Senna GTR™ MODs and improvements
Zerobricks posted a topic in LEGO Technic, Mindstorms, Model Team and Scale Modeling
I got my 42123 a month or so ago and while it's a very awesome set out of the boy I knew I had to give it a proper differential. Here's how I did it in LDD: In order to preserve the original engine position the differential is moved back one stud: A pair of 8 tooth gears transfer the power from wheels to the differential: And while I was at it, I also made the steering work using 8 and 24 tooth gears: I plan to make a detailed HOW:TO video tomorrow, so stay tuned. Meanwhile you can download the LDD here: https://bricksafe.com/files/Zblj/42123-differential-and-working-steering-wheel-mod/42123 Differential and Working Steering Wheel MOD.lxf -
Hi all. Until recently I resided only at the EB Technic subforum. For several reasons (which I won’t elaborate here) I’m taking a break from Technic. Instead I found joy in building City vehicles in LDD and improving them as I like. My main motivation is the nostalgia for the times I had a Lego city and some of the vehicle I had a fascination for as a kid. Small disclaimer: This all just for fun, I have no plans for building any of the following vehicles with real bricks. I would like to kick things of with the first series of vehicles: some utility trucks inspired by the cherry picker in the upcoming 60306 Shopping Street set. l liked the proportions, colors and general look of the original, but missed some play value. So I tweaked the nose, modified the cherry picker for bigger range, added outriggers and some tool storage. This is the result, next to its source of inspiration: The ball got rolling and I built two version of this vehicle, a contractor truck towing an air compressor and one featuring a snowplow. When the cherry picker and the contractor are at work it looks something like this: I hope you like them, I'm currently working on another series of vehicles
-
Decided to finally post all my Jedi Interceptor ETA-2 mods. All were made from either Set 75135, but most were made from set 75281. All the stickers you see were created by me using photoshop.
-
Hello! Here I want to present you my MOD from the Lego 75318 The Child set. More photos on Flickr album
-
I love the UCS Slave 1, it has been my favourite OT ship since I owned the Kenner 3.75" version back in the early 80s. Unfortunately, my wallet doesn't love the price and with the amount of other Star Wars sets being released, it's not on the horizon. I'm not sure if the UCS is genuine minifigure scale or not (I'm sure someone's done the measurements), but I decided I actually wanted something that might fit more easily into a diorama, so I decided on a MOD of 8097. I was lucky enough to pick up a set without minifigures for less than £50 on eBay, and only needed one Bricks & Pieces and one Bricklink order to get what I needed (mostly bricks from the UCS). Without further ado, I give you the Not-really-Ultimate, Not-really-Collectors Series Slave 1! The main job was re-shaping the dark red bottom 'skirt' which was far too blocky in the original. This made the top/rounded end 2 studs wider, so a bit of fiddling was needed. I lost the flick fire mechanism, but kept the compartment play features as I felt the fit with the aesthetic and purpose of the craft. A bit of greebling on the fin arms made a world of difference. The 4x6 dark red tile with studs on 3 edges (I'm sure it has a name) actually lies a lot flatter and smoother than it looks here. The outline is not perfect, but I'm pretty happy at this scale. The nose guns are pretty much a copied/scaled down version of the UCS. Flight mode, with Boba Fett at the controls. The underside is pretty much as-was. The removal of the flick-fire rack means the interior is actually pretty empty. I've covered the opening with a small 4x6 hatch for now that may become some sort of removable holding cell. One final shot with Boba Fett scouting for his latest prey. No arm printing? Well, that's for UCS only! All comments and suggestions for improvements gratefully received and acted upon!
-

MOC/MOD - 4-6-0 Hall Class "Olton Hall" - aka The Hogwarts Express
Phil B posted a topic in LEGO Train Tech
As already shown in a preview in my Hogwarts Express Carriages thread, I have completed my rendition of the "Olton Hall" steam locomotive, famous for pulling the Hogwarts Express in the fictional wizarding world of Harry Potter. Here she is in close-up: [ Hogwarts Express by Phil B, on Flickr This is a model that started as a Mod of 75955, but has progressed far enough from the original set that you can call it a MOC I think. Here is a list of all modifications I made: Lengthened the entire boiler by 6 studs and placed the middle section under a one-plate angle to better capture the shape of the real Hall Class. Widened the engine to 7 studs (almost 10 across the pistons and driverods). This allowed me to accurately model the forward facing windows in the cab, and allowed me to create openings for the wheel flanges to accommodate a larger wheel size, Upgraded the wheels to Big Ben XL Drivers and Big Ben Medium pilot truck wheels - I like how they have true spokes vs the printed spokes on LEGO's regular train wheels. The model works with standard LEGO Large and regular train wheels as well. Extended the pipes from the side to around the nose of the boiler. Redesigned the front buffer beam. Gone is the "lock" from the original model, but it features the same details as the real-life Olton Hall. With the change to 7 wide I widened the cab, but kept the original firebox and gauges from 75955, which was quite an "offset" challenge to do. Completely redesigned the tender to house a LiIon LEGO battery box and a Power Functions IR Receiver, though the model can work with PFxBricks as well. The tender is 6 wide, with one pivoting axle and a fixed PF train motor. On the pictures she is pulling my consist of 5 BR Mk I coaches - 2 First Class, 2 Second Class and a combined First Class/Baggage/Brake coach. Each carriage has a fully detailed interior and is 7 wide. Progress on these carriages has been documented in my Hogwarts Express Carriages thread. Here are the picture and drawing I used for inspiration: More pictures of the engine: The full consist: And the coach interiors: -
Lego WV Funicular 01 by Loslyn Loslyn, on Flickr Lego WV Funicular 02 by Loslyn Loslyn, on Flickr Lego WV Funicular 03 by Loslyn Loslyn, on Flickr Lego WV Funicular 04 by Loslyn Loslyn, on Flickr Seasons Greetings! Here is my Wintry Funicular Railway. I have re-purposed the Winter Village Train Station as an upper and lower station. The winch and winch housing 'level' of my modular mountain is built mainly from the Friends ski lift. I would most welcome advice on how to improve the funicular carriage, which uses some of the school bus pieces. I have not built a vehicle before, and found the different level axles very challenging, it works ok but is not robust or elegant! Lego WV Funicular 05 by Loslyn Loslyn, on Flickr I am pleased with the open platform in the lower station. The east face of my mountain is a WIP and will include ski runs. Obviously the mountain is vertically challenged! I have rebricked the fire station to make it shorter, and converted Santa's Workshop into a train station.
-
[NCS] 886 - Space Buggy, Remastered It is my chassis from [NCS] 6802 - Space Probe by changing the rear of the vehicle. Rear with articulated arm, 2 fire extinguishers, ore box, articulated arm control panel, 1 spaceman's hand tools, one antenna, 1 airtank. Front of the buggy with camera, sensors, binoculars, 2 walkie-talkies, a mini-satellite-antenna and control panel. [NCS] 886 - Space Buggy, Remastered by Horlack, sur Flickr [NCS] 6928 - Uranium Search Vehicle, Remastered [NCS] 6928 - Uranium Search Vehicle, Remastered by Horlack, sur Flickr [NCS] 6928 - Uranium Search Vehiclen, Remastered by Horlack, sur Flickr [NCS] 6842 - Shuttle Craft, Remastered A small remastered 6842-Shuttle Craft. Walkie-talkie, camera/weapon (depending on). On the Shuttle : reactors, engines, jet turbine, cannons, 4 front sensors, radiators, small antenna, 2 horizontal ailerons, 2 vertical ailerons, lifters, steering nozzle, rear computer control panel. Basically, I took a bit of inspiration from the Speeders of the Meta-Universe from Starwars. search keywords for all see : "type = speeders" https://www.starwars-universe.com/encyclopedie/vaisseaux_vehicules.php [NCS] 6842 - Shuttle Craft, Remastered by Horlack, sur Flickr [NCS] 462-897- Mobile Rocket Launcher, Remastered The Mythic 462-897 Mobile Rocket Launcher set was too small, so ... I remastered it in 2020 version. I had some difficulty with the Rocket, because I didn't want to use round bricks. I wanted something more elegant with cool building techniques. So I remade the rocket entirely in brickbuild. Ditto for the radar. In short, a little technical originality. I didn't want to be conventional. I used the elements of my old constructions to keep it homogeneous. The radar cockpit rotates 360°, and the radar itself also rotates, 360°. The radar cockpit is quite worked with control screens everywhere, as well as small joysticks. A walkie-talkie, a hammer and an adjustable wrench hang on it. I retake : - The chassis of my [NCS] 6802-Space Probe Remastered - The radar of my [NCS] 452-894-Mobile Tracking Station, Remastered [NCS] 462-897- Mobile Rocket Launcher, Remastered by Horlack, sur Flickr [NCS] 462-897- Mobile Rocket Launcher, Remastered by Horlack, sur Flickr The goal is to remain homogeneous in the architecture. Which is sometimes not an easy task. All the blocks are interchangeable, between all my creations. It's Modular, on a vehicle scale. Details of the rocket. Use of modified brick, by turning them 45 ° in the central body of the rocket, in order to build it "in hexagon" [NCS] 6901 - Mobile Lab, Remastered Always in the spirit of keeping modules of old constructions to reuse them. Just to swap modules, to make another MOC. Maximum standardization. The forward cockpit contains 2 repair utensils. It opens through doors on the side or through the central canopy. It is a resumption of the cockpit of the "1580 Lunar Scout, Remastered", by adding 2 ladders, and by rotating the roof sensors 180 °. The aft cockpit opens by rotating the canopy, or through the roof by eclipsing the radar. It contains 2 levers and 3 control panels which are in height. The chassis is also a recovery. An excavator entirely made in brickbuild. I did not find any existing parts, adapted to the scale of the vehicle, so a brickbuild is needed :) [NCS] 6901 - Mobile Lab, Remastered by Horlack, sur Flickr [NCS] 6901 - Mobile Lab, Remastered by Horlack, sur Flickr Well, I'm pretty happy with the look. I was worried that with my history of taking modules from other builds, it would result in a lousy mobile lab. Overall, "no". I had to be inventive on the rear 4x6 module block part. Once the seat and the astronaut were installed, I found myself stuck putting screens on him! And worse, not being able to get it out of the cockpit, lol Yeah, that's bad! Even blowing up the radar which is made up of 2 modular blocks, there was really little room. in fact, I had it kinda on my own, absolutely wanting a seat, which made it worse in a minimalist space. My neurons have overheated! Hence the idea of putting a canopy at an angle, from the top, to gain length space to take out the spaceman, but also to put control panels on the ceiling. And in fact, without wanting to, I took again in a different form, the horizontal rear opening of the 2 doors of the original 6901, but in a single vertical one at the rear. [MOC] [NCS] 6802 Space Probe, Remastered Bigger on a Buggy chassis with double probes. The robot deserved a 2020 update. :) - Head 3626bpb0034 : Minifigure, Head Alien with Copper Skin and Silver Eyepiece Pattern - torso 973pb1061 : Torso Robot with Silver Rivets - Arm 62691 : Arm Mechanical [NCS] 6802 - Space Probe Remastered by Horlack, sur Flickr [NCS] 6802 - Space Probe Remastered by Horlack, sur Flickr [NCS] 1580 Lunar Scout Remastered I kept the structures of my old creations, to remain homogeneous, and above all to make it "modular". The goal is to make all of my vehicles modular, and interchange the components between vehicles, to rebuild them as they see fit. Structure of the articulated Mini-arm found in, my [NCS] 6841 - Heavy Mineral Detector, Remastered Structure of the bumpers, which can be found [NCS] 452-894 - Mobile Tracking Station, Remastered I put a mini articulated arm at the back, in addition to the 2 mineral containers. The canopy is not green, because I will take over the cockpit structure for another construction. I couldn't put the chassis as low as the original, but overall I stayed in the "spirit" of the little scout utility vehicle. [NCS] 1580 Lunar Scout Remastered by Horlack, sur Flickr [NCS] 1580 Lunar Scout Remastered by Horlack, sur Flickr [NCS] 6841 - Heavy Mineral Detector Remastered I continue my series. I feel hot and boiling there! ☢️ A little Classic-space 6841 Mineral Detector Remastered, only bigger. I have tried to stay true to the functionality and structure of the original. Then added in all directions: Mini-articulated arm at the back, box to store minerals, box to crush minerals and analyze them, communication antenna, walkie-talkies, various small radars / cameras / front detectors at the front of the vehicle, small rock hammer, hand detector (which can be hung on the mini articulated arm) and various control panels. [NCS] 6841 - Heavy Mineral Detector Remastered by Horlack, sur Flickr [NCS] 6841 - Heavy Mineral Detector Remasterised by Horlack, sur Flickr [NCS] 452-894 - Mobile Tracking Station, Remastered Functional quality, of course :). Radar in tow that turns in all directions. The 2 small folding jacks when the trailer is unhooked. (A radar not horizontal, when the trailer tilts, it works much less well!) Radar on the roof of the vehicle which rotates 360 °. I really thoroughly styled this 2nd radar with sensors everywhere and tried to keep "the best spirit" with the 2 round transparent things. [NCS] 452-894 - Mobile Tracking Station by Horlack, sur Flickr [NCS] 452-894 - Mobile Tracking Station by Horlack, sur Flickr
-

[MOD] 31109s 3rd alternative: Skull Island additional Ship
Stoertebricker posted a topic in Pirate MOCs
Hi everyone! At last I got my own 31109 which I started building the smalles build first, the 3rd model: Skull Island. I have seen several nice MOCs and MODs around this set so far so I wanted to add one myself. I saw all those left over pieces and so started to build a small pirate ship only by using the left-over pieces. Here is what I came up with: Hope you like it. If someone has a good idea for improvement, then you have to be fast or build your own addition to the island! I want to tear everything down soon to build the 2nd model and then the ship -
For over a year I’ve been modifying set 75930: Indoraptor Rampage at Lockwood Estate, and I’ve finally finished it up. I started by completely removing all of the lab parts in the set. I wanted the place to be more accurate to the movie and feel way more like a mansion. Maisie in front of the Agujaceratops skull. The exterior with masonry bricks, a few new windows, a new doorway, and slopes on the roof. While the movie has lion statues, classic baby T. Rex statues take their place here. “Ms. Dearing, you’re early!” Interior overview Lego’s goblets of plants by the entrance were accurately gold, but unfortunately the real pot piece isn’t available in gold as of now. The right and left sides now connect to other rooms on the bottom floor. Sir Benjamin and the Dimetrodon When the chameleon was made in teal was when I barely realized the piece could be used for a Dimetrodon. I wondered if the rubber mohawk piece could be bent into shape and placed on it without glue or such, but in the end I had to cheat by cutting off a bit of it and using some blu-tack to keep the two attached. Iris and the Velociraptor This diorama came first and is what pushed me to get a Dimetrodon for the other diorama somehow. For both it took some effort to use a stick to move and click them in place between the wall and glass panels. Different angles Lounge area, at least one person who lives here has to like tea. Maisie’s room and the Library I debated turning that whole third floor into either Maisie’s room or Mills’ office, but her room had the door and there were enough unique decor ideas that ended up being the telescope, a nightlight, and a green classic T. Rex as a toy. I’m pretty proud of how the center of the middle floor turned out. I used the brown and black furniture to try to cover up as much of the tan wall as possible. The glass vases of plants worked out great. There’s no other piece like that landscape tile so I was very happy that it exists, and it ended up being an unintentionally accurate decoration upon looking at set pictures from the movie’s production designer Andy Nicholson. The ship in a bottle isn't present in the movie but it’s a reference to how there are docks close to the estate. That table is supposed to be the one found in Mill’s office that electronically displayed Isla Nublar and profiles of different dinosaur species. I didn’t think there was any way to represent that, but some friends gave me the idea to use a sticker from the Dilophosaurus outpost set, so that will be something to use eventually. The Indoraptor may be too big, but Blue can somewhat fit through that door and look like she opened it. Mills’ Office Retained that idea of a table and umbrella holder and gave his space a computer with a sticker from 75917: Raptor Rampage. I'll probably replace that map with the one of Isla Nublar printed on it eventually. I used the portraits of Thomas and Martha Wayne from the 1960s Batman set for both hallways. It would’ve been great if they officially had one for John Hammond. The new transparent piece from the DC collectible minifigure series allowed for that ammonite fossil to be displayed accurately. A simple bust build and a drawer with explorer items on top. Just a look at how the hallways now connect the entire bottom floor together. Eli Mills, Sir Benjamin Lockwood, Iris Carroll, and Claire Dearing. Thanks for looking!
-

[MOD/MOC] Lego City Mars Exploration - Heavy Mobile Lab
Horlack Bricks posted a topic in LEGO Sci-Fi
[MOD/MOC] Lego City Mars Exploration - Heavy Mobile Lab Built based on 2x 60225 Rover Testing Drive, 2x 60227 Lunar Space Station, 60229 Rocket Assembly & Transport on theme : Lego City Mars Exploration - Rover - Drone - 2 articulated arms: grippers and drill - Radar antenna - Various tools - Spacesuits / airtanks - Scientific analysis equipment - Microscope - 2 retractable berths - Cockpits NCS - Heavy Mobile Lab by Horlack, on Flickr NCS - Heavy Mobile Lab by Horlack, on Flickr NCS - Heavy Mobile Lab by Horlack, on Flickr ============================================ -
Hi Folks, some weeks ago I presented my Millennium Falcon Moc here on this page. ...but after a while I wasn't completely satisfied with the endresult, so I broke it down (which wasn't easy) and began a rebuild. The new version is larger and I tried to get the outer proportions more like the original Falcon, same with the the interior layout. Length: 58 cm (75257: 44) Width: 40 cm (32) Hight: 14 (14) Weight: 4,1 kg. First some exterior images:
-
[MOD] Lifted and motorized 42110 Land Rover Defender
Zerobricks posted a topic in LEGO Technic, Mindstorms, Model Team and Scale Modeling
Here is my take on the motorization of the 42110. Basically the whole model was lifted to accomodate the bigger wheel, motors and BuWizzes. Model is powered by a total of 8 motors, 4L motors for RWD, 2L motors for FWD, one servo and one M motor. Total gear ratio is 1:3. It uses custom portal hubs in the front which have a pivot even closer than normal ones thanks to the new rims. Rear uses normal hubs and wheels, since they are sturdier. Axles use the original suspension's upper arms as mounting points along with a pair of 9L links for each axle. The original gearbox is connected to the rear drive, so it works normally. Steering is also connected to the original links, so steerign wheel and HOG also turn when steering Winch is motorized using an M motor. Video coming soon. -

4 Privet Drive house 75968 MOD with garage and rear half of house plus 1962 Ford Anglia in dark blue
Murdoch17 posted a topic in LEGO Licensed
Here is my heavy MOD of 2020 set 75968, 4 Privet Drive. The car is a dark blue version of the Anglia in 2018's Hogwarts Whomping Willow set (75953), and fits inside the added garage. Here is the front of the house. I added a visible chimney flue, as I didn't like how the set kept the one hidden inside the wall. The rear of the building features a greenhouse and back door to both the house and garage. The greenhouse folds up and open to get at the inside of it, which at this point holds only a telephone. On the lower floor of the inside is the living room (with record player, couch, and fireplace), kitchen and dining area (stove, sink, table and two chairs). The upper floor features a lamp on a table and a bed. This 1962 Ford Anglia 105E is based off set 75953 (Hogwarts Whomping Willow), but in dark blue. (and no, it does not fly!) The rear trunk opens slightly. Two of this part are missing in dark bluish gray, and four of this part are missing in dark blue to finish the car. The LDD file is available at Bricksafe here. Any thought, comments, complaints or suggestions? -

[REBRICK][MOD] Star Wars Z-95 Headhunter | conversion for display stand and landing skids
NerdYoda posted a topic in LEGO Star Wars
Hello everyone, some weeks ago I bought and downloaded the manual of the classic - and for me best - Z-95 Headhunter of the Designer Moppo (MOC-30461) from Rebrickable (link to the MOC: https://rebrickable.com/mocs/MOC-30461/Moppo/z95-headhunter/#parts). After I had all the parts together and could start building, I soon realized that the MOC was not suitable to be placed next to all the others in my showcase on an acrylic display stand, as the photo of the bottom side shows. In order to present it next to my other models and MOCs, I ordered a suitable Medium Angled Acrylic Display Stand with a 4x4 Top Plate from Wicked Bricks (https://www.wickedbrick.com/collections/vario-display-stands-1/products/small-angled-multi-use-display-stand-for-lego-vehicles), so that I could consider and implement the necessary modification of the original model after receiving it. The idea was to construct an additional carrier and to modify the bottom side of the Z-95 Headhunter accordingly, so that it will fit the model and the display stand at the end. To do this, a sketch had to be made to determine the parts to be ordered. Modification of the Z-95 Headhunter (bottom side). For the necessary modification you need the following parts: (Structure: Designation | part number | quantity | comment) Plate 1x4 2 Knobs | 4599498 | 2 Flat Tile 1x3 | 4558169 | 2 Flat Tile 1x2 | 4211414 | 1 Flat Tile 2x2 | 4211413 | 1 Once you have all the parts together, start by removing the three flat tiles 1x4 from the bottom of the Z-95. The same applies to the Flat Tiles 2x4. At the gained space you attach the above parts from the parts list in the arrangement shown on the photo. This way we realize a mounting possibility for the carrier, which will be built in the next step and serves as a bridge between Display Stand and Z-95 Headhunter. We need the dismantled Flat Tile 1x4 for the carrier, which we will focus on in the next step. The carrier. The carrier consists of two parts. We need the following parts for the carrier Plate 1x4 | 4211445 | 3 Flat Tile 1x4 | - | 1 | From the dismantled parts from above. Half Bow 1x2x2 Inv. | 6144138 | 2 | Half Bow 1x2x2 | 6028813 | 2 | Technic Brick 1x1 | 4211535 | 4 | Plate 1x2 | 4211398 | 2 Profiles Brick 1x2 | 4211383 | 2 | The construction is very simple and can be seen in the following picture. The result. The result is that the carrier sits very firmly on the display stand and the Z-95 Headhunter is also solidly attached to the carrier, so that nothing stands in the way of presenting the model on a shelf or in a showcase. The modification of the underside has been designed so that the hunter does not gain excess weight in one direction or the other to prevent accidental falling. So everyone can decide for himself whether the hunter tilts into a curve, rises steeply or descends. Besides the possibility to show the hunter on a display stand, I also implemented a modification for the attachment of landing supports. The realization is also very easy and fast with a little disassembly and assembly. Here you need - besides the above mentioned modification of the underside - the following components: Technic Lever 3M | 6331723 | 2 2M Cross Axle w. groove | 4142865 | 2 Fric/Stump with cross hole | 4158848 | 1 Fric/Forc with cross hole | 4210695 | 2 Plate 1x3 w/Stub/Along/U.P. | 4210882 | 1 Roof Brick 1x2/45° | 4211614 | 4 Flat Tile 1x2 | 4211414 | 2 Landing skid front. The assembly of the front landing skid is shown on the following photo. In addition, the two Technic Lever 2M, which were originally mounted, must be replaced by the Technic Lever 3M in order to attach the landing skid to the fighter. Landing struts underside. The landing skids of the underside are realized by two Roof Bricks each, which are connected by a 1x2 Flat Tile. Both are then attached to the 1x4 Plate with 2 Knobs on the underside (see above). Just align everything nicely and the Z-95 Headhunter is ready for presentation inside a hangar MOC, since it is now standing on its own landing struts: -
Hi ! Here's a few mods I've made to 75188 Resistance Bomber in the last few days. I first changed the engines to blue (I swear it seems like blue and orange are ALWAYS reversed on Star Wars vehicles!) I'm not a big fan of stud shooters in most contexts, so I switched the rear cannons out for display ones. I also wanted them to rotate together, which took some figuring out. I couldn't find a way to use friction pins to hold both cannons so I put another axle in with a little gear system like in Slave 1. I went through a few different iterations but this was the most compact solution I could find. I transferred the stickers in the bubble canopies to clear 2x2 slopes, and switched the brackets and tiles for a little more visibility. Shorter wings to be a little more in proportion. The interior was already great, but I tiled over the floor and added a weapons rack. I added a small ladder up to the gunner position and added in some more details and stickered controls by the gunner's hands. You can't really see them in this picture, though. The exterior of the turret is mostly the same but it was a great design to start with! For the cockpit I used a bunch of stickered elements from 75105 (getting slowly disassembled in preparation for the big one!) Snap is piloting for the moment, until we find out what the whole crew will be (probably not a bunch of X-wing pilots !) The rest of the changes are just minor cosmetics all over the hull, but I've already made this too long so here's just two more pictures. I didn't capture everything, of course ! This is a really great set! It looks beautiful and is so much fun. As an AFOL I tend to just display things but it's impossible not to fly this around the room ! Thank you :^)
-

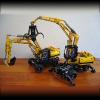
42042 - Crawler Crane - Mods and improvements
kolbjha posted a topic in LEGO Technic, Mindstorms, Model Team and Scale Modeling
I really like this set, and even it has IMO a great gearbox, one of the first things I was thinking of after completing the build, was how to make it RC. I guess most of the six functions are straight forward, but operation of the claw is obviously more tricky. I tried to figure out if it was possible to operate the claw by the hoist string. I realized that it is possible to transfer motion to a pulley in the claw simply by pulling the string on one side of the pulley, and letting out on the other side. The claw should then in theory be kept at the same level, and the motion transfered to the pulley could be used to drive the m-LA. To achieve this, I have used two reels, each of them connected to the ouputs of a subtractor (geared down 1:3 with Z12 and Z36 double bevel gears). If using tracked vehicle implementation of a subtractor as a reference, the "drive" part is done with a M motor driving a worm gear that in turn drives a Z8 spur gear. The "turn" part is done by a XL motor, directly driving the differential housings. I probably could use a L motor as well, thus avoid the coasting of the XL. The string I have used, is simple string for packing purposes. I guess it is better (and more puristic) to use the thick LEGO string, as it looks better, is more solid and no twisting. Problem is, can I get a thick LEGO string that is long enough? Please don't judge from the aesthetics, the main goal for me at this stage was to demonstrate the idea, and I have not put a lot of effort in the looks, or making it compact. Link to video: Here is my own judge for the idea: Pros: IMO it looks more clean than a hanging motor with it's supplying wires. Both hoisting and claw operation may be done simultaneously. Able to operate two functions with a simple string. Adding mechanical complexity to the model, something I like. Cons: The torque delivered to the m-LA is limited, so the grip of the claw is not very strong. It should be apx. equal amount of string on both reals, to achieve claw operation without changing the level of the claw. Claw operation is depending on friction between the string and the claw pulley. If the the claw is resting on the ground or the object it should lift, it will not work. Probably not real-life-like implementation of claw operation. Another idea I have, still not tested, is to convert the hoist string into a closed loop. the claw implementation is the same, with a pulley driving the m-LA. On the tip of the boom, there is a pulley, driven by cross axles from the super structure (the reason for location on the tip of the boom is to reduce length of the string, and number of pulleys, to reduce friction). The hoist may then be done by two pulleys pulled along the boom, towards the super structure. One of the advantages of this implementation, if it works, is that "Con #2" above is eliminated. I don't know if this description makes sense to you, I will try to test this version also. Main problem is, how to make a long, closed loop of LEGO string, without any bumps. I appreciate any feedback, including cons. And I also hope to inspire some of you to come up with a better solution. PS: Somebody who knows how to embed a "visual" youtube link, like most of the others do (I didn't figure out)? -
[MOD] Martian Colonization Base, 4x 60227 I transformed the lunar space station into a Martian land base for colonization The blocks / modules are perfect. I also made a small NPU with train part number 55768. It makes excellent glass roof/skylight :) Picture on high quality 4096x3072 on my flickr [MOD] Martian Colonization Base, 4x60227 by Horlack, sur Flickr
-
Dear All, after so many modding activities regarding the Crocodile it is hard to believe to be able to add something new to it. Don’t know whether this is any “new” – if not, moderators please remove this thread. (Also, please excuse my crappy photography - I am not good at this nor I believe is that tiny camera I have. Also, the LDView screenshots were made without much passion ...) Here it is though: I don’t like blind drivers. (I know that in many cases they are simply mandatory – steamers with more than four driving wheels attached via connecting rods and there we are, particularly on TLG's original curved track. I know only one exception from that: Ben Beneke’s BR23 LEGO replica: This one features 6 driving wheels; they are all flanged and each pair of three wheels is connected using LEGO Flex system parts. In addition, a split center axis is used so that the corresponding center driver is moving inward when going through curves – it is a brilliant solution) With the Crocodile though, the “noses” feature only two drivers connecting via one rod that in addition allows some articulation at the wheel - rod joint. So all-flanged drivers could have worked – unfortunately though, the pivot point of the bogie is not in the center but far out between cab and nose. Blind drivers are thus used accordingly for the pair of drivers closer to the pivot point. And I don’t like them. Particularly because my LEGO layout is rather crowded. So I decided to put some track up the sloped wall – with some curves to see the crocodile meander about – I mean this is what crocodiles do when preying … and then you just see it all the time: The blind drivers are “leaving” the track. Solution: Moving axles, as has been demonstrated in countless contributions here on EB and elsewhere. I decided to articulate the axle close to the cab, which requires narrowing the 4 wide frame – I used a two wide base (three would work as well, but I simply could not figure it out). (Note the red drivers on the side facing away from my chair - will try to get the black ones some other time - do they exist as separate part at all? Need to check) Here are some LDraw screenshots: Also, as friction leading to upward pointing forces goes up quite a bit, I made some room for some "weights", which are required to counter these additional forces. So there are 10 x 1 Euro cent and 4 x 50 cent Euro pieces in each nose, considerably increasing the value of my croc. Without the extra money, each nose weighs about 145 g (not including the pony truck) – with modifications plus the money 210 g. The values of my crocodile is thus retails price + 4 Euros and 20 cents. (Well, I had only 7 50 cent coins that day - the one in the photo is a Swiss coin of almost the same size ...) Further modifications: I simply did not like the coupling offset between noses and cab, tilting the nose downward to the front. This maybe intentionally. But when you look directly at the Crocodile's noses in front of your own nose all day – I had serious sleeping problems. Solution: Not using the 4x4 Technic brick + pin (popping off all the time drove me crazy as well …), but 1x2 plates with tow ball, which conveniently came with the extra 40411 set. That required some modding of the cab frame as well – in addition to the flanges of the new drives close to the cab needing more space for pivoting. So the slopes had to be changed. The color of the axle pins (whatever that color is - sand something) of the pony truck wheels also got me mad. They are partly hidden by the bley 1x2 plates with ladder, but again my eyes are level with the Crocodile … plus I also noticed that on most pictures I found on the web of the II version the “ladder” is missing at all. So I redesigned the truck as well, now featuring a 6L black axle and no ladder. And in addition many of the implementation of previously reported mods: @Sérgio's greebling (soo nice!!!) very slightly modified, and @Sérgio's solution for closing the gap between cab and nose (plus some very minor additions, see pictures above and LDraw files, link below). Want to add the wheel guards as well, as @Sérgio and @Duq have demonstrated. What is that "plate"/slope called, you are using? What else? Ahh – changed the frames to black, as suggested by others. Not entirely because the contrast between the black wheels and greebling is then gone. So I left a few parts in dark bley – simply to show (and: because I did not have them in black). And: I removed all but 2 rubber bands on the cab. None on the wheel of the noses. So here she is: That was it. As usual, I really learned a lot from you guys. Thank you all very much for letting me again dive into the LEGO world of bricks! Forgot: Yes, it negotiates curves (S type) very well. No idea about switches, but my crocodile will only drive back and forth "on the wall", disappearing behind books and magically reappearing … that needs some BLE programming – we will see. In that regard, a lot is going on in the Mindstorms Forum! (Here are the links to the LDraw files (really very rudimentary, just for my documentation. Deep linked - as the folder is not moderated yet http://www.brickshelf.com/gallery/ThorstenB/9VTrain/Crocodile/LDraw/nose_bogie.ldr http://www.brickshelf.com/gallery/ThorstenB/9VTrain/Crocodile/LDraw/ponytruck.ldr) All the best Thorsten
-
I like to present you my Lego town Steinbruck. The name is from Stein=brick & bruck(old German)=bridge. This is my current layout: My MOC and MOD buildings (more detail pictures in the albums; just click the pictures to get there): I'm planning a car wash for the Service Station and will build it in the next months. I also build digital, but can't afford all of them to build with bricks. Click to album.
-
I always like to mess around with existing LEGO sets, especially with set 3177 (a.k.a small car). So I discovered a BMW M4 with a trailer made from another BMW M4 cut in half. I used that idea to make this thing:
-

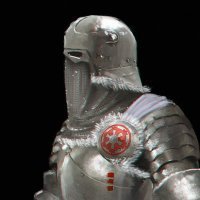
[SR - FB 4 - April 620] The hunt for Red Oktober II - The story of doctor Thaum
Professor Thaum posted a topic in Brethren of the Brick Seas
Back in March 620, Prio Sea, North shore of Tortuga... precisely at Dr Thaum's pied-à-terre The young Iauln is up the tower, searching the horizon with his telescope, the trusted Callaghan is manning the grill, and the doctor... PSHHHHHHHH ! PSHHHHHHHOUUUT ! SHHHHHH ! SHHHH ! KLANG ! Dr Thaum : EUREKA ! It works ! Callaghan, my steam engine is working ! The wheel is turning !! YEEEEEHAAAAA ! TJ Johnson : Excuse me doctor, your parcel... Dr Thaum : I don't give a sh... of that parcel Callaghan, you're a bonehead, Callaghan ! TJ Johnson : This is not Callaghan, doctor... Dr Thaum : UH ?! Oh, sorry, TJ, which parcel ? Errr... OK THE parcel ! You've found him ! Well done TJ ! Here I come ! Dr Thaum : Wonderful guys ! Bring the coffin in my pantry... CALLAGHAN ! Show them in ! And then offer them a drink ! XXXXXXXXXXXXX Dr Thaum : Dear professor, you're finally back to me ! TJ Johnson : Allright doctor, can you explain me what's going on ? I terminated about twenty persons for bringing that corpse back. Dr Thaum : Of course Mr Johnson, You've just brought back to me the corpse of my estimated mentor, the professor Oktober Sippio, he teached me most of my knowledge... TJ Johnson : Talk, talk ! Why should I bring it back untouched and eliminate all witnesses, the 2 altonian captains and some of the crews ? Dr Thaum : OK, OK... many years ago, the war between Oleon and Corrington was in full swing, and with this war, its share of destruction, orphans, famine and diseases, notably the leprosy. The lord-chambellan came to the professor Sippio and asked for a terrible disease, ready to take a heavy toll on the Oleonese ranks and he asked for a cure too, for Corrington, of course, for a stated price... Something as terrible as leprosy. I just defended my thesis and became doctor, with my friend Henry, under the direction of the professor Sippio, and all 3 began to work on this scourge. Callaghan : Wait a minute ! You got paid for that !? For a disease ready to rampage the world !? Dr Thaum : You're a bonehead Callaghan ! I get paid for my care ! The death is offered ! Anyway, the research, especially for the cure, needed a vast amount of money the lord-chambellan was hesitating to provide, and there were suddenly changes in the royalty and the lord-chambellan was dismissed for womanizing, but this red leprosy... Callaghan : This leprosy ?? TJ Johnson : Finish your story doctor... Dr Thaum : This leprosy was good and ready. The cure was ready too, but we barely had only half a dozen unit dose, we do not have fully tested. A cleaning up was then initiated in the ex lord-chambellan business, our lab was destroyed, Henry and I escaped with few samples (including some of the cure) and books and the professor was captured as he was burning the last flasks of Red Oktober. Nethertheless, the professor was the only one to have the complete formula of the cure, but just before I vanished with Henri, he had time to say " I will point to the solution". Since then, I have done all that I can but the professor died in jail and his body ended up in a mass grave. After years the mass grave was found and under my instructions and with some money the coffin was loaded in the LaCrosse, a ship hired for the Sea of Thieves sea link. Unfortunately the ship sank near Terraversa, and it took me almost a year to find the sinking localisation. But when the LaCrosse wreckage was found, that was only to realize that 2 altonian ships found the coffin, probably floating on the sea near the wreck, and take it with them to Ulric. This is where you come in, TJ... Callaghan : Why Red Oktober, doctor ? And were are the flasks you runaway with ? I hope destroyed !? Dr Thaum : Red Oktober... because of the red color of the substrate, and destroyed... No. Have a look around you Callaghan Callaghan : Reuuaaargh !!! This is the Red Oktober ? Dr Thaum : Indeed... Callaghan: And the cure samples ? Dr Thaum : Already consummate Callaghan Callaghan : Let me develop a bit... This is the reason why Henri, Barney, Hadvice, Oggy you and I boarded the Leper Messiah and the Leper Crusader ? You and Henry tried your cure ! And it didn't succeed ! We now have 2 doomed ships storming the seas with full crews of infectious demons !! That's an outrage ! You're a fool ! You lost your best friend and even your son ! And you aren't seeking a solution anymore ? Dr Thaum : Shut up Callaghan ! The cure is a success, as you noticed it, Barney, Oggy, Hadvice, you and I are well, right ? and... TJ Johnson : Why did you give your last dose to me ? Dr Thaum : Some flasks were broken in the skirmish as the lab was destroyed and the professor captured, there was a mini leprosy outbreak after this in the city, and the professor died of his own Red Oktober in jail. So the last dose was for you, as you perhaps have to touch the corpse and bring the last sample back. And Callaghan, the solution is here ! That's why I hired TJ for bringing the the coffin back. The cure formula comes with the corpse of Oktober Sippio ! "The professor point to the solution" Callaghan : You administer me the cure ? When ? Why ? and Henry ? and Hadvice ? Dr Thaum : Enough Callaghan ! Enough ! You have a drink to offer ! Callaghan (leaving) : You smutty old fool! Dr Thaum : Look, TJ, for the cure, "the professor point to the solution", look at that right arm and the index finger... TJ Johnson : A false finger ! How did you notice that ? Looks like a true one ! Dr Thaum : Henry and I made this false finger, the professor asked us to amputate him and replace the real one with this prothesis this is an empty one and he probably hid the cure formula inside. That's why I wanted you to bring me the body back or at least the right arm ! Dr Thaum : All our efforts are rewarded ! I now have the cure formula ! This is designated to be the Doctor's residence in Tortuga, should be licenced as a medium one with court approval @Bregir @Capt Wolf @Bodi @Ayrlego (because of being only a MOD of the old fishing store official) I hope you enjoyed the story... all is not revealed, there is lot more to come ! C&C welcome as usual, bonus pics (of all that was MODed later on ) -
Hi Folks, my name is Friedie, I'm from Bonn, Germany and this is my first posting here. I was born back in 1967 and I allways was a big Starw Wars Fan. In the last years I followed all that Lego Star Wars Creations on the Internet but never took part in building Lego myself (what I did when I was a child of course). In 2017 I thought of buying the new UCS Set but I was was a bit disapointed, that the Interior was not complete and they used these "Sticker-Hallways". I know, it is not a play-model, but even a Display Model should be "complete"in my oppinion, even more when you consider the high price. But The Falcon allways was my favorite ship, as Han Solo was my favorite charater of the series. so finally I wanted to have a Lego Falcon at home, so I decided to buy me the 75257 Edition. It was fun to build but the outcome is so much different from the original thing. So I first decided to mod it and got me some more parts from bricklink. Corona came leavin me working at home and having much more spare time. I looked up a lot of mods and mocs on the Internet, and I also found this site of course. There are brilliant works (stifos!) that inspired me from the start ofmy building efforts. Finally I finished my work and it evolved from some simple mods to a fullgrown moc of the Millennium Falcon witha detailed interior. First some Numbers: Length: 53 cm (75257: 44) Width: 37cm (32) Hight: 17,5 cm (14) Weight: 3,2 kg (2,1) I don't know the number of parts, cause I just build the thing together, so sadly I don't have instructions or part lists to offer. But here are the first pics I want to show you... The "Corona" Falcons Overall Exterior:
-
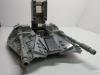
Inspired by some of the other excellent threads on this forum, I decided to have a go at lengthening my First Order Transporter: I've added an extra 16 studs, twelve of them in the troop compartment: it can now take a total of twenty stormtroopers. I have rebuilt a lot of the details: I have also shortened the cockpit and moved it back. It is accurate in profile and still fits a minifig. Finally, I've lengthened the engines and added some greeblies to the space between them. Sourcing another 16 stormies was fun but expensive: Battle of Takodana + 2 batle packs + 2 Bricklink orders. Special thanks to our very own Lobot for his rapid and friendly Bricklink service. Many thanks also to Vodnik, deskp, Veynom & Solscud007 for their inspiration. If anyone wants to build this mod, I've created a Lego Digital Designer file: (LXF) This file is slightly different to my "real bricks" version, due to Lego Digital Designer being a crotchety old block. Bonus fun - Spot the differences! To build the version in the LXF, you will need a 75103 First Order Transporter and about 470 extra parts: (XLS). Having an extra 75103 on hand (£40 on ebay with no minifigs) cuts that down to 300 parts: (XLS).