Search the Community
Showing results for tags 'Mod'.
Found 466 results
-
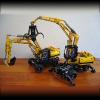
42082 - Rough Terrain Crane - MODs and improvements
Cumulonimbus posted a topic in LEGO Technic, Mindstorms, Model Team and Scale Modeling
The upcoming 42082 Rough terrain crane has inspired a whole list of possible improvements because I believe that at this scale some cool functions could/should be modeled (in random order): Two stage outriggers, preferably PF controlled Multiple steering modes (minimal 2: 4WS and front wheel steering) Pendular front axle Luffing jib, folding away against the boom Second winch for secondary hook Replace LA’s which lift the boom with an actuator with a longer stroke for bigger range in the boom angle Cosmetic changes to cabin, engine cover and upper structure to resemble real cranes more like Grove or Terex Some of these are probably overly ambitious and I’m not claiming to be able build all these MODs in one single model, but I am curious to see how far I can take this. My first step is to take a look at possible two stage outriggers. So far I’m tinkering in LDD to find mechanisms for the horizontal stage which are rigid enough to support the Crane and compact enough to fit on both ends of the 42082. I think it must be possible to fit the outriggers in a module measuring 5x7x23 studs. The ultimate goal would be to lift the crane from its wheels, but considering the size and weight of the 42082, I would be happy if the outriggers can simply provide actual support. Progress so far: -
.thumb.gif.ad7c8d88b264ee812194946c07404504.gif)
[AMS-2][MOD] Lego 9394 RC Dragster - Powered by a buggy motor!
mocbuild101 posted a topic in LEGO Technic, Mindstorms, Model Team and Scale Modeling
Yes, it's an airplane that can drift! (or rather do doughnuts) But first, I think the video is the best introduction: Cool, isn't it? I was actually very surprised how well it worked when I first tested it - especially considering how bad my previous MODs were.. (in fact, it's probably the only RC set MOD that I've done that worked at all!) It was quite a challenge to fit all the electrics in such a small body, and was actually the main reason why I only kept one of the original functions... Features: Steering - powered by PF servo. Drive - geared down 3:5 from fast output of buggy motor. Motorized wings (not RC) - powered by PF M-motor. Easy to remove battery box - if not using rechargeable battery. Other Specs: Weight: 650g (with rechargeable battery) Original functions kept: 1 (out of 3) Theoretical top speed: 14km/h (at least) Links: YouTube: https://www.youtube.com/watch?v=6pTW9vclg0c Bricksafe: https://www.bricksafe.com/pages/mocbuild101/9394-rc-dragster-mod Contest voting: https://www.eurobricks.com/forum/index.php?/forums/topic/162664-ams-2-dragify-your-set-voting More photos: Enjoy! And don't forget to vote! -

Lego Technic 9397 Logging Truck RC Mod with Sbrick
TmoneyTechnic posted a topic in LEGO Technic, Mindstorms, Model Team and Scale Modeling
Hey guys, sorry I haven't posted in a while. I've had the clips to make this video for 2 months now, but not enough time to edit. Anyhow, with that said, here's what I have done. I have rebuilt both of the rear axles so they can be driven by 2 L-Motors, and rebuilt the front axle so that it can be steered by a servo, and still be able to fit an engine and have room in the cab for other motors. I also rebuilt the front of the truck since it seemed too sparse to me, but I've left the rest of the truck (besides some of the internals) original. I decided I only wanted to use a single Sbrick, and I had only one port left, since there was already an M-Motor in the model to drive the functions connected to the distribution gearbox, so I built a custom sequential shifter that I could fit in the cab, and access the axles of the changeover catches in the gearbox, and thus shift through the functions sequentially. This is done with one M-Motor. All of the internal mechanics of the gearbox were left stock, besides the elimination of any white 24 tooth clutch gears. I did not change the rest of the model that much, though I did think having an inline-4 seemed kind of lame, so I put in a V8 instead. i will not release any instructions due to the extense of the modifications. Please enjoy the video and photos below, and feel free to leave a reply! -
After getting an almost complete MTT 7662 set, I started building and as some bricks were missing, I also started modifying. It is a very nice set, with a nice size. It has become a bit obsolete by today's construction standards but it remains impressive. I thus decided to slightly improve it and remove a few other details that were buggering me. MTT (Multi-Troop Transport) by Veynom, on Flickr I decided to eradicate apparent studs and make this MTT stud-less. I wanted also to improve the bottom part of the transport as well as the various opening panels. MTT (Multi-Troop Transport) by Veynom, on Flickr Details have been added here and there as a kind of subtle greebling. MTT (Multi-Troop Transport) by Veynom, on Flickr The rear upper side has been rounded and more in line with the source material. The ending result is more massive. The front side also got a new lifting and some colouring alignment. MTT (Multi-Troop Transport) by Veynom, on Flickr The rear side is probably my favourite part. A detailed bumper highlights the model, the opening hatch is more realistic and detailed. Curves have been slightly tiles, smoothed and/or underlines. MTT (Multi-Troop Transport) by Veynom, on Flickr Of course, I made sure that all play features were maintained. Everything can be opened as before but when closing the panels, gaps have been minimised. MTT (Multi-Troop Transport) by Veynom, on Flickr And as a last picture, here is a field picture with my 7662 flanked by the more recent 75058 version. MTT in the field by Veynom, on Flickr I find it pretty as a lorry. :)
-

[MOD] Bublehead’s 8880
Bublehead posted a topic in LEGO Technic, Mindstorms, Model Team and Scale Modeling
Well I finally unearthed the old girl from my east coast repository (my brother’s house) and yes by the yellowing of the white, you can tell she has been displayed for a few years on my shelf. I built this around 2000, but I only know this by the use of the bent studless liftarms that I had just gotten when I built her, and those came out in 2000. Here is the list of my modifications/functions. See my Flickr pages for lots more photos and close ups. I didn’t have time to take any video. Electric proportional 4 wheel power steering Electric drop top convertible - operated by switch on dashboard Electric micro motor controlled spoiler- operated by switch on dashboard Pneumatic ride height adjustment- from switch in center console utilizing: Front - shock mount point adjusted to maximize suspension travel Rear - pneumatic spring compression to maximize traction Opening doors with internal and external handle/latch Supercharger - belt driven Intercoolers Working brake pedal and brake lights ( no real brakes ) Fiber optic ignition with real timing (simple firing order) Improved body styling and stretched wheelbase. Only original function lost was HOG steering, but since the steering wheel was now proportionally electric controlled, you could steer and push from the steering wheel with no problem with the top down. Hope you enjoy! Joke mode on- And just a note, I am not really looking for any criticism unless you have been doing this since 2000 or 2001 and can remember having to try and add all these features and functions using what we had at the time. Joke mode off- -
OK, so I have never made any secret that I think Emerald Night is crap. Odd proportions, terrible tender, complete lack of understanding of what several parts actually represent, looking *nothing* like the source material,.... I also know (from bitter experience) how difficult (and expensive) making a decent replacement is. After having built some really nice Pullmans, and building a disappointing pacific (which was miles better than EN), taking it apart, starting again, running out of inspiration, then getting made jobless so I couldn't afford to buy bits had I come up with an improved design, I decided to finally do something about my Emerald Night that had been sat in a corner with no wheels for at least 2 years. Things that I wanted to change: Give the front a footplate. Use the cylinder fix. Do something about that god awful (lack of) dome. Raise the cab so it doesn't look too daft with my coaches. Build a completely new tender (seriously, f**k that tender, that city cattle wagon was less lazy). Add lights and S Brick (which I had done a long while ago). So here are the results: Loco The new footplate, added tiles to the front bogie, replaced the green 1x6 plate with a black one, and the improved cylinder innards. New dome with S Brick underneath. Slightly raised cab. Tender The tender was a complete rebuild, but used basically the same chassis. It was however, a little lazy, and relied heavily on what I happened to already have. New Tender Completed Engine with Train. I intend to replace it with an actually good loco one day, but until inspiration and funds allow, this is a vast improvement.
-
Well, i was proud of it at the time, but i feel now that my ISD isn't sufficient enough. Numerous add ons and additions have made the model a bit unstable and the inaccuracies need to be addressed. The main issue however is the disproportional build! The bridge is too large and wide compared to the rest of the body, and it lacks the correct amount of hangers and indents in the panels. This is all a result of me following along the structure of set 6211, which focused on an interior, messing up the proportions. I talk about it in the original post: Now however i start from scratch, and you guys get to follow on and give out suggestions! It starts now with the gathering of extra parts and deconstructing the original destroyer. The plan is to make it bigger, more sturdy and more accurate. Got to gather up all available reference material for this beast... Last photo of it intact. Major sections now removed. I plan to keep the bridge the same, perhaps with some slight corrections. However the rest needs to be broken up and sorted... Now people can see the frame of the build, and the messy interior...
-
The Twi&'lek Bombshell by Veynom, on Flickr The Twi’lek Bombshell The Twi’lek Bombshell is a Slayn & Korpil B/SF-17 Starfortress heavy bomber belonging to the Cobalt Squadron of the Resistance movement against the First Order. This bomber is immediately recognizable through its distinctive nose art. Indeed, a ferocious dune lizard mouth is painted on the nose under the cockpit canopy, but the most noticeable part is a striking blue-skinned Twi’lek female sitting on a heavy bomb and painted on the bomber downward wing. Some people reported this was some kind of tribute to the defunct Jedi Master Ayla Secura. However, several other sources indicate this Twi’lek was only one of the numerous one-night bomb-run of one of the crewmen. Mystery will remain as the Twi’lek Bombshell was destroyed – and all of its crew killed – during the bombing mission on Q’Dar resulting in the destruction of the Mandator IV-class Siege Dreadnought Fulminatrix of the First Order Some archives could be retrieved. On one of them, we can see the Twi’lek Bombshell flying alongside another Starfortress from Crimson Squadron. This photo was probably taken shortly before its last run as 8 bombing kill marks can be seen and resistance records indicate the raid against the Fulminatrix would have been the 9th one. The Twi'lek Bombshell in space by Veynom, on Flickr Another picture shows the Twi’lek Bombshell during a bombing mission above what looks like a First Order cruiser of some kind. This one cannot be the Fulminatrix as we know all but one S/BF-17 were destroyed before reaching it. The Twi'lek Bombshell on a bombing run by Veynom, on Flickr (the above story is pure fiction mixed into canon elements from Star Wars VII: The Last Jedi .) The Twi’lek Bombshell is therefore a heavy MOD of the 75188 Resistance Bomber official set. The following modifications can be listed: The vertical wing has been made thicker by 2 plates and tiled; Nose arts (shark mouth & Twi’lek) and kill marks custom water transfers have been applied; The bomber body length has been increase by 8 studs while the hight was increased by 1 plate in order to better match the original model dimensions; The top turret has been moved backward, detailed and can now rotate; Rear guns and turrets have been detailed, taking inspiration from [URL=https://www.eurobricks.com/forum/index.php?/forums/topic/154310-mod-bsf-17-heavy-bomber/]Gudetamago[/url] The bomber’s top received extra-detailing to closely match the original model. Forward wings have been rebuilt using SNOT. Cockpit and body inside have been detailed. The Twi'lek Bombshell by Veynom, on Flickr The Twi'lek Bombshell by Veynom, on Flickr The Twi'lek Bombshell by Veynom, on Flickr The Twi'lek Bombshell by Veynom, on Flickr The Twi'lek Bombshell by Veynom, on Flickr The resulting model – while much heavier than the 75188 set – remains perfectly playable. It can still bomb (and the panel can rotate to be opened and reload the bombs) and it can still land as the 75188 model. Special thanks to Muad’Brick for the original concept art of the Twi’lek Bombshell and the edited pictures. The Twi'lek Bombshell by Veynom, on Flickr The Twi'lek Bombshell by Veynom, on Flickr Thanks for reading and comments are welcome.
-
So, if you consider the way that 76108 Battle for the Sanctum Sanctorum is designed, it's pretty clear that it was intended to be easy(ish) to convert into a Modular Building. After all, Modulars, as a rule of thumb, have more or less eight studs of space on their footpaths, and if you arrange the Sanctum in its corner formation so that each side wall is flush with the edge of a baseplate, you are conveniently left with eight studs. Add that to it being exactly three storeys tall, and the fact that it can be reconfigured to function as a 32-stud-long facade, as well as fitting perfectly with official Modulars in corner formation . . yeah, this thing is a Modular Building in disguise. Therefore, I am opening the floor to any who wants to share advice or strategies as to how to convert it into a proper Modular Building. There are . . okay, there are bad ideas, but very few! So, who's feeling inspired? (Also, I figured that since this is discussing primarily Modular Buildings, it ought to go in the town section . . sorry if this should be in Licensed!)
-
Hello, So I've wanted to re-create some of those older trains for Power Functions, but, the obvious problem is the size of the PF elements. After browsing this forum for a while, I've learnt couple of tricks though (mainly trick from @Brick Pirate's small shunter), so I decided to check whether it'd be possible to fit PF elements into the engine of 4564 set. My other goal is to be able to bricklink it cheaply, so I've also replaced some rare parts. The result would be pretty great, if not for the fact that I was not able to hide battery box fully - and I'm not sure if I'd try, I'd like to not make it taller - as it currently stands, it's only 1 plate higher than original. Any ideas on improving it are welcome! More images at: https://imgur.com/a/vQZ11 And the LDR file: https://drive.google.com/file/d/1v7jF9eCikgKt2e8_MWJCFB_9QrPpmGVz/view Enjoy!
-

[MOD] [MOC] Lambda-class Imperial Shuttle - 75094 Tydirium based
barneius posted a topic in LEGO Star Wars
My model of Lambda-class Imperial Shuttle was created from scratch and it is based on the construction solutions of the 75094 set. First it was created in LDD and later, after ordering the bricks, I made a number of significant adjustments. The biggest challenge was to keep the proportions as decent as possible, which, apart from the limitations resulting from the use of the 75094 skeleton, does not seem to me to be a simple thing on this scale. Among other things, for this reason, I finally gave up the opened interior (on which I did not particularly care about). Wherever possible, I tried to reproduce or refer to the details of the original. You may attach the landing gear but my model will always be presented on the stand. It is very stable and consists of about 1600 parts and therefore roughly over 600 more than the progenitor. I have designed the wings from the beginning in SNOT. The body is two studs longer, and in a large part, is a completely different construction than 75094. The wings are better embedded in it and they are less swaying, which is important because they are heavier. The fin is also proportionally extended by two studs and embedded somewhat differently. I have managed to slim down the cockpit and get a minimal nose down reduction in relation to the bottom, keeping the place for the stressed Han Solo. In this scale in flying mode, it matches the height of the UCS Slave I and it is the optimal scale for this model for me. 10212 UCS in flight position (and this is the only way I imagine presenting it) is monstrously huge - I mainly mean the height. I think that my model next to the UCS would not be too ashamed. You will find more photos in my flicker album here: https://flic.kr/s/aHskvtke2v Lambda-class Imperial Shuttle by Barney Markowski, on Flickr Lambda-class Imperial Shuttle by Barney Markowski, on Flickr Lambda-class Imperial Shuttle by Barney Markowski, on Flickr Lambda-class Imperial Shuttle by Barney Markowski, on Flickr Lambda-class Imperial Shuttle by Barney Markowski, on Flickr Lambda-class Imperial Shuttle by Barney Markowski, on Flickr Lambda-class Imperial Shuttle by Barney Markowski, on Flickr Lambda-class Imperial Shuttle by Barney Markowski, on Flickr Lambda-class Imperial Shuttle by Barney Markowski, on Flickr Lambda-class Imperial Shuttle by Barney Markowski, on Flickr -
Most of the my Lego "career" has been in the Technic line, but having started looking at modulars a year or so ago I got bit hard. I have all of them from PS on except for TH, but have only built PS so far because I just don't get as much building time as I'd like. I have been doing some old Town forum reading and have been enjoying reading about and seeing mods people have made to modulars by doubling up on them and making them wider, taller, deeper, etc. I'm not normally a moc'er or mod'er since my relaxation therapy is in the following of instructions and getting a beautiful or fun to play with model. However, I'm feeling inspired to dip my toes into mod'ing a modular by buying a double and seeing if I can squeeze any creative juices out of me. I think I can slip a single duplicate modular into the budget (and past the wife!) but am realistically limited to what Lego is still selling (so that means my options are AS, BB, PR, DO, DD). Now that it's double VIP points also, that makes it easier to consider. So, I'm wondering, if you were going to buy a single duplicate modular to build a 2x version from, which one would you pick? For some reason that I don't think I can explain,I have a slight leaning toward DO. Perhaps the pool hall interior has me itching to make a larger pool hall/pub interior. I don't really know so I'm curious what you all think. Thanks!
-
We decided to divide the LEGO 10251 Brick Bank into 2 separate buildings. The bank became Umbrella Bank This is the second building, which contains the Laundromat and an apartment with full interior. The apartment contains an elevator, rehearsal room, kitchen, bathroom/toilet, 2 bedrooms and a living room. It's not presented as an apartment with a family living there, but more as scenes that might happen in a LEGO world. Our version does not have much in common with the original version of the laundromat, except from the interior and a few details from the facade. The main colors are dark azur, dark blue, black and silver. Though it's a modular building, the size does not fit with the official modular buildings. It's 26x26 studs and 75 cm tall. This is the first of hopefully many tall modular buildings that eventually will form a street in our LEGO layout.
-

Red five-car electric passenger train set (60051 / 7745 MOD)
Murdoch17 posted a topic in LEGO Train Tech
This electric high speed passenger train was inspired by both 7745 (High-Speed City Express Passenger Train Set) from 1985 and 60051 (High-Speed Passenger train) from 2014. The train features two locomotives (with no motors in either), one club car and four coaches. The roof of each car comes off to get at the inside, and all but the locomotives have interior details such as tables and chairs. (The cab cars are supposed to have generators and mechanical details, but I couldn't make it look good so they were removed.) The cabs on the two locomotives have computer screens for the drivers, but the rest of the open space is empty. You can add in PF / or 9v motors to either (or both!) of the locos, but I did not due to my personal preference of hand pushing things around. This car is one of four identical ones that all have removable roof sections. The club car's top roof section is removable to get at the upper floor, but the lower section is not accessible at all. (I did try unsuccessfully to make it work. The LDD file for this model is at brick safe. Please note, the red of the train can be completely replaced by blue, if you wanted to give it some variety. Comments, questions and suggestions are always welcome! -
hey, been a while since i've built anything major, but i've finally figured out what i'm going to do for my next moc series. i'd like to build upgraded, full-scale versions of the crazy vehicles from the ninjago movie, as the released sets each seem to be roughly half the size of the movie versions. unfortunately i'm running into an issue in finding reference images of them. the concept art book has some good stuff in it, but stuff like cole's mech in the book isn't the final one (it has a brick built wheel) and the garma-mecha-man isn't represented in its brick form like, at all. any google searching i have done has nearly entirely lead me to pictures of the toy versions, not the movie versions. i'm looking for any screenshots, current mocs or in progress shots, or production shots that are available for these, or any tips you guys could give me on doing them. i'm starting off with the ice tank, so shots of that are the most helpful for now
-
So, I've attempted my first Modular. I was limited by the bricks I have, (and a couple of bricks seem to have somehow fallen off), but it's the right dimensions to fit alongside the official Modular Buildings. Just wondering what thoughts/advice people may have to help me improve my modular building skills? So, here's the house And the people and animals who live there There's an open plan living area on the ground floor With a kitchen area A downstairs WC & a place to sit Going up the stairs, we reach the bedroom area There's an en suite shower & a balcony with Jaccuzzi From there, we can access the roof terrace Where the minifigures like to hold barbecue parties I used transparent coloured bricks where appropriate to let in light but retain privacy
-

Stanced Porsche 911 GT3 RS
StudRobotics posted a topic in LEGO Technic, Mindstorms, Model Team and Scale Modeling
This is the second mod I have done to Lego's 42056 Porsche 911 GT3 RS set. I used the same height lift as I used on my previous Porsche mod and moved forward the bottom arms in the front and the rear of the chassis to add negative camber. The car was able to roll without the body on, but once I put it on, it couldn't roll. This means the car is now purely a display model. As much as a JDM fanboy I am, I'm kind of upset with the result of the car not moving, but at least I'm glad that I stanced this car anyways just for the fun of it. Although, quote automotive YouTuber GasKings, the camber angle does seem a bit too much on here like "a baby giraffe taking its first steps." So, what do you think of this mod I have done? Is it CamberGang worthy? I think it looks neat, but I would like to get rid of the camber (and the height lift) so I can roll this car around again. Here's some more pictures of the car I took. Thanks as always for checking this out, and I hope you'll stick around for my next builds. -
So, I recently picked up the Imperial version of the V-wing, 7915. The first thing that struck me about it, as well as the other versions about this ship (apart from it being gorgeous and a little odd) was that none of them have room to fit the whole astromech in. So I thought I'd change that. https://imgur.com/a/PeDdZ I also made a few further changes; extending the lower fins by two studs with some smooth pieces to give them a little more mass and stability, slight changes to the side of the cockpit so that the canopy is closed and changes to the cockpit itself so the pilot has a console. I've also beefed up the blasters, they don't fall of as easily and the awkward exposed studs are covered. The mechanism to have the wings rotate in tandem is gone to fit the droid, but I've still put a technic pin in, this provides some friction to the wings, so they still rotate but not spin freely, and gives them some security. I think they also sit a good distance from the fuselage. The deflector shield heat sinks I think could be longer? Pictures of the ship have them covering the engine exhausts a bit more than I have here, I might go back and change this, maybe 2 studs longer? Not sure if anything more than this would take them out of proportion (Lego proportions that is) and I don't want them being too bulky. I'm happy-ish with the top of the rear, I wanted to keep detailing to a minimum because it's a Republic era design, but made in the rise of the empire so vents, grills, details would be more prevalent. I've used the gun tower power vent from the Attack on Hoth set, mainly because it was the right shape, but I think the print helps. The engines themselves I'm not too happy with and will definitely go back and play around with these, as well as the underside of the rear fuselage. I don't like the flat bottom, but it's supporting the rest of the rear. It's here you can see I've only added a few studs to the overall length. I'm a little concerned the ship as a whole is now too long for how big it should be, I may see about shortening the nose. I'm also considering trying to get more of a slope to the nose, without making the whole thing too thick, thoughts? Any ideas or constructive feedback much appreciated, there will be updates as I play around with it. Anyone else doing something similar?
-
Hello everyone, has anyone ever tried to take a standard set (or multiple copies of it) and build a modular using only the available pieces? I tried with two copies of Lego City House 4956 set, trying to modularize it without any other additional bricks. Here some pictures: http://www.brickshelf.com/cgi-bin/gallery.cgi?f=379764 I think it would be interesting to see some other projects... 198/5000
-

[MOD] Ahch-To Island Training (75200) w/ X-Wing Door [Updated]
Admonisher posted a topic in LEGO Star Wars
So here's a MOD for 75200 Ahch-To Island Training (and I'm sure I'm not the first person to do it). A cool detail in Star Wars: The Last Jedi is that the door to Luke Skywalker's hut is made from a chunk of S-foil from his X-Wing. You can see the faded red stripes if you look closely. I like 75200, and didn't want to redesign the whole hut, so I decided to make a few customizations that include a new door. It's not totally screen-accurate, but my goal was just to give a closer approximation. Because the new door clips to the existing bar, no other modifications to that part of the set are required, and it's a simple matter to swap out the provided cloth, depending on your mood. Having the door swing up is a bit of creative license, but the interior of the hut is so detail-packed that having it swing inward didn't really work. While I was at it, I also made a few further revisions for display purposes. The base is expanded to give more room for Rey and Luke to stand side-by-side. "Play" features I won't personally use, i.e. the "exploding" wall and spinning platform, have been removed with a few stability enhancements. I added a window to the area above Luke's bed, and some clips to the ceiling to hold a fish, knife, spear tip and a pair of macrobinoculars. The "shelf" in the roof now has a few jars. Rey carries a satchel, as she did at the end of The Force Awakens, Luke's walking stick is a bit more proportionate, and the concealed area under the table now houses a few non-fruit items. Perhaps too much detail in the end, but it was fun. :) And just for reference, this was my first pass at the MOD, which I originally posted here earlier today: -

42076 - Hovercraft Mods and Improvements
schraubedrin posted a topic in LEGO Technic, Mindstorms, Model Team and Scale Modeling
My friend made an RC-mod of the 42076 B-model but is to lazy to post it, so here i am, doing it for him and you guys He raised the chassis 1 stud and all the parts fitted without any great modification. He said it felt as if the chassis was designed to be modded this way Here are some pictures: I like how well the receiver fits in there: -
First up a mention to @Superfunk for their awesome mod which served as much inspiration, you can check out their fantastic Parisian work here. Modification project goals: Increase the width of the structure to the full width of the baseplate Make the ground floor symmetrical with the rest of the building Keep and and enhance the beautiful iconic French architectural style Add an extra floor Update and add minifigures Maintain stairwell access to the upper floors Not order any additional parts, only use parts on-hand (parts not included in the set are present but nothing new ordered) Parisian Restaurant is often one of the most acclaimed and loved Modular sets and is also a personal favorite of mine so it was important to tackle this with as much love and respect to the original design as possible. It was quite the challenge but I feel I've achieved a look that I like even more among the others as its no longer being imposed upon and also gives the gorgeous French architecture more presence. Enjoy! The updated/added minifigures: Maitre d, head chef, pastry chef (baker CMF), head waiter, wedding proposal guy, wedding proposal girl, artist, baguette guy (CMF), cool French guy, baby with oversized head The head chef says he's got tears because he was just cutting onions but he's a big softy and is upset the girl said no to the marriage proposal. Added some more accessories for the kitchen. Centered the wine cabinet with the front entrance and rest of the building. Don't let the waiter's prickly appearance deter you, its rumored he lost his eye while serving as an officer in the Foreign Legion which would explain his strong sense of discipline and great leadership surpassed only by his love of all things French. Second floor apartment. How could it be a French building without French Doors? Not sure who came up with this design first but I've seen it on a number of great Town/City and Train MOCs. Let the sun and fresh air in! Third floor has bedroom and bathroom. In Lego world minifigures take baths with their clothes on and get the 'water' everywhere. The the increase of size in the top floor art studio has allowed the artist to create some larger works. No idea how she'll get it through the door but oh yeah the side of the roof conveniently opens. And finally how it looks with some of the others.
-
Hi guys. I've been meaning to do this for ages. Here's the Friends Hot Dog Van modded to work in a City layout. Pretty self explanatory. Eventually I want to make some furniture that can be stored on the roof and taken down once the van is in location but I'm running low on parts for that. Any feedback or suggestions would be great.
-
Our Christmas project was an XL Brick Bank with full interior. Illumination is next on the wishlist. Happy New Year (DK_Titan & DK_Atlas)
-
Hi, my MOD of new Lego Star Wars set from The Last Jedi - 75202 Defense of Crait. My version is shorter by 4 studies, has better proportions. Currently, the project exists only in LDD. Tell me what you think about this, and if many people want a instruction for this, I try to prepare something.