Search the Community
Showing results for tags 'LEDs'.
Found 8 results
-

1:10 Large - scale motorized 4x4 Tow truck
Zerobricks posted a topic in LEGO Technic, Mindstorms, Model Team and Scale Modeling
I don't usually post my work projects here, but every so often there is a special one that I really want to showcase more in detail. Today I want to show you one of my all-time favourite projects, which is packed both full of functionality and a very high level of detail. Before we go into the details, lets' first let's talk about the idea behind it. We (the BuWizz team) have been cooperating with Slovenian AMZS (Slovenian Automobile Association) for a while now and they are the ones who allow us to record the various speed breaking and such events on their polygon. An idea emerged for a project to design and loose replica of their existing Tow Truck which is to be used for education purposes. Here's how one of their tow truck looks like: I decided to use this specific model as an inspiration of my representation and here were the basic starting functions and features: 1:10 scale Capable of lifting and towing an actual 1:10 model like 42125 All Wheel drive Working gearbox Realistic suspension Highly detailed As with most of my projects, i first started working in LDD and this is what the first prototype looked like: I took some liberty with the shape, notably I removed the crew compartment in order to better the lift arm details. As the project progressed, so did the amount of functions, features and details until I ended up with this long list: Motorized with 11 motors Powered by 2 BuWizz 3.0 Pro bricks All wheel drive powered by 4 BuWizz motors Working gearbox with a high and low gear 3 differential locks Independent suspension in the front Solid rear axle in the back which uses 3x13 curved panels as leaf springs Working V8 engine connected to the drive motors Functioning steering wheel linked to the steering rack Motorized lift which can unfold, raise and lock onto thr wheels of the towed vehicle A motorized winch in the rear Working front LED lights Opening doors, hood and compartments Detailed engine bay with battery, air filter and washer fluid Compartments filled with details such as fuel canisters and various tools Other details include cones and fire extinguishers 3D printed braking discs in the front for show Total piece count is around 3060 parts Just over 3 kilograms 51 cm x 24 cm x 22 cm when folded excluding mirrors Capable of lifting and towing a 1:10 scale car like 42125 even up a steep hill Top speed of 10 km/h Here's an overview of the model and the basic mechanical functions: Driveline is powered by 4 BuWizz motors. The motors drive a 2 speed gearbox and a fake V8 engine: Gearbox is powered by a PU M motor and uses 2 mini linear actuators to switch between low, neutral and high gear: Each of the 3 differentials has it's own lock, actuated by a wave selector and powered by a PU M motor: Steering system is powered by a PU L motor and uses two steering racks in order to both steer the wheels and turn the steering wheel: Finally, there are several more PU M motors used to power the rear arm. The main actuators lift the whole arm and are powered by 1 PU M motor: Another PU M motor is used to unfold the lower part of the lift arm using 2 mini linear actuators: Finally another PU L motor is used to lock the wheels with two more mini linear actuators. The driveline is designed in such way that the arm can swing a bit while cornering: The lifting arm had to be designed to be as strong as possible, yet thin enough to slide under the car we want to tow. The final version was under 2 studs high and capable of lifting a 2 kilogram heavy model with ease: With all the details finalized and the parts omptimized in the LDD version, it was time to build the real deal: As mentioned above, the model is full of details that can be accessed by opening the various compartments: The rear view showing the folded tow arm and the 2 large actuators used to lift it: Few more pictures of the model next to the real deal: Of course no Technic photoshoot wouldn't be complete with the most important photo of them all, the underside: The underside was left open and exposed intentionally, so that the gearbox, the differential locks and steering system can be observed. Of course as with all the projects, this one also had some issues, the biggest being the use of 3x11 curved panels as the rear leaf springs. Originally only a single pair was used to support the weight in the rear and the additional load of a towing vehicle, but it soon proved too much for them and over time they ended up breaking. That is why for the final fix, they were doubled, to increase the stiffness and durabilty of the rear axle: Other than this, there were no other major issues with the model. The driveline has yet to skip a gear, the joints are holding (even the small CV joint used in the front left side) and the model ended up being robust enough for some really rough driving. As mentioned at the start of the topic, this is one of my best models to date, I'm really happy with the amount of sheer functionality, features and details I managed to cram in it and it will forever hold a special place in my heart. To wrap up this already long topic, here's a couple of videos of it in action: -

Ultimate video tour about my lit up city - "Welcome to Bricksonville 2.0"
AntiZombie posted a topic in LEGO Town
Hello everybody, I am happy to show you here the recent quite laborious video about my Lego City; it is called "Welcome to Bricksonville 2.0". (Maybe some of you remember the first one?!) It is a kind of promotional / travel video which took me several weeks of work. Hope you enjoy it. :-) And don't take it too seriously... ;-) -
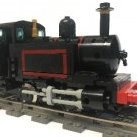
Some time ago I posted this topic of a layout using only parts from the 9V era. That layout has since been torn apart to make way for an improved version. Since it's basically a complete new layout (the water tower is the only part that escaped unscathed), I thought a new topic would be justified. This time the layout has working (non-Lego) lights. Many thanks to @LEGO Train 12 Volts, whose engines with working lights inspired me to try it myself. The engine and tender are permanently coupled with a technic beam to protect the wiring. I just happened to find that a battery box for 4 AA cells fits nicely in a 4-stud space. The switch is visible in the coal. IMG_0850 by the chestertonian, on Flickr IMG_0852 by the chestertonian, on Flickr IMG_0851 by the chestertonian, on Flickr The passenger cars are now 30 studs long and have SNOT windows and removable roofs. IMG_0854 by the chestertonian, on Flickr The sleeping car interior: IMG_0855 by the chestertonian, on Flickr The dining car interior: IMG_0856 by the chestertonian, on Flickr An overview of the layout: IMG_0857 by the chestertonian, on Flickr The station includes two passenger platforms, a pedestrian bridge, and a maintenance shop with full interior. IMG_0844 by the chestertonian, on Flickr IMG_0845 by the chestertonian, on Flickr IMG_0846 by the chestertonian, on Flickr The signal tower: IMG_0843 by the chestertonian, on Flickr The freight platform: IMG_0836 by the chestertonian, on Flickr A small farmhouse with a horse-cart: IMG_0847 by the chestertonian, on Flickr Nearby, a shepherd and his faithful sheepdog watch over their flock. Thanks to @soccerkid6 and @LittleJohn for their versatile canine design! The sheep are based on a design I found here. IMG_0848 by the chestertonian, on Flickr A tribute to Ferdinand: IMG_0839 by the chestertonian, on Flickr The crane's hand crank can be locked in place. The piano was reverse-engineered from one I ran across online. IMG_0849 by the chestertonian, on Flickr Finally, I was inspired by the Switch Modification topic to connect a switch to a signal. Thanks for looking! Soli Deo Gloria
-
Hey guys! After a few weeks of break I'm back and working on my test-setup for train signaling. As some of you know, I've built a small test track on my desk and wired up a lot of sensors and LEDs to program and develop a signaling system for trains. I'm finally at a point where I can drive trains over a layout that has block signaling fully working and completely automated too. Here's a video: When the train passes over the block sensor, a flag is set and it's only when the flag is removed (i.e. the train has fully passed over the signal and an additional time of 1 second has passed), that the signal switches to red and vice versa. The code only makes the block-section check it's sensors and flags get set and removed automatically meaning I have minimal code maintenance to do if I want to change anything. I have a lot more signals planned for the future including switch track signals, crossings and station signals. If you're interested, I can provide a PDF with all the signals I came up with. Let me know what you think. All feedback is appreciated.
-
Hello everyone, Let's me introduce my new moc; Motorised Christmas music stand with RC and LEDs, Must see the video: https://www.facebook.com/shineYu ... ?type=2&theater
-
This is my entry for Episode IV of SoNE Sector C: Communications station The fleeing rebels run through an endless maze of corridors and chambers and eventually stumble upon the main Communications centre. The unarmed Imperial Officers don't stand a chance against the evil rebels and prepare for the inevitable end. However, in the last moment one of the officers activates a trusty mouse droid and, at the sight of it, the rebels flee in terror I'm quite pleased with this, although it's been almost impossible to photograph.....as usual illuminated with Technic LEDs. I'd originally intended to build several searchlights to illuminate the main tower, but the LEDs aren't bright enough so I had to give up on that idea! I spent ages on the internal rocks, I know that it's very odd but it was probably the most fun part of the build. I'm still not 100% happy with the main communication tower, but this is about v15 and it's driving me nuts! Main shot (The rebels flee in terror, at the first sight of the little mouse droid): Daytime shot (I'm quite pleased with the design of the rocks): Overall layout (I can't believe how much time I've spent on the main tower!): Interior (with top section removed): Anyway, I hope that you like it, good luck to my Imperial brothers in the competition! C & C always welcome
-
I had a whole stack of broken 12v light bricks where the bulb had gone. In particular they don't last that long when set in lamp posts. Sick of buying more so needed a way of replacing the bulb with a longer lasting LED. The first difficultly was finding the right LED with a built in resistor so they can run straight off the 12v power supply. I hadn't found 3mm white/clear LEDs before, just coloured ones, but found a supplier here for what I needed. These should also work fine for 9v. Then the other tricky bit was to open up the light brick without breaking it. This wasn't as difficult as I first thought, so here is the guide - no soldering and no glue! The tools used (almost common household items!) excluding the light brick and LED are : 1. A micro-screwdriver. 2. A bent curtain hook. 3. Some sharp nail scissors. Step 1. Using the screwdriver scrape off the plastic tab that helps hold into place the inner part of the light brick : Step 2. Using the holes for the plug as an anchor lever out the inner part of the light brick with the sharp end of the bent curtain hook until you can get under it : Step 3. If the inner part is still not loose rotate the other end of the curtain hook in the space made at the bottom : Step 4. Take out the inner part : Step 5. Use the micro srewdriver to remove the old bulb and contacts until the inner part is clear : Step 6. Throw away the old bulb and wiring and Insert the LED : Step 7. Bend the LED wires around the light brick making sure the LED is centred : Step 8. With the screwdriver continue to bend the LED wires into the plug contact holes : Step 9. Re-insert the metal contacts. This may take some force, but it will be this additional friction which means the removal of the plastic tab earlier doesn't matter : Step 10. Trim off the excess LED wires with the scissors : Step 11. Re-join the central part of the light brick with the cover (remember which way is up!) : Complete! Remember as it's an LED it won't work plugged in either way to the power supply, but that doesn't bother me in the slightest as you just turn the plug around / swap the pins if it doesn't work For train lights where the power will be reversed when you reverse the train I can recommend Janco's light bricks which are superb
-
Here is my Maersk train with PF leds. I really wanted to keep the original look with the two lights above each other, and it worked out pretty well (no brick modification necessary): How do you build it? Attached is the LDD file. The wiring is pretty straight-forward if you are running on PF. If you are using 9V, you'll need to get this cable (the cable with 2/3 high connector bricks prevents the motor bogie from turning in corners). Please comment! Maersk train cab.lxf