Search the Community
Showing results for tags 'LDD'.
Found 891 results
-
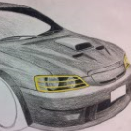
Here is version 1 of the TIE Silencer based on all of the revealed photos and taking some design techniques used in the official Lego set primarily to use the printed pieces. It looks like the hull should primarily be dark gray but The printed hatch that comes with the lego set looks to be black... I'm still tweaking a few areas and playing around with the distribution of black and gray on the hull. Shout out to RebelBuilder, as used some great techniques on his early model based off of just one leaked photo (I kind of like his design better than the official design) Screen Shot 2017-07-26 at 23.15.23 by James Eilers, on Flickr Screen Shot 2017-07-26 at 23.15.45 by James Eilers, on Flickr Screen Shot 2017-07-26 at 23.16.00 by James Eilers, on Flickr Screen Shot 2017-07-26 at 23.15.34 by James Eilers, on Flickr Screen Shot 2017-07-26 at 23.30.36 by James Eilers, on Flickr Screen Shot 2017-07-26 at 23.31.11 by James Eilers, on Flickr
-

[Guide] Using Rebrickable to retrieve parts list from LDD
supertruper1988 posted a topic in Digital LEGO: Tools, Techniques, and Projects
I have noticed that there seems to be a lot of posts where someone shares an LDD file and then someone else has trouble uploading directly to bricklink. I have found a method that works pretty well and I would like to share it here. Please share your feedback and feel free to link to this topic if you find someone in the same situation. Supertruper's Guide to retrieving parts from LDD using Rebrickable Things you will need: Rebrickable account Bricklink or brickowl account LDD file of something you want to build Here are the steps after you have the things above. 1. Log into Rebrickable and navigate to the "My Custom Lists" section 2. On the left click "Add New List" 3. (Optional) rename your list using the "Edit List Details" button 4. Click "Import Parts" and browse or drag your LDD file 5. Click "Append Parts" From here the parts list will load but there will be color errors and Minifig parts do not come up correctly. There will also be no prints selected. Any printed parts will need to be updated. 6. Once all the parts are adjusted click "Buy Parts" from here you can add them to your Bricklink or Brickowl account Thanks for reading, please don't hesitate to provide feedback or corrections. Please also feel free to ask for help here and I will try to help you out as much as I know how. -

Use LDD as Building Instruction,Fully control steps,no generate time
Nachapon Lego posted a topic in Digital LEGO: Tools, Techniques, and Projects
I found a new way to use group function that turn LDD LXF file into easy to use digital building instruction. Authors can manual fully control steps and building order. No more confuse, no more long time waiting for big LDD file to auto generate LDD BI. Group & sub-group bricks by building order -> hide all -> hide each group icon then undo(ctrl+Z)to make bricks show up in building order. For simple way. Just select groups icon in order to make LDD highlight each brick step by step. Below is topic link of Realistic Helicopter Rotor Head Swashplate (Cyclic & Collective). There are three Youtube video and many rendering pictures. http://www.eurobricks.com/forum/index.php?showtopic=90047 -
Hi everyone. I took some time to show you guys how to enable LDD's developer mode and all the tings it can do. Here are a just a few examples of the things you can do in dev. mode: You can render bricks in wireframe: You can use the various rendering modes to show the collision objects of the bricks and color them in some trippy colors: And the best thing of all, you can DISABLE COLLISIONS in order to place bricks in almost any manner: I made a short video on how to unlock LDD developer mode and all the other things you can do with it here: I hope you guys find this info useful and save yourself a lot of work when LDD's collisions give you a headache
-
Specifications: (source: feature video, see above) I do not own the rights for the original design: the ship is created for a hard sci-fi audio drama The Sojourn produced by Spacedock. The model is created using LEGO Digital Designer, rendered in POV-Ray and post-processed in Adobe Photoshop. The Instructions are available on my Gumroad Store FOR FREE: https://gumroad.com/l/sjrn_gvnvr Thank you for your attention!
-
Hello AFOL's, today, i want to show you my new awsome Moc of the Imperial Light Cruiser from Star Wars Rebels. It has Parts: 2908 Lenght: 92,8cm Width: 38,4cm Height: 12,8cm Building Time: 2 Days I would be happy for feedback.
-
Introducing... The Legacy Black Cat Truck! Celebrating 20 Years of the greatest Model Team vehicle ever made! Based on the original 1996 version with a lot of cosmetic changes! Looking very nice with chromed parts! Opening Sunroofs, upgraded to 2010s standards! Shovel, Fire Extinguisher & Toolbox So far, looking almost up to 2010s standards, including the tools! Dual Wheels! Even the cross-member behind the wheels is 2010s standard! Awesome new rear lights! 5th Wheel with locking bar! Everything below looks rounder than before! How I designed the Fuel Tank! Yes, I used the new 1x2 bottom curved pieces! Chrome Galore! Sleeping Compartment Yellow Diesel Engine, just like Caterpillar's engines! (because blue is childish and I wanted it to look more appealing to teens!) Cabin now up to 2010s standards so far! Seats now upgraded with curved headrests! Feeling hungry enough for pizza already? Ultra HDTV with built-in tuner! And that's all for now! Regards, Ryan Smith.
-
While I'm not sure how much this will help people right now. I am working on building 75192 in LDD. I am separating the build into "bags" like the set. When I finish this, I will try to put it all together without LDD crashing, but, with the number of pieces and number of angles, I don't know how that will work. I have read some people saying they don't have $800 to shell out for 75192 and they were thinking about bricklinking it. If so, this may be the way you want to do it. If it doesn't help anyone now, it will when this set is discounted. I will update and edit this as I finish "bags". I am on 8 now. I am still working on it. Also, keep in mind, some pieces are not available in LDD. I will update as I come across them. LDD files are in my Brickshelf gallery when modded. Bag 1, The Frame: 705 pieces. Bag 2, Landing Gear: 388 pieces. The 6 landing gear are identical to build. Bag 3, Forward Rooms, Gunner Seat, Greebling and Front Landing Gear: 545 pieces. Forward landing gear is the same as Bag 2. Missing stickers. Bag 4, Rear Rooms: 457 pieces, missing are 4 Light Bluish Gray, 27263, Modified 2 x 2 Corner with Cut Corner - Facet, I used 14719 on the model. Missing stickers. Bag 5, Rear Engines: I couldn't get the boat rigging pieces on there, they won't flex. Also missing are 6 Trans Light Blue, Hose, Ribbed mm D. 26L. Not available in LDD. 458 pieces, 464 when you add the missing pieces/ hoses. Bag 6 , Forward Mandibles: 530 pieces. Bag 7, Underside of Mandibles: 295 pieces. Which is odd, I figured this would be an even number since the builds are identical. I may have screwed up here, just noticed it when posting. Bag 8, various bits of the underside. 356 pieces. Bag 9, Tops of the mandibles. 426 pieces. Nothing missing, but, the 2, 2 x 4 curved slope pieces are printed. Bag 10, Final parts of the underside, including bottom Quad Laser. 454 Pieces, but, 2 pieces are not available in LDD. 2 light Bluish Gray, 26599, Plate, Modified 2 x 4 with Pin Holes used on the boarding ramp. Bag 11, Starting the top of the ship now. 361 pieces. Missing 8 White 30166, Minifig, Shield Rectangular with 4 Studs. If you are going to Bricklink this set, you can sub 30166pb01, same part, same color, just with a window print on it from 75166: First Order Transport Speeder Battle Pack. You get one in the Battle Pack. So Bricklink maybe with best option!! Also, after posting this, I realized i missed 2 pieces on the right section. So, the total for this "bag" is 369. The file on Brickshelf is correct. Bag 12, Top, back of the ship, Exhaust vents. 472 Pieces, but, there are 16 missing pieces, 27507, Tile, Round Corner 4 x 4 Macaroni Wide. Bag 13, last 2 parts of the top exhaust vents. 357 Pieces. I think from here on out all the bags/ sections should be 100%. Bag 14, front, top of the saucer section. 298 pieces. Bag 15 more of the top, front of the saucer section, base for the radar dish and escape hatches on the sides. 371 pieces. Bag 16, Cockpit and hallways to it. 483 pieces, I know I said everything should 100% since the update, but,the 2 sections of the cockpit are not included in this file. So, this bag has a grand total of 485. Bag 17, last 2 sections of the saucer section, 2 radar dishes, Mynock, plaque, top gunner seat, and front thingies! 443 pieces. Jamie
-
Toa Visorath, member of the Toa team you call in when everything has gone sideways. Got too much Rahi? Call in Visorath and the other Toa on his team, they'll handle it. Some Piraka on the loose? Bring in Visorath and the gang. Visorath wears an Akaku Nuva, as it allows him to see farther and with X-ray, even with his elemental rifle. Those wings help him soar to heights to get the advantage or to avoid rahi, makuta, or other enemies when things get dicey. Mainly he uses them to get to a nice perch to look over his other teammates, or shoot at enemies. "Do I feel lucky?" I'm sad LDD doesn't have better/more Bionicle pieces,. The rifle is a modified version of this one.
-
I've always been a fan of Gerry Anderson's classic 1960s puppet TV series "Thunderbirds", which revolves around a secret organisation using amazingly advanced vehicles to rescue people, so I've set myself the challenge of building all five Thunderbirds out of Lego. The aim is to submit the full collection to Lego Ideas. So far I have designed four out of the five craft, and I'm working on custom stickers for the final CGI renders: Unfortunately, I am a bit stuck with Thunderbird 2 and could do with some help. Calling International Rescue I mean, eurobricks.... Thunderbird 2 is a cargo transport consisting of a thin frame wrapped around a large removable pod and once it lands, the frame is raised off the ground on telescopic legs to allow the pod to unload its cargo. I have a design for the pod and a basic outline for the frame, using the larger bracket bricks to try and keep things secure, and it would be fairly easy to add studs on the bottom and have fully detachable landing legs:
-

Help Wanted - Decal Rendering Issue
LegoPerson885 posted a topic in Digital LEGO: Tools, Techniques, and Projects
A little hard to see in the image, but I am having problems rendering face decals. Most of it renders fine, but the top part appears to have chunks missing. Has any one else had this problem and if so can it be fixed? -
PC spec: Old i7_3630qm ram8GB latop + external GPU gtx 1060 6GB, all max setting ie: AF16x, AA8x supersample. 1. Best view with YouTube and set to 4K 2160p 60fps full screen: (4k monitor or TV) 2. Best view with YouTube and set to 4K 2160p 30fps full screen: (4k monitor or TV) Lego LDD + Mecabricks + stud.io in 4K 2160p 60fps max setting, LDD all 3000+ bricks in one palette 4k screen shots: Lego LDD + Mecabricks + stud.io in 4K 2160p 60fps max setting, LDD all 3000+ bricks in one paletteego LDD + Mecabricks + stud.io in 4K 2160p 60fps max setting, LDD all 3000+ bricks in one palette
-
Vahki were the mechanical law enforcers designed by Nuparu that kept order in the more dystopian times in the city of Metru Nui. Making Onu-Metru their home and the Great Archives their domain, Rorzakhs used their Staves of Presence to spy on the Matoran suspects, routing out illegal trade hubs and Matoran Underworld hideouts. Stalking the ramparts and scaffolds of ta-Metru, Nuurakhs used their Staves of Command, forcing the Ta-Matoran to turn their undivided attention to the work at hand, sometimes to the point of complete exhaustion. Overseeing the district from the rooftops of the crystalline spires of Ko-Metru, the Keerakhs ensured peace by using their Staves of Confusion, making any troublemakers lose their sense of time and space long enough for Vahki to apprehend them. Stalking the canals of Ga-Metru, the Bordakhs used their Staves of Loyalty to make the Matoran delinquents willingly hand over their accomplices and reveal the locations of hidden Matoran Underworld hideouts. Stomping the badlands of Po-Metru, the Zadakhs employed their Staves of Suggestion to soften up the minds of even the most rock-hard stubborn Po-Matoran. Watching over the hubs of Le-Metru, Vorzakhs possessed Staves of Erasing. Considered the most terrifying of all Vahki Staff powers, Staff of Erasing was capable of temporarily stripping the target of any higher mental functioning, leaving them shambling along the streets of Le-Metru without a thought or reason. This was a huge undertaking. It took me a lot of time, energy and motivation to not only put the staves together, but also pose the models in an appealing way, as well as create interesting backgrounds/scenes to put them in. For me as a content creator this set of models is a bit of a milestone as I have started to employ heavily the vector graphics using Adobe Photoshop. Vectors are hella fun but also a handful! I am glad I am doing them though. With some of those I struggled a lot, and in these moments I received help from my spouse Demitsorou who is an amazing artist and you totally should check them out. I've no idea where to go from here, but I guess up is a good direction?.. Anyway, thank you for reading this and checking out my newest creations. <3
-
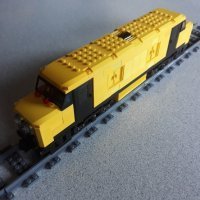
Hi everybody, I am desperately trying to find a LDD file for the 3677 cargo train engine, and the link on this forum is broken. Can anybody help me out? Thanks flyboy4183
-
Hi, I'm new I realise that LDD MOCS probably aren't everyone's first choice and I myself would much rather see one of these in the flesh than just on a screen but of course the availability of parts, prices and time prevail. We'll start with the less impressive of the two I have to show ;) That appears to have worked, so fair enough. It's Stephenson's Rocket only it includes the provision for a face should I ever feel compelled to add one. Theoretically it could run on a layout with something pushing it around but I don't trust the rigidity of it at all. Not entirely happy with the tender because it's so large compared to the engine itself, but it serves. Now for the one I am actually pleased about, an LNER J70 tram engine. I'm not ordinarily one to use SNOT techniques because I never used to be able to figure out how to make everything fit properly (and I still haven't, really) hence the use of those parts that go around minifigs' necks with a stud on the back. I even made a mock up interior for it featuring a boiler and coal bunkers! As well as sort of an underframe with cylinders Have to say, I'm very impressed with the outcome and it's far better than anything I'd ever attempted previously. I'm particularly proud of my solution to shaping the cow catcher. As with the Rocket, however, it isn't self-powered so I may begin work on a Wisbech & Upwell tramway coach with power functions. Thanks for dropping by and let me know what you think - Nick
-
I was looking at that thread about compact PF solutions, and I thought about posting this MOC. The Alco HH series is a line of very early diesel-electric switchers (made in 'Murrika of course) produced between 1931 and 1940 after which it was succeeded by the much more well-know S series. The HH1000 was the 1000HP variant of the HH series of which 34 were produced between 1939 and 1940. Because other companies' color schemes were more difficult to implement, my HH1000 carries that of Union Pacific. UP owned exactly one HH1000, numbered 1251, which it acquired from the Mount Hood Railway in the late 60s. It was probably retired not long after. The most difficult part of the prototype to implement in Lego was by far the cab. Ideally the columns at the corners of the cab would be something like 2LU x 2LU, but that is pretty much impossible in Lego. After much fiddling I was able to get 2LU gaps in the back, but the cab is too long by about a stud to accomodate 5LU columns from the side. You'll notice the PF receiver sticking out of the center window. To me the main feature of this loco is that it is the perfect shape to cram two M motors, the AA battery box, and the reciever into a body 30 studs long. The receiver is actually just floating because that's the only orientation that works. The tractive effort is a little less than what I was able to get out of the RF-16, a combination I think of less weight and shorter bogies, but for practical purposes it'll basically pull anything reasonable - just slowly. As far as I can tell having a gear ratio other than 1:1 is more or less impossible here. This model has been about 85% complete for the past month or two, mainly for testing, but I'm about to BL the remaining parts, so it should get done soon!
-

[MOC] Samurai X's Power Suit, 2013 Edition
Toa_Of_Justice posted a topic in LEGO Action and Adventure Themes
I have revamped Samurai X's Power Suit in 2013. It now features new hands, additional weapons, and an upgraded rocket pack with greater flexibility. Click any picture to enlarge it. Here's the rocket pack. The rocket pack has been deployed. Plus, I added flames! (Note: Only the type of flame with the base rim will fit inside the rocket elements.) The rockets can now move in multiple directions. The hands can rotate at the wrists, and the fingers can move. Each of the weapons now connects to the hands via Technic elements. My connection design allows the weapons to be switched around. Download the LXF file of this model, or check out the Brickshelf gallery when it's public. Thanks to Cat's Cache for providing the additional pieces I used in this revamp! -Toa Of Justice -
Here is N-1 I have been working on. It is based originally on Mike Psiaki's and then scott34567's model he did also based on Mike's. I removed the laser canons on the front since they are hidden on the N-1 except for the small exit hole. I also fleshed out the bottom of the hull based on pictures from the set pieces from the movie. I also did a lot of internal work to strengthen optimize and strengthen the model. Any feedback or suggestions would be great. I'm working on building in bricks right now. I just snagged the newest Lego version (75092) off of craigslist for $15 so I'm just getting my Bricklink order together for the extra pieces I need. Naboo N1 Fighter by James Eilers, on Flickr Naboo N1 Fighter by James Eilers, on Flickr N1 Pilot by James Eilers, on Flickr
-
The first thing I remember about Berlin, apart from the confusion of Tegel, is a ruin towering over the street: the Kaiser Wilhelm Memorial Church. The church was originally opened in 1906. It was bombed during the war, in 1943, and was something of a loose end for a decade. The architect and artist Egon Eiermann rebuilt the church from 1959 to 1963. He wanted to demolish the ruins of the bombed church, but he caved to public resistance and left the original tower standing. The tower has been preserved in its bombed state and Eiermann built a cluster of buildings around it, including a new chapel and a new bell tower. The façades of these new buildings consist of concrete lattices inset with stained glass panels. It's really something to see during the day but it is also lit up at night. In the preserved spire is a cross of nails from Coventry. The church, a beautiful and ugly trace of the war, is surrounded by consumer culture and the bustle of the city. It is flanked to the north by Budapester Straße and the Bikini Berlin mall. To the east is the Europa Center, famous for its giant spinning Mercedes-Benz logo that lights up in the night. An H&M and a Forever 21 sit to the south, just across Ku'damm and Tauentzienstraße, two of the famous shopping avenues of former West Berlin. To the west is the Waldorf Astoria hotel. To the north west, along Budapester Straße, is the Bahnhof Zoo, which was the only long-distance railway station in West Berlin. I know the church has five buildings, not three. But I decided after a month of fiddling with pieces that they would be intractable to build with any degree of accuracy at this scale, particularly the one next to the belfry. Also, having walked past the church around a hundred times, I had entirely forgotten about the small buildings so I don't think it is essential to include them. See a couple more pictures on flickr. All renders were done using the wonderful Bluerender software. Thanks for looking!
-

Using Hinge Align Tools problem
mominbilal posted a topic in Digital LEGO: Tools, Techniques, and Projects
While learning LDD, I am facing a problem. I used Hinge Align Tool to fit a Bean with my model which I added successfully. But it resulted a slight tilt to my whole model with ground, which I do not want. So now one end of model is on ground where other is a bitrHow can I rotate the whole model to rest it completely on ground? -
I really liked Nexo Knights, and I really liked all the little nods towards older castle themes without established locations potentially taking place in its world. So, I decided to try and create a Nexo Knights-refurbished version of two classic sets from the Fright Knights using LDD: Witch's Magic Manor & Night Lord's Castle, albeit combined into one, so that the Magic Manor serves as a sort of hideout/base under the Night Lord's Castle. The bit that I am currently stuck on is a suitable castle gate. The simple wooden doors of the official Knighton Castle set looked a bit weird, and as such I am trying to create a more sci-fi looking portcullis structure or portcullis alternative, in tr. neon orange of course. So far, I have tried using a bunch of 30064 stud/stick pieces (difficult to create a suitably sized structure without running into difficulty connecting the two sets of bars into a structure that can move as a single piece), the large sword pieces from Clay's mechsuit (as with the original use, strange-looking due to the lack of depth combined with the pattern and width) and finally the 4218 rolling gate pieces (serviceable, except the only source of these in tr. neon orange is over two decades old, and I'd like to actually be able to build this thing in real life at some point). If anyone has any recommendations, I'd be glad to hear them.
-
There is a substantial issue that needs addessing... Edit: (Now relatively solved!)
JEB314 (James) posted a topic in General LEGO Discussion
Right, I have been asked to create this thread to raise awareness. I am spearheading a way to solve this, as I have knowledge in this sector. We have someone in our community that has been taking LDD files that don't belong to him, has been making videos on them without the original designers permission, and most importantly has been selling the designs as instructions when he has no right or legal standpoint to do so. Now, this is not giving anyone the right to give this guy 'hate' as it will not make the situation any better. Firstly, I recommend you read the thread created by @Tenderlok, that started nearly a day ago, and has brought this to the forefront: And especially this bit that I wrote just recently in there: "I stayed up late trying to sort this and eventually went to bed. I'm now ready to get back to it... Today I am incredibly disappointed by @Jimbricked... It seems he isn't listening, he seems infact to be saying one thing, doing another... I'm beyond frustrated with this situation, so this is closer to the line that we as community should take: Therefore, I am going to post in here and also create a thread in general. Here is his youtube channel: https://m.youtube.com/channel/UCGzMhduUjLlnpBRHTaOJ8Aw (Hope the link works, if not, tell me and I'll correct it, I'm doing this fast.) This is not to open the door to giving him 'hate', this is a group approach to solve this, and I need help as I am only one man. In terms of consequences, this will now be in a far less beneficial light for @Jimbricked, because of his lack of action. He is now likely going to have to remove videos on people asking, or otherwise get an awful lot of copyright strikes... - Right, the plan: 1. Go on his channel. 2. Look though all his videos, and: (a) If they're your LDD designs, contact him and ask him to delete them, as it doesn't look like he's going to be contacting you anytime soon... If he doesn't respond, fill out the infringement form on Youtube. (b) If you directly know who the LDD design originally belongs to, could you please find contact details for the designer in question, and pop them a message explaining the stolen material is monetized and also has instructions being sold by Jimbricked. From there the designer needs ask him to delete them, and again, if he doesn't respond, they should fill out the infringement form on Youtube. - Therefore, we have legally forfilled the correct approach, by asking first, then if no response, using Youtube's tools to deal with it. - Now @Jimbricked, as you may know, if too many people send copyright strikes on your channel, Youtube is within their rights to terminate your channel... I recommend you cooperate with this or Youtube could in a sense 'slap the book at you' and you'll be left with no channel at all. I have seen this happen. - The other approach which could save everyone time would be to delete every piece of content (video) in which you have used LDD files without permission. That would leave you with the designs you have created entirely yourself, and the possibility of being able to continue uploading your designs in video form to Youtube. In this scenario, you can sell your own designs, but not those belonging to others as well... - I hope I have made myself abundantly clear... Regards, James - P.S. Any questions please ask." The "plan" part specifically is what I need help with. So, any would be much appreciated to solve this. If you know anyone affected in the form of stolen material please do get in touch with them, if you don't have contact details for them, please refer it to me and I will either search for info and contact them or get someone else on it with more links. Thank you for reading this, I love this community and want this whole situation in a better position in the next 24 hours than it has been in the last. James -
Hello Everyone, It is Christmas time again, so here is my new Advent Calendar! This year, I chose to have a collaboration with my friend here in Eurobricks, Robert8, and his wonderful CMF ideas. There are hundreds of great minifigs there, so I made renders from 24 of them. There are some which I already made, and many use newly created molds, that are not in the LEGO database, but plenty of them can be made. Take care, that I didn't copy them, most of the printings are self-made, and I made slight alterations from time to time. Let's say they are "heavily based" on Robert8's ideas. I can tell, that I chose at least one from each series, but some of them were more preferred than others. So let's start! Day 1 - Country Singer - Series C
-

3D LEGO Design & Animation
The_Director posted a topic in Digital LEGO: Tools, Techniques, and Projects
Hello all! Be warned, large images will be in this thread. Please be amazed and hopefully the moderators will be too :D ------------------- First time posting here, so howdy. lol I have already been infecting your discord channel before I even became an official member :P A little about me before I start what this topic is about: I work on building the instructions for installing curtain wall & storefronts as an real life job. So I work in the 2D & 3D architectural industry for a living. And I use Blender as an addictive hobby on the side. Go figure. My goal is to start making 5+ minute animations in only a 3D environment, as while I do have legos, I don't have the space for a full on film studio. I hope to enjoy a long stay with everyone here! I love to share my trade secrets to 3D modeling if your ever interested! ----------------------- On to my topic now: Please see below my work so far making 3D Lego animations. (I apologize for not obeying the 800px square) Thanks all, I will be updating this regularly! T_D -
Hello all, im not a very experienced train builder, but since i saw the movie "Unstoppable", i got inspiration to build trains, so, i made my own version of the 777 train of the movie in LDD, which if im not wrong its a BNSF GE C44-9W, so here it goes: Im not very talented for the aesthetics, thats why it is a bit ugly, it was supposed to have a yellow stripe on the sides, but i think it would look much better with stickers, however, i will see if i can make of bricks. I decided to make it 8 wide, to have more space for details and to make it more scale-realistic. The propulsion system its done by one battery box, one sbrick and 2 XL motors for each locomotive: And this is how it steers (it still can steer to take the normal curves) I hope you like it, i will try to post more pics of the working parts. Thanks.