Search the Community
Showing results for tags 'Helicopter'.
Found 114 results
-
Friends, It took a little too long, much like the ATS, but the MD600N if finally done. Much more at thirdwigg.com, and the Flickr album can be found here. As I child I would see the MD600N and MD520N flying up and around my house. It was time to honor the love for the aircraft. The MOC has the following features: Opening Doors Working dual Joysticks Working dual Foot Pedals Working collective lever Swashplate Collective control (much thanks to Efferman for many components of the design) Swashplate Cyclic control NOTAR rotation Six bladed rotor PF L drive with LiPo Battery Working Landing skids (I mention this only because getting it to support the MOC and not tip over was quite a task) Seating for eight I hope you all enjoy.
-
[TC7] Enforcers - Van Helising
D3K posted a topic in LEGO Technic, Mindstorms, Model Team and Scale Modeling
UPDATE 13/8-2015: I present to you my finished entry for the TC7 contest, the Van Heli-sing armored van/assault helicopter. I will take you through the transformation process as I show pictures of the various stages of transformation. At first it might look like an ordinary armored van (you know, the ones you see in all the Hollywood movies). Nothing fancy, it has a bull bar up front with some powerful lights, and it features a double bottom with angled armour panels (grey) to help deflect landmines and IEDs it might drive over. And now the show starts: First thing it does is to deploy a tricycle landing gear detup, similar to what you see on larger transport helicopters like the Sikorsky CH-53 etc. At the same time, the car's wheels are retracted and hidden inside the body of the van. Also, the long white axle poking out the front is supposed to be for aerial refueling (no function from that axle, except to give it a more helicopter-y look): Next, a ramp opens in the rear, to fasilitate the deployment of the tail boom assembly: As this is deployed, the roof can be opened as well And the main rotor is deployed upwards and rearwards by about seven studs. Also inside the front roof hatches are two large missiles. Both sides of the vehicle have doors that open towards the back, revealing crew served M134 Miniguns: Inside you can see a red 2L axle peeking out. That is supposed to hold a sniper's rifle (that I of course forgot to fit for the photo). It can be used by hand, or it can take the place of one of the Miniguns: The helicopter can also quickly be configured for a gunship role, by closing the doors and lowering and angling the guns forward: The functions are a good mix of manual and mechanical solutions. A lot of worm gears have been used, and things work satisfactory, as you can see in the video Here be a video of the whole transformation. Proper video, not stop motion . Original post: I've had an idea forthis contest for a long time, but only yesterday got around to put that idea down in some bricks! So far I only have the size and a couple of functions nailed, but I hope to finish it in time for the deadline. The above picture shows the model setup in "civilian".. It is duspposed to be a van of some sorts. Not many features except for steering, and perhaps some opening doors when I get around to start on the bodywork. Next picture shows the model in "battle" mode: As you can see the idea is to turn it into a helicopter. The shape of the thing is loosely inspired by an Sikorsky CH-53 (or at least that was what I had in my mind designing it), but of course at a much smaller scale. The front wheels turn 90 degrees upward and smaller landing wheels are deployed on the underside (not visible on this pic). Making the front wheel mechanism was a real pain, as I really wanted them to have steering when in "civilian". Maybe half the total time building this yesterday was used to figure out a suitable solution there, and I ended up with the worm-drive system you can see in front of the wheels. The rear wheels rotate down under and through 180 degrees, as more helicopter-like are being deployed where the car-wheels were. This was the first thing I designed, and decided the overall scale of the model. It uses a worm-drive system similar to the front wheels. The tail boom extends some 18 studs out to the rear (through the yet-to-be-built rear doors) much the same way crane booms do. The rear part is then manually turned up 180 degrees and the tail rotor blades are manually deployed. The main rotor is lifted up and aft roughly six studs (through the yet-to-be-built roof), and the rotor blades are automatically deployed onece you turn the power on due to centrifugal force. Both main- and tail rotors are powered. I plan to either have deployable stub wings with an assortment of missiles/rockets/guns on each side, or possibly openable doors with deployable crew operated miniguns or something on each side. Will have to wait and see what there's room for Of course the body still remains, as well as some technical issues, but so far most things are working satisfactory. As for the name, I was planning to use Van Damme, or possible Damned Van, but piterx beat me to it. However I am satisfied with the current Van Helising, as it is a double wordplay Hope you like it, and hope to have some more work done by tonight -

[MOC] Bell 47 Helicopter
paave posted a topic in LEGO Technic, Mindstorms, Model Team and Scale Modeling
Hello, Eurobricks. I'd like to present my MOC: LEGO Technic Bell 47 Helicopter. Features: realistic rotor and stabilizer bar working swashplate anti-torque pedals power functions Functions: cyclic blade control collective blade control adjustable tail rotor pitch rotation by L-Motor Here's the video demonstrating the MOC's functions: -
A realistic, well-built and beautiful lego model of the famous HALO Falcon transport helicopter. It features: - a cockpit for 1 pilot - 3 seats in the troop bay - adjustable angle of engines and rear wings - a unique set to put up in your room The pictures are too big so I cannot post them on this forum, but you can check them out here:
-
Hello all! While 75915 is an excellent set, the helicopter is not quite accurate enough for me. I then set about creating an accurate version in LDD. I used msx80's wonderful program Bluerender to create the image. Movie Accurate JW Helicopter I hope to Bricklink the parts to build this for real someday. It seats three, two in the cockpit and one in the gunner's seat. I hope you enjoyed my simple LDD MOC. Comments and criticism welcome!
-
Go forth and link removed Because we always need more trains, especially when they're based on a classic TV show!
-
In order to make room for the future home of the Godwins Hollow Regional Airport we had to get most of our planes in the air. Since tossing them back and forth didn't turn put to be a long term solution we decided it was better to try and hang them up. We still have a three man flight of the Agents' jets to hang but everything else that is going up is in the air. Pics are below or you check them all out here.
-
So I told myself when I bought 60036 last year that I wouldn't buy any more Arctic sets, and that I didn't need 60034 because I probably had all the parts anyhow. But then I went into Smyths, and they had a sale, and well....err... here is my review of 60034: Arctic Helicopter Set #: 60034 Year Released: 2014 Piece Count: 262 Minifigs: 2, plus 4 dogs RRP: $39.99, £24.99 I must admit the first time I saw images of 60034 I was quite excited; a lego helicopter not in police or fire colours. Not only that but clearly based on a real helicopter; the Sikorsky S-65 (CH-54) Skycrane, and almost in the livery of a real operator; Erickson Air-Crane. Also the huskies looked awesome! So did the set live up to expectations? The Box: A surprisingly compact square number: The front shows the helicrane doing what it does best, coming to pick up a crate under radio direction from the explorer on the ground. The husky team stand firm despite the rotor downwash and somehow avoid an unplanned swim. A nice touch is the pilot visible in the cockpit as this pose is not really possible in the actual model and he just disappears in the dark behind the trans-blue glass. Note the city skyline hiding just behind the mountains at the back. The back of the box is extremely busy as the left half is entirely taken up by the modular build and city online adverts leaving the right side to demonstrate the action/play features of the set: Take your husky team, detect the crystal block, call in the chopper, then race it home. The top edge is less action, more science with the team photographing and sampling the ice. A 1:1 pic of the helicopter pilot is shown for reference at 90° to the rest of the image as the box is barely a minifig tall. The Contents We get 3 bags, two booklets and a sticker sheet which between them pretty much fill the box (it barely rattles when you take it off the shelf): Sorry no printed parts in here! Here are the contents of Bag 1 which makes the crate, minifigs and dogsled: The ice block and crystal (in this colour) are unique to the theme, there are some 1x1x2s in light bley, we get a couple of ice picks and this is the first time I have seen the new style radio and metal detector pieces. Compare for example the new parts on the left with their classic equivalents on the right: I think the older radio looks much better, I'm also slightly disappointed by the loss of the stud on the detector as this reduces the MOCing potential of the part. Bag 2 & 3 give us too many parts to photo so here are my highlights: 3 2x2 round tiles with hole, 1x2x2 orange windows (though only 1 piece of glass), some orange Technic arm pieces and grey 1x2 plates with Technic axle holes. The Instructions The first booklet is about half the size of the second and covers the husky sled and crate build from bag 1. The cover shot is exactly the same as the box, but removes the helicopter and photoshops in the pilot: The second booklet cover also replicates the box art the same but photoshops out everything but the helicopter. The instructions are clear with good colour differentiation and a wavy pale blue background. My only possible gripe is that, as with 60036, the 'sticker' icon is missing from some steps so stickers magically appear on parts such as: The shot below shows the good colour differentiation between dark bley and black and light bley and white which is occasionally poor in other sets (including 60036). The instruction steps are all very clear and provide part callouts and plenty of pointers so your are unlikely to miss anything. The Minifigs Here we have our pilot with standard smug aviator sunglasses face and the Arctic pilot torso; I still love the leather jacket and parachute printing even if it is identical to that for the 60036 pilot. The explorer fig is the same female fig found in 60036 with the, in my opinion, unnecessary torso hourglass print; the details of the rest of the print are great though as noted in my 60036 review the goggle print limits use of the head to winter MOCs. A view from behind, I do very much love the Arctic logo: The Build and Model: Dog Sled and Crate The crate comes first and there is not much to it- plates over the base stack 2 bricks per support then add the roof, done: It does look quite effective, though lacks some realism in that the contents are not secured in any visible way. The sled is a very similar size to that of the one in 60036 though featuring some design differences. Oddly the sled features a much larger radar screen than the 30036 offering but no visible radar dish. Believe it of not this shot is the sled finished except for accessories and dogs: With everything on the sled looks quite good, and as ever the huskies are brilliant with each having a slightly different appearance due to the grey/white plastic mix: Although it looks good the sled has some drawbacks over that of 30036. Firstly there are no 2x2 round boat studs or similar on the underside to reduce friction so it tends to get caught in carpets. Secondly the camera attachment is rather flimsy and as the equipment in the crate is loose you tend to lose pieces if mushing too vigorously. Finally the crate attached direct to the large orange piece and so has a low of clutch power, so changing loads to the ice block (as shown in the instructions) requires quite a bit of effort and can lead to unplanned disassembly of other parts. 30036 got around this issue with jumper plates though that resulted in some loads being offset due to the different footprints of the 3x4 crate and 2x2 ice block (a problem this set does not have). Here is the sled carrying the ice block: The Build and Model: The Helicopter The helicopter starts with the spine, I was slightly confused at this point about the two 1x2 plate with hinge facing each other: It tuns out that these are a clever method of holding the engines (which I should note are the 2x2 stud versions not the older versions with the same shape but 1x2 pylon attachments): The spine grows very quick and suddenly you realise this model is going to be huge! Notice the winch, which passes through a gap in the spine: The cockpit is a separate build to begin with, and the reason for having 3 windows but only 1 glass element becomes clear: I assume this build method was chosen over using the equivalent 1x2x2 panels to reduce the overall number of unique parts required in orange. I suspect for this reason we also see 1x1 and 1x2 bricks used where we would normally see a 2x2 corner brick: You can also spot in this shot that I was mistaken, we do get 1 printed part after all, the instrument panel which is fairly common to city era aircraft. As with the 60036 helicopter the pilot gets a single control stick rather than the classic 90's two. The rather heavy build at the back of the cockpit gives the model some strength but unfortunately makes the rear window and spotlights feel a bit redundant as the pilot cant really get to them. The real skycrane had a rear facing operators station from which the winch operator could control the aircraft during winching operations. The snot plates of the cockpit are used to provide additional structural attachment to the spine via some 2x6 plates with a few bits of greebling: The landing gear is then built from a variety of Technic parts and some snazzy stickered wedge parts for decoration. The landing gear is probably the only fiddly bit where younger builders might need help (aside from sticker application of course) as parts have to be correctly aligned when inserting pins/axles: Finished, and my is it a big helicopter, although the crate just fits underneath. This is not helped by the fact the model actually sits a few degrees nose down as the nose gear is 2-3 plates higher than the main gear: As the winch is a single point attachment your loads will tend to swing around, though his can be temporarily fixed for the crate by attaching it to the plate at the bottom of the spine when winched fully in. And to justify having this set as well as 30036, well what happens if the mini helicopter from 30036 breaks down and needs rescuing: One last shot of the helicopter from the front: I think lego did a great job in capturing the feel of the skycrane in this model. It looks convincingly like a heavy workhorse and makes me think this model is what 60021 should have been (tilt-rotors don't make sense for logging operations). I must however, note two small deviations from the instructions I made in this build: 1 - I build the rotors with the opposite offset of the blades to produce an anticlockwise (Sikorsky type) rotor rather than the clockwise (Airbus type) the instructions showed. 2 - The rotor mast has an empty Technic pin hole behind the engines which I filled with a pin and 1x1 clear round tile from the spare bits in the set to simulate a gearbox oil sight glass. Finally a beauty shot of the whole set: Conclusion and Scores Parts: 7 - Good selection of bits but nothing unique except in terms of colour. The Figs: 8 - Very nice printing on both figs despite the unnecessary hourglass torso effect. If I hadn't already got the same figs from 60036 (admittedly different pilot face) I would be extremely happy so have rated accordingly. The dogs are simply great, very cute and the individuality of each due to the colour mix is a real bonus. Build & Model(s): 8 - The Dog-sled build disappoints slightly (until you get to adding the dogs) due to its simplicity. The helicopter has enough interesting techniques to please seasoned builder without being complicated; and when finished it just looks great! It would also be easy to use this helicopter in a city/forest scenario by simply swapping the skis for wheels. Playbility: 8 - Should be 10 but points lost due to the issues with changing loads on the dog sled and running it on carpet. A few extra parts could easily have solved these issues. The accessories (metal detector etc) allow for some play before the helicopter swoops in, but let's be honest, that's where the action is! The helicopter winch is easily controlled one handed whilst flying with the other and the model is very robust and swooshable. Value for Money: 8 - Though I think this score depend on whether you have any of the other Arctic sets as you could easily find yourself with many duplicate figs and vehicles fulfilling the same functions which will determine your view on the value of these element and also affect how long each particular set may be played with. Certainly for the sale price (£21) I was very happy, for RRP I would probably still be. Overall: 8 - Excellent helicopter, let down slightly by issues with the dog sled, but not enough to seriously affect the playability or enjoyment of the set. So what's your view?
-

[MOC] Tandem Helicopter
colinrichardson posted a topic in LEGO Technic, Mindstorms, Model Team and Scale Modeling
I started this project a few years ago but let it sit dormant. I've started it up again and figured it would be good to track its progress and start getting some feedback (though there's not much to critique yet). This is going to be a tandem helicpoter loosely based on the Chinook. I'm especially interested in mimicking the Chinook's flight controls and expect this to be the biggest challenge. The real helicopter's controls uses a sophisticated, for its time, hydraulic system to mix inputs from the throttle, stick, and pedals into outputs to the rotors so that it "feels" to the pilot that they're flying a more traditional helicopter. Though I briefly considered using pneumatics to create the control system, the lack of pressure variability made it an unappealing option. Instead, I'm working-out a mechanical gear and axle system to combine and actuate the controls. I may convert to an rc/servo system in the future, but plan on only motorizing the rotor's spin for now. The crude testbed / proof-of-concept mockup that I'm starting with. I'll upload some more images over the next few days. -
When I started this project, I plan to recreate an obscure diaclone triple changer* that was abandoned last minute by Hasbro as a official character in their G1 Transformers cartoon series back in the 80s. I used yellow parts to prototype it because it's been a while since I build something using this color. *try google "diaclone triple changer" to see which toy I am referring to =) After a while, I came to a realisation that difficult compromises must be made to ensure both vehicle modes (jet plane and helicopter) looks good. But the good thing is, my prototyping yielded something else.... instead of a jet, it looks potentially viable as a decent speedboat. So , there! TRIVIA: - I actually contemplating changing the color scheme to blue or white when this project almost reaches 90% completion, but changed my mind coz I had been building alot of blue LEGO creations lately (and I'm reserving white parts for another upcoming triple changer project) - One of the most trivial thing I spent many,many hours on was making a weapon for this guy that can be integrated in both the vehicle modes. - The retractable tyres on the back of the helicopter are quite weak. If I don't position them at the right angle (85 - 95 degrees), they fall down flat ,unable to hold the weight of the helicopter. - 5 mini balljoints (introduced in LEGO LEGO Mixels) were used in this built... including one applied to the robot neck making it more articulated that ever. - I initially used a pair of dark gray rudders for the speedboat mode, but I snapped broken the c-clip of one of the part and I don't have a replacement part. Ended up using black rudders instead. :| ^ the rifle is meant for the robot mode, now integrated into the vehicle as a non-weapon component ^ The cockpit can fit one minifig snugly. TRANSFORMATION HIGHLITES (to speedboat) ^ tailfin split into half to become pontoons. ^ the dark gray stud on the side of the tailfin are connected to secure the poontoons formation. TRANSFORMATION HIGHLITES (to robot) ^ As the nosecone unfolded, you can see how the minifig pilot is connected , via his feet to the light gray bracket part. ^ The yellow c-clip helps to secure the folded-up tailfin halves with a gap/hole to accomodate such c-clip. Without such mechanism.. they will be left dangling and disrupt the poseability of the legs. ^ Pilot ended up at the back of the robot mode after transformation complete, but his presence there prevents the waist from being rotated. ^ Thanks to the mini balljoints implemented on the shoulder, this guy can perform some serious kung fu stance. :) ... and not to mention, ability to hold the weapons with both hands. My favorite photo of all from the whole lot. To view more photos including detailed transformation sequence, do visit my blog entries below : helicopter and speedboat mode: Alanyuppie's LEGO Transformers: LEGO Triple Changer Stormracer Part 1 of 2: Vehicle Modes robot mode: Alanyuppie's LEGO Transformers: LEGO Triple Changer Stormracer Part 2 of 2: Robot Mode Hope you enjoy my works. thanks guys! This year will be my "year of the (LEGO) Transformers Combiner" as well, so I'll focus on that more.
-

MOC: Adventurer's Observation Helicopter
Peppermint_M posted a topic in LEGO Action and Adventure Themes
Mike and Dr. Lightning can oversee the whole site using this observation helicopter, not only giving invaluable views but unearthing hidden treasures too! Archaeology from the sky has been gleaning amazing results for decades, so of course the Adventurers team need to have a helicopter. I broke one of my rules I half set myself when I started the Adventurer Refresh. I did want to keep things within the timescale I set, the interbellum years and the fashions, styles and technology of the time. However a helicopter was too much to resist. So, in my Adventurer universe, technology is a little more advanced so they can have a helicopter like this um, twenty years too early... I'm going to plead Rule of Cool to this. Mike completed his studies and is now one of Dr Lightning's grad students. Still happy to fly or drive anywhere he is working on a doctorate of his own with field study and adventure in between the sensible research stages. Mike was one of the more annoying characters in my games. Maybe because my little brother insisted on playing with that minifig, maybe it was the stupid little slingshot. Anyway, this figure remains in the spirit of the original, but a little more mature. I worked with the waistcoat, but thought jeans worked well for the outfit. The long hair in place of the messy fringe printed on the old face and this older face print with a similar expression as the old. Still searching for any new discoverie to be made, Dr Lightning isn't ready to retire just yet. With the help of his younger friends he is out and about to observe evidence and formulate new theories. This is a simple update of the figure, I thought the smarter suit and the grey hat worked well for the elder character. It is the detective torso, it looks a little bit 'field work' and a little bit 'lecturing'. Just what Doctor Lightning needs. Anyway, with this post the last of the major Good Guy characters from Adventurer's that I owned and have a fondness for are posted! I'll be making a little central post with a timeline and canon at some point. There are some more MOCs to post for good guys from Pharaoh's Quest and bad guys from Adventurers, then some of my own creation. -

[TC5] VTOL Search & Rescue Heli-plane
Dohed44 posted a topic in LEGO Technic, Mindstorms, Model Team and Scale Modeling
My build for the contest uses sets #8068 and #42020, which have 408 and 145 pieces respectively, for a total of 553 pieces. I used 490 on the ship and 14 on the stand. Leaving 34 and 29 pieces unused. The Leftovers by CleverNiftyDude, on Flickr Major pin and axle shortage with these two sets. VTOL Heli-plane by CleverNiftyDude, on Flickr The stand,...barely stands, but I was able to get some cool banking shots,... as it slowly fell over. VTOL with Pilot by CleverNiftyDude, on Flickr Just happen to have a matching Technic Fig for scale,..Nice! Unfortunately my entry post will be pilot-less, as he is not part of either set. VTOL Cockpit by CleverNiftyDude, on Flickr A close-up of the pit, with assorted NF controls and interface. VTOL Top view by CleverNiftyDude, on Flickr Functions incude: Manual 90 deg. swivel of wings/props/landing wheels Manual tail fin rotation HOG prop spin. HOG Ratcheted rescue basket I think I'm going to try to get a few more photos before I enter it. Cheers. -
[TC5] Helix - Intermeshing Police Helicopter
captainmib posted a topic in LEGO Technic, Mindstorms, Model Team and Scale Modeling
Hello all. This is my entry for the [TC5] competition: Helix, a Police Helicopter with intermeshing rotors. This build is a combination of 42002 and 42020. and After some trial and error, this is what I came up with: Functions: - Spinning rotors, controled by rear rotor - Retractable landing gear, controled by grey axle connector on the right Optical: - Cockpit with seats, steps and instruments - Flashlights on front and back Build: The angle for the intermeshing rotors is created with both the pin connector blocks. Almost all gears in both sets are needed here to create the intermeshing rotor system. I also wanted a retractable landing gear. It has seen several build, but the final system is an easy but realiable sliding system. (controled by the grey axle connector). Testing: Testing of this creation is done by my two year old daughter. She loved the spinning of the rotors. No bricks were harmed during testing. Will add more pictures later. Cheers or comments most welcome. Thanks for reading! -
Hello, I recently posted a topic of my lego little bird, but he has been deleted in cause of some troubles. So i post another one, a better one Here is my lego city helicopter: I hope you will love it. ANd if you REALLY love it you can support him on lego ideas: https://ideas.lego.com/projects/83369 see you soon guys !
-

[MoC] adjustable vertical hight scout craft (A.K.A. helicopter)
Dinobrick posted a topic in LEGO Sci-Fi
The AVH scout craft is used for travel within the narrow confines of major population centers. Where more typical fighters are considered a safety risk. The landing skids have room for a pair of troopers. EDIT: I found the lost roto piece, added plasma cannons and a larger tail stablizer. image by austindhinton95, on Flickr image by austindhinton95, on Flickr -
Hey there ! Today I present you my lego Idea project, a lego helicopter: link removed thank you if you support ! (sorry if you find this topic in the sci-fi section, it's cause I don't now where can I put this helicopter )
-
Hey there ! Today I present you my lego Idea project, a lego helicopter: link removed thank you if you support !
-
Eurobricks and Rebrickable were challenged by LEGO® to make alternate models for current year city sets. The builds had to only use the pieces in available in the official LEGO model, be made in LDD, digitized, tested in real brick and be a model a 7-10 year old could build. I received set 60046 "Helicopter Surveillance". This set has a lot of variety, in both parts and colour, but only the masonry profile brick is available in any quantity. Here are my alternate models: Yacht Club Heist On the dock, the white tile gate turns to access to the gang plank. I put the 'Keep Out' stickered tile on the outside brown box. Boat on the Trailer The boat will slide smoothly down the trailer to launch, and the sail rotates. Wind Turbine and Maintenance Truck The wind turbine rotates 360 degrees around the column and the blades spin. There is a trap door in the ceiling to access the roof.
-
Stunt Copter Set #: 6515 Year Released: 1994 Piece Count: 35 Minifigs: 1 RRP: $3.25 (I think this cost 1.49 or perhaps 1.99GBP of my pocket money). Continuing to sort through my childhood lego, I bring you another classic 90's set. The 6515 Octan Stunt Copter (Not to be confused with the much larger 6357 Stunt 'Copter and Truck). Impulse sets of this size/piece count seem to be less common these days and more usually reserved for promo polybags. The design of this set also has a clear lineage from the 26 piece 1630 helicopter of 1990, which didn't even come with a minifig! The Box Due to storage space at my parents, I don't have the box for this set, it was recycled long ago, however as usual the front print on the instructions matches the front box art, showing the helicopter at a nice angle flying over the sea with the shadow of an oil rig and some cliffs in the background. Perhaps rather than for stunt flying the Octan corporation are actually using it to inspect oil and gas pipelines, though admittedly that's a less exciting prospect for most children. The Minifig We get one classic 90's Octan guy (or girl; it's the 90's - without hair I can't tell, and Octan corp is an equal opportunities employer), with large printed logo on his white torso, green legs and a red helmet with trans light blue visor. Standard yellow hands, so (s)he may get cold frostbite in his fingers from the rotor downdraft: The Parts A standard mix of Octan colours, predominantly white and including all the standard bits you expect for a 90s helicopter (2x2 tile with pin, 4 bladed rotor hub, 2x2 plate with hole, etc). As a sign of things to come the set also had a small sticker sheet, with the two Octan legends for the 1x8 white tile rotor blades (stickers already applied in this pic): The Instructions Standard double sided fold out leaflet with 11 steps in total. The background varies from light blue sky at the top to green grass at the bottom but contrast and colouring is fine for piece identification. The Build and Model The fuselage comes first, then the tail boom. Its all very simple part stacking with no snot. The 1x2 plate with 1 stud serves to position the tail boom on the centreline of the copter rather than offset. Landing gear and rotors next and before you know it it's finished! From the front 1/4 it looks just as smart as on the box art. The levers in the pilot's hands give the sense of simple mechanical controls that you would expect in a basic helicopter and are vastly better than the alternative of a patterned tile. From the side, it looks compact, but the proportions seem right for the LEGO world, if not reality. The aerospace engineer in me is thinking about the noise and possible control issues the pilot will have with the tail rotor being constantly in the main rotor downwash. The open cockpit and having your head inches from bits travelling at a couple of hundred RPM might seem like issues too, but in reality many early helicopters put the pilot in similar conditions. From the rear quarter it still feels 'right', though the shortness of the tail boom is still obvious. I suspect if it was lengthened to even 8 studs though she would become a tail-sitter whenever the pilot got out! This model made enough of an impression on the young me, that during my dark ages, it continued to shine some light through: Whilst I should have been doing homework I was actually modelling this set for use in Microsoft Flight Sim 2002: The Verdict Build& Model: Very simple build, but this set does feel complete, unlike the 1630 from which it clearly owes it's design. Something about it the model just seems 'right' to me: 9 Parts: Has all the basic bits needed for any 90's helicopter: 7 Figure: Simple, yes, but good colour combinations, and can't have too may Octan employees can we?: 7 Playability: Everything that should spin, spins, its reasonably robust to 'wub wub wub wub wub' (helicopter 'swoosh') around, and should you wish to crash it, you won't need to break the instructions out to put it back together: 8 Overall: I may be overly fond of this set due to my own nostalgia, but I can't think of a better 30-40 piece pocket money set from the 90's town range. This is what LEGO should be: 9 But what do you think? Am I right/wrong?
-

Flight using Lego
anton1678 posted a topic in LEGO Technic, Mindstorms, Model Team and Scale Modeling
I've seen a lot of dead topics about LEGO flight recently, but no-one has anything electrical that actually flies. I did some research, and some math. We need to strip down our 'planes' , take off the plastic motor casing and battery box casing, maybe even just homebrew a battery box. Tethered flight is possible, according to zblj''s principles, but we need to start looking at the untethered side. Maybe this is going to look like a lego-frame quadcopter, but at least we will be using a lego motor, the buggy motor. Overvolting will also be needed, and maybe a gear-down. -

[MINI] [WIP] Robinson R22
EvilEnderman posted a topic in LEGO Technic, Mindstorms, Model Team and Scale Modeling
'Ello, been a while since I've posted here A good way to break this absence with my WIP Robinson R22. I've always loved that heli, and this contest has given me the boost to attempt to make it. It features a fake engine, connected to the rotors. The front bodywork is pretty much done, but I fear I've already exceeded the parts limit :p https://imgur.com/1w8uDE9 Bottom section - nothing special here. Haven't finished that second 'thingymabob' yet. https://imgur.com/TFiLotx Front view. Something about the front section doesn't look right to me - Don't know what it is - Perhaps it's how wide it is. https://imgur.com/zHPvMqE Rear view. I really like this, the engine is showing, like the real thing, and, the rotor turning hand knob is put onto the engine fan thingy :p Used those system curved bits to get the shape just right https://imgur.com/fG0GJ5a Side profile Picture resizing may not work, but I'm praying for the best. EDIT Nope, i'll use these imgur links 'till i get the opportunity to resize properly. Apologies for the hassle it causes. More pics to come, - or, even stripped down model if I exceed the limit :p Gonna have a good ol' count. Depending on the result of this, decides if I'm gonna strip down, or add the rear section :p -Enderman -
A few months ago, I've made this MOC. The Rock Raiders can use this vehicle to transport energy crystals and mining equipment to locations what's not reachable for ground vehicles. It's based on the original Rock Raiders 4980 Tunnel Transport. But it's not a replacement for the original one, but a extra air unit with more functionality;) Landing pads adapts to the surface Cabin and engines can be connected together Crystal carrier Bobcat More photo's at Flickr: Hope you like it :)
-
Hi all, this morning I re-designed an old MOC that I had originally made a little bit over a year ago. The helicopter is based on the Eurocopter AS350 built to fit with the scale of my other aircraft and is shown in the LAPD livery. I built the heli as well to see how sturdy it is and if it's handled by the base of the tail it swooshes fine. The engine and rear half of the tail are both connected by single studs so it doesn't take much direct force to dislodge them, but it's bearable. The cabin is also about half a plate too low for minifigs to sit but if they're slightly reclined they fit, up to four can squeeze in if the doors are removed too.
-
DENMARK right now. It comes with the weekly Anders And (Donald Duck) magazine no. 15 (10 - 16 April 2014). The price for the magazine is DKK 40. Brickset about 30226.
-
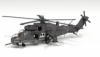
The MH-53J Pave Low III is a large heavy-lift helicopter for the US Air Force and the most advanced and technologically sophisticated in their arsenal. It features a multitude of sensors and radar for the clandestine delivery and extraction of special forces personnel far behind enemy lines or contested areas without detection, often flying at or below treetop height using terrain follow systems and over the horizon sensor technology. It is armed with a mix of M134 6 barreled 7.62mm miniguns and/or .50 cal M2 heavy machine guns, has a crew of 2 pilots, 2 flight engineers and 2 gunners, and can carry 34 fully loaded troops, with an external sling capacity of 20,000lbs. The aircraft were retired in 2008 and replaced with the CV-22B Osprey. This MOC represents 40+ hours of work to design and complete, and features a fully detailed accurate cockpit and passenger compartment with three M134 minigun emplacements, fully functional landing gear, and a folding main rotor and tail boom. http://mocpages.com/moc.php/385312