Search the Community
Showing results for tags 'Head'.
Found 21 results
-

[UK] Fleshy heads & hands to trade - for whatever you like!
AmperZand posted a topic in Buy, Sell, Trade and Finds
UPDATE: Sorry, the parts have been claimed. I have 6 LEGO fleshy heads and 4 LEGO fleshy hands for which, as a yellowist, I have no use (see picture below). All the parts are brand new. I'm giving them away. If you have a UK postal address and would like them, please PM me. What do I want in return? Any new LEGO except: more fleshy parts damaged/scratched parts (yes, new parts can be damaged) dirty, mouldy or smelly parts, e.g. from smoking/vaping non-LEGO parts I'll leave it to you to decide what those parts are. Just want to send me a single 1 x 1 plate? That's fine! I have no expectations There will be no need to send me anything until you have received the heads and hands below. -
Hello ! Please find my latest creation made for Lego ideas ART contest. Colors have senses (Les couleurs ont du sens) My idea was to make a caricatural head and develop a balance between senses and colors. Don't hesitate to leave a comment with your feeling about this creation. You can also visit and comment on Lego ideas page, this will help this one to go out from numerous art proposal : Lego ideas page for "Colors have Senses" Enjoy !
-
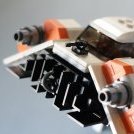
The Head - No, it is not the understated as just another AT-AT, because it won’t be, but for the matter of this topic, it is, momentarily, just a head. Though merely a head, it makes a rather astonishing display piece by itself. Aside from the towering height and lumbering movement of this terrifying machine, the head is quite formidable in appearance, resembling that of a fearsome beast. - In the course to build my original creation of the greatly revered imperial walker of the grand army of the empire, I amass a wealth of reference material concerning studio models, replicas, on-screen images, artwork, etc., to meticulously build the perfect LEGO incarnation that is indubitably authentic to the movies. I have been building this minifigure-scale AT-AT for quite some time—I recall since 2012 with the start of the body section. However, as of recently, since early 2015, I have built the head for this admirable tool of destruction. - Furthermore recently, I have been constructing the infrastructure of the body, acquiring additional parts & correct colors, making considerable amount of alterations, but I have postponed most of this to venture off and design my original minifigure-scale T-47 Airspeeder (Snowspeeder) in LDD, which turned out into a successful MOC and will be a great companion. I planned after that to resume progress with the AT-AT, but after I was inspired by anothergol’s innovative use of paint rollers and mudguards for the waist of his articulated AT-ST, I was just motivated to jump ahead and create my own creation of the imposing “chicken walker” beforehand. Mine, which will implement those techniques of his that I mentioned early, but also the 5 x 5 Scala dish. Interestingly, my own creation first turned out MF-scale, then evolved into UCS scale, then separated into two projects: a MF-scale and UCS scale! A considerable amount of progress has been completed on both projects, with the MF-scale almost finished and the UCS scale having feet and the waist finished. However, for concern of the UCS model, I have postponed its progress to focus on the MF-scele—to complete that and finally resume progress with the MF-scale AT-AT walker. - Regarding this MOC of the AT-AT head, you should notice that I deliberately took some liberty in the greebling located at the bottom. This was a compromise due to the thickness of some elements and from the lack of elements that could properly represent those tiny details, in this scale, authentically. I was as well tight on space for building the main cannons. I originally wanted to attribute a sliding action to them, as if they were in action, but this was unfortunately omitted due to a number of things, which includes: space, structure, scale, parts, etc., which also brought them closer together than intended. Along with other things, like the lack of other small details on the face and others things, that is practically as far as inaccuracies go for it. Nevertheless, one extra detail I have included, which I have not seen previously before represented, are the light fixtures atop the medium support blasters mounted on the cheeks. Then among other characteristics, I can grasp the head by the neck and jerk it around without any parts coming undone, with exception to the roof because it is not fixed together (kinda like other @@ heads I know of ). That rigid likability is attributed to the infrastructure constructed exclusively with Technic & modified plates (w) Technic elements, which also clutches the sides securely in place and almost seamlessly with other aspects. For this fact of such a packed, robust, complex infrastructure, there is no interior, likewise for the whole body—I never had intentions to include such luxuries anyway, but I congratulate those who did. - To determine the dimensions of a MF-scale AT-AT walker, I first acquired theorized dimensions of the actual walker from an in depth survey of its structural components, capabilities, practical role, and tactical uses: here. Wookieepedia is informative in some areas, but it claims the walker is taller than it is longer, which it is clearly not. Besides the overall dimension of the walker’s height and length, this technical commentary also provides a reasonable measurement of its width, diameter of the footpads, and other aspects like the height of boarding hatch. I also found this useful: here. To find the MF-scale, it took some little conversion of average human being height, minifigure height, dividing, multiplying, then more multiplying, but it came out to be around 20in/50cm. Some time on, I took the actual height of my model from toe to the main section of the body and acquired the measurements around 21in/53.34cm, then rework some steps back to get the plausible measurements of 85ft/26m. For the footpads, each are 12 studs in diameter and its height a few measures above a minifigure's chin. So the model is rather on scale for minifigures’ height, as well other aspects in general scaling, as according to the probable height of an actual AT-AT walker. - If there is any misconception about the visor of the command viewport being transparent red, I have some valid reasons to put those to rest. At first, if you notice the moment when five imperial walkers are advancing towards echo base, only the lead walker exhibits a red visor. During the scene, where General Maximilian Veers oversees the battlefield through the viewport the visor is transparent clear. Logically, if the visor was transparent red it could not beam as so bright as it did in a cloudy, snow filled day—not even in a sunny day. Though it appears black this is due to the overcasting shadow from the outside portion of the viewport. Therefore, the red lighting is believably a system for operations in low light periods or environments, to preserve the crews vision in these circumstances, while still being able to function about in the walker. - Well, if you are still reading, I am done for expressing this MOC, for I believe I have covered everything concerning the model and relating to it that was on my mind to say. So, you can finally enjoy the photos and express your own thoughts, criticisms, questions, etc. below. However, bear in mind that I will not be giving out any form of direction that will describe or depict how it is built—I appreciate that this is understood in advance of your comments. Much appreciated, LiLmeFromDaFuture
-
Hello, folks! I am working on a project, and I'm looking to see if anyone is aware of an image repository of *every single* minifigure. I'm looking for images that are consistently taken (i.e. same camera, same lighting, same minifig position, etc.). It would also be great to separately have images of all of the heads. If anyone is aware of such a repository, or knows how one would go about getting such a complete resource from Lego or the like, I'd certainly appreciate it. I've already been working with the developer for "The Unofficial LEGO Minifigure Catalog" app, and am still trying to work through talks. I'm not sure if it will pan out, so I'm looking for any other available resources. Thanks, team!
-

Kev's Decorated Pieces.
Kevin Flemming posted a topic in Digital LEGO: Tools, Techniques, and Projects
I've gone through and added every standard decoration currently available in LDD to separate torsos and heads, in order of how they are in the decoration menu. The best way I've found to use these, is to grab which ones you want, separate them from the rest, select them all and Ctrl-C to copy. While LDD is open, it will remember what you have copied into the clipboard. Open your current project and Ctrl-V to paste in your desired pieces. Or you can simply press Ctrl-I (that's "i") and import the decorations files as a whole. This import method might cause some lag or crashing on weaker systems though, as you will be pasting over 300 pieces into your current project. If you are copying an existing official LEGO set, then it's better to look at the instructions, and use the former method to grab what you need beforehand. Just personal experience from using LDD for years. Torsos: Link to shared file: http://www.mediafire.com/file/d9c95cbs3uyj5x6/Kev%27s_Decorated_Torsos.lxf Some of the backs have been done, but not all. To be honest, I'm burnt-out after doing 340 of the buggers lol. Not all colour schemes are 100% correct, as most are from memory, and I'm not going to look through over 300 torsos to find the right colours. But fear not, friends. Ones that don't have the correct colours have been painted logically (dark decal has a lighter torso, and vice versa) to make them relatively-easy to find. Heads - Updated (22/06/18): Link to shared file: http://www.mediafire.com/file/8e8u88mc1h1618y/Kev's+Decorated+Heads+-+Updated.lxf Update: I've now sorted the heads into a couple of categories. From top to bottom of screenshot: Back of head decals, Female decals, Male decals, and Monster type decals. Hope you find these useful. Anything beats the awful menu that has a mind of it's own, right? -
Today, or maybe yesterday was July 17, and that is the date for World Emoji Day. So I'm gonna celebrate it on my own style, by using LEGO! Celebrating #WorldEmojiDay with LEGO by Kamal Muftie Yafi, on Flickr This emoji artwork is rendered using Blender freestyle and I used an orthographic camera to get the best perspective of it. The emojis are just randomly putted, but I focused for the happy emoji to be in the middle of all the Emojis, you want to always be happy right?
-
How do I fix this? It happens any time I use any accessory that goes around the neck.
-
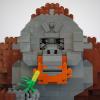
One of Dwarf gates of North mines, called Barak Azril. The Dwarf Runepriest in front of it. Its a simple version of dwarf-head-style gates. In future I hope to build more realistic, closer to original and bigger gates.
-
Hello, this is my latest creation. A shrunken head, like some indigenous peoples used to make. The mouth is sewn up to keep the spirit!
-
I have been in a process where I have sorted through and assembled +3000 minifigures and I have noticed something: I have noticed a difference or perhaps a "new" sub-variant in the old yellow heads with the solid stud and drawn face. I have tried to photograph it - sorry about the poor quality. The one I am talking about is the right one, where the "jawline" (bottom curvature) are less rounded than the normal 1978-1989 heads, making them more "square". They are quite easy to spot in a cluster of mixed solid heads. To give an idea about the "rarity": Out of the around 3000 heads I sorted, I found around 250 yellow heads with a solid stud. Of those were half "solid plains" (no face) and the other half "solids with face". And out of these "solids with face" were about 20, these "solid squares". They are marked similarly to the normal "solid with face" (same type font on top and same markings inside). They seem to come with two different types of printings - thick and thin face pattern - similar to the normal "solid with face". I have been unable to find any info regarding these heads and I have also been unable to find them on Bricklink. Does anybody have any information where these were used or for how long?
-

LDD - Cape and Detached Head Issue
DarkKnight7 posted a topic in Digital LEGO: Tools, Techniques, and Projects
Hello, I'm a newbie with LDD and I'm trying to put together some fig parts, and noticed when I attach a cape and then a head, the head doesn't go all the way on. I've read in some places here that there is a "trick" to getting the head down by putting it onto the torso differently, but I don't see any clear directions on how to do that. Can someone point me in the direction of those instructions on how to fix this bug if there are some here somewhere on Eurobricks? Or can someone provide a how-to video for this? Any help would be greatly appreciated! -
It's my idea for a Bionicle head with two-pieces brain stalk, allowing to build characters with heterochromia which could be useful for making characters who are partially corrupted, for example.
-
Here is a little desktop trophy I created it is a very good model in my opinion but I will leave that up to you.
-
I've been wanting to recreate Generation 1 characters in CCBS for a while. The main problem was that I wanted to use the old Mata heads (so I could fit both old masks and krana), but conventional methods of attaching said head to a CCBS torso looked ridiculous. Solution? Build a new torso. First up is Bingzak Kongu, displaying the Matoran build: I partially used the Mask of Light movie as a guide when building these; it mostly influences the neck and the shape of the arms. Full skeleton in the first picture. The second shows where the chest plate attachment and neck socket fit. The black bracket piece doesn't connect to the socket directly but it keeps it from jiggling around much. Can't say I care for the back much, but it's not an eyesore. Next up is Narmoto Vakama with the Turaga build: The Turaga are a bit more broad and wide than the Matoran to accommodate the sockets for the legs. Vakama features his stole from Mask of Light. Full skeleton along with a better shot of how the front and neck joint connect to the rest of the torso, similar to the Matoran build. Shot of the back. This is the biggest problem with the Turaga build: it's very boxy. Adding the stole (connected by the four exposed studs) helps somewhat. The light bley pieces will be changed to black once I get ahold of some. "Back! Back you foul creature! One more step or I'll--" (Wrong villain, I know, but ssshhh. ) You can really see how the back sticks out here. Again, not a fan, but I don't currently have a solution. Bonus: Turaga Korgot Whenua! Giving him his hunch was as easy as connecting the neck to the back of the head instead of the eyestalk. He needs Dark Bluish Gray hands but those will have to wait until I get some. Thanks for looking! Comments and critiques are highly appreciated.
-
Here is an Easter Island head I made for Lego Ideas: (You can see the whole project here https://ideas.lego.com/projects/109859) Moai: https://ideas.lego.com/projects/109859 It is about 1 foot tall and consists of around 1200 pieces. Moai: https://ideas.lego.com/projects/109859
-
(Logo for Brick Railway Systems, or BRS for short. Railway rolling stock color scheme is black with a thin red base stripe) Background info on the Company: Brick Railway Systems (BRS) was constructed in the early 1870's from pieces of other roads. It began small, with only 120 miles of track laid as of 1873. (Note: Only 57 of those miles were actually constructed by BRS, not by the former component roads) By 1910, BRS had rose through the ranks of the other roads to become the top freight hauler in the country. However, In World War One, the railway was was run into the ground by government control via the Imperial Railroad Administration (IRA), which took over control of all railroads in 1914 and kept them until 1920. Upon return of the company to it's civilian owners, the railroad itself was in shambles The company responded by trimming the unnecessary trains that had been kept running during the war years even though they were practically useless. By 1928, the company had remade itself so much so that it had electrified most of it's main line between Glencoe, Ironwood, & Fort Legoredo. This cut back majorly on some of the costs of steam engine fuel and maintenance for the railroad. The benefit of this was not evident immediately, but later payed for itself when the Great Depression hit. By the the Second World War, BRS was even better off than had been projected in the depths of the depression The war traffic barely affected the system, as the 1920's upgrades had unexpectedly prepared the system for the surge in goods and soldiers. In the late 40's, while several other roads had started getting rid of their steam engines for diesels, BRS was resisting the flow by building more steam, and experimenting with more advanced designs such as duplexes, triplexes, & Garrett’s These efforts never payed off, but the they did give the BRS engineers valuable advice on what to do and what not to do with steam. Meanwhile, diesels were on the railroad from starting around 1936, but not in great numbers until the late '60's. 'The System' (as she is sometimes called) was doing fine at this time, while other roads were struggling. By the '70's, diesel fuel prices had put a stop to the diesel takeover, and optimism was high. This feeling continued right up until 1987. The main competitor, Federal Railways, had gone up for sale and Brick Railway Systems was getting a ring-side seat on what could happen if a road got out of hand. Before their eyes, the road was torn apart by lack of leadership, (not helped by the fact the Federal Railway / Brick Railway Systems merger was denied) lack of funds and working motive power. Then, in late 1992, the railway was finally gone, eaten up by hungry debtors and rival railroads alike. (some of it was eventually bought by BRS) The other half of the '90's & the early 2000's had Brick Railway Systems wondering if the same financial breakdown would happen to it. By 2010 the shock had worn off, and the optimism had returned, albeit with a little more caution. Background on the building: Built in 1977 - 77 after a tornado destroyed the vintage 1899 headquarters for Brick Railway Systems, this building has been modernized several times in it's long life. The first section or "Building A", as it's now known, is shown here and was finished in 1977. A copy was added in 1991 and another in 2010, forming the identical buildings B & C. The rear of the building. The first floor (top right) is the reception area, where visitors wait for the person whom them are visiting to come and get them. The second floor (bottom right) features an area of cube-less cubicles. In the 1970's, it was thought that an open floor plan would encourage free thinking and higher productivity. The idea never caught on outside of BRS, and has become a hallmark of the company. The third floor (bottom left) is the executive level. It contains a very large model railroad showing the humble beginnings of Brick Railway Systems back in 1869 through 1879, when the line ran from Glencoe to Barretts Station and on towards Washington, Missouri. Builder's notes: This model is based off of set 60047 (The 2014 Police Station) and has been modified to an extreme extent. The billboard is a modified and enlarged Grand Emporium sign, which is supposed to say the words BRICK RAILWAY SYSTEMS (in printed 1 x 1 tiles). The LDD file is avalible, and can be downloaded here: LDD file: http://www.mocpages.com/user_images/80135/1428872293m.lxf Comments, Questions, & complaints welcome!
-
Let me know if you like them.
-
Hi, A few days ago i finished my sculpture of sull head an put it o Lego Ideas. There are a few pics: https://ideas.lego.com/projects/90201 What did you think about the Model? I designed it first at MLCad, so if you want i can send you the partlist and se Model as a MlCad File. I would be really happy if you Support my Projekt, im Really new at Lego Ideas. Thanks and Nice Day! Paddi
-
Hi there I'm trying to make a minifig with blue skin but am stuck on the head; the official Lego ones just don't have the right expressions. Does anyone know if there are any custom printed heads out there? Cheers MW
-
This is the LEGO sculpture of a fat boy who wears glasses. In case you are interested in how it is built, click this link: https://www.facebook...16292386&type=1
-
Hi, I'm new here, and I tried a search but couldn't find anything. Anyone has made a list of "compatible" elements for minifigures? I was trying to make some "dwarf warriors", but I found only a couple helmets compatible with a beard piece, and then only with one specific beard. The helmets I found are: DWARF, HELMET, KING DWARF, HELMET, SOLDIER And they go together only with: BEARD FOR MINIFIGURE Anyone can give me some info? Is there any way to place them while keeping the beard?