Search the Community
Showing results for tags 'Gearbox'.
Found 167 results
-
.thumb.png.116032e930e483fb4ebbfdc62183bd34.png)
[MOC] Sequential AWD 4-speed gearbox w/ V8
Didumos69 posted a topic in LEGO Technic, Mindstorms, Model Team and Scale Modeling
Sequential AWD 4-speed gearbox with V8 fake engine Features - AWD with center differential - Sequential 4-speed gearbox - One-finger shifter - V8 fake engine This gearbox is an excerpt from my rugged supercar project. The mid-console has an important role in the overall stiffness of that model. It had to be narrow as well. If you build (have built) it, you will also notice it has very little torsional flex. I wanted a 4-speed sequential gearbox covering a wide range of ratios. So not something like 1:2.5 upto 1:1, but rather something like 1:3:5 upto 1:0.8. Another requirement I had, was that I didn't want red clutch gears to transfer drive on axles rotating at different RPM. This is a common practice, but from modding the Porsche I know it induces a lot of friction on the axles involved. When not engaged, red clutch gears better only make dummy rotations and not transfer drive. And finally, all had to fit underneath the engine; I didn't want the gearbox to be routed through the entire chassis. Instructions available on Rebrickable.com. Have fun! -
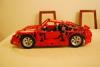
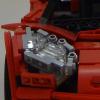
 After seeing Lego's 8860 modern version from 3 sets of 2017, I liked it alot, but I have no nostalgia otherwise for the 8860, while I do for the 8865. This was the first Lego "supercar" I build when I was about 8 years old. Alot of people find it ugly, but I can never hate on this model. So it felt perfect for my "tribute" to 40 years of Technic. I tried to copy as much functions from the original, I decided not to add any new functions that the original didn't have (wether I had room for that in the first place is another thing). The functions are: - 2 speed gearbox (first gear 2:1 and second gear is 1:1, of course like the original: linear) - Full independent suspension - 4 cylinder engine - Working steering wheel (sorry no HOG Lipko ) - Folding headlights - Adjustable seats Features I could not get into a model of this size were a neutral+third speed for the gearbox and a differential at the rear. I could have probably made a rear diff work, but it would mean I'd have to sacrifice the rear independent suspension and build a live axle. I decided the value of having independent suspension at the rear was of greater importance as a tribute to this model than a diff. LDD available for download here (Thanks @LvdH and @Didumos69 for the help on the LDD and the 9L liftarm in front of the model is for dash, supposed to be placed behind the steering wheel) A couple of more images: If you wonder why I didn't use the 2017 part of pinhoel with 2 axle ends on the driveshaft towards the gearbox. That was my intention, but I don't own the part yet and after mounting the gearbox on top I couldn't detect any play in that part anymore, so instead of breaking down the model to get that new part in there I decided to leave it as this. I tried to copy as many details of the engine as possible. A custom V4 engine worked best instead of the standard Lego engine parts, because I could mount the exhausts better and have the transparent red in the centre of the engine (4L lightsaber) where the original had 1x2 transparent red bricks. For the centre console I tried to mimic the original as well. I used a 3L blue liftarm as gearstick because his big brother has it too, same goes for the antenna being red for the headlights. The reason why that isn't simply an axle with a red bush is because from the front view that is visible above the dash and I don't like that. Also, when the headlights are up a bush in that position makes it harder to steer. While I can perfectly fit the mechanism on the passengers side, that felt out of place, so this looked best to me. Folding headlight, simple but effective Adjustable seat's maximum laid back position to keep a seat in its adjusted position I decided to use rubber 2L liftarms below the seats (behind the LBG bush). A little turn of that LBG bush and the seat won't move. Of course I made pictures with its big brother: Which brings me to a problem of this tribute: scale. I originally wanted to use 30.5mm tires, but that mean I'd have to make a suspension that was about 9 studs wide, 10 studs wide if I decide to ignore the fact the 30.5mm tires are far too wide to be in scale. However, I couldn't make a 10 stud wide front suspension that felt strong enough to mount the rest of the car to. While I managed a rear suspension in 10 studs, it looked very flimsy So I decided to slightly scale up my model with the use of these 37mm tires. The end result was a scale of 1 : 0.48 (sorry engineers for this crappy notation ). However where the 30.5mm were far too wide (2studs) for scale, these were a tad worse . To compensate for this I decided to make the suspension smaller in width, so that the total width with tires included would be in scale (edit: and this width is what I based the "1 : 0.48 scale" on, the tires actually needed to be 39mm to be in scale for that ratio and not 37mm, but those don't exist in any way from Lego, the next is 43mm which would be such a significant upscaling that I didn't want to do, 2mm is barely visible I think and allowed me to create a smaller model /end edit). That resulted in this 11 stud wide suspension, which was alot better to work with for mounting a body to it. Also the rear got some much needed inforcement to remove the flimsy look of the 10 stud wide suspension. So with having a scale that basically meant 2:1 it was easy to work with, for bigger sizes I used the 0.48 and for small stuff (4 studs or lower) I used 2:1. The engine is 1 stud too high in scale, but this I could not combine lower with the suspension. I am glad it it's still (just barely) under the "rear window". Thanks for your time looking at my little model.
 -

Gear Grinding in Differentials (EV3)
StudRobotics posted a topic in LEGO Technic, Mindstorms, Model Team and Scale Modeling
I said before in my previous post that I had some problems with my GX EV3 4x4 chassis that I needed to fix. Once again, it's more gear grinding/clicking, but this time it's only in the front and rear differential gears. The grinding occurs whenever the chassis tries to drive into a wall or when it tries to drive in different conditions (because as an SUV it should drive smoothly in dirt or uneven terrain). What also annoys me is that when I push the car, instead of letting the motors move, the differentials make clicking noises that, like I said before, sound like a machine gun. I really need help so I can stop the differentials from clicking so when the car tries to drive into the walls, the motors won't still move while the differentials click, and so the car can be a lot more versatile on uneven terrain (such as what I used for testing, blankets) without the differentials causing a problem when the car moves. Here's some pictures of the bottom of the chassis. -
More Gear Grinding/Clicking in Gearbox (EV3)
StudRobotics posted a topic in LEGO Technic, Mindstorms, Model Team and Scale Modeling
I'm back again with another gear grinding issue but this one is a bit less critical. The grinding only occurs when my 4x4 SUV chassis (with Sariel's 4-Speed Sequential Transmission) is in a certain gear. Here's some photos of the chassis. The transmission is shifted to the speed where the nonstop grinding occurs. When in this gear (I believe it may be 3rd) The car is supposed to move, but it does very slowly while clicking noises fire like a machine gun. This is the only time when the gears grind other than, say, if the chassis hits a wall. When the clicking begins, I hear the driving rings shake (which awfully reminds me of the somewhat gear clicking in the Mercedes-Benz Arocs set). I would love a response a soon as possible to address the clicking problem so I can finish the chassis once and for all. -
Looking For Best 4-Speed Sequential RC Gearbox
StudRobotics posted a topic in LEGO Technic, Mindstorms, Model Team and Scale Modeling
This is my second post on the EuroBricks community and another question asking for as much help as I can get to master the art of the technic gearbox. Like I said in my previous post, for my Lexus GX EV3 4x4 SUV, I tried my best to use Sariel's 4-speed sequential and it ultimately failed on me. Quoting one of my replies... I would be relieved if I could finally finish this creation after five months of difficulty. Here are some pictures of the entire chassis. I said before that the issues with this was that the gears clicked a ridiculous amount at the highest gears which stopped the car from moving. (Hence the reason why the transmission I want needs to have a clutch gear to absorb the large amount of torque) -
Is there any 5+R (maybe with +N) sequential remote controllable gearbox?
bekesizoltan posted a topic in LEGO Technic, Mindstorms, Model Team and Scale Modeling
Hi, I'm looking for a reliable remote controllable 5+R sequential gearbox or ideas how to build one. If it would have a neutral as well it would be perfect. Please share your ideas and if you are aware of any kind of existing solution please share the link. Thanks, Zoltan -
[MOC] Ariel Atom 500 V8
TheMindGarage posted a topic in LEGO Technic, Mindstorms, Model Team and Scale Modeling
This is my latest MOC: an Ariel Atom 500 in 1:9 scale! Technically it isn't a true scale model since I didn't use exact dimensions (I just build what I think looks best), but size-wise it's about 1:9. The real car is the fastest ever variant of the Ariel Atom, a street-legal car built for track racing. Released in 2008, the Atom 500 features a 3-litre transverse-mounted V8 made from two motorbike engines. It produces 500 horsepower (hence the name) and redlines at a rather insane 10,500 RPM. Other modifications include massive wings and the gold-painted exoskeleton. The car weighs only 550kg, giving it a power:weight ratio of over 900hp/tonne (higher than anything short of a Koenigsegg) - It recorded a 0-60mph time of just 2.3 seconds and could reach 200mph. It was the fastest road-legal car around the Top Gear Test Track for over two years. That record lap was on damp tarmac - had the track been dry, it would probably still be at the top. Only 25 of these cars were made, selling for around £200,000 each. My model features: Remote control drive and steering with Power Functions - 1 XL motor for drive and 1 M motor for steering 4-speed sequential gearbox operated with paddle-shifters Working steering wheel Full independent suspension with longitundinally-mounted shock absorbers Steering has zero scrub radius V8 engine replica with moving pistons The zero-scrub radius was a new idea for me. When playing around with suspension linkages, I discovered that mounting the links in a certain way would cause all four to move when turning (rather than just the steering link). The center of steering was further outwards, almost exactly in the middle of the wheels (I think it's where the suspension links would intersect when extended, but I'm not sure of this). The geometry I chose works almost perfectly for 68.8x36 ZR tyres on 56mm rims. Here's a picture of the steering links in their two extreme positions superimposed - the point where the wheel shafts intersect is the center of steering: The suspension is standard double-wishbone in the rear, but with a sideways lever converting the upwards motion of the suspension into longitudinal movement of the shock absorber: The transverse V8 was very difficult to fit in because it has even dimensions and the rest of the chassis has odd dimensions. It is connected directly to the XL motor The interior (or as close as you can get to an interior in an Atom) features two racing-style seats, a steering wheel and paddle shifters: The aesthetics were rather difficult at times. The framwork was very difficult even with the 42055 yellow parts (in fact, getting that set is the reason why I built this model), and at times I had to use some tricks. For example, the rear framework looks like it has two beams crossing in an X-formation when in fact the left and right halves of the "X" are two separate structures: I also replicated the exhaust pipes and gigantic rear wing. One of my favourite parts of the model is the side intake and its red stripe: The PF IR receiver is disguised as the air intake and roll hoop: For more pictures of the car, see my video below. Music is composed by me as well: [media]https://www.youtube.com/watch?v=RhmgbCIpHT0[/media] This project is also on LEGO Ideas! I know the success rate is extremely low for such projects, but it would be amazing if this set because a reality! Please support my project here. Any support is much appreciated. -

[WIP] Compact Supercar (CSC)
5imon posted a topic in LEGO Technic, Mindstorms, Model Team and Scale Modeling
The recent discussion about what makes a supercar reminded me of some photos I still had on my computer, but never published. They are from a project I started last year, but interrupted for my TC6 attempt. The question at the beginning of this project was: how compact can a supercar be? (or rather, how compact can I make it, I'm sure the cracks out here can do better than me). The question about what a supercar does have to have I answered for myself: 4 suspended wheels, independently would be nice At least 2 wheels driven, with differential Steering with HoG and working steering wheel Fake engine with at least 6 cylinders Gearbox with min. 4 gears Sportscar body Some detailing in the interior (seats, basic dashboard). Starting point was the 43.2 x 22 ZR tyrewhich should determine the car's size. So it's going to be really smaller than the typical supercar. Regarding the proportions, I wanted to do something that resembles '70s / '80s sportscars with mid-engine layout. One thing I especially had in mind was my childhood favourite Lamborghini Countach which I still consider unmatched by al its modern Audi remakes. From it, I was going to take the long wheelbase and low silhouette. What also made me stick to an older design style is the fact that wheels were generally a bit smaller back then, so the car could be a tad bigger with the same tyre size. As Crowkillers recently menitoned in a thread I don't remember, the starting point of building a supercar often is the gearbox. This was also the case for my project. I started with the box from N. Kuipers' Pony Car (which inspired me also in other ways, we'll see later), a reasonably small 4-speed setup. However, using it in my small scale as a central console would have placed the gear lever next to the driver's ear. So I decided to flatten the gearbox and lay all 4 axles in one plane, the box thus serving as the main part of the floorpan: From the back, it becomes obvious how the transmission to the engine is built as a kind of rear bulkhead where a lot of the other components will attach. It also becomes obvious that the engine will be mounted quite high, above the rear axle: To this central part of the car comes a second large module, containing th front axle, steering, dashboard and gearbox cover. I tried to keep the whole front axle really compact in order to gain the maximum freedom for the front part design. The HoG (black gear) will be operated through the windshield. From the back, the central console and funky futuristic '80 style dashboard becomes visible: These two units join to form the car's main structure: As a rear axle, I first tried an independently sprung setup, but with the parts available (like universal or CV joints) it always turned out way too wide. So I used a live axle instead, not very typical for a sportscar, I know. But another part that draws inspiration from Kuipers' Pony Car. However, instead of the 6L links, I had to use something smaller... This is how it looks with the axle (and seats) attached: The engine is pretty much standard, except it's a boxer (or rather 180° V) layout which is rather rarely used. But placing it above the rear axle, it had to be flat. And as a boxer fan, it was a logical step anyway. Some shots of the completed chassis, showing also the rear suspension: For the time being, the project is interrupted, but I'd love to complete it with a body. I already tried some ideas, but never finished anything. Colour will most probably be white, the wheels already give a hint to this. Comments and suggestions (especially concerning the bodywork) are appreciated. Thanks for watching and reading! -

6x6 truck VS
shuoshuoliuliu posted a topic in LEGO Technic, Mindstorms, Model Team and Scale Modeling
just made a truck similar with Mr. Madoca's new moc work same function on differencial lock and 2 speed gearbox,but 6x6 -Weight: g -2 XL motors for propulsion,1 XL for 1st axle,1XL for 2nd、3rd axle -2 Servo motor for steering,1st & 3rd axle -M motor for 2 speed gearbox -M motor for locking rear differential,1st axle - 2nd、3rd axle -Portal axles for 1st、3rd axle in order to make a powerful crawler, I need different rotating speed of front and rear axle. For the reliability, I not use the weak center differential. I design 2 seperate XL motors for 1st axle and 2nd+3rd axle. But I add a lock, to lock the 2 XL motors together when necessary. That means there are 2x 2speed gearbox + 1 lock. And to make sure the enough power, I add 2 battery boxs. -

Compact Lego Gearbox | Door Lock Mechanism
DamonMM2000 posted a topic in LEGO Technic, Mindstorms, Model Team and Scale Modeling
Lego compact gearbox - a super simple and compact mechanism! I originally built this lego technic gearbox for a robotic door lock. You can build this simple lego gearbox through the link below. Features a 1:8 gear ratio reduction using a worm gear. LDD / INSTRUCTIONS — https://www.dropbox.com/s/86hgsg48vijh2b7/Mechanism.lxf?dl=0 Inspired by a gearbox in Sariel's Unofficial LEGO Technic Builder's Guide: https://www.amazon.com/Unofficial-LEGO-Technic-Builders-Guide/dp/1593274343 -
Gear Grinding/Clicking Issue In Gearbox (EV3)
StudRobotics posted a topic in LEGO Technic, Mindstorms, Model Team and Scale Modeling
I'm building a SUV drivetrain for my Lexus GX EV3 project that has independent suspension, four-wheel-drive, and a four-speed gearbox with a medium EV3 motor that shifts the gears. Unfortunately, after testing the drivetrain, I found that when in 3rd or 4th gear, the gears make a clicking noise when moving forward and then straight to backward. However, this clicking somewhat occurs less when going from reverse to forward. This clicking really "grinds my gears" and I don't know what to do to stop the gears from clicking. My gearbox is a custom version of Sariel's four-speed sequential that is fit for the vehicle I am building. The input in the transmission is switched to provide more speed. Two large EV3 motors drive the input. I've noticed that when the vehicle stops, it goes the opposite direction for a little bit. Also, like I already said, this clicking only happens in 3rd or 4th gear, but mostly the 4th gear since it brings the most speed. I tried to solve this clicking with different gears and whatnot, but no matter what they still clicked when the vehicle moved forward to backward. The motors and the gearing also bring a lot of torque as much as it brings speed, and this might be one of the problems. Is there any way I can solve this issue so the gear clicking will stop in this situation (moving foward and then straight to backward) for now on? Here's a photo of the bottom of the drivetrain. Thank you in advance for any assistance that you may be able to provide! -

[WIP] Jeep Wrangler (Commando)
Leonardo da Bricki posted a topic in LEGO Technic, Mindstorms, Model Team and Scale Modeling
I have decided, that for my 500th post, I should introduce my new project, my biggest yet. I have chosen to make a Jeep Commando, which is a 2015 Jeep Wrangler with mil-spec additions. Full description can be found here and here are a few photos: JC side JC rear quarter And here are the blueprints I clumsily made up from the ones I found online: Jeep_Wrangler_JK_Unlimited_5door_2012_600_lq_0001 I have done all the math to find the size, based off the wheels I plan to use, which are the 43.2mm rims with 81.6mm balloon tires. So, if everything works out, it will be 45-47 studs long (bumper-to-bumper), and 21 studs wide (including mirrors). The functions I plan on having are: 1. Full PF including drive, steering, gearbox, lockable diffs, both central and on axles. 2. winch, PF, not RC 3. Opening doors, hood, tailgate 4. Partial interior I will begin today, hopefully I'll have some progress to report tomorrow. C&C, comments, any advice is welcome. Thanks! -
[POC] Paddle Shifter Unit
Didumos69 posted a topic in LEGO Technic, Mindstorms, Model Team and Scale Modeling
Scattered over the last few months I've been working on a proof of concept of an improved paddle shifter unit for the Porsche 911 GT3 RS (42056) that uses the stepping principle from Attika's stepper. After several redesigns I finally came up with something that I'm so content with - because of its reliability and sturdyness - that I thought it would not only be valuable as a 42056 MOD but could be of interest to other car builders too. Just like Attika's stepper this setup relies on the interaction with a 90 degree indexer. And just like the orginal 42056 unit it makes use of silicon bands to return the paddles. I tried to hide the silicon bands inside the unit, but that would give too much unbalanced stress to the whole shifting system. The operation is optimal when the bands are close to the paddles. About the operation of the shifters: Each paddle pulls a pusher against a central knob gear independently. When the central knob gear gets pushed over the 45 degree point the 90 degree indexer takes over and completes the 90 degree step. This completion makes the knob gear push the pusher outwards, which allows the pusher to be pulled back into it's starting postion by the silicon band. While being pulled back, the 5x7 frames to the sides of the unit (with their smooth sides facing outwards!!!) make sure the pusher is pulled back inwards too. The video shows a setup that mimics the situation in the Porsche, with the 90 degree indexer integrated in the gearbox. When combined with the indexer, the unit itself can be used in the original Porsche as is. Feel free to add comments or post (suggestions for) improvements. LXF-file here. -

Smallest 4 speed 4wd gearbox?
Attika posted a topic in LEGO Technic, Mindstorms, Model Team and Scale Modeling
Hi Fellas, I've built a gearbox for 4x4 vehicles and it is rather space efficient. Hope you find it usefull. As usual, I'm being lazy and copy-paste the video description as it has all the basic info. Please feel free to ask, judge, or comment and I try to give my best in the reply It is rather small, I'd love to claim that it is the smallest of it's kind. (but I'm not sure, so I don't say that yet.) Help me find out. Dimensions: L: 7 studs W: 9 studs H: 5 studs Comes with the usual gear ratios: 1st gear 8/24 x 16/24 2nd gear 8/24 x 16/16 3rd gear 16/24 4th gear 16/16 The selector lever required some attention as the upper axles are 5 stud apart. I've been using some rare parts there: -Technic Ball Joint with Through Axle Hole http://www.bricklink.com/v2/catalog/catalogitem.page?P=53585#T=C -Bar 4L (Lightsaber Blade / Wand) http://www.bricklink.com/v2/catalog/catalogitem.page?P=30374&idColor=16#T=C&C=16 However this lever mechanism can do the shifting quite well, it still not "stupidproof" and need some attention while changing gears. The frame (housing) First. It is made so colorfull to help you dear watcher separate the parts on the video. For motorized version I recommend to rebuild the housing using studded technic parts. Input/Output Outputs are self-explanatory, two red axle ends sticking out from the differential. The input in the other hand is the axle with the 8tooth gear on the front. It is offset by 2 studs, but using a pair of gears it can be transfered to the center too. Whats more, it can be done on the front as well as on the rear side. Thank for your attention -

Nathanaël Kuipers 2015 Predator Supercar
Paul Boratko posted a topic in LEGO Technic, Mindstorms, Model Team and Scale Modeling
2015 Predator Supercar Full Article HERE Specs & Features - L x W x H (studs): 59 x 31 x 13 - # of parts: undisclosed at the moment (Anyone wants to take a guess?) - The heart of the car consists of a V8 engine; - A vertical positioned gearbox is located right behind the engine and transfers its power directly to the rear wheels; - the 6 different speeds (5+R) can be manually selected with the gearstick between the seats and has a one to one mechanical connection to the gearbox with some linkages; - All wheels are suspended independently with double wishbones; - The front wheels are steered through either steering wheel or HOG and include ackermann geometry; - Front axle also has positive caster angle and kingpin inclination. Bump steer is minimized due to the low location of the steering rod; - Gullwing doors which can be controlled from directly above the airintakes on the side and include a wormwheel configuration; - Bonnet and engine cover can be opened as well, but this is done manually and they have a built-in limitation of their respective opening angle. They stay open due to friction. Looks like Nate has some new teasers up for his new supercar design... No doubt this will be awesome..! "A New Revalation" "After many months of development a new beast is soon to be unleashed! Remember the chassis for a new supercar that was presented here a few months ago? Well, the long wait is almost over and a new Predator is on its way. Many iterarations later and updated with the latest arrival of new parts it's bigger, meaner and more accurate than ever before! A few titbits to wet your appetite: the model is roughly the same size as the recently launched 42039 24-hour racer. But the similarities do not end there. Both use for example the exact same amount of panels, both are powered by a mid engine V8, and then there are a few other features that share some similarity. But that's where the comparison ends, and although on paper they seem similar, in reality they are completely different! All will be revealed soon..." -
[HELP] Controlling 3 driving rings at once
TheMindGarage posted a topic in LEGO Technic, Mindstorms, Model Team and Scale Modeling
I'm building a 6-speed sequential gearbox for use in a future MOC and I've come across an issue. Basically, I need to control three driving rings with a single input, but I can't figure out how to do it. I'm familiar with the standard method of controlling two rings by using eccentric mechanisms 90 degrees out of phase, but this doesn't work with 3. I need six positions that can be selected with a single axle. I don't need a paddle-shifter - I can do that bit myself. The positions must be in order like this: [The three changeover catches are in a line, F means flipped forwards, R means flipped backwards, O means in the middle/neutral] FOO ROO OFO ORO OOF OOR This is all to do with the way the gears are arranged (I needed the ratios to be close; difference between each gear is around 1.3x). I can't change this. The crucial thing is that the mechanism must be compact. I can't give exact dimensions, but I'm quite pushed for space in this MOC. Thanks in advance for any help! -

[MOD] Technic Mercedes Arocs
SNIPE posted a topic in LEGO Technic, Mindstorms, Model Team and Scale Modeling
Hi, I modded the mercadees benz arocs so that it has steering and suspention and drive on the two front axles as well as acenter diff between the two, RC steering, and a drive motor for the wheels. The flat 6 is in the same place roughly and the gearbox motor is roughly in the sam place too. Now I'm trying to add the same sort of outriggers that the 42009 has, but to the mercadees benz arocs, I ALSO am trying to have the steering axle going through this assembly to the rear wheels as well as a centre differential underneath. the outriggers. This sounds like a lot yes but the pnumatic pump can be moved to the back and there is new connectors now to make more compact assemblies. The gearbox would still have two clutches, the only difference, is the pnumatic pump is connected to the same output as the turntable, which frees up one output for the small linear actuators of the outriggers. Does anybody have any ideas on building this? I have been trying but I cannot seem to put my ideas into actual assemblies. I think it is a good idea to use the black 12tooth 13L gear strips like in the 42009 because the arocs outriggers are much too cumbersome. I did manage to fit a centre differential under the original arocs outriggers which is good. The purple axle is for the tipper, the green axle is for the turntable , the orange and brown axle are for the outrigers. -
[MOC] 4-Speed Seq. Sync. Transmission (Instructions)
Rage_Hobbit posted a topic in LEGO Technic, Mindstorms, Model Team and Scale Modeling
Video Found Here: Specifications: Number of Gears: 4 Gear Ratio Spread: 5:1 - 1:1 Shift Reliability: 99% Friction Level: Low Transmission Type: Dual-Sequential Synchronized? Yes Auto-stop? No Optimal Transmission Motor RPM: 15 - 40 Length: 10 studs Width: 11 studs Height: 5 studs (6 with optional support) Note on dimensions: dimensions are measure to the furthest protruding point of the transmission; that is to say, the transmission does not actually occupy all of the space designated above. Also, I know that the measurement for width is greater than that of length, (which is against their very definitions) but length was measured as being parallel to the drive axles. This is the transmission I used in my RHM Wutzwerg (http://www.eurobrick...opic=125571&hl=) supercar. It is a dual-sequential transmission, meaning that it is actually a pair of 2-speed transmissions (one with ratios of 3:1 and 1:1, the other with ratios of 1.67:1 and 1:1) which are shifted in sequence to produce 4 distinct, sequential speeds. It is very smooth and very reliable, the only potential concern being that it can slip under <b>extreme</b> stress situations; this can be remedied by added a gear reduction later in the drivetrain. It does also lack an auto-stop function, however I will be posting an appropriate stepper-motor shortly. Instructions are here: https://drive.google...XVFRGc. Before building, please read the following important notes: -Instructions are in *.lxf (LDD - Lego Digital Designer) format. Sorry, I am horrible with other Lego CAD programs. -Green marks the drive input, red marks the drive output, and purple/pink marks the transmission shifting input. -I do ask that if you use this in a model, you give me credit as the designer of the transmission. -Elastics have to be fastened like this: http://www.moc-pages.com/image_zoom.php?mocid=426942&id=/user_images/116595/1459193308m …so that the yellow part (orange in the instructions) is pulled on axis towards the shifting axle. -The yellow ribbed axle connectors in the instructions need to be replaced with the part below: http://www.moc-pages...595/1459193300m -Any questions, comments, or otherwise can be addressed to me in the comments and I will make an attempt to respond as quickly as possible. This thing won't accept pictures at the moment, so here's a full catalog of them: http://www.moc-pages.../moc.php/426942 -

Shifting System With No Rubber Band
Charbel posted a topic in LEGO Technic, Mindstorms, Model Team and Scale Modeling
I just found a way to do a shifting system witch doesn't use any rubber band. Basically , it's the same system as my Porsche 919 but I replace the bands by these connectors. Some people don't like having bands inside a car (including me ), so this allow even more possibilities. The system is really reliable and works really smoothly. Instructions : https://goo.gl/photos/HjHqpVXdE951Qm1o8 -
[POC] Compact 90° stepper w/o silicon or rubber
Didumos69 posted a topic in LEGO Technic, Mindstorms, Model Team and Scale Modeling
If you don't like things that use axles as torsion bars, then please skip this topic. In the march of steppers, shifters and limiters, here's my throw at a 90 degree stepper without silicon or rubber. I started off with my compact 90 degree stepper which uses silicon bands for returning the shift lever as well as for limiting the shift axle to 90 degree orientations. Because the rotation movements that had to be limited are quite small (max 10 degrees), using axles as torsion bars seemed to be a valid option that wouldn't put too much stress on the axles involved. After some trial and error I found a setup that actually works. It uses 3L axles with knob and half pins (also with knob) with a flat round 1x1 tile attached to them as stoppers and pole reverser handles as torsion levers. In idle state, there's practically no torsion stress on any of the involved axles. Only when you pull the shift lever, the axles get twisted, but not more than about 10 degrees for the shift lever and even less for the 90 degree limiter. The casing had to be made quite strong to prevent any other bending then the intended axle torsion. LXF-file here. -
RotoShift Gearbox and Function Switcher
TheMindGarage posted a topic in LEGO Technic, Mindstorms, Model Team and Scale Modeling
I've made a new gearbox for my next car. This gearbox can either be set to a gear ratio (driving the wheels) or to a function, allowing the drive motors to power something else. In total, there are 4 forward gears, 2 reverse gears and 6 function "ports". The reverse gears weren't intentional - they happened to exist when I added the gearing for the forward gears. The gearbox consists of a turntable with an off-center gear positioned on it. This design uses two off-center gears on the same axle - an 8t and a 12t. This allows more meshing combinations. The off-center gears are driven by a 24t gear in the middle of the turntable, which is powered by the drive motors. Around the turnable, there are many axles with gears on them (12 in this design). When the turntable is rotated correctly, one of the off-center gears meshes with one of the gears on the outside, turning that axle. Some of the axles are connected with extra gears to form a transmission with different speeds; the unconnected ones will be used for functions. Here you can see the internal workings of the gearbox. These are the gear ratios (including the 3:5 gearing before the transmission): Gear 1: 1:2.5 Gear 2: 1:3 Gear 3: 1:4.167 Gear 4: 1:5 Reverse 1: 1:3 Reverse 2: 1:5 Functions 1, 3, 4 and 6: 1:7.5 Functions 2 and 5: 1:5 The gear ratios are rather close, and the reverse ratios are too high, but there is little choice in choosing gears since all of them have to mesh properly with the off-center gears on the turntable. I made all the gear ratios quite high since I'm planning to drive the vehicle with 2 EV3 Large motors, which have tons of torque. There are two inputs - this is purely because I plan to use 2 EV3 Large motors - one on each side of the gearbox. The shifting input drives the turntable with a 28:8 gear reduction - this could be increased, possibly with a worm gear. Note that it is ESSENTIAL to use a MINDSTORMS motor for shifting, since the shift positions are in strange places and not in order. This gearbox can handle plenty of torque - the gearing up before it does help. However, when under high load, the turntable can move out of place and make gears grind. This gearbox works best with minimal backlash on the shifting input. Also, some clever programming can make the turntable adjust its position a little bit depending on the amount and direction of the load, countering the forces pushing the gears apart. The gearbox is very compact for its functionality - comparable in size to a 4-speed sequential gearbox. However, it can only be used with a MINDSTORMS motor for shifting, which will make it useless for most of you guys (unless of course someone develops a version that can be controlled by a PF servo...) -
My latest car: Abarth 595 Competizione Features: -Detailed Exterior -Opening Hood and Trunk -Working 4 Cylinder Engine -Working Gearbox (on an only 12-studs wide car)
-
Compact Sequential Stepper
Attika posted a topic in LEGO Technic, Mindstorms, Model Team and Scale Modeling
Hello fellows, Let me present my idea for a stepper mechanism for sequential gearboxes (4 speeder). Please forgive me giving such a a short description, but I wanted to share this idea before I take of to my hollyday. I didn't even packed yet and I depart tomorrow So I'll insert the video and copy its description here. I'm going to try to get online every day and react on questons and comments. Finally let me say a big thank you for Didumos69 and his 90 degree limiter for the inspiration. This video meant to demonstrate the stepper, not the gearbox. The nature of this design allows it to be used with almost any kind of gearboxes. I'll make instructions for the gearbox later however I've been trying to show it from every angle in the video so you can attempt to reverse engineer it. It isn't that complicated. Stepper: I've got the inspiration from an other idea what Diederik van Leeuwen came up with. He goes by the name of Didumos69 on the Eurobricks forum. Click on the link below to see his post: http://www.eurobrick.../forum/index... The reliability of this stepper depends on the right rubber rings. For the limiter I was using the small lego silicone ring and for the stepper (the green ring) a non lego one that is much weaker than the white. If it is too strong it pulls the knobwheel back instead of sliding trough on it when it returns to the basic position. So find the right combination by experimenting. It requires the frictionless driving rings in the gearbox. The motorisation can be solved by using PF medium motor combined with return to center mechanism too. Sorry for the lack of quality, it was a hasty work. I hope the point I was gonna make gone trough. If there is any question, please use the comment section. I'll try to answer it as quick as I can. Thanks for watching an reading. Hope you find it usefull. There is a few failed changes in the video, those wre caused by applying shorter route on the handle. This design requires to be turned to the end point (about 65 degrees). UPDATE Gearbox instruction video is uploaded: -

[PORSCHE] Porsche 919 hybrid (Hypercar)
Zerobricks posted a topic in LEGO Technic, Mindstorms, Model Team and Scale Modeling
As soon as I heard about the competition I started working in LDD to make the most functional and realistic representation of the legendary Le Mans racing car. Here's what I wanted to encorporate: - Pushrod suspension - 6 speed sequential gerbox driven by rear wheels - KERS with front wheel drive - Working steering wheel - Detailed V4 engine - Realistic dimensions and looks And this is what I managed to create with my limited amount of bricks: All the functions I wanted to incorporate have been squeezed in this small 1:10 scale 47x18x12 cm model and more! The additional features are: - Opening doors and engine covers - Working lights - Double dual speed KERS gearboxes Here's a gif to give you an idea, just how crammed everything is inside (for some odd reason the battery box and steering M motor were not rendered): And a still picture with various color coded modules: Getting back to the real model at hand, notice the eight working lights: The rear covers can open, exposing the V4 engine and the KERS generator unit: Here you can see the rear suspension and the massive spoiler with integrated lights: I even managed to make some room for the driver's seat and the detailed working steering wheel. The orange arms with towballs are the switching paddles. The yellow handle switches the KERS powered front FWD's gears: Just like in the real one, the batteries are where the co-driver is suppose to sit: And this is how the model would look like if I had all the pieces in correct colors and some custom stickers: Oops, I meant like this And finally here's a short 1 minute video of the model in action: To finish up, this has to be one of my more crammed and densest models to date. Even though its smaller than the 42039 it uses almost twice the number of pieces. This makes the car really stiff and heavy, so driving in the high speed is a bit demanding from the 2 L motors. I also had to use a different than usual approach in the rear suspension, since I wanted the car to be in 1:10 scale. This meant I had to find a way to bring wheels closer together, yet still have drive on both axles. The rear axle uses a live-axle driveline, but the wheels are independently suspended. The front wheel drive uses two 90° gearboxes to power the individual hubs. All in all I am quite happy with it, even though it uses a bit too many different colors. It's one of my prettier models, though it may not be as pretty as the competition. But one thing is sure. It doesnt get more technical and functional than this Oh and before I forget : Oh and one more thing. If you are intrested the LDD file, than please wait for a few days for me to make a video on how-to use LDD in developer mode. The model was made in that mode and cannot be correctly opened in normal mode due to all the collisions. -

[PORSCHE] Porsche Prototype
jovel posted a topic in LEGO Technic, Mindstorms, Model Team and Scale Modeling
Hi everybody, This is my entry for the Porsche contest! It features: - working steering wheel and HOG steering - full independent suspension - 5 + R gearbox using a link system - opening doors and hood The gearbox mechanic: Animated gif, switching from 3 to 4 to 5: