Search the Community
Showing results for tags 'Crane'.
Found 150 results
-
.thumb.jpg.fd2a9cb77204ad255ccaa0b983c2b569.jpg)
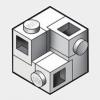
42093 Rough Terrain Crane
a1i2d3e4n5 posted a topic in LEGO Technic, Mindstorms, Model Team and Scale Modeling
42093 alternate model, a Rough Terrain Crane. More on rebrickable.com -
A sailor's solitude For days, months, years it has been just you and me, and no one in between. We watched the sun rise as it warmed your soft skin. We dined under the moonlight, reflecting on your hair. We danced under the rain and rambled through grey skies. I gave you my heart and I gave you my soul. But now I fear you might claim far more than I can give. For the only thing left for you to take, is my life. So, open your arms and embrace me, as I dive into your eternal blue. Swallow my fears and doubts, as I breathe in your serene tide. Walk me through your never-ending garden until we turn into one... when the time comes. But only when the time comes. Louis of Nutwood ________ Hope you all like it. Cheers!
-

42108 availability
trinitechnic posted a topic in LEGO Technic, Mindstorms, Model Team and Scale Modeling
Hello, Has 42108 been retired? From the US retailers, its seems difficult to find and usually at least 50% markup. On lego.us, its listed as out of stock, along with 42082, which must be getting put out to pasture by now. -

Adventurers - 1920's vehicles, buildings, figures, and stuff!
Murdoch17 posted a topic in LEGO Action and Adventure Themes
Adventurers Resupply Depot This building was mostly built from my own imagination and a slight inspiration from Toy story 3 set number 7596. (Trash Compactor Escape) I also used a old 3D base-plate that my brother gave me to give the building a bit of height. The dock is just a little taller than my tramp steamer, but it works great with the rotating crane to load / unload the ship. Also, the second floor and roof top (with the dual skylights) come off for access to the inside details. There is a sliding freight door to get cargo in from outside, and I'm contemplating putting a ramp pieces outside where the large rock piece is to get things down to ground level. Downstairs is the cargo drop-off area. Thing are strewn about the place, with barrels, buckets, chests, and an ancient Egyptian sarcophagus just laying about. (Don't worry, it's empty!) Also on this floor is the armory, with weapons and gadgets of all kinds safely stored on the walls, with the accompanying ammunition in a securely locked safe located upstairs. Upstairs is the nerve center of the Adventurer's exploits around the globe. money for buying supplies is stacked near the radio, while the ammunition safe sits nearest the camera. Opposite from the stairs is the research desk and lounge area. (even globe-trotting explorers need some downtime!) Steam tramp freighter EASTERN STAR I built this 103-stud long 1920's Adventurers tramp steam ship from two Adventurers sets: I used the boat from set 5975 (T-Rex Transport) and modified slightly to resemble set 5976 (River Expedition). The ship features a lifeboat, steering wheel, and a smoke-stack plus I have the bridge with removable roof for the top deck of the ship, and captain's quarters for the lower floor. I also have signs on the front of the ship spelling out the name of the vessel: the Eastern Star. The ladders hanging on the side of the lower deck lead the way to the ship's bridge on the upper level. The life boat is also back here. Here you can see inside the ship's bridge (upper deck) and captain's quarters. (lower level) Some of the recent cargo of the Eastern Star includes: - a gyro-copter - silver ingots and coins - silver and gold nuggets - Dynamite (the accompanying plunger is in the Captain's Quarters / map room) - Ancient spears - the real Maltese Falcon - the Burma Chicken (long-lost cousin to the Falcon) - two halves of a long-lost pirate's treasure map - Money - large rough-cut ruby - poison bottles - antidote bottles - and many other items! Bi-wing pontoon plane THUNDER BLAZER Fly farther and higher than ever before with the Adventurers and their Pontoon bi-plane! This vintage style airplane features two re-purposed kayaks for floats, and dual shotguns for forward-facing protection from the forces of Lord Sam Sinister, while the rear of the vehicle has a gunner's seat with rotating machine-gun turret. (Just be sure to not shoot off the tail of the plane while flying!) In reality, this model was heavily inspired by 2018 set 31076 (Daredevil Stunt Plane) with a gunner seat from set 7186 (Fighter Plane Attack) from 2009. The pontoon floats from kayaks were my own idea, and I think are used in a new and unique way. This model comes with rotating prop, seats for the pilot and gunner and swiveling machine gun turret. Seaplane ISLAND HOPPER What do you get when you combine an Adventurers seaplane, a Indiana Jones DC-3, and a Creator rip-off of the Seaduck from the TV show Tailspin? This model of course! The seaplane seen here is based off the 2008 Indiana Jones set 7628 (Peril In Peru), the 2017 Creator set 31064 (Island Adventures), along with inspiration from 2000 Adventurers set 5935 (Island Hopper) thrown in for good measure. The idea behind this model is to depict a updated version of one of my favorite classic LEGO themes: "Adventurers", but with modern techniques and parts using two of my favorites plane designs smashed together. The rear of the plane makes use of a Toy Story 3 printed 2 x 4 tile for a registration number. The plane has a interior that seats six people: 1 pilot and five passengers. The seats are accessible thought the removable roof / wings. Auto-Gyro LIGHTNING ROD In reality, this model was modified from set 70913 (Scarecrow Fearful Face-off) from the LEGO Batman Movie line. I added the classic two seat Adventurers cockpit piece which is usually used on land vehicles, plus a new set of vintage 2003 landing skids. This model also comes with red and green navigation lights and two independent propeller blades. The good guys: Adventurers (good guys) figures from left to right: -Madame Blue This Alaskan husky is the unofficial mascot for the Adventurers team. -Captain Karloff Owner and operator of the "Eastern Star" tramp steam ship, this captain has an eye for spotting the historical value in something that looks worthless. He always has a bag of cool items he's collected on beaches, sea-side markets, and ports around the globe on his person or nearby on his ship. -Jake Raines This young lad is a American student of Dr. Charles Kilroy's and expert at 5 spoken languages and 3 more written. Also has a knack for defeating ancient booby traps and disarming modern explosives. -Johnny Thunder Australian adventurer extraordinaire and friend to all those in need. Thunder first met Sam Sinister in 1917 when Sinister was in a field hospital for his hand amputation and Johnny was recovering from slight case of shell shock. They have been against each other ever since then. -Dr. Charles Kilroy Eccentric and slightly absent-minded English professor of history, archaeology, ancient languages, and about five other things including medicine. Kilroy is known as "Lightning" to his friends, as he enlightens the team in his own way and serves as a friend indeed. -Miss Pippin Reed This former lead reporter for Adventurer Times was reporting on a Dr. Kilroy's 1920 discovery of a copy of the Book of the Dead when she met Johnny Thunder at a dig site near Cairo, Egypt. They have all been good friends ever since. Also, Ms. Reed happens to be an better aviator than Johnny, a fact which she takes great pride in. She also operates the Island Hopper seaplane on most expeditions. -Mac McCloud Mac may be slightly clumsy, but is a genius when it comes to things of a mechanical nature. He keeps things working for the Adventurers team, such as lowering the steam pressure in the old and worn boilers on the tramp steamer "Eastern Star" and knocking loose engine parts back into place on the sea plane "Island Hopper". -Major Quentin Steele Former British Army officer (and Sinister's former commander, whom Sinister still hates today) This Monster Fighter lost his eye in 1912 due to a fight with a certain Werewolf, whom he later tracked down and defeated. He has signed on to Johnny Thunder's team as of 1925. Not Shown: -Clutch Powers As a former resident of the neighboring realm of Ninjago, Powers is a stranger in a strange land... no, better yet, a strange time. Used to the modern ways of Ninjago City, this waylaid movie star got himself stuck in the bridge-realm of the Monster Realm in the Earth year 1912. When he got seperated from his filming group and the portal back home closed, he was stuck in the perpetual darkness for about a week until the Monster Fighters group (led by Dr Rodney Rathbone) found him. They led the culture-shocked Clutch back to Earth once they defeated the Lord Vampyre clan. He has been making black and white silent movies of his life on the "World of the Ninja" ever since. A good friend of Jake Raines, as Jake is a fan of his "Temple of the Snake People" adventure film series. The forces of evil Characters from right to left: - Lord Sam Sinister Brother of Alexis Sinister, and Lord of Sinister Manor and owner of his own steam train. Sam lost his left hand in World War I while in the British Army. He later replaced it with a polished steel hook which is as cold as his heart. - Alexis Sinister The sister of Lord Sam Sinister is completely evil and slightly unhinged while being crack shot with any weapon. She hates Johnny Thunder to an extreme extent after he refused to join Sinister in his diabolical schemes. Last seen on Dino Island escaping to places unknown while the island was sinking. - Senor Palomar This South American crime lord is an associate of the Sinister family. He helped Sinister try and get the Sun Disk from the Amazon jungle, before losing it to Achoo, the ancient guardian of the disk. After that adventure, Palomar has fallen out of favor with Lord Sam Sinister, but he hopes to be in his good graces again soon. -Mister Graves A mysterious man of whom little is known. He sometimes is a ally of Lord Sinister and company, although are also enemies at times too. He is always seen with a gold lapel pin in the shape of a badge and a little black book of which he is almost constantly writing in. What is he writing? None have dared ask. EDIT 8/4/20: Everything updated! Comments, Questions & Complaints are always welcome! -

42097 Spider Crane
Ngoc Nguyen posted a topic in LEGO Technic, Mindstorms, Model Team and Scale Modeling
A-model functions: - 4 HOGs for each outward expansion of the outriggers. 2 knobs in the front, 2 knobs in the back. In other words, each outriggers swings out independently. - 4 HOGs for lowering of the outriggers through self-locking linkages. - Another 4 HOGs for each telescopic expansion of the outrigger. - HOG for turntable rotation. - HOG for boom lifting, through regular LA. - HOG for boom extension. - HOG for winch. - It appears the base of the superstructure crane has another level of elevation. B-model functions: - 2 HOGs for lowering of the outriggers through self-locking linkages. - 2 HOGs for each telescopic expansion of the outrigger. - I can't spot any knobs for outward expansion of the outrigger. But it doesn't make sense to not have them. - HOG for main tower erection, through regular LA. - 1 or 2 HOGs for main tower telescopic extension. The main tower is composed of two gear racks placed on top of each other. I spot 1 HOG for the bottom rack, but can't see any for the top rack Controlling all 4 outriggers is gonna be tedious... But the linkages are pure genius! Parts in new color: - Dog bone 3x5 in YELLOW. I spot 8 of them. 2 in the boom, 6 in the undercarriage. - Gear rack holder in YELLOW Rare parts: - 3x11 panels in YELLOW - T-liftarm 3x3 in YELLOW - Macaroni 90 degree connector in YELLOW (first appearance in 42094) - 6 holes pulley wheels in BLACK (first return in 42069) - Pin hole with pin in BLUE (first appearance in 42083) It uses the regular LA, not the XL LA in Liebherr. Sorry for this wrong info. The 2 outriggers in the B models have movement limitors. But I can't seem to spot them in the A model. I really wonder what will be used to stop the outriggers from swinging outwards too far. -
Warning: long post ahead! Go and get your cuppa first... This thread was supposed to be my 3-stage WIP-story and entry for the BMR OcTRAINber 2019 Technic Challenge. I was ecstatic when the theme was announced, trains+technic is exactly what I like building. Unfortunately, life conspired against me, and I have no access to my bricks this month. I can still enter the contest, but with an unpublished 3.5-year-old version of the model, rather than a new one as I would have liked. This also means the pictures and videos are far from ideal, since they were only taken for a personal record rather than a contest entry. Nevertheless, here we go. My subject: the British Railways Plasser Theurer "General Purpose Crane" GPC72. A fairly simple, robust and versatile self-propelled maintenance crane, they were often used for track laying. They could be coupled up and work in tandem to replace large track panels on double track lines, or work over one end lifting individual rails and components. For a whole host of prototype photos, visit Paul Bartlett's amazing site: https://paulbartlett.zenfolio.com/plassercrane My model V1 was built in March 2015. I had only recently acquired Power Functions components, and decided to have a go at building a decent, functioning rail crane. The result looks a bit of a mess, but worked rather well and proved the concept worked in LEGO. The two switches were used to operate the two m-motors, mounted side-by-side under the chassis. The nearest one is clearly connected directly to the winch spool, whilst the far one operated a gear train to slew the superstructure. The boom was raised and lowered manually, using the mini linear actuator - I'd ran out of motors and space by this point, and the switches meant this was never going to be a fully remote-controlled model anyway. Of course, it was a bit of a cheat. Power, propulsion, and speed control of the functions was provided by a "PF wagon". I could have built it into a Class 08... but I didn't. Overall, the crane worked surprisingly well and was great to play simulate operations with, but it just looked a bit... odd. I wasn't really satisfied with messy cables and the PF wagon either. Therefore, a year later, V2 was built. The functionality and controls remained exactly the same, but everything from the mechanism to the aesthetics was rebuilt from the ground up. And she looks much better for it! Slightly longer buffer-to-buffer and adhering to my now-standard 7w (perfect for British models), there's more space to fit everything in. The battery box is mounted sideways under the front bonnet, which makes it slightly too blocky for the prototype but it looks good enough. The motors are in similar positions to before, and the switches have moved to the rear bonnet. The IR receiver was the one component I didn't bother to hide, but the real thing has a fair amount of clutter above deck too so I wasn't too bothered. The boom is only red because I didn't have a yellow one when I took these photos! Use of this part over standard bricks allowed me to include boom extension as a manual function. Eventually I got a yellow boom, and replaced the over-sized pulleys with twice as many smaller ones. Note that the battery box had also been stolen for something else by this point! Annoyingly, these sub-standard photos and unpolished model must be my entry for "OcTRAINber - The Technic Challenge", since it's the latest model I've built and filmed. So here it is. But that doesn't mean this model doesn't stop there! I've been building several digital versions since 2016, culminating in V3 - the ultimate. This was what I'd hoped to get home, build and enter for the contest, but it's not going to happen until at least Christmas now. With cleaner (if blockier) lines, stronger motor mountings and another complete redesign for the superstructure, she's better than ever. I pondered fitting in a micro motor to control the boom remotely, but it didn't sit well, would prevent unlimited 360-degree rotation, and I can't find many sold in the UK. I did make sure this design allows easy replacement of the switches with an IR receiver though, and vice-versa. If some of the part choices seem a little odd, it's because I'm planning to build it from my existing collection of bricks - I hope to build this latest model, if there's time over Christmas. Until then, more photos and V3's LDD file are available at https://bricksafe.com/pages/Collet22/general-purpose-crane. Happy building!
-

42108 JCB Roto Telehandler
mpj posted a topic in LEGO Technic, Mindstorms, Model Team and Scale Modeling
Hello! Recently I built an alternative model using only parts from set 42108. It is a roto-telehandler, mainly based on JCB Hydraload. All functions are manual: - boom raise/lower - fork tilt - turret rotation - 4 wheels steering - stabilizers There are 2 attachments: fork and hook. It is in the same scale as my other models (1.21) and instructions can be found here: https://rebrickable.com/mocs/MOC-43871/technicprojects/jcb-roto-telehandler/?inventory=1#comments Functions summary: I hope you like it! -
 Motorized model of a crawler crane with Mindstorms EV3. Features driven tracks, and superstructure functions controlled by an automated distribution gearbox. Functions/features: Driven tracks Boom elevation Boom extension Winch Superstructure rotation Ever since TLG released the rotary catch pieces from the Bugatti set I sought to incorporate it in a distribution gearbox so that I could control 4 functions with 2 motors. However, I did not want the play experience to be constantly interrupted by shifting the gearbox. For instance, if I used PF and installed a stepper mechanism to control the gearbox, I'd constantly have to count how many "shifts" I've done to ensure the right function is engaged. With that in mind, I realized Mindstorms EV3 is the perfect solution to this - by simply utilizing a touch sensor, the mechanism can detect how far the shifting motor has rotated thus automatically selecting the right function. The gearbox, which sits at the heart of the superstructure, features a cam attached to the shifting motor to hit a touch sensor. When a command is received from the remote, the shifting motor rotates until the touch sensor is pressed, then the EV3 tells the shifting motor to rotate a certain number of degrees to select the corresponding function. This utilizes a switch/case for the remote, and because it features up to 11 button combinations all superstructure functions are controlled from the same channel (channel 2 on the remote). This gives controlling the model a very natural feel, and sometimes I even forgot that I was controlling a distribution gearbox because the EV3 shifts it so seamlessly. As for driving, it too uses a switch/case for the remote. Because it's just a simple tank drive, the commands for this are much more straightforward compared to the gearbox functions. Driving is controlled from channel 1 on the remote. Additionally, there are sound effects that play while operating the crane. Pressing the left two buttons together in the 1st channel starts the engine (thus starting the program), and pressing the right two together stops it (thus ending the program). Because the PF IR remote uses levers instead of buttons, this effectively makes the model inoperable with only a PF remote. The EV3 remote feels more natural for controlling this model too, as some superstructure functions (boom elevation and superstructure rotation) involves pressing two buttons simultaneously. In the end, I'm pretty satisfied with how this model turned out. I was initially worried that this gearbox I had in mind won't work as smoothly as I imagined, but it turned out to work flawlessly. It often made me forget that I was even controlling a gearbox as the EV3 does the shifting for me. Of course, there's still areas that could be improved - for instance, the boom extension and winch operate pretty slowly. Not using a worm gear in those mechanisms probably would've helped, but that would mean the mechanism becomes "unlocked" as soon as the gearbox disengages it. Occasionally the gearbox would jam, making me restart the program, but overall the finished model met my expectations. Video: Photos:
 -
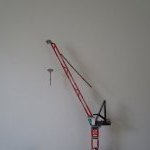
[MOC] Luffing Tower Crane
Crane Guy posted a topic in LEGO Technic, Mindstorms, Model Team and Scale Modeling
Hi Everyone, I built a Luffing Tower Crane, I tried to make it as realistic as possible. Sorry for the poor image quality, lighting wasn't the best. I am currently working on a High-top Tower Crane. -

[MOC] Road recovery crane. A big one!
corujoxx posted a topic in LEGO Technic, Mindstorms, Model Team and Scale Modeling
I am a real fan of Lucio Switch, but I also like to do my own models. This one was based on Lucio 8x8 truck, but adding some personal touch. To be honest is a little bit fake. I run of of pieces and due of this, only one side of the model was completed. The brick consumption of this scale is terrible. I don´t know the exact number of bricks, but must be around 11000. ) electric motors, 4 x power function batteries and 4 x RC controls from the Volvo wheel loader. This model is very good looking, but absolutely senseless. Too big, too heavy and it squirms under its own weight. Next one will be smaller, for sure, but was a nice try. -
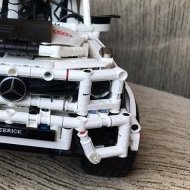
Volvo Crane Truck - 42078 C-model
mpj posted a topic in LEGO Technic, Mindstorms, Model Team and Scale Modeling
Yes, another C-model of the 42078 set In the last 3 months I enjoyed my spare time in building a C-model of the 42078 Mack Anthem. My truck is an 8x4 flatbed version, with foldable crane behind the cab. I worked a lot on the cab shape, as already mentioned in @grego18f topic, who was building a Volvo FH too! It has opening doors but no tilting cab and no fake engine (I preferred a better looking cab than changing the shape to let the cab tilt). The crane is functional (all functions are manual), knobs are on both sides of the model. Main problem is the absence of the turntable. The crane is quite stable, but of course cannot load heavy loads. You can of course mod it adding a small turntable Outriggers control knob is on the back: I added 2 attachments: fake hook with chains, to move a small container, and forklift to move small pallets. Video: Model consists of around 1500 parts (so you have around 1000 leftover parts - mostly small parts and Lego System bricks). Instructions can be found on rebrickable: https://rebrickable.com/mocs/MOC-34643/technicprojects/volvo-crane-truck Stickers are custom made and could be available for purchase soon. I hope you like it! -

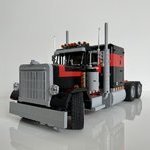
[TC17] Hard-Knock Life [VIDEO!!!]
Leonardo da Bricki posted a topic in LEGO Technic, Mindstorms, Model Team and Scale Modeling
Hello everyone! I finally finished my build, made the video, edited the video, aaaannnnnnndddddd..... POSTED THE VIDEO!!! I would like to say thanks so much to everyone who offered advice and critiques throughout the build process. Please read through the build log below for more information about the truck, but for now, please enjoy the video! -------------------------------------------------------------------------------------------------------------------------------------------------------------------------------------------------------------------------------------------------------------------- I started out with a bit of a classical Mad Max-style build... A hot-rod, with an oversized engine, and high suspension... And nice pointy bits sticking out all over the place. It has since morphed into a hot-rod mated with monster truck, sprouting a crane from the middle, on Claas tires and requiring 12 shock absorbers... And its motorized! Photos will come tomorrow with the sun and the good lighting. -

[ MOC ] 42082 Rough Terrain Crane Mini-Replica (Control-)
cyberdyne systems posted a topic in LEGO Technic, Mindstorms, Model Team and Scale Modeling
Hello, everyone! I've mentioned that a lot of you liked my 42100 mini-replica so the time has come to release another Micro-model in the "Control -" line up :) This time I chose 42082 to be downsized. This crane and mini-Liebherr, both are in almost the same scale. The crane has all the same functions as it's "big brother": -AWD with fake engine -All-wheels steering -Deployable outriggers -Turning the tower -Lifting and elongating the boom -Winch All functions can be controlled via knobs on the sides and on the back of the tower. As bonus thing it also has a compartment for outriggers' plates. Here is the video which shows how all this machinery works. Thanks for watching. Merry Christmas and a happy New Year! -
42082 - Rough Terrain Crane
Ngoc Nguyen posted a topic in LEGO Technic, Mindstorms, Model Team and Scale Modeling
Imma start a dedicated thread for this set as well. All info so far: Rough terrain crane 4057 parts 229 Euro 1 meter telescopic crane. With power functions. Largest TECHNIC set for parts. 4 wheel steering. V8 engine sticking out at the rear, uncovered. Unimog wheels with covers. 5 motorized functions: - Raising boom - Extending boom - Lowering winch - Lowering outriggers - Rotating superstructure B mode: drilling vehicle. -
Gravel loading facility for railroad hopper wagons - set 733 inspired real world MOC
Murdoch17 posted a topic in LEGO Train Tech
This model was inspired from this set-733 like MOC by @AFOL7777. I turned it into a railroad-served industrial track ballast loading facility to have the crane load dark bluish gray 1 x 1 round bricks into the crane's bucket. Then you can drop them into train hopper's when they arrive with the pull of a sliding plate. You may have noticed I had to extend the height of the model 1 brick, to allow for Diesel 10 to fit underneath, as he is the primary engine to work the ballast facility. (His claw made him too tall, but it's okay now.) The tan tile parts under the crane are the pull pins to make the coal fall into the hopper cars. Inside of the crane with "controls" for the bucket motors and the crane itself, which travels along some narrow-gauge tracks and can swing from side to side. In reality, the "hand of god" method is used to make the crane move, with a rope extending to the roof of the crane cabin which I can wind and unwind to load and unload the ballast into the train cars. The office of the owner of the ballast operations. The reason for the odd footprint is the factory MOC I made earlier this year resulted in a base-plate piece (dimensions 16 x 48 studs) that I was looking to use somewhere.... enter into the picture this model, and now I've nearly solved that little issue. This 6 wide BR "Warship"class with hydraulic claw (AKA Diesel 10) model has been heavily modified by me from a old Class 37 file by LazarusBricks to have new removable roof sections for the cabs with seats for figures and cab controls. As you can see, I chose to leave off the face to keep the engine more in line with the rest of my locomotives. Diesel 10 works the ballast facility most of the time, so I included him here. I'm going to have my Diesel 10 model pull 6 of these coal cars plus a brake van inspired by the 1980's 12v era red/ yellow sets to my gravel facility. The 12v era model and Diesel 10 are already built, and the plank wagons are on order as of 1/11/2020. NOTE: All credit for the six dark grey wagon models seen in the picture above goes to @Pdaitabird, who designed them. See here on Flickr for the awesome tutorial by him for the construction of the BR plank wagon. BUILDERS NOTES: The ballast facility is now done, but the trucks to be filled with the crushed rocks are not (yet). More pictures to come soon! -

Crane Slewing Ring Using 6109283/6109285 Turntable
Paul Allen posted a topic in LEGO Technic, Mindstorms, Model Team and Scale Modeling
Has anyone tried to motorise this large turntable. It is approximately 60mm diameter compared with the standard, smaller, 55mm turntable but I cannot find a gear combination that lines up with the standard beam hole spacing. Help please! -
"I've been working on the railroad, all the live-long day!" This train consists of a ALCO diesel locomotive (specifically a RSD-12 type) and six cars: - a (working!) crane car - depressed-center rail wagon - a (working!) ballast hopper - tool / worker bunk car - weed killer tanker - wide-vision bay-window caboose. The train model features several neat printed pieces found in several Juniors sets and and seven generic track workers. (as seen below) ...while the roadbed crew consists of: -Bucket-lift truck from set 3179 (Repair truck) -Dump Truck from set 7789 (Lotso's dump truck) Drill vehicle MOD from 7936 (level crossing) Front end-loader from set 7630 (front end-loader) ...and a official's inspection car MOC - not yet built This model was originally a ALCO MRS-1 built by Anthony Sava, but has been so severely modified that it no longer looks like the prototype loco. So I went searching And found another ALCO locomotive, a RSD-12 that looks like my loco. Both my model and the prototype have the six wheels, and the same basic hood and cab design. The long hood of the loco has been designated the rear with a double red light. (no picture taken yet of this car) This car is not your ordinary tanker car - it contains weed killer for use on the ballast the train lays down. This stream crane model was heavily inspired by Whoward69's instructions for a set of crane and match truck train cars. I modified the original model seen here. I originally meant for the crane to have ropes to move the boom, but it got confusing on which rope went where so for now it's moved by the H.O.G. (Hand Of God) method. The crane can spin around in 360 degrees and lift anywhere up to 90 degrees straight up. (Their is a double set of pins keeping the boom from going too low, as well.) Here we see how the crane is hooked up to the depressed center flatcar most of the time. The heavy-duty depressed-center wagon has brick-built arms to secure the cargo of railroad track in place. This model was inspired by a coal hopper on an older website called LGauge .com. I tunrned the old finger hinges into new pin-orientated ones and colored the car yellow to match the MOW paint scheme. The hopper's bottom door open and can dump 1 x 1 round plates / bricks onto the tracks for ballast. (no picture taken yet of this car) This is the workers tool car. In reality it's empty, but it's supposed to have rows of racks for tools, and a special box for broken tools to be fixed when they get back to the division HQ. The caboose features two ladders (one per side) and more of those fancy printed 2 x 4 tiles. This is where the job site foreman has a little office. The med kit is also located here. This is the headquarters for my Maintenance of Way operations for Brick Railway Systems. I was inspired by set 60009 (Helicopter Arrest) from 2013 for most of the building, while most of the inside details came from set 10027 (Train Engine Shed) in 2003 a whole ten years before the other set was even produced. As for the billboard on the roof, I borrowed the letter's design from my brother's model (with his permission), and put them on a billboard to spell out OCTAN. The tracks on the side of the building are for my ALCO RSD-12 and it's accompanying six car work train to sit and await their next task. The inside on the lower floor is furnished with a lathe, drill press, fire extinguisher, oil drum, and a vise. The upper floor (the break room) has a table, a few chairs, coffee machine (with paper cups!), fireplace, and a recycle bin. I will be updating this with the two missing pictures soon. As for the digital items, I will built them as funding allows. As usual, Comments, Questions and Complaints are always welcome!!
-
I started this a little into the new year and let me say the good thing about a building site MOC is it doesn't have to look finished to be so. Woohoo! I realised then that I had never made a building site MOC which seemed a dereliction of duty considering building buildings is what us AFOLs do right? Being firmly stuck in the past when it comes to LEGO dimensions (the mathematical measurement method, not the game console games) I like to build 4-wide vehicles and so generally build buildings to a slightly smaller height than is common these days. Way back in 2007 or thereabouts I picked up the Tower Crane set (#7905). Looked great on the box but to be kind to it it looked terrible when included into my city at the time (like the Eiffel Tower did). Size of course was the big problem, too high and too wide, detraction. Conscious that the scale needed to fit be appropriate to the style of my city and also that the road needed to connect to another road the building site area was quite restrictive at 24x34 studs. This made it a little tricky to fit in everything (actually I didn't include any external scaffolding or portable cabin as a result of having no space to put it but in the end I added a further 16x48 baseplates to accommodate the roofed hoarding and side lane) but I find the restrictions made the build overall more enjoyable as there a little challenges here and there. The tower crane is 5x5 studs which itself introduces a few problems mainly related to the attachment of the ladders and boom. Two counterweights for the boom are used, one the official weight black brick but seeing that in reality you usually see grey concrete slabs (or things that look like concrete slabs) being used I tried to replicate this look. The big problem here was the simple fact that my counterweights combined were not heavy enough to support the boom with any significant load. So off I went to raid the tool box and filled a revised hollowed counterweight with nails (see here). Speaking of booms, the builders built this in record time to cash in before the next crash. Hope you Town fans and 4-wide loyalists out there like this build. Happy to hear people's thoughts or comments on it! I will look to replace these waste shoots with a white or another colour version at some point, just to add a splash of colour, not that too much LBG is bad or anything. Would like the 1x1x2 cylinders used for the streetlights not to have cutouts. Got the calculator out and the office area is accurate. Made a little microscale version of the 'finished building' for this billboard. The construction company logo is the jumping frogs. Maybe because they jumped legal hoops to avoid being prosecuted on health and safety grounds? Finally can get that Welder to work! Also you can look down the dry riser. Someones's not happy. Fact. All tower crane operators end up with glasses due to eye strain despite in cabin cameras. Just made that up.. The view from above. Please make sure your figs are not afraid of heights before looking down.
-
Speed-build video: https://www.youtube.com/watch?v=bvelE1MXuaA
-
"We got two hours to load those bombers! Move it!" -Rebel ordinance supervisor The Rebel Munitions Speeder is a ubiquitous repulsorlift vehicle within the hangers and warehouses of the Rebel Alliance. Designed to cart cargo and personnel efficiently around Rebel bases, it's equipped with a primary wedge-shaped speeder that is controlled by a single driver and can hold a 3x4 crate in its bed, two pilots or technicians on the side, and is used to pull cargo carts behind it (in a similar way to a train). Although the amount of carts being pulled varies, it usually maxes out to three or four for efficiency reasons. Although more can be added, this would require additional puller speeders, and I have not made one with a connection at both the front and back- though it wouldn't take much to modify one. The carts being pulled can carry pilots to their craft, soldiers to ships or assembly points, cargo to various locations, and munitions to be loaded or stored; they're also equipped with clips to hold chains or tethers, and the side panels can be lifted up to help access the repulsorlifts or be raised to form a small bridge. SW Rebel Munitions Speeder #1 by Jonathan Wallace, on Flickr SW Rebel Munitions Speeder #2 by Jonathan Wallace, on Flickr SW Rebel Munitions Speeder #3 by Jonathan Wallace, on Flickr The bomb rack is the same as the one in the 2016 Y-wing, just recolored. SW Rebel Munitions Speeder #5 by Jonathan Wallace, on Flickr With the bomb rack as a basis, I designed a similar missile rack. Although not shown in this picture, you can fit three more missiles in between the four shown here. In addition, the pinhole brick is there so this can be laid down on a bed of some speeder 'truck' via a stud, or swing from a technic pin; the modified tile on top is there for a similar purpose, being either clipped into place, or being hung from a hook- this is all to give some more options. SW Rebel Munitions Speeder #4 by Jonathan Wallace, on Flickr Although not technically part of the 'set', the crane was developed alongside the munitions speeder, and is meant to be used in conjunction with it. This was originally just an enlarged version of the crane from the 2016 Y-Wing set, with it later being changed to fit my tastes, and using parts from two of those cranes. This repulsorlift vehicle is fairly quick, and has two arms. The secondary arm in the back can be made bigger, though this may necessitate a redesign; currently it's used to pull things behind it or hang small things off its hook to be hauled around. The modified tile on the back arm can be detached and used to both move weapon racks on and off the cargo carts, as well as move astromech droids up into starfighters. SW Rebel Munitions Speeder #6 by Jonathan Wallace, on Flickr SW Rebel Munitions Speeder #7 by Jonathan Wallace, on Flickr Here's some rough pictures of the munitions speeder and the crane. SW Rebel Munitions Speeder #1(R) by Jonathan Wallace, on Flickr SW Rebel Munitions Speeder #2(R) by Jonathan Wallace, on Flickr If you want to build this for yourselves, here's the instructions: https://drive.google.com/open?id=11u-Y0sUKkJ-tCg6gHOvNngsbRYxv6Hwd As always, any feedback would be much appreciated And may the Force be with you, always.
-
Hello! After a few months of hiatus, some updates from my town :) Here we are the latest update of my construction site, with a more realistic tower crane, partially insipired by set #7905. Enjoy the pictures and I hope you'll like!
-
This took me a few months to complete, for a few reasons. I decided to post this, even though I technically haven't finished this project, but this past week I decided to post this weekend if I couldn't think of anything new to add. The genesis of this project was my modding of my Brick Bounty (nothing much, just some improvements here and there), and I wanted to create something more substantial. To be clear, this is my first ship MOC, as well as my second large MOC. I don't say this in hope for leniency (go ahead and bash me), I just want to give some context. I recognize this as a learning project; indeed, you can see some progress (albeit not much) in the pictures below. I'm already doing MSP Phase II, which incorporates a few techniques that improve the design quite a bit. This project was divided into two batches: Batch 1, which is a Supply Ship and a Armed/Converted Merchantman; and Batch 2, which is Frigate, a Prison Hulk, and a Sheer Hulk. I wanted something that gave me more than just a warship, and I think I covered my bases fairly well. In addition, this project (and to a lesser extent Phase II) is a kind of a bridge between official Lego sets (in my case, the Brick Bounty) and bigger and better MOCs (such as the beautiful specimens here on Eurobricks); as such, I wasn't too concerned with making great MOC (or even necessarily a good one), but rather a decent one that would go fine with Lego's ships, and perhaps (hopefully) wouldn't look too out of place alongside proper MOCs. Batch One: The first ship up is the 'Supply Ship', a.k.a. the Tub. This is meant to be a ship used to move troops, equipment, or victuals to wherever they're needed. It's not pretty, but it gets the job done. I started off by making sure a minifigure can stand straight up inside (5 bricks tall). I've kept this throughout this project, but I have changed to a smaller height in Phase II. I also used the 1x2x3 inverted slope for the hull sides. This is a real thing, though it's more used in modern times than in the Age of Sail (a flare, as opposed to a tumblehome). This shows the inside, and probably the main point/draw of this batch- the anchor system. You can see the channels for the anchor chains; string might be better, but I wanted to use chains like Lego does (there's a couple reasons why, mainly because chains are more readily available to me). 'Modular Ship' (Supply Version) #4 by Jonathan Wallace, on Flickr Here's a look down the inside. The two Technic connectors under the Technic plate are meant for the chains. The end of the chains are attached to the top one, and wound in between the two, similar in concept to what's on the Brick Bounty (sort of). 'Modular Ship' (Supply Version) #5 by Jonathan Wallace, on Flickr A more overall view of the ship (with Bosun Bob at the helm). I wanted the ship to have some kind of defense, so I put some some carronades on top. 'Modular Ship' (Supply Version) #1 by Jonathan Wallace, on Flickr A top down view of the deck. Besides the anchor, the only real feature is the grate/cover. 'Modular Ship' (Supply Version) #2 by Jonathan Wallace, on Flickr A view of the stern area. The bracket is meant for a nameplate or something similar (the inverted slopes around it can be removed and replaced to widen it if necessary). 'Modular Ship' (Supply Version) #3 by Jonathan Wallace, on Flickr The second part is the Armed/Converted Merchantman', a.k.a the Lumberer (I don't know if it would actually qualify for a 'HM_'). This is basically an 'upgraded' version of the Supply Ship, armed with cannons and carronades to help defend, and comfortably keep pace with, various convoys. A view of the bow; not much, but the bow mount (modified plate) gives me some options. 'Modular Ship' (Converted Merchantman) #2 by Jonathan Wallace, on Flickr Here's a view of the gunports; also a better view of the bow mount. 'Modular Ship' (Converted Merchantman) #1 by Jonathan Wallace, on Flickr I think Lego's cannons look better; it's probably because the ship's a bit chunky. 'Modular Ship' (Converted Merchantman) #3 by Jonathan Wallace, on Flickr Batch Two: The third ship (and the pinnacle of Phase I) is the Frigate. In the British system, which I base most of my information and inspiration from, it's actually not a frigate, but rather a 'Post Ship'. Many Sixth Rates were of these types, but all were commonly called frigates anyways, and so that's what I labeled this as. I found a picture early on of HMS Euryalus that I took a lot of inspiration from, if not direct translation of some design elements. This is also the only ship that's actually modular; the rest are built in a way to make it easy to make it modular, but also easier to build in the first place (I admit a bit of laziness probably crept in there, but I wanted to move on to other stuff). Here's the ship, piece by piece, form bow to stern. There's 20 pictures, so I put it here to shorten the post a bit. The fourth and fifth 'ships' aren't really ships- at least not anymore. These are what are called hulks (specifically a prison hulk and a sheer hulk). They were once warships, but once they were too old to be really useful anymore, they were converted into some kind of hulk. I've searched on here before, but I haven't found anybody who has made either one of them. I'm sure the talented shipwrights here could have a much better crack at such projects than I, but even if I just spread the idea around, that would be enough for me. The fourth ship is the Prison/Accommodation Hulk. These were used as floating prisons to keep prisoners of war, mutineers, or just overflow from the regular prisons on land. Accommodation hulks were like floating barracks; used in a similar way to the prison hulks. The fifth and final ship is the Sheer Hulk. These craft were floating cranes, usually implemented in putting masts onto new ships (or replacement masts for those ships that lost theirs in some way, shape, or form). After the Age of Sail, though still in the 19th Century, purpose-built sheer hulks were made to help increase maritime construction. Multiple capstans were used to power the crane, and the sides/railings of the ships were usually cut down near the deck. Modular Ship (Sheer Hulk) #1 by Jonathan Wallace, on Flickr I've found many photos of different sheer hulks, and all have some different kind of combination (rigging, number of crane arms/booms, etc.), but I tried to build what was sort of the average of what I saw in my reference photos. I didn't end up finishing this one, as I couldn't really make the crane fit together quite right. If anyone can think of anything, feel free to make your own (just make sure to send me a link ). Modular Ship (Sheer Hulk) #2 by Jonathan Wallace, on Flickr This has been my Modular Ship Project (Phase I). I haven't made instructions for this (mostly I don't feel it's really a MOC worthy of it, but also I'm busy/lazy), but I do plan to make them (*ahem* eventually ). Phase II has already begun; I'll still be using prefab hulls, and I plan to make a Third, Fourth, Fifth, and Sixth Rate. I've already discounted a First or Second Rate, but I'm holding out on a Two Decker. Although I will work on a Three Decker a bit in my Testbed before I close Phase II. Any comments, suggestions, or critiques of any kind are welcome; I await the feedback!
-
My Name is Ryan Taggart. I design my modulars using LDD, and source bricks through Bricklink & Brickowl. This is my third completed MOC Modular. The Crane is a redesign of the 2006 set 7905-1 (the tower, controls, and rear end are new - the boom is like the set [hard to improve on] ) It also features a home for the 'portaloo' from Service truck 60073-1 The custom printed elements were done by FAB Bricks UK. For details and for the design and thought process visit me @ MOC Pages. http://www.moc-pages.../moc.php/424271 NOW LIVE ON LEGO IDEAS https://ideas.lego.com/projects/129250 UPDATE - 18th Feb 2016 24 DAYS IN 5000+ SUPPORTERS! THANK YOU EVERYONE I've added more images: hope you like it.
-
[MOC] Small 4-axle mobile crane - finished!
lcvisser posted a topic in LEGO Technic, Mindstorms, Model Team and Scale Modeling
See this post for pictures of final result After having put a number of projects on the back burner due to being too lacking skills and/or parts, I figured I should try to build something a) smaller, b) simpler and c) using (mostly) parts I already have. I decided on a small-scale mobile crane, based on the 49.2 mm wheels. I also decided I should start a WIP topic to get feedback and stay motivated to finish (or abandon ship if it turns into a disaster ). I first did some prototyping of the undercarriage in LDD: I'm fairly happy with the prototype, although I'm not fully convinced about the styling of the engine compartment. It looks a bit untidy, but I'm not certain on how to change that without resorting to system bricks. Any advice? This being a WIP topic, I also started building, of course. I violated point (c) above a bit, since it turned out I don't have all the parts, but most is there: So far so good, except the steering long is really poor: (Bricksafe is cropping the image for some reason: find the full picture here.) You can see that the fat tires and the pivot offset in combination with the close spacing does not allow a lot of space for the wheels to turn. I could space the wheels one stud more, but I think that doesn't look right: Upper is the current spacing, lower is one stud more. What do you think, form or function? -
 Hello guys! At last I can represent to all of you my latest MOC. It's a Lego Technic Liebherr LR 11000 Crawler Crane. I tried to build a copy of a famous Liebherr-brand crawler crane. If to be honest it was my dream to build a human-high technic crane. This model is approx two meters high. It has five independent winches! Real crane has six, but two of them goes to one hook, what was not necessary to represent in lego version. Except string crane is build of 100% Lego. As a counterweight I used three big battery boxes in the superstructure and three ones in the additional counterweight carriage. Below I will list crane's functions. RC: 1,2) Chassis drive and steering - one L motor for each track. 3) Superstructure rotation 4) Operator's cabin uplifting via small linear actuator 5) Main boom winch 6) Luffing Jib winch - winch is located on the main boom like in the original model 7) First hook winch 8) Second hook winch - winch is located on the main boom like in the original model Manual: 1) Derrick boom winch - needs only when assembling/disassembling crane 2) Addiction counterweight extensioin - need to balance crane under heavy loads 3) Addiction counterweight up/low - need to balance crane under heavy loads or without a load 4) Addiction counterweight steering - need to steer wheels in the counterweight carriage when superstructure rotating and need to make wheels parallel to move crane forward or backward 5) Chassis uplifting - chassis have installed four small linear actuators which can lift the chassis under the ground to put on tracks like in the real Liebherr!! As TLG doesn't have any pulleys of 0.5 stud wide and with the pin hole in the center and 3D parts are too expensive I decided to drill the original ones. Firstly I used 4 mm drill to make a round hole instead of an axle, after 4,5 mm and finished with the 5 mm drill. No any part was broke. And this time I already has video to show you: And a couple of photos. https://bricksafe.com/pages/Aleh/liebherr_lr_11000 Hope you will like it. Feel free to ask any questions. Also very appreciate critics. But for sure my wife definitely will not stand another crane To start building i was inspired by the set 42042 - I love it too moch!
.thumb.jpg.19742e89790e473128572b8d3969c36d.jpg)