Search the Community
Showing results for tags 'BUS'.
Found 90 results
-
-
So, some photos attached make this obvious - it's based on the WrightBus New Bus for London. It's currently on the Lego Idea's site at https://ideas.lego.com/projects/154570/ - I'd be grateful of support to get this to the next stages. Comments and thoughts always appreciated, too :) Key features: Opening front and centre doors An open rear platform for minifigs to jump on and off A removable roof to access the top deck to place minifigs inside A removable portion top deck to allow access to the bottom deck Blank destination panels for customisation within the end pack Two staircases for top deck access "Push Bell" and grab poles on the lower deck for minifigs to stop the bus https://flic.kr/s/aHskEj6J68 has some images: NBFL-01-2000px NBFL-02-2000px NBFL-03-2000px[/url NBFL-04-2000px NBFL-05-2000px NBFL-06-2000px NBFL-07-2000px NBFL-08-2000px NBFL-09-2000px NBFL-10-2000px NBFL-12-2000px NBFL-13-2000px NBFL-14-2000px NBFL-15-2000px NBFL-16-2000px
-
You might have seen the new shop@home promotion in the newest store calendar of this month. Although you would think that this will mean the whole world can get this promotion, it seems only Canada and the States can get it... Is this a part of the store errors maybe? Even the UK cant get this promotion. Instead, there is a weird small set with a piece of cardboard And if this is the intention, when will Europe get the promotion?
-
Hello fellow City friends, I've just finished a Volkswagen T3 camping edition "Westfalia", "Caravelle CL" and a standard. The scale used is 1/42 and regarded by myself as minifig/city scale, for it uses 1,70m for a minifig being 5 vertical studs high (including head pin). It frankly wont fit any minifigs properly, since its 5,6 studs wide (1,80m) and i needed a lot of interiour structure for the roof and windows to stay in place In some renders i used non-transparts windows to give better contrast (bluerender aint good with trans! ). Critique and feedback always welcome, feel free to enjoy the pics Cheers, Ron. New lands.... by Ron Dayes, auf Flickr T3 Westfalia side view by Ron Dayes, auf Flickr T3 Westfalia back view by Ron Dayes, auf Flickr T3 Standard by Ron Dayes, auf Flickr T3 Caravelle Cl by Ron Dayes, auf Flickr
-

Speed Champions VW Van?! - 24 Hours of LeMons Edition
droomangroup posted a topic in Special LEGO Themes
So my friend Eric built a 24 Hours of LeMons race van from a 91 VW Vanagon and a 2.5 subaru legacy motor. I helped out with making the Polizei decals but overall it was a sweet deal for me because all I really had to do was show up and drive. It was my first LeMons race and my first time on a track in an actual road race, and it was FUN. If you haven't heard of the series, check it out here... http://www.24hoursoflemons.com/ Our van even got some great press on roadkill.com... http://www.roadkill.com/lemons-sears-pointless-vans/ http://www.roadkill.com/sears-point-lemons-winners/ Anyway, my friend spent a lot of money and hours building this awesome van so I wanted to do something nice to thank him for his hard work so I made him a LEGO version of our van to say thanks. Obviously this box is just a mock up, but I did make these designs into an actual box using a LEGO box I turned inside out and covered with some large photo prints from my 13x19 printer...I just forgot to take a picture of it before giving it to him. Since I knew he'd appreciate building it, I made the van into a kit with instructions made from photos since making actual quality instructions is a huge pain in the megablocks... http://odometer.org/polizei/ I really like the minifig fez as an aircleaner... Overall I'm super happy with how it came out, it was my first attempt at a larger vehicle and I think it worked out well. I did cheat a bit with the black decals to make a wider grill, but I figured if TLG can use a sticker for the middle divider on the split window of their VW bus, then I can get away with that. Here's some pics of the real van in action... -
After the T3, i had to go further back in the models origin - to the more popular "T1", also known as "hippie bus" or "Bulli" (called in germany) Enjoy, feel the vibes and peace! The front HIPPEEEY BUS! by Ron Dayes, auf Flickr the back end - in this case the one of the T3, but its practically the same, just that i put round headlights on the T1 where as in here there are the cheese slopes. VW T3 update by Ron Dayes, auf Flickr
-
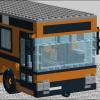
Hello Guys. I need some help. As I am beginning to plan for my Lego city, I have realised I need public transport for my minifigures. So naturally I went onto brickset and searched up possible public transport sets. The only one was 200$! So I am now trying to build an moc bus based on the ones in the public transport set. As a inexperienced moc builder I came to the forums to seek knowledge. Does anyone know any tips? I am using LDD and LDD Manager. If anyone has an moc bus like it we might be able to strike a deal... Looking forward to hearing from you! Many thanks, Hip
-
My new creation is a school bus: Opening doors with M-Motor Drive with L-Motor Steering with Servo LiPo, 2x IR
-
[MOC] Motorized Bus with Instructions
HallBricks posted a topic in LEGO Technic, Mindstorms, Model Team and Scale Modeling
Hi! This is my first (maybe second) post on this forum, but I've been following it for quite a long time now. I started building with Lego Technic about five years ago and now I would like to share with you the video of my latest creation which is this Motorized Bus. This model features: Drive, powered by two L-motors Steering, powered by a Servo Motor Opening front and back doors powered by two M-motors It also has a very detailed fake V6 engine in the back. I started building this model about a year ago. My spare time is rather limited since I'm a student, and I've been working on other projects as well, but there's still a lot of work behind this creation. The doors were the most challenging things to build and it took a very long time to get them right, I've rebuilt that mechanism at least five times. It was also very hard to make a mechanism that would fit under the roof of the bus and not be visible through the windows. Well, now it's finally finished and I'm quite happy with the end result so I hope you like it too and enjoy watching my video! -
-blank
-
Hey, It is time to present you my next MOC: Trolleybus, based on ZiU-9 (ZiU-682). Hope you enjoy! Features & Functions • XL-Motor for propulsion • M-Motor for steering • L-Motor + 5 mini linear actuators for opening doors • Working steering wheel • Movable trolley poles • 2x IR Receiver • 1x LED lights • LiPo battery for power And the video:
-

Solaris Urbino 12 IV
Porsche96 posted a topic in LEGO Technic, Mindstorms, Model Team and Scale Modeling
Welcome, I'd like to present a bus Solaris Urbino 12 IV. Specifications Scale 1:15 Length 103s / width 23s / height 27s (83/18/22 cm) Weight: 5,4 kg Front suspension: Independent, double-wishbone Rear suspension: Live axle Suspension with kneeling system RWD 2-speed gearbox AA+AAA Battery Boxes 7 motors Functions Driving - 2XLs Steering - L Opening doors - M Kneeling system - L + Servo Changing gears - M LED headlights Working steering wheel History Some time ago I decided to build a bus. I chose Solaris, beacuse it's a polish concern, which is producing buses and trams. I started building in mid-Febraury, and I finished it few days ago. Chassis The biggest challenge was to construct a strong chassis. We need to remember that it's a low-floor bus. The drive motors and the gearbox are (like the real one) located veritically on the left, behind the rear axle. It's causing big stress and I had to overcome it by the chassis. It consist of 3 parts: at the bottom there is a floor 2s thick, built from panels 5x11 and frames; at the top there are beams 3x3s on each side of the bus, they are built from liftarms. These two elements are combined by 7 rungs. The construction of the chassis is similar to the hulls of ships and planes. Drivetrain The bus is driven by 2 XLs. Gearbox ratio: I - 12,6:1 II - 4,2:1 The gearbox is built from frames, using 2 gear 24, 1 gear 12 and 1 gear 36. The gears are changed by M motor and mini linear actuator. The biggest problem was to lead the drive from gearbox to the axle. It is the weakest point of the bus - 2 universal joints, connected to the gearbox and to the axle, under a load break. Steering For steering I used L motor with reduction 14,4:1. It propels the gear rack 1x13 and also the steering wheel. Suspension Front suspension is independent with 2 yellow 6.5L absorbers per wheel. Rear is live axle. It has 1 grey and 5 yellow 6.5L absorbers (1 grey and 2 yellow for the right side and 3 yellow for the left side). Opening doors + kneeling system The doors are opened by M motor, reducted by 40:1. The drive is transmitted by liftarms used as links. The kneeling system is realised by 2 medium pneumatic cylinders. The pneumatic wires are connected only from one side, so the bus can rise using the absorbers. L motor drives the compressor and servo opens the valve with reduction 3:1. These 3 motors are electrically coupled, so in each door there is a gear with clucth. Thanks to that, the compressor doesn't stop at any time. The most wanted photos :) From the top From the bottom Some photos Gallery -
Hi everyone ! Here is my first MOC, not built yet bust just made with LDD. It is taken from this real bus that has worked all around Milan in 80's years. Well, it is quite a big model but thanks to the big size I could make the opening doors and the steering wheel. It has 4 seats at the back, 3 on the right side (where there are doors), 6 seats on the left side and one driver seat. Before building it I wanted to make the roof opening. Every suggestion is welcomed !
-
Hi everyone! My newest creation is remote controlled! It's a bus and it's my fifth tiny RC at minifig scale! Hope you like it! My previous RCs on Youtube: , , , Of course I visited the intercity bus station with a camera and the bus again, as I did recently! The type of the bus is Ikarus, but only the body is Ikarus, the engine and chassis is Scania. That's why you see the word 'Scania' on the front. It's possible to travel by it in Hungary. At the area, where I live, the bus company has I guess three of them. So we have more chance to catch it, than to catch . If you read the technical things below, you will see, that it has some disadvatages. But I like it very much and I'm really satisfied with the body! It has some crazy building techniques in every directions. As far as I know, they are my own inventions. Maybe they are already exist, but I didn't know them. My favourite detailes are the headlights, the taillights, the upside-down windows near the gear rack, the covering method of the destination screen and the air conditioner. Technical detailes: It is more difficult to build a bus at this scale, than a truck. For example at a the truck we can use five stud wide frame, and after that we can cover it by tiles, so it won't be too wide. But for a bus we have to use panels to make the windows, they are 1 stud wide on both sides, so if we want to stay in 6 studs, the frame can be only 4 stud wide. And Technic prefers the odd numbers... It's not good if the driven wheels leave the ground, so the rear wheels are not completely fixed. Looks like, if I make something better, something becomes worse. It's the first time, that I used servo motor for steering. The steering features are better, the frame is worse. Below you can see an image without the body. You may notice, that there is an arch in the frame, like a bridge. The AAA battery box is at the back, and its weight causes this deformation. Furthermore there's no possibility to fix the body by studs after the servo motor. Therefore the mudguards touched the rear wheels. I had to raise the rear part of the body by half plate. It causes some deformation, too And finally I have to tell you in secret, that the servo motor moves the gear rack on a little bit longer distance, what the inner things allow. So the motor twists the frame. You can see it in the video at . Therefore one of the front wheels sometimes leaves the ground.And almost all of the weight is on the driven wheels, so sometimes the bus wants to go straight ahead, instead of turning. But it's very rear. And finally you can see the small piece of pneumatic hose, which holds the window in upside-down position. The base and the top of the window panel has a different thickness. It depends on its position, in which height the more space in the body is. If I use the window on a normal way, the gear rack pushes it out, during steering. All in all it looks cool and works well, so I'm happy with the result of my fifth attempt! More pictures: http://www.moc-pages.com/moc.php/425778 Thanks for visitnig!
-
This is my attempt at making a Touristic Bus - Coach. I tried to keep the vehicle 6 studs wid, like all other LEGO models are, but now, when it's made I see, that 8 studs would be better. Well, next time. :) As mentioned already, creation is 6 studs wide and 33 studs long. Both doors can be opened. I tried to build both doors the same size, but 4 studs wide front doors was too wide. I tried to build with SNOT technique and made 3 studs wide front door, but then "Battle droid arm" for opening the door can't be mounted. So I decided that the front door will be two and the rear will be four studs wide.
-

[C-Model][MOC] 42008 Bus
Samer posted a topic in LEGO Technic, Mindstorms, Model Team and Scale Modeling
All of a sudden while at work, this idea came to me and I got so interested. Objectives: Bus as 42008 C Model Good looking as much as I can include bus details as much as I can pneumatic door and baggage driven by pump compressor motorized drive as a 3rd function (what else a bus has to offer?) manual steering easily removable battery Parts: approximately 930 parts out of 1276 Build time: around 3 weeks Limitations C Model, hence no parts outside 42008 allowed 42008 presents the folloing challenges: not enough lift arms to build a floor in the passenger area managing the available quantities of Green and Red beams to build the bus body and make a good choice where green and where red goes. weak pneumatics I'm new and this is my 1st serious try, I only built 42008 before this. In general I'm satisfied by the end product. Next are things I think could be better: hiding the pneumatic hoses, got lazy at that. sliding baggage door, (couldn't figure out how to do that) more sturdy/smooth steering two doors rather than one using the white gear I may try to enhance this later (as a free MOC), but for now I will go to build some car sets to learn more about vehicle functions. I will start with 42029. Thank you for having a look. Remaining parts (around 340) -
To give some background, I created a coach for my children to play with. Fairly basic, I'll give it that - some pictures are on my Flickr. Then I got a bit thoughtful whilst I was working on a project paper... and ended up coming up with this. The Prototype can be found by clicking on here - it gives you an idea of what inspired me. My vehicle is a 6-stud wide bus, with a 4-wide swing out door. Ideas to make it swing and side inside would be welcomed. The bus seats 4 and a wheelchair user (I could look at doing some flip down seats) as well as the driver. Some images: 01-Solo by CreativeDoink, on Flickr 02-Side by CreativeDoink, on Flickr 03-Rear by CreativeDoink, on Flickr 04-Offside by CreativeDoink, on Flickr 05-Front by CreativeDoink, on Flickr 06-Dash by CreativeDoink, on Flickr 07-Interior by CreativeDoink, on Flickr 08-Interior by CreativeDoink, on Flickr 09-Driving cab by CreativeDoink, on Flickr 10-Driving cab by CreativeDoink, on Flickr 11-Driving interior by CreativeDoink, on Flickr 12-Interior by CreativeDoink, on Flickr 13-Rear by CreativeDoink, on Flickr 14-Rear by CreativeDoink, on Flickr 15-Street by CreativeDoink, on Flickr 16-Street by CreativeDoink, on Flickr So, that's the bus. Some improvements to be made (given the lacking small bricks) - considering it took about 6 hours start to finish, thoughts appreciated. Doink
-
Hi, as I'm going to to build some scenes from the Harry Potter movies for the Lego Fanwelt Event next year in Cologne, Germany, I began with planning these two magical vehicles: The Weasley's Flying Ford Anglia and the Knight Bus, emergency transport for the stranded witch or wizard. So here's a rendering of the LDD models: Magical vehicles from Harry Potter by Vaionaut I hope you like them ;) Best Vaionaut
-
Hello, I built big bus, two-story, eight wheel, I'd love to know what you think...
-
Sorry, a lot of photos.
-
For a display my husband are participating in shortly (strathpine, Queensland, Australia), I decided to build a Friends street. Lego Friends street by tikitikitembo, on Flickr It started with me building a modular style building based on the Lego movie ice-cream truck. Lego modular ice-cream shop by tikitikitembo, on Flickr And it grew from there. The friends cafe: Friends cafe modular - first floor by tikitikitembo, on Flickr The friends school: Modular Friends school by tikitikitembo, on Flickr The friends vet: Lego Friends modular vet by tikitikitembo, on Flickr Add the modified juice shop, beach house, modified bus, brick built road, a bit of a garden and it is done. Lego Friends street by tikitikitembo, on Flickr Thanks for looking :)
-
Hello all I would like to share a coach (this time one from the street, not from the rails). The prototype was a Neoplan Cityliner in the newest version. I picked this coach because of its special look of the windscreen. I built the long version with three axles as a 8wide model with the LDD. The most difficult part was of course the curved windscreen but also the rear was a bit tricky and there is a lot of SNOT work on both ends. Now enjoy the pictures: Neoplan Cityliner 1 by StefanEris, auf Flickr Neoplan Cityliner 2 by StefanEris, auf Flickr Neoplan Cityliner 3 by StefanEris, auf Flickr Neoplan Cityliner 4 by StefanEris, auf Flickr If you want to see pictures of the prototype, take a look at this (German) site: http://www.bus-bild.de/name/galerie/kategorie/Bustypen~Reisebusse~Neoplan+Cityliner.html Stefan
-
I love double decker bus. There is some Enviro 400 in Hong Kong which is yellow of CITIBUS. When I search photo, I find that there are also popular in UK. So I build one of the Enviro 400 of London. I.E. DennisEnviro 400, Stagecoach of London, a common bus which we often see in London and UK Many thanks to TBB recommend. http://www.brothers-brick.com/2015/05/06/keep-calm-and-use-public-transport-%E2%99%9A/ Many thanks for watching ;)
-
Hi all, Here share my MOC, AEC STL London Routemaster start from 1930s, with minifigs scale. Routemaster and the Morden bus (coming soon)
-
[WIP] RC MAN SL202
Kiwi_Builder posted a topic in LEGO Technic, Mindstorms, Model Team and Scale Modeling
Hey all, I have been working on an MAN SL202 in the Redbus NZ paint scheme: This model has full suspension including an auto-kneeling function where when the front door is opened the front left air suspension is lowered. I have built most of the chassis and the front and rear suspension, but as you will see the front suspension needs a complete overhaul due to steering problems. Time to stop rambling on and give you some images Air hoses are for the kneeling. Rear view. Front view of front suspension, not the left side wheel is over-rotating when steering and causes the wheel to lock at a right angle to the chassis and stopping forward movement. When it is able to drive the steering is at a bad angle when straight and this causes a large amount of resistance. When the steering is turned the geometry is way off and causes major sledging and resistance. The front axle when kneeling. The pump and RC switch for the suspension lowering and raising. Rear suspension design. Rear suspension's range of movement. Chassis view. So as you can see the project is coming along nicely but the front axle suspension needs a complete overhaul so any designs that work well would be greatly appreciated These photos and more can be found in a bigger size on my Bricksafe: http://bricksafe.com/pages/Kiwi_Builder/Technic.