Search the Community
Showing results for tags 'Architecture'.
Found 375 results
-
A danish church designed by a danish architecte built with danish bricks The building For the last TechLUG contest, it was required to walk into the steps of Jorn Utzon by creating a building designed by this worldwide known Architecte for his Sydney Opera House. Scanning his creation, I found that this church is particularly interesting. Indeed, when we consider the outstanding design of Sydney's Opera roof made with fractions of spheres, it is surprising that the same architecte designed also this church looking much more like an industrial building. However, when one examines the interior of the church with its nicely curved ceiling, the Utzon touch becomes an evidence. For me, the ceiling profil looks like a see wave but clouds were the source of inspiration of J. Utzon (in a church, are we not near the sky ?). The link with Sydney's Opera and its roof cut into spheres becomes more clear when one consider this drawing Where one sees that the profil find its origin into many arcs of circle like the Opera'roof and the ceiling of its main hall Inside the church, the light is particularly impressive because it is canalized by the curved white ceiling Finally, an aerial picture This , mixing real and virtual pictures, gives you a nice 3D description of the building .If you want to see more about the church, I suggest you this pdf file and this one who analyzing the building in terms of additive architecture. Finally, this diaporama allows to do a virtual complete visit of the church. The goal of the construction I think that you have understood that I want to include the interior ceiling into my MOC. This is clearly a building for which the interior is essential to get its architectural concept. It is also well suited for such of construction because the ceiling is a single profil and the roof is made of straight plates : the whole ceiling/roof section being completed by the two very similar facades. The idea is then to aloow to access inside the building by removing the rwo facades : the ceiling/roof section has then to be self standing without having to be supported by the facades. This represents the challenge of the MOC. The version in lego bricks I have started bu building the facades checking that the roof remains hidden by them, then I have built the base and finally the ceiling/roof section. The facades with their glass roof have fixed the scale : indeed, for this roof, trans clear cheese slopes are the most sguited fixing the thickness of the facades to 2 studs. To built the walls of the facades, I have used a few hundred of 1x2 white plates with 1x2 grey bricks on top allowing to render their particular shape. For the ceiling, I have mainly used arches, half-cylinder or various curved parts : for this, I had to build cylinder facing cylinder using hinges with 2 and 3 fingers. The roof is made with tiles fixed onto plates assembled to the ceiling using 2x1 hinge bricks or by the couple Le toit est constitué de pans réalisés à l'aide de tiles liés par des plaques fixés au montage par des briques plate with handle/plate with vertical clip. The virtual MOC First, a virtual MOC has been made and used to do this stop motion video showing the constructions steps . The ceiling profil and the roof tof the virtual MOC The real MOC The base : It includes some elements recalling that the building is a church like an altar, a baptistry and wide seats. I have also included some element specific to this church like the corridor behide the seats which is a white grid inside the church and a brown grid outside which are represented by 1x2 vertical grid tiles and like the elevated space behind the altar delimited by white fences. Without the facades : The MOC is finally very stable and stands easily without the facades. The two facades : They include corridors in there lower section (made with panels two bricks high) to recall that they are mainly hollow and one includes the organ hidden by the brown panels With the backward facade : The complete church viewed from outside : Jorn Utzon presenting his building : Thanks for having read this long presentation and I hope you will enjoy this MOC.
-

Ah ha! The perfect place for an Adult Lego Addict!
bricksare4me posted a topic in Hello! My name is...
Hi everyone! I am new here. My reintroduction to Lego started with the Monster Fighters Haunted House. Then I got interested in Architecture, and Superhero figures. I also love the "home assessories" Lego items. -
Master Architect Challenge There are many wonders of architecture throughout Historica: massive dwarven halls, lofty elven towers, elegant cathedrals, and impregnable fortresses. But Revolword and the Elementals have laid waste to many of these structures. Now that Revolword has been defeated, craftsmen across Historica have started taking up their tools to rebuild the former glory of Historica. Show your character assisting in either the building of a new architectural wonder, or assisting in the repairs of a building damaged by the Hand or Elementals. The main focus of your MOC should be on the architecture of the building and construction work on the building. Maximum size 48x48 (2304 studs in any configuration), minimum size 8x8 (in any configuration). Deadline: August 1 (as long as it is still August 1st somewhere in the world, entries will be accepted) Prizes: There will be a winner selected from each guild and they will earn a guild specific parts pack and GoH title: "Master Architect of Historica" Prize packs: Builds will be scored in 3 categories 1. Guild style - How well does the build work with the overall styles and theme of the Guild? Are you incorporating your Guild colors? Does this look like it would fit well within some region of your guild? If your build is actually set in the lands of another guild, explain where it is and why you're building it. 2. Technique - Is your build very original? How does your build stand apart? Have you utilized some new techniques that you haven't seen before? Did you have a very intriguing storyline or did you show entertaining interactions between the characters in your MOC? Creativity and originality will help boost your score here. 3. Presentation - Does your presentation pop? Are your pictures crisp and clear? Did you provide different views of you build? Did you provide a good description of the build to accompany your pictures? Photo quality is a key aspect. Post a pic of your entry here, and a link to the topic. If you have any questions please ask
-
Hello! I haven't done much building in the past year (the first MOCs I posted were a couple of months old when I joined) but now I have time to spare and can focus on building. Today, I present Battersea Power Station, a hallmark of the south London skyline and star of a couple of Doctor Who episodes and the cover for Animals by Pink Floyd. I saw it when I was in London just the other day, and it was very exciting! I have designed it in the style of the Architecture sets because I think it (the building) would be at home in the line. Pictures follow. You can see them on Flickr as well. Thanks for reading! And, of course, comments and criticism are welcome.
-
INTRO Hello LEGO fans. This will be my first review. I learned a few things from it so my subsequent ones should be better. I also found there is a review of this set already. I didn't read it past the first photo as I didn't want to unintentionally copy it. Another note, pictures were taken at night. The flash was leaving too much spots, so I decided to go by lamp only. I am fairly busy during the day, but I'll try to get my next reviews with better photos. I also don't separate the parts by colour or similarity, but I did for this review as it may be easier to see what's inside. There is also a catalog at the end of the booklet. Link to pictures in Flickr for slightly higher resolution SET INFORMATION LEGO Architecture, Landmark Series, 21011 Brandenburg Gate 362 pieces $34.95 retail model 22.4cm x 9.2cm (8.8in x 3.6in) Front Back Bottom Signature from the designer printed THE PARTS Box opened Booklet cover Booklet history information first pages Parts in assorted bags Parts sorted (for review clarity, I don't usually sort) BUILDING THE SET The instructions were easy to follow. Below are some random pages: And some of the building progress: Extra parts, among them a label in English. FINAL PRODUCT Completed front Completed back IMPRESSIONS - The instruction booklet was of high quality paper, unlike the regular LEGO sets. It also had a nice history in the beginning and history snippets throughout the pages. At the end there was information about the designer. - The parts had less variety and neutral colours. This opens up possibilities for different building projects. The set also looks geared for a more mature audience due to the colouring. - The price is higher and I don't think the better booklet justifies it. For comparison, the 70~ piece sets were $20 and regular LEGO goes for as low as $11 for the same piece count. - The set is still targeted at teenagers, however, it doesn't exactly look like a toy so it can be a nice room ornament as well. RATING Building: 9/10 Playability/Reusability: 10/10 Appearance: 10/10 Value for cost: 6/10 Quality: 10/10
-
This is my newest LEGO project, a model of castle Neuschwanstein. I wanted to build this for some time because it is a beautiful and interesting building and I don't live too far from it. The original castle was build by the famous "Swan King" or "Fairy Tale King" Ludwig II of Bavaria. Today it is one of the most visited castles with more than 1.3 million visitors annually. It started as an LDD design that you can see in the first image. I choose the scale so that it was possible to put in (nearly) all of the windows in some reasonable form. If the windows aren't right it just doesn't look right... Difficult parts were the towers and the angled back part of the main building! I also included a little model of the king's golden carriage drawn by four white horses, approaching the gate. Of course then I had to build the real model, too. And here it is! It's been some work but I'm really happy with the result. Last but not least a cleaned up "promo shot" :-) This is also a project (#1128) on LEGO CUUSOO so if you really like it you can find it there: Neuschwanstein Castle, Bavaria
-
I never disassemble sets from my collection or my best MOCs, so now I have nearly no parts for serious models. This is a small part of Forbidden Palace Architecture (China), made only to demonstrate some techniques and details. Forbidden Palace Architecture by GZakky, on Flickr With figs by GZakky, on Flickr As it should look as a part of big MOC by GZakky, on Flickr Roof detail by GZakky, on Flickr Here you can see my first Chinese-styled MOC. My Flickr - Minifigs and Architectural designs in LEGO
-
DO NOT ADJUST YOUR SCREEN! The tower is meant to be leaning. Well, actually, it isn't, but it does, and it's why it is so famous that even Americans have heard of it! ( ) Although, that may be in part due to Superman III. I can now officially reveal that 21015 - the latest LEGO Architecture set, coming (in a numbering system of which George Lucas would be proud) immediately after 21017 - is not 'Eames House' as previously thought, but is instead the famous Leaning Tower of Pisa. Actually, it's the Campanile (bell tower) of the Duomo di Pisa (Cathedral of Pisa), but what has really put it (and Pisa) on the map is its rather jaunty angle. It is one of the most famous landmarks in the world, and despite Italy's abundance of Roman, mediaeval and Renaissance architecture, it is the obvious choice for the Italian entry to the LEGO Architecture Landmark Series. I'm sure its architect would be rather chagrinned to know that his creation is more famous for its lean than for its architectural merit, especially as the tower itself has merit aplenty, and might even deserve a place in the LEGO Architect Series if anyone had seen fit to remember the poor blighter's name. Anyway, we're here to discuss the Leaning Tower in official LEGO form, and so I'm proud to announce another Eurobricks Exclusive Architecture review, with thanks again to The LEGO Group! Review: 21015 The Leaning Tower of Pisa Informazioni sul Set Name: The Leaning Tower of Pisa Number: 21015 Theme: Architecture (Landmark Series) Release: 2013 (May?) Parts: 345 (including Brick Separator) Weight: 472 grammes Price: TBA Disclaimer: At the time of writing, the set isn't listed anywhere, and I don't even have a price for it yet. As such, I'm not able to comment on the set's value for money; but there's still a lot to talk about! Links ... LEGO Architecture Site ... Shop@Home ... Brickset ... Bricklink ... Peeron La Scatola Click the picture for a larger full-frontal Once again, the latest LEGO Architecture paperweight demonstrates its abilities on another smartly austere all-black box. The LEGO logo really stands out, yet the beauty of the design of these Architecture boxes is such that you forget that LEGO usually stands for a toy. The picture is - I believe - a render, but it's wonderfully done, and captures the tower from its best angle. Interestingly, this set carries the name of the tower in Italian - Torre pendente di Pisa - in addition to its location; I haven't seen that before on Architecture sets from non-English speaking countries; but then for most of them the name is the same. We can also see that Adam Reed Tucker returns to the helm for this latest voyage into LEGO Architecturedom. Round the back, we are treated to the usual picture of the 'real' building and a composite render/line-diagram of the model with dimensions. I always like the splash of colour that the 'real' photos afford. My box has got a little scratched on the bottom, probably because it was rattling around alone in a box large enough for two; the photo has unfortunately highlighted this. Click the picture for a larger image Interestingly, the Italians, having been afforded second billing on the box front, are relegated to last place in the pecking order of European languages, behind English, German, French, Spanish, Portuguese, and Similish. (Google Translate thinks the last is Hungarian - did you know Hungarian doesn't capitalise place names? I didn't. ) The Italians are, however, the only nationality to be told that the included booklet is in Italian. Well, also in Italian ... Having seen a picture of this model from a toy fair, I was expecting a smaller set, and was a little surprised by the size of the box. Measuring H 260 x W 190 x D 59 mm, it's the same height as the Big Ben and Willis Tower boxes, but considerably wider. I wasn't sure whether to include this box comparison picture, but it does show how wonderfully collectable these sets are! The sides of the box are identical, save for the designer's name almost lost beneath a weight of languages on the non-flap side: The picture is the same as the box front, minus the paperwork. If the orientation of this picture offends you, click here. A 1x1 round brick is THIS big! According to the box top: Yet more languages! And no, ghosts aged 0 to 3 cannot play with these parts. I still appreciate the feeling that a lot of attention has been paid to these Architecture sets, and the ever-present command to 'Enjoy your building experience' is welcome as always: Inside the box are four polybags, the Booklet, and a flier inviting you to take part in a survey to try to win the Farnsworth House (one of the few Architecture sets I don't own - how did they know???). I think that flier has been in every Architecture set I've opened - they must have given away quite a few Farnsworths by now. Il Manuale di Instruzioni How cute! This little book measures 125 x 170 mm, a little over A6 size, and perhaps its orientation favours the dimensions of the model itself. Despite its diminutive poratrait, it is quite a chunky tome, with exactly 100 pages including front and rear covers. As now expected for the Architecture line, extensive information about the tower - including the reasons why it leans but hasn't fallen down - occupies the first twelve pages ... Click for a larger picture ... and all accompanied by some wonderful pictures and some wonderful Italian. Pass the Pinot Grigio, darling! I've said it before: the care and research that has gone into producing these Architecture booklets is outstanding, and help make these sets far, far more than simply a construction model. Did you know, for example, that the tower started leaning during construction, and that the architect attempted to compensate, so that the tower is actually curved? (To be fair, I think I did know about that, but now I know it in much more detail. ) I won't take away one of the major selling points of the set by showing pictures of the entire content of the booklet; however, it usually becomes available on the LEGO Architecture site before too long, albeit not in English. The downside of the pretty booklet's dimensions is that it is stupendously difficult to photograph, particularly if you're trying not to damage the book. Several attempts later, I was able to capture a sample of the instructions themselves: Little factoids appear in the corner every four pages, and add further delight to the experience. The inset shows a close-up of this one (see! I told you the tower is curved!), and conveniently obscures Rufus's hand, which was a necessary prop after the Blu-tac didn't work. The instruction steps themselves are, not surprisingly, a little repetitive; however, there is a twist which may cause problems for anyone attempting to speed-build the set. But why would you do that? You'd miss out on all the little snippets! The 'twist' will be revealed later. The manual concludes with the Inventory, but not before the usual 'Word from the Artist' spiel, and the History of LEGO Architecture, with which any Architecture aficionado will be well acquainted. The former is noteworthy for a little picture of Adam Reed Tucker with a couple of prototypes of the LEGO Leaning Tower, showing that he experimented with various widths of tower. Le Parti A surprising flash of orange breaks the monotony of the Larger Parts selection, but it's only a Brick Separator. They get everywhere these days, like cockroaches. I'm sure that after mankind destroys itself, the post-apocalyptic world will be littered with both of these. Looking at the round parts in the top right, you'd be forgiven for thinking you're about to build a Wind Turbine. Most interesting here are the nineteen 2x2 plate hinges, useful for anyone building a (properly) round tower, and the large quantity of white 1x3 arches. I remember being excited to encounter one of these when I reviewed 5771 Hillside House; now I have another thirty-five of them. Architecture sets don't generally make great parts packs due to the relatively high cost, but if you're looking for certain white parts in large quantities you might be tempted. In particular, the forty-eight 1x1 plates and eighty-six 1x1 round bricks could be very useful indeed. Aside from the large quantity, there aren't any particularly rare parts in this set (excluding the printed Leaning Tower plate, which is of course unique); the selection is however remarkable for the small number of types of part used: there are only forty different parts in the set, including different colours of the same part and the brick separator. La Costruzione We start with the base... or do we? Clearly this ins't the whole base. Actually, this is just the bit that tilts; whoever made the instructions clearly thought it wise to spare us the horror of trying to build the entire tower whilst it is leaning. In the second pane we see already how the tower will be constructed. In case you hadn't worked it out already, the LEGO tower has five sides; it is built via a pentagonal arrangement of 2x2 plate hinges around a round 4x4 core. At the moment, the pentagon is only attached via the two jumper plates in the first frame, and - when the small sub-build in the right frame is attached, will be open at the furthest point from the camera. This brings us to an important point, which I think should be made now as I will refer to it throughout the build. The LEGO Pentagon When building a ring-structure from plate hinges, usually you can create a 'complete' ring from two layers of plates. It is the key step to building a 'round' tower, like Derfel Cadarn's. However, if building a ring with an odd number of sides, where the length of a side is less then four studs, you need three layers of plates to complete it: In fact, in this tower, in any one layer of plates only two sets of adjacent sides can be joined. This is important, as we shall see. A third layer of plates is indeed added at this point, completing the ring, and a 2x2 pin-brick - 1x1 technic brick connection further secures the ring to the central core. This is the only attachment between walls and core above the base, and helps to prevent the walls coming off if you lift the set by grabbing the tower. Some 1x1 bricks and plates build up the centre of the walls here. In case you're wondering about the black plate on the left of the picture, it will be covered up eventually. I guess it helps you to orientate the nascent model easily during construction. Next, a clever use of technic connectors atop 1x1 round bricks forms the columns: On top of these are placed the first of the many 1x3 arches, and they are covered with a layer of plates. Note again that some of the sides are connected together with hinge plates, but it's not possible to connect them all. The core is built up with half-cylinders and round plates, very much in the style of a wind turbine, and a further layer of 1x1 rounds and arches goes on. Now things get a little repetitive, as we start to add layers to the tower. However, if you were thinking of pre-fabricating the walls, think again: you can't. At each layer, two different sides are connected. Going clockwise with the 'front' (black plate) being 1, in the first frame sides 2 & 3 and 4 & 5 are joined; in the second, 1 & 2 and 3 & 4 are linked. The side which is 'left out' gets a 1x3 plate instead. It helps to follow this 1x3 plate: as we work up the tower adding layers, the side with the 1x3 plate moves around anticlockwise: sides 4, 3, 2, 1 respectively. This is how strength is achieved without a bulky 3-plate high ring at every level. At intervals, an extra layer of central 'core' is added. Although it is a little repetitive here, watching which sides get linked keeps you on your toes. It helps to build a lot of 1x1 round brick - 1x3 arch arrangements in advance, though. The walls are topped with some 1x1 round plates, which can be a little fiddly. The narrower topmost layer is built directly onto the central core: Note again that there's nothing connecting the walls to the core above the base. A cute little flagpole tops off the roof ... ... and that black plate is finally covered. Now to make it lean! For this, we need a little clicky-hinge arrangement, and the rest of the base: The base is 14x14 studs, made from a square of 2x12 plates. Note the light bluish grey 4x4 mostly-tiles, which will support the lower end of the tilty bit of the base ... ... like this: Aside from a few more tiles, we're done. All your base are, finally, belong to us. Il Modello Completato Leaning Tower, you're ... taller than I expected. At 259 mm tall, she's the second tallest of the entire Landmark Series; only the Burj Khalifa is taller, but that is the tallest building in the world, so that's to be expected. Only the 'real' Leaning Tower is actually the smallest of all the Landmark buildings: its scale is determined by the design. Interesting construction aside, the decision to build the tower as a five-sided polygon has its drawbacks. I guess it is the smallest scale which produces an approximation to a 'round' tower, without resorting to round pieces, and allowing the inclusion of arches; however, some of the 'roundness' is lost from some angles: These four views - shown against a black backgorund for emphasis - demonstrate the difference in profile caused by the pentagonal cross-section. Viewed square-on, there is a 'flat' side apparent in the two views perpendicular to the 'lean'; in the views parallel to the lean, you're facing either a side or a point of the pentagon. The base level of the 'real' tower has a number of 'filled-in' arches producing slight alcoves, with a rhomboid design at the top. The model replicates the latter with round plates in the arches; it's probably the best that can be achieved at this scale. The downside is that the recesses of the alcoves are lost, but there probably isn't a better way to achieve this. The use of the technic connectors to make smooth columns is rather effective here. And now for the obligatory gratuitous close-up of the printed tile: It's interesting that the set name (according to the box) is The Leaning Tower of Pisa, while the 'The' is omitted from the tile. Of the other Landmark sets, only (the) Empire State Building is habitually referred to with an article; however, in that case both tile and box say simply, 'Empire State Building'. The tower looks quite pretty from above! Note that the top of the utmost layer is 'closed off' by the 4x4 round plate; the real thing is open to the air up here. This aerial shot highlights a slight anomaly of the pentagonal design. The inside 'radius' of this pentagon is wider than that of the 4-wide cylinder which makes up the core, but the two are attached at the base on the leftward face in this view. Thus, the origin on the pentagon doesn't sit in the centre of the the circular core. This produces an interesting but unwanted effect: the walls, attached to the core only at the base, 'wobble': I've tried to illustrate this photographically; it's much more obvious 'in the flesh', and you'll notice it whenever you pick the model up. Since it'll spend most of its time on the shelf - an isn't especially obvious visually - it isn't a big deal. Rispetto alla Torre Reale We've seen the model; now for the reality check. Here's the real Leaning Tower, picture courtesy of Wikipedia: Firstly: the angle of the tower. You can't judge the angle by comparing the two shots; they are most likely not taken from the same direction. We'll deal with that more 'scientifically' shortly. Obviously, the LEGO tower isn't round enough; you could argue that a larger scale model (eg., six sides) would produce a more realistic approximation, but I guess there's a cost/benefit ratio to take into account here, and I would wager that TLG wouldn't want to risk losing sales to a much more expensive and only slightly more authentic set. In the booklet, you can see that Adam Reed Tucker experimented with various sizes. I think the five-sided result must have been a necessary compromise. Clearly, at this scale, much detail is lost; in particular, there aren't nearly enough arches. The real tower has some thirty arches per level; a realistic model would perhaps have to have fifteen sides to even approximate to this number. I think the ideal compromise would perhaps be an eight-sided tower, but even this would be monstrously big, and perhaps prohibitively expensive for many. I can live with LEGO's 5-sided compromise. There are a couple of things I'm not so keen on. One is the use of 1x1 round plates to top off the walls, and the 'roof' (which shouldn't be a roof: you can see sky through the arch on the topmost level, or you can look here). They 'round off' the top too much, when you can see from the picture that there should be a slight overhang at the top. I think even tiles would have better here; for the top layer this piece would have been ideal - but maybe it wasn't yet available when the set was designed. The second is the topmost level itself - it isn't wide enough. The top of the real tower is like a crown; that of the LEGO tower looks more like a pimple. Now let's return to the angle of the tower's lean. Beware: this section contains mathematics. According to the booklet, the tower leans at an angle of 3.99 degrees, but prior to restoration work between 1990 and 2001, the angle was 5.5 degrees. What angle does the LEGO tower lean at? Let's see. The tilted part of the base is 8 studs long, and its lower end sits 2 plates lower than the higher end. A 1x1 brick is 8mm in length (actually 7.9, but there's a 0.1mm gap between bricks to take into account too, so we can safely assume 8mm), so an 8-stud gap would equate to 64mm. A 1x1 brick has height:length ratio 6:5, so a plate height is 8mm x 6/5 = 3.2mm; two plates are therefore 6.4mm. The angle formed is TAN(6.4mm / 64mm) which works out at 5.7 degrees. Close enough for me! I'm impressed at the work that must have gone into getting the angle correct (assuming, of course, that it isn't a lucky coincidence). La Conclusione When pictures of this set first appeared, it was greeted with a degree of scepticism from some, who pointed out the many MOCs of this building already in existence, including the diminutive but clever CUUSOO entry by moctown. I have already pointed out that a number of compromises have had to be made to recreate the Leaning Tower at a scale which provides a degree of accuracy without being prohibitively large and expensive; even larger MOCs such as this one by torgugick have had to reduce the number of arches on each level. The decision to build the tower with five sides - whilst producing asymmetry in the profile - does lead to a more interesting build, and the overall effect is still pleasing to the eye. It is perhaps a little too narrow, and I'm not keen on the rounding at the tops of the walls and the summit, but I'm very impressed by the correct 'lean' angle. It is also considerably larger than I expected, and dwarfs the majority of the Landmark Series, despite being in reality quite a small tower (56 metres compared to Big Ben's 96m): It is useful to compare the Leaning Tower to Big Ben here. Ben crams a huge amount of detail into quite a small model: look at all the lovely SNOT grille tiles. In comparison, the Leaning Tower is really rather plain. And monochrome too: the area immediately round the real tower is paved, but it's almost impossible to find a picture of the tower without the grassy area around it; I really would love to have seen some green on the base. Easily modded, I guess. I punteggi Design 7 The tower is recognisable and not just because it leans! The five-sided design is intriguing and original, and produces a reasonable degree of authenticity whilst keeping the size (and, presumably, price) down; kudos to the designer for getting the lean angle spot on. However, the appearance is marred by a lack of colour and texture; the too-narrow top section, and the rounding of the tops of the walls. Build 9 You might expect a huge amount of repetition, but the build process is refreshingly interesting and surprisingly pacey. Seeing how the five-sided construction is realised is fascinating, especially how strength is added with hinge plates around the walls. Plus you get to learn stuff while you build! Parts 7 With only forty different parts in the set, the selection is limited, but there are large quantities of certain useful parts: 1x1 round bricks, 1x3 arches, and 2x2 hinge plates, all of which might well prove useful for your own architectural designs; however, you would perhaps be unlikely to buy this or any other Architecture set purely as a parts pack. (I say that, but I bought Fallingwater as a parts pack, and it's what got me into the range in the first place. ) Value X Now here we have a problem: we don't yet know the price! Overall 76% My score 7/10 If you are angling towards perfection, the Leaning Tower falls a little short; it is however an interesting build and its lean alone will make it stand out from the rest of the range. It's perhaps one for the collectors, or a souvenir. Some sets are must-haves at any (reasonable) price; this set probably isn't one of those, and I suspect the price tag will turn out to be a deciding factor for many. Thanks for reading! I hope you enjoyed the review. Please comment! Rufus Many thanks to Kim Thomsen of The LEGO Group for providing this set for the early review. Riferimenti The Leaning Tower of Pisa on Wikipedia Tower of Pisa information site LEGO Architecture Site LEGO Architecture on Shop@Home My flickr Set My other LEGO Architecture reviews: And Finally ... I can make them all lean! And of course ... Setting this picture up was a lot harder than it looks. Thank you, CopMike! Join the Reviewers Academy to learn how to make great LEGO reviews!
-
I hope it is not too late too post for the community build. Anyways, here is my latest MOC. I had completed it on saturday, but was only able to post this yesterday. I think after all it had taken me about 6 hours. For much months the idea of using dome topsfor a senate building. intitially, I wanted to do just the building, but later I couldn't resist to make a sort of interior too. I could have used a plate build dome, but I wanted it to have a smoother look. more pics on my Flickr account. http://www.flickr.co...s/77259875@N05/ overview: the top layer is builded like a Lego Architecture set, with the 1x8 tiles on the side. I wanted to photoshop a "Senate Building" text on it, but I don't know how. Could anyone explain how to easily put text in a picture, so it looks real? reference pic: actually my MOC isn't angled enough, but Lego still hasn't produced Brick, round corner 6 x 6 x 2 Dome top. I had to improvise the statues with teeth, it's ashame there are no straight versions. without the "roof": The "roof" is attached with 4 studs. when removed, you can see the Galactic Senate's Grand Convocation Chamber. The Grand Convocation Chamber: reference pic: I made it Light bluish gray in stead of Dark bluish gray because of several reasons: Because I thought Light bley looks better, the outside of the base already is light bley, and because I simply hadn't got the right pieces and enough in dark bley . Bonus pic: (bad) photoshopped image of the Senate's C&C welcome!
-
The local museum asked me to build something iconic of our town. I decided to build one of the most distinctive and iconic buildings in Longmont. The Dickens Opera House. It was built in 1881 by William Dickens as, well, an Opera Theater. I used to perform as a young boy and into my teens at the dinner theater that operated there when I was growing up. I met my first girlfriend there, and for many other reasons, it is a special place to me. Anyway, the model is built now and on display at the civic center until it gets moved to the museum where it will be on display (with a couple other of my models) until September. The design has elements of the building the way it looks today to be recognizable, that's why the front awning look the same, but I made some adjustments to add details from the way it used to look, which is why the side awning is different and the roof line is stone colored as it used to be (it is black now). On with the photos: Photos of the building This is pretty much how it looks today, (no signs on the building now) This is how it looked when I was growing up This is the sign on the building now The model It is built with over 4000 LEGO pieces, it cost me about $1200 in parts and took about 16 hours to assemble. The only non-lego part is the sticker on the sign that I made in Photoshop and printed on an address label. The poor cutting skills of the sticker was also done by me. I have some of the sign that shows some of the technique I used to design it, because I get asked about that since both the top and bottom are identical, and are the bottom of LEGO (the studs face inward toward the center of the sign) This is the sign with one of the black plates removed (left side, you can see the studs sticking out where it was attached): and give it a little turn to see how the Lego pieces are stacked:
-
I've finished my latest skyscraper model, the Shanghai World Financial Center. Click on the Flickr Set for more images. Shanghai World Financial Center by Spencer_R, on Flickr
-
Hello fellow builders, Between two projets I did some simple vignettes about some architecture meme. As a student we see them often! I didn't have time yesterday to post it so here it is. I think many of you can agree about these, event if your not working in this specialities, it is, if I can say that, the same in any work! Please enjoy! Because you have to finish this! A vision about the architect profession! 1. Your friends think you do some press presentations and projects releases 2. Your parents (hopes) your making (enought) money 3. Your society think you arrive with a new vision and / or weird artist concept! 4. Your students think your a good manual person 5. You think your doing something genius has Frank Lloyd Wright did 6. What you are really doing is try to stay awake to finish your project and after that think about eating and sleeping! The old version of our loved / hated program! When he's in you work, when he's out... well obviously you don't work harder! So what do you think about these? Comments and suggestions always welcome. --------------------------- Thanks! Harton
-
First of all, a big thank you to Bonaparte and LEGO for making this review possible. This has been really fun. I knew very little about this set when it was given to me, so I looked it up and found that it looked to be a very good set. As I'm going to study engineering, the architecture series really quite appeals to me, however, I'd never gotten one as I really like minifigures. Will this set hold up to my expectations? Read on! Set Information: Name: Imperial Hotel Set Number: 21017 Pieces: 1188 Price: US $130 Ages: 12+ Minifigures: N/A Theme: Architecture Year of Release: 2013 Brickset Flickr Set I left plenty of pictures in their large size! Box: The overall design of the box is the same as the rest of the line, black, with a shot of the model. Very professional looking. Underneath the model, there is what looks to be blueprints, which really give the set a "design" feel. Flipping the box over, we have some writing about the set as well as some construction details. A picture of Frank Lloyd Write adorns the upper right corner and his signature is in the bottom middle. The left side of the box has pictures of the left side of the built model, and an overhead view of it. On the right hand side, there's a faded out shot of the front of the model as well as the name of the designer; Rok Kobe. I find the top most interesting. Along with the 1:1 image, there's a part of the model in a brick-paper format that fades to the built model. Also on the top there's a box that says, "Frank Lloyd Wright Collection." Nothing to special about the bottom, just your usual warnings. Contents: Architecture sets have flaps and open much like other toy boxes, when I opened mine it looked like this. Quite full, and the "Enjoy your Building Experience" printed on the bottom of the box here, made me smile. Inside the box were 10 bags, the manual, and six 6x16 plates. Only a few parts stuck out to me, the 3x3 corner slope in sand green, the 2x1 brick with studs on one side in light bley, and the printed 1x8 tile. (Though in every Architecture set) I believe the 2x1 brick is new for this year. Here are our extra parts. The 1x1 tiles and plates are most useful to me, and there are quite a few of them. Manual: The manual is much more of a book than the usual LEGO set, it's bound and is made of much heavier paper than a usual one. The front of the manual has the same art as the front of the box, minus some of the facts about the set. On the first inside page, there's a picture of the hotel as it stands today. (As well as what was recreated in the set, minus the tourists) Continuing on, much more like a book, there's a contents listing on the second page. Underneath a paragraph talking about the destruction of the hotel, there's a painting of the hotel, and I must say while simple it looks like a grand building. As you continue turning the pages, you come across the two page spread. Exactly like the one on the of the box, but three or four times larger, it was also very hard to photograph. Each step in the manual was very clear, I had no problems telling what color was what. Here's a shot of just one of the many steps in building the model. The Build: Here I cover the first few steps. We establish the base for the hotel as well as the concrete around it. (Each of the build pictures link to a 1600+ pixel version) Continuing on, the first level is constructed, with plenty of half-plate offsets. Then the roofing over the entrance is added, and the bottom floor is completed. You then start on the second level and add some of the many windows. Finally, the roof is added, and the model completed. Finished Model: Wow, is a good word to describe the completed model. I could sit a look at it all day. The size, details, and colors really have a "wow" factor and make the model shine. Here you can see the many windows that you are built using snot techniques, really nicely done LEGO, and capture perfectly the real look of the building. The back of the model is flat, and has no details what-so-ever. But since you never see the back why put anything there? This set is big. At 34 by 30 studs the hotel has a large footprint, it's bigger than Bag End! The next several pictures are all of parts of the model that I thought had interesting building techniques or just looked cool. Here we have some of the windows and the roof, that I think works nicely together, The front entryway to the hotel is very ornate. A lot of half-plate offsets are used in this model, you can see a few here. The windows here on the side are attached with 1x1 bricks with a stud on one side, the snot gives the building a great look. This technique here isn't new, I just think that it looks pretty neat. Looking at the real building alongside the model, it's very close. I'm not sure about the decision to recreate it in tan, but it does work nicely with the green. The only one thing that could be added is the reflection pool, but that's not part of the building so I see why it wasn't included. Conclusion: There's no one good word to describe my feelings for this set. It's large, accurate, and I had an amazing time building it. I was mostly surprised at how complex the model really is, though I'm fairly sure this is common for Architecture sets. 1188 pieces make this the second largest set in the line, and a very good introductory set for it. Again, I'd like to thank LEGO and Bonaparte for the opportunity to review this set, I had a great time! Ratings: Playability: 9/10 This isn't a set you can play with, however, it would make a great model to put on your desk as a conversation piece. Design: 10/10 The design is top notch. It matches the real building nicely and I find no flaws. There are a variety of techniques in this set that I thought were interesting. Price: 9/10 I didn't pay for this set, but for any set with this large if a piece count anything between $100-$130 is very fair. Parts: 10/10 There was a huge selection of tan light bley, and dark bley tiles and plates. These sets are known for that but I didn't realize it until I got one. Total: 38/40 An excellent score, I would pick the gem up if you've been thinking about it, or even if you haven't! Like this review? Want to learn how to make good reviews? Then join the Reviewers Academy!
-
I've built this little MOC last year, after my actual trip to China. Hope to order some parts via Bricklink to built more accurate one... Also, I don't like these photos... Of course, it looks much better in real life and on preview pics with low resolution.) More photos on Flickr
-
Wrest Point Casino After picking up a few Architecture sets at 50% off I was inspired to try one of the local iconic buildings. The scale is off and a few details have been omitted but I'm pretty happy with it for now. Wrest Point Casino by Taz-Maniac, on Flickr Wrest Point Casino by Taz-Maniac, on Flickr
-
Well, this was going to be my entry for my MOCoff with Flare. But he backed out two or three days before the deadline, so I won by default. I'm quite happy with how the MOC came out, and yes it is supposed to only be viewed from the one side. Flickr Set Facebook
-
Hello folks, Its been a while since I post something in this section, but this time is over, and I restart this in big! Just to let you know, I've been working on some house modeling since 3 months and I can finally show you the first results of that hard working session! In this period I was not able to built as I wish, I have (again today) deal with my schoolar projects, which means, I cannot run Autocad and POVray at the same times... Because my motherboard card will really not appreciate it! I'm trying many different things and I'm learning how to work with Povray, so for the moment I'll expect to show you a new creation in begining of February. I also at the end ot this post present you a personnal project, that I wish will interest some of you, city builders. So without any word on this, I will now show you my first creation in LDD, I expect finish the hand-build soon. So I present you: The Lumber House Here's the text, if your not able to see it clearly (due to size limitation): "The Lumber House is listed as a pioneer in the way of building green homes, because in addition to the concept of sustainable construction, it is equipped with the latest domotic advance. The home is warm and perfect for any meetings with relatives or simply to relax and admire the view. Being on an elevated foundation gives the house an impression of lightness. Although it is a single-storey, it has a high ceiling in the living room to enhance the supply of light. The house roof is divided in two sections, with a green roof on its upper part, reducing heat loss caused by the large windows. The use of timber fills our senses, acting more than just siding and structure. This model is mobile and thus, respectful for the environment, only one base is needed. The Lumber House can be perched on top of a hill as the same ways it would on riverside." The house has: - 1 kitchen - 1 living room (with a fire place) - 1 bedroom (option with 2) - 1 W-C - Enought storage (inside and outside (the red square)) Notice the main door is a little hidden, the front view has only one window, which gives a really good privacy look and let the other sides have all the sunlight. Notice also the "frosted" window in the second perspective view for the washroom. So I now presents you different views: Persective Front and top Lateral and perspective 2 To see the pictures / panels in a bigger scales: http://www.flickr.co...otos/harton888/ Comments and suggestions are always welcome! --------- Okay, I hope you have like what you just saw. Now I want to talk to you of the group I create, a groupe name: It is a simple groupe created to regroup some study and realisations about Lego architectural and design creations! If you have some techniques you can share it to us, if you have made some really cool house, institutions, shop or any other types of building, and that it is good looking or you have made a good presentation work, well add it to the group. I always said do it as a porfessionnal would do (you're the professionnial!). If you have some cool city creations, such as exterior parts, bench, park elements, etc, show us. Because we have, as citizen of every city around the globe, a quest to accomplish, which is to made our city evole and progress in the good way. This means, new involvements, new way of doing thing, which results to a new desgn a new architecture, because adding trees in our streets will not gonna save us if we don't do any other efforts. Let's talk about these new creations, let's invent them, let's build them in Lego first, let the artist in you save us. Show us what you are able to do and put it on EB to let the others know and add it to the group solution. The only requirements, are to have fun and to have a clean presentation! The future is now! Link for the Evolocity group: http://www.flickr.co...oups/evolocity/ Thanks, Harton
-
Hi, this is my first post at this forum, and also my first try on some more serious Lego building. I am fascinated with the LEGO Architecture-series in the amazing way the manage to capture the silhouette of a building, whit a relative “simple” Lego construction. I have now used two days trying to transform my local church into a Architecture-model. I have tried different techniques, and rebuilt it several times. What do you guys think now? Here is the first build which I was not happy with: Strandvik kyrkje.lxf
-
B-OV-38B Hi. I've just finished a MOC which I've been working on for a few months. It's a smaller-than-minifig scale (not sure of the right way to describe the scale, it's much larger than normal microscale stuff) model of the church in London where I had my wedding reception last year. It was built in the late 1700's and designed by Hawksmoor, a contemporary of Christopher Wren. Here's photo of the church in real life (not mine, thanks to the photographer) And here is it on Streetview: A couple more views (There are more including WIP on my Flickr pages): Comments are appreciated. I have just over a week, and then I'm going to give it to my wife (she doesn't know what I've been working on), so I'd like to make it as good as possible. I'm particularly troubled with the spire, which goes from 4x4 studs and is 14 or so studs high. Plates don't seem to be made with enough of a sharp angle, so I've gone with the current design, which does have holes from certain views. Thanks for looking. Lee
-
Hello AFOLs, Now that I have fully restart my classes, I have time to post new MOCs. So it will be a short and simple explanation. I made this little project in my "free time" about 2 months ago, during a big rush, so during the night ... instead of sleeping ... I'm sure many of you will love it and even recognize them selves, because I do not think these situations are the only for architecture and school projects! They can be easily be live at your office or in your family. So, it is simply some vignettes representing the number of projects and especially the reaction and how we deal with it! Now that the project is complete, check out the last Level 6-7-8-9 and 10!! Notice: In each vignette you will find a clue of the new one (a little concept), could you guess what is it? Projects, projects, projects, the overall picture! Usually at this point everyone is happy and work on their favorite hobby! Or as said, do nothing. Because some of you notice the flute on my previous MOC. Music is a good way to pass time. Cheer! Because you start working, you thing you will work hard for real, but it is just an illusion, it will pass... At this point, you begin to realize that you should start working because new projects keep entering and now you hunt time! When you read that line over and over... ---------------------------------------------------------------------------------------------------------------- Okay, I have finally finish it, so I hope you will enjoy and maybe survive till the end! So place for Level 6-7-8-9 and 10! --------------------------------------------------------------------------------------------------------------- That's the question! Well you'll sleep sometimes, later... Next month. Only because the taste is good, note because you need one! Lonelyness you getting use to it. The ultimate effort, reach your limits. At this point... well I think you get it! The gallerie: http://www.flickr.co...otos/harton888/ ---------------------------------------------------------------------------------------------------------------- So, how many projects can you take? Do you recognized yourself, in these situations? Your comments and suggestions are always welcome! Thanx, Harton
-
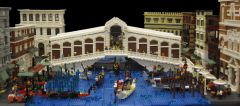
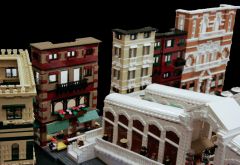
From the album: Rialto Bridge
Probably the most visited and most photographed bridge in Venice, (Ponte di Rialto) opened in 1591.Connecting the districts of San Polo and San Marco across the Grand Canal in the heart of the city, the Rialto Bridge has always been a busy crossing over the canal.The bridge is formed by two inclined ramps covered by a portico with shops on either side. This area has long been a market place for Venetians and Tourists.© Anu Pehrson
-
-
-
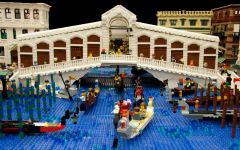
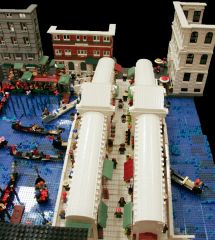
From the album: Rialto Bridge
Probably the most visited and most photographed bridge in Venice, (Ponte di Rialto) opened in 1591.Connecting the districts of San Polo and San Marco across the Grand Canal in the heart of the city, the Rialto Bridge has always been a busy crossing over the canal.The bridge is formed by two inclined ramps covered by a portico with shops on either side. This area has long been a market place for Venetians and Tourists.© Anu Pehrson
-
Hello everyone. It seems the inspiration for my Revenge of the Sith Community Build entry came far quicker than it did for The Phantom Menace Build, and it didn't come at all for the Attack of the Clones Build (), so I set to work straight away when the idea came to me last night. Over the past week I've been rebuilding and updating my Architecture sets for the Eurobricks Official Set LXF Index, and so I suppose I was still in that frame of mind whilst deciding on what I would build for this project. I therefore decided to combine two of my favourite LEGO themes: Star Wars and Architecture, and create the Jedi Temple in the style of a LEGO Architecture set. It is, of course, much bigger and less accurate () than any previously released Architecture sets, (though I'm pleased to say that I think it may be more accurate than some past Star Wars sets ), but I still think it fits the theme well enough. Even though it's a digital model and the Laws of Physics don't have to apply, I tried to build the model in a way that made it structually sound enough to be built with real parts, although many are not available in the colours I used anyway. The building is hollow with no interior, save for a few supports. A close-up of the top and spires. A close-up of the main entrance. -------------------- Front and plan views with part outlines. I spent a couple of hours last night and a few hours today making it, so it is a quick MOC, but hopefully not rushed and sloppy. It is comprised of 2424 parts (coincidentally 24 is my favourite number! ). I'm aware that the scale is not right in certain areas: the ziggurat is probably too tall for its width, and the towers on top are probably too large, and so I may modify it a little more before the deadline, so I'll consider it a WIP for the time being. LXF File Please do not use the file or images without my permission. Thank you for looking. All comments are welcome. PS. This model is now uploaded to LEGO Cuusoo here. Your support and comments are greatly appreciated!