Search the Community
Showing results for tags '9v'.
Found 135 results
-
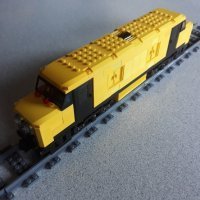
Which 9v freight train set would you prefer 4564 vs 4563 ?
jaesroe posted a topic in LEGO Train Tech
Hi, I have recently started my 9V train journey after graduating Modular set. This 9v Train...wow...such an amazing theme and i can't stop searching and watching videos related to this hours and hours...every day...Among the great sets of lego 9v trains such as 4558, 4551, the freight train sets are also very interesting and attractive, mainly due to its unique design and cargo wagon, loading various cargos and playability I assume. So, in my opinion, both 4563 and 4564 are the two best freight trains sets of 90s 9V era. I wonder which set is your preferred set if you have to choose one set? and what is the reason that you chose that set? Any comments, thoughts about those two set would be appreciate!! Thank you! -
For the last 5+ years I have been running a train under my Christmas tree, powered by a LiIon PF battery box and double motors. I recently answered a question on Bricks.stackexchange.com where someone asked for advice on which power system to buy, and the answer I had to give surprised me so much, that I went ahead and changed my own strategy immediately as well. I am now the proud owner of an oval (16+ curves, 12 straights) with a L+R set of points of 9V track, including transformer, wall wart and power-to-rail connectors. Total cost were around $120, however, this is after deducting the going BL price for other train components that came with my purchase. If I didn't exclude those, my total would have been $190. (All US dollars). This prompted me to do a quick compare on the costs of a fully working train oval for under a Christmas tree. The Oval consists of 16 curves and at least 8 straights. The cost of whatever Christmas train you choose to run is not included: Powered UP: Battery Box: $50 at LEGO S@H, $35+shipping at BrickLink (only 1 US Seller) Motor: $14 at LEGO S@H Wheels & Axles: ~$3+shipping on BrickLink for 2 axles and 4 wheels Decorative sides: ~$2.50+shipping on BrickLink Tracks: 1 Track Pack (8 straights, 4 curves): $20 at LEGO S@H, $16 on sale occasionally at other stores; 12x Curved tracks: $6+shipping at BL or: Buy set 60197 ($160 at LEGO S@H, occasionally on sale for less at other stores (e.g. currently $128 at Target) plus 4x Straight track ($7+Shipping on BL) - used ones run about the same cost as the promo prices. Depending on how you count, this is $100-$160+tax for this setup, and you need to keep a mobile phone around (or pony up another $15 for the remote control), have to keep the connection alive, and will have to replace/recharge batteries every 2-3hrs. Power Functions: Battery Box: $13 on LEGO S@H ($15+shipping on BL), or the LiIon pack which has no US-based sellers currently neither on EBay nor BL, but should go for $100-$150 if available. IR Receiver: $10+shipping for a used one on BrickLink Decorative sides: ~$2.50+shipping on BrickLink Tracks: 1 Track Pack (8 straights, 4 curves): $20 at LEGO S@H, $16 on sale occasionally at other stores; 12x Curved tracks: $6+shipping at BL or: Buy a retired Power Function set (used) such as 60051, which with patience can be bought used, complete on EBay for $125-$150. You'd need extra straight track though (see Powered Up), which runs ~$7+Shipping. Again, depending on how you count, this is a $70-$150 purchase. Likely the cheapest option currently, until prices for Power Functions start skyrocketing once all components have officially retired. You get 2-3hrs run time, and unless you add $100 to your total for a LiIon battery box, you will need to buy rechargeable batteries and a charger (or cycle through alkaline AAA's like a madman). 9V: Get a used but working copy of 4561 ($100-$150 on EBay) Buy some extra straight track: 4*$5+shipping on BL (let's call it $25) Total: $125-$175 Suddenly the convenience of never having to change batteries or recharge with a $150 9V purchase sounds pretty attractive, doesn't it? Quite fascinating, for a product that has been discontinued for almost 15 years.
-
Hello dear Lego fans, After having signed up here in the Eurobricks forums in 2011, I posted a new thread in the "Hello my name is..." section about my plans to create my own Lego City layout. Now almost 9 years later, I can finally show you some of the progress that has been made just at the beginning of the new decade :) Good things come to those who wait. Renovations on the attic are finally complete (apart from the lighting) and we now have around 110 m² to unleash our imagination. The current plans of the Lego city layout add up to around 60m² in size and they are, as you can see in the video, far from finished. However, I thought you might be interested in some of the things that my girlfriend and me were designing in the last couple of days. The name of the city is still unknown, but the overall design has started to take shape with a downtown area, which includes all the modulars, and shops, a residential area, an amusement park, a winter village, a train yard and a harbor/beach area. I would also like to add an airport to the city and some of the classic monorail tracks have been placed already. We are also getting into MOC a little bit and we will add our own creations to the layout as soon as they look nice! The commentary of the video is in German, but I am trying to add English subtitles into the system. Please let us know what you think here in the forums or in the comments section of YouTube. I will keep you posted on future updates if you like :) Note: All of the parts used in this layout are original Lego parts, except for some of the baseplates. I thought that lime green in the Hogwarts castle area might look cool, but I will probably exchange it for regular grass green baseplates in the near future. Thank you so much for taking a look! :) Christof
-
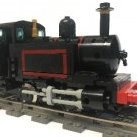
This little British-style tank engine is built around an old 9v train motor. I've had this model up on Flickr for some time, but just got around to posting it here. It's unfortunate that the 9v motor doesn't accommodate moving rods, but I can always pretend the engine has its brakes constantly applied to control those troublesome trucks! Thanks for looking! Soli Deo Gloria
-
I was discussing this afternoon with my fellow club members about the 10183 Hobby Train and the whole Save 9V campaign from 2006-2008. If I recall correctly, at one point in time, before ditching the 9V Line all together, there was an idea that Lego would continue the 9V line as the Hobby Train Line, with the RC line being the 'kids' line. There were rumours about other radii and all that kind of stuff. You know, like the good old 12V times. Or, at least... That's how I remember it. But my fellow club members say I'm making up stuff, and that I remembered this wrongly, it was just the Hobby Train 10183, and nothing more... And for some reason I can't find anything about the whole Hobby Train Line, because internet is being clogged with talk about 10183 (turns out 15 years later it DOES sell!) instead of the whole Line. So, my question is: Whatever happened to the Hobby Train Line?! /Edit: found this gem in my collection, seems my mind at least wasn't totally playing tricks on me!
-
Hello, May i present my 9V bar layout, features some of my sets from the 90s, some lightly modded, and some bridges i made. Train delivers drinks to guests at parties.
-
Hi all, wanted to share this MOC as I "teased" it many years ago but did not finish it until now. I started building the B1 in an effort to build the smallest possible 1:48 scale PF model, but ended up building the slightly smaller A6b, and then later on the even smaller EMD Model 40. Since then the B1 has been sitting in a folder on my computer gathering virtual dust. Last year someone inquired about the model and I decided to finish it once and for all, and this is the result: This is a pretty simple model just by virtue of the small size: the build is basically the same as that of the A6, just larger due to the larger scale size of the locomotive. It actually has a lot of volume compared to something like the Model 40, but the shape of LEGO motors and electronic components means that you can basically never fully utilize the 6-wide space in an 8-wide model. The part of the model that stumped me initially was connecting the massive side frames to the body. I had tried a couple times to find a solution over the years, but I finally cheated by cartooning the tanks on the sides of the locomotive with plates such that I could fit structural components behind them. The pantograph can also move up and down! Anyway, here is my video going into more detail about the model, as well as a Brickshelf gallery (when moderated). EDIT: Instructions for this model are now for sale on Rebrickable: https://rebrickable.com/mocs/MOC-48349/NonsenseWars/148-pennsylvania-railroad-b1-power-functions-9v
-
On my new layout, I have now displayed four tracks that are operated individually with a 9V speed regulator each. All power connections to the rails have been checked w.r.t. polarization. Conceptually, the setup is equal to the Lego Train 9V Extreme display, including crossover swiches linking these tracks together. The basic idea is to run trains on these four tracks independent from each other in elective directions. The first tests showed no problems. However, these initial tests were performed with one train at a time. Recently I started to run several trains at the same time. Then I discovered that there seems to be some kind of interference between all four tracks. When running trains in opposite directions, the engines slow down or come to a stop. Notice that all crossover switches are in straight position. When operating the four speed regulators, they work only on the designed tracks, i.e. there is no visible interference at all in terms of other engines on other tracks would start running simultaneously. I just don't understand this problem, particularly considering the fact that I have never experienced similar problems on the Lego Train 9V Extreme track. Any advise to get this problem solved would be highly appreciated! Below a schedule over this layout with positions of the power connections to the track
-
I'd like to present my latest locomotive, loosely based on various British 0-6-0 goods engines. This MOC is a first for me in several ways...it's the first locomotive for which I've attempted to print decals, and the first I've built using BBB wheels. I'd like to thank @ScotNick for graciously granting me permission to use his magnifying glass technique for the front cab windows. Lord Dudley is named after a 15th century politician and its number is an homage to the USS Voyager (NCC-74656). Lord-Dudley-1 by the chestertonian, on Flickr Lord-Dudley-2 by the chestertonian, on Flickr The 3-axle tender holds a 9V motor (the third axle swivels to go around curves) and features the classic BR "lion-on-a-unicycle." I don't have a proper label maker, so I printed out the decal on regular paper and covered it with a slightly larger piece of adhesive laminating sheet. This leaves enough overhang of the adhesive layer to stick to the sides of the tender. Note that only the logo and the red lining are printed; the white lining is brick-built. Lord-Dudley-3 by the chestertonian, on Flickr The tender holds a battery box to power the locomotive lights. The batteries are accessible by removing the coal. Lord-Dudley-4 by the chestertonian, on Flickr Lord-Dudley-5 by the chestertonian, on Flickr Finally, Lord Dudley's driver and fireman pose along the line by their engine: Lord-Dudley-6 by the chestertonian, on Flickr Lord-Dudley-7 by the chestertonian, on Flickr Thanks for looking! Soli Deo Gloria
-
After last summer, I noticed deteriorations of current transfer from rails to 9V engines. This is due to coatings of rail plates, something that occurs over time. Normally, I clean rails/railplates manually. However, in the case of the 9V Extreme Track, this is hardly possible since many sections are difficult to access alt. out of reach. The only remaining expedient for cleaning is a highly efficient rail cleaning train! The latest version of my rail cleaning train consists of three different types of cleaning units: Cleaning unit type I: Total weight: 760 g Cleaning surface: wooden blocks covered with three layers of fabric Cleaning unit type II (4 units): Total weight: 250 g Cleaning surface: Masonite board Cleaning unit type III: Total weight: 380 g Cleaning surface: Cotton wool rolls (normally used by dentists ...) Because of the heavy weight in combination with considerable friction, I have to operate the rail cleaning train in two versions. (It feels like driving a car with applied handbrakes ...) Both versions include six locomotives 7939 with two 9V engines each: Rail Cleaning Train version Alfa: Rail Cleaning Train version Beta. Does it work? This is how the undersides look like after the first cleaning rounds: After several rounds through the entire layout, the current transfer between rail plates and 9V engines is back to normal again.
-
Hi everyone. I was wondering if anyone has any experience with taking a 9v battery plug and joining it with a PF wire. Just like this MiniZip. Any suggestions, tutorials, or discussion is much appreciated. Thanks.
-
Some time ago I posted this topic of a layout using only parts from the 9V era. That layout has since been torn apart to make way for an improved version. Since it's basically a complete new layout (the water tower is the only part that escaped unscathed), I thought a new topic would be justified. This time the layout has working (non-Lego) lights. Many thanks to @LEGO Train 12 Volts, whose engines with working lights inspired me to try it myself. The engine and tender are permanently coupled with a technic beam to protect the wiring. I just happened to find that a battery box for 4 AA cells fits nicely in a 4-stud space. The switch is visible in the coal. IMG_0850 by the chestertonian, on Flickr IMG_0852 by the chestertonian, on Flickr IMG_0851 by the chestertonian, on Flickr The passenger cars are now 30 studs long and have SNOT windows and removable roofs. IMG_0854 by the chestertonian, on Flickr The sleeping car interior: IMG_0855 by the chestertonian, on Flickr The dining car interior: IMG_0856 by the chestertonian, on Flickr An overview of the layout: IMG_0857 by the chestertonian, on Flickr The station includes two passenger platforms, a pedestrian bridge, and a maintenance shop with full interior. IMG_0844 by the chestertonian, on Flickr IMG_0845 by the chestertonian, on Flickr IMG_0846 by the chestertonian, on Flickr The signal tower: IMG_0843 by the chestertonian, on Flickr The freight platform: IMG_0836 by the chestertonian, on Flickr A small farmhouse with a horse-cart: IMG_0847 by the chestertonian, on Flickr Nearby, a shepherd and his faithful sheepdog watch over their flock. Thanks to @soccerkid6 and @LittleJohn for their versatile canine design! The sheep are based on a design I found here. IMG_0848 by the chestertonian, on Flickr A tribute to Ferdinand: IMG_0839 by the chestertonian, on Flickr The crane's hand crank can be locked in place. The piano was reverse-engineered from one I ran across online. IMG_0849 by the chestertonian, on Flickr Finally, I was inspired by the Switch Modification topic to connect a switch to a signal. Thanks for looking! Soli Deo Gloria
-
This is the latest contribution to my Lego train collection: another Trans Europ Express (TEE) VT 11.5, this one 7-wide and 2.5 m long. (Still remember when I visited the railway stations in Basel as a young guy and admired these legendary trains with their monstrous locomotives). This train with four 9V engines is a (slightly modified) copy of @HoMas original that was launched last fall. The length of locomotives and coaches is 52 resp. 48 studs. (The significant overhang of the noses resulted in extensive modifications of the 9V Extreme track, particularly w.r.t. polycarbonate railings). Even this train is equipped with PF LED (powered by two 9V batteries) for the front and end lights. Button cell powered mini LED string lights are used for interior lighting in each coach with the benefit of no cables between the coaches. The TEE VT 11.5 project has been my most challenging, complex (and most expensive …) Lego train project so far. The result however is simply breathtaking and magnificent! What a magic experience to watch this train in action! Extreme coping with extreme …. And what an exciting and instructive journey it has been to build this iconic train – the crown jewel of my train collection! A big thanks to Selander and HoMa for all advice and help! And a big praise to HoMa for his incredible MOC, one of the most beautiful and most spectacular trains ever built in Lego. Big Brother and Little Brother ... (Copyright Ulrich Budde) And this is how the train looks like in reality. (The VT 11.5 was actually awarded a gold medal at the Expo 58 in Brussels “for outstanding technology”!)
-
I have the pleasure to present a Rework of my first MOC After several years I had to redesign a locomotive with more bricks, more length and more realism and more functions Length: 58studs Wide: 7 studs Weight: 1050g Pieces: around 1200-1300 Motor: 9v motor + PF train motor linked with a PF extensión wire This Scheme is famous by the Big locomotive series and number painted on sides, I could put a vinyl sticker but I decided to go further and make all lettering with pieces with all limitations of this More details Grill effect using Dark gray and DBG This locomotive is not going to run in R40 as is ridiculous due the length, but is necessary to me to run trough Lego switches so, boguie has all front attached to pass without problems trough them. I used custom lightning using SMD leds and coil wire to include realist lights with no pieces modification. And also I included a LIPO battery with USB charging, all inside the locomotive MORE PICTURES IN FLICKR ALBUM
-
[How to:] Fix frayed wire on Lego 9v track connector
Unfinished_Projects posted a topic in LEGO Train Tech
How to: Fix frayed wire on Lego 9v track connector Materials: Frayed wire New wire Heat shrink crimp connectors Heat shrink tubing Wire strippers Razor blade Lighter or heat gun Step 1: Cut wire between track connector and ferrite core (black cylinder), cutting as close to the ferrite core as possible. Step 2: Cut wire at similar length on the controller end. Step 3: Strip back rubber insulation from controller end, track connector, and new wire. Step 4: Crimp wires together, sliding the heat shrink crimps as close to the connector as possible. DO NOT FORGET TO SLIDE HEAT SHRINK TUBING ON, IF YOU ARE USING IT. (I forgot for one half) Step 5: Use lighter or heat gun to melt shrink tubing, again sliding the heat shrink as close to the connector as possible. Step 6: Repeat for wire between track connectors if needed Step 7: Test *Disclaimer* There may be a better way to do this. I simply used what I had to fix the problem. No guarantees that this will work for you. Thanks for reading and hope this helps someone, Unfinished_Projects -
After many years of dreams, reflections, planning (starting Winter 2011/12), testing (starting fall 2013) and finally building (starting spring 2014), this project has finally crossed the finish line - probably one of the world's most extreme and most challenging layouts for Lego Train 9V! An indescribable feeling, great satisfaction and relief - and what a fantastic experience! First some introductory remarks: This is not a "usual" but rather a conceptual layout with analogue power supply and -management, without landscapes and buildings (except one train station). A particularly sophisticated construction with four themes: a one-track vertical climb, two double-track climbing spirales, a double-track high-level track 2.16 m above floor level and a rail yard. The layout is intended for Lego trains equipped with standard Lego 9V train engines. It is built with standard Lego 9V rails and points, some of which are modified. So are all four 9V Train Speed Regulators. With the help of points, the layout can be segmented into four sections (Loop A - D) which make it possible to run four trains simultaneously, independent of each other, with up to ten engines each. However, this requires more hands... To avoid/prevent spontaneous decoupling, all my trains are equipped with super magnets. I also would like to take this opportunity and thank all of you who have contributed with support, valuable advice, and encouragement during all these years. Without all this help, this project would have remained just a dream. And this is how it looks like: More pictures, facts and videos will be added to the first entry of this thread Addendum # 1: Technical Data and Details: Track lengths: Total track length (incl.sidings and dead-ends): approx. 173 m Total "Tour" length (from start to start): approx. 105 m Loop A (High-level track 1/High-speed track): approx. 32 m Loop B (High-level track 2): approx. 29 m Loop C (Climbing-wall from level 85 to traverse on level 175): approx. 46 m Loop D (Level 50 and level 85): approx. 21 m Rails: 949 straight, 263 curved and 37 modified (4, 8, 10 and 12 straight) Points: 13 standard points (whereof 3 are operated electrically) 6 crossover points (4) 11 half-curve points (1) Track Design Program: Track Designer Application (R) version 2.0 by Matthew D. Bates (Matt's LEGO (R) Train Depot) Electrics/Electronics: 1 Power Supply Unit VOLTCRAFT EP-925, 3-15 V(DC), max. 25A 4 modified Train Speed Regulators (4548) with LM350T regulators, 3A diodes, outside heatsinks (with a thermal resistance of 1.9 K/W), mini-fans and digital thermometers to measure temperatures inside the boxes 4 Control-boxes to operate 12 points electrically. The boxes are equipped with "memory-sticks" to memorize the position of each point since these are out of reach and sight. 12 PF Medium engines mounted on the electrically operated points 52 Power connections to rails 1 Control-box to selectively turn on/turn off 11 power connections Approximately 1000 m cable whereof approx. 850 m RK cable 1.5 square mm Märklin pins and sleeves 1 LED strand (4 m) with dimmer 1 IR-thermometer to measure heatsink temperatures Construction: 7 levels: Rail yard level (50 cm above floor level) Train station level (85) U-curve level 1 (115) U-curve level 2 (145) U-curve level 3 (175) Eaves level (195) Top-level (216) Max. gradient: 83 per thousand (The gradients are built in such a way that all trains can manage to get uphill and downhill with adhesion, i.e. without cogwheels). Min. clearance: approx. 12 cm Train shelves: Shelf system: Algot (IKEA) 15 train shelves type A (102x11x1.6 cm), 8 straight/shelf 27 train shelves type B (166x11x2 cm), 13 straight/shelf 12 train shelves type C (217x11x2 cm), 17 straight/shelf all train shelves are strengthened with 22x45 mm wood strips All in all 54 train shelves with a total length of 86 m (678 straight) and 108 railway buffers 2 "Trains-in-Transit" (TIT) Trolleys (Algot) Room dimensions: 5.5 x 7.3 m Occupied floor space (incl. train shelves): approx. 9 square m Construction materials: Wood (45x45 mm) and wood strips (22x42 mm) MDF boards (6 and 10 mm) Glass shelves (6 mm) Polycarbonate strips (3 mm) and rivets Cable conduits Steel cords (3 mm) with wire locks Perforated plates and angle irons Cable ditches and cabling towards cable terminal Cable terminal Power supply unit and cable terminal box Control center Addendum # 2: More pictures with some of my MOCs Glacier Express with Matterhorn in the background Trans Europ Express (TEE) "Rheingold" and TEE-VT 11.5 in alpine environment Swiss "Crocodile" (10183) with heavy RhB cargo transport in the steepest part of the entire track - a gradient of 83 permille! "Uppsalapendeln" in the midst of the Swiss Alps - imagine if this were for real .... Emerald Night on its way up to the mountains Track Cleaning Train at Knivsta Station - ready for new missions Track Maintenance Train on its way for a new mission Addendum #2A: Train shelves "Trains-in-Transit" (TIT) Trolleys with two Maersk and one TTX Train section(s) ready for transit Addendum #3: Videos https://www.youtube.com/watch?v=47CqLOQKGLM&t=10s
-
Some of you may recall a few months back that I posted an LDD MOC of a locomotive using only parts from the 9V-era (linked here). Since then I have built the locomotive in real bricks, along with a layout using the same premise: to examine what I could build using only bricks that I already have, all of which are from before around 2005. If you compare it with the render in the original post, you'll notice that the engine has been modified to look more American than European, and the coaches have been elongated. The base is a 4' x 4' piece of plywood; if anyone is interested, Krylon Gloss Emerald Green is a very close match to Lego green. IMG_0662 by the chestertonian, on Flickr IMG_0663 by the chestertonian, on Flickr IMG_0664 by the chestertonian, on Flickr IMG_0670 by the chestertonian, on Flickr The layout is set in the early 20th century as the west is beginning to settle down. The town of Brick Butte fell on hard times after the local Army post was disbanded in 1896. Fifteen years later, there is little left but a few buildings (some built from materials salvaged from the abandoned fort) and a few dozen residents. IMG_0665 by the chestertonian, on Flickr I'll introduce you to some of the prominent citizens: Count DuCoup moved to America after his nation's defeat in the Franco-Prussian War, and eventually settled in Brick Butte. IMG_0666 by the chestertonian, on Flickr Hank Solo, as usual, is engaging in some shady transactions... IMG_0667 by the chestertonian, on Flickr Sheriff Quentin G. Jensen and his deputy, Juan Quenobi, patrol the dusty streets. IMG_0668 by the chestertonian, on Flickr Retired Major General Ben Caine O'Bee trains his young neighbor in the use of the cavalry saber. IMG_0669 by the chestertonian, on Flickr Meanwhile, state senator Paul P. Dean visits the town in his newfangled motorcar... IMG_0672 by the chestertonian, on Flickr Finally, here's a video of the train running around the layout. Thanks for looking! Soli Deo Gloria
-
 Dear LEGO® Train Fans, (You can found a german translation here.) We’re planning a new event for lego train fans, who want to be different then other lego train exhibitions and so we're proud to present the “Bauspielbahn 2019” in Schkeuditz, a town next to Leipzig, Germany. Schkeuditz is next to the Leipzig airport and it’s easily accessible via the Autobahn A9 and A14. "We" - these are a handful of lego train fans from leipzig. In last five years we were part of a lot of lego and model train exhibitions all over germany. But now it's time to cook our own soup and we want to make some different like other train shows. the 'Bauspielbahn 2019' will take place from 14th to 16th June and is primarily intended as a event for LEGO railway fans to get to know each other, assemble a huge common layout and to play together. The exhibition will be open for the public on 15th and 16th . Welcome is the entire range from 4.5V to the new Powered up, from the more classical station to the shrill fantasy landscape. As a single model or contribution to the common layout. For the joint layout, the assembly is planned for Thursday (13th), single layouts/mocs can be build up on Thu or Fri. Over the days, we’ll do sightseeing, have barbecue in the evening (depending on the weather) and introduce every tourist trap in Leipzig to you. You can camp on the enclosed grounds or park a caravan there (toilet on the premises available, shower unfortunately not); Hotels in different price categories are available in Schkeuditz, we are happy to help you with addresses. Please don’t hesitate to ask questions, should any occur. Invitation to a Train Enthusiasts Weekend From 14.06. to 16.06.2019 Goal We would like to use the weekend to assemble a common train layout, with LEGO fans from everywhere contributing their modules. Anyone can take part, as long as the segments meet the requirements listed below. A prior registration is necessary to enable us to plan the layout of the railway. Any kind of modules with e.g. train stations, connection tracks or just regular tracks, landscapes etc are welcome. (Maybe you know the modelrailroad - Meetings like FREMO - or others.) pictures are from our lastest exhibitions. but the layout of the get-together-weekend / Bauspielbahn 2019" will look some different, of course. Location We have gained the opportunity to use the Historic Tram Depot Schkeuditz as fitting venue to assemble our modules. It’s not just its history that makes the old depot a fitting location, but also its size. The available hall area is about 1000 m2 and well lit by skylights. Exhibition The event will be open to the public during the weekend. Aside from spectating the traffic on the main installation, visitors will also be able to see single exhibits with models or segments that couldn’t be integrated. Common layout We will be contributing multiple segments to combine with yours for a large installation with diverse train routes. Modules that fit our specifications would be appreciated, but are not necessary. The detailed methods of construction and basic requirements will be published during the next few weeks. However, segments with differing designs can still be utilized. The main routes of the common layout will consist of 9V tracks, operated with the classic speed regulators. Multiple electrically separated routes are planned, to allow for power supply for the individual modules and to enable the simultaneous operation of multiple trains. Non-electrified tracks can, depending on the available amount, be used for connection tracks or individual routes. The same applies to 12V tracks. Differing types of tracks could also be connected via train stations. Every module of the collaborative layout will require at least one track with possible connections to other modules, ideally on multiple sides. Exceptions are welcome, but need to be agreed upon on an individual basis. However, the final layout can only be determined after all participants have registered. Individual modules and installations. Any model related to trains is welcome and can be displayed on additional tables. Registration Participants can register with their name and a short model/modular description until Sunday, 31.03.2019 at eisenbahner@lbrick.de. We reserve the right of admission. To allow for the best possible planning we require specific information from you. After initial registration we will send you a form for the specifics of your modules. Please fill it with all the information about your contributions and send it back to us. I hope we will see us in June. Michael / MTM
 -
Hi everyone, I've been mainly lurking and commenting occasionally these last couple of years because I've been busy building my latest layout, and rather than post WIP pictures as it went along I've been taking stills to put together into a time lapse video of the whole build. Here's a photo of the layout as it stands. Whole Layout (DSC09786) by andyglascott, on Flickr The video is on Youtube. Building started in December 2016 and for the first 8 months or so was fairly quick, then I got to the point of relying on monthly Bricklink orders. There is still a bit of work to do, particularly on the station, which as you can see is in a corner.... WIP Station (DSC09747) by andyglascott, on Flickr As well as waiting for monthly Bricklink orders, progress has also slowed as the birth of our first approaches next month, so I figured even though things aren't finished, if I don't post this now it might take a while to get to a "finished" stage! The top level of the layout is 9v, with just 2 trains on it, the bottom is 12v with 7 trains, 3 of which can run at any time (there are three 12v loops on the bottom). Enjoy. Andy
-
[MOC] Dual-voltage (9V-12V) GySEV Vectron locomotive
Ashi Valkoinen posted a topic in LEGO Train Tech
Hello all, I'd like to introduce my latest MOC, the Siemens Vectron locomotive of GySEV/ROeEE railway company. These locomotive appeared only months ago on Hungarian rails, the Austrian-Hungarian railway company, GySEV/ROeEE bought 9 of these with different equipment. Some of them are dual-voltage and run under 25kV, 50Hz (Hungary) and 15kV, 16.7Hz (Austria), some of them are capable to work with DC supply as well, and 2 of them with the two different AC-supply will get diesel units inside to ensure the locos can move on industrial tracks not electrified at all. When these locomotives started to appear I designed it in LDD, there was a little competition between Hungarian LEGO train fans with the design. I was the first who finished the virtual build and I loved it, so I decided to build it as soon as possible. This was the first versions, but only AC-DC locomotives have 4 pantographs, the AC-only types have only two of them. I'm quite proud of the angular green tile in the side pattern and also the angled front needed a little thinking around. I started to love the old hing plates with two and three teeth - these teeth do NOT brake the line of the hinge plate and the whole LEGO part fit into less space and easier to build other things on the top of these bricks. The slots for lights are also capable of to be lit by LEGO LED lights - another good invention introduced first in my Stadler FLIRTs to use the flexible exoforce tubes which are capable of bringing the light of PF LEDs where I need that light. You may ask why is that M-motor hanging around - it has a great importance in this model! As the real thing with two different AC-supply, my Vectron works under two different LEGO-voltages - it is compatible with 9V track and 12V track as well! The M-motor switches a polarity switch brick, which cuts off 12V pickups from 9V train motor's contacts - when the locomotive runs in 9V mode, the pickups for 12V track could touch the same rail when going through 9V points, and the loco could short circuit herself! When the loco runs in 12V mode, the polarity switch is ON, and the 9V train motors are supplied from 12V track. At the other end of the locomotive there is an another M-motor - it cuts off the 9V train motor from the output of the controlling SBrick - it won't be a wise idea to power that SBrick both from battery box and both from the 9V track, through its output... Look at the next image, how it works: So if the locomotive reaches the end of electrified track (12V or 9V), it still can carry her train forward - it can run on internal battery box as well. And finally, yes, these stuff did fit into the model: (Since the lower light on each side serves as red and white light on the real thing and upper slot serves for long distance lights at night I put white lights on the upper, red lights on the lower slots.) Also some other images and further details can be found in Hispabrick Magazine #29: http://www.hispabrickmagazine.com/sites/default/files/Descargas/HBM029_ENG.pdf Comments and critics welcome! Some other photos: -
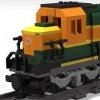
First off, I would like to say that, no, I am not terrible at maths! All shall be explained! (Sorry, this may be quite a lot of reading!) The Back Story: First aspect: Some weeks ago, I was having a general look for sets that might be of interest to me. I stumbled upon a very good deal on the Lego City Bus Station (Set no. 60154). I decided in a spur of the moment purchase to pick up 2 sets, with no real plan… That’s what sowed the seed! Second aspect: In the not so distant past, I had purchased a huge Lego haul from eBay containing many train set items and accessories. In amongst this, was an incomplete copy of the Lego Freight Rail Runner (Set no. 4564) – (maybe 80% complete) – at the time I didn’t really know what to do with it. Over time I harvested the 9V motor, wheels, couplings, bogie plates, wagon parts and straight track – basically all the good stuff! Now, I’m a big fan of seeing people doing set combining! I have never seen anyone attempt something like this! (Correct me if I’m wrong!) The Hypothesis: “Is it feasible to make a decent looking locomotive of any kind, combining Sets 60154 and 4564? – Using minimal significant other parts, but in cases where necessary only using parts I currently have, and not resorting to ordering things. The locomotive should ideally use Power Functions with 2 motors, lights are not necessary. Also, the finished model should be sturdy, strong, and able to be played with by children.” Answer, Was It Possible? Yes, and in my opinion, it turned out rather well. What I attempted to build was a massively simplified Class 37, with much artistic licence! Here is the finished product: Thus, the idea for “60154 + 4564 = 37?” was born! What do you think? Any questions, thoughts, or criticism will be much appreciated. Regards, James :)
-
When I saw the pictures of this train in @HoMa:s Lego Trains Book. I simply couldn't resist the temptation (particularly not after having seen TLGs miserable train news for 2018 ...) So I built it myself. A true pleasure with a very high degree of satisfaction. And another beautiful contribution to my train collection: A big praise to Holger for this very nice MOC which wakes many train memories back in the years when I grew up in Switzerland. This train is a 9V version with a total of four 9V motors mounted on the first two coaches. The interiors of the locomotive are therefore empty, i.e. no PF stuff. The Be 6/8 is built in Reddish Brown to match the colours of the Swedish iron ore train with the Dm3 and the Da locomotives. In addition, it is adapted to the challenges of the 9V Extreme layout, in particular the humps at the level transitions. And the rods by Trained Bricks really put the dot over the i ... PS: Imagine - a Swedish iron ore train together with a Swiss Crocodile in the midst of the Swiss Alps - goose bumps all over again ...
-
Hi all First time poster, long time LEGO-lover! Hope you all are good :-) I recently did a major clean-up in my storage-room and found a bunch of my old LEGO's. Bliss!! Among all the wonderful bricks I found my old 4563 Train set. I set it all up... and it didn't work. Then it suddenly did. And then it didn't. When it WAS working, it seemed only to go when the control (4548) was set to full speed. And the speed was very inconsistent - slowing down/speeding up very sporadically. Maybe corners was especially slow (?). the other locomotive I have (4551) didn't go at all. I tried different lengths of track, but then remembered that the train could usually get going even though the ends were not connected. So here's the question(s): 1: Does anyone know of this problem and how to fix it? 2: Would it be easier to upgrade the "engine" to some of the new RC-stuff? 2.1: Are there any good guides out there for that? Any comments, help and suggestions will be highly appreciated! Revolver_Aage
-
In his Lego Train Book, @HoMa mentions that tutorials are available to access the internals of 9V train motors (#5300, #10153). Where can I find such tutorials? The only thing I am interested in is how to open these motors without damaging them permanently.
-
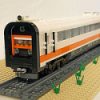
These are the first pictures of the latest contribution to my train collection: a Swiss IC Train with an Re 460 locomotive (partially based on an idea by @Stefaneris). In addition to the locomotive, the train consists of five 1st class coaches whereof one is a panorama coach. The train has a total lenghth of 2.3 m and is equipped with four 9V engines. Quite fascinating to watch this unit climb all the way up to the Swiss mountains and all the way back to Knivsta Station - in two minutes! Goose bumps - and a touch of homesickness ...


-Mini.thumb.jpg.03594ed3626ab4a4b625a32af4d03d5f.jpg)