Search the Community
Showing results for tags '7760'.
Found 10 results
-

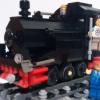
[MOC] Lego DRG V3201 - Diesel/Pneumatic Locomotive - in 12v style
Paperinik77pk posted a topic in LEGO Train Tech
Hi all, always starting from this inspiring discussion... ... @Reker1000000 introduced me to a very particular locomotive: "DB V3201 seems like it would be an interesting starting point for a locomotive to model in 12v style with the red motor..." The locomotive we're speaking about is the DRG V3201, one of the first experiments to upgrade from steam to Diesel engines. In this case, Diesel motors were available , but problem was related to transmitting their power to the wheels. Gears were too weak, Hydraulic transimission was still in development...so the idea was to replace steam with compressed air, therefore maintaining the "old" transmission system (including distribution) used by steamers. In short, it worked this way: DIESEL ENGINE --> COMPRESSOR --> RESERVOIR -->CYLINDERS --> COUPLING RODS --> WHEELS More or less what is seen in some Pneumatic locomotives made in Lego (great stuff!) with electric motors. Well, seems great, but there were many problems related to the heating of compressed air, its cooling (!) and cylinders lubrication - all for maintaining its efficiency. Here's an interesting link! http://www.douglas-self.com/MUSEUM/LOCOLOCO/diesair/diesair.htm All in all - a very complex hybrid system, with many gaps to be solved with engineering "patches". But it's a cool locomotive and making it in 12v style could really be a challenging task. First of all, it's the most asymmetric thing I've ever seen , second - it's a very tormented design - which cannot be captured fully in 12v style, due to lack of parts at the time. It's however a very peculiar locomotive (depicted also in a postal stamp!!!) and it's worth to be tried. Here it is, just out of the shed , helped by a small V60. In reality, this event could not happen, since the V3201 was scrapped many years before the launch of the little shunter, but since we can do whatever we like with our fantasy, I was more optimistic and imagined a restored V3201 ready for some hystorical train! The V3201 is based on the chassis of a BR78, which - luckily - is one of the 12v locomotives I've already tried to create. Therefore, chassis was already prepared and only needed to be adapted to the longer body. This big beast has a quite boxy body, which seems to be made soldering together some parts of cabins, cut from steam locomotives. The central part of the body is sticking a bit out from the overall shape, and this is due to the big submarine diesel and air reservoirs. The main charachteristics are the two big gray radiators, the small windows on the corridor side, and those big stairs. Stairs were a nice thing to replicate, even if these are not the same as in the prototype. I did not use the big train doors, since these did not allow me to recreate the stairs and handrails. In the real thing, the stairs go over the cylinders, so using the 12v standard ones was quite a mess. I replicated them with normal parts. and this was not a problem. I had however to "cut" the stairs in half, the upper one being fixed to the body, while the lower one being part of the bogie (and turning accordingly). With the 12v motor, this design needed to be somehow adapted. On a real 12v motor, the central hole can accept an half Technic pin. Using a normal Techic brick some plates and tiles solved the problem. The ladder is kept in place by the pin and "slides" together with the motor. Between the radiator and the cabin there's a small, virtually transparent door since it's made of a panel full of small holes. The body in reality should be 4-wide in that point. I tried fences, door fences, everything did not fit and SNOTting was quite impossible (for me at least), given the limited parts available. Even Marklin's model is solid in that point, so I concentrated more on having at least a grille pattern. Using the ladder part was not so nice, it was just confusing. I therefore tried the just seen @zephyr1934 technique (thanks to you and Katy!), to have some visible horizontal lines. I used 3794b parts (jumper) . It works also with normal plates, but this is way better. Doors features a possible, even if not used at the time, SNOT for the door hadle, using headlamps bricks. Here's a shot from above, showing the 7-wide central part of the locomotive. As you can see I played a lot with the jumpers parts. And here's the "blind side" of the locomotive there's not so much to say ,being pretty smooth! Apart big red wheels and red motor, 2x1x2 and 1x1x2 black windows are there, just to remember there's some 7730s and 7750s blood inside the veins of this "thing". Here is visible the big radiator... ...and here is visible the smaller one. Looking better at the central headlight you can see some "white stuff" between the bricks - it's the classic 12v light brick with the addition of a small diode. This old trick allows the headlight to be lighten up according to locomotive's direction. Radiator is made by 1x1 plates, trying to replicate the "pattern" of the real thing. I put here red lights in 7777 style, even if these should be white, according to prototype. A brief mention to the Shed - it's an old MOD - I do not sincerely remember if I already presented it here in Eurobricks. It's a 7777 build, converted to a more shed-looking thing. Since I like to replicate dioramas in 12v style, this could be a nice addition to the overall scene. I hope you like it! Thanks again to @Reker1000000 for his inspirational idea! Ciao, Davide -
Hi all, after seeing the beautiful V60 created by @Asper, I realized that I've never tried to represent it (I started with the V80 and V100). Being the iconic 7760 historically identified a s a V60, I did not pay too much attention to that specific group of locomotives. But it's a nice shunter and has a pretty complex shape, so I wondered if it could be possible to replicate it in 12v-style. The result is pretty similar to the 7760 and to the red little locomotive shown near the car-loader in 7777 book. The front hood starts in 4 wide, then becomes 5-wide to return again to 4-wide. The rear part of the cabin is 5-wide and features low doors (standard train doors were too big). 2x1x2 blue windows are going all around the cabin (no absurdly expensive 3x1x2 windows needed!) I did not mean to make it too complicated, but at least representing the enlarging/restricting body was mandatory to make it different from the 7760. Paint scheme and the headlights were made to elaborate a bit the front and rear parts. Some handrails made with bars could have been nice, but were not existing as parts at the time. I made also the red version with yellow stripes - just to see how it was like. The more I look at it the more I think also the V100 needs some restyling, now! That's all for the moment! Ciao! Davide
-
So, this mod started with me wanting to rebrick the 7760 Diesel Shunter. The plan was to replace the expensive parts with similar cheaper ones. After doing so i wasn´t really happy with the frankenstein-like 9V - 12V mix i had created, so I decided to redo it and mod the Engine with modern parts. This is the result: 7760 - Diesel Shunter 9V Mod by Henrik S, auf Flickr 7760 - Diesel Shunter 9V Mod by Henrik S, auf Flickr 7760 - Diesel Shunter 9V Mod by Henrik S, auf Flickr 7760 - Diesel Shunter 9V Mod by Henrik S, auf Flickr 7760 - Diesel Shunter 9V Mod by Henrik S, auf Flickr 7760 - Diesel Shunter 9V Mod by Henrik S, auf Flickr Feel free to comment and critize, i hope you enjoy the pictures
-
I've always enjoyed the off-centre-cab shape of the classic 7760, so no sooner had I bodged my own PF-9V battery connector then I started to build one. There ended up being very little in common with the original set other than the overall body/cab shape, but anyway. The colour scheme was dictated by A: my existing parts collection, because I'm a student and don't like buying things, and B: an attempt at what this loco would look like if the British Rail Civil Engineers had used one. I quite like using this grey-yellow-black livery on locomotives, because the black around the windows and doors make them stand out against the bodywork. The handrails either side of the cab don't really make sense, but the only LBG 1x1s I had available are either horizontal clips or headlight bricks, so I put them there anyway. The cab is actually fairly open inside, but there isn't really an interior unless you count lots of wires... The front bonnet ended up held in place by gravity and friction rather than stud connections; this makes it very easy to open in order to detach the battery from the connector, which is the only way to turn the model off! With the cab removed as well, we can see there really is just a big bundle of cables in there. The receiver is only half poking out into the rear bonnet, but signal reception is still fine. In building this model I stole plenty of parts from my 20T Brake Van (and yet still didn't have enough LBG 1x1 & 1x2 bricks, hence why the cab sides are so messy). This meant it needed rebuilding, and I'm actually happier with it now - it's lost the handrails, but the yellow banding is a lot more consistent around the ends. Finally, the loco with its short works train of a bogie flat, a general purpose crane and the brake van. And, as ever, the Bricksafe folder containing the photos and LDD file can be found here: https://bricksafe.com/pages/Collet22/7760-inspired-shunter. Thank you for reading; what do you think?
-
Hi! This is my latest MOC. It's a pf 7760 that runs on pp3 (9v) battery with a custom adapter. Since i don't have the 7760 i built it with all kinds of colors (it is a prototype after all). Here is the pp3 battery. I wanted this loco to have the iconic 12v clicking , so i put a little metal tab between the motor and some bricks. Here it is in action with the custom clicking sound. The rear with the ir receiver. And here it is .
-

My 1500km road trip in the name of Lego . . . . some pics and commenta
Breakdown posted a topic in Community
There's probably a couple of you who saw just the 1500km round-trip part in the "Shameful Confessions" thread. For those who don't know I'm from Canada. Tariffs are a pain here, and 12V lego is virtually non-existent anywhere in the Americas. If you spend 48 hours, you are permitted $800, so I managed to grab a few outer rails for my blue 12V stuff, a few cross overs and managed to snag a great deal on a pair of monorail points. Ever since seeing pictures on social media from a friend I've had the abandoned turnpike on my bucket-list. The key has been finding a legitimate reason to go there. An auction winning from just inside the Virginia border would finally be the catalyst - stated on E-bay local pickup only. After much back-and-forth between the sellers and myself, along with a friend's house that I stayed at - around the Pittsburgh area. We settled on a date, and then it was just me my car, my friends and 1500km on the road. (For those with a keen eye for violations, my car was in park while taking pictures in juristrictions where there are laws against that kind of thing. I also had some help in the car. It's about an hour an a half to the US border. I selected the "Rainbow Bridge" because it was the long weekend. The picture, and by far the clearest I've ever seen in my lifetime at that location, is the duty free store, just prior to hoping on the bring. It's usually more time efficient to cross at the Peace Bridge, but inbound visiting the US, it's usually the worst or near worst of the three options. In all I spent about 30 minutes in queue awaiting customs. It's a pretty spectacular view. This is the view just prior to entering Grand Island. There's not much on the island, other than a small them park of sorts, which looks very dated. There's a $1 toll to cross into the island. This view, you can see the Skylon Tower, Minolta and the Casino down by the Falls. Obviously the bridge to the island. I look some Panoramas, and eventually I'll get around to processing some of those. I love the blue on these bridges. I was just weirded out by these patterns, it's as if they wanted to prevent walking on grass at all costs. You can't really walk in a straight or perpendicular line at all, this is from the lookout, where the pic of the bridges was taken. Bridges leaving the island are more attractive. But man are they skinny!! Welcome to PA!! This was the 10 minutes of driving on the way out where it rained, not hard, just just got a little rain. PA is the northern border of where we can get this stuff and OMG!! That sweet, sweet nectar. I was so hungry but it was totally worth waiting for Pennsylvania for the Sweet Tea. I can't get this at home and every day without it I die a little inside. -
Hey Guys hope you are all having a wonderful 2016! I have another shunter built today (If you haven't noticed I have build a couple, they're just a fun way to pack things into one small package). The Idea came to me recently one night that I liked the 7760 but will never be able to afford it while I also enjoyed the red/white color scheme of the 4563 Load N' Haul engine. So I thought to combine the two and make it look more modern but still have that classic style we all love. Here it is Enjoy! MOC: The Combo Shunter (Mix of 4563 and 7760 plus a modern twist) by Rail Co, on Flickr Love the classic train drivers, he doesn't seem very smart for hanging all the way outside the door... MOC: The Combo Shunter (Mix of 4563 and 7760 plus a modern twist) by Rail Co, on Flickr A side view here you can see the under carriage detail but for a more "bright" but iffy quality picture you can check my flickr. MOC: The Combo Shunter (Mix of 4563 and 7760 plus a modern twist) by Rail Co, on Flickr The front view shows the front grill along with something I haven't personally put a model yes which is a SNOT window design which is built sideways. MOC: The Combo Shunter (Mix of 4563 and 7760 plus a modern twist) by Rail Co, on Flickr Back view nothing to exciting to show here. MOC: The Combo Shunter (Mix of 4563 and 7760 plus a modern twist) by Rail Co, on Flickr Some of the cab detail. Sorry for my camera doesn't do close-ups well at all. MOC: The Combo Shunter (Mix of 4563 and 7760 plus a modern twist) by Rail Co, on Flickr Thank you all very much for looking. A with all my MOCS constructive criticism s always welcome along with compliments alike. Keep on Chuggin -RailCo
-
I have been in a building mood lately and have noticed a few people saying they would like to MOC but don't know where to start (and don't want to mix up the bricks from their sets). The solution to both problems is with the old 'alternate builds' from the 80s:) This great photo is by Flickr user Zoltán Becsei I'm not the first see an opportunity to make a 7760 style shunter using 60052 parts. There is also a particularly excellent one by reinstein here: https://flic.kr/p/9KrZRe but as far as I can tell no one has made a PF shunter only using the parts found in the blue diesel. So, I'm throwing out the challenge, can you make a PF shunter using only the parts found in the blue diesel? This took me about two hours to do and was much cheaper than going to the pub for my Saturday afternoon:) To help people who would like to get into MOCing I have uploaded the in-progress photos of my build into Flickr so you can see the silly mistakes I made and the things that just didn't work along the way. Laughter is positively encouraged. Here are a couple of the progress shots. https://flic.kr/p/w87Z5G So. I'm not exactly happy with the nose... but I can't see another way to do it without raiding my brickstash. Please feel free to post your builds in this thread if you are keen to give it a go.
-
Hey everyone! I've finally decided to start my own thread, rather than piggy-back someone else's. Frankly, I need help with this: https://www.flickr.c...157643245649484 I'm trying my hand at remaking the classic 7760, with full PF components (lights too!) for a while now, but have hit a wall. The problem lies with the cab windows, and my current solution looks terrible in real bricks... So, I threw together an LDD moc up of what I currently have, and earnestly hope that you can provide me with something insightful! http://www.brickshel...ry.cgi?f=554681 Thanks in advance, ~M_slug357~
-
Hello all, I'm trying to build my own Deutschen Bundesbahn for my diorama. I really like the front smoke stack on this model but after hours of searching on bricklink...I can't find it. Anybody help identify the front smoke stack? http://www.brickshelf.com/cgi-bin/gallery.cgi?i=3182532

.thumb.jpg.19742e89790e473128572b8d3969c36d.jpg)