Search the Community
Showing results for tags '500'.
Found 6 results
-
Hi all, since it's now published on Brick Model Railroader group, I can finally present also here in EuroBricks my second entry, this time in "MOW vehicle" section: You already know it from the WIP thread - it's a small little patchwork of two Fiat 600T/850T vans and a FIAT 500 499,5cc (21HP) motor. Here's the full story! And here's some bonus content!!! Presentation for Octrainber ends here , but there are some other photos: Transmission is on only one axle, as in the prototype, and it's using (again!!! ) the twisted rubber band transmission. The battery is a 200Mah Li-Po, connected to a small circuit in order to charge-discharge and manage the output to the motor. It can be recharged with an USB Adapter (in this case a serial to USB adapted I had at home). And two videos, showing the rubber band transmission and a small track with the 500 in action! https://www.flickr.com/photos/138174786@N04/51670350725/in/album-72157720126403108/ https://www.flickr.com/photos/138174786@N04/51673059120/in/album-72157720126403108/ I hope you like it! Ciao! Davide P.S. for reference! For more information, please refer to this site (it can be translated) https://scalaenne.wordpress.com/2017/07/29/draisina-fiat/ and to this video, showing a restoration of the Fiat 500 Draisina - which inspired the Giovanni and Giorgio story (Italian only, sorry, maybe it can work with subtitles) https://www.youtube.com/watch?v=X7vwRs0Akkk&t=211s
-
It's been four years since the last classic European car graced the CREATOR range, and I said then I'd be delighted to see more of them. Since then we've seen the handsome Mustang and the sleek Aston Martin DB5 - technically a European classic car but I haven't counted that one! The range's latest offering, the Fiat Nuova 500 ('Cinquecento'), fits neatly into the category of small cute classics previously epitomised by 2014's 10242 Mini Cooper and 2016's 10252 VW Beetle. I was delighted to see the widespread use of a rarer colour (dark azure) in the Beetle; now Bright Light Yellow takes centre stage for the Italian classic. The Fiat 'Nuova' 500 was launched in 1957 as a successor to the 500 Topolino and was designed as an inexpensive, practical city car with a rear-mounted engine following the style of the successful Beetle. Its 479 cc engine boasted a stunning 13 horsepower (my lawnmower is 430 cc). Just short of 4 million were produced until the model was succeeded by the Fiat 126 in 1975. Earlier models featured rear-hinged 'suicide' doors; these were replaced with conventional front-hinged doors with the release of the 500F in 1965. Review: 10271 CREATOR Fiat Nuova 500 Parts: 960 Price: £74.99 | $89.99 | €79,99 | AU$139.99 Like the Beetle and Mini, the LEGO Fiat no steering, but aims at a realistic body for display with authentic features. Coming in at the same price as the VW Beetle (in the UK; the latter is pricier in most regions), the Fiat consists of over 200 fewer parts. Let's see if that price hike is worth it. Box I confess that at first glance at the box i thought this set was ordinary LEGO yellow, and it was only in looking at the little painting on the box that I noticed the paler tones of Bright Light Yellow - it's particularly noticeable when you compare to the yellow round tile on the artist's palette. The box art mimics approximately the scene of the painting, with the car posed attractively in front of Rome's iconic Flavian Amphitheatre, or Colosseum. I was disappointed not to see a tiny easel in the painting. Some lens flare adds sparkle. Cobbled streets abound. The box rear shows off the car's attractive rump, along with the set's other features which exceed the bounds of their respective insets. The car stands out beautifully in the otherwise nondescript and unidentified back street; a pronounced sepia filter provides a warm which contrasts but complements the dark blue of the CREATOR Expert range box trim. Sadly, thumb tabs are the designated means of opening - disappointing for an adult-oriented set such as this. I am pleased to see some schematics along with real set reference images on the box top: This saves me the job of sourcing my own reference images! They've even produced a LEGO schematic. The box contains some nine polybags - three modules with three bags each, the instructions, and a separately-packaged fabric part, which you can see here. Instructions The manual comes in a separate polybag which also contains the sticker sheet. There's no cardboard backing but the wrapping has in my case done a good job of preserving the booklet. I love this! The square manual evokes an old Polaroid photograph, and if that weren't obvious enough there's a rotated panel within the picture like a photo within a photo. The faded colours and dress provide the perfect 60s vibe and (even though I'm not that old) have me pining for family holidays long-since passed. Interestingly the car featured in the picture is an older model with rear-hinged doors. I think this is the first time I've encountered a LEGO instruction manual that doesn't feature the set on the cover. A downside to the cute square booklet is that it doesn't stay open, and I wasn't about to go breaking the perfect-bound spine just for the sake of some photos. The instructions are clear against a duck-egg blue background, with suitable callouts, and extra guidance for the few tricky bits. Some four double-pages at the front provide some interesting history into the car and the FIAT company. I'm a big fan of these educational instructions - what a fabulous way to preserve our cultural heritage. Also in the instruction pack is one of the prettiest sticker sheets I've ever encountered. The decals for the car are reasonably easy to apply, though the smaller square ones all go onto curved parts. They are well colour-matched. The 5x5 square painting is gorgeous. As is customary, a variety of nationalities are featured in the car registrations. The Danish (DK) and German (PN) plates both feature the set number formatted to a realistic registration number (although in Denmark, 10.xxx numbers were for motorcycles I believe). PN is not an obscure region of Germany but instead refers to the set designer Pierre Normandin. The Italian plate is worthy of note. 'TO' is the area code for Turin (Torino; the 'T' in FIAT and the firm's city of origin); 'F01965' can only refer to the 500F model which was released in 1965 and was the first to feature front-hinged doors, as does the LEGO version. Parts The three modules' parts are shown in the thumbnails below: click the pictures to see larger versions. I didn't identify any new moulds in this collection, but the headline is the shear number of parts appearing for the first time in bright light yellow. This colour has been in the ascendency for a few years, featuring for example as panels and bricks in Friends sets, or as the secondary colour of the new livery of the CITY fire sets, but I have not previously encountered such a fine spread. This extends too to the SNOT parts; there are SNOT brackets and bricks of various conformations all in BLY - contrast the Beetle whose extensive SNOT pieces were for most part grey. Otherwise, the 10x4x1 windscreen and the 4x2 2/3x1 trans-clear curved bricks are found only in the Old Trafford set, and there are three (one spare) 1x1 round tiles with a lovely FIAT logo - see later. The four medium dark flesh arms-with-pins in the centre photo took me a while to identify; they are originally Nexo Knight parts found more recently as ice cream cone limbs. Build I won't go through this exhaustively; instead I'll just try to give you a feel for the build and highlight some interesting bits. We join here fairly early in module 1. Of some interest is the construction of the chassis: In the centre are dark grey 2x4 plates with pins on each side, usually used as wheel axles, here connecting to the technic beams on either side. The centre beams are connected to the outer beams and the black 2x2 plates with technic hole via 3L pins. The result is a strong floorpan only a brick high. The underside is reinforced; see here. The rear bumper and lights is attached via SNOT plates, and also unusually with the 2x3 clippy-tile. I remain uncertain of the purpose of the two blue stud-pins on either side of each end of the chassis; they serve no apparent purpose except possibly to help put the axles into the right holes. If that's the case, I can't help but feel a little patronised. Next we build up the rear, at the start of Module 2. You get to see how the wings are attached at a slant using hinge-plates in a technique that will be familiar to anyone who has ever built an X-wing. See here for a part-assembled view. Above these slanted sections, SNOT-attached curved plates help define the car's double-curvature. Note the small 2x2 with corner cutaway, which attaches solely to the single stud of the grey headlight brick you can see mounted on its side - it's next to the turquoise brick if not immediately obvious. I always like headlight bricks used this way. You can also see the gearstick and handbrake, along with the bars to which the chairs will be attached. Up till now the build has been enjoyable, without being especially challenging. It starts to go up a gear at this point. r The dashboard section is a SNOTty conundrum that requires a bit of mental gymnastics to keep oriented correctly. This is made harder by the fact that a sticker needs to applied to one of the inverted 2x2 curved plates, seen here at the base of the dashboard but will face to the rear of the car when mounted - and it will be all too easy to set it upside down. The black block seen here is the fuel tank, which will attach to the visible forward-facing yellow studs of the dashboard section therefore reverting to studs-up. Towards the front are two black 2L pin joiners, the purpose of which is a little mystifying at this point. I (wrongly, as it transpired) assumed they were to attach the headlights. Next come the doors. I've part-deconstructed one here to show how it's made. 1x2 SNOT brackets - regular and inverted - hold some 1x2 clicky-hinges; these attach to 2x1 clicky hinges to produce a half-stud offset to which the contoured door upper is attached, delightfully smooth with curved plates on inverted tiles. Note the 1x1 corner panel brick just in front of the door hinges, and the 1x4 brick-with-slot at the base of the door - these are significant as will be explained later. On the right is the rear window made out of a door panel. The result is slightly asymmetrical, but it's barely noticeable. Moving into Module 3, the front panel is attached to the the inner studs of the 1x2 SNOT bricks, and the two 1x1 grey inverted brackets. You might think this would be a little weak, but the headlights help to keep it attached. Here you can also see that the black pin-joiners have nothing to do with the headlights, which instead will attach to the forward-pointing bars of the black 1x1 round-plates-with-bars (these things) sandwiched between 1x2 round-end plates. Why the round-end plates? And, for that matter, the heel-print tiles? Answer: they allow the wings to attach at a slant. Regular plates or bricks would interfere with the square front ends of the wings. Here, also, the purpose of the black pin-joiner part is made clear: the wings are seven studs long, and the 1x2 curved-top bricks require a 1x2x(4/3) curved brick to fill the gap. This has a protruding plate, and the black cylinders accommodate and also support this. Note the as-yet-unattached wing at the bottom of the picture. The free end of the hinge will be mounted on the black and yellow studs just in from the door hinge, and this reveals the reason for the 1x1 corner panel: it accommodates the rounded pivot of the hinge plate. Kudos to the designer for the problem-solving skills on display here . Finally, the secret of the folding roof is revealed to be more of those mini-frying pan pieces, this time in BLY. They leave a small visible irregularity in the roof edge, but I'm glad they are at least colour-matched. It is then a little tricky to attach the windscreen and the luggage-compartment cover without breaking it, but when it's done, plus wheels and the set's extra bits, we have a finished car. Overall, the build is deceptive. Apart from a few tricky bits, it is smooth and easy to follow, but enjoyable; it is all too easy to miss some wonderful design touches that help recreate the car's curvy outline. I'd rate the difficulty as 'Expert' (harder than Average but not Master or Legendary ) The Complete Set First impression: yup, it's definitely a Fiat 500. I think the LEGO version has the iconic double-curved bodywork down pretty well. I was pleasantly surprised by the slanted front and rear wings, which help to recreate the ovoid shape of the Fiat, and weren't immediately apparent from the box art or my brief look at the promotional pictures before receiving the set. It looks great in Bright Light Yellow which I think was the perfect choice: whilst the car would look stunning in a bright mid-blue tone, or dark blue or green, these have been used recently for CREATOR cars; possibly the only other colour I could see making such an impact here is the very rare Medium Green. The head-on view isn't the car's most interesting angle. The windscreen is perhaps rather obviously too rectangular, a flaw of the medium of course. There should be a curve to the top edge, and the screen of course should bow slightly. The front is nicely contoured, and I like the use of the unicorn horns to mimic the flashing here. I'm not quite so keen on the headlights, which I think might have been better made with inverted domes. You can see I've put on the Italian plated for the Italian car. A three-stud-long tile is used (3x2 at the back) which works well. The curvy rear has I think turned out nicely, helped by the stickers which are a reasonable representation of the vents for the rear engine. I'm not so keen on the flare of the wheel arches form these angles, but they are less obvious from any other viewpoint. Ideally, the lip of the wheel arches should extend all the way round, but no such part exists. You might also notice that the construction differs front to rear: Inverted slopes are used at the rear, but I think the SNOT-mounted cheese wedges at the front give a smoother more circular outline. The contour of the roof toward the rear is a little fussy from the side, with an obvious step between the roof and rear window. I do like the double-curve of the sides, but this comes with slight problems: notice the half-stud gap behind the door handle, caused by the upper bulge being offset, but this improves the front edge of the door, where the cut corner almost perfectly matches the rake of the windscreen. Ideally the top line of the upper curve would be continuous with the curve of the front luggage compartment; it's close, but not quite matched, and interrupted by the windscreen. The tricky curves of the rear have provided a significant challenge, which the designer has worked hard to overcome. The result is mostly successful: The convex engine compartment cover works superbly, and the light clusters look great and are instantly recognisable. The transition from the rear curve to the side is a little awkward: above the light clusters, there are two 45-degree slopes topped by a 33 degree cheese wedge, then moving to the almost-vertical bottom end of the yellow curved brick: the 33 degree cheese looks a little incongruous and I wonder whether another 45 slope would work better. I like the way the 45 slope echoes that of the cut-corner curved slope on the side, but below this the curved end of the rear wing ends a little messily. I can't suggest how to improve this though, and I am being super-picky here: the overall result is lovely. The birds-eye view really emphasises the car's ovoid outline. From here almost everything is smooth, and I hope you agree that the slanted wings are a triumph. I also like the minifigure skates as door handles. Here's a real one, in a similar colour, for comparison: The LEGO version has managed to reproduce the double-curved body sides pretty well, with only the step at the sides of the windscreen interrupting the curves. Missing are the tiny wing indicator lights, which i believe were standard on the 500F (correct me if I'm wrong), and the door mirror, which does not appear to have been mandatory and may even be a later addition. The lack of door mirrors does make the LEGO car look a little odd, conditioned as I am to seeing them on all cars these days. Features The luggage compartment cover lifts to a maximum of about 45 degrees to reveal a poky space taken up almost entirely by the fuel tank and spare wheel. No room for picnic baskets in this car. On the plus side, the spare wheel is the same size as the other wheels, unlike the Beetle's. I've switched to the German plates for this section. The inset shows a close-up of the 1x1 round FIAT tile, which is pretty and much nicer than the VW equivalent. You might notice here a slight quirk of the construction: the front panel sits half a plate height proud of the main body; the 1x8 tile on the top therefore half a plate behind. The latter lines up perfectly with the compartment cover when closed. It's barely noticeable, and if anything helps to smooth the contours. I'm not so keen on the black bars to which the headlights are attached, and wish they'd used light bluish grey. The doors open wide - really wide. On the inner aspect of the door is some dark red to match the seats, a telephone handset for the inner door handle, and an antenna to mimic the window handle (not a winder: it rotates the quarterlight window). Recall that I mentioned the 1x4 brick with groove at the bottom of the door: here you can see the reason for its use: it allows the door to close around the protruding pivot of 2x2-2x2 hinge plate at the rear (second panel). Again, an ingenious solution. The front seats flip forward, as you can see, using the ice cream cone arm pieces. True to life, the dashboard is rather Spartan body-coloured painted metal, and the steering column features an indicator lever and a single speedometer. You may just be able to make out some cheese wedges under the steering column to represent pedals. Compared to the real thing, the LEGO version is reasonably accurate. There's even a white round-end plate behind the speedometer, which would a more impressive nod to accuracy were the steering wheel also white. The wheel should probably be larger, but having seen the problem of the oversized steering wheel in the Mini, I think too small is better than too big. I've taken the roof off to give a better view of the interior. The decal does a good job of imitating the real dashboard switches, though there should be one more and some indicator lights. Here too you can admire the handbrake and gearstick, the latter crudely but effectively realised from a flick-fire pin in a ball joint. There's a surprising amount of space for such a dinky car; you could even sit two adults in the back, provided they have short legs and don't mind getting intimate. I'm not sure how authentic the white tops of the seats are; I can't find a reference image to a car which has them, except for this model. The rear engine is also given a bit of detail. True to life the cover opens downwards; the cover is perhaps a little thicker than necessary, but the effect when closed is pleasing. Here the engine looks like a rather randomly thrown-together collection of parts, but when compared to the reference image below, you can see that the designer has gone to some effort to make it accurate: Bonus points for the gold flower piece to match the oil filler cap! Finally we should look at the accessories. There's a sturdy travel case, emblazoned with national stickers of Switzerland, Sweden, Italy, Denmark, Poland, France, Germany, and Somewhere; there's a tall easel on which can be mounted the really quite beautiful artwork on a 5x5 grey tile. The accompanying artist's palette sports four paint colours only one of which (red) features in the painting: the yellow is regular yellow. Only the palette and brush fit in the trunk, requiring the easel to be stowed in the passenger footwell and poking out of the roof. The automotive masterpiece, meanwhile, must be thrown unceremoniously onto the back seat like grocery shopping or children. The trunk mounts easily onto the rear luggage rack, where the combination of reddish brown and MDF colours complement nicely the light yellow of the car. Comparison So how do the European small cars compare? Bear in mind that while the Beetle and Fiat and built at approximately the same scale (the VW Beetle is a metre longer than the 500), the Mini should be the same size as the Fiat. I now notice that somebody, probably a small child, has tipped both the Fiat's seats forward. I'm really quite positive about the Fiat, but I can't help feeling that it looks a little bland compared to its older siblings. Perhaps it is because the front is relatively featureless. The (intentional and authentic) lack of door mirrors is particularly noticeable here. All three look amazing from the rear. The Mini again has an unfair size advantage, and I am perhaps not doing the Fiat justice by showing it straight on where its narrow profile makes it seem that much smaller. However you feel, I think you will agree that the three make a great collection. Conclusion I really like this car. The slanted wings and double-curved bodywork help to capture the essence of this automotive classic, working well despite the constraints of medium of LEGO. The bright light yellow livery helps emphasise the car's playful nature, whilst bringing yet another peripheral colour to the LEGO mainstream. Realistic features abound and add to the display potential, and it will sit happily on the shelf by itself or in the illustrious company of any of the CREATOR Expert cars, including the Mustang and Aston Martin. The selection of BLY pieces will delight any parts-collector or MOCer, especially given the array of SNOT pieces. The build process is satisfying, and in the latter stages both entertaining and somewhat challenging, with interesting techniques from which I've certainly learned a thing or two. And now I find I have a conundrum. I reviewed the Beetle in 2016 and was quite critical; it is for the most part a great set, and an interesting build. It is currently still available, and in the UK is the same price as the Fiat, despite some 200 more parts; it is perhaps more interesting to look at, and not just because it is physically larger. On paper, the Beetle is the better set of the two. However, there is something about it which didn't sit right with me, and still doesn't: mostly it is the steep rake of the windscreen which resembled more a 2CV than a Beetle, but also the chunkiness of the wheels and wheel arches always felt a bit off to me The Fiat doesn't really suffer any of these issues. Aside from a few minor cosmetic substitutions, I don't think I would change anything about the set as it is, with the currently available parts, and I don't have any major criticisms of this set. And yet, if you asked me which of the two you should spend your hard-earned £75 on, I would have to say ... the Beetle. If you can afford it, get both. The Fiat is a better rendition of the original car, and has a wonderful informative instruction manual usually the preserve of Ideas or Architecture sets. Design 9 There's very little I would have done differently. Build 8 A little mundane at the start, but gets interesting from Module 2 onwards, with some mind-screwing SNOT work and some fascinating solutions to tricky problems. Parts 8 Lots of useful SNOT parts, and a ton of parts that are new to Bright Light Yellow. If you need BLY, get this! Play/Display 8 The car's small size and narrow profile might make it look less imposing compared to the Mini and Beetle, but its colour and curviness do make it stand out. Value 7 Parts per pound, it is still great value, although perhaps not compared to the Beetle. Whether this difference is due to licensing (TLG has a long history of licensed VW products) or the extended manual, I don't know. If the latter, I will just quote myself: Overall 80% My score 9/10 I love this set. Fiat or Beetle? Follow your heart. Oh, and TLG? More classic cars please! Rufus's 10252 Beetle Review Fiat 500 on Wikipedia
-
An Italian Classic Together with Gabriele Zannotti aka zanna I've been working on a scale model of a FIAT 500 for almost two years now. I've actually already made a topic on EB a while ago but the model has improved a lot since then and we also took some cool pictures of the real life model so I decided it would be appropriate to post a new thread. The model As it stands right now the model is made of 1210 pieces and has plenty of details and features to offer. The boot which is located at the front can be opened revealing the fuel tank, a toolbox and an actual spare tyre. The bonnet in the back is decorated with several custom decals depicting the various cooling vents as well as the license plate and additional details. It can be opened which allows you to see the detailed 500cc straight twin engine. Furthermore, the doors can be opened and the front seats tilted forward allowing you to access the rear seat bench. On sunny days you can also swap out the closed sun-roof for the opened variant. Boot details The rear end Openable doors and hatches The engine bay Dashboard details Foldable seats Open roof Thanks for checking out our topic. Additional images can be found in both Gabriele's flickr page and mine. Our model is still very much a work in progress and we keep improving the build and adding new details. We've actually uploaded our model to LEGO Ideas and it has already surpassed 7.5k but your support would be greatly appreciated so we can meet the 10k goal in time.
-

[MOC] Ford Focus RS 500
DugaldIC posted a topic in LEGO Technic, Mindstorms, Model Team and Scale Modeling
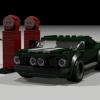
The Focus RS500 was launched in April 2010. A limited production run of 500 units (101 of them for Britain) were produced. It has a turbocharged 2.5 L5 petrol engine which produces 345 bhp and can do 0-62 mph in 5.4 seconds, with a top speed of 165 mph (266 km/h) making it the fastest Focus yet. Flickr Album: https://flic.kr/s/aHsmcw9qTe The new model was given the RS500 designation to highlight its strictly limited production run of 500 individually numbered vehicles, all of which were offered for customers to purchase. Each RS500 carries a metal plaque on the centre console, hand-engraved with a unique identification number from 001 to 500. Ford Focus RS by Dugald Cameron, on Flickr This is my rendition of the Ford Focus RS 500. This is a commission build and as such will not have any instructions. Ford Focus RS by Dugald Cameron, on Flickr This car is a full manual model and features a 6-speed manual gearbox tucked below the miniature inline 5 cylinder, fully adjustable seats, fold flat rear seats, adjustable steering wheel, open-able hood, trunk and doors, closed loop pneumatic e-brake, custom cantilevered suspension with reverse ackerman steering, HOG steering with working steering wheel, spare tire, 4x PF lights at front, 2 PF lights at rear with fully detailed engine and interior. Ford Focus RS by Dugald Cameron, on Flickr This is my first full manual model, with tons of challenges along the way and a total build time of over a years work. Ford Focus RS by Dugald Cameron, on Flickr Ford Focus RS by Dugald Cameron, on Flickr Ford Focus RS by Dugald Cameron, on Flickr Ford Focus RS by Dugald Cameron, on Flickr Ford Focus RS Ford Focus RS by Dugald Cameron, on Flickr IMG_3053 by Dugald Cameron, on Flickr Also thanks @Didumos69 for basic working of the seats and the big push in building and HOG model! And thanks @crowkillers @Rudivdk For your inspiration for the gearbox! And last but not least @Lox Legofor all the help throughout this build, especially for the photos and video you rock bro! And as always more pictures available on Flickr, click any of those pics to see more! Thanks for the interest. -
My latest car: Abarth 595 Competizione Features: -Detailed Exterior -Opening Hood and Trunk -Working 4 Cylinder Engine -Working Gearbox (on an only 12-studs wide car)
-
This is my Lego Star Wars Coruscant MOC; includes the Galactic Senate, Avenue of the Core Founders, a Platform and 500 Republica Building 20150215_235234 by etelenzos, on Flickr 20150215_234958 by etelenzos, on Flickr 20150215_232709 by etelenzos, on Flickr See it on my Gallery: https://www.flickr.c...57650424875907/ INFO WOOKIPEDIA -Avenue of the Core Founders: http://starwars.wiki...e_Core_Founders -500 Republica: http://starwars.wiki...i/500_Republica -Galactic Senate: http://starwars.wiki...i/500_Republica