Search the Community
Showing results for tags '42039'.
Found 18 results
-

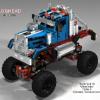
[MOC] Dirt Track Modified 42039 C-Model
CF 28 posted a topic in LEGO Technic, Mindstorms, Model Team and Scale Modeling
Hello all. Here is my LEGO interpretation of a circle-track dirt Modified, which is popular in the United States. Several similar versions of them race under different sanctioning organizations, the most popular being IMCA and UMP. The car is a C-model of the 42039 "24 Hours Race Car", and thus uses only the parts from that set. 21 studs wide between the hubs, 23 at the widest part of the body, 50 long, and 14 high from the center of the wheels. Has the fake V-8 engine mounted toward the front, but fully behind the front axle, as in the real vehicle. Front suspension is independent double-wishbone, similar to the A-model's design. Rear suspension is a reasonably accurate approximation of the live-axle 3-link with panhard bar that is used in many (but not all) of these cars. Uses a "hand of god" style steering with the finger knob on the roof, but is also connected to the working steering wheel in the left-hand-drive cockpit. Thanks for looking! -

[MOC] 24 Hours Le Mans Car (42039 alternate, 42077 c-model)
ace_klimax posted a topic in LEGO Technic, Mindstorms, Model Team and Scale Modeling
https://rebrickable.com/mocs/MOC-28352/klimax/24-hours-race-car-42039-alternate-42077-c-model https://bricksafe.com/pages/klimax/24-hours-race-car-from-42077 Inspired by official lego 42039using 97% of parts from 42077dimensions 52x22x11cm* HOG front wheel steering* rear and front suspension* opening back engine hood* 6-piston engine connected to rear axle* one seat* open cockpit52 pages of generated instructions (A4 landscape orientation) - sample on bricksafe more models from 42077 coming soon -
[MOC] C-models of one set based on A-models of another
thekitchenscientist posted a topic in LEGO Technic, Mindstorms, Model Team and Scale Modeling
I'd like to share with a quartet of c-models which are based on A-models from 2018-19. There has been no model since the Racing Yacht and Heavy Duty Forklift that had that special something to make me want to buy it (the Car Transporter came very close). I typically stick to buying the low/mid range sets and now have around 20. I enjoy the challenge of C-model creation as you can see on bricksafe, and using Rebrickable.com I looked at which of the 2018-19 line-up I could enjoy the building experience for using bricks from my existing sets. I initially was going to make the First Responder from the Airport Rescue Vehicle but the similarities with the B-model for this set ruled it out. Turning the Racing Yacht into the Powerboat was a logical next step. I tried to follow the instructions for 42089 making substitutions and skipping sections as required. Once that was done, I went back over the model with the remaining pieces to try and find a way to complete it whilst keeping the vibe of the parent model. This process made me very familiar with the instructions for 42089 such that I tried again with the Heavy Lift Helicopter and Airport Rescue Vehicle. Having woken up my brain to the possibilities, I went back to Rebrickable.com to look for a bigger challenge. Comments in reviews about the chassis for the Rally Racer put me onto the 24 Hours Race Car being a good candidate. This followed the same basic process as before but this time need much bigger reworks. I often realised the piece I really need to complete the bodywork of the model had been used elsewhere in the chassis, and a swap would be needed. I'm pretty pleased with the outcome. This idea of recreating an A-model as a C-model is not new (https://rebrickable.com/users/klimax/mocs/ has a number of examples). More pictures of each model can be found on Bricksafe (https://bricksafe.com/pages/TheKitchenScientist). This version of the Rally Car has kept the suspension and HOG steering but lost the opening front/rear. I managed to add steering via the steering wheel. The brick built 3-cylinder engine is not linked to the wheels but turns with the propeller. Using a worm gear I was able to link the propeller to the wheels but there was no engine this time. This model had all the parts to recreate the engine/wheels/propeller functionality but lacked some of the panels needed to keep it power-boaty. As a compromise I took the arm mechanism from the Airport Rescue Vehicle and mounted in the extended boat. -

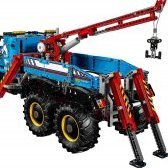
[C-MODEL] 42039 - Peyote Dream
Immo posted a topic in LEGO Technic, Mindstorms, Model Team and Scale Modeling
The C-Model of notorious 42039 24 Hour Race Car. Just like Bootleg Belle, the idea here was to build an oversized desert truck. While Belle goes with hot rod styling, Dream is a pickup truck that someone carved up to extreme extent, installed an oversized and boosted V8 in the back, topped it with preposterous wing and thus fashioned a beast to dominate any desert. It looks angry and ridiculous, because that's how I felt while building it - my girlfriend was reading a particularly bad - yet published by a renowned publishing house! - novel aloud while I was building Features: ► V8 engine with moving pistons and twin "procharger" pulleys, ribbed hose headers and two exhausts, connected to rigid transmission with differential ► radiator with cap & hood intercooler intake ► individual front wishbone suspension & rear live Hotchkiss drive (dragged axle) with integrated bumper ► steering connected to HOG ► opening doors ► cockpit with a (non-functioning) steering wheel, dashboard and seats ► oversized rear wing, rear view mirrors, front lights, reverse lights and stop lights, two side fuel tanks with caps -
42039 or another 42069?
Yevhen posted a topic in LEGO Technic, Mindstorms, Model Team and Scale Modeling
Guys, help! Right now I can buy 42039 for $110. What do you think of the price? Is the set worth the money? It consists of 1200 parts and it's not too many, in my opinion. On the other hand, I can buy another 42069 for $100 as well (I already own one), but there are 2400 parts! P.S.42077 is a similar set just for $70, but I definitely dislike the rally car. -
[RC] 42039 - 24 Hours Race Car: instructions done
Aventador2004 posted a topic in LEGO Technic, Mindstorms, Model Team and Scale Modeling
so, here it is, my 42039 ultimate edition. it keeps almost every function present on the original car, sans the engine. the build is not easily modde, so it is strong, but not easy to rework the original from prebuilt. i also added a few cosmetic mods it uses: a pf battery (AA) *2 pf recievers (v2 or v1) *2 pf controllers 2 pf L motors a pf M motor a pf servo motor 3 pf lights it drives, flashes lights, runs doors and engine cover, and steers. *can use Sbrick. recievers. body panels removed. comment your thoughts. -

Power functions lights and 42039 question
teos posted a topic in LEGO Technic, Mindstorms, Model Team and Scale Modeling
I've been modifying my 42039 (24 hrs racecar) to be remote controlled with an sbrick and was wondering if the power functions light unit will work for that set? I don't have any of them, so I'm not sure if the wires are long enough to reach both light sections in the front (or two sets of PF lights one front and back). Thanks in advance! P.S. I just got my 1st sbrick last week and they are amazing. Now I want another. -
2018 IndyCar moc c model (wip)
Aventador2004 posted a topic in LEGO Technic, Mindstorms, Model Team and Scale Modeling
i am working on a new car starting soon i saw a image of a rendering and urged myself to try to make it what is this......... good luck figuring it out Edit: look below -
[C-MODEL] 42039 F1 (instructions released)
Aventador2004 posted a topic in LEGO Technic, Mindstorms, Model Team and Scale Modeling
as my first moc on this site i would like to introduce my 42039 f1 c model moc it reatures: hog steering, fake engine, suspension , and drs activator pros: very durable, and light (850 grams) cons: bump steer, and ugly drs activator Aventador2004 Updated pics coming soon full gallery at bricksafe (first version, not the updated one) -

[HELP] Motors to make 42039 Radio Controlled
Mutak posted a topic in LEGO Technic, Mindstorms, Model Team and Scale Modeling
Hello. I just bought the Lego 42039 set, and immediatel after building it I thought it would be cool to make this model radio controlled. The instruction contains step by step guide to attach motor for door or to attach the lights, but there is no instruction how to make it. I'm 26 years, and I don't have my old lego anymore, and this is my only set which I have right now ( I always loved lego!). I'm wondering which motors I would need to buy, to make this car a radio controlled one. I have found few howto videos in google and youtube, but they are not mentioning the sets which you need. I saw that sometimes instrcutions are mentioning 'L Motor' or something like that, but I really don't know what it means and which set contains it. Can you please provide me some guidelines how to add RC functionallity to such model ? Maybe those parts which they are mentioning are spare parts, not in any set? -
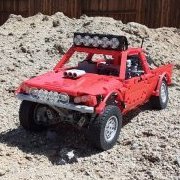
[C-MODEL] 42039 Baja 1000 Buggy
offroadcreations posted a topic in LEGO Technic, Mindstorms, Model Team and Scale Modeling
Hello all, Today I present my newest MOC: a c model of the 24 Hours Race Car, a Baja 1000 Buggy based off Agrof's Class 1 Unlimited Buggy. It has independent suspension, HoG steering, a seat, lights, and custom stickers. I created the stickers by copying the ones that came with the set, printing them on sticker paper, and cutting them out. The steering has a little bit of toe-in, but it works fine. I also used tires and wheels that didn't come with the set to make it look cooler. Here are some more pics of the WIP stage and how it looks now: Please tell me what you think and have a great day! Edit : 1 more picture. -

[C-MODEL] C-Model Index Discussion
Josephiah posted a topic in LEGO Technic, Mindstorms, Model Team and Scale Modeling
Hi all, This topic is for discussion of the new C-Model Index (under construction here), and for suggestions of C-Models for inclusion. I hope the index will help us all keep track of the great C-Models people have created, and in many cases, their instructions. I've managed to find a good collection to get started, but no doubt I will have missed some, so please tell me any you'd like to see added (or any mistakes/missing details/etc), and I'll add them in future updates. Rules for inclusion: Uses parts from only one set; That's about it! Where possible, I'll list details of EB topic, youtube video, instructions, and part count. Models detailed on EB are obviously favoured, but I've already come across one or two from elsewhere which I feel deserve to be included. They are listed in no particular order. Where individuals have listed their creations as C-Model, D-Model, etc, I have ignored this and called them all C-Models, because each designer's classification doesn't work when all compiled together. To keep this manageable, I'm going to try and release these in groups according to the original set. To start with, here's all the C-Models I have managed to round up for the set that got me out of my dark age - and perhaps its no surprise, given the sheer number of useful parts: [EDIT: moved 42009 into the index.] Hope this is useful - suggestions welcome. Jo -
 Hi all. I'm asking for some advices from experts. I am into lego technic "standard" constructions from a few years, now I want to enter in the world of modding and make some custom creations. I love electric models, speed and the "mechanical engineering" behind LTechnic. I also know the existence of SBrick and I love the idea and I want to support them. Then i think that a good start can be the motorization of an existing model, adapting it to power function, engine, steering and SBrick. I am thinking about buying the 42037 Off Roader or maybe the 42039 LeMans Race Car. I have an old (10-15 years old) offroader, I can disassemble it and get some parts from it, mabye. So I think I'm going to buy: - SBrick - XL Engine (I know it's a bit overpowered but I want to create a speedy car and reuse the engine for future creations) - Servomotor - Power Functions - 42037: Formula Off Roader OR 42039: 24 Hours Race Car Is it a good way to start? I need something else important?
 -
Hi, my first post and my first MOC… For about 20 years my Lego-Time ended. I don't know why but I began to looking last year: whats new about Lego-Technic. I was pretty amazed, new pieces, big sets, pf… So I bought the 42039 set and at the moment it's my only one of the new models. Bricking A to B and B to A I began to play around and want to try a MOC… something Off-Road… Thats the Result (but still WIP): Functions: Steering, working engine, individual suspensions and and functional working hood on the back
-

[MOD] TE022 Ralley Paris-Dakar SUV based on 42039 B
metulskie8 posted a topic in LEGO Technic, Mindstorms, Model Team and Scale Modeling
A pretty colorful SUV based on 42039 B model with the drive, the radio control and steering of the RACER 8366. Thank you for watching... Full Galerie on: http://www.technic-dialog.de/Homepage/index.php?page=24&album=1373 -
G'day everyone. Thought Id share the RC conversion I did on the 24 hr car. My sons have been racing it on smooth concrete so I didn't have to worry about torque, just speed. Using 2 L motors for drive, servo motor for steering and 2 M motors for the doors and rear hood. This setup is no good on carpet but if you swap the two bevel gears around on the fake V8 it can run on carpet. The pieces in pink are the pieces I added. The pieces in blue represent the servo motor and the ones in orange are the L motors. Sorry no video just a lxf file (Ldd) which can be downloaded from here: http://www.freespace.com.au/filehosting/2075 have fun if you build it.
-

[REVIEW] 42039 - 24 Hours Race Car
Jim posted a topic in LEGO Technic, Mindstorms, Model Team and Scale Modeling
REVIEW - 42039 - 24 HOURS RACE CAR INTRODUCTION When the preliminary images of the "Le Mans Racer" surfaced somewhere last year (2014) it got a lot of praise. This changed dramatically when the final images of the 24 Hours Race Car showed up. The front side of the car, especially the head lights, and the curvature of the side of car had changed a lot. The car obviously still resembled the prototype, but the new design raised a lot of eyebrows. The new design was considered a step back instead of forward. Eventhough I still liked the design, I must admit I liked the earlier design better too. With the emphasis on past tense liked. I am not sure anymore and this review will show you why. Like the Arctic Truck this set has a B-model which is well worth checking out. That's why this review includes both the A-model and B-model. For people who are on the fence, the B-model might actually convince them to buy the set after all. Let's see what this set is all about! Note: All images can be clicked for hi-res versions. SET INFORMATION Number: 42039 Title: 24 Hours Race Car Theme: Technic Released: 2015 Part Count: 1219 Box Weight: 2110 gr Box Dimensions: 47,8 cm x 37,3 cm x 8,7 cm Model Dimensions: 40 cm x 18 cm Set Price (MSRP): €99.99 / $? / £99.99 Price per Part: €0.082 / $? / £0.082 Links: Brickset, Bricklink THE BOX The box measures 47,8 cm x 37,3 cm x 8,7 cm and weighs well over 2kg (2110 gr to be precise). The width of the box is the same as the box of the Arctic Truck. This box also feels like it's filled to the brim. THE FRONT The front shows a picture of the main model in action, with radial blurred wheels to emphasize the motion of the car. The lower right section shows the dimensions of the model. Upon completion, it will measure a length of 40cm and a width of 18 cm. THE BACK Like the front, the back side has exactly the same setup as the box of the Arctic Truck. The top shows the functions of the model, while the lower left side shows the B-model and the lower right side shows the motorization options. The picture of the B-model looks so cool, it could be a model of it's own. At this point I was very eager to build both models and compare them. THE SIDE One of the sides usually shows a part in 1:1 scale. This time it's one of the wheels indicating the size of the model. CONTENT OF THE BOX The box contains: 1 Book(let) 1 Sticker Sheet 13 Bags 4 Tires INSTRUCTION BOOKLET Since I own two copies of the set, I also received two instruction booklets. What's catching my eye is that my second copy is supplied in different packaging than the first one. It's for the first time (that I am aware of) that the instruction booklet and stickers come in a sealed bag, without cardboard back. Hopefully this will be a new standard for all sets with sticker sheets. Instead of multiple booklets, this set contains a single square bound book. In earlier reviews I have epxressed my preference for a single book. I don't see any advantage in having 2, 3 or even up to 6 booklets. STICKER SHEET Like the actual model, the sticker sheet looks very vibrant. The bright green, white and black color combination has found it's way to the stickers as well. Either you love 'em or hate 'em. Since I started writing reviews I have been applying stickers and I am happy I started doing it. Stickers do give the model it's finishing touch. BAGS WITH PARTS Thirteen bags with a total of 1219 parts (give or take a few) are supplied in the densily packed box. The rims and flex are sealed in a bag as well. Sometimes looking at the bags makes you wonder what the logic is, behind the distribution of the various parts across the different bags. Well this time it really got me confused. Take a look at two of the bags below. There's a bag containing all the 3L Blue Pins. Then there's a bag with various parts....and a single 3L Blue Pin. I figured this might be an error, but both of the sets have the same anomaly. TIRES The tires have been supplied unbagged, as usual. HIGHLIGHTED PARTS This chapter describes new and interesting parts. This set actually contains a lot of them. This set also contains an abundance of panels. If you aren't into panels, this isn't the set for you. CHANGEOVER CATCH This year (2015) the new changeover catch parts were released. It's a combination of three parts. The advantage of the new parts is that the red gear is the same on both sides, which avoids mounting it the wrong way around. It also avoids the changeover catch slipping out of the driving ring, like it used to do. You can apply lots of pressure, but the catch doesn't slip out. PINS Some of last year's new pins are also included in this set. 12 x Pin with Pin Hole and 21 x 3L Pin with 1L Axle. Securing Technic Beams can be quite simple with the new Pin with Pin Holes. The new 3L Pin with 1L Axle gives you more possibilities when connecting Beams and other parts. Below are two example situations where the new pins have been used. Granted, the examples below can be accomplished by using other techniques. However, some predicaments from the past can be easily solved by using these new parts. Like me, you will most likely appreciate the ease of use. ENGINE AND SUSPENSION Also included are two Steering Portal Hubs and Steering Portal Hubs with Ball Joint Arms and four Steering Portal Axles for driving and steering the vehicle. These parts are commonly used nowadays. The picture below also shows some other parts, like gear rack, steering arms and suspension. FRAMES This set comes with a single 5x7 Frame and three 5x11 Frames. PANELS This set contains a whopping 47 panels in three different colors. I personally like panels a lot and I do appreciate the variety we have at our disposal lately. This set even contains a new 13x3x2 Curved "Mudguard" Panel. NEW 13x3x2 CURVED PANEL This is the first set to contain the new 13x3x2 Curved Panel. Looking at the pictures doesn't do these panels justice. In real life they are actually quite big. I figured they would be smaller, but they are even longer than the 11 x 5 frame, with a length of 13 (including the attachment points). Hopefully this part will be available in other colors as well, preferably white, for adding variety to your EV3 robot. 19L WHITE FLEX-AXLES The White 19L Flex Axles have only been released in a single set, the 8461 Williams F1 Racer in 2002. Current prices on Bricklink are as high as 15 Euros! Needless to say we are very happy with the return of these White Axles. Now we can build Jeroen Ottens' awesome Alfa Romeo 4C Spider for a decent price as well. I am really happy that useful rare parts are being used more often by TLG designers PART LIST Here's the complete list for all 1219 parts. As you can see in the Highlighted parts section, this set contains a lot of interesting and useful parts. If you don't own sets like the 8070 - Supercar, this might be the set to pick up if you want to start building your own supercar. THE BUILD Enough with all the set and part information, let's build the model. REAR SUSPENSION The build starts with the rear suspension and drivetrain. As you can see in the picture below, the length of the Axle between the Steering CV Joint is 4L, where it usally is 3L. This is an indication that the finished model will be a bit bigger than usual (8070 for example). The finished suspension is one of the cleanest suspension setups I have seen in an official model. It's pretty basic, but it works like a charm. This setup is defintely worth using in your MOC. Here's a video: After attaching the suspension to the frame you rotate the module and secure it. At this stage the rear section of the chassis with suspension is almost finished. V8 MID-ENGINE Extending the chassis forward results in the picture below, where the front spoiler is already visible. What's also visible is the V8 engine placed right in front of the rear axle, resulting in a Mid-engine setup, perfectly suited for sports and race cars. Two exhaust pipes have been fitted on either side of the engine, together with two hoses attaching them to the engine. The instructions are easy to follow, although you sometimes you need to bend the beams a bit. Minor improvements are possible here and there, but nothing shocking. FRONT SUSPENSION The front suspension is a bit more complicated than the rear suspension, which makes sense considering the fact it contains the steering rack. The shock absorbers are placed in a different angle than the rear ones, resulting in a somewhat stiffer front suspension. All in all the front suspension is well designed and the steering rack can be easily powered with a Servo Motor. The picture belows shows the front suspension attached to the chassis. If you follow the official instructions to motorize the model, the area in front of the suspension is used to mount the battery box. When you are modding this model to make it Full RC this area can be used to mount the servo motor. GEARBOX Like the gearbox in the 8070, it's not used to switch gears powering the drivetrain. It's used to switch between two functions, opening the doors and the hood/bonnet. The gearbox is located at the left of the vehicle, near the cockpit. The mechanism to open the doors is located on the left side, while opening the hood/bonnet is taking place at the right side. To accomplish this, some axles traverse under the cockpit to the other side of the vehicle. Following the axles to other side of the vehicle and adding some gears, results in the situation below. The video below shows the gearbox in action. DOOR OPENING MECHANISM The mechanism to open the door is comprised of some Knob Wheels, Links without Stoppers and Pins with Towballs. Take a look at the doors opening and closing. THE FRONT Using the new mudguards and various other panels you finish the front of the car. The front is probably the most controversial part of the car. This is caused by the preliminary pictures shown before the release of this car. In the early pictures the front of the car had smooth curves and beautiful lines, while the final car lost these smooth lines and got a more blocky look in return. I must admit that at a first glance, the new design lost some of it's appeal. However, this model grew on me pretty rapidly. The headlight design can be found, in more or less the same way, on several real Le Mans type race cars. THE REAR The rear of the car looks great, with the stickers continuing from the mudguards to the panels underneath the spoiler. The two exhausts sticking out give some details to the back. I absolutely disagree with all the negativity surrounding this car. Maybe it's one of those models which needs to grow on you. FINISHED MODEL Here it is, the finished model. I know some of you don't like the looks of the car, but I think it looks great. The color scheme is outstanding. The new (for Technic) bright green parts, combined with white and black make this car look very vibrant and colorful. I am not a big fan of the green used in the 42008 - Service Truck, but I do like this bright green a lot. It fits perfectly well with the Mindstorms EV3 set. The curves on the side of the car are not as smooth as some of us hoped, but I still think the car looks more than acceptable from the side. The stickers add some nice details to the car, giving it that characteristic race car look. The model looks great in pictures, but it does even look better in real life. I love this picture of the front of the car. However, I do wonder if a dedicated 24 hour Le Mans Racer has the seat and steering positioned off-center?! Using the good ol' Google Machine I come to the conclusion that they do have centered seating and steering, at least the majority of them. There's ample space in the cabin, which makes me wonder why TLG decided to place the seat off-centered. The rear view looks cool too, with some of the suspension showing and the two exhaust pipes clearly visible. The bottom view is very useful to determine the size of the car in studs. It measures approx 59 x 27 studs. The chassis looks organized and well designed. The engine has been placed close to the ground, which is perfect for the weight distribution. A low center of gravity improves the handling of the car. I really enjoyed building this baby. The build is very clean and organized, although there are some steps where you need to bend the beams a bit to get things into place. Seeing the model come to life and seeing it grow to pretty impressive proportions is very satisfying. For me it was fun, but I reckon kids will go nuts over this set and the build. SIZE COMPARISON What became obvious during the build, but what's emphasized when you have finished the model, is that it's quite big! The size of the car is pretty impressive. The pictures below show the car next to the 42030 - Volvo L350F. The side view emphasizes the size of the car. It's even longer than the Volvo, if you dismiss the bucket. PARTS LEFT Some parts left. Nothing out of the ordinary. FEATURES AND FUNCTIONS Unlike the B-model, this model doesn't implement any unexpected features. The functions it does implement are exactly what you would expect from any car. Steering (HoG) Working fake engine Suspension Opening doors (gullwing style) Opening bonnet/hood Opening trunk Gearbox for switching between functions Unfortunately the steering wheel hasn't been linked to the HoG (Hand of God) steering mechanism. Placing the seat in the center would have provided an easy way to link the steering wheel to the steering mechanism. it's a shame we hardly see actual steering anymore. Opening the hood actually opens up the entire rear section of the car, providing you with easy access to the motor compartment. The mechanism to open the hood works properly, which results in smooth opening and closing of it. The same goes for the gullwing style doors. Both functions are operated manually and you need to switch with the lever to the left of the cockpit. These two functions are also the ones which can be motorized by placing an M-motor near the cockpit and a battery box in the trunk. All things considered I think this car offers lots of playability. The model is solidly built and the functions are easy to operate. I'd say it's pretty safe to let your kids play with it. B-MODEL Unlike the A-model, the B-model for this set received (almost) universal acclaim, and I can see why. Often the B-model is a pale shadow of it's part donor. In this case the model looks so good, it could be a model of it's own. It even incorporates a neat feature, which actually deserves to be in the A-model. There's a lot a variation in the quality of digital building instructions TLG is providing, but these ones are of very high quality. The picture below shows most of the chassis with suspension, fake engine and gearbox in place. FINISHED MODEL Some concessions have been made, but overall the car looks fantastic. The black of the roof has been extrapolated from the hood, which definitely works for me. The rear section of the car feels a bit empty, but the panels do cover up most of it, so it's hardly noticeable. The V8 stickers will be upside down if you use the parts from the A-model. Since I could apply new stickers, I have placed them using the proper orientation. The bottom of the car shows the chassis. It's obviously a bit smaller than the A-model's chassis. FEATURES AND FUNCTIONS Taking the functions into account, this model isn't playing second fiddle to the A-model. Besides the obvious functions like steering, opening doors and hood, this car features folding fog lights, which deserve a better podium than a B-model. Steering (Hog) Working fake engine Suspension Opening doors (manually) Opening hood/bonnet (manually) Opening trunk (operated by gear) Folding fog lights (operated by gear) Gearbox (used to switch functions) FOG LIGHTS One of the most interesting features of the B-model are the folding Fog Lights. It almost feels a bit weird that a feature like this is implemented in the B-model, instead of the A-model. Below are 4 steps showing how the mechanism works. I have also included a video. The mechanism is somewhat reminiscent of fork mechanism used in the 8109 - Flatbed Truck, which has been described in Efferman's Review. Take a look at the video to the fog lights in action. PARTS LEFT A fair number of parts left, which isn't uncommon for a B-model. SUMMARY To summarize how I feel about this set, you need to take a look at the picture below. The combined image reflects the quality of this set....or better yet....sets! You actually get two great models, for the price of one. You don't like the A-model? No problem, you can have lots of fun with the B-model. I can't stop playing with the fog lights, it's mesmarizing. The color scheme on both models is outstanding. I simply can't emphasize enough how well this color scheme pleases the eye. The regular green is dull and boring, but this bright green really pops out, especially when combined with black and white, and possibly some red details. Black, white and a little red?! Sounds familiar? Yes, bright green can easily be combined with your EV3 robots. So while you are combining the bright green with your robot, why not use the great new curved "mudguard" panels. These new panels are introduced in this set and they look great. They open up a lot of possibilities in the design department. The build of the A-model is outstanding. It is fairly simple, but since it's so clean, I really enjoyed it a lot. I think the build should be entertaining, which doesn't mean it needs to be a real challenge. And let's be honest; when is a build really challenging?! The rear suspension is a good example of why I liked the build. It's very simple, yet very effective. Works like a charm. The same goes for the other functions in both models. And the star of the entire show can be found in the B-model. How's that for a surprise?! Being aware of the fact that I like this model a lot better than most of you seem to do, I really encourage you to give this model a chance. The sheer size is impressive, the color scheme is awesome and you get a bonus model, which is actually worth building. SCORE Okay, so how do I grade this set? 8 DESIGN Open to debate, but I like it a lot. 8 BUILDING EXPERIENCE Fun and clean build. 9 FEATURES Superb function in B-model steels the show. 9 PLAYABILITY Both models offer lots of playability 8 PARTS Lots of new parts and cool existing parts. 10 VALUE FOR MONEY Two models for the price of one. 8,7 TWICE THE FUN I hope you enjoyed this review! More pictures can be found on my Flickr page. -

24 Hours Race Car (42039) in USA in January or March 2015?
Osuharding1 posted a topic in LEGO Technic, Mindstorms, Model Team and Scale Modeling
So after a brief look at LEGO Shop@Home for many different regions (USA, Europe, UK, etc.), it appears as though 42039 will not be available in the USA on January 1, 2015 but it will be in other regions. This seems to be a trend with the largest first half sets. For example, the USA did not get 42000 until March 2013 and we didn't get 9397 until March 2012 whereas European countries had access to those sets from LEGO January 1st. Anyone know why this is happening? I assume it's because Technic is not as popular in the USA.