
Jurgen Krooshoop
-
Content Count
736 -
Joined
-
Last visited
Everything posted by Jurgen Krooshoop
-
[MOC] Backhoe Loader V3
Jurgen Krooshoop posted a topic in LEGO Technic, Mindstorms, Model Team and Scale Modeling
After almost 2 years of non-Lego-building, it was time to finish a new MOC. May I present: Backhoe Loader V3, an improved version of my most popular MOC, the Backhoe V2 from 2012. Just as the V2, the V3 is fully remote controlled. Now back in 2012, only the M-motor and the XL-motor were available. Now that we have the L-motor and the servo-motor, they can be used to upgrade the model. Also, we now have the perfect tyres for a tractor, thanks to 42054, 42070 and 42081. The Backhoe V2 used the very rare and expensive Power-puller tyres, so now it's much easier and cheaper to get the correct tyres. The blue colour was chosen to distinguish between my previour backhoe loaders (which were all yellow). Of course, it possible to build this model in yellow instead. A lot of effort went in preventing the use of rare parts. 2 rare parts I was unable to extract were the 2 technic panels on the sides of the front. Remote Controlled Functions: 1. Driving (2x L-Motor) 2. Return-to-centre steering (Servo-motor) 3. Gearbox to select between Loader or backhoe operation (M-motor) 4. Loader (L-motor) 5. Loader-bucket (L-Motor) 6. Backhoe boom (L-motor) 7, Backhoe stick (M-motor) 8. Backhoe bucket (M-motor) 9. Backhoe rotation over 180 degrees (L-motor) 10. Outriggers (M-motor) Non-motorized functions: 1. Ready for PF-lights 2. pendular front-axle 3. Hood open/closed The model can be powered from the rechargeable Power Functions battery (8878), or the AAA-battery box (88000) and 2 SBricks allowing the model to be controlled with a smartphone or tablet (iOS & Android). Improvements over the Backhoe V2: 1. Loader up/down works faster, thanks to the L-Motor 2. Front bucket works faster thanks to the L-motor 3. Backhoe up/down works faster, again thanks to the L-motor 4. Motor for the backhoe bucket is now in the boom instead of the stick, improving the balance of the backhoe 5. Rear wheels are more realistic and much easier to find 6. Nice blue colour for a change 7. Uses the big bucket of the 42030, which iscales better to the whole model As with most of my MOC's, full building instructions are available. You can find them here -
The Ultimate 8043 (modifications)
Jurgen Krooshoop posted a topic in LEGO Technic, Mindstorms, Model Team and Scale Modeling
What do you get if you take the new 8043 Motorized excavator, some extra PF and technic parts and a crazy builder ? The Ultimate 8043 DOWNLOAD INSTRUCTIONS. I modified my 8043 even more than I did the first time. I believe these mods are all "legal" builds. These mods hugely increase the playability of the model. It now includes: * Full independent simultanious controll of all the functions * Joystick-controller that works just like a real excavator. Based on a desigh by Jason Railton * 8878 Rechargeable battery * XL-motor for lifting boom * PF-lights * Improved bucket looks and operation * Improved Dipper range * All the gear-reduction moved to the undercarriage * Cabin roof This time I made full (photo-) instructions so everyone can turn their 8043 into a properly working mean digging machine. -
Ultimate 42009 RC-Mobile Crane
Jurgen Krooshoop posted a topic in LEGO Technic, Mindstorms, Model Team and Scale Modeling
Just as I did with the 8043 Motorized Excavator, I made a fully remote controlled and improved version of the 42009 Mobile Crane Mk II set. All the essential functions of the crane were motorized, which are: Driving (1x XL-motor) Steering (1x M-motor) Outriggers (1x M-motor) Outrigger-legs (1x M-motor) Lifting/lowering boom (1x L-motor) Extending/retracting boom (1x L-motor) Lifting/lowering hook (1x M-motor) Upperstructure 360+ degree rotation (1x M-motor) Funtions that were improved: Boom extends further. Max boom-length 96 studs Boom retractrs further Better steering-lock Solid metal hook Increased lifting power Faster outriggers More efficient drivetrains Building instructions Full building instructions are available as free download. And there are 2 different parts-lists: 1 for the complete model and 1 that only contains the extra parts needed bedises a standard 42009. Go to the Instructions page on www.jurgenstechniccorner.com to download them All remarks and questions about this MOD and the instructions can be posted here. Enjoy the video: -
Ultimate 42082 with instructions
Jurgen Krooshoop posted a topic in LEGO Technic, Mindstorms, Model Team and Scale Modeling
3rd in the series of my Ultimate models, here's the fully remote controlled version of the Lego(r) Technic 42082 (released in the summer of 2018). Just as with the Ultimate 8043and the Ultimate 42009, the goal was to make all of the essential functions remote controlled using only Power-functions parts and make building instructions for it. All the motorized functions can operate simultaneously. The remote controlled functions are: Driving with running fake-engine Steering 3 steering modes: all-wheel, front wheel and crab-steering modes Outriggers Rotation of upperstructure Lifting/lowering the arm Extending/retracting the arm Lifting/lowering the hook Manual-functions that were kept from the original model: Opening the grey tool-doors on the side Opening the cabin-door Fitting the outrigger-pads in the vehicle The 4-wheel-drive was kept intact, but unfortunately, the space in the 2 compartments where the chests with the chains and tools were stored, was used to place a batterybox and PF-receivers, so the chests don't fit anymore. Compete building instructions are available on my website -
[MOC] Backhoe Loader V3
Jurgen Krooshoop replied to Jurgen Krooshoop's topic in LEGO Technic, Mindstorms, Model Team and Scale Modeling
I'd like to answer your question, but I don't understand what you mean. Both buckets are fully functional. The model is just as big as V2, so Power-puller wheels should fit, but I haven't tried yet I built my own analog modular synthesizer, which was quite time-consuming No, you could build the V3 in yellow and use your pieces, or build the V2. It's still available. -
Manitou Telehandler
Jurgen Krooshoop posted a topic in LEGO Technic, Mindstorms, Model Team and Scale Modeling
With a parts count of allmost 3500 (!) parts, it's my biggest MOC up until now and together with the Backhoe Loader V2 (with 9 motorized functions using 8 motors) it's the most complex. Using Manitou equipment as inspiration and reference, I finally got to building a fully functional, motorized, remote controlled, rotating telehandler. The chassis and the upperstructure are essentially 2 different models which can easily be separated and joined. Each has it's own PF receivers (or SBrick) and batterybox. Chassis Here's a list of all the functions: * 4-wheel motorized drive (with 1 XL-motor) * 4-wheel steering with return to centre * 3 different steering modes: normal, crab and 4-wheel steering * Outriggers can be extended and lowered The chassis contains a double switch to selects between "drive-mode" and "outrigger-mode". The double switch uses the new driving-rings to switch the functions of 2 motors. In driving mode the motors operate the driving of the model and the switch that selects the steering mode. There are 2 steering modes: normal steering, where only the front wheels turn. Second is 4-wheels steering, where the front and rear-axle turn in oppisite directions. And third is crab-steering, where the axles turn in the same direction. This makes it possible to make sideways-movements with the vehicle in small spaces. It's accomplished by using servo-motors for turning the axles. The front-servo always truns the direction in which you push the controll. The rear-servo is driven by a PF-switch, which in it's turn is moved by an M-motor (with clutch gear). This way, both axles are allways synchronized, you can even change steering mode while the axles are turned. In outrigger-mode, the 2 motors can extend and lower the outriggers (as you'd expect). Unfortunately, the 4 mini-actuators used for lowering the outriggers are not strong enough to lift the enourmous weight of the model. The side panels open up to reveal some of the motors (on the left side) and the batterybox and receivers (on the right side). The batterybox can easily be removed to change batteries. Upperstructure The upperstructure has 4 motorized functions: * Rotation of the complete upperstructure (with 1 L-motor) * Raising the Boom (with 2 Linear actuators and 1 L-motor) * Extending the boom with 3 sections (with 1 L-motor) * Changing the angle of the attachment One of the challenges of this model was making the attachment / hook up and down. The drivetrain for this function had to extend together with the extending arm. In the real machines this is done by neatly folding the hydrolics-hoses. In my moc, it's done by using the red sliding 8-tooth gears introduced in the 42009 Mobile Crane Mk II. The red gears slide along 32L axles togehter with the section of the boom they're attached to. This way, the drivwetrain can be extended to more than twice it's length. Extending the boom is the weakest function of the model. Even when using rollers, there's a lot of friction when the 2 inner sections of the boom are sliding out of the base-section, each with it's own rate. It will not be able to lift a lot of weight. Rotating the entire upperstructure is done with 1 L-motor. The new big turntable from the 42043-set was used and reinforced with 4 support wheels / rollers to ensure smooth 360+ rotation. Since there are no wires running from the chassis to the upperstructure, the rotation is endless. Again the batterybox can easily be removed to change batteries. For cosmetic details, the cabin features an opening door, liftable lever (for better access to the chair) and detailed control panel. Remote controll The model can be controlled either with (4) power functions receivers and customized PF-joystick-controllers or with (2) SBricks. The building-instructions show the version with PF-components. But the PF-receivers can easily be replaces with SBricks, 1 SBrick in the Chassis and 1 in the upperstructions. This is my prefferred means of controll, as the ASBrick-system allows scontroll over the speed of the individual motors. Building intructions Complete building instructions for this model are available here. They come as a PDF-file of almost 600 pages accompanied with all the neccesary parts-lists. -
Link Belt 250 X 3 Excavator with instructions
Jurgen Krooshoop posted a topic in LEGO Technic, Mindstorms, Model Team and Scale Modeling
Following up on the Zorex-220 PF-excavator, I found that there were some things that could be improved. Inspired by the colour-scheme of the USA-based Link-Belt Excavators, I started designing a new excavator. Allthough the principles and scale are basically the same as the Zorex, there are many differences: * Link Belt is based on a real existing machine, Zorex is just a typical excavator* Link Belt has fully studless chassis, completely hiding the drivetrain inside the chassis, while maintaining the suspension* Improved driving and slewing thanks to a roller.* Uses L-motor for slewing* Openable cabin-door, cabin-roof, superstructure-side-doors and opening top.* More detailed interior* Greebles mimicing the insides of the machine* Improved scaling by extending boom and tracks Link Belt & SBrick Some weeks before Lego World 2014, I was contacted by the Sbrick-team, asking if I would like to demonstrate the Sbrick at Lego World. They sent me the Sbricks and this excavator was chosen to be the test-model for there prototype-Sbricks. The tests at Lego World turned out succesfull, the model and the Bluetooth-controlled Sbricks performed well. Using an iPod Touch as controller, there was no interference with the many PF-controlled models there. Ans the Sbrick-system allows you to controll the speed of the motors, making the controll very precise and more realistic. So when I started making instructions, 2 versions had to be made: 1 for the PF-version and 1 for the SBrick-version. Find out all about Sbrick at www.sbrick.com and social.sbrick.com Instructions Full building-instructions are available for at http://jurgenstechni...nstructies.html Parts lists http://jurgenstechni...Parts Lists.zip -
Kenworth W900 MOC with instructions
Jurgen Krooshoop posted a topic in LEGO Technic, Mindstorms, Model Team and Scale Modeling
May I present my newest MOC: the Kenworth W900 US Truck. It has all the technical functions you'd expect from a supercar: * Full live-axle suspension on all axles * Both rear-axles are driven * Remote-controlled steering with working steering wheel inside the cabin * PF-lights (OK, I went a bit overboard with those 8-) ) * Openable hood and cabin doors * Remote controlled driving And the most important function of this model: 4-Speed remote-controlled gearbox The main design goal for this gearbox was to have a reliable and comprehensive gearbox with more than 2 gears. One thing that was very important was that the gearbox had to be able to handle a lot of torque. It had to be able to drive large Lego Technic models. Another aspect was that switching gears had to be very easy. First, the transmission itself is a 2-way transmission, where one has a different gear ration compared to the other. Then I develloped a kind of switching-logic, where 1 M-motor would be able to switch 2 driving rings, each in either direction. For this I used differentials, 24z clutch gears and an inverter-mechanism which uses a sliding worm-wheel. Instructions Full building instructions for the Truck are available here. -
PF Backhoe V2 with building instructions
Jurgen Krooshoop posted a topic in LEGO Technic, Mindstorms, Model Team and Scale Modeling
After many requests for instructions for the PF Backhoe loader I built 1,5 year ago, I decided to rebuild the model, improve it and make building instructions. It has been my most complex Lego-project so far. Technically, it’s very similar to the first version. That means there are 8 motors for 9 functions: Driving & steering Outriggers Frontloader & bucket Backhoe, dipper & bucket Backhoe rotation Technical differences with the first version are: Front bucket now has the big LA’s instead of the mini LA’s Dipper is 1 stud shorter More compact design Speed controll for driving Other improvents are esthetical: It now has a seat and steering wheel inside Panels in the front section Fenders for the front wheels Rear-fenders with round curve Roof with curved sides I’m very happy with the end-result. The new version looks nicer and all the functions work properly. Instructions The main goal of this model was to make building instructions. It took a long time to make them, but they’re finally ready. They come as 254-page PDF-file, including parts list. You can buy them for € 10. The instructions are available at www.jurgenstechniccorner.com You can see the online parts-list at rebrickable.com and as image. Or you can send me an email. -
[MOC] RV
Jurgen Krooshoop replied to Chapachuk's topic in LEGO Technic, Mindstorms, Model Team and Scale Modeling
Really, really beautifull !!! My compliments. -
Manitou Telehandler
Jurgen Krooshoop replied to Jurgen Krooshoop's topic in LEGO Technic, Mindstorms, Model Team and Scale Modeling
Reasons for using rechargeable battery in the chassis had to do with the available space. Of course, the AAA-box can be used (which are used in the instructions). Reason for using the normal AA-box on top had to do with cost. It's not needed for counterwheight, a rechargeable bbox can be used there as well. -
Manitou Telehandler
Jurgen Krooshoop replied to Jurgen Krooshoop's topic in LEGO Technic, Mindstorms, Model Team and Scale Modeling
Yes, the combination of 42009 and 42030 gives you a very good start. You'll be able to compare parts lists soon, as this model has been submitted to Rebrickable. -
Manitou Telehandler
Jurgen Krooshoop replied to Jurgen Krooshoop's topic in LEGO Technic, Mindstorms, Model Team and Scale Modeling
Yes, Blakbird made the transparent render. I can make instructions, but I cannot make renders like that -
8043 - The Bucket that Never Was
Jurgen Krooshoop replied to LennyRhys's topic in LEGO Technic, Mindstorms, Model Team and Scale Modeling
Oh man, I really like your bucket, LennyRhys ! Are they still available ? I'd certainly be interrested in buying some from you. They'd look great on my Link Belt excavator. -
Ultimate 8043 SBrick Building Instructions
Jurgen Krooshoop posted a topic in LEGO Technic, Mindstorms, Model Team and Scale Modeling
With the help of Alez Zeimet (AFOL1969) and Strikeman, I've created full building instructions for the SBrick-version of the Ultimate 8043 Motorized excavator. Go to the instructions-page to get them. It wasn't just a matter of exchanging the Power-functions with SBricks. Because of the different shape of the SBricks and the fact that there are 4 PF-connectors on top, the SBricks didn't fit. So I rebuilt the U-8043 and modified it so that 2 SBricks would fit neatly inside the model. And the profile I created for the Link Belt 250 X 3 excavator worked perfectly with this model as well. -
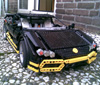
Madoca's Corvette C3 build review and instructions
Jurgen Krooshoop posted a topic in LEGO Technic, Mindstorms, Model Team and Scale Modeling
Welcome to the build-review of (IMO) one of the finest mid-scale MOC's this year: Madoca1977's Corvette C3 Stingray. Madoca was so kind to provide photo-instructions of this MOC, which allowed me to make an MLCad-file and complete building instructions. The instructions can be downloaded here. Blakbird made some renders to complete this project. Specifications: Number of parts: 1187 (including the remote-controller) Size (WxDxH): 21 x 49 x 14 studs Propulsion: 2 x L-motor, rear-wheel-drive Steering: 1 x Servo-motor Power-source: 1 x 8878 rechargeable battery or 88000 AAA-batterybox Lights: 4 x PF-LED's Building process: Building this MOC starts with making the rear-chassis, which has the drivetrain and suspension. The suspension-design is very interresting and unlike any suspension design I've ever seen. It uses Unimog ball-joints to create independent suspension while still having a very narrow chassis, while still mainaining the differential for the rear-wheel-drive. Also, the space for the battery-box is prepared, allowing the batterybox to be perfectly centered. Next is the front-chassis. Again the suspension design is quite original. It must have been quite a challenge for Madoca to fit the complete independent suspension system for a model this slim. The suspension travell is quite small. Both the left and right wheel share the same set of LBG 6,5L shock-absorbers. This section also has the Servo-motor for steering. It's was bit trucky to build because one of the axles in the steering system had to be rotated 45 degrees to achieve a perfect return-to-centre-steering. The steering lock is not the biggest which can be achieved with the servo-motor, but this is due to the use of 6571 small steering arm . Next is attaching the L-motors to the front-chassis and joining the 2 chassis-sections for 1 complete chassis. The final construction feels sturdy and well-braced and well-supported. This chassis will survive heavy driving sessions ! Then we add all the remaining Power-Functions elements. Since this model has 4 sets of PF-lights, there are a lot of wires ! But there's enough space for every wire to be well hidden inside the chassis. All the lights are connected to 1 PF-switch. The bodywork for the rear section is up next. This is the first preview of the sleek lines and curves of this MOC. Panels and liftarms are placed in angled posisions in very creative ways. The rear bonnet provides easy access to the battery-box, which can easily be removed for exchanging batteries. After finishing the rear end, another surprise is coming up, which is my favorite feature of this model. There's a smart switching system, which connects the PF-switch to a lever in the dashboard and to the elevating-mechanism of the headlights. When operating this lever, the lights pop out and are switched on simultainiously, marvelous !!! All that's left is to finish the bodywork. The more panels are added, the nices the model looks. And that's what makes it one of the nicest MOC's this year: the final model looks extremely good. I compared it to some photo's of the real car, and it's surprising to see how detailed the lines and curves of this car are reproduced using technic panels, liftarms and connectors. And it's especially remarkable, since it's only a MID-scale MOC. Kudos to Madoca for this exquisite design ! The only thing I didn't like so much is the colour of the seats. Since they're black, they are barely visible from the outside and don't stand out at all. It would like it more if they were DBG or LBG. But building them in DBG would require changing the design, since 1 of the parts used is not available in DBG. Performance: Allthough the model is relatively heavy for it's size, the driving-performance is very nice. It drives quite fast. And the final steering-lock is acceptable, taking into account the length of the car and the specific steering-parts used. The original model uses 2 24z white clutch-wheels in the drivetrain. I deceded to replace them with DBG 24z gears for a more direct response. I kept the white clutch-gears in the instructions. One thing I liked less is that some details of the bodywork (especially the headlights) come off easily while driving. The bodywork is a bit fragile and cannot withstand accidental collisions very well. There were a few tricky parts to build. Placing the PF-switch and routing all the cables to the correct position was quite a task. Rare parts There are only a few rare parts in this MOC. These are the 6571 steering arm small, the 6574 gear-rack 1x2 with 2 ball joints and the red 19L flex-axles, of which you need 4. And then there are 4 red connectors #4 and 6 red connectors #5 Some more pictures: Pintures in full resolution can be found here -
Erik's creations
Jurgen Krooshoop replied to Erik Leppen's topic in LEGO Technic, Mindstorms, Model Team and Scale Modeling
Very nice compact truck !! -
Link Belt 250 X 3 Excavator with instructions
Jurgen Krooshoop replied to Jurgen Krooshoop's topic in LEGO Technic, Mindstorms, Model Team and Scale Modeling
@ darksheep: The new profile is not available yet, that's why I included the settings for the old and the new profile. It works with fine the old profile, the changes are mainly cosmetical. I don't know why it's taking the SBrick-team so long to make the new profile public. As far as I know, the new profile is finished, just not available yet. -
Link Belt 250 X 3 Excavator with instructions
Jurgen Krooshoop replied to Jurgen Krooshoop's topic in LEGO Technic, Mindstorms, Model Team and Scale Modeling
This model has been submitted at Rebrickable. Waiting approval. -
Link Belt 250 X 3 Excavator with instructions
Jurgen Krooshoop replied to Jurgen Krooshoop's topic in LEGO Technic, Mindstorms, Model Team and Scale Modeling
42000 and / or 42025 -
SBrick General Discussion
Jurgen Krooshoop replied to Nofer89's topic in LEGO Technic, Mindstorms, Model Team and Scale Modeling
@Jim: Yes, I've received the file. Thanks !! -
SBrick General Discussion
Jurgen Krooshoop replied to Nofer89's topic in LEGO Technic, Mindstorms, Model Team and Scale Modeling
Does anyone happen to have an LDraw-DAT-file of the SBrick allready ? -
Madoca's Corvette C3 build review and instructions
Jurgen Krooshoop replied to Jurgen Krooshoop's topic in LEGO Technic, Mindstorms, Model Team and Scale Modeling
Yes, I really like the idea of an "Instruction Maker" sign -
Madoca's Corvette C3 build review and instructions
Jurgen Krooshoop replied to Jurgen Krooshoop's topic in LEGO Technic, Mindstorms, Model Team and Scale Modeling
@M_Longer: Whenever you have specific MLCador LPub-related questions, you can contact me at info@jurgenstechniccorner.com -
Madoca's Corvette C3 build review and instructions
Jurgen Krooshoop replied to Jurgen Krooshoop's topic in LEGO Technic, Mindstorms, Model Team and Scale Modeling
@gmshades: Connectors added to the rare-parts list. @M_Longer: Yes, The resulting PDF is the direct output of LPub.