

codefox421
-
Content Count
198 -
Joined
-
Last visited
Posts posted by codefox421
-
-
My issue with the last minute connector swap is twofold.
QuoteThese rails will be 100% compatible with the recent LEGO offerings.
Firstly, ME Models made the above statement, and that is why I backed for metal rails. I build entirely battery operated, but my LUG won't give up 9V yet. If I had known the ME Models rails would be incompatible with my LUG's existing track, I would have only backed for plastic track!
Secondly, I take issue with the late-minute nature of the announcement. This is something that should have been revealed before or at the time that ME Models opened up orders to backers for additional metal track/geometries. If they had, I would, again, not have contributed money toward a rail system that is incompatible with my LUG's existing rail collection.
It's been over two years, I still haven't received my entire plastic reward, and now I find the additional metal rails I've ordered for the benefit of my LUG will be incompatible with the track we already own. I've tried to be positive for the last two years, but this is basically the last straw. The whole project smacks of mismanagement and broken promises. On the bright side, maybe @coaster's project will get more support now.
edit: formatting
-
Is anyone else far less excited about these now that they require adapter tracks or is it just me?
-
Thanks for the photos and video, pirzyk and CrispyBassist! These are looking really great, Coaster! I hope they fair better in the next round of kickstarter crowdsourcing. I believe they'll have a chance to get funded.
20 hours ago, HoMa said:Thanks for sharing your pictures. Unfortunately I haven't had time yet to set up my R104 switches which I've got from BrickTracks recently. But they really look promissing! Could someone who already painted the white 3D print prototypes give some advice about the type of (spray?) color which was used to color the tracks in gray?
Hi HoMa! For lasting color, dying is probably the best bet. A shapeways representative once directed me to this article when I inquired about how to color their white nylon (WSF) material: http://makezine.com/2013/05/09/how-to-dye-your-3d-prints/
-
You may also be interested in BlueBrick, a track designer made specifically with LEGO in mind. It's windows-only like TD, but since you seem to have a knack for running exe on osx it should be no problem!

-
On 11/28/2016 at 10:38 AM, McWaffel said:As promised, here are some photos of our office train :D
I can also post a short video of the train running if anyone is interested

That looks super fun! It's always great to see someone dusting off their old bricks. Please do share a video!
-
17 hours ago, LEGO Train 12 Volts said:Very nice video ...are the rods of your emerald night from a custom shop?
Yes, they are. Zephyr1934 makes them, and sells them over here: http://www.bricklink.com/store/home.page?p=zephyr#/splash
21 hours ago, dr_spock said:Neat. Do you have one showing how to control with your phone?
Surprisingly, I don't, not of controlling a train anyway. In the video at the end of the first post in this topic, I briefly demonstrate controlling a truck with my phone: http://www.eurobricks.com/forum/index.php?/forums/topic/99090-motorized-42005-monster-truck/ And in this topic, I demonstrate controlling a train with an NXT intelligent brick via Bluetooth: http://www.eurobricks.com/forum/index.php?/forums/topic/93663-emerald-and-blue/ That's the best I have right now.
-
Here's a silly little video I made last year and never shared. Both trains are controlled from my phone via my open source Bluetooth receiver.
Stay tuned for the bloopers at the end.
 Hope you enjoy!
-
Kickstarter announcement coming soon! Stay tuned!
Exciting news! Can't wait!

It's a bit late in the game, but with your demonstration of breaking the R324(?) crossover into A,B,C/D have you considered something similar for the R104? Maybe just two parts A (has the points) and B/C (has the frog/double-cross), so that the end piece, B, can simply be swapped out for a double crossover piece, C?
R56 and R72 curve, black.
the studs are good, the connection is a bit lose.
Connection looseness is probably a result of the polishing that Shapeways performs (sometimes, at random) on Black Strong & Flexible prints. I highly recommend only printing in White Strong & Flexible; I have never had mechanical tolerance issues with it.
Also, you can dye White prints with Rit dye, so probably can achieve grey: http://makezine.com/...your-3d-prints/
-
Steve, which size of magnets does one need for the magnet holder and coupler you sell?
Yikes, I don't actually know! :-) I assumed you'd use the existing LEGO ones which slide out with a little coaxing. I guess I'll measure them and post that info.
SteveB
I measured one this evening. It's 10.2mm in diameter and 7.4mm thick.
-
The standard TLG bogie traveled 19 section and the custom bogie traveled 23 sections.
My guess is, with proper lubricating, both of these could travel even farther. I know some people on the forum, of which jtlan is one, lubricate their wheel sets. I've experimented with automatic transmission fluid as a lubricant, hoping it would attract less dirt than a traditional lube, and it works to some extent, but the silicon-based stuff that jtlan uses lubricates much better.
-
That's great, how much is it saying then for the Metallic Plastic, dare I ask?
Think if you do split it up into 3 or so pieces the polished option may help with the friction issues you mentioned.
For example, if it helps, this track convertor was printed in the polished metallic option:
How are the tolerances with the polished metallic? I haven't tried that one before, but I have tried black strong & flexible (BSF), which wound up being polished. The polishing removed a lot of material and basically destroyed any clutch power it might have had. What's been your experience?
-
Hi BlueRailTrains. Interestingly enough, I was looking into your work recently because of my open source LEGO Bluetooth project, which you can find at https://github.com/BTbricks
It would appear that your device is closer to a traditional DCC decoder than my Bluetooth receiver or an SBrick. Am I reading that correctly?
-
So if anyone can give guidelines or instructions how to build a SBrick replacement, I would be one of the first "beta testers".
With a little bit of rerouting, you could probably drop one of these into the driver boards I've designed.
It looks like it has the same footprint as the HM-06/11/13 Bluetooth modules I've been using.
http://www.eurobricks.com/forum/index.php?showtopic=87340
Edit: you'd probably want to omit the ATtiny841, but I'm not 100% sure that'd be possible; it looks like the ESP8266 only has three PWM outputs, which is one less than is needed for two motor outputs.
-
jtlan has tubing from McMaster Carr, and I've used some of it. It's decent stuff.
Here's a photo of what it is:
-
Kickstarter backer still waiting. :(
Just curious: metal or plastic (or both)?
-
This what you mean? http://www.eurobrick...howtopic=102241
I recommend using thinner wire than legoman666 recommends. I initially tried 0.025 inch phosphor bronze wire, which was too thick. It caused extra friction, slowing down and heating up the motor. I inevitably settled on wire of 0.02 inch diameter (about 0.5 mm) that I think is beryllium copper. (I don't know for sure because I got it out of a scrap pile at a local model railroad club.) Beryllium copper tends to be more expensive than phosphor bronze, but it has better spring characteristics than phosphor bronze, so to get a similar springiness at a lower cost use phosphor bronze wire thinner than 0.02 inches (0.5 mm).
-
Yikes, I don't actually know! :-) I assumed you'd use the existing LEGO ones which slide out with a little coaxing. I guess I'll measure them and post that info.
SteveB
I'd love to know too. Adding non-LEGO magnets to the altBricks holders might prove to be more economical than bricklinking those old style couplers.
-
For future reference, I was able to extract the .exe on my Mac using The Unarchiver
Some explanation like this should probably be included in the first post, so that mac users don't have to scour the thread, hoping to find someone offering a compatible archive, in order to learn that this is not a Windows-only project.
-
Had fun running my trains around ME Models' wide radius curves last weekend.
The horizon express retains so much more speed through those R104s.
-
If they made a cheaper version closer to the $30 mark with only 2 outputs, and let you do everything you need software-wise through the app, I would be sold. For now, my dreams of bluetooth engines are going to have to wait a bit longer.
I think their pricing is bounded by the price of the Bluetooth module that they use rather than the hardware needed to add an extra two outputs.
If you're looking for a Bluetooth receiver that costs less, you could check out my open source Bluetooth project (link in my signature).
Legoman666 has put together a few for people in the past, so you could ask how much he usually charges.
-
But you are absolutely correct, with the 1x8 crossties, we do have to have them in between studs in order for this to work, unless you'd rather have a 2x8 crosstie at every connection, which, frankly, looks terrible. I'd start investing heavily in the 1x2 plates with 1 stud.

Why not design the offset directly into the ties? I would image that anyone with a sizeable, non-permanent layout (read: LUGs) would hate to have to place a million jumper plates just to set up track.
-
Polishing is probably what did it. It's mechanical polishing, so it abrades away the surface of the object, which screws up all the dimensions and tolerances. Only un-polished black and white are able to be selected for the parts I've got on Shapeways. :) Clutch power on the ends using deep studs (like those found on the monorail stanchions) is excellent, but clutch power against regular studs is good but not great. The tile recesses to lock the pieces together work very well though.
I'm not sure why gray isn't one of Shapeways default material choices, but my only way to color match it currently uses a process for which the regular monorail straight is too large. I'll keep investigating!
And yes, prices are higher than what I'd hoped, for exactly the reasons that coaster points out. :)
Thanks for the reply. A Shapeways rep explained that Black Strong & Flexible sometimes gets polished without warning. At those prices, you'd better watch out!
The rep suggested printing in Unpolished White Strong & Flexible, which is guaranteed to never be polished, and pointed me to a DIY article for dyeing 3D prints. Could be useful for matching the light gray. http://makezine.com/...your-3d-prints/
-
I'm seriously interested in what you're doing here. That switch looks amazing.

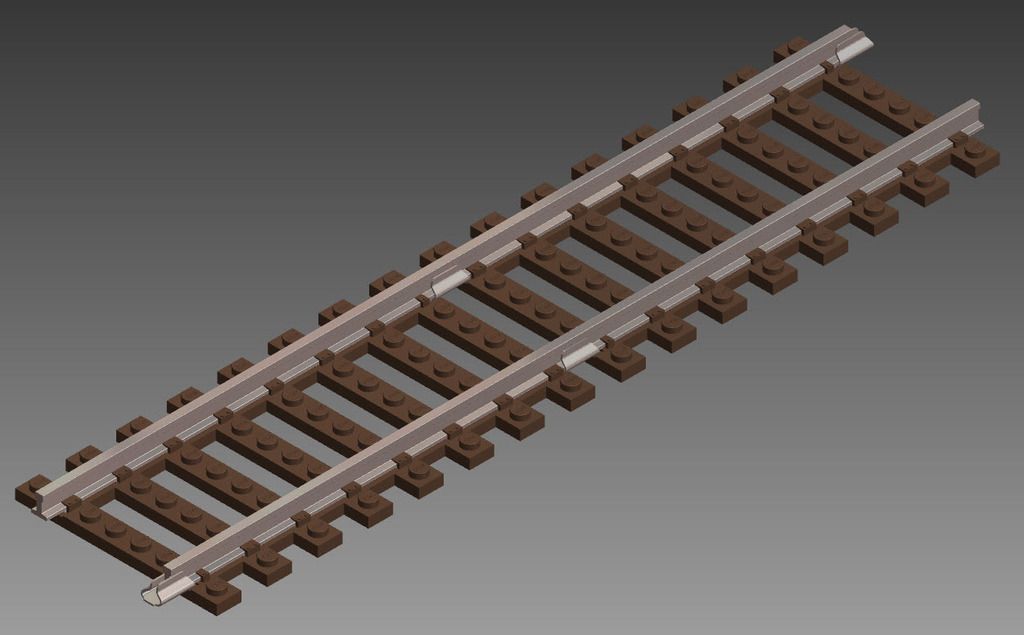
I'll work on curves next, but they take a bit longer to model, so wanted to get these out there first.
Thoughts?
My 2¢: you need to work on curves sooner than you think. You will find they influence your straights.
Your current geometry centers the rail join directly above a stud and centers the length of the track on a gap (between studs). Let's suppose you have curves with 40+16n radius. This means, for a quarter circle, we go down 40+16n studs and to the right 40+16n studs. Therefore, we are still at a stud/gap intersection, but the track has rotated 90 degrees, so the ties no longer align with the grid of studs. The rail join is now directly above a gap, and the track is centered on a row of studs.
Instead of writing 907 more words, here's a diagram:
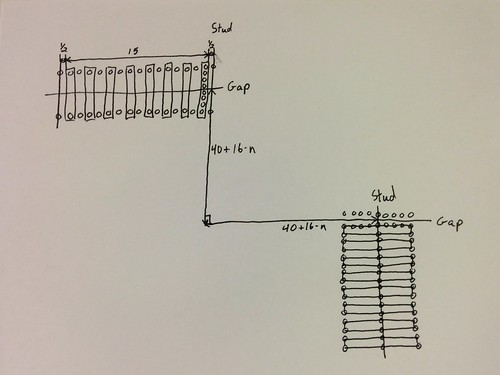
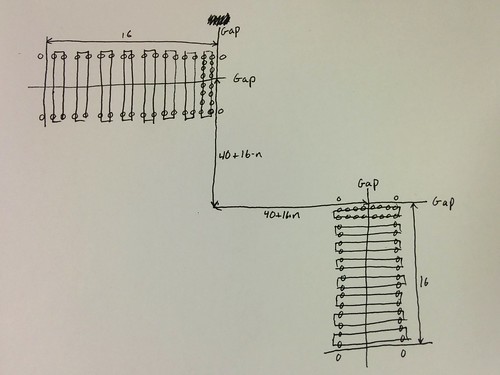
If you were to center the rail join directly above a gap, achieved by centering the ties between studs, the geometry continues to work around curves. This has the added benefit of making an adapter track easier to design, since the rail join will be in the same place as LEGO's.
-
What IP camera are you using?

Kickstarter: ME Models Tracks for both metal and ABS only track pieces
in LEGO Train Tech
Posted
Yeah, and that works fine for 90 degree corners. The trouble is that I was mostly excited about being able to do things like this, which uses a single R56 and doesn't have room for a conversion track on each side of it.