

Robert Cailliau
-
Content Count
80 -
Joined
-
Last visited
Posts posted by Robert Cailliau
-
-
Maybe you can fly a TARDIS back to when you can order from Alien Motors.
Never mind. It's probably much more useful four your child to get some more straight rails. But I found a motor here:
and here
and here
https://www.amazon.fr/Moteur-SODIAL-electriques-12000RPM-vitesse/dp/B01E9TDBGW
I don't know but they sort of look like they might work. I could order & send if you wish.
-
That's better! In your first post you mentioned 60198 (or did I read it wrong?) which is definitely not Duplo.
10875 is duplo and cute. As usual, it has only 4 straight rails against 18 curved ones. When my wife & I started buying Duplo trains for our granddaughter we noticed the lack of straight rails. We then bought lots of them second hand, which has been very successful. However, the Lego marketeers have cleverly changed the colours over time so that the older ones don't look very good when mixed with new ones. There are at least four different colours. Fortunately little kids are not (yet) influenced by fashion and don't care.
(ah, the curse of science training… and maybe the alien motor guys watched too much Doctor Who)
-
:-)
Yes, I have fixed some of them, since I'm also in the group of people who simply cannot throw anything away if it can be repaired. There is a worshop in the basement complete with 3D printer and metal working miniature lathe + milling machine, and with a lot of "materials" that "might come in handy", and they often do. But I have none of these motors. My pages about opening Lego locomotives are of no use to you, as we have nothing as recent.
And by the way, that set looks like it is not DUPLO, but normal. Correct?
-
Alternatively you could perhaps buy a whole thing:
https://www.bricklink.com/v2/search.page?q=28743&tab=A#T=A
It might not be more expensive.
-
Hi Jan!
I had not understood the thing about the generalised track layout program!
Fantastic. That is NOT an easy thing to write. I played a bit with the free version, looks great. You have taken everything into account… I did in my younger days (60 years ago) play with some Märklin and remember the tool they had: a plexiglass cut-out drawing tool. With all those different circle radii.
All the best with that!
-
It is a funny piece in more ways than one. It follows the old style, where they could not be put on top of bricks or plates because the coupling bits went down too far, getting in the way of the studs of the plates or bricks. Therefore they cannot be used to build on supported slopes or bridges, only laid out flat.
You may wish to explore
/L/Lego/Duplo/Train/Rails/Dimensions/
(on first visit you may have to click the "Englsih" button and then reload the link; I'll change that asap)
So who wrote the track planning app? Can I get it?
BTW, also note this:
-
On 11/30/2018 at 1:14 PM, edge_nl said:Robert, I just have to say thank you for the great resources about dimensions and other lego/duplo descriptions.… … … …If more people are interested about such a design, why not start a new topic about this?
Goede middag Edge_nl,
For some reason I did not see your thank-you (thanks!) nor your very interesting 3D printing suggestions for more rail formats.
Sorry for that, I just saw them this morning.
And yes, a topic for 3D printing of compatible parts is a very good idea. I have a printer (Ultimaker-2), but the grandchildren have outgrown Duplo…
Does a 3D group of topics not already exist? I have not looked. In any case, Duplo rails do not require the same precision in 3D printing as standard Lego pieces do. Unless parhaps for sticking to Duplo bricks.
Thanks! (I've got OpenSCAD too)
-
There you go:

So it's three studs by four.
These bits are useful to close some layouts with tracks at angles other than 90º. However, they do not stick to plates or blocks and there is quite a lot of play.
The answer then is: 3x8=24, so 8 small ones will have the same length as 3 standard ones. Nothing in between.
-
Yes, "someday" is also on many of my lists… ;-)
Anyway, perhaps I should research techniques for getting 0.5 unit distances with the studless beams.
Another "someday": publish a list of parts that would be useful but do not exist. Many of them are connectors.
-
I did not find this set so very good. The pneumatics don't really work as well as I would expect, probably due to the not so very good compressor, but also due to the hoses to the pistons. The gearbox that drives it all is complex and has a lot of friction. The geometry of the steering is good though. But I would certainly not rate it as the best Technics set ever.
There are some excellent sets, and some that are rather disappointing. Admittedly, it's very difficult to make Technics sets that work well and in the end are also good-looking. The Arocs gets 5 out of 10 from me. The bucket wheel excavator (42055) is the best one I have built: everything works well and all dimensioning is correct (*)
Then there is the whole issue of creativity: building a mechanism with the new-fashion beams that have no studs is sometimes frustrating, as there is no easy way of getting a half-unit offset. (**) But that has nothing to do with this particular set, it's a general remark.
Robert.
(*) the ferris wheel, 10247, has Pythagorean triangles that are wrong, one of them has a side that is off by 2.77mm (implemented: 132mm, Pythagoras: 129.2308mm); there are several Pythagorean triangles in the bucket wheel excavator but every one of them is correct! (If you need elucidation: a Pythagorean triangle is a right-angled triangle in which all sides have integer lengths, such as 3-4-5 (because 3x3+4x4=5x5), which is needed in the case of Lego where everything has to fit a discrete grid).(**) For example: making a 40 tooth wheel mesh with a 16 tooth is difficult: the axles need to be (40+16)/16 = 3.5 units apart. 3.5 is easy with the bricks with studs but not with the studless beams. I'm trying to design an astronomical clock that's as good as John Stouffer's (https://www.buildsteam.com/home/introduction-to-the-lego-astronomical-clock) but will sit on a table top instead of needing a large drop. Using only the "new" Technics "religion" of studless beams is very difficult, and I have actually given up and reverted to the beams with studs.
-
I never see a reason why an old thread would necessarily mean it's inferior.
As to your observations, I may have posted the url https://www.cailliau.org/Alphabetical/L/Lego/Duplo/Train/Rails/Dimensions/ before, or not.
And yes, my (my granddaughter's) locomotives can also pull many carriages. The locomotives have changed. It also depends on the wear on the rubber tyres, the state of the batteries etc. Many parameters.
Have fun,
Robert.
-
Jim, you wrote:
Stage 3: Chassis rear end
Four Flexible Rubber Axles are used in the base of the chassis. I am not entirely sure why TLG used these parts, since you will lock the assembly using liftarms. Possibly, it's a construction used in the real Mercedes, or these parts will be used in the B-model. I would love to hear your thoughts.
In the thoughts below I used the part numbers as they appear on pages 481 and following of the construction manual.
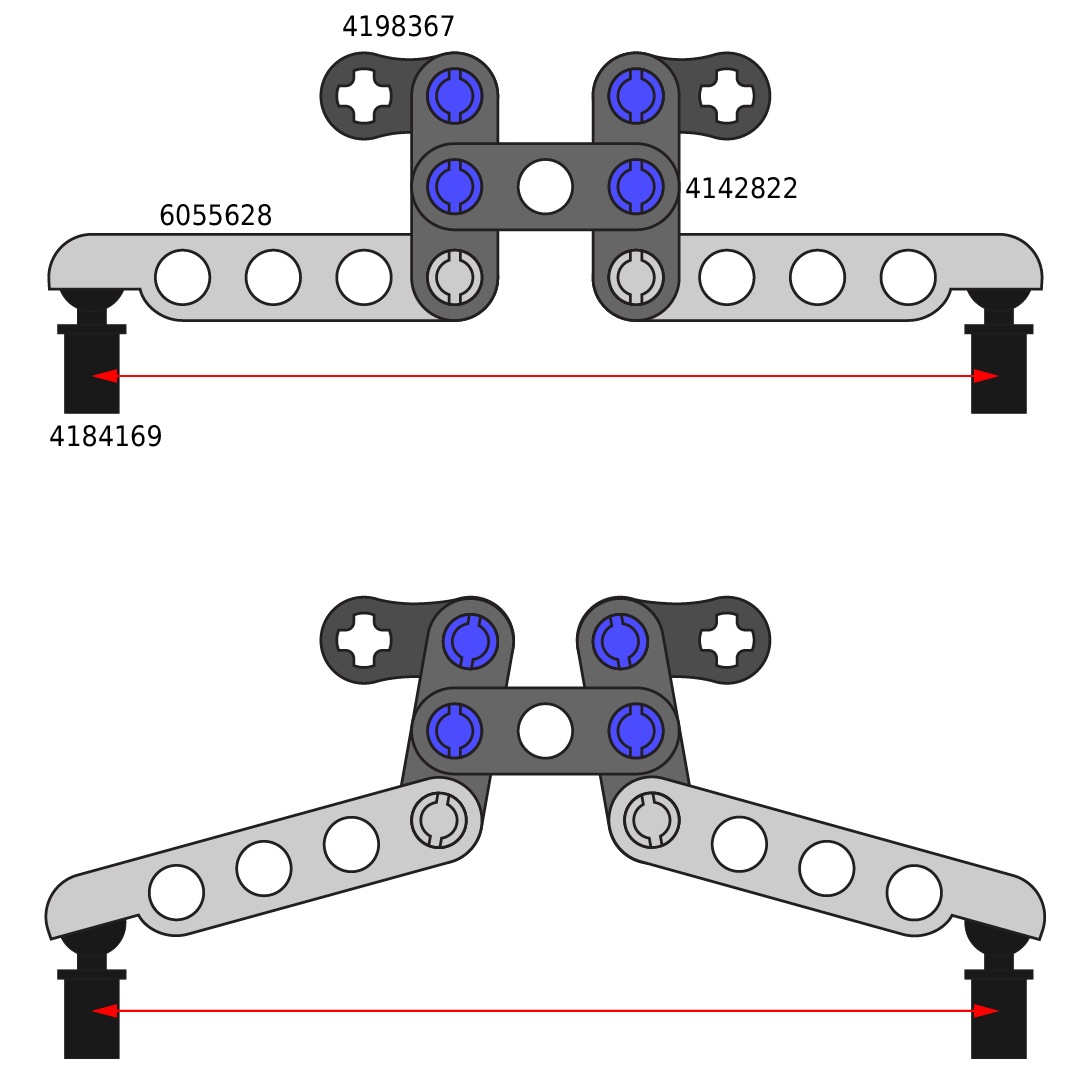
(1) In the construction manual on page 163, on the frame, the rubber liftarms (4198367 rubber liftarm length 2) lie horizontally. They connect to vertical black beams (4142822 beam length 3) that can rotate around fixed blue pins that go through their centre hole.
(2) On page 200 the bottom holes of these black vertical beams each get a suspension arm (6055628 steering arm with ball socket) connected to them (the picture on page 200 shows the assembly downside-up, so the bottom holes are at the top in that image). Note that these arms are shown at an angle in all illustrations. Geometrically the sockets for the ball heads are therefore closer together than they would be if the arms were horizontal. They need to be pulled apart slightly if they are to adjust to the Lego grid.
(3) On page 218 these arms get the ball heads of the four pegs (4184169 pin with ball head) of the double differential.
(4) On page 219 the "shock absorbers" (they are only suspension springs really) are attached and they push the differential away from the frame.
That distance puts the steering arms at the angle they were already depicted at, which pulls outwards on the vertical beams. The necessary flexibility can only be achieved by the stretching of the rubber liftarms.
If you replace the rubber ones with normal, stiff ones (4211741 for example) then it all feels very different.
There is an image at http://www.cailliau.org/Alphabetical/L/Lego/Models/42043-Arocs/RubberLiftarms.jpeg
The distance between the black ball heads indicated by the red line with arrows is a fixed distance (on the differential assembly)
-
OK.
Sorry, I did not know there was more about this specific thing elsewhere.
The only reason I wrote anything at all was to point out that the different angles Jim mentioned in his review are indeed desired and not a design mishap in the Arocs.
Off for now,
R.
-
Well, I did have a go at Ackerman steering in Lego. Competion: anyone can do it nicer, more robust, more compact?
See this page:
http://www.cailliau.org/Alphabetical/L/Lego/Models/42043-Arocs/AckermanSteering/'>http://www.cailliau.org/Alphabetical/L/Lego/Models/42043-Arocs/AckermanSteering/
There is a link to an .lfx file so those who want to try it may use buiding guide mode in LDD to see how I did it.
I'll put some real photos up too, and will make it into a remote-controlled car.
(you can also watch
http://www.cailliau.org/Alphabetical/L/Lego/Models/42043-Arocs/
and
http://www.cailliau.org/Alphabetical/L/Lego/Models/42043-Arocs/Steering/
)
to Starmort: it's all a matter of local taxes, people getting money off you just for postage, and other weird things, nothing to do with an open market. That needs a lot more hammering from the European Commission.
-
To wildboar: coop :-)
To 750ACE: thanks, actually I did not know the name! I only remembered the text and diagrams from the Meccano instructions (back in 1955…) Yes, I should have looked for it on Wikipedia & sent the link. I found this:
https://en.wikipedia.org/wiki/Ackermann_steering_geometry (quite incomprehensible article in fact)
There is a lot more, not to mention suspension methods.
To LXF:
Hope you found my page & were able to read it.
In the intervening hours, I have attempted that steering with Lego, with moderate success. I may publish it. Or not.
-
Hi LXF:
How about this: http://www.cailliau.org/Alphabetical/L/Lego/Models/42043-Arocs/Steering/
(there is nothing else yet about this model though)
(And to make some of you jealous: I got my box for 85CHF = 77€ in an after-Christmas sale where I spotted it at 170CHF but was told at the checkout it was 50% off…)
-
Congratulations on highly professional photos!
I was even fooled by some of the outdoor pictures!
Just a small thing: you write "Using different links results in different steering angles for both axles."
Yes, and you might add that that is desired.
In fact when I decided to buy it I was wondering how they would deal with the problem of making all wheels point to the same centre of rotation. Unfortunately the rear wheels do not turn, and at the front wheels in each pair are always kept parallel whereas they should not be. The latter problem is easy to solve in Meccano and almost impossible in Lego.
I'd upload a picture, but I'm out of attachment space. For those who are interested: draw a top view of the truck, with rectangles for the wheels. Then draw a line extending one of the two rear axles, say to the left. Choose a point on that line, the point of rotation. From that point, draw lines to the centres of all other wheels. Then rotate the rectangles that represent the wheels so that each is perpendicular to the line that goes through it. Those are the only positions of the wheels that will make the truck steer a circle around the point of rotation without making the tyres slip and therefore wear out.
You will notice that the first pair of wheels must turn a little more than the second pair and that at least some of the rear wheels should also turn. I have seen real platforms with four rear axles, all of which turn correctly as well as the double front axle.
You will also notice that in each pair the wheel closer to the point of rotation needs to swivel a little more than the wheel on the other side. I know of no Lego set in which steering wheels do that (but there may be some).
-
GallardoLU, it is hard for fathers to wait, but you will have to… It's even harder for grandfathers :-)
-
Hi GallardoLU,
9 months seems very young indeed! I just looked back into our photo/movie archives: our granddaughter Nora had Duplo when she was 1 year old. At that point she could not put blocks on each other, but thouroughly enjoyed the "dolls", especially the very old type (that were only "heads", see http://alpha.bricklink.com/pages/clone/catalogitem.page?M=dupfig030#T=S&O={"ii":1} ). She played a lot with figures and with separate objects such as cars and the plane until she was 3 or 4. She got her first Duplo train set at her second birthday, and the school (kindergarten) where she went in Paris also had a duplo train set. At 2.5 she discovered her grandmother's normal Lego, which is very neatly kept in a storage box with little trays, all types and colours sorted. She loved that, but only because it was a lot of orderly stuff with lots of the same pieces, not because she constructed much with it. (unfortunately my status here does not allow me to post more pictures).
She walked at just under 1 year, and talked (a lot) from somewhat later.
She is now 6 and still gets the train out to play with, as well as the farm animals, cars, and things, but for construction she is now into the Lego Friends series and of course did the Ice castle from "Frozen" (41062).
The locomotives have a big button on top to make them go, and that was fun when she had enough hand coordination to push that button accurately even when the train was moving. So maybe that is a "turning point": sufficient eye-hand coordination. It's also not easy to put trains onto the rails (see http://www.cailliau.org/Alphabetical/L/Lego/Duplo/Train/Rails/Dimensions/ )
We have 5 locomotives, but two are certainly sufficient, as it all takes a lot of room on the floor. There are some older style railway cars with roofs that open so little figures can be put in, and she also loved to do that, as well as making long trains with lots of figures on them.
-
It will fit: there is enough play. Most of Lego's own examples of layouts do not fit exactly and need the play. As soon as there is a piec of track at an angle the trancendental lengths of cos(L) and/or sin(L) give those problems (L being the length of a straight track).
See pages linked to from http://www.cailliau.org/Alphabetical/L/Lego/Duplo/
As to the custom-built locomotives with different wheels not going up bridges, that is because the Duplo locomotives have wheels that act as pinions on the racks at the sied of the bridge slopes (see same pages). A good custom-built locomotive would probably have to use those wheels. Can be done with "destructive" techniques, meaning taking a real Duplo loco to pieces to use its parts in another construction.
-
Apparently. Though I think most of our recent discussions should be under mathematics.
:-)
-
Guy:
I looked at your javascript ("inspect source" etc) and saw it is table driven. Should not be too difficult to attempt to translate into LiveCode (if ever I get enough time again).
Mechanical computation is very interesting indeed. About two years ago I was at a special presentation at the Geneva Science Museum where they showed two of the four surviving machines made by Pascal. As usual, the carry-over mechanism was the most fragile and difficult.
The Science Museum in London built part of Babbage's Analytical engine; perhaps with today's crowd funding a bigger part could be built.
I'm the proud owner of a Curta calculator which I bought in 1968 to help with my engineering studies. I can still extract square roots with it.
Today's youngsters can't believe what they see when I take the cover off: http://www.cailliau..../zCurta-en.html
Ah, and Märklin had a cross-switch which had linked points, though I have not given any thought as to whether it would be useful in your designs. Anyway it would be a sprung set. If you type "marklin double cross switch" you will find images.
Perhaps this discussion should be taken to an entirely different forum, not even Lego…
-
Guy:
Robert -the infinite points are required for each distributor -not for the (potentially infinite) track !!
The Chalcraft and Greene report (in my previous post) assumes (page 8) that you have a string of network cells to represent each ‘0/1’ position on a tape. Their diagram shows just 3…
Each network cell requires a distributor. These are not easy to construct from lazy and sprung points. As they say:
‘the reader is strongly advised to try constructing one of these - it makes an infuriating problem’ (page 10)
Their solution is to use an infinite number of sprung points. One for each time the distributor is used. They did not allow themselves to use linked points. Not too sure exactly why … I think it adds a whole new dimension of complexity. Maybe someone can tell us!!
However, it does reduce the number of points required for each distributor from infinite to 3. But you still need many network cells. The Lego Turing machine that you linked to for instance has 32 tape positions.
At least that’s my understanding. I’m not going to build a Turing machine -way too big. But a distributor circuit is really just a flip-flop point. So it is useful for other things. A flip-flop counter function (interactive) is here on my cr31 site.
Now if Duplo provided flip-flop points as well as lazy and sprung points things would be a whole lot easier!! It would also allow for some very interesting layouts. As far as I know no manufacturer produces flip-flop points. A reliable mechanism could also be quite a challenge to design.
btw, Ian Stewart in his book ‘The Magical Maze’ describes the same idea but using lazy, sprung and flip-flop points.
This is all rather unbelievable…
IFF I go see the Grenoble guys and their machine, I'll tell you.
Your interactive tracks are fantastic. I'd like to go into how you do the interactive displays, but unfortunately I'really in dire time-need right now.
Best!
-
As far as I can remember from my courses on finite state automata, a universal Turing machine needs only 7 flip-flops. Of course, being a universal machine, it needs to read the program defining the machine it emulates, needs to keep a record of the state of that machine, and then also needs to read the input and write the output.
All of this potentially needs and infinite "tape" and an enormous amount of shifting tape back and forth.
So yes, there is an "infinite" thing needed if it is only done with switches. Maybe it could be done with pushing cars around, acting as "bits" on tape, whereby the tape would be some length of straight track, sufficiently long for a given machine to emulate and a given input (potentially infinite). Each car could represent a single "bit', and have a "sense" so that it can be made to represent each of the two bit states (usually called 0 and 1, but I don't like that as it smacks of numbers).
Well, something for another lifetime.
:-)
[MOC] Microscale Le Mont Saint Michel - Normandy France
in Special LEGO Themes
Posted
Absolutely fantastic... Do you have a parts list & building instructions? I would like to make a copy...