

Jonas
-
Posts
262 -
Joined
-
Last visited
Content Type
Profiles
Forums
Gallery
Posts posted by Jonas
-
-
Hi Thorsten,
thanks for your warm response. And yes, it was so nice times with old good Speccys,
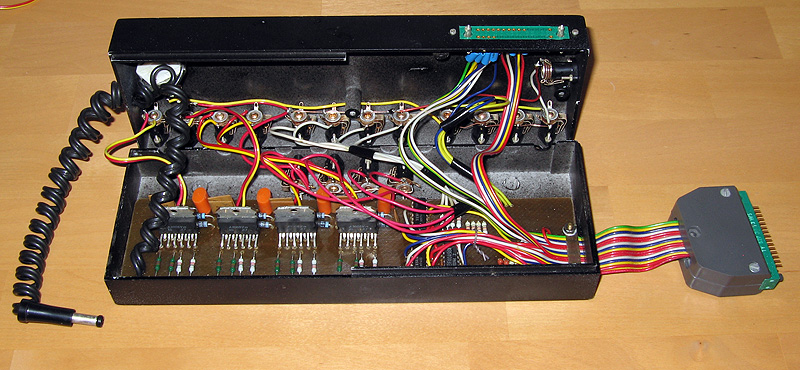
I had built my interface in 1988. I have no schematic anymore, but I still remember that I used integrated stereo amplifiers to make small-footprint H-bridge drivers for motors.
My programs were written mainly in Basic but the time-critical parts, such as controlling motors with opto-sensor feedback or joystick control, were coded in Z80 assembler.
BTW, I had built also another interface with 8-bit AD and DA converters and used it for my experiments in those early times of speech recognition. A large part of my dissertation in 1980s was made on my Spectrum.
Unfortunately, the computer does not function anymore. But it still has a place of honor in my private exhibition.
-
A sweet topic for us, older Technic and computer fans!
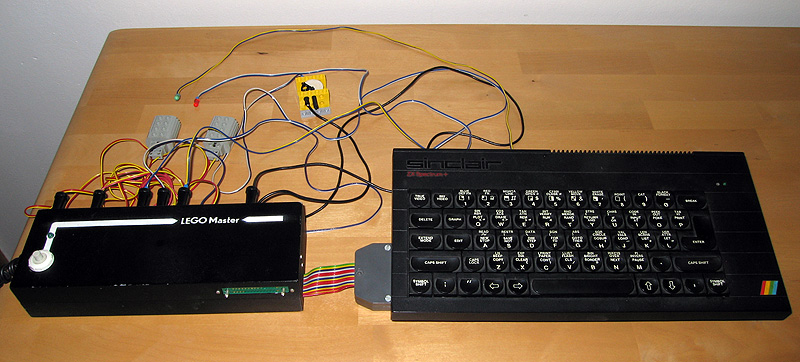
It reminds me my attempts to link the Lego and ZX Spectrum worlds back in late 1980s.
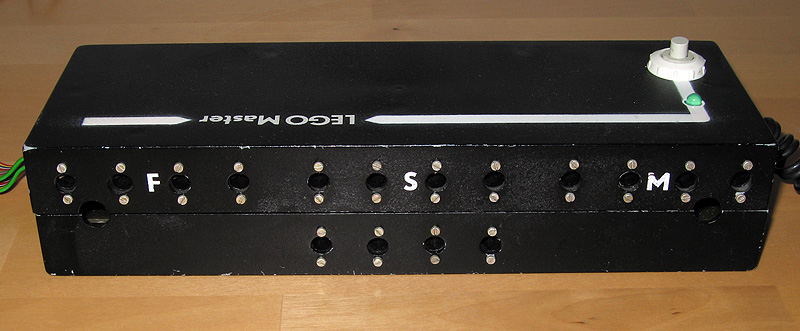
I was lucky to have had the Spectrum+ version whose larger case allowed me to build in a 3-port parallel interface (8255) and additional memory banks. I have also designed and built an interface for controlling LEGO models (up to 4 motors, 8 LEDs and 4 photodiodes used for feedback control). Here are several pictures:
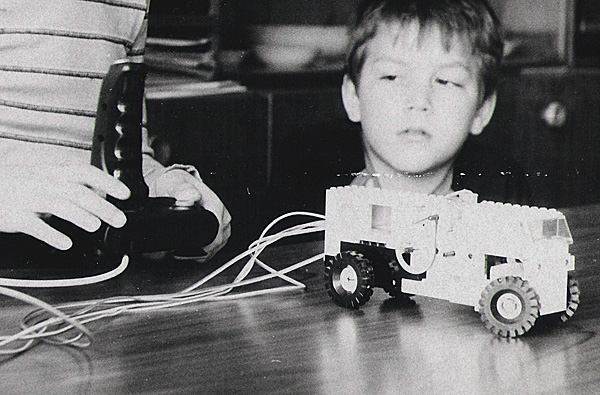
It allowed me to control various manipulators ...

... and also vehicles (via a joystick connected to the parallel interface as well).
Some other pictures can be seen on my Brickshelf.
-
13 hours ago, Mr Jos said:
... a worm screw that can be extended as long as you wish. (per 6L length)
If only the TLG would come with a Technic-compatible nut. The only available brick-type nut is not well suited for Technic constructions.
-
Super! It is nice to see that somebody was able to recreate this Akiyuki's masterpiece.
I would appreciate some more detailed photos.
-
1: 10
3: 6
5: 4
2: 3
6: 2
4: 1 -
For me, the most sophisticated pneumatic contraption is Pneumatic Ball Factory by Quanix. He made at least 3 versions. Here is the last one:
-
5 hours ago, Berthil said:
Spin-off from the Ferris wheel, Planetary Lift module with free instructions:
This looks like a very interesting and - at the same time - space-friendly GBC module.
-
13 hours ago, David Lechner said:
You can save the calibration values to a file.
.....
Thank you David for this useful hint.
Also thanks to Jos for his one.
-
Hello all,
I have a question on using memory in EV3. I want to run a program in two modes. In the first one, I am going to do some calibration based on measurements from sensors and computation, and after that to store the computed values. This should be done only occasionally, especially in case when the working environment changes. In the main mode, the program should retrieve those stored values and use them for its repeated runs.
What is the best way to do it in Pybricks?
-
This is a very clever design. Thank you very much for providing the sketch of the main linkage and the stud.io file. I have just build a pair of legs to learn how it works.
I admire your creative solution to these three 2.5-stud-long arms.
-
I like the new type of gripper. It seems to be well suited for small elements.
-
This is a real masterpiece of Lego construction and programming.
-
It is a really nice and well designed creation. It must be a great attraction for visitors of any Lego convention.
-
Again, you have created a wonderful machine. A nice inspiration for some of us, including me.
-
Looks both mechanically and aestethicly nice!
I have a question to that special 3D part. Which of its variants offered on the Shapeways page do you use? There is a large variance in their prices, so I would like to know your experience.
-
Amazing! It is really cleverly designed plotter which seems to be rather precise - for Lego plastic components. I look forward to your next steps and hope you are going to show us some construction details.
-
40 minutes ago, Doug72 said:
Can anyone advise is the part number and how long is it ?
Does it come with the “nut”, & part number.Nut: https://www.bricklink.com/v2/catalog/catalogitem.page?P=23422#T=C
-
4 hours ago, DrJB said:
Can you kindly clarify the connection between the red/helical axle and the gray parts? Do those have smooth hole or something else ?
It seems to be a sort of nut.
You can see it, e.g. here
-
4 hours ago, SNIPE said:
May I suggest one of these, per axis:

Interesting idea. I did not know that such a spiral rod and a nut existed. May I ask: What properties the rod has? Is it firm like a technic axle? Can it be (firmly) driven by technic components?
-
1 hour ago, playmorelego said:
@Jonas were you able to resolve the ball picker movement, especially when its at the vertical position ? I have the same problem as you've listed here. I've built Berthil's V3 version, and the system strains when the ball picker lever passes its vertical position . Any thoughts here is much appreciated !!
Unfortunately not. I had to give up.
-
An interesting idea. It took me some time to understand how it works. How many chain links have you used?
-
I played with MrJos' code a bit and made some optimizations that are based on a) precomputing some variables, b) applying goniometric formulae for a difference between two angles, and c) rearranging some terms in the equations. The new code is more compact and about 2 times faster. (Now, the main speed bottleneck is the physical reading of the 6 motor angles.)
Here is my code:
yawbasecos = math.cos(yaw_base_angle) yawbasesin = math.sin(yaw_base_angle) pitbasecos = math.cos(pitch_base_angle) pitbasesin = math.sin(pitch_base_angle) pitarmcos = math.cos(pitch_arm_angle) pitarmsin = math.sin(pitch_arm_angle) rolarmcos = math.cos(roll_arm_angle) rolarmsin = math.sin(roll_arm_angle) yawarmcos = math.cos(yaw_arm_angle) yawarmsin = math.sin(yaw_arm_angle) #new angle introduced and its cosine and sine computed difpitcos = math.cos(pitch_arm_angle - pitch_base_angle) difpitsin = math.sin(pitch_arm_angle - pitch_base_angle) #new variables added tempA = rolarmcos * yawarmsin tempB = a67 * rolarmsin * yawarmsin tempC = pitbasesin * pitarmcos * yawarmcos - tempA * difpitcos tempD = a67 * tempC - a45 * difpitsin + a3 * difpitcos - pitbasecos * (a67 * pitarmsin * yawarmcos - a2) #significantly simplified equations x_pos_fork = round(yawbasecos * tempD - yawbasesin * tempB) y_pos_fork = round(yawbasesin * tempD + yawbasecos * tempB) z_pos_fork = round(a67 * (tempA * difpitsin - yawarmcos * difpitcos)- a45 * difpitcos - a3 * difpitsin + a2 * pitbasesin + a1) -
This is a very clever design of a machine that solves a practical task. (BTW, just an hour ago I had to change a chain on my bicycle. So I know what the task is about.)
-
I want to show you my new robot. Its construction has been inspired by the robot seen on the webpages of the German company Orange Apps - link. It is their 3rd version of the robot, the older one could be found on their Facebook page. They sell the robot either as a building kit or already assembled. (Both are pretty expensive, though.) Anyway, the robot is really elegant, with eye catching and smooth orange shell. I looked at their videos and designed something similar, but not the same. My primary goal was to build a 6DoF robot that would be lighter and more compact than my previous one inspired by Akiyuki.
Here are several pictures:
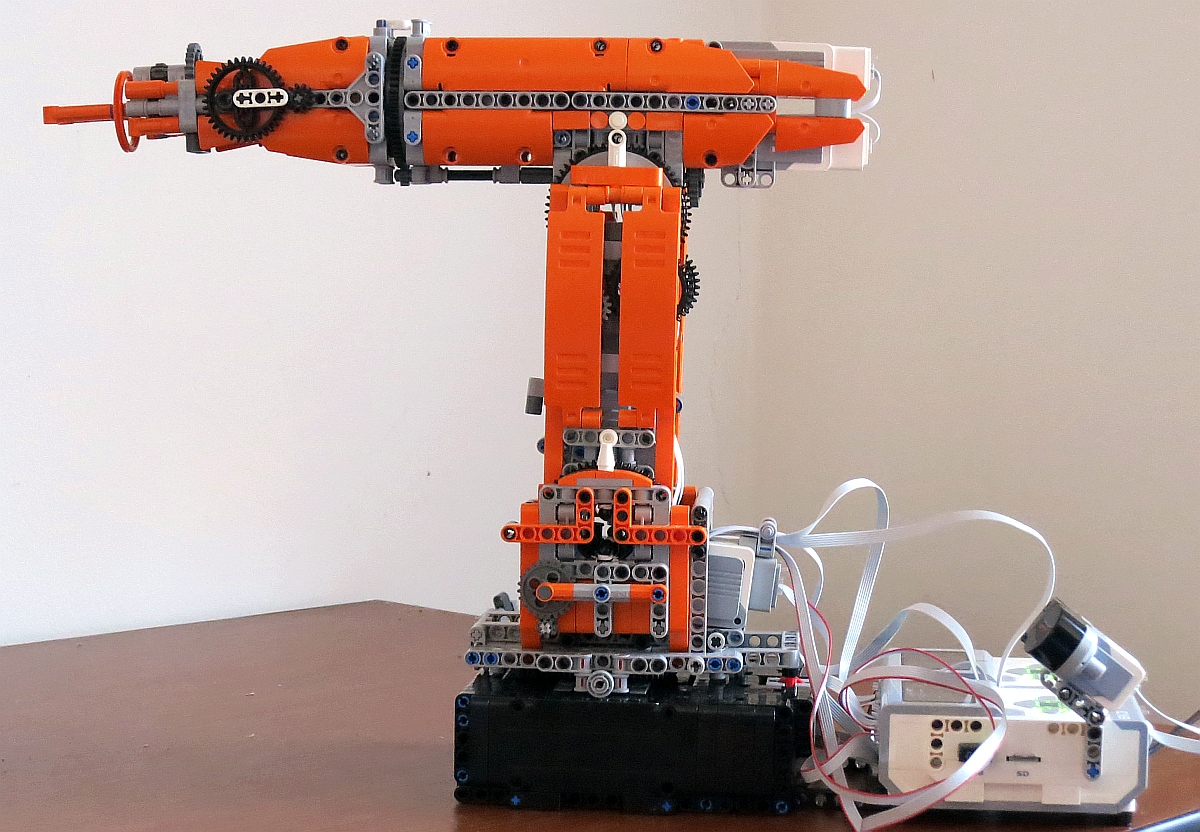

And a video showing the current state in programming. The program written in Pybrick micropython includes modules for automatic home-positioning, sequential control between pre-set points and optional manual control via IR beacon. I am still working on the implementation of inverse kinematics control. Here, I must thank MrJos for showing us that it is manageable and giving us some hints.
Sinclair ZX Spectrum (1982) and LEGO Interface A (1986): #9750 controlled by a Speccy
in LEGO Technic, Mindstorms, Model Team and Scale Modeling
Posted
If I remember well, one of the key circuits was damaged during my HW experiments in 1990s. I switched to PCs in my professional work and to embedded systems (like Arduino) in my hobby. See here.