

Xris
-
Content Count
48 -
Joined
-
Last visited
Posts posted by Xris
-
-
Very nice build - and what a wonderful train!
I've seen a complete original Rheingold train leaving Dortmund Central Station on one morning last month.
Seemed as someone made me a surprising X-mas present...Xris
-
12 hours ago, dr_spock said:Nice work. Is there a way to make it so that it can move a bit parallel to the tracks so that you don't have to stop the train perfectly on the spot?
That might become tricky:
As the coupling is broken up by pulling the train against the decoupler, it is required that the decoupler does not move parallel to the track.
-
Yeah,
now it looks as if the morning shift just left for their coffee break!
My last suggestion leads the same way as Paperinik77pk's comment: Add some rusty bits here and there.Congratulations!
Xris
-
Hi,
a really nice design, I like the brick masonry.
How about adding...
- a covered examination trench for one loco stand (in fact, just change the floor tiling e.g. using grill plates)
- a crane runway with a hand-operated pulley
- suspended lamps
- borrowed lights in the ceiling
- a water tap and sink
- an air compressor
- a rack for reserve feed-water pumps or air pumps
- a workbench
- a small smithy
Regards,
Christian
-
Hi Beltigan,
on a length of 133cm I would probably try to use regular track, build a small cosy winterly terminal train stop (perhaps with a xmas fair) and a short track running into some kind of hideout (tunnel, deep forest, avalanche gallery, ....), so that the train can come from the hidden place, stop at the terminal and go back again. As suggested before, you could use some electronics (LEGO Mindstorms, Arduino or similar) to let the train commute automatically.
Regards
Christian
-
21 hours ago, LordFattee said:You asked about magnets. Lego is currently using sealed magnets. These are very similar to the older unsealed magnets, but just coated in plastic. I guess it keeps them from chipping? Either way, they are pretty interchangeable. I have both sealed and unsealed and they work together fine.
Hi,
they sealed the magnets in order to increase safety according to infants: The magnets of the old design could be removed from their housings by some force. Kids could ingest them - baaaad magnets. Therefore, LEGO sealed them in plastic. If you are a grownup builder, and no small child is around your models, just choose the type that fits best according to the optical and technical needs of your design.
Xris
-
Hi Günther,
I really enjoy the photos of your more and more detailed layout. The waterfall and the pond are really nice eyecatchers.
The dead ended road leading to the pond - with its center line markings - looks like a primary road, which does not make much sense. You could try to eliminate the road markings and probably create a turning area at the road's end. Another detail is about draining the pond: Where does the water leave the pool? A small weir and an overflow/outlet (into an invisible) underground duct could be a solution.
I hope, both suggestions might help to further the realistic impression of the scenery.
Christian
-
Hi Spy,
the LEGO 10V and 9V train system works as any usual model railway: A transformer powers the two metal rails. The train motor has pickups ensuring the electric connection to the powered rails. The LEGO 9V train motor block uses all four wheels as pickups. The 12V motor uses an extra brick with 2 spring loaded pins, which are pushed down onto the powered rails. In both cases, the train's speed/power is regulated by adjusting the voltage fed into the rails (and hence the train motor).
In order to use power functions remote and receiver with the 9V-train system, you need to disconnect the motor from the power pickups, instead connect the pickups to the PF-receiver via an H-bridge to avoid polarity problems with the PF-receiver. Then, you can connect any LEGO 9V motor to the PF-receiver and set the rail voltage to constantly 9V. Doing so, you can set up up to 8 trains for control by PF IR-remote controls on a single electric rail circuit.
Regards
Xris
-
Hi,
Your layout and display room look tidy and very elegant. A great design!
I am also planning a climbing spiral in order to connect a floor level with an "overhead" level, so I am very interested in the experiences you made.
You mentioned the max inclination used, but what average inclination did you chose for the ramp sections?
I guess the 180° curve sections between the ramps are a mayor problem, even though they are leveled. However, did you also experiment with inclined curve section?Regards,
Xris
-
Hi,
6 hours ago, igordost said:Another limitation of this solution - cars have to be connected always in the same direction
You can easily overcome this using a bridge circuit to connect any load to the train energy bus.
Christian
-
2 hours ago, igordost said:Hi. My solution is based on jewelry magnetic locks attached to Lego buffer. More details in Flickr
This is a really nice solution! (The remaining problem is a working solution for decoupling the wagons...)
Respect!
Christian
-
6 hours ago, BubbaFit45531 said:I also prefer not to deal with batteries and potential leakage mess.
Is there a currently available cheap wind-up motor part?Hi,
just search for "pullback motor" on bricklink. As far as I've seen, they are all below 1$.
Xris
-
2 hours ago, xboxtravis7992 said:Do O Scale Kadee use a spring for self centering? I have only worked with HO Kadees so I only know of the "whiskers" which self center the coupler.
Yes, the O-gauge Kadee couplers use a spiral spring for self centering.
Christian
-
Hello,
this is a very nice build! In conjunction with the rounded corner, the trapezoid roof and the increased platform shown in the five topmost photos give it an elegant look.
Thanks for showing it!
Christian
-
Hi,
now I finally got it. The pictures of the transmission mechanism made it clear to me.
Thanks a lot!
Yes, the entire frame is built around conditional relationships between each lever and the locking bars have been designed to replicate these relationships. As I mentioned above, the frame is based on a specific location and is intended to be faithful in it's operation as well as capturing it's appearance. Using a track and signalling diagram that showed the type, number and location of the various assets under control from this signalbox as well as the order and function of the levers in the frame, I was able to work out the various interlocking relationships between the levers. I may not have got it 100% right, but I feel happy that the frame will work in a prototypically accurate way.
-
Hi,
your lever frame looks really nice. It looks like you can lock arbitrary combinations of levers in their positions, but did you try to model conditional dependencies between the levers (i.e. A can be set if B is set and C is not set)?
Regards
Xris
-
-
Hi,
a reliably working power pickup would be highly welcome.
I think your concept will be easier to implement than the other solutions favored by detail-oriented model builders.
Xris
-
Hello Marbleman,
congratulations for this solution! The generated "vapour" is less smelly and you also avoid the oily emissions produced by usual smoke generators.
Since finished my QJ locomotive(http://www.eurobrick...21#entry2572918), I begin to plan upgrade smoking effect. At beginning, I plan to use smoking device always used on train model but finally failed. It's not suitable to Lego train.
Could you please report on the problems you ran into when trying to use conventional smoke generators? Was it just insufficient voltage or current? I would be happy to learn from you.
Christian
-
Hi Udo,
The old gray 12 volt Lego transformer can withstand up to 8 ampere " burden"

In the old gray 12 volt Lego transformers. I have always 2 transformers for a circuit planned
Two transformers in parallel, the voltage keep at max. 12 volts, and the power / capacity seigt on 16 Amper.
Non - Non- two transformers in "row", the voltage rises to 24 volts, the power / capacity keep at 8 Amper
I do not use the higher 12 volt. But I can, who wants in.
"8 VA" is the product of voltage and current that may not bee exceeded at any time. So, it will deliver 8 A, but only at 1 V or less (at which your motors won't move your train yet).
However, the label also indicates, that at currents exceeding 0.8 A, the transformer should be switched off by the internal fuses.
You should be careful when switching old 12V transformers in parallel: When you remove all but even one plug from the outlet, the plugs of all others will be powered with 230 V by the remaining wired transformer. Touching the plug contacts is hazardous!
The newer 9V power supplies are switched power devices and hence less dangerous.
Regards
Christian
-
Hi Elroy,
Perhaps region specific advertising could be used but that is a topic for another discussion. To my knowledge no translation attempt was taken with RAILBRICKS but feel free to correct me if I am wrong. This may in part be due to the American oriented content. But there are some amazing builders in Japan, Germany, UK, etc to name a few countries that also need recognition and could well serve to inspire the next round of LEGO train fans.
I doubt that localization and translation will gain enough additional readers to justify for the increase of work and process complexity. Stay with articles in English only. Most members of the target group should be capable of understanding English articles, especially if they come along with good photos, drawings or sketches to illustrate them. The magazine should try to unite fans, not to partition them into distinct groups. For the same reason, "value added" contents should not be considered in the first. There are established platforms, like Eurobricks, that allow for focused discussion within a special interest group like LEGO Trains (and even easily looking beyond one's own nose into other LEGO special interest groups), finding MOCS etc. A magazine should provide a platform for deep drilling articles and build a collection/an archive for central topics centered on its theme.
While most people tend to prefer local variants of train motives, they will nonetheless appreciate "foreign" models as they can still extract building techniques and get inspired. Readers can also keep attuned by providing some kind of international mixture. So, even if an issue focuses on, say Chinese railways, there should also be some content regarding explicitly some other Asian, American and European railways - even a small collection with photos of according MOCs might already serve the expectations.
I support Duq's thesis, that the magazine should become as much a "fully-fledged" LEGO model railroading magazine as possible, covering topics as rolling stock, railroad architecture and infrastructure, landscape, controlling (animation techniques, electrics & electronics, software), operation, layout design, customization of tracks, etc. It is easy to find pictures of great train related MOCs on the internet - but background information or explicit descriptions of challenges and their solutions are hardly found and make up the basis for a magazine.
Christian
-
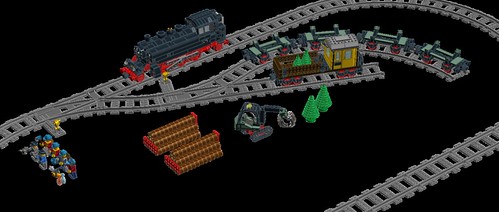
Hi,
That is a nice composition. When adding parts, just drop some of the "ready to ship" logs and add some living, built tree instead - and a chainsaw, so that the lumberjacks can do their work fell it to get an additional function.
Regards
Xris
-
Hi Kjetil,
PS! I have access around the whole table (that's one of the reasons it's not bigger)...
That's great!
You write that you want to have trains overtake and cross each other. For this, you need at least 1 station with at least 2 tracks. But you do not need 2 1/2 loops unless you want to run 2 trains independently without an operator. If you would reduce to 1 closed loop with a "main station" and a branch line with a dead-end station, you could save some space allowing for a private siding within your industrial area - and for more convincing, larger buildings throughout your layout.
You could also design the raised part of the layout to mimic an elevated urban railway with a typical stop station or even small through station to allow for train crossings.
Regards
Xris
-
Hi K.,
in order to give any meaningful advice, I would need to know what plans you have with your layout. What are the primary and secondary goals you want to reach?
One thing I could figure out by now: The road crossing on the right does not make much sense, as it seems to lead nowhere...
Another thing is, that the presented layout might be good for running trains in loops, but if you like shunting, you should try to place the according yards within your reach (i.e. within 0.7 m of the front of the table).
Regards
Christian
Trixbrix slip switches
in LEGO Train Tech
Posted · Edited by Xris
Hi,
I ordered a wide range of the R40 switch types and short tracks they offered then. I tested them an a layout for the kids - just on the floor and without ballast.
The quality is ok: Optically, they are inferior to injection moulded track elements, but quite good for 3d printed objects.
Regarding reliability, I have encountered similar problems as zephyr1934 did, and also recommend not to use the double/single slip switches on mainlines: There were regular derailings (not related to speed) and the parts sporadically fell apart (fixating or ballasting them might help).
I think the main reason is that the slip switches are not delivered as a single track element, but as a combination of two parts, most likely in order to avoid warping. Perhaps, the interlocking mechanism could somehow be improved.
In contrast, the single left/right switches, triple-switch and crossover all worked quite fine. I have not tested the 45°/90° crossings yet.
Xris