
q_biq
-
Content Count
14 -
Joined
-
Last visited
Posts posted by q_biq
-
-
Thanks a lot @lowlead!
 On 11/17/2021 at 2:30 AM, lowlead said:
One aspect that you beat the 75313 on would be the hip joints on your version not protruding out beyond the armor plating. Clearly LEGO had to make the legs very strong, but in the process they sacrificed some of the aesthetic - understandably.
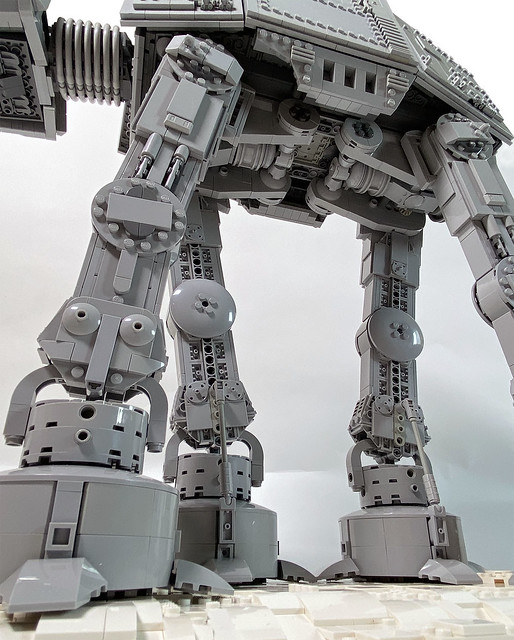
It's nice to see that you noticed this :-) That was one long process to get the legs to fit under there. But it was so clear when seeing reference material of the AT-AT viewed from the front that the legs had to be narrower / closer together than they are in many of the official models. So to attach them where they are now and still keep enough space to do the underside detail was quite a challenge.
And good idea about the rubber tire! - I thought the same thing when I saw one of those build videos :-) I fear the friction would still not be enough though. The simple fact is that the ratched joints are not really strong enough for a build of this size, even if you take two for each leg (as it is the case for the shoulders/hips). For this to work the build would have to be considerably less heavy - and then I'd have to let go a lot of the interior detail. And that would be sad for us AND for the Stormtroopers.
-
A very big THANK YOU @dvogon for your nice feedback! :-)
I'm glad that you like it - now I just have to see if I'll try to adapt at least the shoulder/hip joints to something other, maybe similar to the LEGO version. Not to change the design, but to get that bit of stability which would make it easier to handle. But I fear the gear/turntable LEGO used is too big for my model.
Oh well, you can't have everything :-)
-
Thank you so much @Jerac! :-)
That's exactly what I was trying to do: To integrate the studs that can't be avoided, to sometimes specifically add more studs (which do not need to be there) - in order to get to a look, a texture that feels correct. I mean: The moment I decided for a non-studs-on-side approach, the studs on the wedge plates are just a fact. They can be reduced to the necessary minimum, but then everything to me quickly looks kind of artificial. This is not my idea neither - LEGO themselves follow a similar approach I believe (with of course lots of further considerations in mind). And again: I personally like a perfectly clean look very much (as for instance DMAC, cavegod, jhaelego and others did perfectly) - but I also like the "original" LEGO-look, where studs are showing here and there. It's all about distributing them more or less evenly. So there was a lot of trial and error that went into this before I arrived at the present state. And I'm all the happier that this gets noticed :-)
-
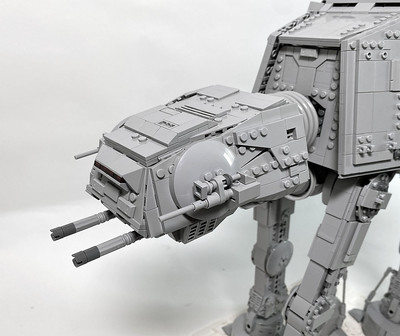
@A_C: Thank you! :-) Yes, the neck has 19L pneumatic tubes for the outer finish. These are "alternating" with 6x6 round plates (actually it's two 6x3 half circle plates) - and held together on the underside with a pneumatic T-piece (you can see it in the photo from foot level upwards).
@macaron35: Thank you as well! Très gentil :-)
-
6 hours ago, MaceWindu said:Nicely done! As have already mentioned it’s remarkable that you’ve managed to make a great exterior as well as a great interior. There will definitely be things to compare between your moc and 2021 version!
Thank you! Again, the main reason I was able to do an interior at all is the basic structure from Raskolnikov. I only made it a bit bigger and tried to optimize the available space. I can post a few more pictures of the interior where you can see a bit more of the basic layout. In order to really show the inside of the hull I'd have to partailly disassemble the body and maybe experiment with a tiny light source inside.
-
4 hours ago, 20feet said:That's a great-looking AT-AT! Can you describe how it differs from the other big AT-AT MOCs you mentioned?
It's difficult to say really. Aside from the Raskolnikov model, on which this MOC is (very) heavily based, I don't know the slightest bit about the internal structure of all the other models out there. As far as design goes I'd say you'd have to decide for yourself in which way the versions are different. There are several models out there for instance that use studs on side construction for the hull. I decided early on that I'd stay with the plate-visible-from-outside look, as I personally like to see a couple of studs here and there.
As far as size goes my model is a bit bigger as the one from Raskolnikov - but I'd have to go count studs to be able to tell exactly how big the difference is. The model is clearly smaller than the one from cavegod or the one from jhaelego. If I'm not mistaken, Stonewars recently did an article on the soon to be expected AT-AT, where they showed the size and brickcount of some of the big models. This could maybe serve you for the comparison.
Thanks again! If you have other questions, fire away!
-
2 hours ago, danielwerner said:@q_biq [...]
The only criticism I can give the MOC is that to me the bottom part of the feet feels a bit too tall. Like one stud (right now it's 4 studs tall, right?) or so? Or am I mistaken? Would love to hear everyone's take on this.
All in all, very well done!
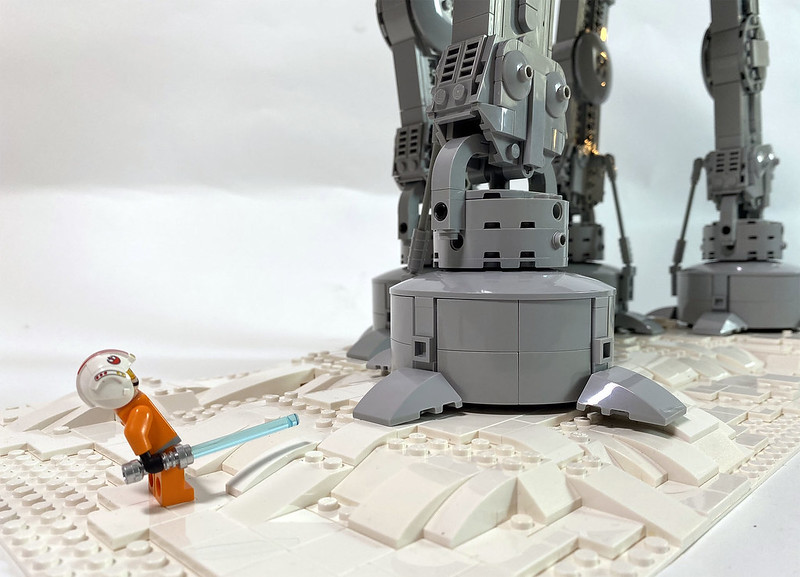
You're absolutely right :-) 3 Studs high would be nearer to the correct proportions. I even had them like this once - but as LiLmeFromDaFuture correctly said: the potential problem is the construction underneath. The whole foot does loose an additional bit of structural stability this way. So that's why I finally decided against it. And as I wrote in my presentation: I kind of like the look, even though it's not perfectly exact. I like the slightly more imposing or menacing look that it gives the walker. Call it creative freedom :-)
1 hour ago, LiLmeFromDaFuture said:Indeed, for its 8x8 diameter, but there could be more to the design underneath that would make reducing the height difficult, perhaps @q_biq?
Does look great still!
It's the 10x10 dish ;-) I had a version with the 8x8 dish once - but it just didn't look right. As the legs are a bit too thick, to my eye the feet needed to be bigger, especially when viewed from the front.
Many thanks again for all the praise!

-
Thank you all very much for your nice words and positive feedback!!!
@LiLmeFromDaFuture: Thanks, that means a lot coming from you :-) I spent hours and hours on your AT-AT forum entries - your approach of trying to get all characteristic details in impressed me - and the exchange on leg stability helped me a lot!
@danielwerner: Thanks, that's a good question! On the one hand I do want to share the joy :-) After having done all the work, it would be kind of sad not to let others take part in it. That said: I have a few reservations on "releasing" the model/instructions just now. First and foremost: So far I did the instructions so that I could build the thing myself. As I obviously know the model and its construction a tiny bit, I didn't need to pay that much attention to do it in a fail-safe way. For instance I only did the instructions for one leg, knowing how I would have to mirror the others to work. If I released something "officially" I'd feel obliged to make instructions which don't cause any frustration whatsoever to the people putting the thing together. It should be fun after all, and I know all too well how nerve-wrecking it can be when things don't work out the way they should. And then there's also the stability aspect: As it is, it just barely stands by itself. The whole process of attaching the legs, adjusting the joints and posing the model is ...adventurous. So I would need to put some more work into the project in order for me to feel ok with it. So let's say for the moment that it isn't completely hopeless ;-)
@20feet: Thank you as well! I'll have to think about that before I can answer you :-D
-
That was fast :-) Thank you very much azzer86 for your nice feedback!
-
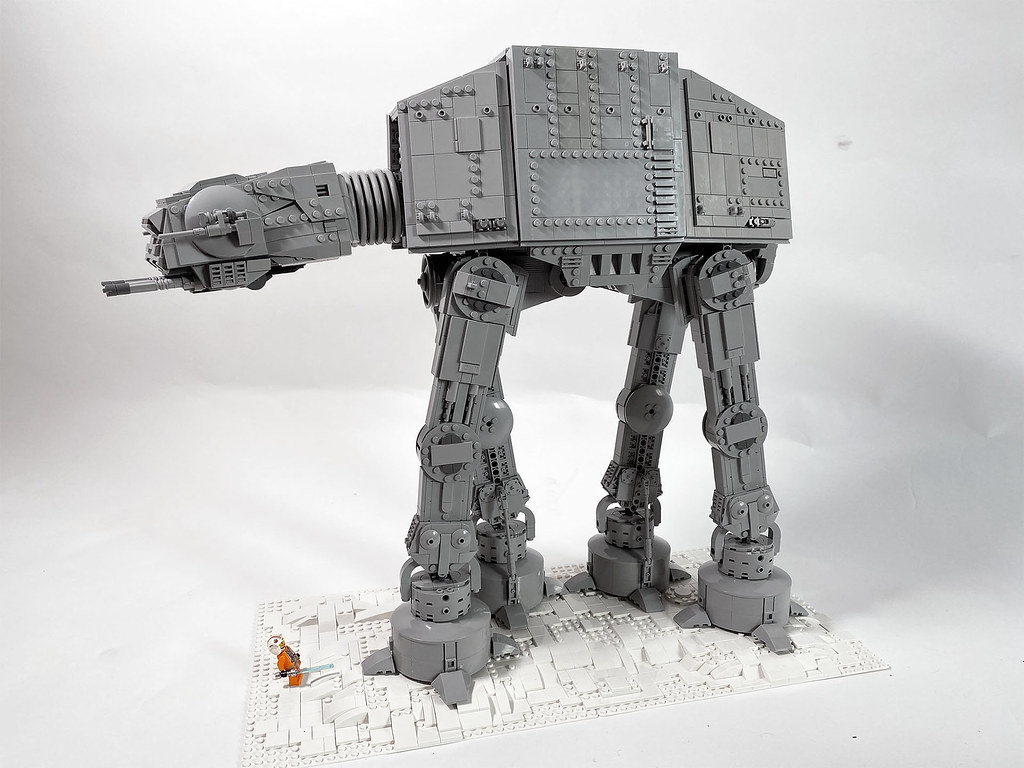
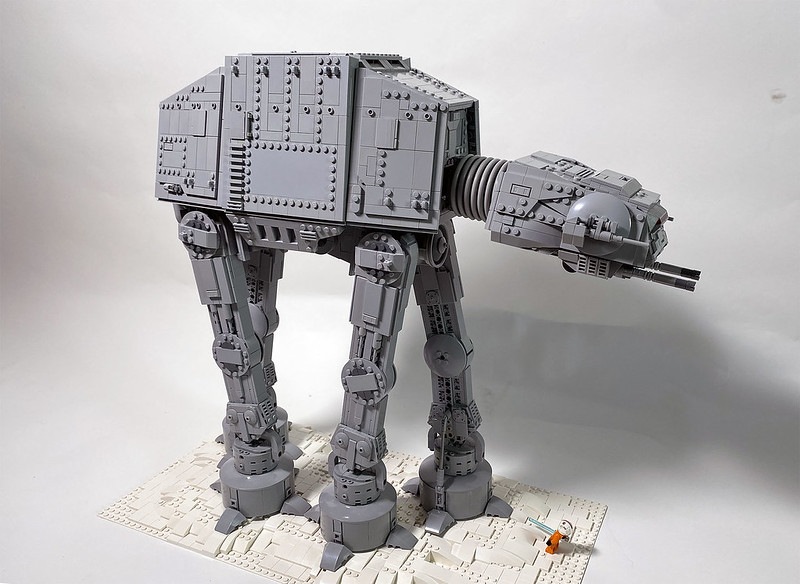
AT-AT
- Number of pieces: 6150 (without the base)
- Dimensions (cm): 54 x 17 x 48
- Digital development: November 2018 - May 2021
- Building time: June - September 2021 (±24 hours pure building time)
Technical aspects:
- Working knee and shoulder/hip joints
- Head/neck can be turned left and right
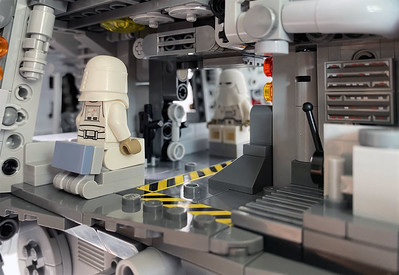
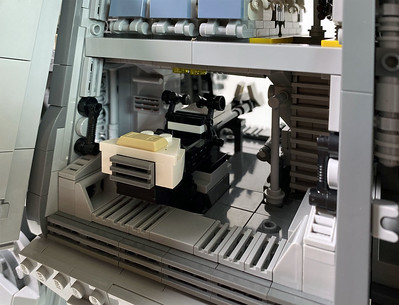
- Full interior, easily accessible
- Holds a crew of 20 + 1 snowspeeder
- Motorized: no
- Internal lights: no
- Handling once fully assembled: nearly impossible ;-)
This build began in November 2018 as kind of a spare time project. I was in the middle of digitally modding the Millenium Falcon which had come out a year before, and I felt I needed a break, a little change from always thinking about the same model.
The 2017 falcon was actually the model that brought me back out of my — rather long — dark age. A friend of mine had shown me a rebricked version of the 2007 model a few months earlier, and I remember how that had suddenly got me interested in Lego again. Seeing a huge model like this was so far from my last Lego memories from the late 80s that I almost couldn’t believe it. And when I saw the teaser for the 2017 version I realized I just had to see how my old favorite hobby felt now, 30 years later. I’ll maybe provide a more detailed account about how I found my way back to Lego once I’ll have finished actually building the modded Falcon. For now let’s just say that — aside from beginning to buy and build official sets — I discovered Lego Digital Designer, and in using it slowly got to know all the new/current parts, learn different building techniques, understand and appreciate Lego in a new way.
While searching on the net for pictures of the falcon and ideas how to mod different parts of it, I also found my way to Eurobricks and a couple of its forums about Star Wars. And that’s how I stumbled upon the AT-AT from Raskolnikov. I loved the approach to find sort of a middle ground between the huge expert models and the little ones Lego had done. Thanks to Raskolnikov who made the instructions available for free, I first built it digitally to get the feel of the construction — as I said, I needed a change from working on a spaceship, so a gigantic motorized metal elephant seemed far enough. And while I was looking how many extra bricks I’d need to build it for real, I began to do some little modifications on the digital model. Just a few tweeks here and there — to change some aspects more to my personal liking.
And then this got completely out of hand :-D

With every little thing I changed, something else caught my eye. Soon I was no longer satisfied with the general proportions of all the different parts of the AT-AT. I began looking for other existing LEGO MOCS and a bit later for source material: blueprints (yeah, but which are the "correct" ones?), photos, drawings, movie stills, whatever I could get my hands on. Over the next year or so almost every sub-assembly was adapted, modified, redesigned. After having initially focused primarily on the exterior design, I realized later on that I had to think more about stability. All the more so as in correcting proportions the whole model constantly got bigger. So it was back and forth several times between exterior and structural design, until I felt more or less confident that the whole thing would finally stand on its own.

Probably the biggest help in all of this was reading in different forums here on Eurobricks. On the one hand, just looking at photos from other MOC's (Raskolnikov, cavegod, jhaelego, dmaclego, A_C, LiLmeFromDaFuture) showed me what was possible, gave me ideas and further motivated me to try something myself. But more importantly: All the discussions about techniques, stability issues and design aspects — all these different opinions from creators and readers were the most inspiring part of it. So my huge respect and thanks goes out to everybody who contributed to that creative exchange. Without it, this model would either never had been finished or would surely look a lot less good — or it would have crashed the moment I tried to stand it on its feet.

Before I got to this moment however, I first had to learn that once the model seemed to be finished in digital form, building it for real would still be quite far away. Not only had I to figure out what parts I already had, which ones I needed and most of all: how to get them without steering straight for financial ruin - it also got ever clearer that some sort of building instructions had to be made. Not to sell them, but building the thing directly from LDD seemed unpractical. So after searching for quite a bit I finally found (here on Eurobricks, where else?) a software solution which fit my needs. …And then I made the same experiences as probably anyone who once created instructions for a complex model: In thinking about how to build the thing step by step, I suddenly noticed structural weak spots and all kinds of difficult to build or downright impossible assemblies. So now it was back and forth between doing building instructions and redesigning the digital model.

On a side note: Doing this made me more profoundly than ever appreciate the work Lego Designers do. I can only vaguely imagine how much work must go into the whole process of making the model nice, strong and fun to build AND the instructions failsafe, easily understandable, logic…
And then one day, the instructions were finished, all parts delivered and the two-and-a-half-year long process of finding "my" AT-AT came to an end. Funny enough, right around then the first rumors appeared that Lego would put out a giant UCS AT-AT. I think that’s what finally made me stop — the realization that IF I waited for this thing to come out, I would have to begin all over again, there being surely at least a few new parts, new building ideas, etc. So I just would have to build the thing, now or never :-)

The only thing I changed after this was adding the base — as a direct consequence of noticing how unbelievably heavy the thing got, once the main body was getting finished. I knew then that standing the thing on its legs without the support of at least a couple of studs would be …adventurous. So after having spent I don’t know how many hours on the question of functional knee and shoulder joints versus stiff legs in fixed positions I finally found myself with working joints/legs - that were in a fixed position :-D (which reminded me of something somebody had asked in one of the AT-AT forums: are you sure the bending option is really worth the whole hassle?) But hey, at least I know I could position them the other way round if I wanted to — And the one knee which bends a little from all the weight gives it a nice "natural" look.
After having spent so much time on thinking about making the whole build strong and easy enough to assemble, it was satisfying to finally build it with real bricks and to see it coming together nicely. In the end it’s a little bit overbuilt in a couple of places, where simpler techniques (or fewer bricks/connections) would have been sufficient — but at least the brainwork during all those long nights finally paid off somewhat.
As for the interior design my version of the AT-AT doesn’t try to replicate any specific illustration or design. It’s a mishmash of inspirations I got in the forums here, from drawings on the internet and of my own ideas about what "made sense". And of course the construction of the model partly dictated what could go where. The snowspeeder for instance just had to go in the middle part, otherwise I’d have to do it a lot smaller. I kept the basic layout and the trap door in the floor from Raskolnikov’s design, added a fake engine section in the back and decided to greeble all the walls from the inside as well. Which might be considered a bit futile of course, as we big figures can’t really see the greebling in its place without partially disassembling the model. But at least the snowtroopers should feel at home :-)

In the end I’m mostly satisfied with the result. As usual there are some parts I would like to be better still, sections where I went with compromises. For instance: Yes the feet are a bit too tall, but I kind of like ‘em like that. Overall I’m happy that it stands, and that everything holds together (at least long enough to take some photos :-)
It’s interesting: When I now look at the other models again, my version isn’t anything special, it doesn’t add a whole other level of design. But, funny enough, it took me almost three years to redevelop this thing from the inside out to get to that point. So it was at the least a great learning experience with a result that works sufficiently for me. And who knows, once I’ll see how Lego did the legs on their 2021 version, I might revisit this project once more.

-
Thanks very much Jim!
I tried to directly paste the link before, but it didn't work when I copied the link from the flickr size selection page. Thanks to your tip with the url ending, I tried copying the image by right-clicking on the image itself, instead of the link to the image* - and now it works :-)
*...I hope this explanation is in any way clear ;-)
Great, exactly as I always have experienced Eurobricks - it's just a nice community, with many many nice people :-)
Thanks again!
-
Hello everyone :-)
I'm getting started here and have so far read the site guidelines, the new member guide, tried out some posting, have also read this thread about flick image embedding:
https://www.eurobricks.com/forum/index.php?/forums/topic/97921-flickr-tutorial/...but I don't understand what I'm doing wrong.
I don't have the "tree picture" to insert any images, why is that...? From all the options described in the above mentioned post I have very few, none that let me insert pictures. The only picture option I have is the "attach file" one down below, which is limited in size for obvious reasons.
Do I have to pass the 10 post barrier in order to be able to insert flickr links?
Any help would be greatly appreciated :-)
-
Ok then, trying out things :-)
This is a sub title
And this is a list of things:
- Number of pieces: xxxx
- Dimensions (cm): 54 x 17 x 48
- Digital development: 2018 - 2021
Continuing on with Text - then let's try an image..
Why doesn't the flickr hotlinking work here, what am I doing wrong...?
This would be the next paragraph...
Ok then another try:
first image:
I don't have the "tree picture" to insert any images, why is that...? From all the options described in this post I have very few...
https://www.eurobricks.com/forum/index.php?/forums/topic/97921-flickr-tutorial/
second image:
Third image:
Aaaaaha! :-) Got it
-
48 years old, born in Basel, Switzerland, I was a huge Lego fan up until my teens — but then began my rather long dark age, which lasted until 2017/2018. During the last four years I have been continuously falling deeper and deeper into the Legoverse once more.
In autumn 2017 I bought my first Lego set since the late 80‘s (the Mercedes Arocs), followed by the new UCS Millennium Falcon, the latter being the set that got me hooked again.
Since then I have been building MOCs and buying sets again, first mainly Technic, then Creator Expert cars and some Ideas sets. With Lego having finally discovered the AFOL market lately, it has gotten harder and harder to choose what and what not to buy — as not only money, but also space is a constant issue, as no doubt most of you/us have encountered.
Through my re-immersion in the Lego world I have also been discovering LDD. Digitally building sets and then moccing them was what got me to learn about all the dozens (if not hundreds) of new parts compared to what I knew from my childhood. It was and still is fascinating to rediscover this world I had known so well as a child, but then almost completely put aside. That said, I still have a couple of creations from that time, and now that I‘m writing this, I think I‘ll maybe get them out of their boxes and show some of them here. Until that time, the newer MOCs/MODs will have to do.
Eurobricks has been a precious source of knowledge and inspiration during these last couple of years. So I‘m looking forward to the creative exchange with likeminded Lego fans and fanatics :-)

[MOC] …bad timing? Yet another big AT-AT…
in LEGO Star Wars
Posted
Thanks @LukeSkybuilder! :-)
As for the size: If I take the "official" measures, which mostly seem to be in the range of 25-26 meters in length and about 22 meters in height, then my version would be at an average of 1:47.
So the Lego version is much closer to minifig scale with its average of 1:37. You can see that mine's slightly too small in that the three doors/hatches on each side of the hull are a bit too small to get a minifig through easily. But I'd say it looks sufficiently big to pass as "in scale" ;-)
Thanks again - I'll think about that photo suggestion :-)