

lnteknik
-
Content Count
23 -
Joined
-
Last visited
Everything posted by lnteknik
-
[MOC] Classic Porsche 911 1:10
lnteknik posted a topic in LEGO Technic, Mindstorms, Model Team and Scale Modeling
Hello everyone, hope you are doing well. I have recently re-visited a model which I started building years ago when I first dove in the world of lego technic. I have made some final adjustments and the model is now complete. It's my pleasure to share it here: 911S 2.4L from the 70's - 1800+ parts - 1:10 scale - air-cooled flat six - 4 speed manual gearbox (an adaptation of the gearbox found on @Charbel's Volcano supercar) - working steering wheel - independent rear suspension - macpherson strut front suspension (courtesy of Gergely's Technic Models on Youtube) - openable doors, bonnet, and engine cover What do you think? P.S.:This MOC shares ~70% of the parts with set 42096 - Porsche 911 RSR. And I have also make sure no blue pins are visible outside. If you are interested, instruction is available here And with the orange F150 fenders available, I'm thinking about building a Targa version too :) -
[MOC] Mini sport car with full sized V6 at the front [Free Instructions]
lnteknik replied to SaperPL's topic in LEGO Technic, Mindstorms, Model Team and Scale Modeling
Very cool! Thanks for sharing -
[MOC] Mini sport car with full sized V6 at the front [Free Instructions]
lnteknik replied to SaperPL's topic in LEGO Technic, Mindstorms, Model Team and Scale Modeling
Great job! Very clever and innovative solution for the steering. I think the big block engine and steering linkage combination should be displayed in full glory. How about making it a hot rod instead? -
42143 - Ferrari Daytona SP3
lnteknik replied to Ngoc Nguyen's topic in LEGO Technic, Mindstorms, Model Team and Scale Modeling
A great parts pack… to build another Ferrari, perhaps LaFerrari Aperta. I will buy it still, but no way will I build that ugly SP3. What’s wrong with Ferrari styling department recently? Squinty headlights, pointy nose, and overly complicated rear… other than the 296 GTB, it’s just going downhill starting from the SF90 On the other hand, those SP3 wheels look very saucy, cant wait for Lego to make them! And I hope we get a yellow Ferrari instead of red, there are too many red technic vehicle sets around imo -
42141 - McLaren Formula 1™ Race Car
lnteknik replied to Ngoc Nguyen's topic in LEGO Technic, Mindstorms, Model Team and Scale Modeling
It has the same launch price as Ferrari 488 set @ 179.90 EUR, roughly the same techs - steering, suspensions, and moving pistons engine. This has more large panels which explains the lesser parts count. It also has probably more expensive tires. But all in all, I'll say it's the successor to Ferrari 488 and Porsche RSR set. TLG has effectively revived the Racers series and charge a premium for livery/stickers -
42141 - McLaren Formula 1™ Race Car
lnteknik replied to Ngoc Nguyen's topic in LEGO Technic, Mindstorms, Model Team and Scale Modeling
Photos are up on US lego site 42141 It seems to me that the top part is removable to reveal the engine. The halo is quite interesting actually, a few new parts in orange for sure. -
42141 - McLaren Formula 1™ Race Car
lnteknik replied to Ngoc Nguyen's topic in LEGO Technic, Mindstorms, Model Team and Scale Modeling
Nice parts in normal blue! I would love to build a classic Alpine A110 in blue some day. I also spotted a few parts new in orange, like the orange wishbone that forms part of the halo (quite clever of the designer), 5x7 frame in orange and perhaps part 15100 in orange too? That would be sweet. I wonder at first why they didn’t use soft axle for the halo, but then again, halo needs to be hard, not soft right? New panels for the wings end plates too so this is already a great parts pack. Tech-wise it seems rather disappointing. Other than the usual suspects, I believe the DRS is not functional, but I’m not sure how DRS will work in the 2022 car either. I’m curious what the underbelly looks like. Doesn’t seem like ground effect is featured here -
42141 - McLaren Formula 1™ Race Car
lnteknik replied to Ngoc Nguyen's topic in LEGO Technic, Mindstorms, Model Team and Scale Modeling
Yeah you may be right. I probably jumped the gun a little there. Tumbler tires, blue ring, full wet make a lot of sense. And it’s probably too hard to print on the curved side walls of those tumbler tires so yup printed wheel cover must be. These wheel covers will probably try to make the rims look bigger too. Typical TLG! -
42141 - McLaren Formula 1™ Race Car
lnteknik replied to Ngoc Nguyen's topic in LEGO Technic, Mindstorms, Model Team and Scale Modeling
Definitely 2022 car! I’m quite excited for this, can’t wait for clearer pictures. Lots of #5, #6 panels in orange are used. The top fin seems to be a black propeller blade from 42125. #50,51 panels in perhaps normal blue? I hope it comes with printed tires, and if they are printed, do you think the tires will come brand new moulds? Definitely a buy, build and mod to Ferrari F1-75 using 42125 parts -
[MOC] Ferrari F40 1:10 Redux
lnteknik posted a topic in LEGO Technic, Mindstorms, Model Team and Scale Modeling
Ferrari F40The most iconic supercar from the edgy eighties. The last hardcore beast signed off on by Enzo. The absolutely definitive Ferrari. The legendFunctions- Working steering wheel- 5+R dogleg gearbox- Fake V8 working engine- Independent double wishbone suspension at all 4 wheels- Openable doors, front and rear clamshell- Manually operated pop-up headlights Design and InspirationThis creation is inspired by the fantastic work of @jorgeopesi from 7-8 years ago, reborn with contemporary Lego Technic pieces. I kept the gear shift mechanism of the original, and changed the gearbox to a modified version of @Rudivdk's 5+R manual transmission. Some exterior solutions also take reference from jorge's version, but everything else from steering, suspension setup to engine, body panels etc are my own designs. It's not a mod by any means, but hopefully a worthy remake. With the evolution of LEGO parts palette over the years, I have also managed to add more details to the model, such as: - cooling slots under the rear spoiler - exhaust manifold and a see-through rear grille - detailed interior and more representative racing bucket seats - detailed engine bay with all the bells and whistles (intercoolers, airboxes, etc) - as well as, the iconic line that runs across the entire car - also worth mentioning is the 3-piece rod hidden in the rear bumper that supports the rear clamshell when it's opened. Construction The car was originally built with parts from set 8145, 8070, and additional parts from my parts bin. However, 2x 42125 is also a great base, which provides 70% of the parts. The missing 30% is listed here. When making instructions, I have also tried to substitute expensive parts such as Red 14L soft axles, or Red 1x6 thin liftarms with more affordable solutions. The wheels used in the instruction are also from set 42125 to save cost, but if you want to use standard technic 56mm D wheels - part 15038, just need to use 7L liftarms instead of 6L as the rear wishbones. These wheels will stick out a bit and provide a slight rake, giving the car a more aggressive look. The wheels used in photos are third party/non-lego parts. They are great (provide a good offset between the front and rear wheel covers, making the rear wheels look "deeper") but perhaps not for the purists. You can send me a private message if you want to know where I get those wheels from, but note that I'm in no way affiliated with the seller. Neither can I guarantee the quality of the product nor seller's trustworthiness, so tread at your own risk. Instruction hereThe instructions booklet is 666-page long and contains 828 steps (talk about "Manifest" if you watch that show :D). You will find 11 modules and 10 assembly stages in between to combine the modules to form the final model. You can follow the instructions in the chronological order of the pages, or skip around, build all the modules first (in whichever order you like) and then follow the assembly steps, just like how real cars are built in the factory. Either way should bring you a enjoyable building experience. Thank you for reading this far. I hope you enjoy the write-up. Look forward to hearing your thoughts More pics here (bricksafe) Sneak peeks of my upcoming creations -
[MOC] Ferrari F40 1:10 Redux
lnteknik replied to lnteknik's topic in LEGO Technic, Mindstorms, Model Team and Scale Modeling
As promised, I have added the link to the FREE 3D model of my version to Rebrickable Here is the direct link for your easy reference https://bricksafe.com/pages/Lnteknik/freef40 Thank you for the encouragement. Means a lot to me. Can't wait till my next project Thank you for taking your time to voice your opinions. For what it's worth, I do appreciate your two cents! -
[MOC] Ferrari F40 1:10 Redux
lnteknik replied to lnteknik's topic in LEGO Technic, Mindstorms, Model Team and Scale Modeling
Fair point, and thank you for offering to take some pictures for comparison sake. I hear you, if the instruction paywall is something that prevents ppl from seeing the difference, then I think I may have solutions for this: 1. The bricksafe gallery link in my original post contains renders of all the 11 modules of the car. You can compare them to instructions of Jorge’s version and draw your own conclusion 2. I’ll even go one step further and do something that you may think is excessive, but I hate to have my reputation tainted: I’ll share the 3D module or .io file for FREE. Everyone, please have your own analysis before commenting. If you think that I have done my due, and want to support my work, feel free to buy the instructions. I’m not making instructions for profit, it’s a hobby for me, for what it’s worth instructions proceed help fund my parts purchase to continue working on new models. I have spent many hours working on the instruction, making it as easy to build as possible so yeah instructions will NOT be free. If you want to use the 3D model to build my version, be my guest. I don’t care if some Chinese brands make copies of my model and sell them, either. Just give me some time to clean up the .io file, it will be included as a link on rebrickable page soon -
[MOC] Ferrari F40 1:10 Redux
lnteknik replied to lnteknik's topic in LEGO Technic, Mindstorms, Model Team and Scale Modeling
Thank you for sharing your thoughts. Perhaps the contention here is where we draw the line MOD vs MOC. I built this myself so below is the full transparency of what I took reference from Jorge's version. You can judge it for yourself, and the instruction is out so whoever has it (thank you) can verify what I've said. Note that by "referenced" below, I mean heavily modified. Only the concept is referenced, not copying the execution/usage of parts. First, the chassis, which should be taken into account because without the chassis, the bodywork has nothing to latch on to - Engine: NO reference - Engine Bay Details: NO reference - Gearbox: Modified Rudivdk's 5+R (given full credit) - Shifter: Borrowed from original (given full credit) - Rear Axle: NO reference - Front Axle: NO reference - Steering: NO reference - Seats: NO reference - Dashboard: NO reference - Roof Support Structure: NO reference The bodywork - Entire Front Clam-shell (lights, bonnet, front wheel arches...): NO reference - Side Skirts: NO reference - Doors: NO reference - Roof: NO reference - Area behind doors: referenced (with key addition of a black line) - Rear Clam-shell: referenced (partly, I'll explain) I guess we all agree the main sticking point is the resemblance of the bodywork area from behind the doors to the rear bumper, so let's dissect a little - Rear Bumper: Structure: referenced; Rear Fog Lights: referenced; Exhausts: NO reference - Rear Clam-shell: C pillars: referenced; Area on the Side of Rear Lights: referenced; Rear Fenders: referenced; Spoiler: referenced; Support Structure: NO reference; Area below Spoiler: NO reference; Rear Lights: NO reference; Rear Grille: NO reference; Support Rod: NO reference I can safely say less than 50% (way less) of the entire car are borrowed solutions. Calling it a MOD is unfair, wouldn't you say? I have presented the facts, if you still arrive at the same conclusion that it's a MOD, that's your prerogative. Regarding the instructions price, let's not just use scale as a factor. I tend to think it's the complexity of the build that matters. This MOC is densely built and contains almost 2,600 parts, that's Porsche GT3RS region (1:8 scale), and 1,000 parts more than 488 Ferrari set (1:10 scale). You can say this MOC probably has more pins, but actually the Porsche has around 200 more pins (all types combined) compared to this. I charge a price that's fair for my effort of making instruction. It's up to the buyers to decide whether it's worth it. Sure, there are 1:8 MOCs out there that are cheaper, but no one is stopping the buyers from buying them instead of my MOC. Jorge's version is free, too (thank you for the generosity). If my version is just a 1:1 copy/replica of his, I think no one in the right mind will purchase my instructions. Thank you! Yes, filling the gaps is not something I take lightly. It's really hard to come up with gapless solution without making it look like a mess with all sorts of parts combined. -
[MOC] Ferrari F40 1:10 Redux
lnteknik replied to lnteknik's topic in LEGO Technic, Mindstorms, Model Team and Scale Modeling
Hi Jorge, Sorry if I didn’t make it clear and I dont want to be disrespectful to you and your creation. I admire your version but it’s also not my intention to copy somebody’s work and call it my own, let alone selling instructions for it. My conscience is clear in the sense that majority of the design is my own, everything which I borrowed have been stated and given the due credit. Comparing parts list will probably show the clear difference between the two models but I’m also more than happy to share the instruction with you for you to make your own assessment -
[MOC] Ferrari F40 1:10 Redux
lnteknik replied to lnteknik's topic in LEGO Technic, Mindstorms, Model Team and Scale Modeling
@brunojj1 thank you for the kind words! It's my great honour hearing that from a true master like yourself. Haha I thought I could get away with those 2 red 3x2 panels (which were not painted, but red-taped , but of course no little detail can escape your keen eyes. I hope LEGO make them in red in the future, so I can release a "pimped" version to fix the gaps. Although I think somebody can technically build this in White or Black and have a crack. I know, sacrilegious colour choice for a F40 but...possible @LvdH Thanks! Again it's an honour that my model can join the rank of other fantastic creations in your collection. Look forward to your photos when the time comes . And yes, those are the wheels I used. They should be compatible with your custom printed wheel covers, too @BennyF Thank you! Somebody already built an 1:8 Enzo with Sian parts and if I'm not wrong there's also a modified version of set 8653 in 1:10 scale, so I'll probably skip -
[REVIEW] 42127 - The Batman - Batmobile
lnteknik replied to Jim's topic in LEGO Technic, Mindstorms, Model Team and Scale Modeling
Thanks for the review! I love the high quality pictures and the occasional jokes :). I still believe this set is a good parts pack nonetheless. Black panels and connectors are always welcome. However, I do agree its look does start to grow on me. The front and rear views look very menacing. Also agree with you on the wheels’s choice. Those wheels just don’s fit, the side wall is too thin and the front wheels are disproportionally small. Can you try 62.4x20 tires upfront and ‘89 batmobile front tires - 68.7x27 at the back, if possible? Just curious how that would look -
[MOC] Classic Porsche 911 1:10
lnteknik replied to lnteknik's topic in LEGO Technic, Mindstorms, Model Team and Scale Modeling
Thank you! Regarding the choice of tyres, yes indeed I pick those tyres mostly because of how well they fit the scale :) The only thing I don't like is the rim. If only I have the skills create 3D printed Fuchs rims haha Thank you! 10295 is also cool but imo, the bumpers are a bit chunky and I also prefer technic than creator. Motorization is very possible for this MOC. There is plenty of space for a servo/control+ motor behind the front axle and if the gearbox and backseats are removed, a battery pack and 2 motors can fit there. I'll consider doing so in the future, Thanks! Stay tuned :) Thank you for the kind words. Yes, the front suspension is really unique and all credit to the original designer. I do think it's pretty awesome so I have incorporated it in my MOC. The suspension does work smoothly in my experience, no jamming so far. Using only soft springs but because of the positive caster angle, it can support the weight of the model well. I do have some footage of the suspension in action, will find time to upload it to youtube and share it here ofc << done! -
[MOC] Classic Porsche 911 1:10
lnteknik replied to lnteknik's topic in LEGO Technic, Mindstorms, Model Team and Scale Modeling
Thank you everyone for the kind words! I love your suggestions and I will consider some mods in the future :) I have added some more photos for the chassis as well as the front suspension, kudos to Gergely who is the original creator of such an awesome setup. Wheel-wise, the closest possible alternatives are 1989 batmobiles wheels. However, they do stick out about 1 stud at the rear and half a stud up front (pics below). Perhaps a Turbo S or RWB version can use those wheels :) Rear bumper, yeah I think it's possible to not to use stickers and brick-build the bumper strips, I'll definitely do this for the Targa version. -
Ferrari F2004 1:8 MOC (with instruction)
lnteknik replied to lnteknik's topic in LEGO Technic, Mindstorms, Model Team and Scale Modeling
Thank you for the kind words. Yeah I did use some parts of 42000 design in this MOC and of course tried to improve them. 42000 is probably modelled after a later Ferrari F1 variant, like the F150 of the year 2011, not the F2004. Set 8674 is the closet Lego set I would say, although it's modelled after the F2005, again not the F2004 :) -
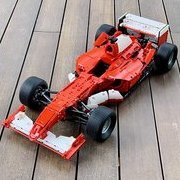
Ferrari F2004 1:8 MOC (with instruction)
lnteknik posted a topic in LEGO Technic, Mindstorms, Model Team and Scale Modeling
Hello everyone. I would like to share a MOC I have just completed: Ferrari F2004 F1 car It’s in 1:8 scale with 1700+ parts. Some features: working V10, pushrod suspensions, steering wheel, removable front wing, rear wing, headrest, and engine cover I have uploaded some pictures to bricksafe: F2004 Bricksafe Instruction is also available here: F2004 Instruction -
Ferrari F2004 1:8 MOC (with instruction)
lnteknik replied to lnteknik's topic in LEGO Technic, Mindstorms, Model Team and Scale Modeling
Thank you! Thank you for following along, Thank you for the kind words! Regarding the modular bit, I’m inspired by many expert builders on this site. Having built some supercars such as ones from Bruno or Charbel, I must say connecting the modules is one of the best part of the building experience so I tried to have that in this MOC, too Thank you! It was a dream-comes-true to me too, glad that I was able to finish it Thank you! I got to say I had it easier because 42000 suspension is a rather good base. Also thanks to quite a number of videos on YouTube that explain F1 suspension to dummies like me, I was able to grasp concepts such as torsion bar, heave spring, damper, anti-roll bar... I tried to give it a go but not every concept was incorporated of cos @Gray Gear @TeamThrifty @Jerry LEGO Creations I can see very valid points from your posts, and I do see MOC makers giving more love to suspensions over the years.The LEGO Group should set an example, too. If someone can put anti-roll bar into the Porsche GT3 RS set with a few simple modifications, I don’t see why TLG can’t. Especially when their target audience for those 1:8 supercars is 18+, I’m pretty sure many will be very happy with such additions -
Ferrari F2004 1:8 MOC (with instruction)
lnteknik replied to lnteknik's topic in LEGO Technic, Mindstorms, Model Team and Scale Modeling
Thank you! Those tires are almost perfect as intermediates haha, if only the rear tires are a bit wider Thank you! That’s a nice suggestion. I don’t have those bricks now but will have some in order Those caps are experimental, didn’t make it to the final version :) Thank you for following along. Not gonna lie, those instagram likes do give me motivation to finish the MOC -
Ferrari F2004 1:8 MOC (with instruction)
lnteknik replied to lnteknik's topic in LEGO Technic, Mindstorms, Model Team and Scale Modeling
@saberwing40k thank you very much. Took me a while to find the guide to upload pictures I just uploaded the pictures to Flicker and embedded them here: