
laix
-
Content Count
69 -
Joined
-
Last visited
Everything posted by laix
-
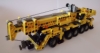
LEGO Technic Mini Mobile Crane MOC
laix posted a topic in LEGO Technic, Mindstorms, Model Team and Scale Modeling
After finishing my MOD of the LEGO Technic 9397 I wanted to add pneumatics to other sets. My choice was the LEGO Technic Mini Mobile Crane 8067. To make it more interesting I decided to use it's parts and make a MOC loosely based on the Liebherr LTM 1200 5.1. And this is what I came out with. All functions are comparable to bigger scale models like e.g. the LEGO Technic 8460. - 5 axles steering system actuated by a 20t, 12t gear reduction on the back - four outriggers to stabilize the crane while lifting - a rotating crane, mounted on the new turntable elements (99010, 99009) - the crane is lifted pneumatically with a Pneumatic Cylinder (47224c01) - the crane consists of two booms so it can extend - a hook with rope - dummy engine The most difficult part was the steering system and it took several attempts to realize it. I got inspired by the LEGO Technic 9390 and developed the idea. This results in a modular system of small size. The turning radius is nearly 40 cm. Note: None of the axles meet in a pivot point which causes some problems (slipping wheels, vibrations), especially on the front axle. I made this compromise according to the small scale. More detailed pictures of the steering mechanism to be found on Brickshelf. The Boom is lifted by a Pneumatic Cylinder (47224c01). Two Small Pumps (x191c01) provide the air. I used a Technic, Shock Absorber 6.5L, Complete Assembly (Normal Spring) ( 731c05) to run the pumps manually. With an 1L stroke you have to push about 20 times to lift the heavy boom. The boom is extendable and uses Erik Leppen's design. It's really strong and fits the scale quite well. More detailed pictures to be found on Brickshelf. I'm very happy how everything turned out and I hope you like it as well Regards, laix -
LEGO Motorized Pneumatic Pump
laix posted a topic in LEGO Technic, Mindstorms, Model Team and Scale Modeling
One of my plans for 2012 is to build a pneumatic walker. Therefore, I have to guarantee a sufficient air-flow. Main restrictions are space and of course weight. After several attempts with different arrangements and a destroyed Pneumatic Pump (yes, I removed the spring and afterwards it couldn't hold the pressure anymore), I started to copy some designs from other builders like e.g. Sariel's rocking compressor. But I was pleased by none of them. I wanted something more stable and reliable and when I discovered radbot's concept on eurobricks, I was enthusiastic to build a frame housing those 8 Small Pumps. The dimensions are 7x10x10 studs. I used the Pin Connector Perpendicular Long (32557) in order to achieve a 2L displacement on the crankshaft. If you like to see more, visit my blog, brickshelf or youtube-profile. Hope you like it. Greets, laix -
LEGO Education - SmartCity
laix replied to laix's topic in LEGO Technic, Mindstorms, Model Team and Scale Modeling
It's about 1 m long, I think it's from the Rescue Helicopter 8068. I've also uploaded some pictures of our SmartCity. Best regards, laix Edit: Sorry for the large photo, changed it. -
LEGO Education - SmartCity
laix posted a topic in LEGO Technic, Mindstorms, Model Team and Scale Modeling
Hey, I was really busy over the last months and wasn't able to build any models in my free time. But luckily I get paid to build at work where we made several projects over the last year. One of the major tasks was to build a model to display several options to generate and store electricity. Some of you may are familiar with Isogawas great GBC "smartcommunity" and we wanted to transform this idea into a real working power generator. Therefore we used ten Renewable Energy Add-On Sets (9688) and four NXT 2.0 to control everything. The video is in german, an english translation will follow soon, as well as a pictorial overview on my blog. Hope you like it. Best regards, laix -
ETF HTX-380 Mining Truck.
laix replied to Saberwing40k's topic in LEGO Technic, Mindstorms, Model Team and Scale Modeling
Found this post on the French SeTechnic-forum. It's by builder jacques27: TRUCK ETF 190 MT-240 After the failure of the V1, V2 so here. ETF 190 MT-240 is a study to replace the existing mining trucks, this truck is a project that has not yet been put on the market. Points that were the hardest to achieve are: Axles. The rotation of the bucket. DIMENSION Length: 67 cm Height: 24 cm Width: 26 cm Weight: 4.400 KG CHARACTERISTIC 1 motor xl 1 motor L M 2 engine 1 BB 2 IR 4 pneumatic cylinders 20 wheels The TRUCK -
need the name of a technic part
laix replied to lockdownTF's topic in LEGO Technic, Mindstorms, Model Team and Scale Modeling
You probably want this part, am I right? Technic, Pin Connector Toggle Joint Smooth Double with Axle and Pin Holes (87408) -
Lego Technic Kart!
laix replied to Ferrik's topic in LEGO Technic, Mindstorms, Model Team and Scale Modeling
It seems to be a modified version of the Lego Bike Burner (8236) -
please help me identify this piece
laix replied to GazK's topic in LEGO Technic, Mindstorms, Model Team and Scale Modeling
They seem to be Hose, Rigid 3mm e.g. 75c22. But every axle with axle joiners should do the same job Probably the easiest way to search for specific parts is to use Bricklink's search for "Catalog Items" and showing the results in "Thumbnail Gallery". You will get a quick overview and find your parts really fast. -
Best Pieces for Hose System?
laix replied to Crtlego's topic in LEGO Technic, Mindstorms, Model Team and Scale Modeling
Hey Crtlego, while building my Unimog, I tested several setups for pumping water. The easiest and most efficient one is to pump air into a water filled tank. You can replace the LEGO tank with PET bottles and increase the number of pumps as well. Another possible solution is to pump the air with the small LEGO pump. It's made out of plastic so the water won't damage it. The main disadvantage is, that you have to place the whole mechanism and pumps underwater. For my Unimog I used a closed circuit, which is able to suck in the water. But you need a lot of force to actuate the pump and it can only deal with smaller amounts of water at once. Edit: After seeing DLuders's post I remembered this great pump. It has an amazing volume. Best regards, laix -
Mini Unimog - Fire Brigade
laix posted a topic in LEGO Technic, Mindstorms, Model Team and Scale Modeling
After introducing my Mini Version of the LEGO Technic 8110, I have to build another Version. A Fire Brigade Truck, inspired by VFracingteam's Unimog. Its main features are as follows: - Front PTO with water cannon - Water tank and pump And this is what I came out with. The Unimog is used in rough terrains and with the snorkel it's able to cross small rivers. The water cannon lets the firemen extinguish the fire from inside the cab. The roof contains some tools and the "water pump" which is an old Pneumatic Spring Cylinder. Its main advantage over the new pumps is the ability to suck in the water. A Pneumatic Airtank is used to store the water.The pump can be lifted to be operated easily and is stored when not in use. The most important part of the pumping mechanism is the Pneumatic Distribution Block 2 x 4 with Non-return Valve. There is the tank insert on the left, pump in the middle and the water outlet on the right. More detailed pictures to be found on Brickshelf and further information on my blog. It's a Fire Truck, so it has to be able to extinguish fire. To proof its ability I made a short video. Best regards, laix -
please help me identify this piece
laix replied to GazK's topic in LEGO Technic, Mindstorms, Model Team and Scale Modeling
It's the Technic, Gearbox Half (32166) -
RC Red Heat
laix replied to fourlord's topic in LEGO Technic, Mindstorms, Model Team and Scale Modeling
That's a really great model I love the compact frame and will definitely build it once I have some spare time. -
Roller coaster idea
laix replied to Zerobricks's topic in LEGO Technic, Mindstorms, Model Team and Scale Modeling
It's a great idea and the Pin Connectors cost only 0,06$ per part. This isn't too expensive i think -
scale 1:16 8x8 Panther(rosenbauer) MA1 WIP
laix replied to legobouwer's topic in LEGO Technic, Mindstorms, Model Team and Scale Modeling
That is an awesome model. You captured the looks perfectly, gave it a lot of great functions and a working water pump. Couldn't be much better -
Mini Track Loader
laix replied to Alasdair Ryan's topic in LEGO Technic, Mindstorms, Model Team and Scale Modeling
I like the idea of the several tools. The only thing, that bothers me is the arms point of rotation. It would be more accurate without the 90 degree connector. But all in all you did a nice job and thanks for sharing. Have you seen this version before? -
8868 Air Tech Claw Rig or 9397 Logging Truck
laix replied to PlaneCrazy's topic in LEGO Technic, Mindstorms, Model Team and Scale Modeling
Totally agree with that. Just bought one some minutes ago on German ebay for only 36 Euro (48 USD, 46 AUD). In Germany most of the famous Technic models are very cheap if you buy them used, so you may check the shipping costs -
vYKo1000/ Teuk's Lego Technic Breakdown Truck
laix replied to DLuders's topic in LEGO Technic, Mindstorms, Model Team and Scale Modeling
I'm glad, that my work inspired you. You did a great job with the several functions. The look of it could be improved, but I followed your post on SETechnic and you already improved your skills. Keep up the nice work! -
VOTING: To sail the Technic sea
laix replied to Siegfried's topic in LEGO Technic, Mindstorms, Model Team and Scale Modeling
2) 3 Votes 6) 2 Votes 14) 1 Vote 15) 1 Vote -
MOC:FrontEndLoader
laix replied to peterski's topic in LEGO Technic, Mindstorms, Model Team and Scale Modeling
Like this version more than the bigger one. You just have to put bigger wheels on both of them -
Member's Websites
laix replied to timslegos's topic in LEGO Technic, Mindstorms, Model Team and Scale Modeling
After I've started my blog this year, it's now worth posting in this topic. laix's Blog laix's MOCs on Rebrickable laix's Brickshelf Gallery laix's YouTube Channel P.S.: Great Idea with the favicons, Splat -
Help with the 'Mog Needed
laix replied to grum64's topic in LEGO Technic, Mindstorms, Model Team and Scale Modeling
So you connected the receiver and the M-Motor for the pump with the battery box? In this case the M-Motor will run as long as the BB is turned on. You could use a Power Functions Switch or another receiver for the M-Motor. What electric components do you have? -
Thanks for your help, I added the Extended Mode long time ago, but I wasn't aware that you can choose to work in a "downgraded" version after that. Now it works
-
I read the whole thread and haven't found my problem. Has anyone else problems with the 9M Beam, which is only available in a strange looking red?
-
Pictorial Review: 9397 Logging Truck
laix replied to Lost_In_Noise's topic in LEGO Technic, Mindstorms, Model Team and Scale Modeling
Why don't you start it after you've taken the pictures? I can't understand this way of starting new threads. But I'm looking forward to see the review -
Mini Unimog - Fire Brigade
laix replied to laix's topic in LEGO Technic, Mindstorms, Model Team and Scale Modeling
I've just finished the LDD-File for my Unimog. I used colored round Plates to show you where to connect the Hoses. It has also been added to Rebrickable.com