
Wurger49
-
Content Count
245 -
Joined
-
Last visited
Everything posted by Wurger49
-

[MOD] Grand Castle Upgrade Modifications From Two 31120 Medieval Castle Sets, No Extra Pieces Required
Wurger49 replied to Wurger49's topic in LEGO Historic Themes
oh right, I get you now. -
[MOD] Grand Castle Upgrade Modifications From Two 31120 Medieval Castle Sets, No Extra Pieces Required
Wurger49 replied to Wurger49's topic in LEGO Historic Themes
Nice, keen to see some photos, the official main build pretty good I got to say, curious to see how your drawbridge looks on the other side. -
[MOD] Grand Castle Upgrade Modifications From Two 31120 Medieval Castle Sets, No Extra Pieces Required
Wurger49 replied to Wurger49's topic in LEGO Historic Themes
Thank you! With different designs there are different reasons and justifications, hopefully I explained why the changes and placements are applied across the different posts, I try to avoid being different for the sake of different. Try your hand on the 2 sets first, before adding a third set, as LEGO is expensive, takes up space and there are always new sets coming around the corner. -
[MOD] Imperial Trexler Armored Marauder Upgrade Modifications, using pieces from two 75311 sets
Wurger49 replied to Wurger49's topic in LEGO Star Wars
Thank you for letting me know that you were successful in doing this MOD. I used the dark tan tiles for the boxes, as all 4 LBG tiles were used in the vehicles. I left the troops inside the vehicle, so I didn't need more than 1 mortar. -
[MOD] Grand Castle Upgrade Modifications From Two 31120 Medieval Castle Sets, No Extra Pieces Required
Wurger49 replied to Wurger49's topic in LEGO Historic Themes
Big thank you to Graham Hancock from Blocks Magazine https://blocksmag.com/ to feature this design on Issue 83! Two years in a row following last year's Enhanced Pirate Ship 2 x 31109 . 31120 Article by Richard Yao, on Flickr -
[MOD] Imperial Trexler Armored Marauder Upgrade Modifications, using pieces from two 75311 sets
Wurger49 replied to Wurger49's topic in LEGO Star Wars
After studying Rob van Leeuwen and Papaglop's Marauder MOC turrets, I used the remaining bricks from the two sets to build an alternate turret with SNOT side walls. The stowage bin is now built into the back of the turret, I left it out on the other design due to the surrounding cheese slopes. The gun mounts are interchangable, no tiles are placed on the bar handle plates as they will be taller than the sides turret walls. The two silver 1x1 round plates represent the range finders/sensors on top of the guns. Advantages of the new turret: - round base vs the octagonal base - cleaner side walls with less different shaped pieces - stowage bin as on screen. Disadvantages of the new turret: - front and side views look boxy due vertical side walls and vertical back - flat tops on side walls Please let me know what you think and prefer! Either way, you can build both turrets at the same time and move the guns between the two, which is what I am doing. Turret Comparison by R Y, on Flickr Turret Comparison by R Y, on Flickr Turret Comparison by R Y, on Flickr Turret Comparison by R Y, on Flickr Turret Comparison by R Y, on Flickr Turret Comparison by R Y, on Flickr -
Nicely done, love how you did the vegetation
-
[MOD] Imperial Trexler Armored Marauder Upgrade Modifications, using pieces from two 75311 sets
Wurger49 replied to Wurger49's topic in LEGO Star Wars
I compared this MOD to MOCs on Flickr, width and height are about the same, just the cockpit is slightly shorter. -
[MOD] Imperial Trexler Armored Marauder Upgrade Modifications, using pieces from two 75311 sets
Wurger49 replied to Wurger49's topic in LEGO Star Wars
I can't find any official dimensions from Star Wars, so your guess would be as good as mine. -
[MOD] Imperial Trexler Armored Marauder Upgrade Modifications, using pieces from two 75311 sets
Wurger49 replied to Wurger49's topic in LEGO Star Wars
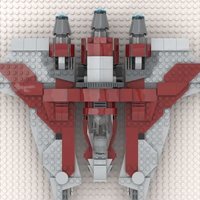
After watching The Mandalorian S2E4 again, I realised that my turret is even more oversized then I thought. So I went to fix that by reducing the height by one plate, two 1x1 cheese slopes are taken from the cockpit opening and used on the back of the turret. They are replaced by two LBG Round 1 x 1 quarter tiles. No tiles are placed on the bar handle plates as they will be taller than the sides turret walls. The two silver 1x1 round plates represent the range finders/sensors on top of the guns. Now the turret is a lot more screen accurate. V1.2 Low Profile Turret by R Y, on Flickr V1.2 Low Profile Turret by R Y, on Flickr V1.2 Low Profile Turret by R Y, on Flickr -
[MOD] Imperial Trexler Armored Marauder Upgrade Modifications, using pieces from two 75311 sets
Wurger49 replied to Wurger49's topic in LEGO Star Wars
GuCi2012 from Reddit was kind enough to share with me a change he made to to cockpit guns, again only using pieces from the set! They can elevate now, very smart GuCi2012, thank you! https://imgur.com/a/E7078c1 -
oh, first time seeing those special rock pieces! The micro scale castle is just beautiful, love how you even fit a cathedral inside, and the clever use of pieces to create the battlements on the wall.
-
I can fit 48 Landsknechts on the 32x32 base plate. 6 crossbowmen on each flank 1st row of 6 Sword and Buckler Men 2nd row of 6 Pikemen 3rd row of 6 Pikemen 4th row of 4 Halberdiers and 2 standard bearers 5th row of 6 Pikemen 6th row of 6 Pikemen Element 6335192 and 6335666 for black falcon minifigures Element 6302992 and 6251186 for the blue Ninjago minifigures Element 6319864 and 6250881 for the red Ninjago minifigures Pikes are made using 4611883 Spear + 6296951 Handle + 6170420 Stick 6M Halberds are made using 4611883 Spear + 6363145 Axe Head + 6296951 Handle 6076677 Round Shield 6295400 Sword, No.18 6268844 Pearl Dark Gray Crossbow 4211196 Reddish Brown Crossbow 6268960 Quiver 6248874 Armour 6327807 Armour, No. 12 6037507 Knight’s Helmet 6125711 Tournament Helmet 6327809 Knight’s Helmet Closed 6289361 Blue Feather 6268955 Blue Streamer 6326096 Red Feather 6268946 Red Streamer Landsknechts by R Y, on Flickr Landsknechts by R Y, on Flickr Landsknechts by R Y, on Flickr Landsknechts by R Y, on Flickr Landsknechts by R Y, on Flickr Landsknechts by R Y, on Flickr Landsknechts by R Y, on Flickr Landsknechts by R Y, on Flickr
-
31120 Alternate Build - Drawbridge Defense
Wurger49 replied to TeriXeri's topic in LEGO Historic Themes
very nice edition of the drawbridge. -
Looking good mate! What do you mean by "Lastly I hated the 1x1 round stud that just throwing the back wall off so I fixed it"?
-
[MOD] Imperial Trexler Armored Marauder Upgrade Modifications, using pieces from two 75311 sets
Wurger49 replied to Wurger49's topic in LEGO Star Wars
Q: Should the top panel at the front of the vehicle have a stop point or does it just go all the way down, making it so you have to manually position it so there’s a window gap at the front. Secondly, what is the subassembly to the right of the side door (top panel) in the second last screenshot in the Eurobricks thread? A: The stormtrooper helmets act as the stop point, it positions the top panel perfectly in the right slope, without the troopers, it will go all the way down, Bruce's version on Instagram goes down further because he left out the seats, I pointed it out last night and he will fix that. If we are talking about the same thing, it composes of one 54200 LBG Slope, one 1x1 DBG brick, one 1x1 TR round plate, one 1x3 LBG plate, one 3700 DBG Brick 1 x 2 with Hole and one 2420 DBG corner plate. -
[MOD] Imperial Trexler Armored Marauder Upgrade Modifications, using pieces from two 75311 sets
Wurger49 replied to Wurger49's topic in LEGO Star Wars
Big thanks to fellow afol bruce_swift, he designed new gun mounts that have elevation! still using pieces from the 2 sets! Updated Turret by R Y, on Flickr Updated Turret by R Y, on Flickr Updated Turret by R Y, on Flickr -
[MOD] Imperial Trexler Armored Marauder Upgrade Modifications, using pieces from two 75311 sets
Wurger49 replied to Wurger49's topic in LEGO Star Wars
Q: "Hello Richard i am trying to make your imperial marauder but i am stuck hère ..i was wondering if you coud give me some help?" (with photos of the side sponsons) A: "Hi, did you build the official set?" Q: "No, I started from 0." A: "Oh, you are meant to build the official set, then mod it according to my pictures, as I only focused on the changes. But you got the front!!! that's the hard part." Q: "I thought that was the easy part, the sides are killing me tho. Just trying to see how" A: "if you just build the side flanks according to the official instructions, you will able to build mine quickly, it's a small change. " Q: "I will start looking at the manual right now, thank you for the reply Richard." A: "it's one stud longer, changed the inverted slope to 2x3, and changed the bracket." -
Love your wall details! My only suggestion would be that the castle gate towers are massive compare to the rest of the castle, may be build up the back?
-
[MOD] Grand Castle Upgrade Modifications From Two 31120 Medieval Castle Sets, No Extra Pieces Required
Wurger49 replied to Wurger49's topic in LEGO Historic Themes
Oh noes, still no discount at Netherland, but good that you got rewards points plus the sailboat! As a playset, the LEGO castle walls are always 1 storey tall, which is rather low, especially when comparing it after I built mine up to 2 storeys, so I would still recommend building the walls taller to go with your single-floor houses. You definitely need to downscale the Blacksmith set to go even with a MOD that is my scale. The Medieval Castle's floors are 6 bricks tall, the Medieval Blacksmith's floors are 7 bricks and 2 plates tall, with the brown frames, it's very hard to downscale... I am looking forward to your changes and learn from them! 31120 is indeed an awesome set, I love the vibrant yellow, would recommend to anyone that likes buildings. Looking forward to your drawbridge, I started LEGO only in 2019, so missed out on the old sets. -
[MOD] Imperial Trexler Armored Marauder Upgrade Modifications, using pieces from two 75311 sets
Wurger49 replied to Wurger49's topic in LEGO Star Wars
I highly recommend building the LEGO 75311 first according to official instructions before using the pieces from the second set to do the modifications. Exploded View: 8-stud-wide Imperial Trexler Armoured Marauder MOD, using pieces from two 75311 sets by R Y, on Flickr LEGO Imperial Armored Marauder Upgrade Modifications by R Y, on Flickr 8-stud-wide Imperial Trexler Armoured Marauder MOD, using pieces from two 75311 sets by R Y, on Flickr Current Turret Turret Comparison by R Y, on Flickr V1.2 Low Profile Turret by R Y, on Flickr Current Alternate Turret Turret Comparison by R Y, on Flickr Turret Comparison by R Y, on Flickr LEGO Imperial Armored Marauder Upgrade Modifications by R Y, on Flickr LEGO Imperial Armored Marauder Upgrade Modifications by R Y, on Flickr LEGO Imperial Armored Marauder Upgrade Modifications by R Y, on Flickr LEGO Imperial Armored Marauder Upgrade Modifications by R Y, on Flickr LEGO Imperial Armored Marauder Upgrade Modifications by R Y, on Flickr LEGO Imperial Armored Marauder Upgrade Modifications by R Y, on Flickr 8-stud-wide Imperial Trexler Armoured Marauder MOD, using pieces from two 75311 sets by R Y, on Flickr 8-stud-wide Imperial Trexler Armoured Marauder MOD, using pieces from two 75311 sets by R Y, on Flickr LEGO Imperial Armored Marauder Upgrade Modifications by R Y, on Flickr LEGO Imperial Armored Marauder Upgrade Modifications by R Y, on Flickr LEGO Imperial Armored Marauder Upgrade Modifications by R Y, on Flickr V1.2 Low Profile Turret by R Y, on Flickr -
[MOD] Imperial Trexler Armored Marauder Upgrade Modifications, using pieces from two 75311 sets
Wurger49 replied to Wurger49's topic in LEGO Star Wars
Question for the build: " I was wondering if the back opening panel for the turret has the same build as the one in the set and if the part of the flank where the storage compartment and the guns are is built just like it is in the set but made slightly larger." Answer: "The back opening panel is the same as the offiicial set, only difference is that I used cheese slopes instead of 1x1 plates next to the grilles. The flank is lengthened by one stud, one extra 3x1 slope, and used a inverted 3x2 slope to replace the inverted 3x1 slope, the bracket is moved out in stud, blue engine exhaust and grille pieces on 2x4 a plate." -
[MOD] Grand Castle Upgrade Modifications From Two 31120 Medieval Castle Sets, No Extra Pieces Required
Wurger49 replied to Wurger49's topic in LEGO Historic Themes
I used my photos to create my second Youtube Video on Windows 10 Video Editor, please check it out. -
[MOD] Imperial Trexler Armored Marauder Upgrade Modifications, using pieces from two 75311 sets
Wurger49 replied to Wurger49's topic in LEGO Star Wars
I used my photos to create my first Youtube Video on Adobe Spark, please check it out. -
Wow, so many SNOT techniques applied, even for the wooden floor! I love the diagonal stripes on the gatehouse, curious to know how you did it? Great work on the tower corner connections, up to the battlements, where the 1x1 round bricks are connected. Only suggestion is may be a window or two on the back of the wooden house, and have two shades of green and two shades of grey for the landscape? What are the white tooth on the grass meant to represent?