

_TLG_
-
Content Count
428 -
Joined
-
Last visited
Posts posted by _TLG_
-
-
Nice, accurate model!
-
Cool display!
-
Cool detailed build!
-
-
-
-
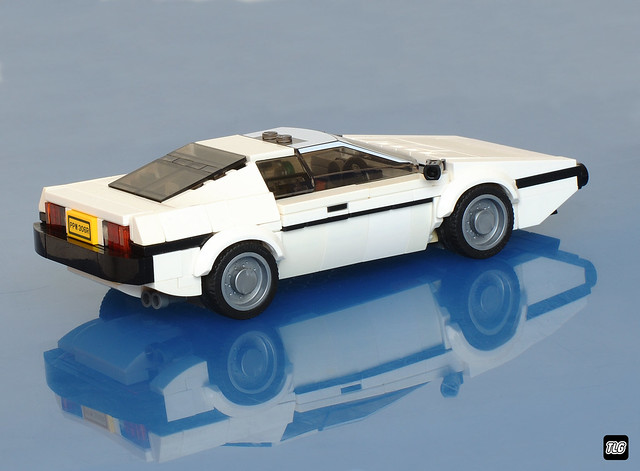
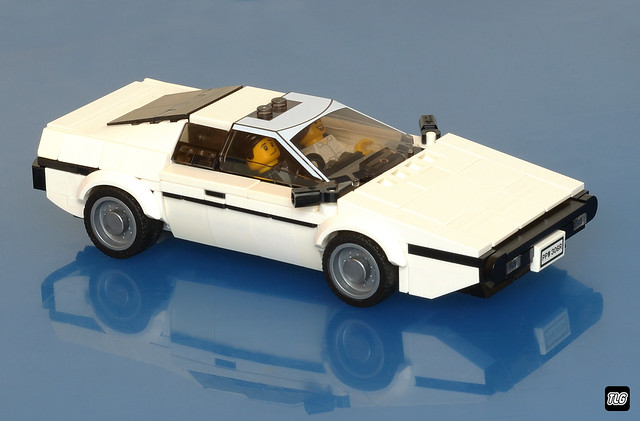
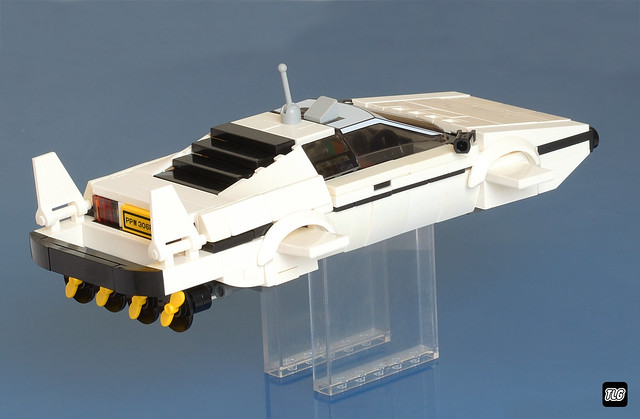
Hello Lotus, James Bond and Speed Champions fans,
The Lotus Esprit S1 is a sports car built by Lotus Cars from 1976 to 1978 at their Hethel, England factory. It has a rear mid-engine, rear-wheel-drive layout and it was featured in the 1977 James Bond film The Spy Who Loved Me, where a car famously converted into a submarine after a road chase. The car used in the underwater scenes is nick-named "Wet Nellie". Building instructions are available on the following link:
https://rebrickable.com/mocs/MOC-178962/_TLG_/lotus-esprit-s1-007-james-bond-submarine-conversion
It is a studless build in the new, 8 studs wide Speed Champions style. I wanted to create a clean model which is as accurate as possible in this small scale. I prefer the brick built solutions to keep the flexibility of the used parts in further builds, and therefore only two vehicle registration plate stickers are used.
My intent was to keep the width-length-height ratio of the real car and this size makes it possible. The model contains lots of details: for example the black stripes on the sides, door handles, detailed tail lights etc.. Maybe the most challenging one was the front and the front bumper with brick built headlights. I tried to fill every unnecessary gaps and therefore some tricky build techniques are used.
The car can be converted to submarine.
The model has space for two minifigures with helmets or small hairs.Thanks for visiting,
_TLG_ Lotus Esprit S1 - James Bond - Instructions 01 by László Torma, on Flickr
 Lotus Esprit S1 - James Bond - Instructions 02 by László Torma, on Flickr
 Lotus Esprit S1 - James Bond - Instructions 03 by László Torma, on Flickr
 Lotus Esprit S1 - James Bond - Instructions 04 by László Torma, on Flickr
 Lotus Esprit S1 - James Bond - Instructions 05 by László Torma, on Flickr
 Lotus Esprit S1 - James Bond - Instructions 06 by László Torma, on Flickr
 Lotus Esprit S1 - James Bond - Instructions 07 by László Torma, on Flickr
 Lotus Esprit S1 - James Bond - Instructions 08 by László Torma, on Flickr
 Lotus Esprit S1 - James Bond - Instructions 09 by László Torma, on Flickr
 Lotus Esprit S1 - James Bond - Instructions 10 by László Torma, on Flickr
 Lotus Esprit S1 - James Bond - Instructions 11 by László Torma, on Flickr
-
Nice build, I like the big table especially!
-
Cool build with many nice details, I like the circular window tops especially!
-
-
Thank you for all votes, comments and any kind of support. Unfortunately it has not been selected in Bricklink Designer Program, therefore I decided to make the instructions available here:
-
Awesome build with many clean details!
-
Cool build, I like the eyes especially!
-
I am not a technic guy and probably the features are nice as well, but the shaping is absolutely cool!
-
Wow! Cool idea and nice build!
-
@Feuer Zug Thank you! This technic brick seemed to be the most realistic solution and there is enough room for the pin and bar lights as well :)
-
Cool detailed build and congrats for the frontpage!
-
-
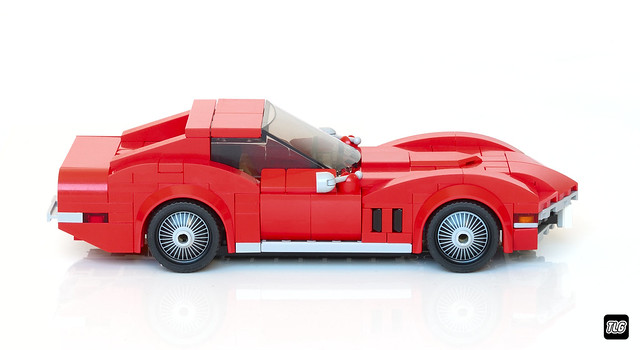
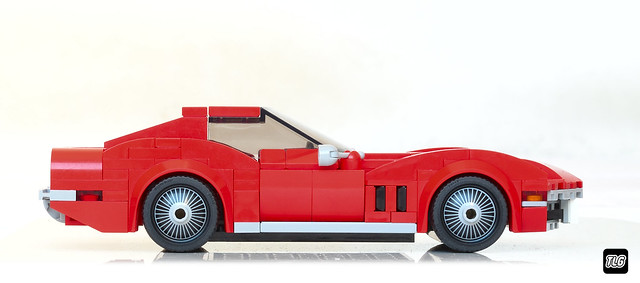
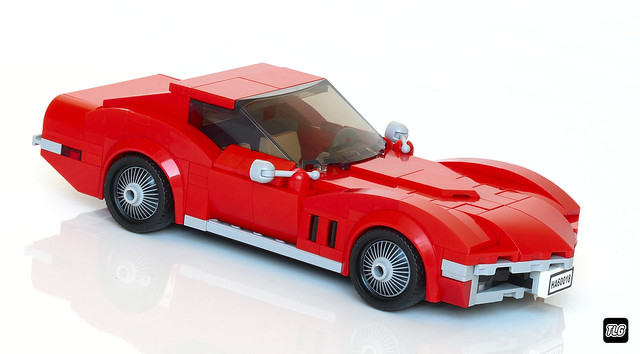
Hello Corvette and Speed Champions fans,
The Chevrolet Corvette (C3) is the third generation of the Corvette sports car that was produced from 1967 until 1982 by Chevrolet for the 1968 to 1982 model years. Engines and chassis components were mostly carried over from the previous generation, but the body and interior were new. It set new sales records with 53,807 produced for the 1979 model year. Building instructions are available on the following link:
https://rebrickable.com/mocs/MOC-176144/_TLG_/corvette-c3-stingray
It is a studless build in the new, 8 studs wide Speed Champions style. I wanted to create a clean model which is as accurate as possible in this small scale. I prefer the brick built solutions to keep the flexibility of the used parts in further builds, and therefore only two vehicle registration plate stickers are used.
My intent was to keep the width-length-height ratio of the real car and this size makes it possible. The model contains lots of details: for example the front bumper, the emblematic side grills, the side view mirrors, the embedded tail lights, the fuel cap etc... I tried to fill every unnecessary gaps and therefore some tricky build techniques are used.The instructions includes some modification ideas, for example front blinker and alternate side grill, see picture 6, and luggage rack, see picture 5.
The model has space for two minifigures with helmets or small hairs.
Thanks for visiting,
_TLG_ Corvette C3 - instructions 01 by László Torma, on Flickr
 Corvette C3 - instructions 02 by László Torma, on Flickr
 Corvette C3 - instructions 03 by László Torma, on Flickr
 Corvette C3 - instructions 04 by László Torma, on Flickr
 Corvette C3 - instructions 05 by László Torma, on Flickr
 Corvette C3 - instructions 06 by László Torma, on Flickr
 Corvette C3 - instructions 07 by László Torma, on Flickr
 Corvette C3 - instructions 08 by László Torma, on Flickr
 Corvette C3 - instructions 09 by László Torma, on Flickr
 Corvette C3 - instructions 10 by László Torma, on Flickr
 Corvette C3 - instructions 11 by László Torma, on Flickr
-
Nice, clean builds, I like the photo with the poster!
-
Nice shaping, cool functions!
-
Nice scene, I like the bridge and the trees especially!
-
Cute small build!
-
Very nice and clean build!
[MOC] Jeep Wrangler 1:13 - Powered Up
in LEGO Technic, Mindstorms, Model Team and Scale Modeling
Posted
Really cool shaping and nice features!