

CommanderJonny1
-
Content Count
55 -
Joined
-
Last visited
Posts posted by CommanderJonny1
-
-
On 4/6/2019 at 10:34 PM, Reaper said:Very interesting! It really suits its name!
Thanks! The whole idea was more of a Looks/Function -> Name -> Looks/Function process

-
Great build! The texture on the wall is nice (I'm assuming the mason bricks are supposed to represent exposed bricks), and the small office is simple but effective. Two nitpicks though: one, the slopes creating the arrow loops/slits are backwards, as the alcove should widen when going further in; two, by the time of Hardrian's wall, lorica segmentata was more prevalent- now, if they're auxiliaries (such as the archer on the wall), then I suppose it would make sense, and I appreciate the use of the Kingdoms mail armor torso.
-
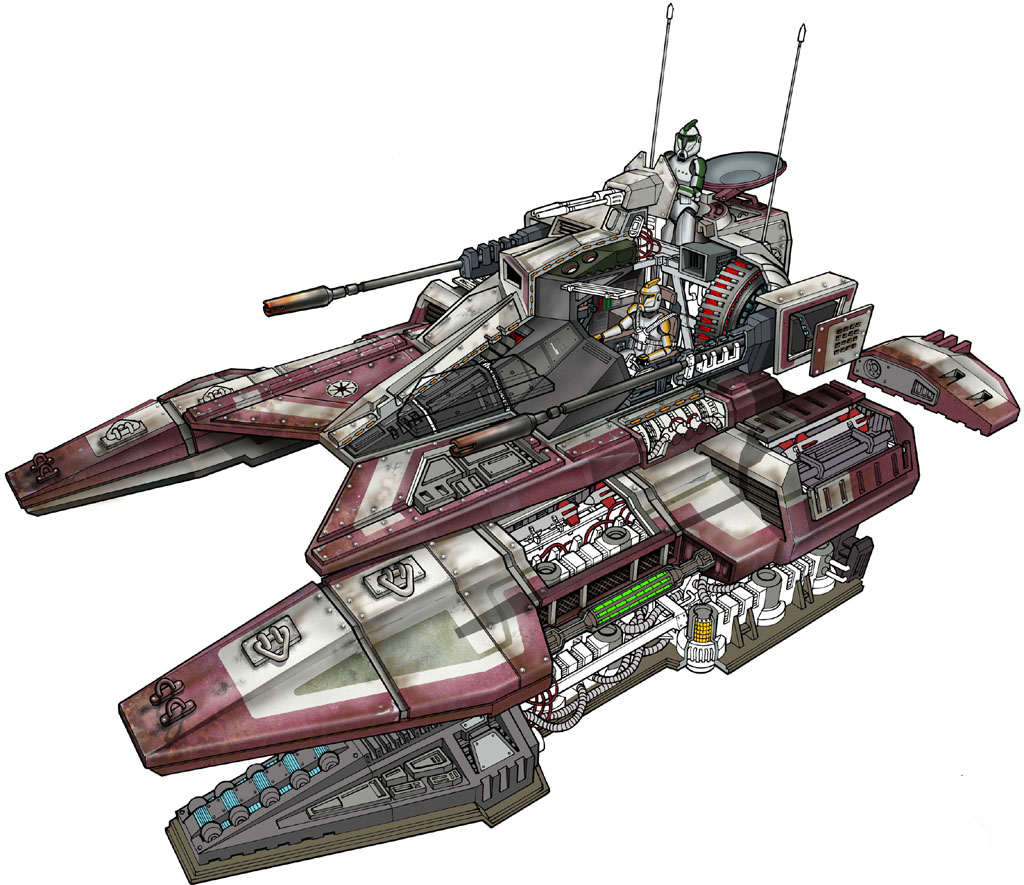
"The Mark I was a stopgap; the Mark II is a workhorse." -Rebel Alliance Officer
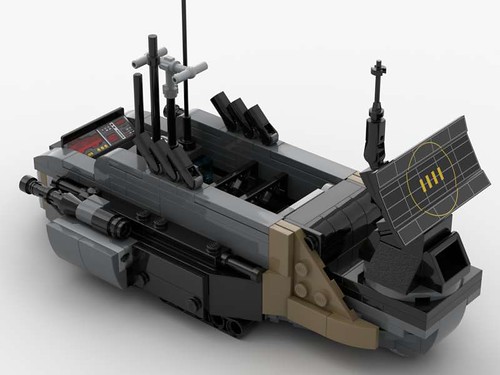
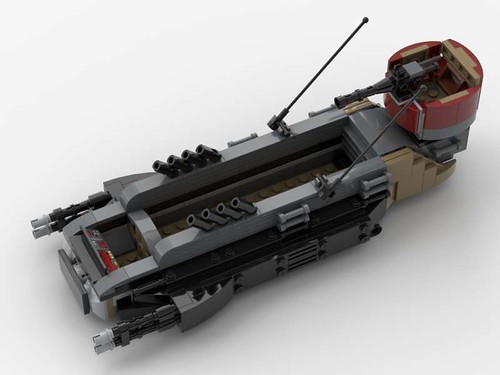
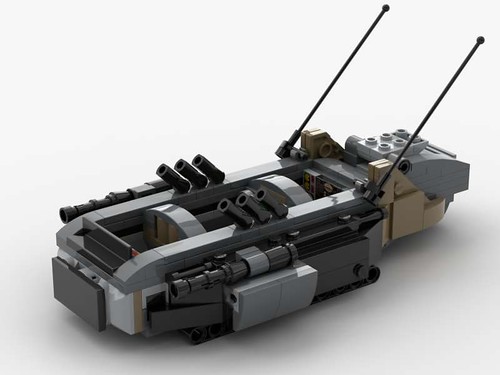
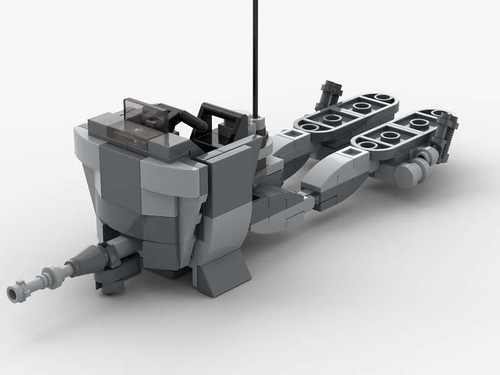
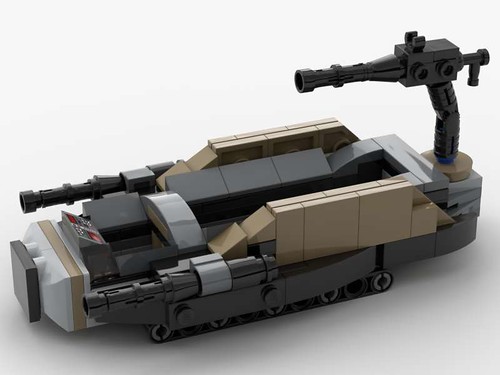
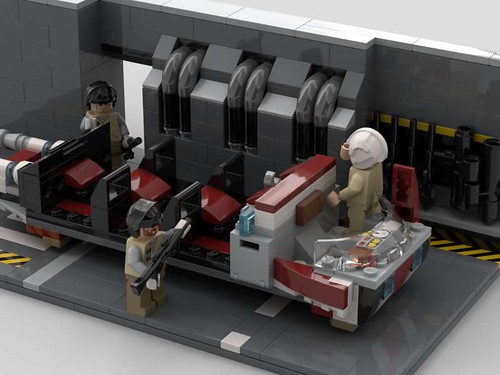
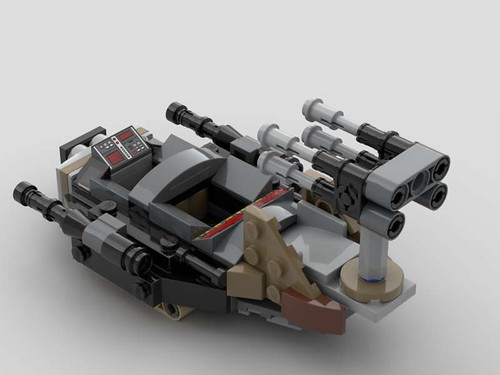
I'm back with the Scorpius line of Multi-Role Vehicles, this time with the Mk II. I am working on a Mk III, though I don't know if I'll finish it or not; and even if I did, there probably won't be a Mk IV as there's only so much I can do with one overarching deign. Another point is that this is the largest version I was reasonably able to make with the bracket construction. As a result, there is a weakness in the 'tracks' area, as the main connection points between the sides and the bottom/chassis is at the front and the back. The versions with seats and/or equipment crossing the middle also help with the problem; this means that the Mk IIC is the weakest structurally (this makes a little sense in context). As opposed to the original Scorpius, which put everything on what was essentially the same hull/chassis, the Mk II's four different variants have noticeably different makeups, while still adhering to the same general design style. Sidenote- each variant (mainly the pictures) will be put into a spoiler section to try and minimize the size of the post.
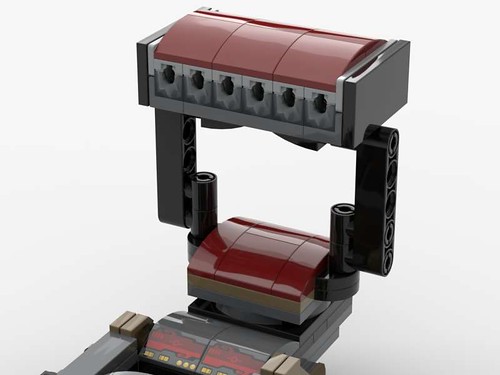
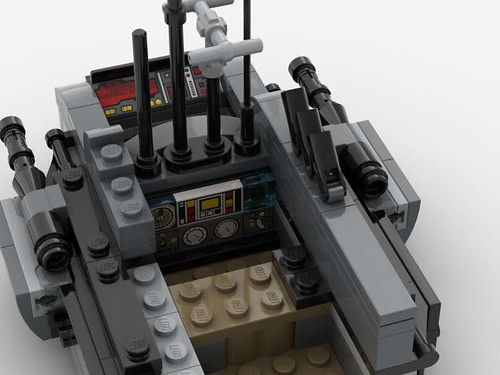
The first (and base) version of the Mk II is the Mk IIA, which functions as a standard (medium) armored vehicle. This version is the most versatile, being able to carry troops or cargo while still functioning in its main role as a front line combatant. The modularity of the Scorpius line is expanded in the Mk II, with the 'A' model having twice as many attachments as the Mk I, as well as multiple different configurations for its secondary armament. While some of these attachments are the same (or otherwise larger/upgraded versions of the previous ones), there are some new ones; a few of the attachments were thought of for the Mk I, but were deemed to be too big and therefore implemented on the Mk II. Another advantage of the Mk II is the fact that all of the attachments can be taken off and put in fixed positions (or turret emplacements) if need be, such as in the case of needing to quickly create fortifications.
SpoilerThe Mk IIA has a crew of two (a driver and a gunner), and can hold two 3x4 crates, six 2x2 boxes, up to three soldiers, or some combination of the three. The first attachment is the Light Artillery Cannon, which is able to fire quickly and accurately, and is perfect in an anti-armor/anti-vehicle role.
 SW Scorpius Mk IIA #1 by Jonathan Wallace, on Flickr
 SW Scorpius Mk IIA #2 by Jonathan Wallace, on Flickr
The second attachment is the Medium Ion Cannon, the counterpart to the above cannon.
 SW Scorpius Mk IIA #3 by Jonathan Wallace, on Flickr
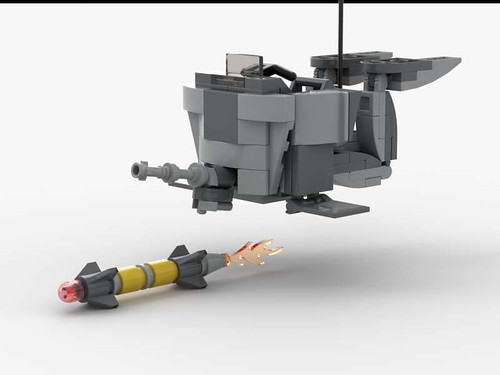
The third attachment is the Missile Launcher Battery, a weapon used for saturation attacks, and extremely useful against enemy troop concentrations.
 SW Scorpius Mk IIA #4 by Jonathan Wallace, on Flickr
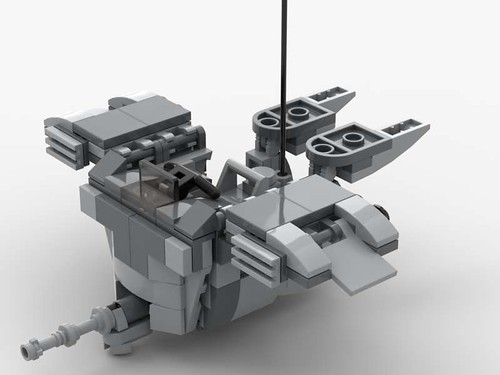
The fourth attachment is the Calliope Missile Launcher, a weapon with a large degree of attack, and good against aerial targets. The top pair of pins (on the bottom) can be removed to give the launcher more flexibility, or to just be able to fold the launcher down when it's not in use or is in storage.
 SW Scorpius Mk IIA #5 by Jonathan Wallace, on Flickr
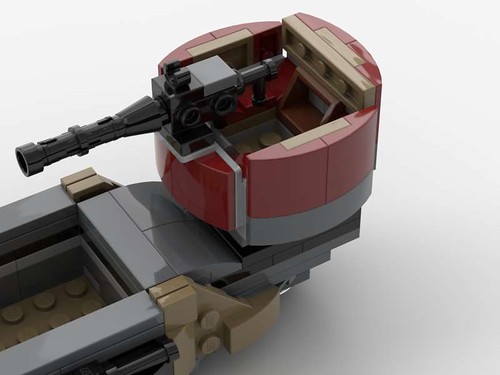
The fifth attachment is the Quad Heavy Repeating Blaster, a weapon excellent in both the anti-aircraft and anti-infantry roles. This turret is inspired/based off of the quad .50 caliber machine gun mount, a.k.a. the 'Meat Chopper'.
 SW Scorpius Mk IIA #6 by Jonathan Wallace, on Flickr
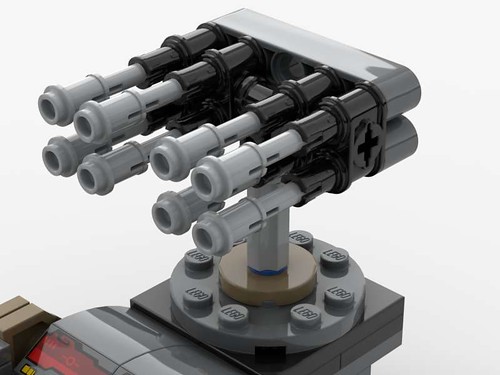
The sixth attachment is the Octuple Light Blaster Cannon, essentially just two of the Quad Blaster Cannon from the Mk I put together. This is a general purpose weapon, and it is expected that during operations half the barrels will be taken off at some point (for use elsewhere).
 SW Scorpius Mk IIA #7 by Jonathan Wallace, on Flickr
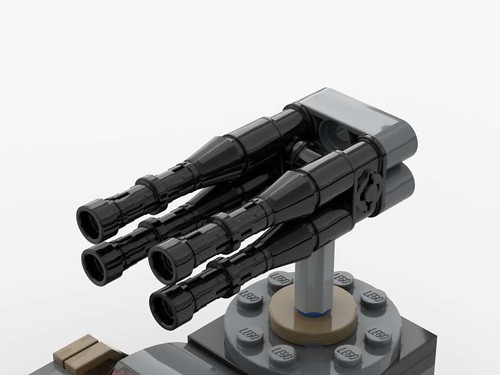
The seventh attachment is the Quad Medium Blaster Cannon, a direct upgrade to the Quad Blaster Cannon, and it fulfills the same role(s).
 SW Scorpius Mk IIA #8 by Jonathan Wallace, on Flickr
The eighth attachment is the same Electromagnetic Crane as before, though in this case it can be enlarged due to the bigger base.
 SW Scorpius Mk IIA #9 by Jonathan Wallace, on Flickr
The ninth attachment is a simple/traditional crane. This would be used in combination with a 2x2 modified tile, and like the crane above it can also be enlarged.
 SW Scorpius Mk IIA #10 by Jonathan Wallace, on Flickr
While the final three attachments can be placed on the 'A' model, they will be shown with the other variants due to them being used in a more specialized way.
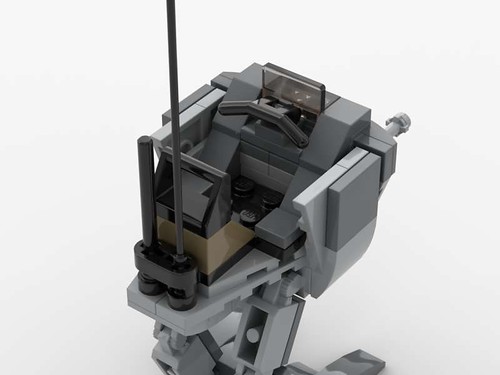
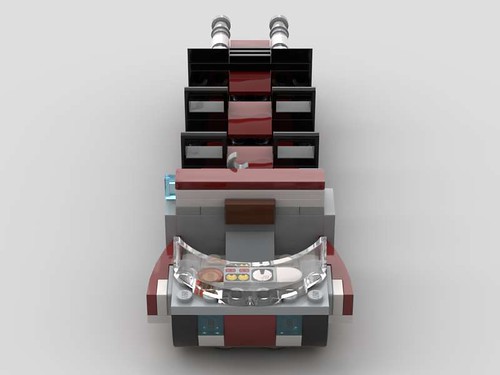
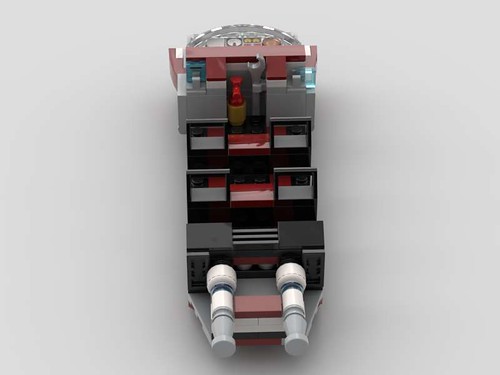
The second variant, the Mk IIB, is a 'Command & Communications Vehicle' that can be used to either coordinate Rebel forces (whether other Scorpii or not) or function in the Electronic Warfare role. The secondary armament is lighter to compensate for the increased weight of the sensor equipment and other additions. Powerful sensors were installed, and while both of the rear positions had their specialization, they could operate in the other's role in a secondary capacity during emergencies (with some modifications). Due to its sensitive nature and lack of heavy armament, the design focuses on survivability, with increased armor protection as well as canister launchers that can create smoke clouds to facilitate escape.
SpoilerInstead of a main armament, the Mk IIB has a multi-variable sensor package, and carries a crew of three (a driver, a Communications Officer, and a Sensors Officer).
 SW Scorpius Mk IIB-D #1 by Jonathan Wallace, on Flickr
There is a storage bin between the two operator positions; this also used to get in and out of the rear compartment.
 SW Scorpius Mk IIB-D #2 by Jonathan Wallace, on Flickr
A better look at the Communications Officer position; the panel includes a (sensor) direction finder, a holoscreen, a frequency adjuster, a power level switch, dials, general controls, and a manual data screen. When talking to people through the transceiver, the line is patched through to the helmet of the operator.
 SW Scorpius Mk IIB-D #3 by Jonathan Wallace, on Flickr
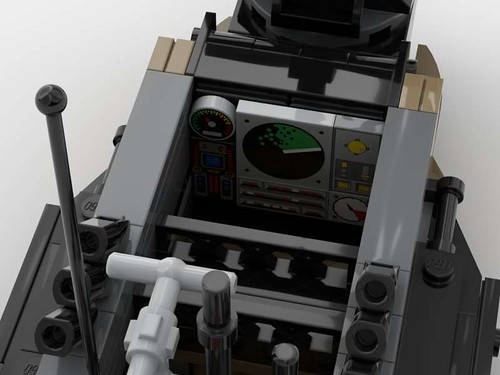
A better look at the Sensors Officer position; this is a similar idea to the Radio Intercept Officer (RIO)/Weapons Systems Officer (WSO) in aircraft. The panel includes a radar screen, both a temperature gauge and adjuster (to keep from overheating and to keep the profile signature of the vehicle down), movement and fine adjustment controls for the sensor dish, sensor data storage access, a manual shut down, and general controls.
 SW Scorpius Mk IIB-D #4 by Jonathan Wallace, on Flickr
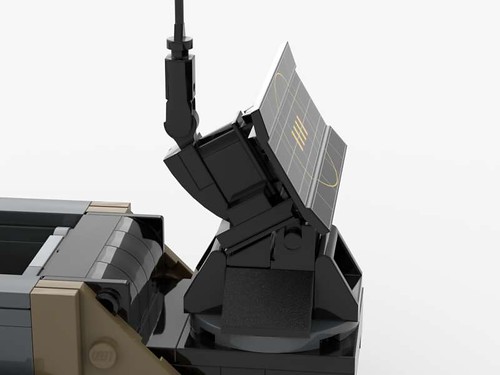
A closer look at the sensor dish and mount.
 SW Scorpius Mk IIB-D #5 by Jonathan Wallace, on Flickr
The third variant, the Mk IIC, is a troop/cargo carrier; the gunner's position is removed and the main armament is replaced with manned turrets. Although these turrets are a bit exposed, the turrets can also be remotely activated by the driver. There are two versions of the Mk IIC, a lighter and heavier version, though both function in the same role. The two turrets that the 'C' model is equipped with is one with a Heavy Repeating Blaster, and one with a pair of twin missile launchers (as well as a communication array).
SpoilerThe first version is the Mk IIC-1; it can hold three 3x4 crates, eight 2x2 boxes, up to five soldiers (or some combination of the three), and carries a crew of two (a driver and turret gunner, although the turret gunner can be an infantryman that dismounts with the gun).
 SW Scorpius Mk IIB-D #6 by Jonathan Wallace, on Flickr
 SW Scorpius Mk IIB-D #7 by Jonathan Wallace, on Flickr
 SW Scorpius Mk IIB-D #8 by Jonathan Wallace, on Flickr
 SW Scorpius Mk IIB-D #9 by Jonathan Wallace, on Flickr
The second version is the Mk IIC-2; longer and taller than its lighter brother, it trades a slower speed for much better armor protection and larger interior capacity. Having the same number of crew, it can also hold four 3x4 crates, fourteen 2x2 boxes, up to eight soldiers, or some combination of the three. New additions on this version include canister launchers, antennae (in case an officer aboard wants to communicate to allied forces on the ground), and access ladders on the outside- indeed one design flaw is the fact that the interior ladders in the back are the only way to get out of the rear compartment, though in emergencies troops could exit through the cockpit (this would, however, be a bit difficult if the driver was still there).
 SW Scorpius Mk IIB-D #10 by Jonathan Wallace, on Flickr
 SW Scorpius Mk IIB-D #11 by Jonathan Wallace, on Flickr
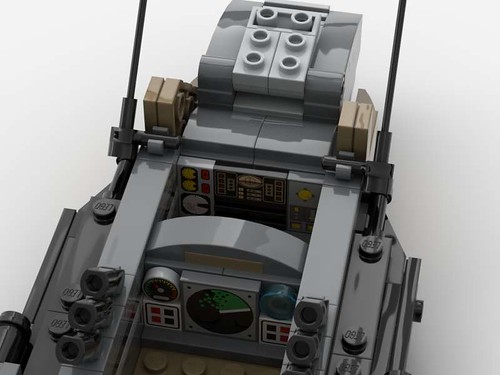
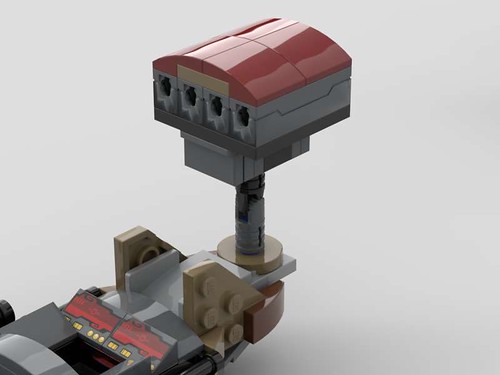
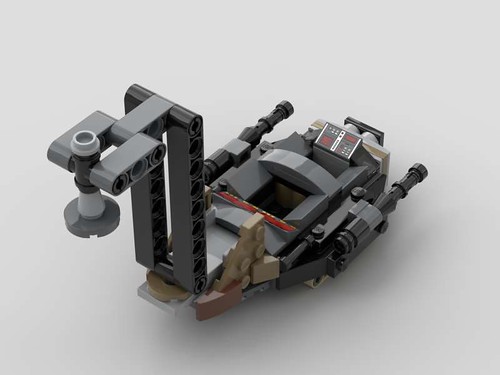
The final variant, the Mk IID, is a Self-Propelled Gun/Artillery; the gunner's position is enhanced, and a Sensor Operator position is added right behind. As with the CCV, the Mk IID has a lighter secondary armament (and canister launchers), in this case to compensate for the larger main armament. This variant has a crew of four- a driver, a gunner, a Sensors Operator, and a spotter; the commander of the vehicle can either be the spotter or the Sensors Operator. Some 'D' models operate without the fourth crew member, and instead carry one or two 2x2 boxes.
SpoilerThe Mk IID is equipped with two different main armaments, with their mounts being in a fixed forward position (though they are able to elevate). While moving, control of the countermeasures and secondary armament can be transferred to the gunner, so as to let the pilot concentrate on driving.
 SW Scorpius Mk IIB-D #12 by Jonathan Wallace, on Flickr
A better look at the gunner and Sensor Operator positions. The gunner's panel includes the targeting and weapon setting array (that's directly linked to the main gun), the movement and firing controls, and the weapon monitoring system. The Sensors Operator's panel doubles as a sensor and communications array, and is a simplified combination of both of the systems from the 'B' model; this includes a radar screen, a temperature monitor and adjuster, a holoscreen, and general controls split between sensors and communication. Information from the sensors are fed from the SO's position into the gunner's.
 SW Scorpius Mk IIB-D #13 by Jonathan Wallace, on Flickr
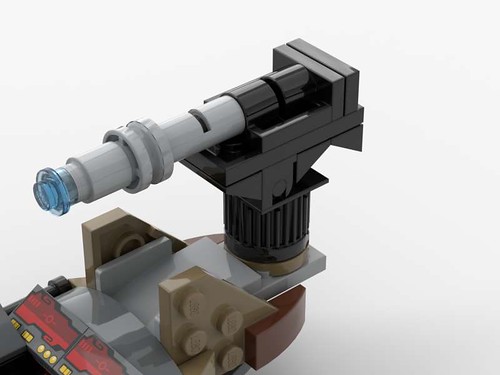
The first of the two main armaments, the Medium Artillery Cannon is used against fortifications, as well as more 'soft' targets; due to its slow reload however, it's not very effective against vehicles or other moving objects.
 SW Scorpius Mk IIB-D #14 by Jonathan Wallace, on Flickr
The second main armament is the Heavy Ion Cannon, used against large vehicles and electrical concentrations. Although rare, this weapon can hit and damage ships in atmosphere if the firing angle is right.
 SW Scorpius Mk IIB-D #15 by Jonathan Wallace, on Flickr
This is a decently sized vehicle, and as such it would fit the main spot in a battle line; the Mk I would be more of a scout or escort, while the Mk III (if ever finished) would be more of a support/assault/breakthrough vehicle. If you'd like to see a Mk III or not, say so (design suggestions would be welcomed as well).
If you want to build these for yourselves, here's the instructions:
Scorpius Mk IIA - https://drive.google.com/open?id=1WIH1HYCXpS7h2m0WsNKKExUv2-SIxYzy
Scorpius Mk IIB, C, & D - https://drive.google.com/open?id=13pjbkONitA_VE1z-zBAMXfB0mM5-0dy2
As always, any feedback would be much appreciated!

-
On 4/1/2019 at 3:42 AM, sander1992 said:Nice to see different kind of shapes for the cockpit (is this the right word).
That is a real walker?
Ok.
 I get more and more the feeling that I am a newby at Star Wars vehicles.
Perhaps I should play more video games.

Nice job!

Thanks! I think 'cockpit' would acceptable; I've kind of wondered too, and I've seen seat/saddle (though more to refer to a part of the whole). No, this isn't a real walker (maybe I should have labeled it more clearly) from Star Wars, and I added the 'quote' and such to give a bit of flavor- though they are meant to mirror, or at least imitate, the 'real' All Terrain walkers; 'Brickthana' is my own fictional lego counterpart to Rothana Heavy Engineering, a subsidiary of Kuat that makes military vehicles. I created the 'Variable Terrain', or VT, series as my own take on SW walkers, and it was originally an offshoot of another project which I'm not completely satisfied to post yet. The fun thing about Star Wars is that, vet or newbie, there's always more to learn. So if you don't recognize a vehicle (a *real* one, not something like these which are more likenesses), don't worry, as there are plenty even extremely knowledgeable fans don't know- though surfing through Wookiepedia may help if you have freetime
.
-
On 3/24/2019 at 10:48 PM, LiLmeFromDaFuture said:These look so weird
Especially the third one with the sharp taper. Its stance gives the impression of possibly falling on its long rear end. Just imagine the occupants' frustrations when a group of attackers rushes and pushes the walker's on its back. 
Yeah... the 'L' version is the culmination of the entire series (and as I said, the closest analogue to the AT-RT), so I don't mind the clunkiness of the others. I was more afraid of the other ones falling forward rather than backward (these are based off the Geonosis Walker set, and I found it was kind of easy to do that) so it was a balancing act between the the two. As for the taper, I considered doing a thinner profile, but I wanted to make sure I used that modified brick/modified plate combo and it ended up as that; I might rework the sides and post the updated version on Flickr.
-
"Not as pompous as claiming 'All Terrain', we instead provide... variability." -Brickthana Engineering Executive
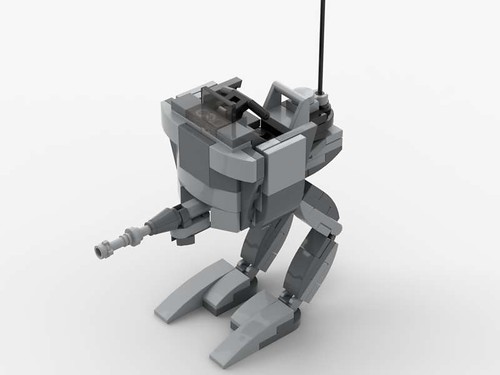
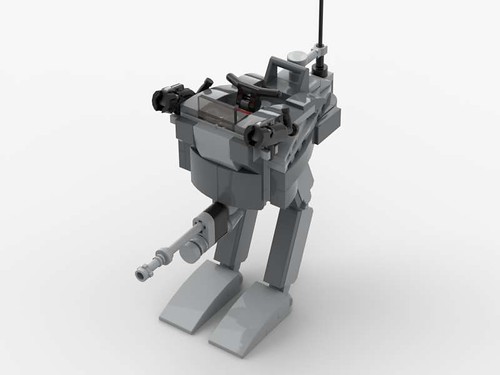
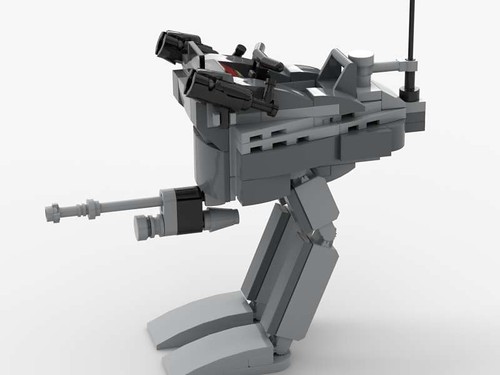
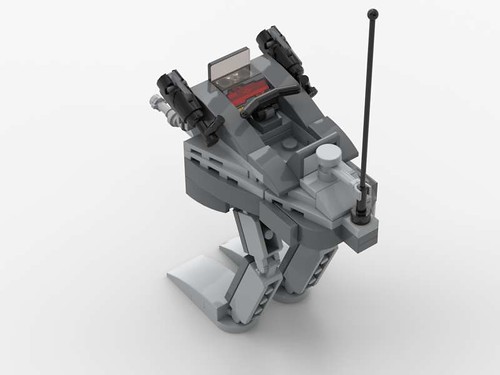
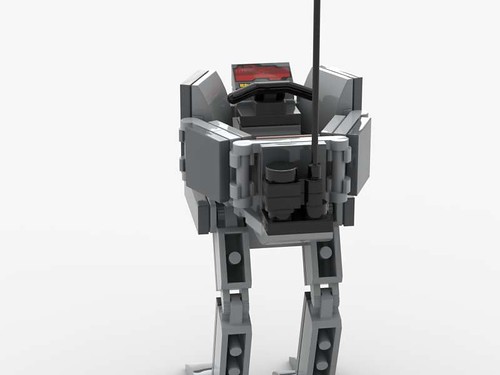
Following the increase in the numbers of Rebel groups, the Galactic Empire needed more equipment to deal with the new threat, and turned to numerous companies to fill the gaps. An alternative to the 'All Terrain' family of walkers, the Variable Terrain series was meant to be a cheaper, more easily produced addition to Imperial forces. Part of this initiative is the Variable Terrain Reconnaissance Transport, a group of walkers designed to supplement their AT counterpart in a variety of ways. While following a superficially similar design, Brickthana has tried, with varying degrees of success, to expand the mission capability of its walkers. To try and compete with Rebel designs, versatility was a must for these new vehicles being made.
First up is the initial prototype of the VT-RT concept, eventually getting the designation of 'VT-RT(L*)' and be the basis of the VT-RT(X). Although broad/blocky, a design 'flaw' inherent to many of the VT family, the aim of the designers were to add more protection to both the driver and the important components of the walker itself. Eventually these walkers would be replaced, seeing some use as turrets after modifications.
 SW Imperial VT-RT(L) Prototype #1 by Jonathan Wallace, on Flickr
 SW Imperial VT-RT(L) Prototype #2 by Jonathan Wallace, on Flickr
The second walker of the RT series is the VT-RT Experimental. Being dubbed the 'Expendable' by its drivers, the VT-RT(X) was a further step in trying to get as much from its frame as possible, with four versions being created. While all had the same base model, they could be modified into the different versions to operate in different mediums- these being the standard land configuration (Experimental-Land), an amphibious configuration (Experimental-Sea), an aerial configuration (Experimental-Air), and finally one meant for use in space (Experimental-Vacuum). Issues plagued the RT(X)- from certain system malfunctions to poor handling, eventually forcing Brickthana to review the design and begin work on a new version of the walker.
SpoilerWhile the second RT walker to be designed, the RT(X) was completed last, incorporating elements from the previously completed RT(L). The chassis was also lightened, to allow its various forms to be more effective.
 SW Imperial VT-RT(X) #1 by Jonathan Wallace, on Flickr
 SW Imperial VT-RT(X) #2 by Jonathan Wallace, on Flickr
This is the storage/launch position. as opposed to the other RT models, the RT(X) was designed to be able to be stored on large racks. This feature was incorporated in the design of the RT(X-A) to allow it to be launched while in the air.
 SW Imperial VT-RT(X) #3 by Jonathan Wallace, on Flickr
This is the RT(X-S), being equipped with a pair of small repulsorlifts, along with propulsion jets. This version is designed to float in water [think of something akin to a jet-ski]; while equipped with a blaster cannon, it's in a fixed position, and therefore it's recommended to have a sidearm and/or a secondary armament (such as a projectile launcher) mounted.
 SW Imperial VT-RT(X) #4 by Jonathan Wallace, on Flickr
 SW Imperial VT-RT(X) #5 by Jonathan Wallace, on Flickr
This was the prototype of the RT(X-A), but was deemed completely infeasible by the designers for a multitude of reasons. Although dropped as an RT design, it was shelved for later use as the basis for aerial patrol craft. Equipped with actual wings, and a pair of small but powerful twin jet thrusters, this fanciful design was envisioned to carry bombs or rockets, with the wings folding up for storage and launch alongside the legs.
 SW Imperial VT-RT(X-A Prototype) #1 by Jonathan Wallace, on Flickr
 SW Imperial VT-RT(X-A Prototype) #2 by Jonathan Wallace, on Flickr
This is the RT(X-A), being equipped with a pair of thrusters, as well as two small repulsor fins/winglets. As it was intended to be off the ground (and therefore possibly engage targets of similar altitude), its blaster cannon was put in a more articulated mount, and had room to have a weapons pod or missile underneath.
 SW Imperial VT-RT(X) #6 by Jonathan Wallace, on Flickr
 SW Imperial VT-RT(X) #7 by Jonathan Wallace, on Flickr
This the RT(X-V), being equipped with two pairs of double thrusters, a forward light/sensor, and a glare reducing screen. This version was intended to operate in space, and so it's height was reduced, and magnets added to it's feet. This would allow its drivers to patrol dockyards, debris and/or asteroid fields, and space stations with relative ease. These could also be used to help construction or repairs in space, being able to attach to ship hulls.
 SW Imperial VT-RT(X) #8 by Jonathan Wallace, on Flickr
 SW Imperial VT-RT(X) #9 by Jonathan Wallace, on Flickr
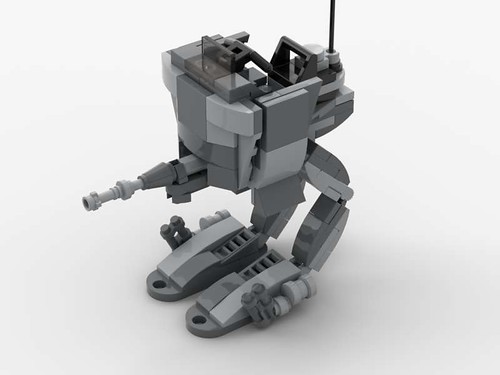
The third walker of the RT series is the RT Heavy. The biggest of the three 'standard' VT-RTs, the RT(H) design was completed first. Meant to be a versatile infantry support vehicle, it ended up not performing to expectations, though it was still useful in its role. While it does have some amphibious capability, it was not equipped like the RT(X-S), and therefore is not as reliable in the water as its cousin. To compensate for some of its deficiencies, it is armed with a heavy blaster cannon and two detachable grenade launchers, as well as a more powerful transmitter.
 SW Imperial VT-RT(H) #1 by Jonathan Wallace, on Flickr
 SW Imperial VT-RT(H) #2 by Jonathan Wallace, on Flickr
 SW Imperial VT-RT(H) #3 by Jonathan Wallace, on Flickr
The fourth walker of the RT series is the RT Medium. The RT(M) was something of a misplaced design, as originally there was only two sizes that the RT would come in. This changed when it was decided that a design in the works (a troop transport) needed better escorts, and the RT(M) was created. In addition, there was an explicit order to try and incorporate parts/sections of one into the other, to ease production and interchangeability. While it was initially proposed to have a rotating bottom, to be converted into a turret, this was denied. Though it was mounted on a pair of legs, the body retained some of its features as a turret, including its armored sides and controls that can fold forward.
 SW Imperial VT-RT(M) #1 by Jonathan Wallace, on Flickr
 SW Imperial VT-RT(M) #2 by Jonathan Wallace, on Flickr
 SW Imperial VT-RT(M) #3 by Jonathan Wallace, on Flickr
The fifth and final walker of the RT series is the RT Light, the most direct counterpart to its AT compatriot. The RT(L) was designed to be a well balanced machine, combining decent armament, speed, and protection. Like its bigger brother the RT(H), it can float, however it wasn't designed with this explicitly in mind, and therefore has no propulsion; furthermore, if rocked too much, it can easily tip over and sink.
 SW Imperial VT-RT(L) #1 by Jonathan Wallace, on Flickr
 SW Imperial VT-RT(L) #2 by Jonathan Wallace, on Flickr
 SW Imperial VT-RT(L) #3 by Jonathan Wallace, on Flickr
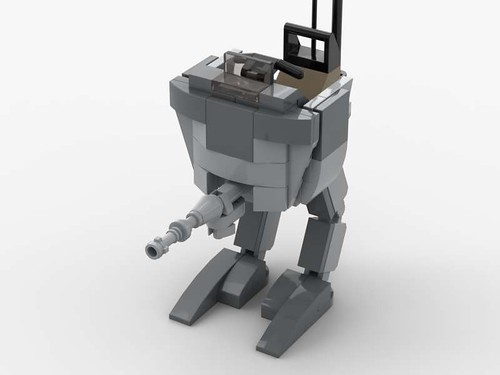
A semi-addition to the RT project is the RT Droid, an automated bi-pedal walker. The VT-RT(D) is in a sort of grey area, and so is not fully included with the rest of the RT walkers. Instead, it's been put with other Brickthana droids, and may even have its designation changed.
 SW Imperial VT-RT(D) #1 by Jonathan Wallace, on Flickr
If you want to build any of these for yourselves, here's the instructions:
VT-RT(X): https://drive.google.com/file/d/1yff351-w3sy1eyjQWu0awe88lGsyM2Nk/view?usp=sharing
VT-RT(H): https://drive.google.com/file/d/1wtnQpUb9V0GD_j1_cZuB9T0KiSRMrKJQ/view?usp=sharing
VT-RT(M): https://drive.google.com/file/d/1gJOcc4ppMsbLF82g1kfIGiZ7wjpzxWR3/view?usp=sharing
VT-RT(L): https://drive.google.com/file/d/1tipChHxhxKB54LxdCGOvqzqOZEkCfRVs/view?usp=sharing
As usual, any feedback would be most appreciated!
P.S. As far as the VT-RT(D) goes, you can see more pictures on Flickr, and I plan on including it in a topic with other Imperial Droids I'm currently working on.
-
Good looking MOC (and here I was, looking around the SW forum right before posting a similar topic
)! As with anything this size, scale can be a problem, but you pulled it off really well, especially the feet. I will say that the front looks a bit narrow, but I do realize that there's nothing to be done about that (again, size/scale). A final note, the blaster cannon seems a bit short and chunky; perhaps a fllickfire missle would work?
-
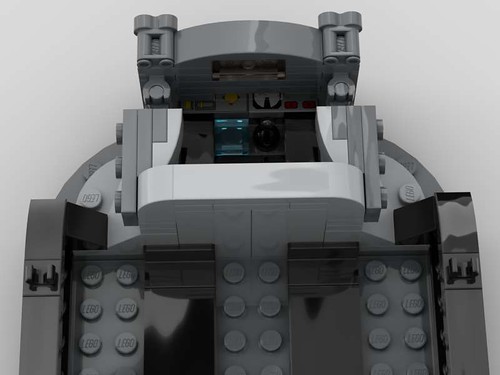
On 3/20/2019 at 6:58 PM, LiLmeFromDaFuture said:In this case, it seems like they function as vents for the guns. Although, I hear people claim disparities within these cross-sections, so who really knows.
This is pretty much the only cut-away that I've found online (and I can't really remember the Visual Dictionary much), and there's not much technical information on Wookiepedia (and the information that is on there has a big disparity between Legends- which I ascribe to- and 'Canon'); I'm not sure if this cross-section is from the Essential Guide to Vehicles, which is considered one of the go-to reference sources for these things.
-
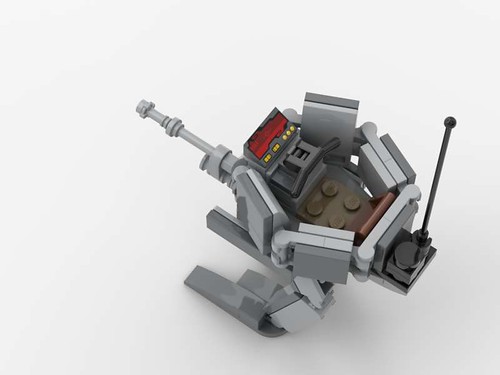
@LiLmeFromDaFuture Actually, they are indeed intakes (or at least filters of some kind). I had thought there was a seat for the gunner that could move up and down (somewhat like the 2008 set), but perhaps there's just a raised platform that he can stand on. Sorry for the poor picture, but it helps.
-
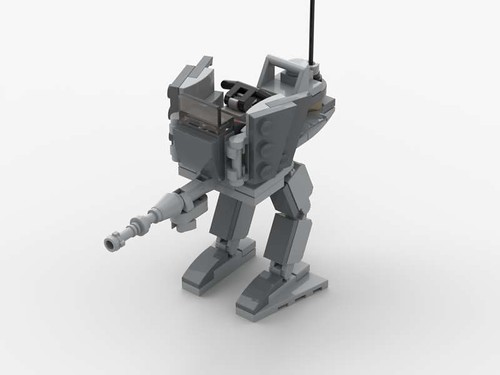
23 hours ago, TheBrickBuilder14 said:My previous design was indeed more "flat" compared to this one but while looking at the source material I felt making it a bit taller would actually be for the best as I could capture the top 2 "eyes" much better that way.
Ah, ok. Perhaps I'm just more used to looking at ones like those from Battlefront II, though I think it's more that the sides (where the repulsorlifts are) seem a bit small. Even your reference picture shows them as being a bit more "chunky". I don't know if adding a plate or two to the height would help or not, but I do see why you did what you did, given the scale that you used.
17 hours ago, LiLmeFromDaFuture said:I did not recognize these before, as the angles leading into the detail gave me the impression of some "intake." They seem too small compared to the main eyes, but I see the limited space given to work with.
I hadn't really noticed them from before either; the two on top, while I thought they were intakes as well at first, I believe are actually the secondary viewports. These would be for the commander/gunner, whereas the two main viewports would be for the driver.
-
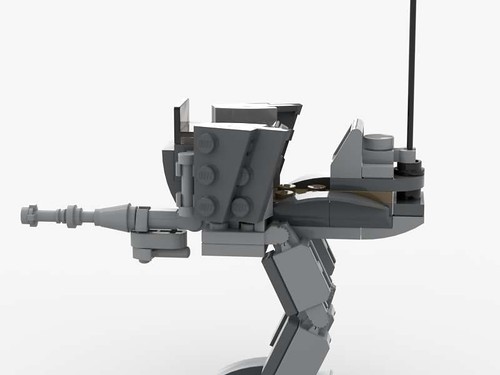
I think overall this is great. I really appreciate the inclusion of the rear hatch as well as the missile/rocket launcher, though I will say that the cockpit/cabin portion seems a bit big (tall). Besides this, excellent proportions and nice details (is greebling the right word?).
-
@Per_SW Thanks! As a franchise with 'Wars' in the title, combat vehicles are a given, but I consider support vehicles for a military (or just in general) to be a must as well. As for the 'SW look', that was nice coincidence on my part
; I did draw some inspiration (and of course the color scheme) from some Republic speeders, but to be truthful, this was a quick, spur-of-the-moment idea that used pieces I needed to get out of the way.
-
Usually for something like this (i.e. a derivative of a design) I would put the other versions in the same post as the original, but in this case I only thought of doing a modification of my Scorpius MRV while I was working on its successor. After I went through that design, I went back and retroactively built the following versions of the original. Think of these additions as something akin to the Creator X-in-1 sets; in this case, a base model and the subsequent retooling that the Rebels did to add even more versatility to their arsenal.
Here's the Mk IB-1; it's essentially the same as the 'A' model, although it would allow a commander/officer to stand in the middle.
 SW Scorpius Mk IB-C #1 by Jonathan Wallace, on Flickr
Next is the Mk IB-2, the Communications/Electronic Warfare vehicle based off the Mk IB-1.
 SW Scorpius Mk IB-C #2 by Jonathan Wallace, on Flickr
After that is the Mk IC-1, the troop/cargo carrier. Although not very effective due to its small size, it can still fit three 2x2 boxes, or up to three soldiers comfortably (you might be able to stuff a fourth in if they were standing up, but three is advisable). In addition, the tail mounted blaster cannon is operated by the pilot/driver, however it can be put on a lower mount so that the soldier in the back can man it; this blaster cannon is also meant to be removed if necessary (being taken by the soldiers to use in an attack).
 SW Scorpius Mk IB-C #3 by Jonathan Wallace, on Flickr
Last is the Mk IC-2, a slightly bigger version of the Mk IC-1. This can hold four boxes, or up to four soldiers (as before, you might be able to stuff an extra one in).
 SW Scorpius Mk IB-C #4 by Jonathan Wallace, on Flickr
If you want to build this for yourself, here's the instructions: https://drive.google.com/file/d/1qjOejLkC8vBtY-OSVEAHEsZPiJV0w4KA/view?usp=sharing
And again, any feedback would be appreciated.
-
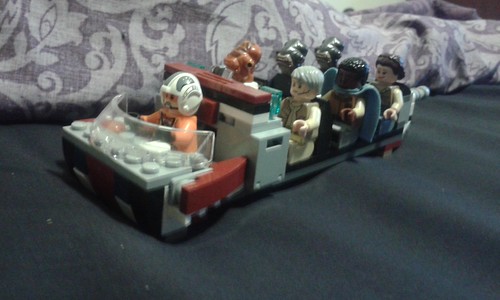
This isn't much of a MOC, but I think it fulfills a needed role. This floater/speeder was made for the purpose of ferrying dignitaries or other high ranking personnel around bases. While not a combat vehicle, it can operate in an observational role. Two fairly powerful thrusters can propel the floater out of danger or to its destination quickly, while its two cargo boxes contain macrobinoculars and blaster pistols for the occupants' use (either in self defense or in support of others). While not intended as one, this vehicle can be easily converted into a light cargo hauler; this would supplement the sometimes overtaxed Rebel vehicles in moving around supplies and material.
 SW Officer's Speeder #1 by Jonathan Wallace, on Flickr
 SW Officer's Speeder #2 by Jonathan Wallace, on Flickr
 SW Officer's Speeder #3 by Jonathan Wallace, on Flickr
While regular soldiers have their own transports, some times you just need to get somewhere fast.
 SW Officer's Speeder #4 by Jonathan Wallace, on Flickr
 SW Officer's Speeder #5 by Jonathan Wallace, on Flickr
 SW Officer's Speeder #6 by Jonathan Wallace, on Flickr
Here's some rough shots of the vehicle:
 SW Officer's Speeder #1(R) by Jonathan Wallace, on Flickr
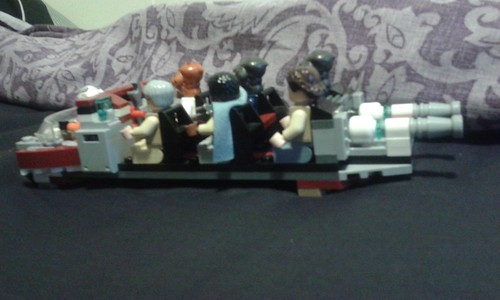 SW Officer's Speeder #2(R) by Jonathan Wallace, on Flickr
If anyone wants to build this themselves, here's the instructions: https://drive.google.com/file/d/1iFO6gQFDdLmDCi7ibU1wXWmd8qype5iX/view?usp=sharing
Again, any feedback would be appreciated!
-
Yes, I was a bit confused on the labeling; as far as the "just" defense' goes, I feel a MOC goes beyond its medium- just like a regular model ship is more than a piece of wood, a MOC isn't a toy (though of course it can be used as such, and I usually have something like that in the back of my mind) just because its medium (Lego) is. I acknowledge that starting small is best (I do think my Gunboat is better than anything in this project), but one of the intents of this project is seeing how capable I am in size, with a Frigate being something of a midway benchmark. I do recognize the pre-fab issue (while looking down on the sheer hulk, the word 'pencil' kept popping into my head), and I've seen it discussed before. You'd never fit a three-decker (or probably even a two-decker) on them properly, but as this project is a stepping stone from what Lego makes to 'true' MOCs, I'm content with using them here. I am tinkering with a two-decker on a pre-fab hull, though technically the side of the hull isn't on the pre-fab pieces themselves; the main issue/problem I find with them is putting the center, for the lack of a better term, 'bulge' on a ship. With something like a Frigate or Corvette, you can get away with a more even-sided hull (granted, larger Frigates probably need a bit more of a curve), but anything larger needs the bulge.
Right now I'm going to stick to pre-fab hulls (and therefore the smaller ships), though as I make bigger stuff, I'll switch over. I believe the bow curve, especially the area where the deck meets the bowsprit, is where I need the most help, as all my current tries are terrible. I want to make both 'Lego ships' and historically based items (a long time goal is making the USS Constitution), but I don't feel that I'm particularly prepared to make accurate historical models just yet. Because of this, I'm going with stuff that would fall under the Lego 'Pirates' theme for the time being.
-
@kurigan I said any feedback, and I meant it (the truth may not be what someone wants/likes, but they should still use it). Being self-deprecative is just part of my nature; I love history, and of course Lego, and seeing some of the ships on here made me want to really make my own stuff. I highly doubt I'll ever be the 'best', but I still want to try to keep improving my MOCing skills. Imitation is the sincerest form of flattery and all that, but if I do see something I like and/or I think is better than what I was currently using, I will put it in instead (and give credit as much as I can; sometimes I don't see any names). I admit that a 'pat on the pack', so to speak, is nice, but only if something deserves it; I feel most creators want gratification on some level for a creation that they're proud of.
I'm pretty much completely new to MOCing (the most I've done before is modding different Lego sets), and I wanted to learn as much as I can. There's only so much you can take away from pictures, so having feedback is worth a lot. As far as your comments on advice go, I kind of take the quote of 'If everybody's thinking the same, then nobody's thinking' to heart; different perspectives allow for improvements or ideas that you otherwise wouldn't have. And when I say something 'is' a certain thing, I don't mean for that to be specifically concrete, but rather what I had built it as; this is kind of hard to put into words, but what I mean is I started out with a certain idea/construct in mind, and I built it with that as a guideline, not a set in stone rule or interpretation. I said that one ship is a 'Frigate/Post Ship' because I had built it and interpreted the design as such- hopefully that makes sense. I do apologize, as I did point out/caption the pictures (it's a habit from elsewhere); I'll remember in the future that it's not needed.
Thank you for the feedback; I consider it invaluable because A) it's an honest assessment, and B) I consider you a veteran/experienced member of this forum, and therefore someone who's comments/advice, in my opinion, hold a certain weight because of that experience.
As far as the carronades/cannons, I labeled them as carronades as they seemed to small to be actual cannons (in my mind at least), and I used them with that intention in mind; because of that, I won't edit it, but I do acknowledge what you're saying. I'm not completely sure who made them either, but the picture I used to build them was by Brickdoctor, and he said on the Flickr description it was inspired by SlyOwl. The carronades I've seen pictures of usually are on a slide mount (which I wasn't sure how to make), while some were in carriages. I admit that the shape is more indicative of a cannon, but I didn't really have anything else on hand at the time.
-
Love the extensive implementation Sand Green; it's just pleasing to me. I also liked the different tile combinations you used for the various floors. As an aside, before I read the title, the first word that popped into my head was 'mint' (more of the candy variety, again the Sand Green, but perhaps still a good idea for a MOC?).
-
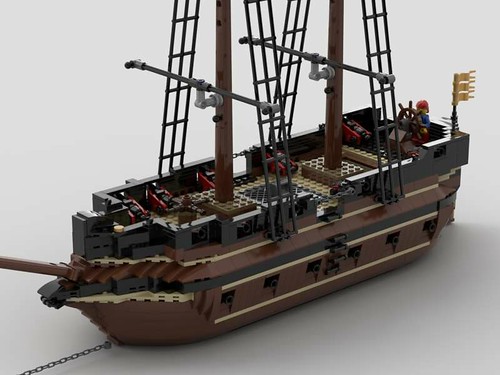
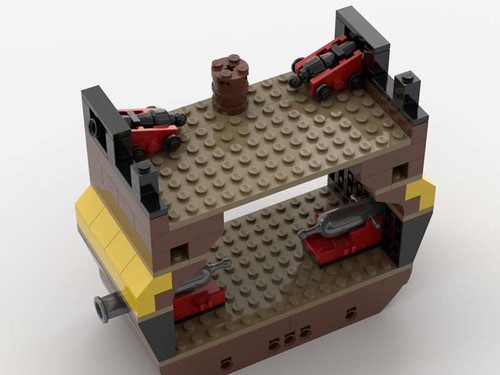
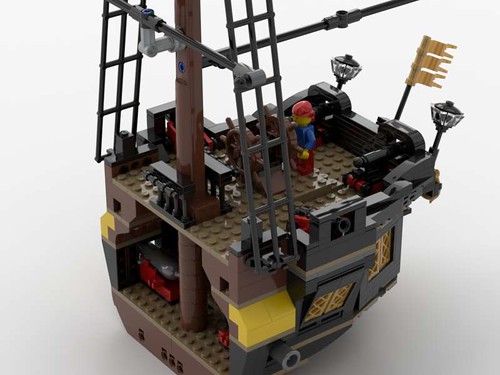
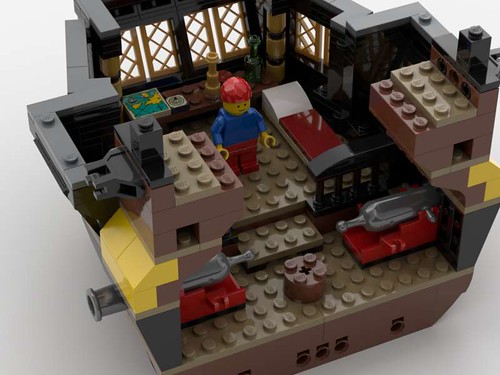
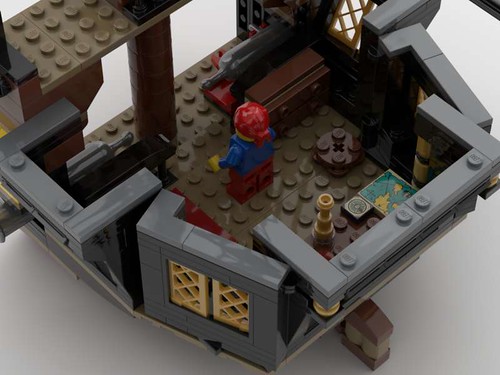
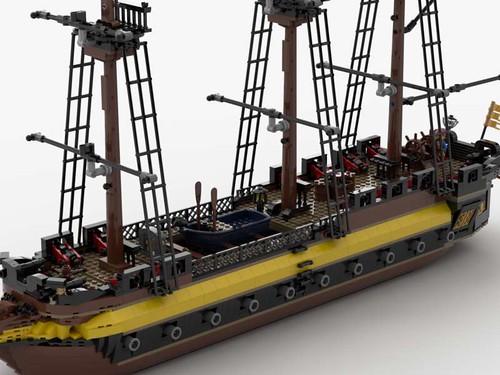
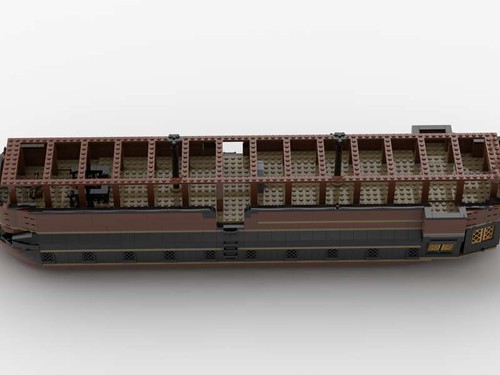
This took me a few months to complete, for a few reasons. I decided to post this, even though I technically haven't finished this project, but this past week I decided to post this weekend if I couldn't think of anything new to add. The genesis of this project was my modding of my Brick Bounty (nothing much, just some improvements here and there), and I wanted to create something more substantial. To be clear, this is my first ship MOC, as well as my second large MOC. I don't say this in hope for leniency (go ahead and bash me), I just want to give some context. I recognize this as a learning project; indeed, you can see some progress (albeit not much) in the pictures below. I'm already doing MSP Phase II, which incorporates a few techniques that improve the design quite a bit. This project was divided into two batches: Batch 1, which is a Supply Ship and a Armed/Converted Merchantman; and Batch 2, which is Frigate, a Prison Hulk, and a Sheer Hulk. I wanted something that gave me more than just a warship, and I think I covered my bases fairly well. In addition, this project (and to a lesser extent Phase II) is a kind of a bridge between official Lego sets (in my case, the Brick Bounty) and bigger and better MOCs (such as the beautiful specimens here on Eurobricks); as such, I wasn't too concerned with making great MOC (or even necessarily a good one), but rather a decent one that would go fine with Lego's ships, and perhaps (hopefully) wouldn't look too out of place alongside proper MOCs.
Batch One:
The first ship up is the 'Supply Ship', a.k.a. the Tub. This is meant to be a ship used to move troops, equipment, or victuals to wherever they're needed. It's not pretty, but it gets the job done. I started off by making sure a minifigure can stand straight up inside (5 bricks tall). I've kept this throughout this project, but I have changed to a smaller height in Phase II. I also used the 1x2x3 inverted slope for the hull sides. This is a real thing, though it's more used in modern times than in the Age of Sail (a flare, as opposed to a tumblehome).
This shows the inside, and probably the main point/draw of this batch- the anchor system. You can see the channels for the anchor chains; string might be better, but I wanted to use chains like Lego does (there's a couple reasons why, mainly because chains are more readily available to me).
 'Modular Ship' (Supply Version) #4 by Jonathan Wallace, on Flickr
Here's a look down the inside. The two Technic connectors under the Technic plate are meant for the chains. The end of the chains are attached to the top one, and wound in between the two, similar in concept to what's on the Brick Bounty (sort of).
 'Modular Ship' (Supply Version) #5 by Jonathan Wallace, on Flickr
A more overall view of the ship (with Bosun Bob at the helm). I wanted the ship to have some kind of defense, so I put some some carronades on top.
 'Modular Ship' (Supply Version) #1 by Jonathan Wallace, on Flickr
A top down view of the deck. Besides the anchor, the only real feature is the grate/cover.
 'Modular Ship' (Supply Version) #2 by Jonathan Wallace, on Flickr
A view of the stern area. The bracket is meant for a nameplate or something similar (the inverted slopes around it can be removed and replaced to widen it if necessary).
 'Modular Ship' (Supply Version) #3 by Jonathan Wallace, on Flickr
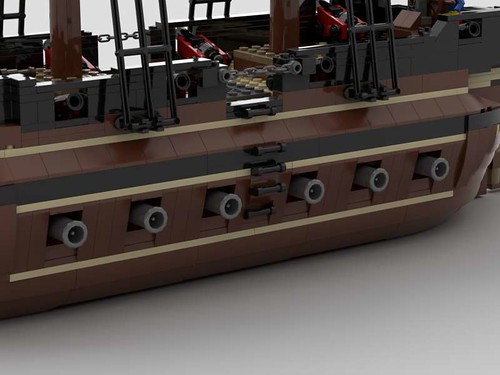
The second part is the Armed/Converted Merchantman', a.k.a the Lumberer (I don't know if it would actually qualify for a 'HM_'). This is basically an 'upgraded' version of the Supply Ship, armed with cannons and carronades to help defend, and comfortably keep pace with, various convoys.
A view of the bow; not much, but the bow mount (modified plate) gives me some options.
 'Modular Ship' (Converted Merchantman) #2 by Jonathan Wallace, on Flickr
Here's a view of the gunports; also a better view of the bow mount.
 'Modular Ship' (Converted Merchantman) #1 by Jonathan Wallace, on Flickr
I think Lego's cannons look better; it's probably because the ship's a bit chunky.
 'Modular Ship' (Converted Merchantman) #3 by Jonathan Wallace, on Flickr
Batch Two:
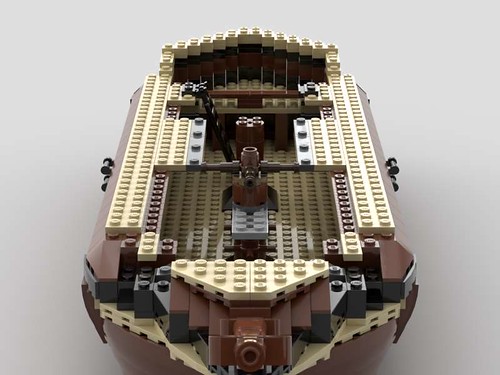
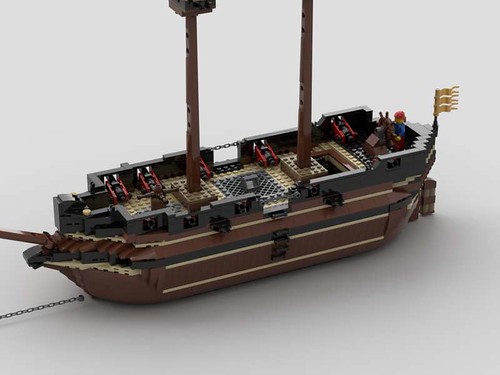
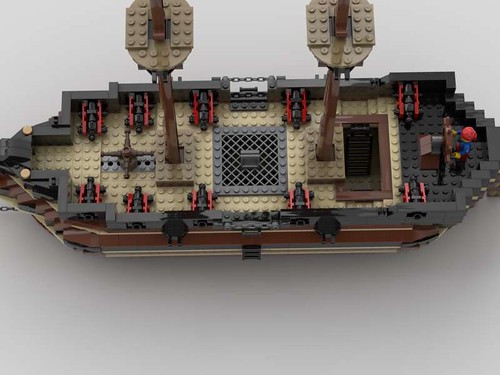
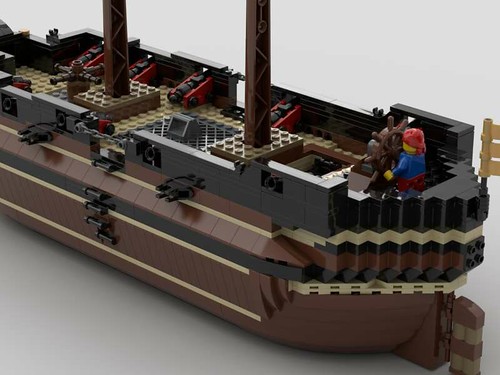
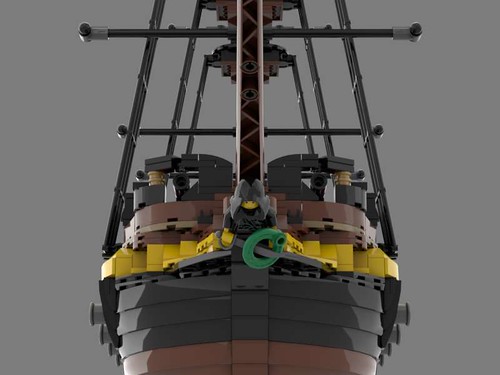
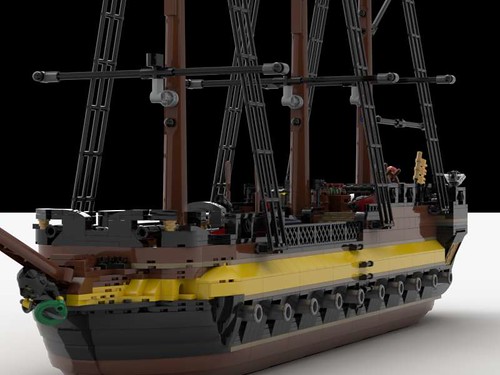
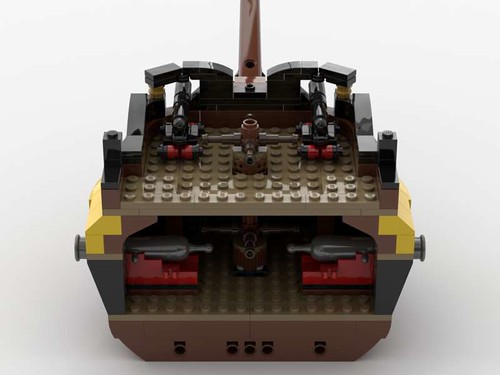
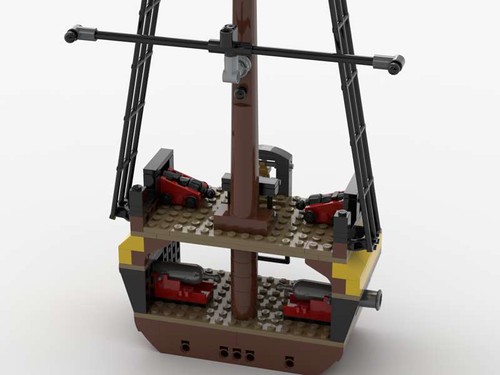
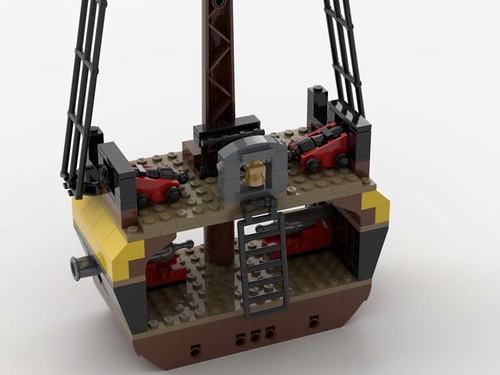
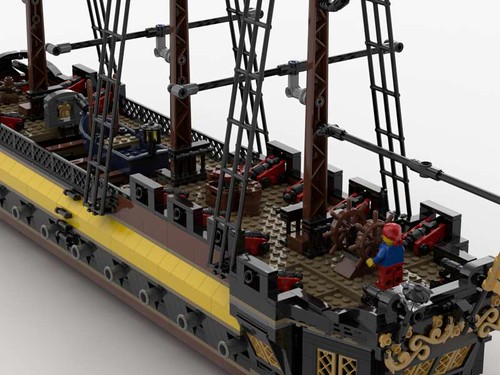
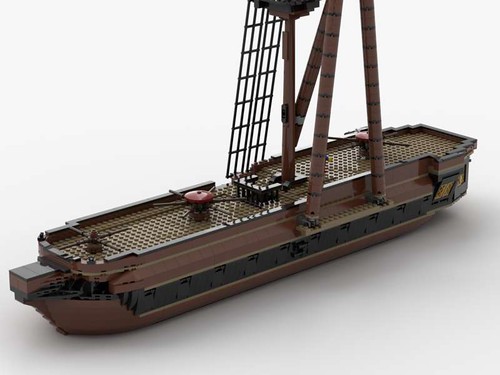
The third ship (and the pinnacle of Phase I) is the Frigate. In the British system, which I base most of my information and inspiration from, it's actually not a frigate, but rather a 'Post Ship'. Many Sixth Rates were of these types, but all were commonly called frigates anyways, and so that's what I labeled this as. I found a picture early on of HMS Euryalus that I took a lot of inspiration from, if not direct translation of some design elements. This is also the only ship that's actually modular; the rest are built in a way to make it easy to make it modular, but also easier to build in the first place (I admit a bit of laziness probably crept in there, but I wanted to move on to other stuff).
Here's the ship, piece by piece, form bow to stern. There's 20 pictures, so I put it here to shorten the post a bit.
Spoiler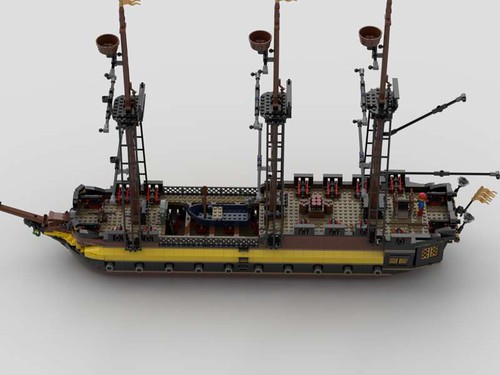 Modular Ship (Frigate) #1 by Jonathan Wallace, on Flickr
 Modular Ship (Frigate) #2 by Jonathan Wallace, on Flickr
 Modular Ship (Frigate) #3 by Jonathan Wallace, on Flickr
 Modular Ship (Frigate) #4 by Jonathan Wallace, on Flickr
 Modular Ship (Frigate) #5 by Jonathan Wallace, on Flickr
 Modular Ship (Frigate) #6 by Jonathan Wallace, on Flickr
 Modular Ship (Frigate) #7 by Jonathan Wallace, on Flickr
 Modular Ship (Frigate) #8 by Jonathan Wallace, on Flickr
 Modular Ship (Frigate) #9 by Jonathan Wallace, on Flickr
 Modular Ship (Frigate) #10 by Jonathan Wallace, on Flickr
 Modular Ship (Frigate) #11 by Jonathan Wallace, on Flickr
 Modular Ship (Frigate) #12 by Jonathan Wallace, on Flickr
 Modular Ship (Frigate) #13 by Jonathan Wallace, on Flickr
 Modular Ship (Frigate) #14 by Jonathan Wallace, on Flickr
 Modular Ship (Frigate) #15 by Jonathan Wallace, on Flickr
 Modular Ship (Frigate) #16 by Jonathan Wallace, on Flickr
 Modular Ship (Frigate) #17 by Jonathan Wallace, on Flickr
 Modular Ship (Frigate) #18 by Jonathan Wallace, on Flickr
While putting together the finishing touches to this project, I realized that I could lower the rear down a bit to have a more streamlined look; it's not exactly a flushed deck, but it's close enough to do the job.
 Modular Ship (Frigate) #19 by Jonathan Wallace, on Flickr
 Modular Ship (Frigate) #20 by Jonathan Wallace, on Flickr
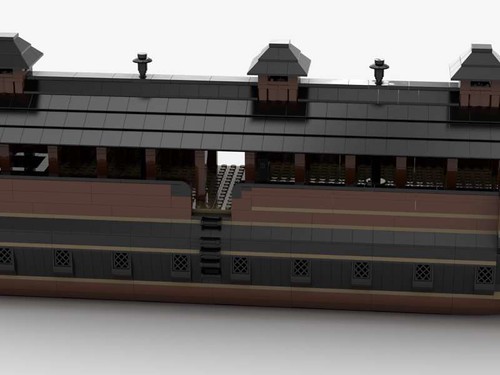
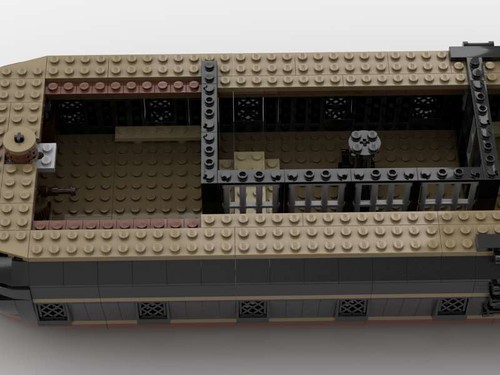
The fourth and fifth 'ships' aren't really ships- at least not anymore. These are what are called hulks (specifically a prison hulk and a sheer hulk). They were once warships, but once they were too old to be really useful anymore, they were converted into some kind of hulk. I've searched on here before, but I haven't found anybody who has made either one of them. I'm sure the talented shipwrights here could have a much better crack at such projects than I, but even if I just spread the idea around, that would be enough for me.
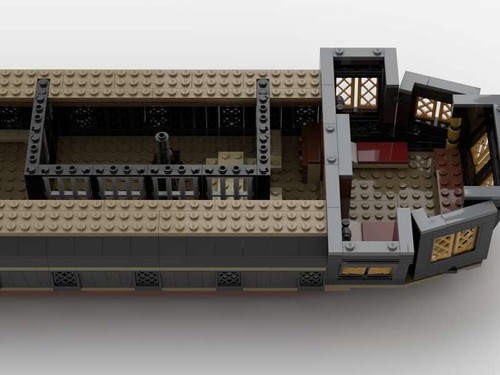
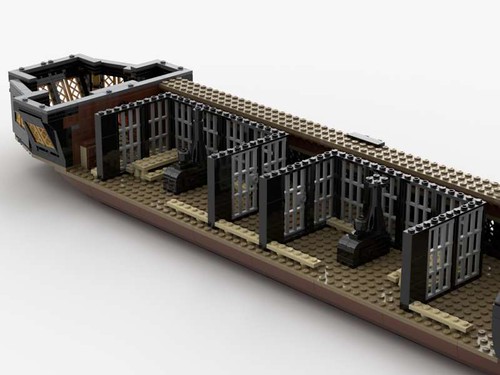
The fourth ship is the Prison/Accommodation Hulk. These were used as floating prisons to keep prisoners of war, mutineers, or just overflow from the regular prisons on land. Accommodation hulks were like floating barracks; used in a similar way to the prison hulks.
SpoilerThe main striking feature is probably the roof, which has given me some interesting ideas for some future Castle MOCs.
 Modular Ship (Prison Hulk) #1 by Jonathan Wallace, on Flickr
I replaced the opened gunports with windows, and I think the effect isn't too bad.
 Modular Ship (Prison Hulk) #2 by Jonathan Wallace, on Flickr
Here you see the support beams and the tops of the stoves; plain and boring, but hey- it's a prison.
 Modular Ship (Prison Hulk) #3 by Jonathan Wallace, on Flickr
Forward area with one of the cells and some benches.
 Modular Ship (Prison Hulk) #4 by Jonathan Wallace, on Flickr
Rear cell, with a small guards' quarters.
 Modular Ship (Prison Hulk) #5 by Jonathan Wallace, on Flickr
A better view inside the cells; thank you @Imperial Shipyards for the stove design (still love the Achille).
 Modular Ship (Prison Hulk) #6 by Jonathan Wallace, on Flickr
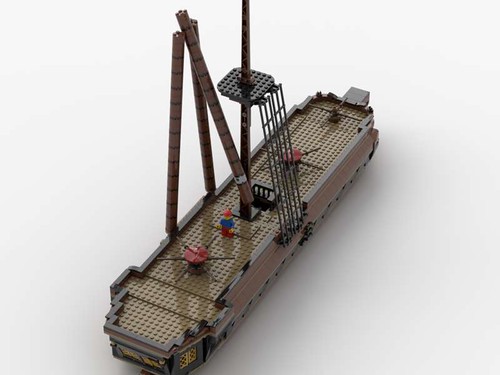
The fifth and final ship is the Sheer Hulk. These craft were floating cranes, usually implemented in putting masts onto new ships (or replacement masts for those ships that lost theirs in some way, shape, or form). After the Age of Sail, though still in the 19th Century, purpose-built sheer hulks were made to help increase maritime construction.
Multiple capstans were used to power the crane, and the sides/railings of the ships were usually cut down near the deck.
 Modular Ship (Sheer Hulk) #1 by Jonathan Wallace, on Flickr
I've found many photos of different sheer hulks, and all have some different kind of combination (rigging, number of crane arms/booms, etc.), but I tried to build what was sort of the average of what I saw in my reference photos. I didn't end up finishing this one, as I couldn't really make the crane fit together quite right. If anyone can think of anything, feel free to make your own (just make sure to send me a link
 ).
).
 Modular Ship (Sheer Hulk) #2 by Jonathan Wallace, on Flickr
This has been my Modular Ship Project (Phase I). I haven't made instructions for this (mostly I don't feel it's really a MOC worthy of it, but also I'm busy/lazy), but I do plan to make them (*ahem* eventually
). Phase II has already begun; I'll still be using prefab hulls, and I plan to make a Third, Fourth, Fifth, and Sixth Rate. I've already discounted a First or Second Rate, but I'm holding out on a Two Decker. Although I will work on a Three Decker a bit in my Testbed before I close Phase II.
Any comments, suggestions, or critiques of any kind are welcome; I await the feedback!
-
Uniforms in general can be a complicated subject; the British had both red and blue uniforms during this period, both for officers and the regular soldier, however this is subject to a sort of caveat. The English/British, well, 'Redcoats' are of course red, however, this is only for the regular army. 'Royal' institutions wore blue; the Royal Navy wore blue uniforms, albeit usually only for officers, as the regular sailors wore mainly white. The Artillery Corps technically isn't (or at least wasn't) part of the army, as it was seen as a specialized role; it was considered at least officially separate, and as a Royal institution (the 'Royal Artillery'), it was granted the right to where blue uniforms. That's why you'll see paintings of guys in blue by cannons, surrounded by guys in red. The actual army isn't, and wasn't, a Royal institution (that's why it's always referred to as the 'British Army', and not the 'Royal Army'), and therefore isn't given the privilege of the color blue.
The original English/British army was created after the English Civil War(s) by the Parliamentarians in the form of the New Model Army; they chose red as the color of the new professional army's uniform as it was the cheapest color (bureaucracy at work!). When the King was returned to power, the army (and it's uniform) was kept. Now, there are a few minor exceptions of a sort to the uniform rule- and that's Royal Regiments. These are units in the army proper that (through some reason or another) are 'Royal' units. While they don't have blue uniforms, they are allowed to have blue facings, as well as a special cap badge. There is at least one army unit that does have actual blue uniforms, and that's the Royal Horse Guards (eventually amalgamated with the 1st Dragoons), and is part of the Household Cavalry (along with the Life Guards).
-
@LiLmeFromDaFuture Thanks!
On 2/3/2019 at 2:15 PM, LiLmeFromDaFuture said:Great job for including a background to this creation! It offers so much to the experience beyond just the photos.
I wouldn't exactly call it a background, though sometimes I do come up with actual backstories because that's just how my mind works.
-
If anyone wants to build this, here's the instructions: https://drive.google.com/file/d/1pPEG-t0oeNBDl0hfCpn5kx2zuIsZbC13/view?usp=sharing
-
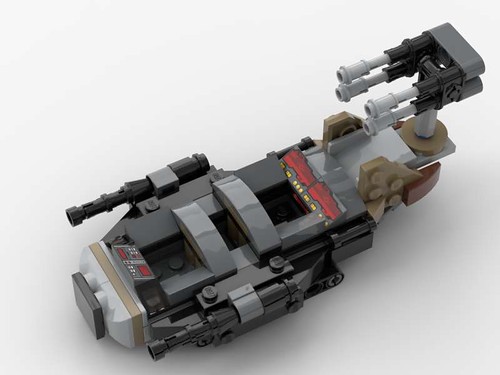
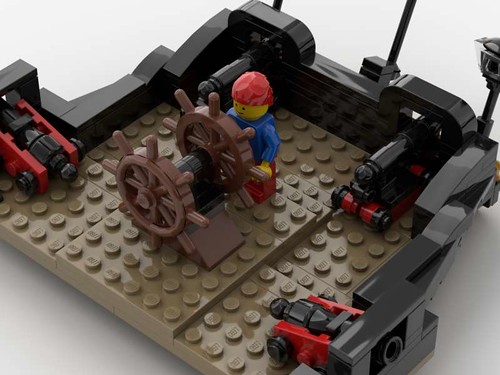
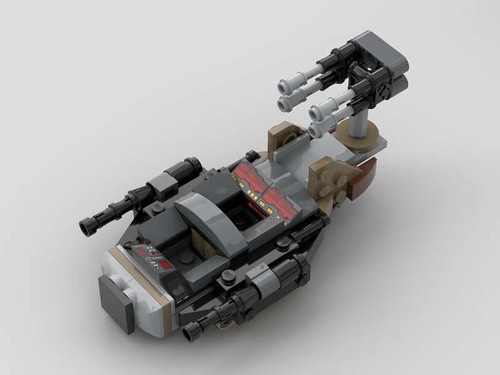
"Have a problem? Just MRV it!"
About a year ago, I got the Jawa battlepack (mainly to get a 'new' astromech for my rebel forces). I promptly scrapped the sandcrawler for pieces, mostly to help build my Bluecoat gunboat. This still left me with some Technic liftarms and and quite a few 1x2 brackets. I decided to use them to create a Rebel vehicle, specifically some kind of crane to lift astromechs into the my Y-Wings. It was only after I had built it that I came to realize it didn't exactly fit the role right, and so I added a couple of heavy blaster cannons to make it into a sort of combat recovery vehicle. I also wasn't exactly sure if I should label it a speeder or a tracked vehicle, or some kind of combination of both (though I am sort of leaning towards the last one).
Even after this, I still wasn't completely satisfied, and so I went ahead and adapted it into a full-on combat vehicle with some light blaster cannons. I really warmed to the idea since my Imperials had multiple heavy and light vehicles, while the Rebels only had a couple of speeder bikes for any battle scenario. Going with the idea that the Rebels were resourceful and seemingly modified the living daylights out of everything, I went ahead and started other attachments. I couldn't make anything big, but I wanted to make sure the Rebels had some kind of decent firepower. Thus the Scorpius Multi-Role Vehicle was born.
Originally, I called it the 'Scorpio' (for various reasons, but of course mainly for the shape), though I settled on 'Scorpius' because I wanted 'Scorpio' to be the label of a more 'real world' MOC. The heavy blaster cannons can be replaced with missile launchers [spring shooters] or grenade launchers [stud shooters] for various configurations, though I feel that the original configuration is the better one.
 SW Rebel Scorpius MRV (Multi-Role Vehicle) #1 by Jonathan Wallace, on Flickr
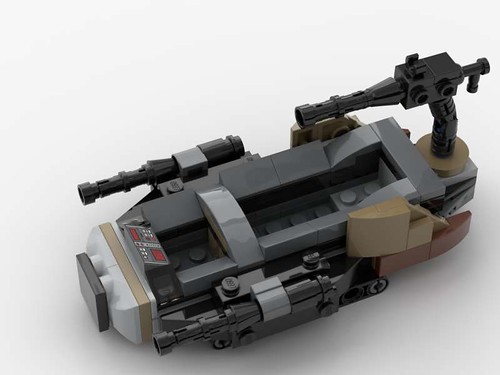
The quad-blaster cannon is probably my favorite attachment. It can be folded up for storage, and is great for an anti-infantry or anti-aircraft role.
 SW Rebel Scorpius MRV (Multi-Role Vehicle) #2 by Jonathan Wallace, on Flickr
I kind of feel that the missile launcher is a bit clunky, but I also think it's the best I could do for the small size requirement. I started with something similar to what's on the 2015 Hailfire droid, and then went through a few iterations before settling on the final one (I thought that the one where I had the launchers attached to the sides of the mount looked the best, but it was impractical because of the above size requirement). I also considered a Calliope style launcher, but again, it would be too big.
 SW Rebel Scorpius MRV (Multi-Role Vehicle) #3 by Jonathan Wallace, on Flickr
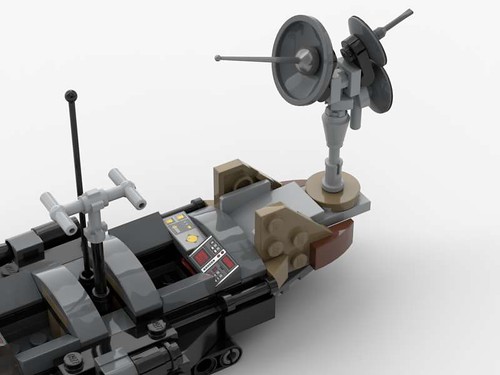
For the various weapons attachments, I made a goal to make sure I had at least three types- a blaster cannon, a missile launcher, and some kind of ion weapon. The main reason is force distribution (an ion weapon would kind of even the playing field a bit). This actually stumped me for a while, as any ion gun I could think of would be way too large- indeed it would be more of an artillery piece/base defense turret than anything that could feasibly be placed on anything smaller that an AT-AT or a ship. I looked up some ion cannon turrets, and decided to use the NX-7 as inspiration, as it was (or at least looked) kind of small. The result of that effort became the Imperial version; I redesigned it a bit, and ended up with the below as the final product.
 SW Rebel Scorpius MRV (Multi-Role Vehicle) #5 by Jonathan Wallace, on Flickr
Finally, we have the original attachment: an electromagnetic crane. This can be folded up as well, even when attached to the rest of the build.
 SW Rebel Scorpius MRV (Multi-Role Vehicle) #4 by Jonathan Wallace, on Flickr
And here's just some rough shots of a Scorpius ambushing an Imperial Cargo Speeder.
 SW Rebel Scorpius MRV (Multi-Role Vehicle) #1(R) by Jonathan Wallace, on Flickr
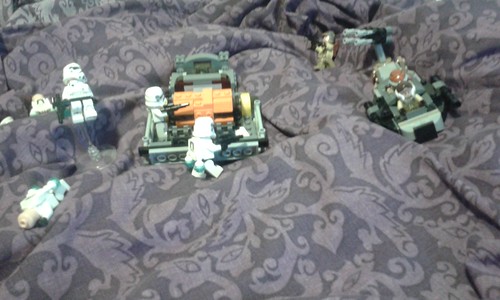 SW Rebel Scorpius MRV (Multi-Role Vehicle) #2(R) by Jonathan Wallace, on Flickr
 SW Rebel Scorpius MRV (Multi-Role Vehicle) #3(R) by Jonathan Wallace, on Flickr
If anyone wants to build this themselves, here's the instructions: https://drive.google.com/file/d/1p-vc92bWUDP7EzSOOKz6FyKbGDa-kD9u/view
And again, any comments/suggestions/feedback would be appreciated.
-
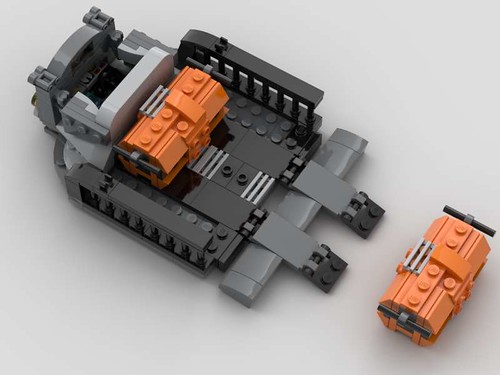
The catalyst behind me making this was simple- I had a pair of Imperial Hovertanks that I wanted to use in a more combat-oriented context. Therefore, I needed to make something that was a low level hauler (i.e. something like a flatbed truck, at most a few studs off the ground) capable of holding two of Lego's Kyber crystal containers. I remembered from some older books that in the EU, they had 'floats'- basically small speeders capable of even going inside buildings. This inspired me to make a small cab attached to a low flat bed, going back to the 'truck' mentioned above.
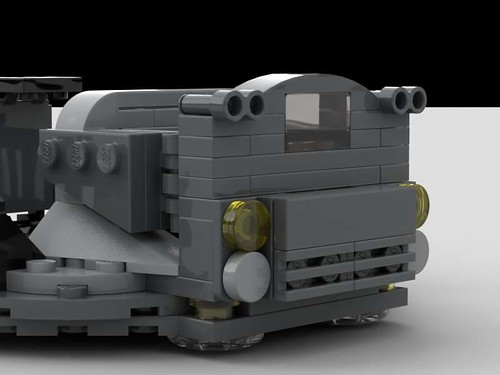
While the bed is exposed except for the side railings and the rear ramp, I wanted the bed to have at least nominal protection, hence putting heavy doors when doors aren't particularly needed. I also forwent a wide open windscreen for a smaller enclosed one for similar reasons. The idea behind this is that A) the pilot/driver would be protected from rocks and debris, and perhaps even shrapnel (protection from small arms is up in the air); and B) the cab area can be separated from the rest of the speeder (specifically the bed) and be used on other vehicles.
 SW Imperial Cargo Speeder #1 by Jonathan Wallace, on Flickr
 SW Imperial Cargo Speeder #3 by Jonathan Wallace, on Flickr
 SW Imperial Cargo Speeder #5 by Jonathan Wallace, on Flickr
 SW Imperial Cargo Speeder #2 by Jonathan Wallace, on Flickr
 SW Imperial Cargo Speeder #4 by Jonathan Wallace, on Flickr
Another function is as a small squad transport (Filing Out at Bay 10). Other uses could be placing a crane or some kind of weapon in the back. I'm not sure if a communications center would be a good fit or not. Also, with other things besides cargo or troops in the back, the rear ramp can be removed. I'm sure the bed can also be extended without it be overly long as well.
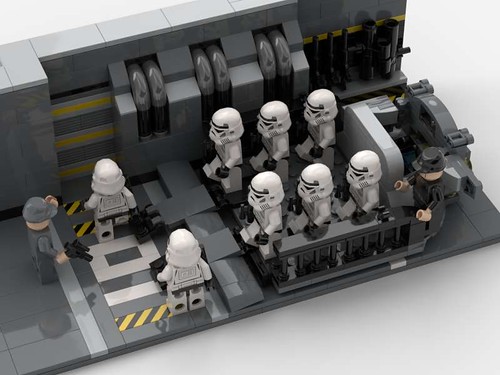 SW Imperial Cargo Speeder #6 by Jonathan Wallace, on Flickr
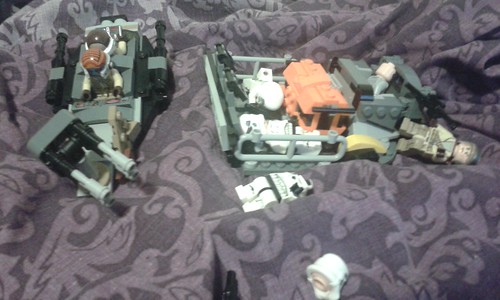
A rough picture of the ICS being ambushed by the Scorpius MRV (coming soon).
SW Rebel Scorpius MRV (Multi-Role Vehicle) #3(R) by Jonathan Wallace, on Flickr
Any feedback/comments would be appreciated.
-
[moc] Hadrians Wall
in LEGO Historic Themes
Posted
Ah, ok. With the arrow slits (to be a bit more clear), I meant the 'windows' on the front and back that use the 1x2 slopes for the angled sides- the outside should be flush with the rest of the wall; there's plenty of examples (albeit more from medieval castles) on google. I feel your pain on Lego's Roman soldiers, but for something like this, mail is still a great choice (and thankfully much more abundant). Are you going to do a Roman cavalryman? Either an Equites or some kind of auxiliary would be interesting; I made one, though it could be a bit better with more resources.