

Brickandkall
-
Content Count
18 -
Joined
-
Last visited
Posts posted by Brickandkall
-
-
10 hours ago, scheyjosh said:Sorry to bother again. I think I skimmed over it but I tried to look for an answer for 41531. Did you guys just use the dark grey color instead of figuring out the DBG issue? Thanks! Currently at 3,300 pieces!
Yes. I used DG & DBG interchangably, same of LG & LBG. Some people went for more stastic solutions like painting parts.
-
8 hours ago, scheyjosh said:Do you know where the transport ship instructions and brick list are in the folder? I cant find them!
Are you referring to the GR-75 Rebel Transport? If so, this isn’t included in the Nebulon pack, but, you can source it for free on this forum.
Just do a search of Mortesv posts and you’ll find one for it which includes a link to download the LDD file. It’s only available as an LDD file, you’ll need to convert it to PDF and create a part list from this.
-
100% agree with what Afol and Midlife added above. One other thought you might consider is this. Picking up on what Afol said about shipping costs, the official online Lego shop and some Bricklink stores offer free shipping for orders over a certain amount. For bigger projects like this, that's worth bearing in mind. Their parts usually cost a bit more (especially in the case of the official lego store), so its a juggling act to figure out what's best, but I found it worth pursuing.
-
50 minutes ago, scheyjosh said:That makes sense! And due to my funds I will probably have to do mostly all alternates.
So I'm really excited because before a few days ago I had no idea what an LDD file even was. I downloaded the program and see everything now and the instructions for the stand...thing is I can't find the damn parts list on the program. Is it there somewhere or somewhere else? Im on a Mac if that makes any difference.
Using a Mac shouldn't make a difference. I'm really testing my memory cause I do't have access to the program as I type this, but I vaguely recall you convert the file to HTML format (within Lego Digital Designer) and then you can either upload it to Bricklink or convert it online to a spreadsheet doc. I just googled converting LDD file to part list (or something like that) and found an explanation pretty quickly.
-
35 minutes ago, scheyjosh said:Hey! Thank you for responding.
My main fear is that using LG instead of LBG will heavily stand out, which I wouldn't want. I want it to look as nice as possible of course! Did you switch out a lot of parts for LG?
To be honest I used LBG and LG interchangebly. Each to their own, but, I personally like the mix of these two colours, it offers a shading affect, leaves parts of the ship looking weathered.
8 minutes ago, scheyjosh said:Oh, and does anyone have a copy of the stand that @churcholomade? I definitely want to go the route since it seems really sturdy and would be cheaper. thanks!
@churcholo posted the LDD file on one of his posts in this thread. If you're having trouble finding it go into his profile and look at the posts he's made and you'll find it. Be weary that if you're looking on an i-device or the like it might tell you that the file isn't there.
-
3 hours ago, scheyjosh said:Hey everyone ~
So I decided this will be my first ever attempted Moc because I love it so much. I have already started to collect parts and everything, but obviously many parts are hard to find and expensive...even more so now than 3 years ago.
I was wondering if the parts file in the $50 package is different than the one on rebrickable? I've read through a good amount of this forum and I was trying to figure out replacement parts, but as I went along it just got super confusing. Does anyone have a list of good possible substitutes? Like 4095 in LBG. That's gonna be a pain and I doubt there's a substitute haha
Thanks guys! I really hope someone has a solution haha
Hi @scheyjosh, from memory the two lists are different. I believe the list provided with the pack is more accurate then the one on rebrickable. I originally created a wanted list on Bricklink using the list from Rebrickable as I wanted to identify what I had first and what I needed to buy before committing to the pack. However, when I got into the build I found I was missing a few parts that were on the pack list but not the rebrickable one. I'd recommend using the list with the pack if you have it, though I can guarentee this is not 100% correct either.
As for part costs, I did the build about 6 months ago. Firstly, you might decide if you definitley want to use the transclear stands or if you want to use the alternative provided by @churcholo. Some of the Transclear parts are costly and in limited supply in the quantities needed, so worth avoiding if possible. Secondly, I would vet your wanted list, look at parts with high costs/limited suppliers and then look for alternatives. Some can be easily subbed out, LG for LBG. Others might have alternatives that serve the same purpose with little effect, like your 4095. I think this is the umbrella stand? If so, plenty of antenas, bars, hoses that could be subbed in with little effect on finish.
-
11 hours ago, rockpig said:Hi,
Thanks for your quick response. Many thanks for your heads-up on the liftarm 15 issue. I'm glad you were able to display your MOC on churcholo's stand. He designed a great looking and extremely sturdy stand.
I would appreciate advice on installing the stand during the build processs. Any page or step number would be most helpful.
Thanks,
rockpig
@rockpig I agree, great design. If you haven't seen my setup there's a picture of it above on this page of the thread. @churcholo stand blends the model in really well to the background I chose, I wish I'd used in on the rear as well.
RE the heads-up on the lift arm problem, I might have got the specific's of this wrong. I said the instructions mentioned using two 15 liftarms in lieu of 13 liftarms, I think it might actually be that the instructions list use of two 13 dark grey liftarms when they're meant to be 11's. I think it is step 335 listed on page 522 of the instructions. Having said that, the very next step (336) shows the placement of two 15's, so it could have been that, the memory is too foggy at this point. Either way, I'd just say, be wary of the problem. Aim to line these liftarms up at the bottom then check the placement at the top. The one that's wrong won't quite look right, it'll look like it extends slightly past where the top panelling will sit. If you're like me you'll probably think "I'm just reading this wrong", trust your judgement, it'll save you a lot of pain later on.
As to installation of the pedestool stand, as mentioned above, I didn't use the rear one, I kept @mortesv original transclear one which can be popped on and off relatively easy, whereas churcholo's has to tie into the structure. With that in mind, I'd still say get them in as early as possible, once all the framing is finished, but you need to be mindful about what that could impede. I originally suggested putting the front one in once the framing for the fin is largely completed, which could be as early as step 358 on page 545. But having flicked through the plans to refresh my memory, I'm reminded that's likely to create a problem with installing the pods on the fin. The pods sit between the technic frame elements, and from memory, some of the pods need to be slipped up from the bottom. Consequently, the bottom of the frame needs to remain open until these elements are installed, meaning, the stand can't be put on until its done. With this in mind, you might be best to do some of the steps out of order.
Here's what I'd suggest. I would work in order up to step 126 on page 603, at that point, I would skip ahead to the construction and installation of the pods. Disregard the steps outlined on pages 604 to 630, as these relate to the construction and installation of the original stands. There is a small detail to be done, recorded on pages 631 to 635. At this point, turn the ship upside down and start the construction and installation of the pods, which is outlined in pages 636 to 917, along with steps related to completing the framing for the fin. You can obviously ignore the steps related to the construction of the transclear stand here, which are recorded on pages 908 to 914.
At this point, I would be installing both of churcholo's stands and then turning the ship over to support it on them. As for the rest of the build, follow the instructions from there out. Hope that helps.
-
2 hours ago, rockpig said:Hi Everyone,
I am about to begin the build process of this MOC using churcholo’s stand. Can anyone who has built it with this stand provide me with any tips for the stand installation? Mainly, how does the stand attach to the build? Could someone please provide me with the page numbers where the stands should be attached, and the part to attach it to? Any help would be appreciated.
Thanks.
rockpig
Hi @rockpig, I would suggest that you build churcolo's stand first. Once you've done that, get stuck into the build of the ship. Once you've gotten to the point where you've completed the frame for the fin where the stand is attached, add it at that point. I added the stand later on after I had finished the build, replacing the original stand. All very doable the way I approached it, but, it was fidly, I had to remove the paneling in part along the fin (and of cause replace it all later) and there were many tense moment worrying that the model would fall over as I did it.
If you follow my advice above, I'm confident you'll have no problems at all identifying where the liftarms from the stand sit inside the frame of the ship. The four liftsarms can only be placed in one location so that they are evenly spaced. Furthermore, from memory, you cannot set them any deeper into the frame of the model because the descending lift arms from this part of the ships design prevents that. Consequently, getting the virticle level of the pedestal (stand) right is pretty straight forward also.
One more thing, if you haven't already picked it up on this thread (as I didn't before carrying out the build), there is an error in the build of this part of the ship where the fin's frame is attached to the rest of the ship. From memory, the instructions suggest that 2 dark grey 15 technic liftarms are meant to be used, but they're actually meant to be 13's. You'll know it when you see it because the ones depicted in the instructions sit too high on the model, getting in the way of the top panelling from being installed. You don't want to miss this because it is extremely painful removing them later on, as I learnt, you'll do a lot of damage to the build to correct it.
Hope that helps
-
12 hours ago, SirCharles1977 said:That is not correct actually. In my parts list green is any color. All other colors are specific. Some because of aesthetics, others because that's the only real option or the only real financial option.
On rebrickable the "blue" bricks are not actually blue. That's just the color Rebrickable uses for the image to indicate they are Any Color.
My apologies @SirCharles1977. I was looking at the parts listed created automatically by Bricklink when I copied the Rebrickable inventory across. The Rebrickable inventory only has 7 colours listed in it, Black, Blue, Dark Bluish Gray, Green, Light Bluish Gray, Red and Trans Clear. But the list of colours is a lot more extensive once the list is transfered into Bricklink, including, pink, red, yellow/tan, browns, light blues and so on. I think this is largely due to Bricklink assigning a colour automatically for the Blues (non descript colour parts). I'll use the Rebrickable list instead of the one I created in Bricklink to figure out what parts I have and what parts I need to get. I haven't set this up in Rebrickable, its a great tool, but I don't know how any one has the patience to do it. I have millions of random pieces I've colour coded and set into sub-categories, but I don't have the time to go through and enter them all into Rebrickable.
Hopefully be in touch soon to purchase my package.
-
Fantastic work @SirCharles1977. Very keen to add this to my future projects but want to check what I have in the way of parts first.
I know the Rebrickable list is not comprehensive but I'll use it as a guide for now. Your Youtube video noted the greens can be sourced in any colour, someone else asked about the blues. There's quite a few other unusual colours which I'm assuming aren't colour critical either???
I'm assuming the only colour critical pieces are the Light Blue-Grey, Light Grey, Dark Blue-Grey and Dark Grey, is that a reasonable assumption.
-
10 hours ago, AfolFree said:Can someone confirm the exact length of the MOC ? I got a 130cm shelf and I wonder if it would be enough to hold it ?
It’s 1230mm long so you should be right on the length.
-
12 minutes ago, GAC said:I received instructions on how to build a better front support, but I am not sure what this part is from or where I can get it, any help would be appreciated.
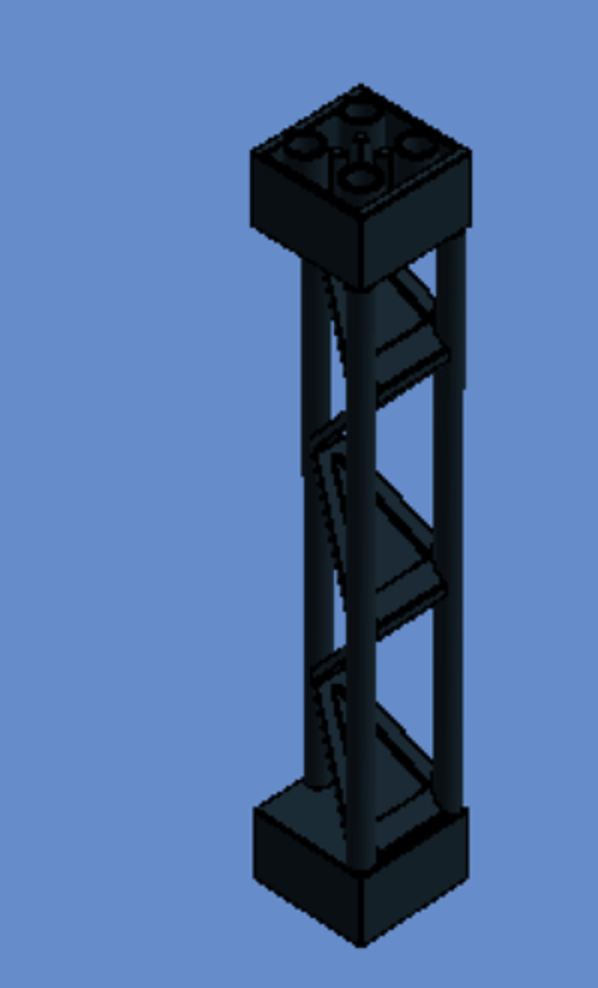
@GAC, looks like the 2 x 2 x 10 Girder. This is available in four different variants, Bricklink parts 30517, 57893, 58827 and 95347. The overall specs of each seems to be the same, the variation appears to be largely to the decorative girt, for example, some have two sections while others have three. Some have the three virtical posts while some have one. The one you have pictured is 30517, but I would suggest looking at which is available in numbers and at the best price. Given you want it for the stand I'm assuming you want it in black, that being the case, I think 95347 is the most accessible option, but there isn't much between them.
-
Thanks @m4st3rt3ch & @Midlife-crisis. There’s actually quite a back story to my journey, if you’re interested in knowing, here it is.
My wife was diagnosed with breast cancer in late June 2018, though I’m happy to say the prognosis was good. She’s through the treatment now, but as you can imagine, it was a rough road, lots of chemo and radiotherapy. All she could do was focus on herself and the treatment, so it fell to me to look after our three young boys and keep things going while tending to my usual load.It was during this time that I first heard of Lepin. Curious, I checked out their website and dove straight in to their Star Wars catalogue. Most of the sets they sell are straight rip-offs of Lego ones, so when I saw the Neb B it stood out. Curiously, there was a video attached, but the Neb B in the video wasn’t the same as the one they were selling, in fact, it was much better.
Turns out the video Lepin were using was the one @Cjd223 had posted on YouTube. I wanted to know more about the design so I started searching the web and eventually found @mortesv pictures posting the whole fleet. That really got the juices going. With all that was going on at the home front I decided I really needed a distraction for myself.
I’ve collected a lot of the UCS models myself and decorated my older boys bedrooms and play areas with them, but my younger son hadn’t been as well attended to, and he loves Star Wars and Lego more than his brothers. So it was the rebel fleet for him. I tracked down the instructions through Rebrickable, and then here at Eurobricks (NEWB me hadn’t heard of either at this stage), I had about 60%+ of the parts already, so I hit Bricklink hard and away we went.
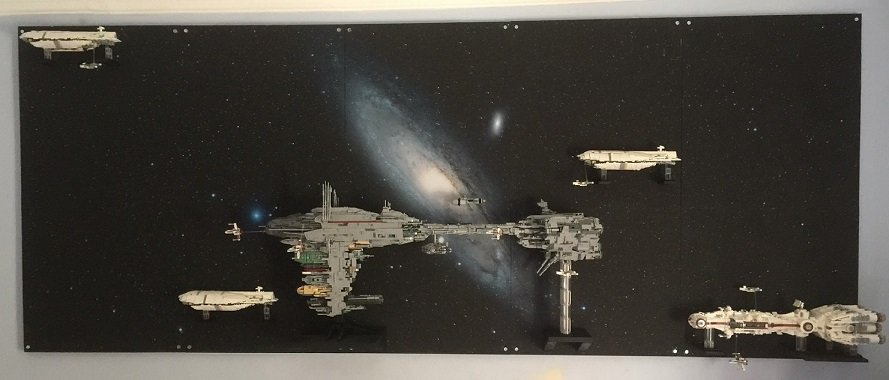
I decided I wanted to replicate the Empire scene as close as possible, so I studied the closing scene repetitively. I’ve even tried to position the ships as close as possible to where they are in the scene, which wasn’t easy given the minimal depth of field in my display. And before anyone says it, yes, the galaxy is technically on the wrong side of the fleet, some artistic licensing was needed .
There have been some great additional ship designs put out there, but I’ve opted to stick with the Neb-B, Falcon, Transports, Heavy Tanker, X-Wings and Y-Wings from that scene. The only ambiguous addition is the Corvette. Personally, I don’t think that is the Corellian Corvette in that scene, but I’m happy to pretend it is. It’s an iconic ship design and a great scale offering from @mortesv.
The backdrop is a shot of M31 (Andromeda Galaxy) from the Hubble site, I got this printed on self-adhesive wallpaper. I built five timber panels, cut out slots for shelves for the ships to sit on, applied the print, fitted the shelves, and bolted the thing to the wall. It's 3m long by 1.2m high.
I made one small modification to the Neb-B to eliminate the need for a stand under the spine and to brace the ship. On the backside of the spine I attached 4 black right angle technic arms. Between the arms are 4 black technic bricks (1x10's, sitting perpendicular to the spine) with 4 more black right angle technic arms at the opposite end, which are screwed to the background panel. This effectively supports the weight of the ship and gives it lateral support so there’s minimal risk of it falling forward.
I would have loved to add lights, especially for the engines of the larger ships, but I've run out of steam for now. I even spoke to Rob at Brickstuff about this, he’s keen if anyone wants to pursue this with him.
Acknowledgements
Firstly, a big thanks to @mortesv for sharing this amazing and inspiring design. You put a lot of time and effort into this and I know I speak for everyone when I say, we’re grateful you chose to share the design so we could be part of it too. One of these days I’m going to cease to be amazed and accept that just about anything can be designed and built from Lego, but not today.
Secondly, @Cjd223, thanks for all the work you did converting the designs into a workable PDF instruction pack. Some projects can be worked well enough from LDD files, this wasn’t one of them.
I’d also like to acknowledge @ecmo47, my redesign of the Falcon and X-Wings were based on his mods, as was the mod to the Neb-B thermal pod. Thanks to @churcholo for the front pedestal design. Thanks to @bricksmarlin for the pictures of the Heavy Tanker which I used to reverse engineer its design on LDD, as well as his redesign of the Y-Wings, which I largely adopted. And finally, thanks to @Lobot for providing the directions to the Hubble shots where I sourced the M31 Andromeda picture. I appreciate some of these designs might have been sourced by the above from elsewhere, if that is the case, my hat is off to you unknown legends, the above is just acknowledging where I sourced my inspiration from.
-
-
53 minutes ago, m4st3rt3ch said:They're custom made. 1:1 copies milled out of aluminium. On the one hand, LEGO never made these bricks from aluminium. On the other hand, since these bricks are copies, they don't allow illegal building techniques, they're a little heavier, but bend much less. Huge models often need steel frames, because bricks alone wouldn't bear the weight. The Nebulon-B isn't quite the largest model, but it's design makes it very fragile. Why not use aluminium (only 1:1 copies, no illegal parts like screws) beams/liftarms for the backbone of such a MOC? Forget about part prices, it's more of an ethical question.
If improvement of the structural integrity is the primary motivator, I wouldn't bother. The only place I've found movement in the frame is in the neck shaft that connects the front hull to the rear engine compartment. The rest of the build is quite sturdy, Mortevs did a pretty good job of this IMO. Given that these aluminium parts aren't genuine, quality control is in question. I read a review about the Lepin reproduction of Lego and the review said that while the Lepin product was good and improving, the quality control standard they applied was nowhere near as accurate as what Lego applies. Lego has some extrordinary margin of error they apply to ensure their parts fit properly, and thus securely.
While these aluminium parts might look the same and seem to fit right, if they're not built to the same margin of errror, their use might be a false economy. Sure, they'll be more rigid then the plastic alternative, however, if the connections aren't as firm as genuine lego parts, it will compromise the build. They might seem to fit firmly at first, but over time, particularly under the weight of the build, the joints could start to slip. Not saying this will happen, just saying to proceed with caution.
If I were to put attention into anything to improve the strength of the build, it would be to improve the strength of the decorative elements like the panels, greebling and stands. A lot of these are held together quite flimsily, sometimes by a single stud. Another person posted that its worth having plenty of extra small plates on hand, 1x2's, 1x3's, 2x2's, 2x3's and so on. I would concur with this, I'd also recommend some extra technic studs here and there.
As to the ethical question, each to their own. I'm a purist, so, I prefer to stick with genuine lego parts only. Others are happy to substitute in non-lego parts from other brands or custom parts as you've suggested. In this case, I don't think they're necessary.
-
On 12/9/2018 at 6:05 AM, Darthmarty said:So, I was going through the LDD files for the Nebulon-B, and I noticed there seems to be a small chunk of the rear exterior that is in the instructions, but missing from the file. This is page 145-150 of the instruction manual, and it's a section underneath the front of the rear part of the ship.
Maybe this has already been discussed elsewhere in this thread, but not that I can remember (and I've read through all 23 pages at least a half dozen times). For some reason the forum isn't letting me upload a screen shot I took, but like I said this is page 145-150 of the instruction manual, and step 105. It was easy enough to add back in.
I've finally started collecting the pieces to make this; I'll get it built someday...
Hi Darthmarty, I never used the LDD files, and from what I read on this thread, few people did, only now and then when they were uncertain of what was reflected in the PDF plans and needed clarification. The LDD is very difficult to follow, not to mention, given its size, it can be difficult to open and use for some. I got by solely using the PDF plans with the exception of the hosing installation, which Cjd223 rightly points out in the package information you would have gotten from him. There's a text file that recommends using the LDD file for the large hose placements on the nose.
There are a few other moments where the plans aren't clear, but I managed to figure things out. Biggest problem I ran into was the installation of two lift arms in the framework for the main hull. Can't remember if the plans say they should be 1x15 liftarms of 1x13 liftarms but they're meant to be one size down from that. Can't remember what page that was on, 500 rings a bell for some reason. It's been covered by others in this thread, I know its a bit of a read but I would take the time to go back and read the whole thread if you haven't already, would have saved me some pain if I had.
11 hours ago, m4st3rt3ch said:Question:
Technic liftarms (and some other parts) made from aluminum are available on bricklink. Would these pieces be helpful (if available in correct size) and if yes, what do you think about using them, especially in a model like the Nebulon?
Hi m4st3rt3ch, as long as they're genuine lego parts can't see any harm in using them. If they're genuine they should be 100% compatible, you just need to be sure the colour won't detract from your final model. Most of the liftarms are concealed by paneling so you don't see them, but bear in mind, there are cracks here and there between the paneling. Substituting darker/blander colours for those recommended in the plans and parts list isn't going to affect the appearance of your final build, but you might want to be careful about using brighter colours. For example, if you used a bright red liftarm, the red might stand out through the cracks between paneling, by the time you know that, its a long road back to change it. If you think you'd be ok with a little silver bleeding through the cracks, go for it.
-
On 4/23/2017 at 12:05 AM, churcholo said:Hi @rockpig,
I uploaded the DLL file to my personal server, it's a pleasure to share it with the community, you can download it here:
http://simoneweb.altervista.org/lego/Nebulon-b_pedestals_v1.2.lxf
Hi @churcholo, not sure if you're still monitoring this discussion but would be keen to get a copy of your LDD file for your modified pedestal. Tried the link in your post but it’s not active.
I'm looking at retaining mortesv's rear stand as is but want to eliminate the front and middle one by using your design. Not discounting the comments of others like ecmo who noted sag problems with the neck over time, I have my own solution to deal with this.
I intend to use technic brick elements to build a small black bracket. One end will be affixed to the neck of the Neb-B with technic pins, the other end will be screwed to the timber backdrop behind the Neb-B, which will also be black and should conceal it.
Hoping this will be enough to support the neck from sag as well as providing support against the model moving laterally. Thoughts???
As I’m new on here, can’t PM yet, hence why I’m posting here. If any one is in contact with churcholo would be greatful if you could highlight my query.
Building Mortesv's Nebulon-B Thread
in LEGO Star Wars
Posted
Hi @TorbenP, I actually got an email from @Cjd223 just recently. It did come in on the chrdvorak@hotmail.com address he has listed in the thread to get the plans, but, in the email he has included a new email address, alloutbrick@gmail.com, to contact him on. If the contacts on his website aren't working maybe give that a try.