

coghilla
-
Content Count
94 -
Joined
-
Last visited
Posts posted by coghilla
-
-
amazing...LOVE the very first one. Its used here in Australia. I have been thinking about building one too.
-
On 09/01/2018 at 12:54 AM, Fuppylodders said:Because people are individuals and have different tastes. What one might find pleasing about somethig specific, another might find it boring. Someone might find the lack of something a con, while another person might find the lack of the same thing a pro.
Not everyone has to have the same tastes or justify them.
Very true. I don’t really like the look of most of the builds. It’s not the style of architecture that I like.
-
A good list. I’d support roller door updates and locker doors. But I think we need three or two wide (still 4high) parts.
-
Impressive. I love the cat photo it certainly gives your model some scale.
-
This is a great topic. I’ve built a couple if modular style buildings over the years, ranging from 16wide houses to 48 wide office buildings.
Browsing the responses there are a few common threads. But all based around Individuality.
I like the more modern style of buildings that is making its way around the world. This can be seen in Seattle and here in my own city of the Gold Coast (the 2018 Commonwealth Games will be held here in April) I’m lucky to drove past several inspiring buildings each week.
Im a design draftsman (started in architecture now in civil works) and I can see the proportions of buildings and think in brick geometry.
My planning phase is using grid paper (with brick proportions) to sketch up the design. I like to build facades as it works well with my lug display and I don’t like doing internals.
-
18 hours ago, zephyr1934 said:An excellent build, thanks for sharing and all the back story. Congrats on the article in the paper too.
9 hours ago, LEGO Train 12 Volts said:This is absolutely gorgeous!

I like your solution to use flexible hose on the front and the harpoon for the windshield wiper!
The stickers are the icing on the cake!
You've to be proud for the article on the newspaper!

Thanks again. The windshield was something i saw a while ago and it does look good for the windscreen wiper. The flexible hose for the curve cam out alright. It was the hardest park of the build trying to get the double curve. I was speaking to a senior manager at Bombardier they are most proud of that design feature (they won a design award) but wasnt easy.
I also want to do something for the gap between the carriages. not sure how yet.
-
Thanks all for your comments.
Michaelozze stage 2 is complete just testing now the extension to Helensvale from the hospital. Further stages south along the GC highway are on the cards with the next stage to Burleigh Heads just started planning.
I have been invited to a morning tea next week with the model at the light rail depot. A few more snaps and a tour around.
-
On 10/1/2017 at 9:28 PM, ColletArrow said:A Network Rail two-car Windhoff MPV (google images search) is quite long when built roughly to scale, I had a go at one digitally once. Their breakdown/recovery cranes are pretty big too, but the best has to be the ballast cleaner; that is a pretty long monster, especially if you include the self-discharging wagons.
The UK doesn't have much in the way of everyday use large/long rolling stock as our loading gauge is quite restrictive.
I built a couple of these last year (at scale too) and they didnt go around a curve. I built them just to sit as a static display. Scroll down to the last post.
-
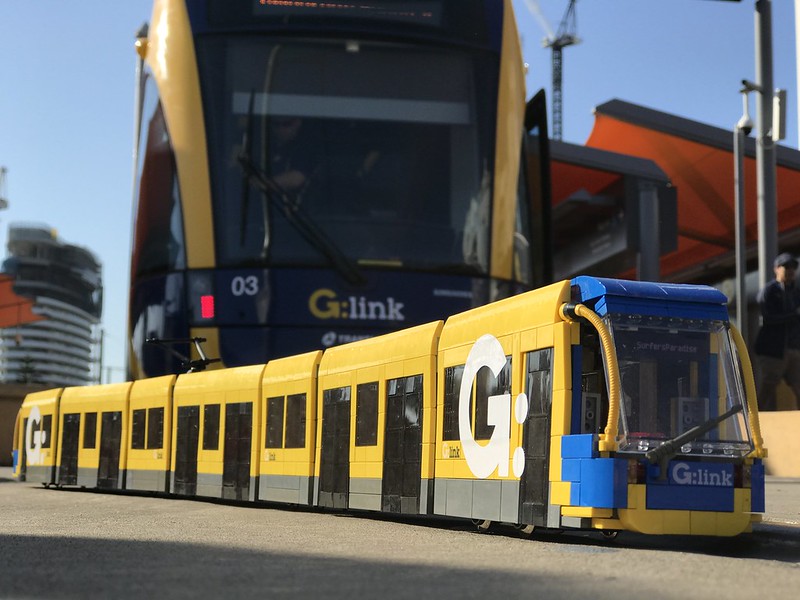
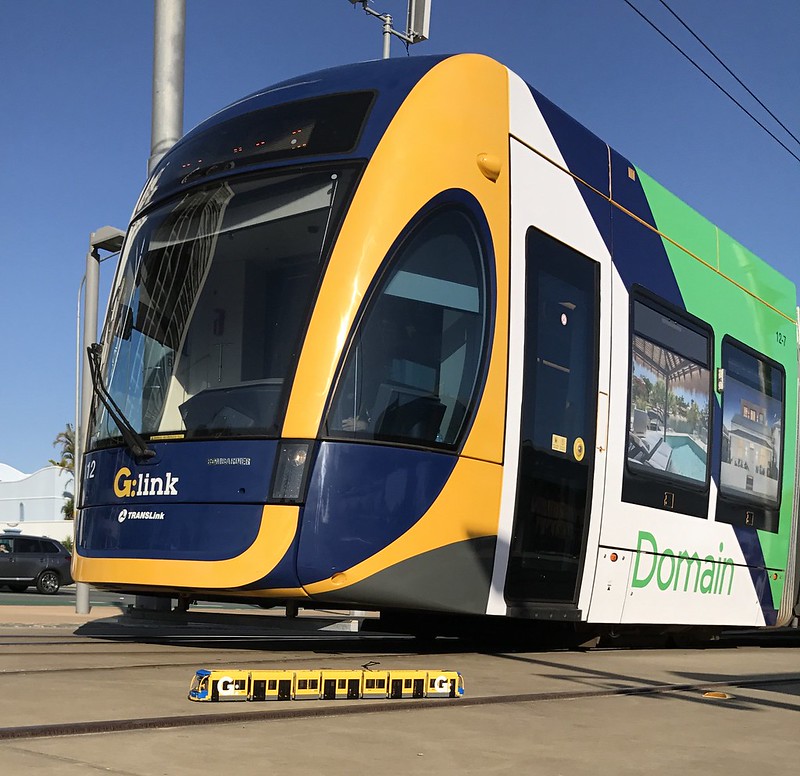
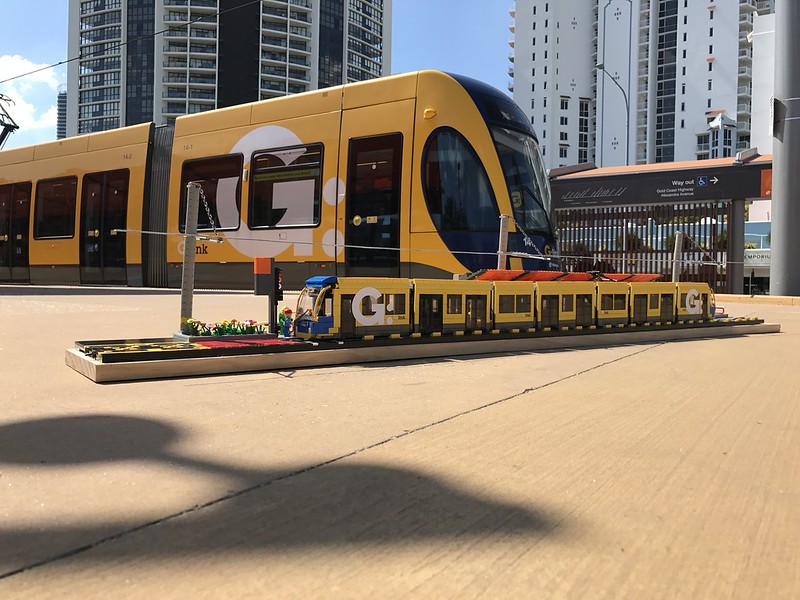
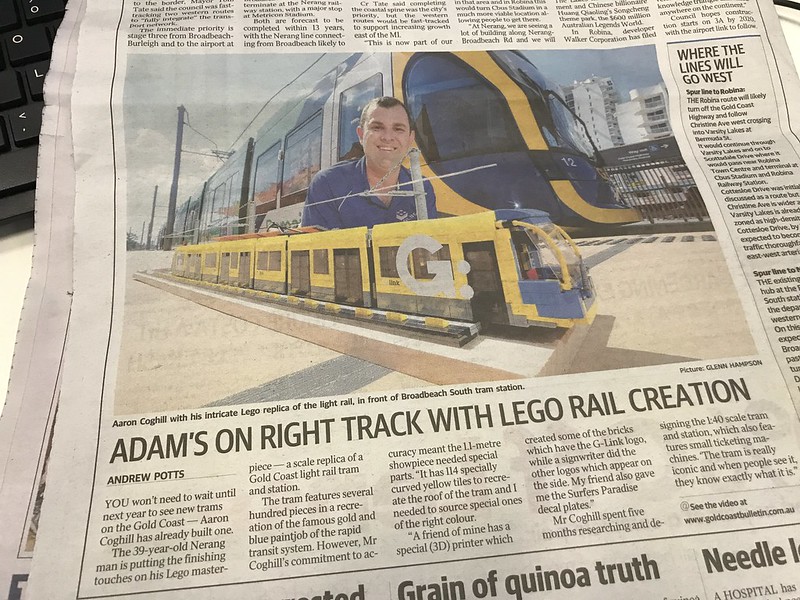
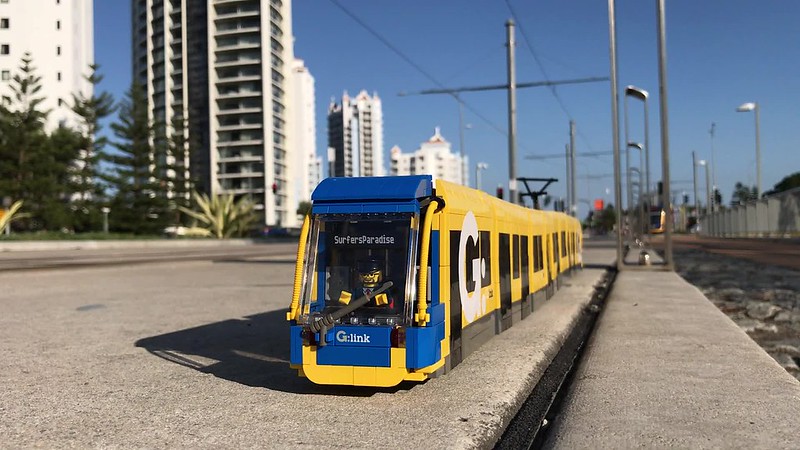
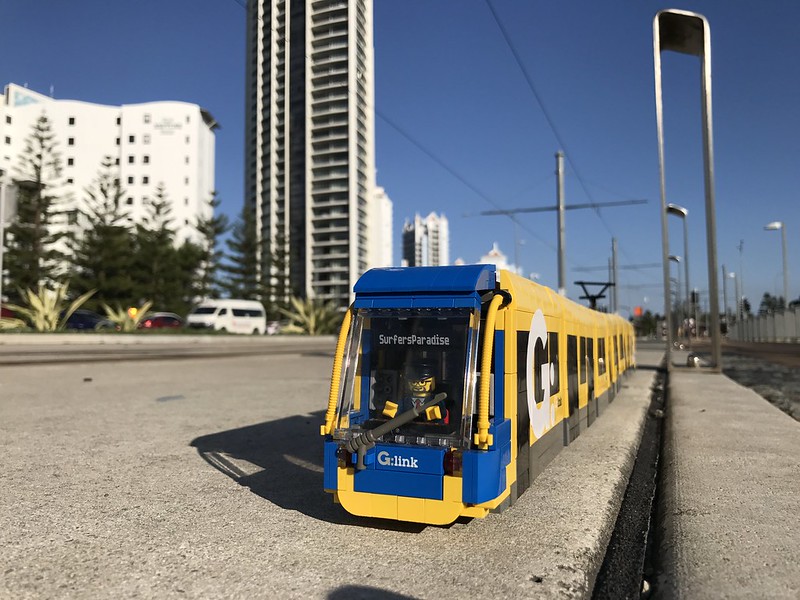
Just over a month ago I revealed my latest creation to the world, a scale model of the light rail vehicles that are located in my home city of Gold Coast (Queensland, Australia).Just over 3 years old the light rail system here is currently being extended to comprise a total of 19 stations over a 21km single line, using 18 Bombardier Flexity 2 LRVs (light rail vehicles).My Lego version of the G: (gee, the local name for the trams) is a roughly 1:40 scale, 8 wide, 136 studs long (8.5x normal straight track lengths), 7 carriages in yellow, dark gray & blue. I worked on the design for months getting the proportions right. In a twist of fate that i was on the right track a technical drawing i found when printed at the build scale, a 9V motor unit has the same wheel base as the printed drawing.Like the Flexity 2, the overall unit is made up of three different carriage types. A wheeled drivers unit, a suspended passenger unit (with doors) and another wheeled passenger unit that sits between the suspended units. So a LRV is made up of an odd number of carriages with the odd numbered units having wheeled contact & even carriages suspended between.It is powered by two 9V train motors that are positioned in the first & last carriages. And due to its design performs nicely on standard track geometry including a full 4x (90deg) curve.The carriages are joined together using old school ball hinge parts (two) placed at the top and bottom of each carriage. This keeps them straight and in line with each other., and allows for a bit of vertical movement due to tables never being level at shows.The side panels are built with a snot technique of tiles on plates. A friend owns Print on Bricks and did the small tiles while the large G: were done at a sign writers.I also created a light rail station in the same style at is located in my city.The local paper did a small article on my creation and I will be displaying the model with GoldLinq (the operators) and Bombardier (manufactures) at two seperate shows these coming months.I have to thank Ashi Valkoinen and his CAF Urbos 3 tram, Budapest [REAL MOC] post that gave me inspiration. -
On 9/26/2016 at 6:38 PM, Hod Carrier said:By the way, is there space on your model to add the steel safety wall at the side of the train? This is there to protect the workforce from train movements on the opposite line and is quite an obvious feature of this train.
HC I thought of that in the first stages of planning. other than fence panels I couldn't think of anything to replicate the look. Fortunately for my minifigs there is only one track so no risk of movements on an opposite .
 On 9/27/2016 at 9:04 PM, Hod Carrier said:
Er, well...
When I say that I'm seeing the process for myself what I mean is that I'm seeing the structures going up. I've not seen the Factory Train itself along that stretch. It's like the fairies coming in the night and leaving signs of their visits.
I agree that you can't realistically model the entire Factory Train and I think that you've selected the right sections. Wagons carrying masts, piles, register arms, crew mess facilities and other structures aren't especially interesting and modelling the concrete pouring stage is perhaps a bit tricky. It's a shame you opted not to include the piling unit though, but as you're not modelling the piles either I guess that's fair enough.
At the risk of topic drift, the Great Western Mainline electrification is behind schedule. There are a number of reasons for this, but part of it is due to the piling unit. It simply isn't man enough to drive all the piles as far into the ground as needed and therefore the entire process cannot move as fast as planned. They should stand just a foot or two above the ground level so that the structures can be bolted onto them, but often you'll see them standing 12 or more feet proud meaning that Network Rail has to come back later with a more powerful piling unit to finish the job. Rumours suggest that the specification for diesel/electric hybrid Hitachi IEP trains that are intended to work this route has had to be altered with the train needing more diesel traction units than originally envisaged so that there is no delay for them entering service.
LOL @ fairies
Speaking of the piles, other than a column of 2x2 round bricks i'm not sure what could be used, but had a tinker without achieving anything last night. I guess now the last show is over the deadline to get it done is past (much like a school assignment) there isnt a hurry or stress..
I'll probably create the pile section of the display now, but not using a Windhoff MPV but rather a road/rail vehicle. I will keep you updated.
-
Thanks Hod Carrier & BrickHat.
HC you are very lucky to see the process for yourself I'm relying on photos and videos from websites. I did a fair bit of research into the process that network rail are using and the 23 MPVs / wagons they are using. I selected the three MPVs as it is a close to the limit of parts i have and the display would be too big. So the 3 middle stages in my opinion sell the story.
My early planning processes did include the pile driving unit, but it never got off the drawing board. I already had the Robel & the Plasser & Theurer units so adding them on the day was pretty easy, even if they do need some tweeking.
I redesigned the wagons last night and are now a lot more rigid & therefore stronger.
-
Several years ago I posted about my project to build the Windhoff MPV. I updated the post last month with a few pics of the almost completed models. The models depict the electrification of existing train track for running of electric trains. The whole build project has been inspired by the electrification of the Great Western Trail Line in the UK using the Windhoff MPV.
Last weekend I attended the Brick Event on the Gold Coast (Queensland, Australia). The table was a bit cramped but by talking to the public they were able to see the design and function of the machines. By the end of the first day talking to my table neighbour he convinced me that the 2 tables wasn’t enough for the display so to the floor I went.
Originally I was going to build two MPV’s, but during the process I increased the build to three with the third having a container style build with some nice snot construction techniques for the drivers cabin. I was quite happy how this turned out. The Windhoff MPV’s were fun (even if it took me a while) to build, especially since I went 8-wide therefore creating the scale of 1 stud = 1 foot. This gives the models great detail and sense of scale. I coupled the MPV’s with a wagon using the same scale. The MPV’s feature ISO locking points at 10’ intervals and a small knuckle boom crane at the trailing end. The substructure detailing was fun to create, trying to get the detail right balance between ease of build (using the parts I had), Lego geometry and accuracy. I was able to get during the build a couple of 1x4 light grey tiles with a text on them looking like a serial number or build plate. At 70 studs long (buffer to buffer) I was unable to get the bogie set to rotate as it is fixed to the sub-frame structure, so running it around the track is a no go for me.
The coupled wagons are 70’ (buffer to buffer) long at have ISO coupling points for 3x 20’ or 2x 30’ containers/pallets. I’m not 100% on the real world bogie spacing but again they are fixed and offer no rotation.
As part of the display I had previous built MOW equipment (trucks and the work wagons created by other talented individuals) showing the electrification process. I designed my own catenary system and while I’m happy it has room for improvement.
Stage 1 – footings
The Robel Bullok and trucks prepare the site and the footings.
Stage 2 - mast
MPV #1 is configured for mast installation with a stylized cab, 10’ tool room, a frame for mast storage and a long reach crane.
Stage 3 – minor structures
MPV #2 is configured for minor structure installation with a stylized cab, 10’ tool room, a 30’ pallet with an elevated work platform, and knuckle boom crane. Coupled to this is a wagon which holds plenty of catenary structures and a knuckle boom crane.
Stage 4 - Wiring
MPV #3 is configured for wire installation with a snot container style cab, a 30’ pallet with an wire dispenser spindles and a knuckle boom crane, a 10’ section for more spindles and again a knuckle boom crane. Coupled to this is a wagon which has a 30’ pallet with an elevated work platform, and a 30’ pallet with a 24’ scissor platform.
Stage 5 – testing
The Plasser & Theurer MTW100 measure test and adjusts.
As can be seen in the pics I used twisted wire. It was a great idea that didn’t pan out as I expected with too much twist and rigidity and the real stuff is held under tension which isn’t possible with my display. I have brought some other wire which will stay straight thanks to the youtube video hack.. There are plenty of small improvements to be made, but then no one is ever 100% happy….LOL
None the less please enjoy the pics and let me know what you think.
Video:
<iframe width="560" height="315" src="https://www.youtube.com/embed/vU1z_H10LF0" frameborder="0" allowfullscreen></iframe>
 2016 Brick Event Gold Coast by Aaron Coghill, on Flickr
 2016 Brick Event Gold Coast by Aaron Coghill, on Flickr
 2016 Brick Event Gold Coast by Aaron Coghill, on Flickr
 2016 Brick Event Gold Coast by Aaron Coghill, on Flickr
 2016 Brick Event Gold Coast by Aaron Coghill, on Flickr
 2016 Brick Event Gold Coast by Aaron Coghill, on Flickr
 2016 Brick Event Gold Coast by Aaron Coghill, on Flickr
 2016 Brick Event Gold Coast by Aaron Coghill, on Flickr
-
looks great. good work on the knuckle-boom crane, they can be challenging.
-
Well finally something to post about.
Its nearing display status. I have managed to complete in the past few weeks the super and sub structures of the vehicles.
I have some modules to build that will fit onto the MPV's and wagons and provide the working components (hydraulic knuckle-boom, scissor lifts and cable dispensers. They will be on show next weekend at the Gold Coast Brick Event.
The MPVs are 72 studs buffer to buffer and the wagons are about 50 studs long and are still all 8 wide.
The three MPV's will show the sequence of a track getting power.
- The first MPV will install the mast into pre established footings
- The second will install the catenary equipment
- the third will install the wiring.
 Windhoff mpv by Aaron Coghill, on Flickr
 Windhoff mpv by Aaron Coghill, on Flickr
 Windhoff mpv by Aaron Coghill, on Flickr
 Windhoff mpv by Aaron Coghill, on Flickr
the full album is here
- The first MPV will install the mast into pre established footings
-
My group did it a few years ago with the large layout we had. The layout had 3 running tracks with sidings and electric switches. Was great fun abet no schedule was used.
 Ipswich Layout by Aaron Coghill, on Flickr
 -
This is a great mix of two good modulars. Excellant work there. Congratulations
-
Very good looking building and scale copy. Good work! :)
Max
Thanks Max
I like that a lot. I'm a huge fan of realistic urban builds.
thanks again. Me too. My city is a young one and the old look doesn't do it for me. The only Lego modular i like is the Detectives Office. I have a few more modulars on my site Including new firestations from New York.
Oh wow. That's very lovely!
thanks Jnr Shark.
I found a better photo of my creation from one of the LUG displays
 IMG_8951 by Bricktastic, on Flickr
 -
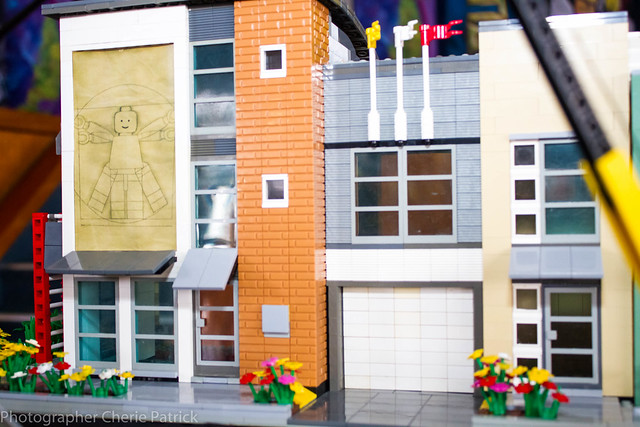
here's mine. A modern building in Queensland Australia.
 16 Lake St by Aaron Coghill, on Flickr
 16 Lake St (montage) by Aaron Coghill, on Flickr
 -
a rural station for the wildland/forestry trucks would be cool. agree it wouldnt have to be super fancy and maybe similar to the forest police would be cool.
I was a bit surprised too that Lego didn't release a fire Station for the Forest theme, especially when the City Advent calendar in 2012 had 3 Forest fire minifigs with a couple of small builds that had walls made from Medium dark Flesh (Medium Nougat) Masonry profile bricks with red and Yellow stripes which would made for a good colour scheme. It didn't have to be that big, maybe something similar in size to the Police forest one and more of a co-ordinating base.
I think this would make a great station. Medium Dark flesh (Medium Nougat) Masonary bricks with Sand Green grill bricks above the appliance hall doors.
-
back on helmets over here white are for general firefighters, yellow officers and red batallion/zone/area chiefs. The top officers comissioners are black.
-
Great review Steve. Agree with you 100%
Some thoughts on the fire sets (as a Lego fire enthusiast).
Overall, the lineup is good but not exceptional. I realize these sets are targeted at kids, but I think Lego slightly underperformed on some things.
60109 Fire Boat
I like this set. Nice to see Lego using a larger hull piece (more realistic) for the fireboat. It would be nice to be able to extend the length of the boat.
Would it make more sense to have the shack on fire instead of the lighthouse?
Grade A-
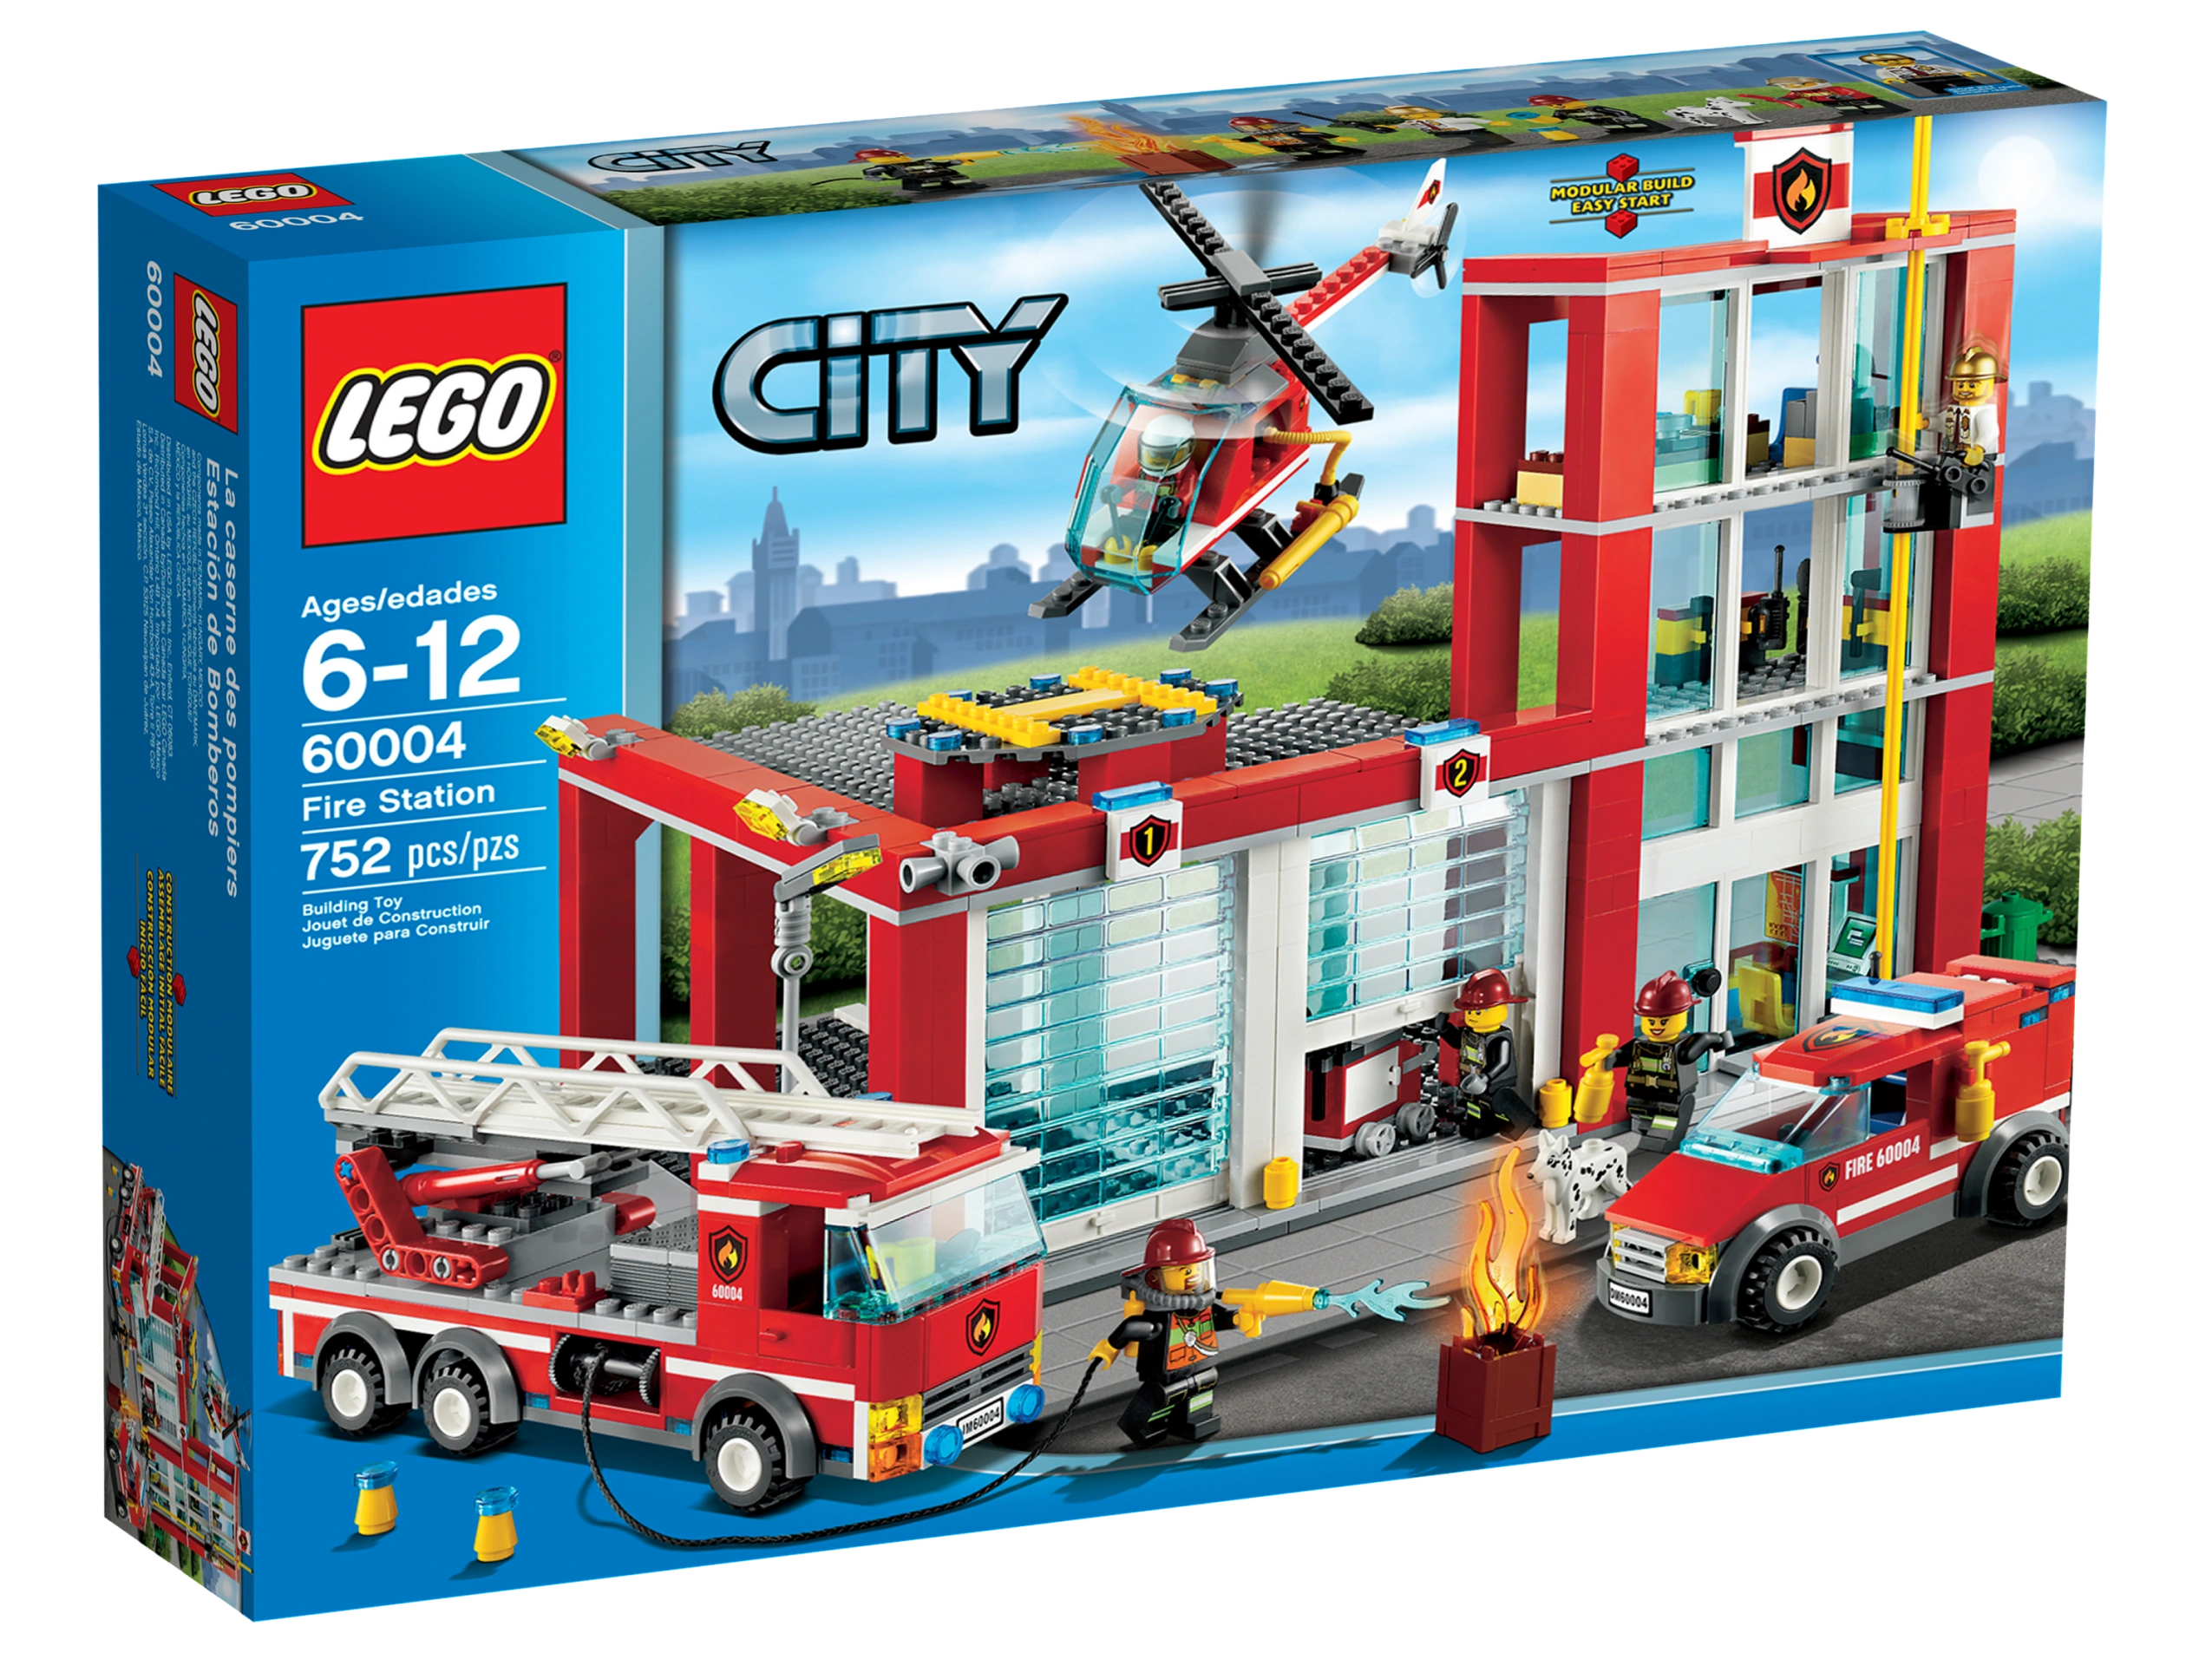
60110 Fire Station
This set is almost exactly like 60004 (which I liked) but not quite as good. It does look like we get roll-up garage doors. The revolving door seems more at home in a hotel than a fire station. And, while I get the playability, I cannot figure out why there's a fire pole outside the front of the fire station. I do miss the baseplates that came with fire stations in the 80s and 90s.
Water guns are just silly. Really, Lego???
Grade B-
60111 Fire Utility Truck
I like the idea of a Unimog fire truck, but I don't get the snorkel trailer. It doesn't make any sense (this unit is for the forest?), and the boom doesn't reach high enough to be of any practical purpose.
If it were towing a bulldozer instead you'd have a MUCH better set! http://brickset.com/...Evacuation-Team
Grade B
60112 Fire Engine
It's nice to see a hook-and-ladder truck back in the lineup. The design is fairly good.
Unfortunately, the thing is designed backwards!!! The ladder should be on the front of the trailer and not the back. https://ideas.lego.com/projects/51537
I'd also like to see them make the ladder so it can extend.
Grade B- (grade reduced for being backwards)
What's missing
Lego missed a couple of opportunities with this lineup. I'd like to see them
• Re-release the 1x4x4 lift doors in red. They're going for about $20 each on Bricklink.
• Consider a hazmat team. It's becoming common in the United States to have this as part of the standard fire department. http://farm4.static...._ea315bd0be.jpg
• Release a 2x6x2 windscreen that's flat and not sloped. This has been a huge missing piece for fire apparatus builders.
Also, it looks like we finally get a yellow fire helmet in the Mixels sets. Yay!
-Steven
-
I loke this a lot. Well done.
-
logged in at home. Yes it looks good. Well done
-
all the images are not working for me. Is it just me?
MOD/MOC: Road-Rail Excavator
in LEGO Train Tech
Posted
a great machine. I love to attempt to reverse a design that works. Very satisfying when you can pull it off.
Great job on the vibro compactor / pile driver. I attempted but never got my head around how to get it to work for my Windhoff work units.