

The Cartographer
-
Content Count
7 -
Joined
-
Last visited
Posts posted by The Cartographer
-
-
I'm in love with both of these designs! You really nailed the look of both racers and with so few parts! Very impressive! I'll vote when I'm done writing, but I have to say that I like Anakin's more, as I really appreciate how well you captured the subtleties of the vehicle using a few simple techniques.
If I were to make one suggestion, it would be to make the wing-like parts of Sebulba's racer larger or just thicker. Microfighters tend to have exaggerated, "chubby" features, and I feel like Sebulba's is 90% there. Compared to the rest of the engines, the split-x intakes look a bit undersized. As a whole though, both models look fantastic and capture the essence of the racers perfectly! Well done!
JB
-
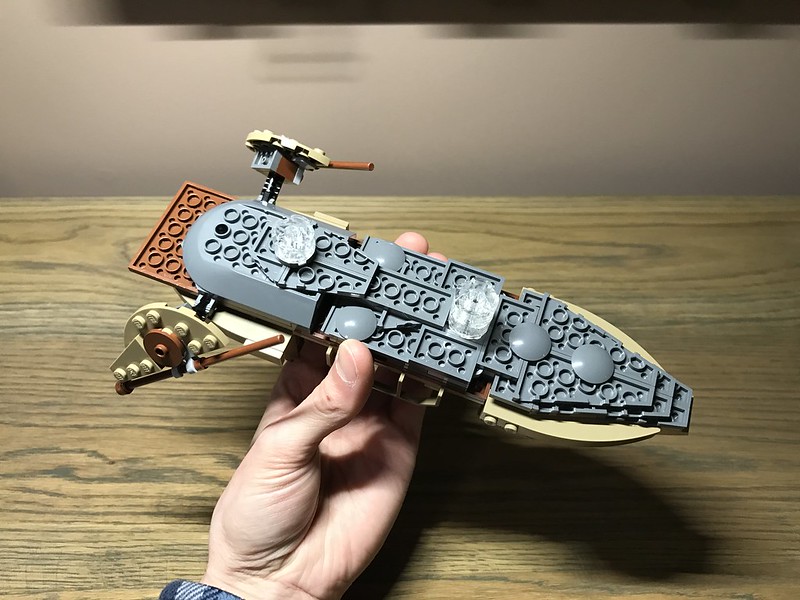
I recently bought the new desert skiff set, and I like it a lot more than I thought I would. Unfortunately, I'm not a fan of the stubby extendable catwalk (admittedly one of the cooler features of the set). I've owned the previous desert skiff (9496) for quite a while now, and I really like the hinged design of the catwalk. As soon as I had this set put together I went to work modding it. It doesn't look a whole lot different, but the changes required I remove much of the bottom detail, which is unfortunate. With the mods, it's a full two studs shorter in length, has two hinged catwalks (one on either side), additional railing detail, a hinged compartment "lid," and a raised driver platform. I'm not quite finished, but I'm out of spare parts for now.
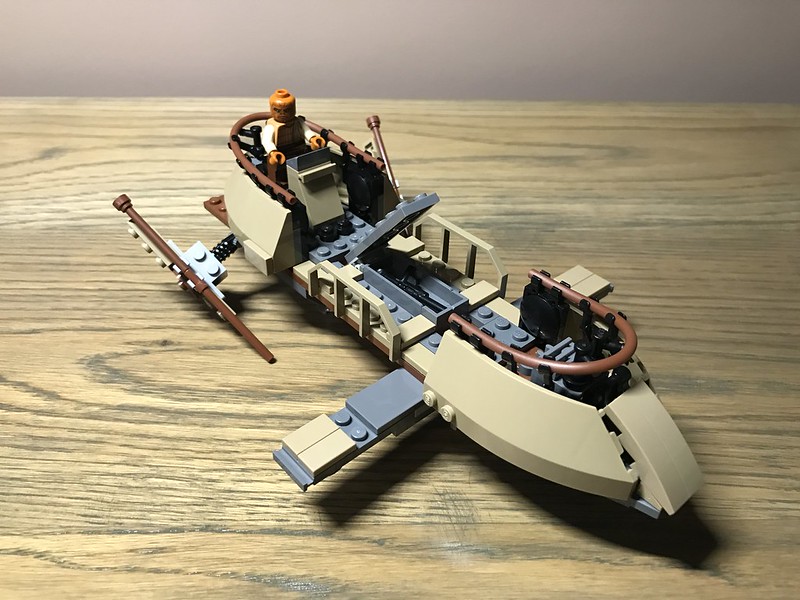
Thoughts and criticism are always appreciated! Thanks for lookin'!
JB
-
Hey there, Moppo!
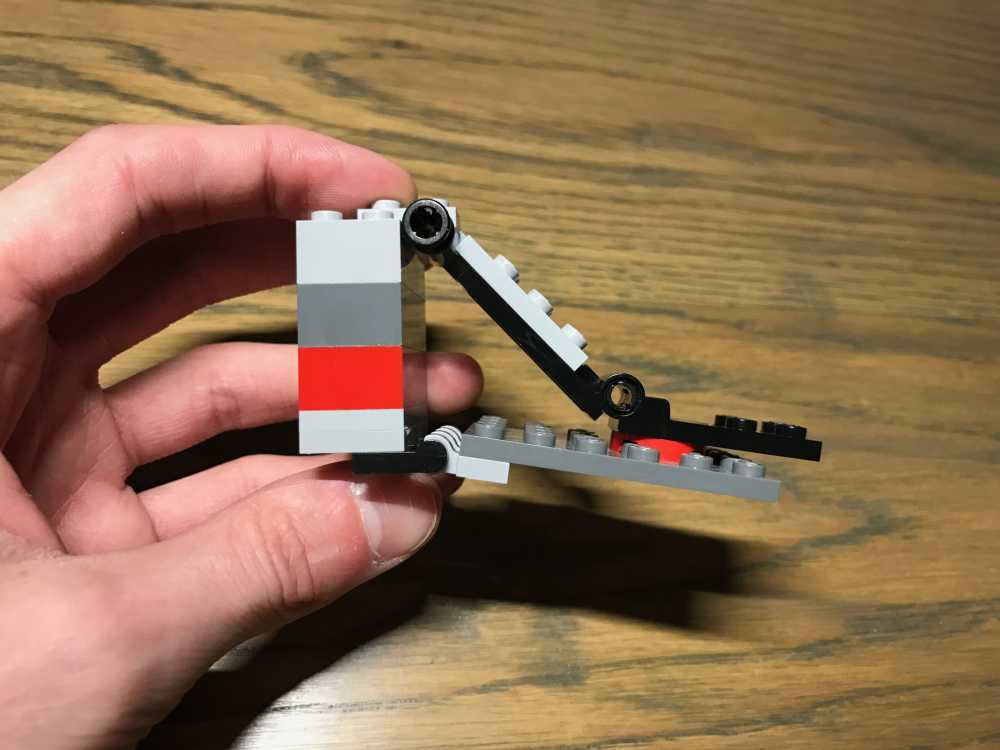
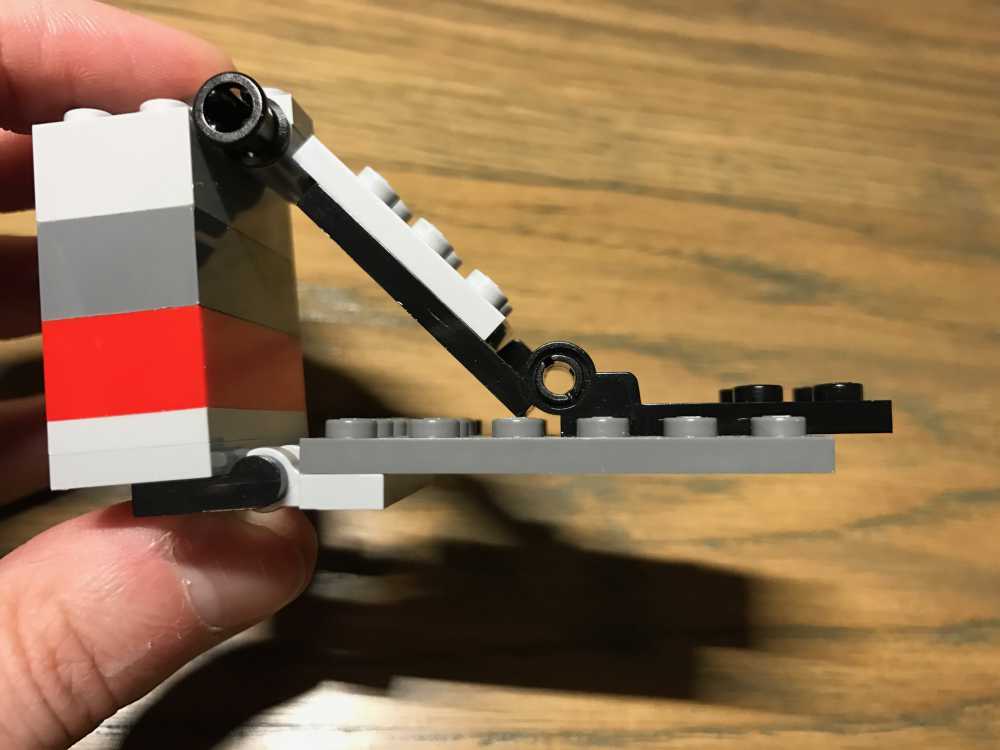
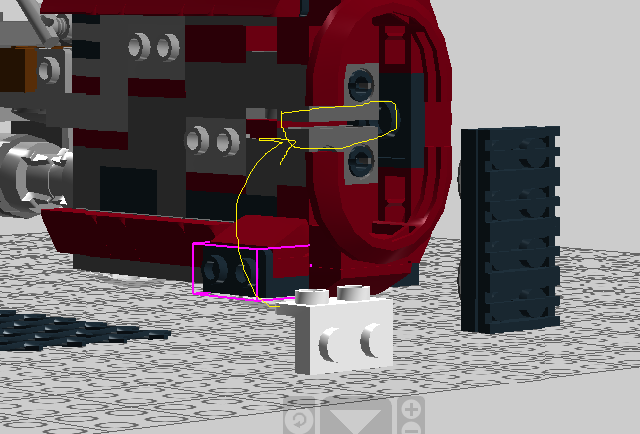
So, 'cause I thought this looks like an awesome way to secure a wing, I wanted to see if it would work. Whether this works might depend on your leniency when it comes to "legal" building techniques. The bottom of the piece does technically touch the stud, but not enough to really stress the connection. I'd say it's nearly perfect considering the angles you're going for. With the assembly secured within the model, you might see the bottom clips begin to pry away from the plate, if ever so slightly, but you'll have to build the model and find out. The only thing I could suggest is placing a plate under that piece to separate it from the wing. I've attached two [lo-res] images that sort of show what I'm referring to. As long as it's secure, which it seems to be, I think you'll be fine!
Hope this helps a tad!
JB
-
On 5/30/2016 at 0:55 PM, PaulPrime said:Very nice, you have improved the accuracy of the official model, there is no doubt about that. Have you tried to put a bracket like the white one in that position between the two 1x2 technic bricks? Maybe the space is too narrow, I don't know.
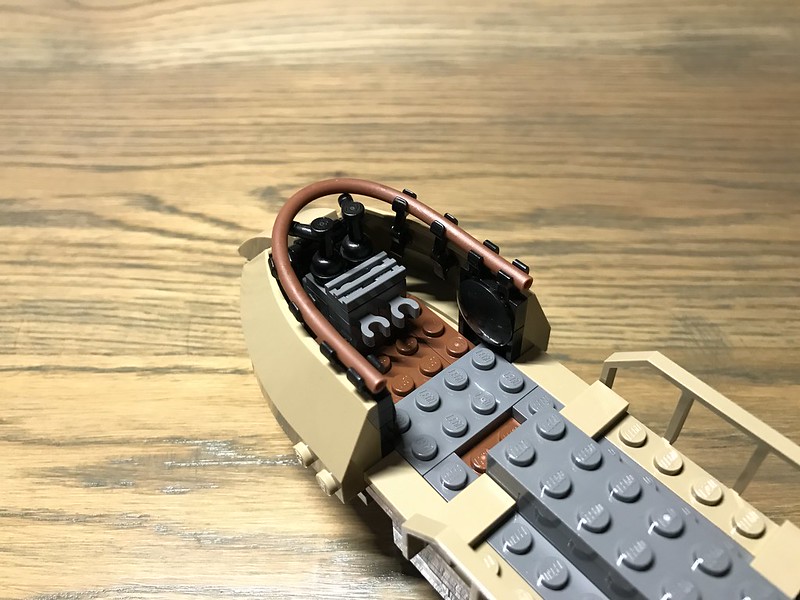
That bracket has the correct thickness I believe, but there's not enough space for it to fit in that orientation. And then if it did fit, the studs facing out wouldn't quite line up enough for it to fit in that space. And then if they did line up perfectly, the mudguards would prevent anything thicker than what I already have in there to sit correctly (there's a 1-stud space between where it connects to the model and where the curved part begins, and that grill is already 1-stud thick). *sigh* I'm sure if enough people play around with it, we'll find better solutions.
IMO, the front of mine is too round looking. It is too round compared to the actual speeder. That is something that LEGO did well — the overall form-factor of the vehicle was preserved. The 1x2x2/3 and 2x2x2/3 slopes do not come in dark red, or else I'd be trying to figure out a way to make those pieces work.
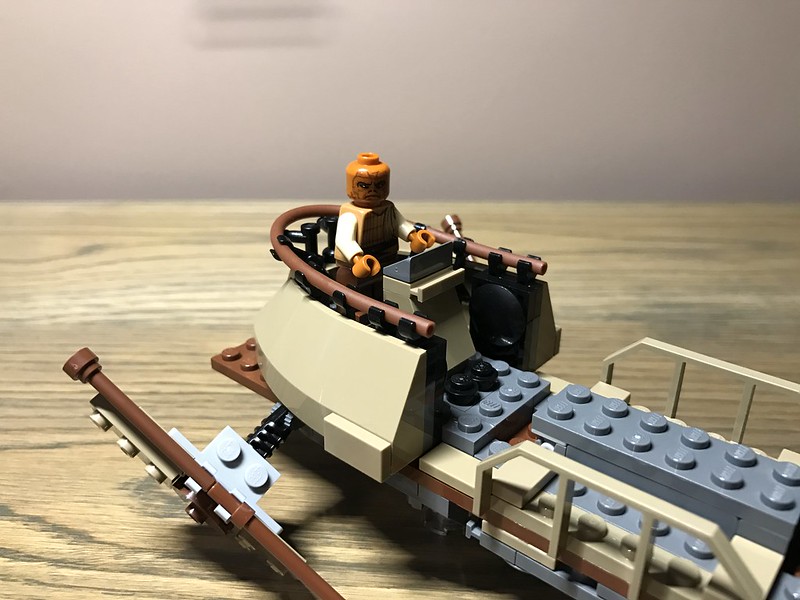
I do like your solution to the way Rey sits in/on the speeder. If you're worried about the gap when she's not riding, you could always add a piece in there, similar to how the recent Dew Back came with extra pieces if you wanted to take the trooper harness off. You could even hide it in her bag of salvaged junk if you wanted to incorporate a net like I have.
Thanks for trying, though! Keep building!
On 5/29/2016 at 10:39 PM, Japanbuilder said:This looks great. The nose in particular is fantastic.
After seeing how the NEXO line up used the motorcycle part but backwards I was wondering if there was a way to use that piece in that same way here going into the housing of the speeder?
It might make the build a bit more slender and have Rey sit on it in a better way than on 4 studs. But getting the dual engine pods seems like it won't look right at all with that piece. Still I wonder if it is possible.
On 5/29/2016 at 10:28 PM, Cyanide-Tipped said:Nicely done!
I was wondering if it'd be better to make it so that the mini-fig "sits down" in it like it would a Lego motorcycle (essentially standing up).
I'd love to try to make that work, similar to 'Prime's version... I have run out of ambition for the moment, but I may return to it later. There are too many things that I want to do and not enough time/money (lol).
On 5/29/2016 at 9:50 PM, Cjd223 said:Nice work! I think this certainly makes It look a lot more screen accurate than the few things that TLG initially left off when making the set.
I appreciate the comment! :) I try to make things as accurate as possible. Sometimes there's only so much you can do.
JB
-
This is super creative and an awesome first post! The diorama looks amazing with all the little details you've included, especially that leaderboard — so clean! I'm assuming those are stickers. If so, how'd you make them? There's so much detail in such a small space, which is great if you plan to keep it around a while. Your vehicles look cool too with the added wheels (the Y-wing is my favorite).
I'd love to see some type of series like this released by LEGO — something similar to the racing sets, except with small scale ships and little pit-crew style docking bays. Not sure how practical that would be.
Great concept! Hope to see more vehicles! Also, did you not have any TIE pilots? Or is the AT-AT in the shop, having some new tires put on? :P
-
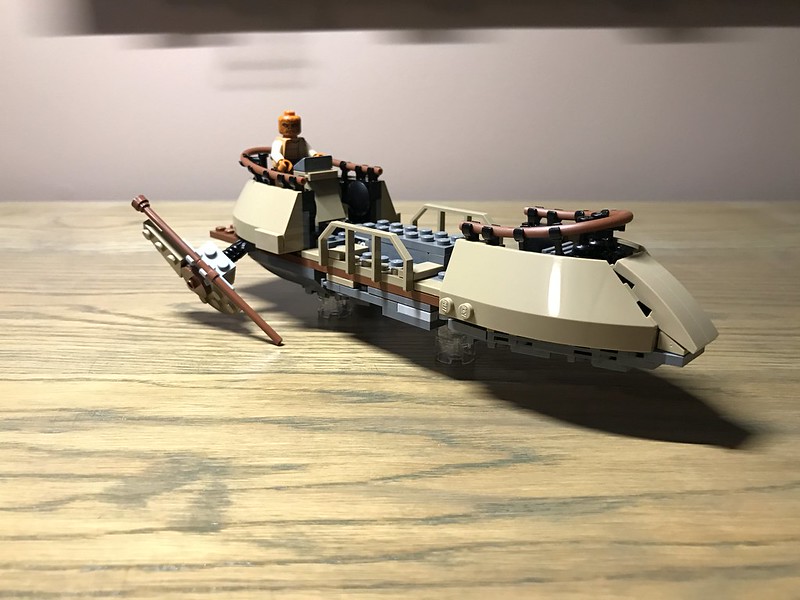
Hey everyone! This is my very first post, as you can probably tell. I've been wanting to share this moc/mod for a while and haven't really had the time to do so until now. I consider all of my projects to be WIPs because I'm always tweaking them, and I'm never completely satisfied for one reason or another. I'll be posting more mocs/mods soon, I hope.
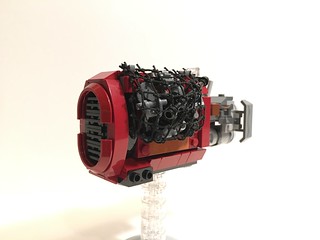
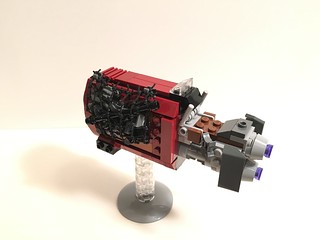
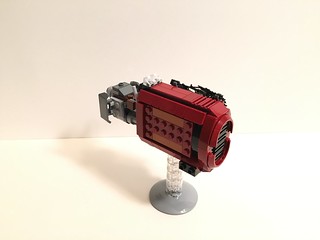
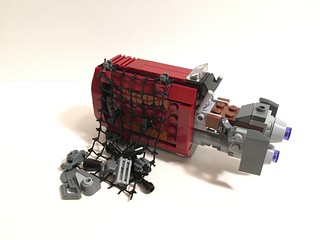
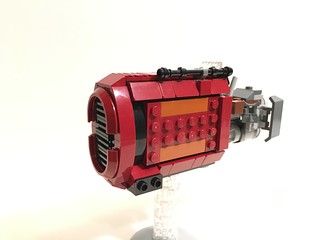
Rey's Speeder [MOD] by Joseph Karins, on Flickr
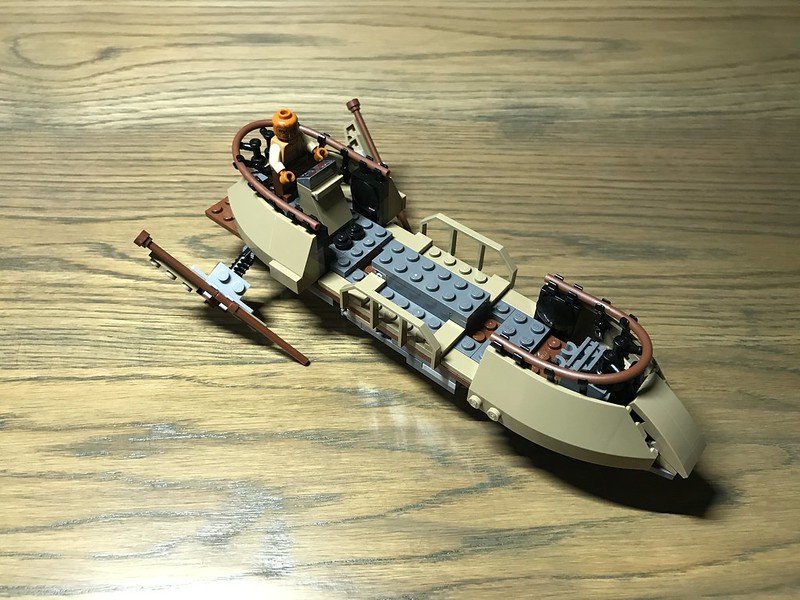
Like a lot of others, I wasn't super crazy about the official set, but it had potential (and I wanted Rey and the other guy). I didn't set out to make a better version because I liked the vehicle (or the set). I just wanted to see if I could, to make a short story shorter. I've seen a lot of mocs and mods for this set and a lot of creative solutions. I really wanted to make the mudguard pieces work for the front of the speeder, which I thought were perfect. Most of the speeder still resembles the original set; the back section is nearly identical. It still looks like it's made out of LEGO elements, and could be something LEGO might've released. Most of the "playability" of the set has been lost (like the pointless stud shooters and rey's sled/hover board), which I don't think anyone here will complain about. I'll probably come back to this to see if I can make more use of the body of the speeder, but I'm happy with how it looks right now.
A few comments on the build: The only modified part is the net, which I've made smaller (6x10 as opposed to 10x10). Also, the front grill is not actually attached to anything, but sits rather snuggly between the two side pieces and the top and bottom mudguards. I know some purists on the site are opposed to modifying pieces and "illegal" placement, but I've spent more time than I wish to admit trying to figure out how to attach the grill to the set. The way it looks is nearly perfect imo, and I dare someone to come up with a better solution! :P You'd make me very happy.
I'm including the LXF file so that anyone can build it or improve/modify it at will! Not much else to say. Hope you like it! Questions, comments, and criticism are always welcomed!
-JB
PS - I'm not a professional photographer (lol). This is my first time trying this setup and I'm not super thrilled with the results.
[MOD] Rey's Speeder
in LEGO Star Wars
Posted
DMs sent!