
Kendo
-
Content Count
207 -
Joined
-
Last visited
Posts posted by Kendo
-
-
@Arthur Schopenhauer : Thanks for the comment man
 . The next update will probably be the finished thing !
@La Chupacabra : Do you mean this one [ http://www.bricklink.com/catalogItemIn.asp?P=88295&colorID=66&in=A ] ? If so , it's a minifig shoulder armour part from some Prince of Persia sets
 .
. -
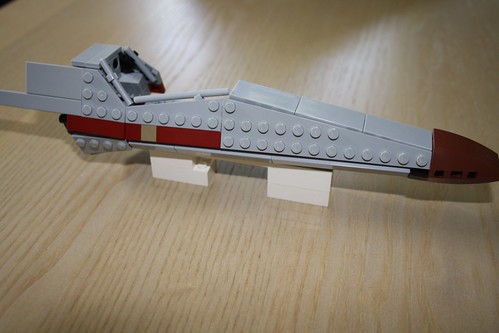
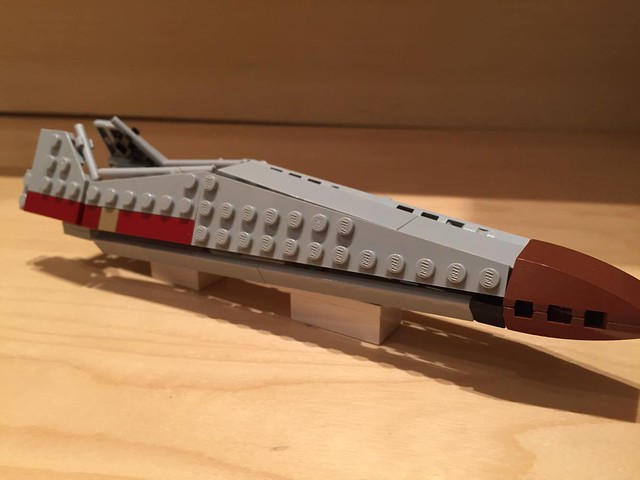
Hey guys , new ( kind of late ,but I got a new job and went away on holidays for a while) update on the X-Wing.
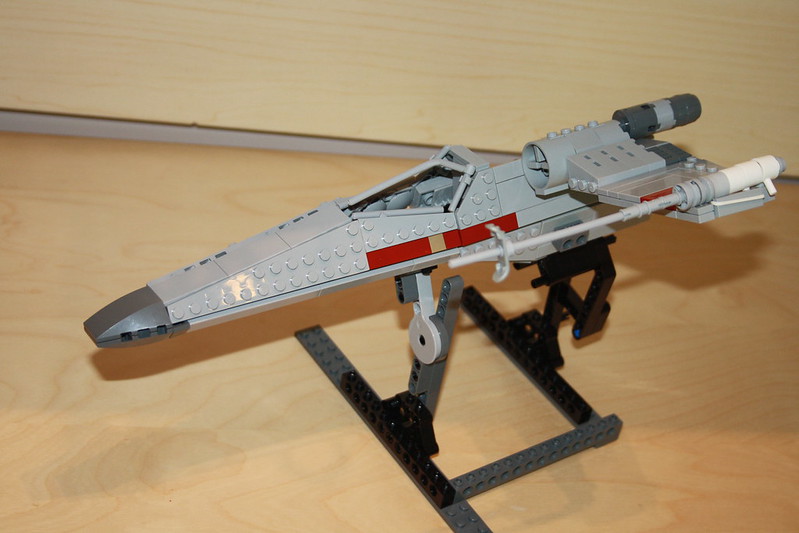
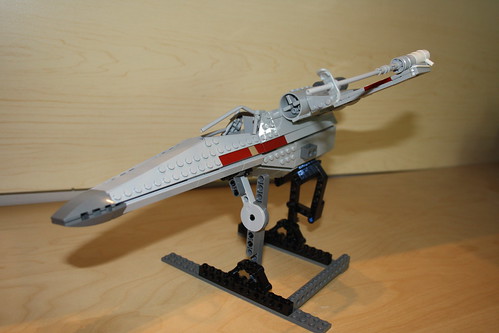
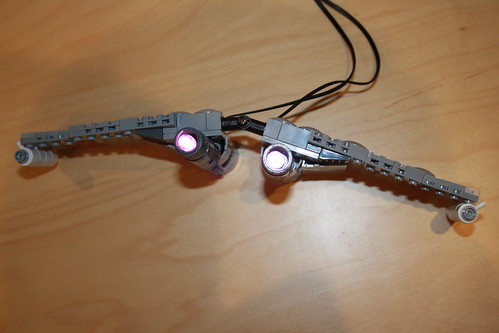
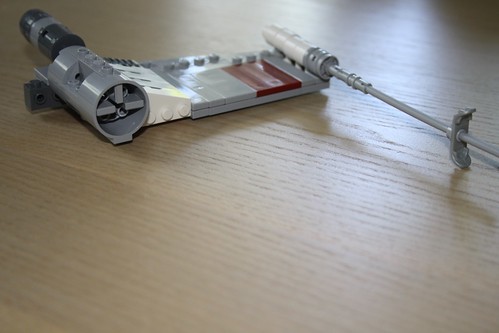
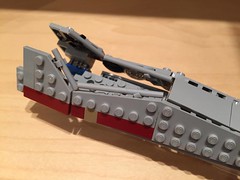
The body is next to complete ( only have the right side panels on so I can access the inside , as I'm trying to make some connections stronger). I'll probably add rigid hoses to cover the gaps between the panels. I also added PF lights to the exhausts , the photo doesn't showcase them that well but they shine in the iconic pink/purple colour. The big engine parts are ideal for hiding the cables , they won't be visible at all in the final model. The two main things that remain are the greebling on top, behind R2 ( I really need to buy the newest R2-D2 version - I only have the old one ) , and the detail in the back. S-foils are stuck in attack position for now since that's what you really want for displaying an X-wing , but I'm playing around with ways to make them close up for flight too. The stand is obviously thrown together in seconds just for now , I'll build a proper one soon enough.Finally , please ignore the hose on the canopy not being as bent as it needs to be , these things are tough to bend properly , but I think I have a solution . As always, please help me improve this by commenting your opinions and suggestions , it really helps a ton
( Also, click the images to see a better resolution on flickr) . -
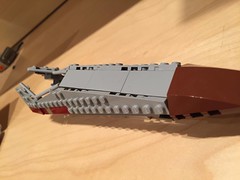
Hey guys , sorry for the double post but I think it's excusable since this is an update (just a small one though). I worked on the angled part in the belly , and added a couple of tiles on the top of the cockpit . Please ignore the ugly "inside" of the cockpit , it will of course , be fixed , but I think I'll leave it for last. I also finished the main cannon on the wing. I am 100% sure about the techniques I used , but I'm not sure about the length . Please comment what you think about it .
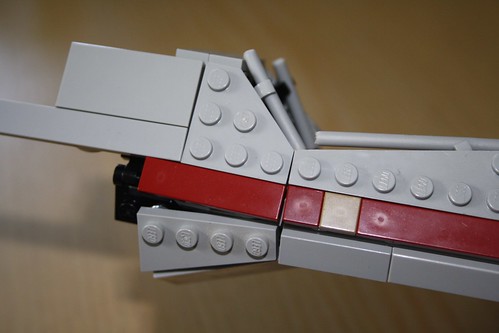
Personally , what bugs me and will probably be changed soon is that 2x4 wedge below the dark red tile. The angle isn't right , it should be replaced with a 2x3 wedge , and then the angle will be perfect . My problem is that if I do replace it with a 2x3 , it will (obviously) not be as long , and won't cover the whole area. I have an idea that fixes both problems , I'll test it out tomorrow. Please comment your opinions and/or suggestions guys , it really helps
. -
Oh , I see what you mean now . That guys X-wing is pretty good , he uses almost the same technique as I do on that area ( although he posted it only one day later than I posted mine so there's no chance it's a "borrowed idea" , just minds thinking alike ). In his version the problem doesn't exist because the 2x4 tiles for the top part are 1 plate higher . that way the can't be lower than the top of the nose though. I think I can achieve middle ground with mine with both the wedges not being higher than the top , and the top not being as high as the nose. I'll get working and will update you guys by Friday
 .
. -
Thanks for the comments guys guys ! I had a bit of progress and now that 2 out of 3 BL orders are here I'll post an update on the next couple of days.
@Kit Bricksto (awesome name dude) : I totally get what you're saying . That way the wedges can be slightly angled inwards so it will get more narrow towards the front . That's a great idea and I'll consider it , but first thoughts are that I'm already fine with the small amount of "getting narrower towards the front" effect that the parts create as they are angled , and on a more technical note , it will be extremely hard or even impossible to achieve while keeping the 92946 parts on the bottom of the nose ( the ones that are currently black ). Nevertheless play with the idea before completely dismissing it , as it is a really good one.
@Joebiwankenobi : Thanks for the comment man
 !
!@Arthur Schopenhauer : I'm so happy you get that , because capturing the general "feel" of the model is just as important to me as all the angles and techniques . And the reason I chose Light Bluish Grey is exactly as you said : it compliments and captures that feel.
Keep the comments and suggestions up guys , this is making the process much more precise , fun and creative
 .
.P.S. I'm on vacation for the next couple of weeks so building will greatly speed up !
-
Sadly I'm using many illegal/unorthodox techniques. It's the only way to get the shapes and angles right in this scale. If you guys are interested I can make instructions for it when it's done , LDD can't show the illegal connections that will be used. The wings will probably just be on hinges , since I don't want to ruin the accuracy with a knob to turn for a gear function. Keep the feedback up
! -
Thanks for the comment ! Glad you guys like it
. Please keep up the feedback , it really helps me . -
Love the ship , it just has this Ralph McQuarrie feel to it ... And I think that minus a couple of studs that could be covered up here and there , and the fact that the "wings" on the front should be angled and not "step-like" ( although there aren't any slopes that long so I get why you did that ) I think you captured it pretty well
. Keep up the good work man ! -
Thanks for the comments guys
, keep them up ! I'd love to hear as many opinions as possible ! @Tyutyu : Yes , forgot to mention that , I had to use a modified part , it's just a 3x12 cut in half , nothing fancy , it's something I think TLG should actually produce , and it's quite likely they will with all the similar ones they put in the racers theme , but well , I use modded parts , I expect purists to come to my house and burn me in the pyre any minute now
@Atlas : About the 2-wide tiles issue , I though so too at one point and looked at alternatives , but a close examination of various schematics showed me that the particular area's width decreases so slightly that there's no need to do that , as long as I portray it with the 47397/47398 pieces ( I hope you understand what I mean , it's kind of hard to put to words , I'd actually need to physically show you in order to properly explain it ).
@Kamil Z : Thanks man , next update coming in a week or so when my BL orders arrive
Keep commenting guys
! -
Hello guys ,
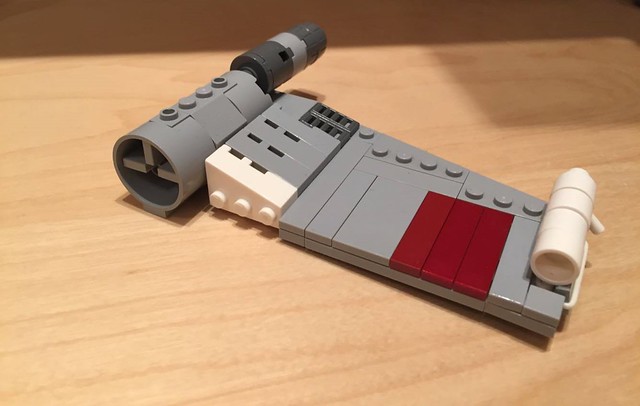
I am currently working on an X-Wing moc. The focus is to get it as close to the movie version as possible ( while strictly keeping it minifig-scaled ) , without caring about action-features , play value/"swooshability" etc . While waiting for a couple of Bricklink orders , I decided to post some WIP photos of what I have so far . Do have in mind that many of the parts' colours are substitutes while waiting for the correct coloured ones ( such as the brown nose and every white piece in there ) . Lastly , I 've decided to go with light bluish grey and not white for the main colour . I know this debate has been going on forever , and fully respect the people who want it white , but for me light bluish grey not only represents the actual colour a bit better , but also provides that battle damaged - real world and not CGI feel that I love about the original trilogy ( it's a real, living world , with real vehicles and that sets it apart as the best in the sci-fi genre , imo at least ). Anyway , enough indirect prequel shots fired , here are some pictures , please share your opinions and/or suggestions
(sorry about the medium-low level quality , a friend borrowed my camera so I had to make do with my phone ) .
There's also and LDD file I made which I'm attaching , it's not quite the whole thing , it's more of a sketch-up of how it's going to look without caring about how everything will connect ( as it is better to find that out when physically building it , when illegal and unorthodox connection techniques can be used ) , so have a look there , as there's much more than I've shown built in the photos above ( almost the whole thing , or at least the first version of it ) . Finally , note that there's going to be a "88295" part (http://www.bricklink...colorID=66&in=A) stuck on the "85861" parts on each of the four laser-canons , they're just not available in LDD so I couldn't show it there . Please share your opinion , recommendation or any other type of feedback guys , I really need it and will truly appreciate it
 . Thanks for looking !
-
Having made one myself, I must say, stunning work ! Love the front, the headlights and the whole area around them is spot on ! One small comment/recommendation I have though, the only part that kind of sticks out and doesn't resemble the game model too much is that "3942" part you used as an afterburner . But other than that , amazing job man , great representation of a great Batmobile
-
Thanks for your comments Neonic and Brickadier Gen.
. Well, it is very similar to the first Batmobiles, many parts of it resemble the Burton Batmobile. Now about the scale , I did some calculations before I started building , using measurements from a replica I found online , converted everything to "minifig scale" and that's pretty much what the size is supposed to be ( width , length , everything ) . Of course, minifigs have much different proportions than real humans , so noone can ever 100% accurately convert something , but I did my best . Keep the comments up guys , I really appreciate your opinions and thoughts -
Thanks for your comments guys ! I'm glad you like it
. Please keep the comments up , I love hearing your opinions and suggestions for this , it's really important to me . -
Thanks steveholt
. The minifigure is an amazing custom by eBay member "onlinesailin", PAD printing on original Lego parts. I'd never use a bootleg, it makes me sad that they even exist  .
. -
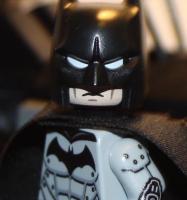
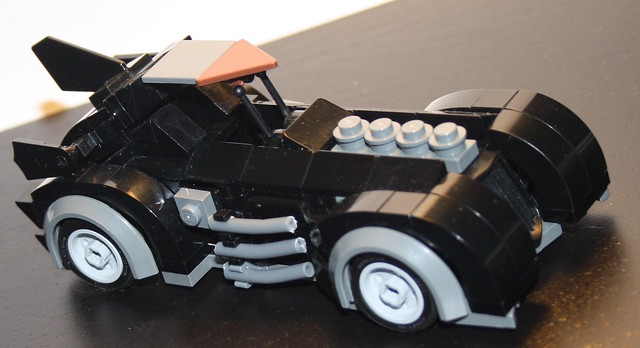
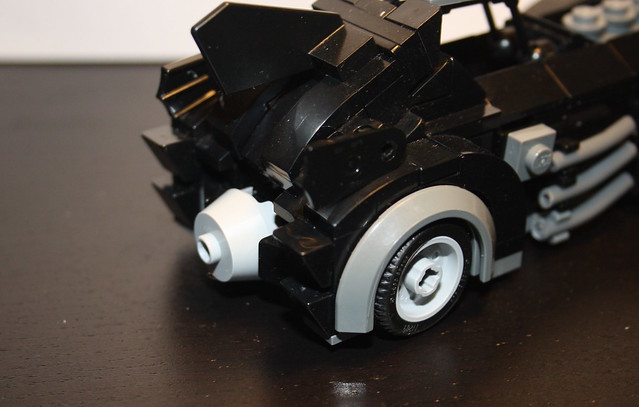
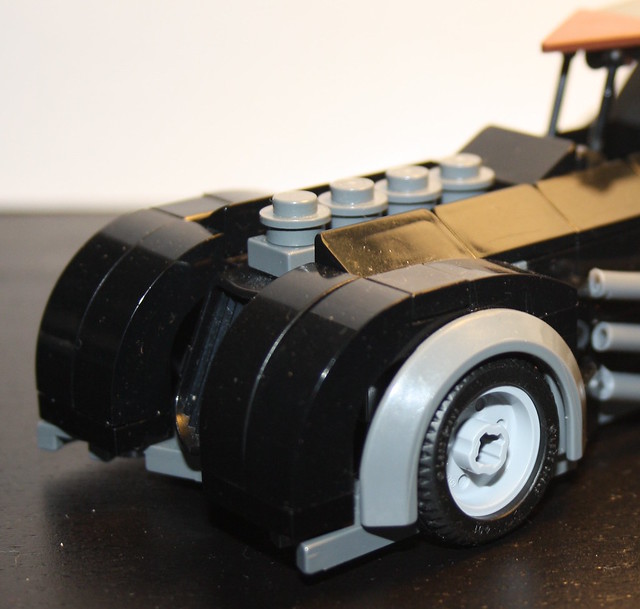
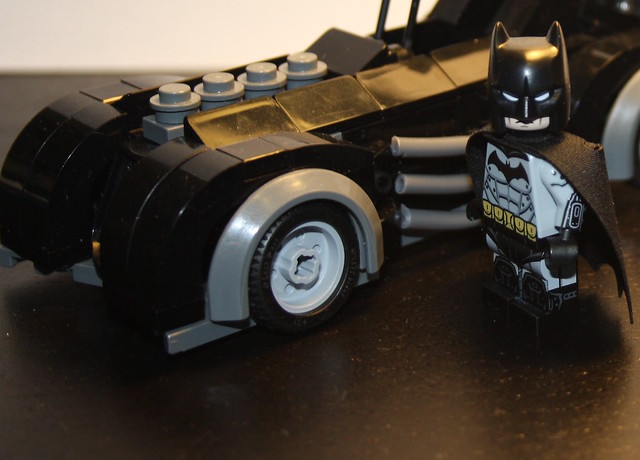
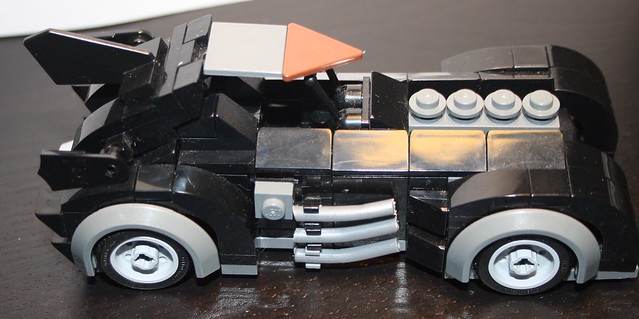
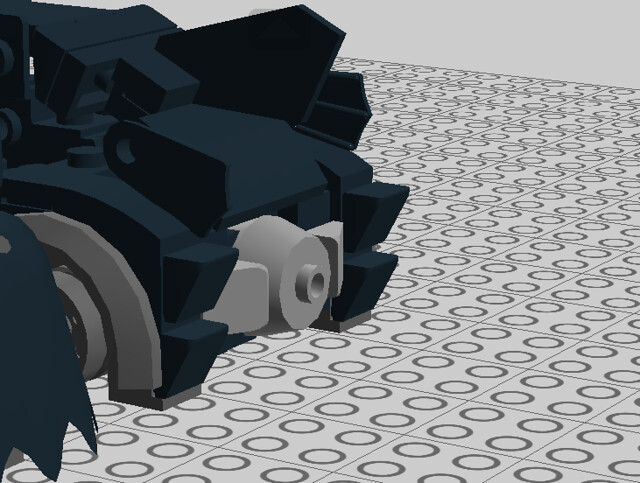
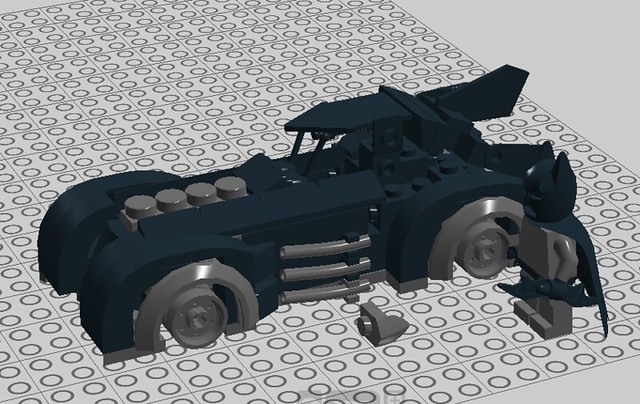
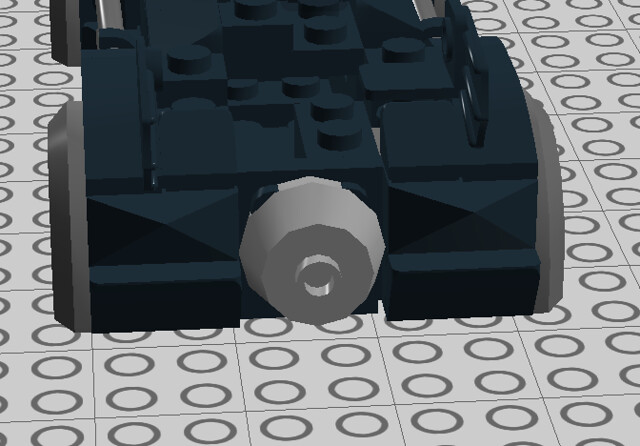
Hey guys , after waiting two months to get all the parts , everything I need for my Classic Arkham Batmobile has arrived . In my mind I’m still calling this a WIP , as there still remain some changes to be made , but they are really small and subtle , so I decided to post it as it is ( and maybe post a V1.1 later ) . As I’m sure you can imagine , one of these changes is changing the colour of the two “road signs” on the roof of the car to black . Unfortunately , these parts don’t come in black , so I’ll paint them ( I don’t love the idea anymore than you do , but I think the parts fit in perfectly and they look inaccurate being grey and brown ). I am also playing with the idea of adding stickers to give the model that extra bit of accuracy , specifically on the "6005" parts in front of the rear wheels . Finally , what’s a Batmobile without Batman ? I knew , from the moment I started building this that I had to get a custom Arkham series Batman minifig to go along with it . And when I tumbled upon onlinesailin’s Arkham City Batman, I was amazed by the astonishing level of detail, the amazing resemblance to the iconic suit, everything . Thanks “onlinesailin”, for the best minifigure out there , this moc wouldn't be the same without it . Now, I’m sure you came here to see a Batmobile, not read boring details, so here are some pictures .
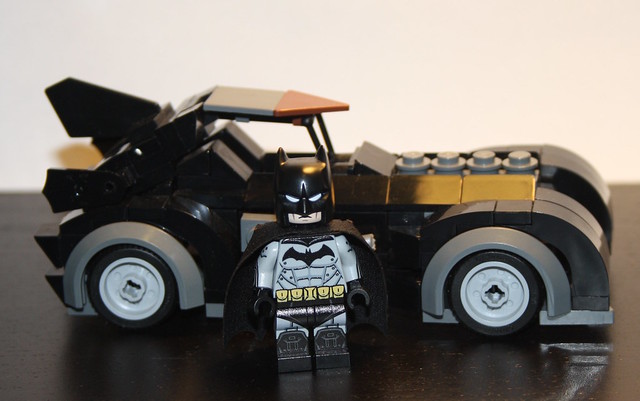

 Now let me get that explosive gel ...
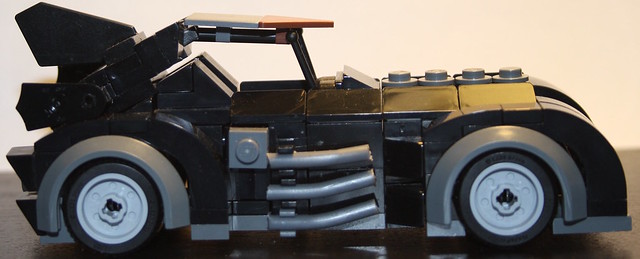
I really hope you liked my build , please comment your opinion and/or constructive criticism . Thanks for viewing :)
-
This is amazing ! I love everything but the head just takes the prize , it's spot-on ! Do you plan on displaying it on a wall , like a picture or a painting ? I think it will look great that way .
-
Hey guys , I've tried searching for the images but can't seem to find them anywhere , I know you can't post them here but can anyone please PM a link ? Thanks
-
Well , If I could cut a Batman cowl like that it would be perfect for me ... If you stumble upon a cut off one please do send a link
-
I've seen lots of people try cutting cowls and never once has it looked all that great. Hooch's goggles aren't going to fill up the eyeholes of the cat mask well enough, either.
Well , about the Catwoman mask , the more I think about it the more I loose faith in it , but it goes the other way around for the new Batman cowl . I think it will look spot-on if cut correctly ! Do you have links to pictures of the cut cowls you speak of ? I'm pretty bad at cutting myself so I need to see if it will work for me and then have a friend cut it .
-
Hey guys , I'm making a huge batman ( new 52 themed) MOC and I want to include as many characters as I can . I have great minifigs ( official and custom ) for everyone except Catwoman . I'm not a fan of the official TLG figure and I couldn't find any good custom ones either . So I decided to do some research and find a way to make one myself ( the new 52 version ). Yesterday I had this idea for her ,but I don't have the parts , so I post it here in hope one of you guys do , so that you can post a picture of her .
Ver.1 : prof. Hooch ( HP ) head and official catwoman helmet/ cowl
Ver.2 : prof. Hooch ( HP ) head and the new batman cowl , with the front area beneath the "eyebrows" cut off . I think this one will look significantly better , but it requires modding and obviously isn't purist . As for the body , I think I'll use a design similar to TLG's ,but without any purple on it , and on an AREALIGHT curved torso , but the head/helmet is what's actually troubling me , and has me asking for your help . If anyone has the parts to make these and can post them ( with any random torso and legs , it makes no difference ) I'll forever be in their debt , as it's next to impossible to order them online where I live in

-
I think I'm leaning towards the first one myself . Thanks for the comment N_Cat , keep them up !
-
Thanks PercyJ ! Any suggestions guys ? I 'd really appreciate it if more people commented on this
. -
Hey guys ,
My first MOC when I came out of my late dark ages one and a half year ago was the Batmobile from the first two Arkham games ( well , technically it also cameos in "Origins" ) . It was ok for a first creation after years of absence I guess , but not that great . Some days ago I stumbled upon the LDD file , and I thought " Why not revisit it , make it great and actually build it with real bricks as well this time ". I'm posting this as a WIP because I've finished 80-85% of it but I'm kind of stuck and I need some opinions and suggestions . Here is what I have so far :
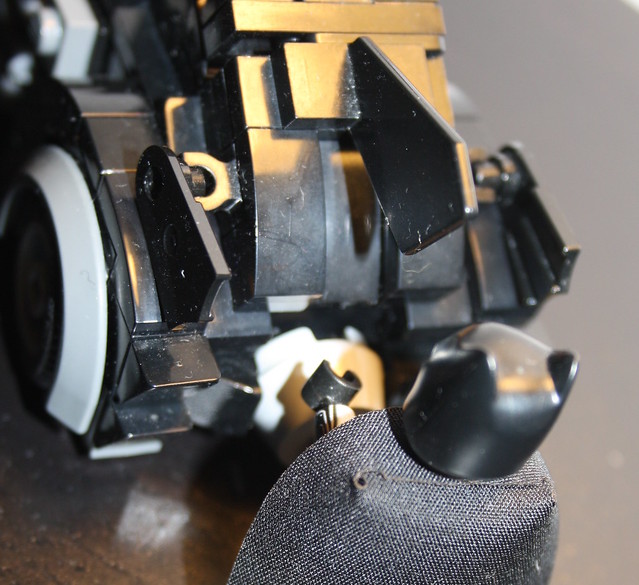
The tooth piece is supposed to go between the 1x1 plate and 1x1 tile right behind the "tubes" , LDD won't let me put it there but I think I'll be able to squeeze it in there when I actually build it . The tubes / hoses will be flexed so that they're closer to each other and have the angle like the "real" model . As you can see ,the front part is complete , but the back , specifically behind the driver's seat is only a rough draft .
So here comes the part where I need your help . I've created two versions of the back "afterburner" area as well as I need your opinion on which looks more accurate , and as many ideas and suggestions as possible for the part behind the driver's seat .
Here is the second version of the back area .
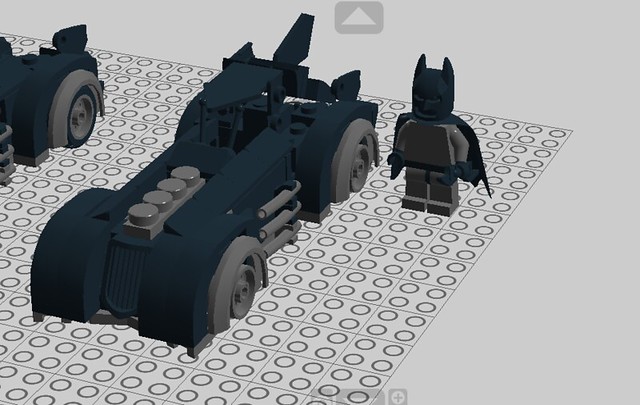
And , since 2D screenshots can never truly express the 3 dimensions , I'm attaching the LXF file . The one on the right with Batman next to it is what I've been showing so far , the one in the middle has the second version of the back area and the one on the left is the one on the right without the roof , whatever you see there is "complete" ( but of course can be changed if needed).
Note : I know some parts don't exist in the colours I use , but I don't like to be limited by the colours TLG produces their parts in , so I'll probably paint them . Also , you may find some "silly " bits in the LXF file , like three 1x1 plates on top of each other instead of an 1x1 brick etc , obviously this won't be the case for the final model , just didn't pay attention to this kind of things and concentrated only in replicating the vehicle's look .
Thanks for viewing and please leave a comment of your opinions/ suggestions , it will help a lot
.
-
That's a great EP VII X-Wing ! The only things I don't like are :
-The "windscreen part" , it's kind of blocky and doesn't fit in with the great nose that leads to it
- the round "dishes" on the 4 canons , this is something I don't like in almost every X-Wing moc since these aren't round at all in the movie versions . Might I suggest a http://www.bricklink.com/catalogItemPic.asp?P=88295 instead ( not my idea , saw it when I was looking for X-Wing mocs online but never never visited the guy's photo stream so I don't know who he is , credit goes to him ) instead ?
Other than that I think it's spot on !
Awesome job like always
[WIP] T-65 X-Wing
in LEGO Star Wars
Posted
Thanks ! It's something I 've experimented on before , involving stripping the PF lights of their cover , so they can fit through the axle hole
  .
.