

ritztoys
-
Content Count
380 -
Joined
-
Last visited
Everything posted by ritztoys
-
I'd love too, but my phone is controlling the sbrick. Can't film at the same time, I'd be a wreck trying such! There are approximately 1768 elements + or - a few. The full length is almost 42". The cost will depend on how many elements you might have in your own supplies, I'd guess this would cost ~ $300 USD via Bricklink prices. (not including the sbrick)
-
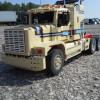
My Peterbilt 379 s.w.s.a.d.
ritztoys posted a topic in LEGO Technic, Mindstorms, Model Team and Scale Modeling
Will update post, when I figure how to upload photos Ahh okay, I think I've got this figured out....... Alright, this truck was created to fill a need for a Short Wheelbase Single Axle Dually, which will be used to transport "Double Trailers". The original designer will recognize lots of styling and detail from several of his trucks......... http://ingmarspijkhoven.blogspot.nl/ As shown in the last picture, the 'brains' of my truck! More picture available, comments good or bad welcome. -
My Peterbilt 379 s.w.s.a.d.
ritztoys replied to ritztoys's topic in LEGO Technic, Mindstorms, Model Team and Scale Modeling
Thanks Ingmar, I appreciate your comment very much, coming from "The LEGO Truck Master" ,himself. I hopefully will be able to come up with a set of 'Doubles' for this truck as my next project Thanks I_Igor, I have many dual axle Semi's, but wanted to add this combination to my collection, of course very influenced by our favorite designer. Funny you mention the colors, I got the idea from a lady's outfit on a TV news channel, she had these exact colors! -
My Peterbilt 379 s.w.s.a.d.
ritztoys replied to ritztoys's topic in LEGO Technic, Mindstorms, Model Team and Scale Modeling
aminnich, Leonardo da Bricki, Bricker Bricker 72 Legorigs Thanks everyone for your compliments and suggestions, Bricker Bricker 72, you have a sharp eye and figured out the various design clues I included in this truck. The Lipo Battery box was tried in the location behind the cab, I couldn't figure out a way to make it attractive and hold the exhaust pipe too! With the sbrick located in the bottom back of the cab, it sticks out about a 1/2 stud, otherwise the wires are too cramped behind the servo motor to move the sbrick somewhere else. Also I wanted the chassis short between the fifth wheel and cab, it can still clear any of Ingmar's trailers hooked to this truck The drive line was made to be sure I will have plenty of pulling power for "Doubles Trailers", although I will be very curious to see Ingmar's improvements in the Mack Vision. I wanted originally to build a short chassis truck with the Mack Vision bodywork, but my fingers wanted to build a new truck and I couldn't shut-off my brain! This truck also uses Ingmar's early suspension along with the 100% LEGO elements for the steering system, which works very well. I'm open to improvements(always) but I had plenty of old parts in my supplies, that I wanted to put to 'work'. -
My Peterbilt 379 s.w.s.a.d.
ritztoys replied to ritztoys's topic in LEGO Technic, Mindstorms, Model Team and Scale Modeling
Thanks again, I'll use a Black # 6180. The Dbley are too expensive! (rare part) -
My Peterbilt 379 s.w.s.a.d.
ritztoys replied to ritztoys's topic in LEGO Technic, Mindstorms, Model Team and Scale Modeling
Thanks for the compliment. My 'little voice' said this area needed help, so your suggestion................ What do you think? -
Attachments -- and how to delete them
ritztoys replied to Legoboy22's topic in Forum Information and Help
Thanks for your reply, I'll try again. I haven't posted in a while (old/forgot how) -
Attachments -- and how to delete them
ritztoys replied to Legoboy22's topic in Forum Information and Help
Are 'Bricksafe' pictures not allowed? I can't upload from there as I used to do before? -
Howdy my friend, I wrote you an email, didn't get a reply. You must be very busy, especially with this new forum,
'Scale Modeling', looks like some interesting reading. Been busy on the house and (1) new project completed.
Let me know you're still okay.
Regards, Stephen
-
-
Merry Christmas To all the lurkers, designers, MOCers, here at EB have a great Holiday season.........
-
[MOC] Telehandler
ritztoys replied to Lipko's topic in LEGO Technic, Mindstorms, Model Team and Scale Modeling
I finally finished this fantastic creation, what a learning process! I think I've built & dis-assembled this MOC about four times, learning how these pieces all fit together, and getting all those pieces installed and in the correct order too. The nephews are very excited to get to play with Uncle's new LEGO toy. The boys suggested some simple appearance changes for their new toy, fill in the fenders, change light fixtures background to White ( they said they couldn't see them ), exhaust changed to Gray, & give the operators seat a custom upholstery job. Thank-you Lipko for a fantastic building experience. -
[MOC] Telehandler
ritztoys replied to Lipko's topic in LEGO Technic, Mindstorms, Model Team and Scale Modeling
Yes you're right, I did go too far in my construction, sometimes I can't get my fingers to stop building. Oh no, I didn't mean to convey this creation was "a mess", hardly so this creation is great IMHO. :thumbup: Apparently my software is out of date. I'm guessing that it didn't show all the parts you used for building this. Thus, this made my construction efforts difficult, trying to understand everything going on inside of your MOC. This creation is well thought out and with a very strong structure too. In my defense , I haven't built Technic models like this in years, but I can see issues ( sometimes ) in various assemblies that don't make sense until they are built and in my hands. btw, that LBG pin w/stop-bushing in the earlier lxf files is now been turned around 180* and is now facing the other way. So there are no "part collisions" anymore and everything in that area works. . Also the latest files have lots of new information for me, thank-you. -
[MOC] Telehandler
ritztoys replied to Lipko's topic in LEGO Technic, Mindstorms, Model Team and Scale Modeling
I did, I did follow your advice, just some of those groups didn't make sense and I continued building other sections. Maybe went to far in construction in some other areas? I don't know about those 'part collisions' as I'm just looking at the steps as they are generated? Putting everything together very carefully, sometimes hard to see where some pins are added. That stop bushing does indeed have an axle pin, which goes into the two thin leftarms, next to the L motor. ( at least on my LDD files ) Thank-you for the additional files and information. -
[MOC] Telehandler
ritztoys replied to Lipko's topic in LEGO Technic, Mindstorms, Model Team and Scale Modeling
That's an understatement for sure, for those wanting to build this, be ready to be challenged. Your Trucks & Trailers BI are built using elements in the "Model Team" style, which are forgiving if you make a building mistake and have to go back to correct, this is a very different creation and you have to pay very close attention that you don't leave out any elements.( since there are no BI ) My 2nd attempt is going much better, I've stopped here as I'm awaiting elements to complete the transmission, before building to far and I can't add some of those intersecting liftarms. Also I found an error in the new lxf files, you can see, right above the L motor, part of a 3L Blue friction pin. This is replacing a 3L friction pin w/bushing. The bushing pin goes through the 5x7 square frame and protrudes out the other side. This can't connect ( wasn't in 1st files ) to the 3x7 bent liftarm, as it will put the whole steering assembly out of line for the steering axle and small Black gear to go through the support inside the 5x7 square frame. The 3x7 bent liftarm is attached at the inside top of this frame with the parts Lipko mentioned in post #51. Please by all means, bring on those Ldraw files, more information is better than not enough! Also pay close attention to some elements that are used in between those 5x7 square frames at the rear, under the LA location. These ( strength parts ) will need to be installed early in your construction or you won't be able to add these later. You'll find putting this area together only to later realize you forgot something and have to take it apart again. I was in in this area many times adding then taking out pieces to put others in, then adding all those other parts that were already assembled, back in. Not frustrating at all, just getting a better idea of how Lipko thinks! -
[MOC] Telehandler
ritztoys replied to Lipko's topic in LEGO Technic, Mindstorms, Model Team and Scale Modeling
@ Andy D.......Yes, this is big. It will easily fill two 32x Baseplates @ Lipko..........Yes, I think I have the latest software. The first files did have errors, but after building once and tearing down, I learned a whole lot of the structure and how to approach building in some different ways to include pieces I couldn't add the first time. I also learned from the updated files about those very shifting rings you mentioned. That's why the 'transmission' wasn't finished correctly. ( didn't understand, these items weren't included in the first files ) Also I haven't built with these newer Technic elements you have used, so I wasn't familiar with them. The second lxf files has the "suggested building guide" arranging the steps a little different, but is much better than original files. There are those 90* liftarms that you need to be careful not to exclude. Some support axles & gears, some are strength intersections and some do both! After the first build I wrote down various step #'s for sub-assemblies and after gaining building experience, knew where to insert these into the main frame assembly steps. ( I hope ) To sum up this building challenge.........awesome! :thumbup: Thanks Lipko -
[MOC] Telehandler
ritztoys replied to Lipko's topic in LEGO Technic, Mindstorms, Model Team and Scale Modeling
For those who are gathering parts and like myself, who couldn't wait to start building, I found some missing parts not on the LDD list. Be sure when you download this file that you pay attention to the "error list", that is provided whenever a new file is opened in LDD. This list will show almost all extra parts needed for this build, I found one part not mentioned on any list, # 14720 for ( 5 ). This is needed pretty early in the build, two are used in the frame sides, one supports 'gear train' going to boom, one on rear axle assembly, one in boom assembly. I started my build using the first lxf version and found some stuff that didn't make sense. During assembly various liftarm beams are 90* to frames sides, sometimes these can't be installed because of building progress has gone too far. So after building what I have completed, I decided to tear down what I've built as now I have a much better understanding of when various pieces should be added early in the assembly. I downloaded the updated file and things I didn't understand before, now do. I've included photos of what I built before it being dis-assembled, notice the 'Flesh Gear' located in the lower frame on both sides. Be sure you add this early in your construction. ( It is part of boom lift gear-train ) ( Yellow beams are supposed to be DBG, short on supplies ) -
[MOC] Telehandler
ritztoys replied to Lipko's topic in LEGO Technic, Mindstorms, Model Team and Scale Modeling
I couldn't wait, I had to start building this fantastic creation. Pic shows Steps 526 through 627. I realize I will have to take this apart many times to add the sub assemblies as shown in the early steps of LDD, but what the heck I like building A very large MOC Lipko, thanks again for sharing :thumbup: -
[MOC] Telehandler
ritztoys replied to Lipko's topic in LEGO Technic, Mindstorms, Model Team and Scale Modeling
Thank-you so much Lipko for the lxf files. I've always wanted to build a proper Telehandler and this fits the bill. ( besides looking fantastic ) :wub: I recently took apart an 4500+ piece Technic MOC, now I have plenty of parts to start building this great machine! ( Although my fingers are killing me now ) I have about 85% of the parts, BL here I come for the rest! The LDD program took over 10 hrs. to get a building sequence, steps show a lot of 'floating assemblies', but there doable. This build will make me really pay attention. -
[MOC] ICARUS Supercar
ritztoys replied to Madoca 1977's topic in LEGO Technic, Mindstorms, Model Team and Scale Modeling
madoca1977, STUNNING looking car!! :thumbup: I've built many of your vehicles and your construction equipment, all are very enjoyable to appreciate your genius skills. But this one has raised the bar of your creations. I look forward to building this MOC of yours, btw I still operate/display your Black 2-Door SUV( I had the red one too, but needed the parts for another project ) at the local Brickworld show, from your early building career. edit: I just watched your video, please excuse me for a moment while I pick up my jaw off of my laptop!! -
Scania 143M Torpedo 6x4 Australian truck
ritztoys replied to 2LegoOrNot2Lego...'s topic in LEGO Technic, Mindstorms, Model Team and Scale Modeling
Bricker Bricker 72, Great job, You have done this truck right in your own style and colors. (one of my favorites) I've built almost all of Ingmars' trucks & trailers, everyone of them is a pure joy to build, and maybe even mod! These trucks are even better when you use an sbrick, :thumbup: much better control with out worrying about the daylight factor. -
Nemo57, That crane is STUNNING! :thumbup: You have created a beautiful MOC in "Minifig scale" too. If you ever make building instructions, show me..........." Where is the line forming to get these? "
-
"What he said", andyscouse.....I put (2) Town Hall kits together for a stand alone building. It's the center of my small town, "Palm City", which I will proudly display at Brickworld Indy in a couple of weeks.
-
[APP] BrickController2
ritztoys replied to imurvai's topic in LEGO Technic, Mindstorms, Model Team and Scale Modeling
Thank-you for your reply to my questions. I've been through the set-up process with the sbricks' official software and was able to 'test' via my phone, with all working OK. (I haven't downloaded a profile yet) I guess my question was too vague, Should I remove the first download in my phone from your code above? And then re-scan the code again?(for the updated version of your app?) I'm wanting to use your app to control my LEGO creations as the sbrick official software is still having issues for Android phones. Some people have reported that they can't drive and steer at the same time. I plan to use your app during an up and coming Brickworld show nearby, using this method instead of the LEGO ir system. -
[WIP] Mining Dumper
ritztoys replied to jorgeopesi's topic in LEGO Technic, Mindstorms, Model Team and Scale Modeling
That's very good looking , I'll be in that line for building Instructions, if you will provide them? -
[APP] BrickController2
ritztoys replied to imurvai's topic in LEGO Technic, Mindstorms, Model Team and Scale Modeling
Howdy imurvai, I downloaded through the qr code above, should I do this again? Or is the current download(from above) OK? I'm using Samsung 6S, or should I modify something? I'm not the brightest bulb in the pack I might need help changing something? Any help appreciated as the sbrick software doesn't work as well as yours seems too, thanks
