

ritztoys
-
Content Count
380 -
Joined
-
Last visited
Everything posted by ritztoys
-
MOC: Flying Scotsman (with free instructions)
ritztoys replied to damangos's topic in LEGO Train Tech
Thank-you damangos, the link worked just fine, now to gather parts! Lego #10194 wayyyy to expensive to modify to your locomotive. -
MOC: Flying Scotsman (with free instructions)
ritztoys replied to damangos's topic in LEGO Train Tech
Me too, what he said! -
Yes it does, controlled by a Micro motor sitting vertically inside the truck cab. IR sensor, battery box, M motor located inside trailer. Power is fed through the "5th wheel" to one side of the 'differential' so that turning is very easy. I would love too, I had such a great time during Brickworld Indy, but my vehicle is not weather proof and $$ is a problem for the whole weekend. PM me about any questions you have, be sure to visit one of these 'modern breweries' to get some really good ideas! (& beer)
-
Hello all brick builders, my City display needed a brewery and this is what I came up with...... As this is a tall building, only the roof comes off to see the inside. So here are some pictures before the walls were "squished together" These "tank designs" (which I modded a lot to fit building) belong to Rory Archer of Australia My minifigs always enjoy their adult beverages, especially when they can see where their favorites are made!
-
Thank-you very much, looking forward to your style of facade Thank-you, I appreciate the your 'take' on this creation! Thank-you, I'll modify when I get the structure out again, yea I know too many lampposts. I didn't include them when I recently displayed @ Brickworld Indy.
-
Thanks for the compliments and suggestions, I understand the facade is a little dull, the reason I added the window "keystone" for some detail. Are you referring to the 'profile brick'? I have a hard time mixing those types of bricks into my creations, oppps my OCD is showing!!
-
Final for this creation, fits well into my display.
-
Here is my new building in my display @ Brickworld Indy 2019
-
First of all this post is dedicated to the original designer, sheo, who many years ago created this train. The minute I saw it along with the functions that sheo had included, I had to build it. While searching through and organizing my files in my laptop, I found this train and decided now was the time to build! All available parts needed to build this creation, I put everything in a large baking pan and nothing falls out. (for my feet to find later) After day 1 of building, I tell my fingers to keep it slow so that I can enjoy the building experience. (the original model uses IR control) Day 2, replaced the IR control with the sbrick Day 3, needed to see how long this creation will become.................long! Day 4, working on prime mover and first coach Day 5, prime mover cab finished and first coach side installed Day 6 ,all cars need to stay together while working on second coach roof Day 7, far side wall of second coach installed, notice interior lighting for passengers! Day 8, second coach wall installed, moving on to third coach and final car roof installed Day 9, interior picture showing operators control panel Day 10, completed model, darn good looking train! Now all you builders familiar with the sbrick know there are four controls available, so I have throttle, light control, and the best part of all is the coach doors open on the third channel of the sbrick! Watching all six doors open (when at a train station) is jaw dropping. So with all his other creations (sheo), the building experience for this train was just incredible, heck any of his creations are just plain awesome! I felt very privileged to be able to build such a great creation and add it to my layout.
-
I finally had a second phone to take pictures, as the first one controls this train(sbrick) Check the attached video, it can go faster! Along with it's brother MD40 https://www.youtube.com/watch?v=E9DWm09xldw
-
Okay you asked......this is what started it all! Thank-you, I added my experiences of 'field testing' to figure out the interior design and the full layout. The funny thing I built the building first and made everything else fit inside.
-
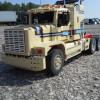
Thanks to cubo for his Semi Truck creation.....I challenged myself to build one too, I now have a delivery Semi for my Brewery....
-
Thank-you from the creator himself.... I need to "polish up" my talents on using technic and model team together. There are only a few elements that can be used(in this scale) to help the transition between the two types of LEGO bricks and have a somewhat strong structure. I now understand why your cab may have 'one stud' attachment points for your design.
-
Thanks for the compliments! I struggled with the connections of the 'rear end/Technic frame" to the Model Team style of the drivers cab, gotta improve that.... The truck was made for the delivery option of my latest building..... Having a decal with the Brewery's name on the truck's trailer would really be awesome!
-
Cubo, your creation inspired me. So I challenged myself to make a Semi like yours.......
-
Thank-you Thank-you, I saw those lamps on a local building, and thought "How to get that look in LEGO"? Thank-you, I was striving for a 30's to 40's style of building as most of my display is kinda in that period of design. Thank-you, Yes I struggled with the "City" lamp posts, and/or the building lamps together. I don't know how the City display would look eliminating those said posts? ("the builder forgot to put city light posts on the sidewalk?") It might make the building a little more attractive? I didn't want to do too may exterior details as this building was repurposed and the new owners had a tight budget to keep remodeling costs to a minimum! The whole project happened because of a 'beer delivery wagon' I had that needed a home.
-
Thank-you cubo for your answer. I could use a delivery truck just like this in my display "Palm city". I'm working on it!
-
cubo I figured out that part I was referring too is a #87082 w/gold rings on the pins, resulting in a half pin on either side for support into the truck frame? (which I noticed are assembled into a 'half' lift arm) A mix of Technic and Model Team construction, good job! Can you tell I want to build this.......also a lot of 'snot building' going on in the Driver/Cab part of the truck?
-
cubo, can you tell me what the element is that supports the 'drive line' w/gold rings on each side? Thanks (trying to understand all the parts used) and the third gold ring, just used as a spacer?
-
Hi, I'm thinking of building a truck like this, is the 'driving motor' in the trailer vertical? Or do you have it sitting horizontal? Any interior photos of the drive motor set-up? Any help appreciated, thanks
-
[GBC] Cardan Lift
ritztoys replied to torso's topic in LEGO Technic, Mindstorms, Model Team and Scale Modeling
I have that too! I try to not let it show, but when I'm working on a new MOC, this unfortunate habit of mine shows big time, ask the wife..... Her response, "You're taking that apart again?" -
[GBC] Cardan Lift
ritztoys replied to torso's topic in LEGO Technic, Mindstorms, Model Team and Scale Modeling
This GBC runs pretty darn smooth, my issue was the gear that runs the 'lift' gets out of timing with the 'crank arm' and/or the parts associated with the mechanism. Good luck giving more strength to transfer arm, I haven't any problems with the design, although I have noticed 'white dust' in all the gears running this portion. -
[GBC] Cardan Lift
ritztoys replied to torso's topic in LEGO Technic, Mindstorms, Model Team and Scale Modeling
Because you're using multiple base plates, be sure they're secure to each other. The one under the ball lift section can mess up the 'timing' if it comes loose from the one next to it. Handling during set-up usually helps everything dis-connect, I always have to fix timing at various venues to display. -
[GBC] Cardan Lift
ritztoys replied to torso's topic in LEGO Technic, Mindstorms, Model Team and Scale Modeling
-
Thank-you sheo, it was pure joy to build. Yes Sir, that would be very attractive having your newest train in Red! I agree, very pretty train indeed! I'm looking forward to see it running too. Now I'm acquiring r104 size tracks to add to my layout. ( which of course I now need to change anyway ) The door/link system is very clever, although handling the train off the track can be scary! I've since made a combination display stand (wood), which becomes the base of a protective box so that I can take the train to various venues.