

Fritzy
-
Content Count
411 -
Joined
-
Last visited
Posts posted by Fritzy
-
-
My guess is they won't be releasing in January, as the LEGO Shop already has listings for sets that will be coming out next month and none of these are included in the batch.
-
Good idea, but weak realisation.
I'll say. The second build especially.
-
Found this little guy in the Christmas-stocking-stuffer section of Target this week


Thanks for the unintended reminder for me to keep an eye out for this!
-
This looks promising for the Wall-E Lego Ideas.
Yeah, let's hope! Speaking of, I wonder what the reason is for the unanticipated delay.
-
Has anyone been able to find a lot of stuff at Target on clearance? It seems like the US Target almost always has a huge variety of items on clearance, yet up here I can never find anything at all.
For me, they're few and far between. But I am grateful for what I do find. On a related note, Target has had some random price cuts on LEGO sets over the last few months (can't remember if it's been discussed in this thread) — including the Imperial Star Destroyer, which was about $108 if I remember correctly, and this happened shortly after its release.
But you're right about the US having more deals. I remember seeing that someone found a new Guardians set on clearance.
-
I went this morning, they had loads, but wouldn't sell them to me separate... I asked 3 different people...
Doesn't surprise me. I'd imagine the same rule applies for the mini modular buildings, although I did read of someone being able to buy them straight on their own.
-
Yes, it's been long overdue, hasn't it? Does anyone have their eyes on the Rocket Racoon minifigure?
-
I'll be getting all of this wave, they all look interesting to me. The only set of the 2 waves I don't like is Hurricane Heist, I just can't bring myself to like it enough to buy it. Maybe if I can find it on clearance, but such deals are hard to find in Canada.
Have you been able to find any deals on sets from the first wave?
-
The Jester is one of the minifigs I care most for from this series, but now that I'm reading negative feedback on it, it makes me think I should skip it entirely (note: paying $3.99 per minifig in Canada).
-
I was eyeing the bike escape set. And I do agree you seem to get a good amount from the two smaller sets. I'm mainly unsure about the small pieces and how easy they are for a five year old. I have some friends who have five yr old twins and while they have a fair amount of regular Lego sets they seemed to enjoy the junior sets because they were easier to build and take apart. Not sure if anyone else here have children who have played with both types of sets.
I just posted a review of this set the other day. Take a look and see if it might help address your concerns. If it doesn't, let me know and I'll see if there's anything else I can add to assist you.
-
Great review btw
Thank you!

-
Thanks much! Do you have any requests?
It can be sets from this or another theme. From the LEGO Movie line, I can tell you that I do plan on reviewing the Getaway Glider set. -

Awaiting destruction or rescue...or a destructive rescue.
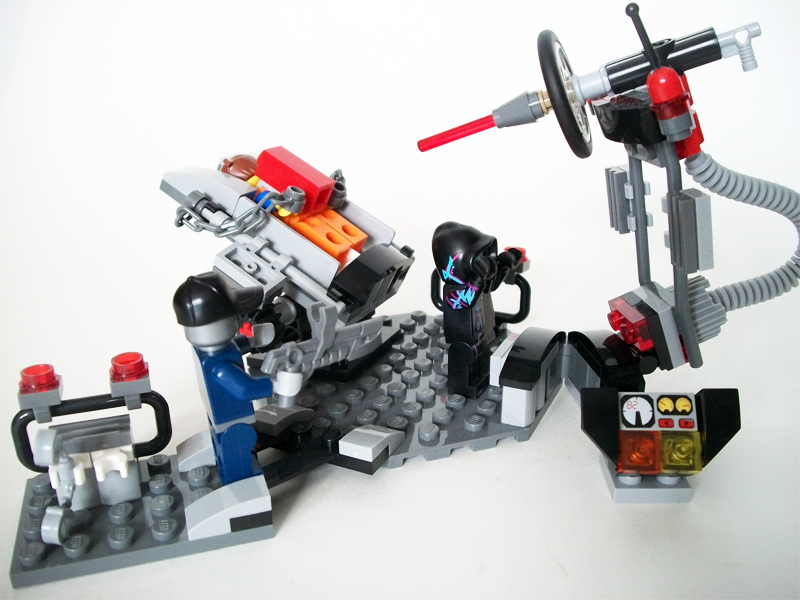
If you've ever had nightmares of being chained to the chair of a maniacal dentist, the Melting Room set may send you haywire. Put yourself in Emmet's place and it may inspire thoughts that are more chilling than sympathetic. "At least Emmet doesn't have to watch in horror," you reason. But the real scary part? The brick on his back is the most valuable thing in the room.
Name: Melting Room
Set Number: 70801
Theme: The LEGO Movie
Year: 2014
Pieces: 122
Minifigs: 3
Price: $12.99 US / $15.99 CDN
--
Packaging
Front
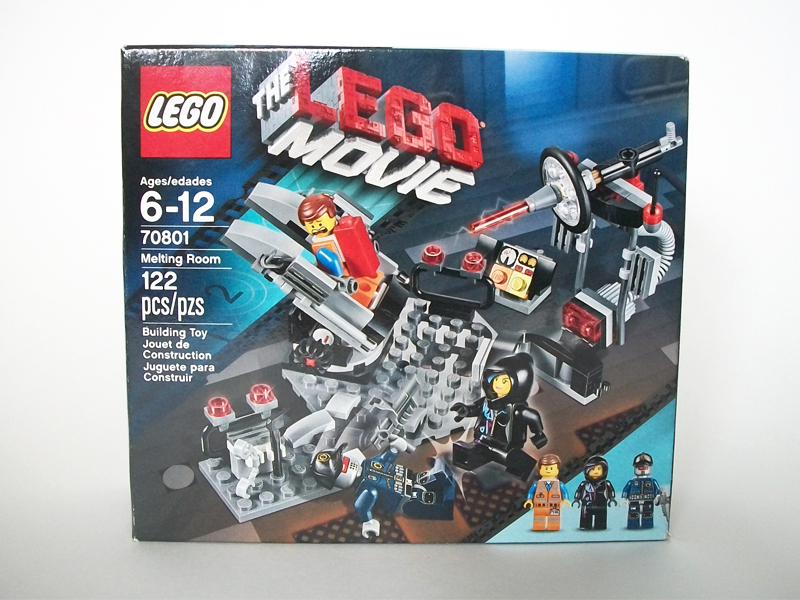
The front of the box has the set taking up a surprising amount of real estate for its actual size, to the point where the piece count should serve as a reminder of its true stature. In other words, images on the front of the box are larger than they appear. There's not a whole lot of variation that could be done with depicting this scene, but the 'rescue mission' aspect does translate with Wyldstyle trumping the SWAT unit, who would presumably go on to plead for mercy, all while Emmet freaks out over a charging laser.
Back
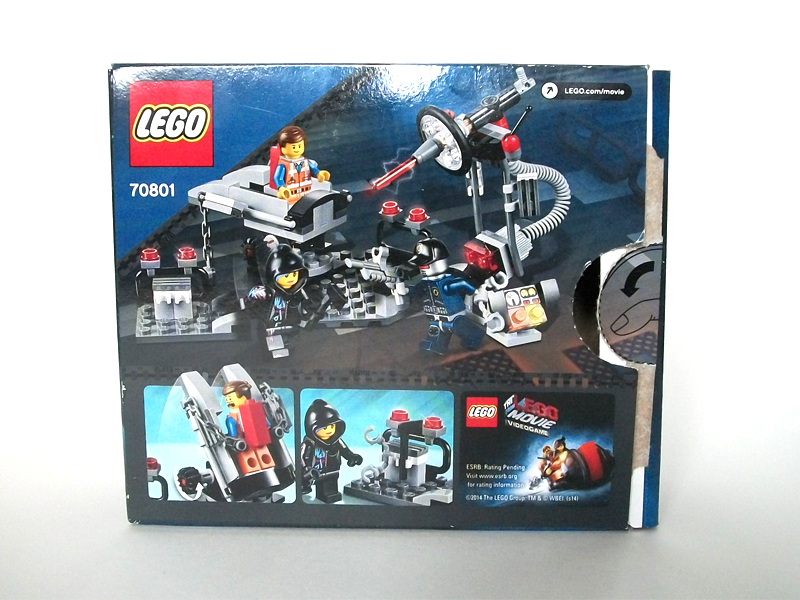
The artwork on the back showcases the main play feature on this set — the crank mechanism on the chair where Emmet sits. In this case, the main shot sees Emmet sitting upright, watching on as Wyldstyle takes out the SWAT robot. He's less fazed by the glowing ray about to slice him in half than he is in the first bumper below, where he's shown panicking as the chair swivels and rotates. (Which is it, Emmet?!)
Rather than highlighting the folding aspect of the laser, the second bumper shows Wyldstyle about to grab the axe at the small storage station. If play value is what you seek, the artwork here isn't as convincing as it perhaps could be.
Minifigures
Emmet
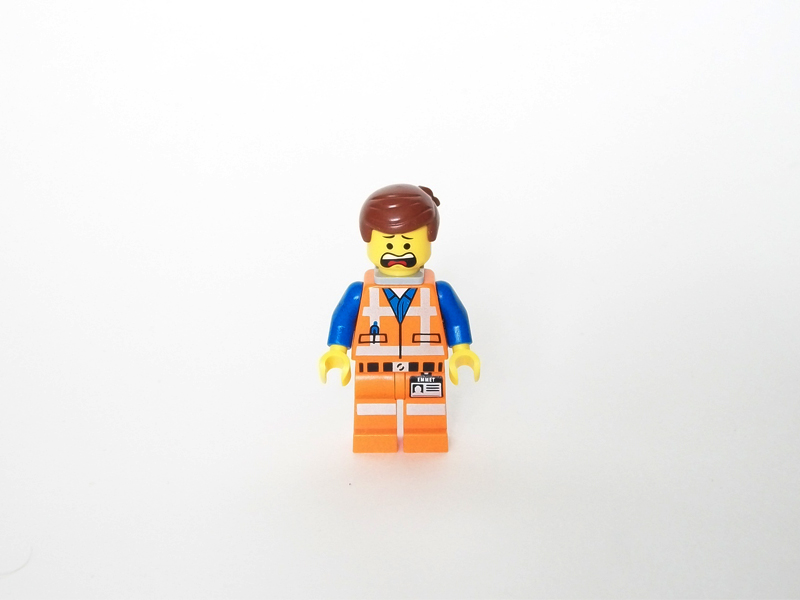
Standard Emmet getup (Piece of Resistance included) with a double-sided frightened/passive face.
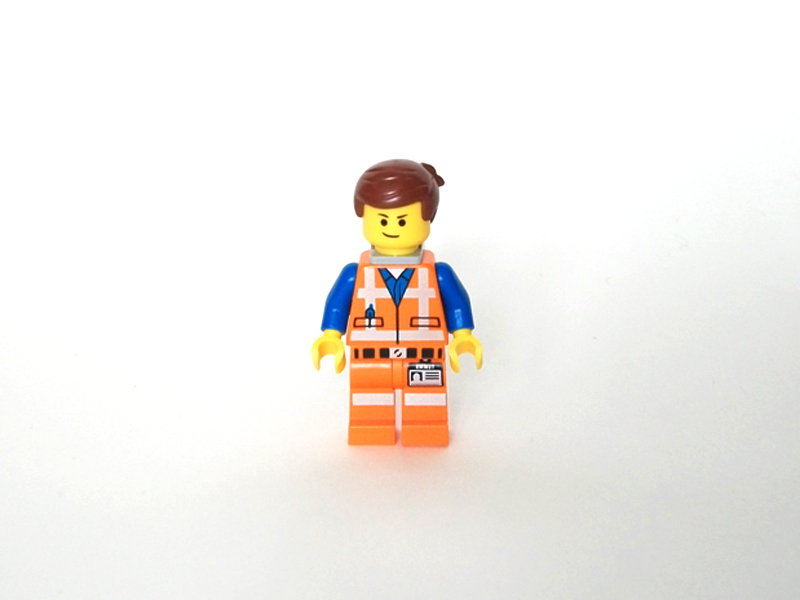
No doubt an expression of confidence in Wyldstyle's rescue abilities.
Wyldstyle
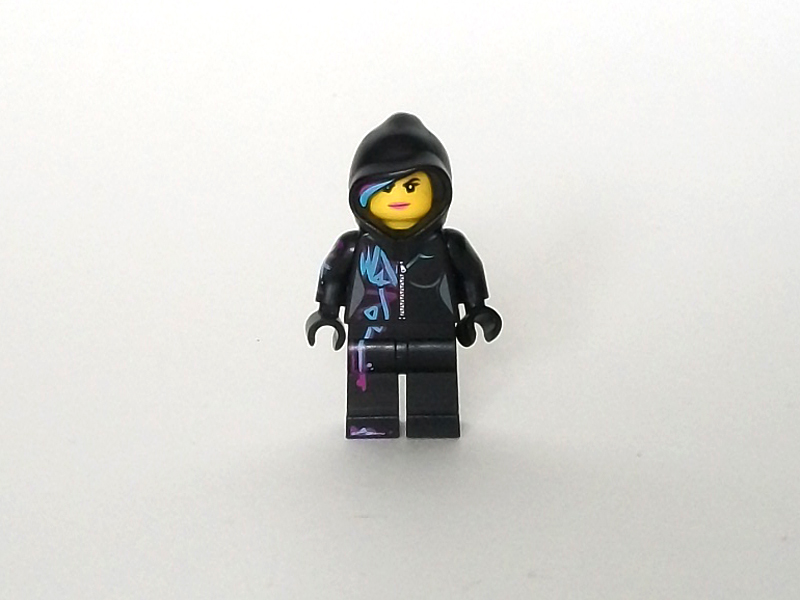
Wyldstyle gets a special, exclusive add-on for her minifigure in the form of a hood. Along the inside, you'll spot threads of purple and blue colouring to represent her hair underneath the hood — that is, what it would be if there was a separate hairpiece included. As per movie form, she also wields an axe in this scene for loosening Emmet's chains.
Robo SWAT
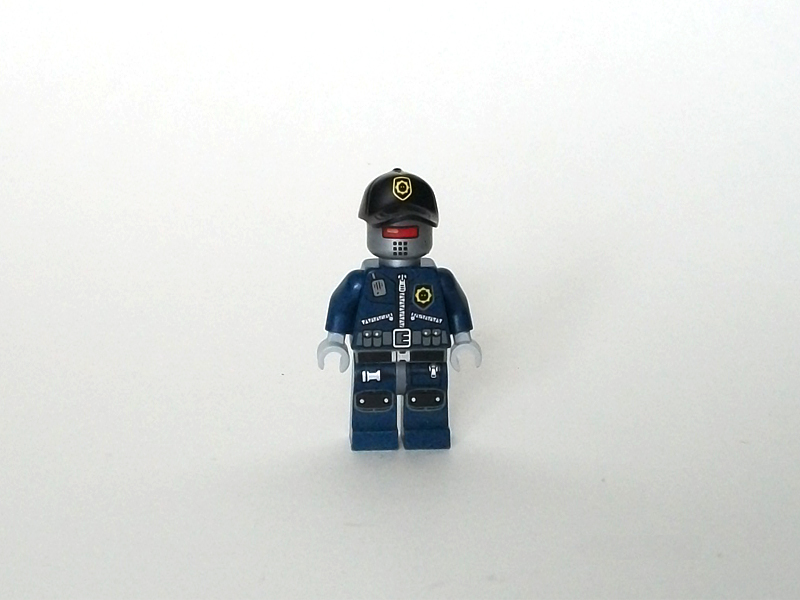
The third minifigure is a standard Robo SWAT unit from the Super Secret Police. Front torso and leg printing reflect a well-prepared and adequately stocked unit, while the back shows a receiver peeking out from what would be his back pocket for communicating with the rest of the team. He also comes with a black cap featuring the SSP insignia on the front, along with slight grooves and indentations for detail. Also included in this set specifically for this fellow is a small blaster, no doubt for guard duty.
Build
The "evil dentist chair" serves as the centerpiece for the set, fixed atop a small octagonal base. An A-shaped piece (with grey arch pieces on the ends for some stability, though not perfect) connects this area to a small platform meant for item storage (i.e., the blaster and a set of handcuffs), and here is where you'll also find one of two security barriers with two red lights — the second being situated adjacent to the chair.
Strapped in tight.
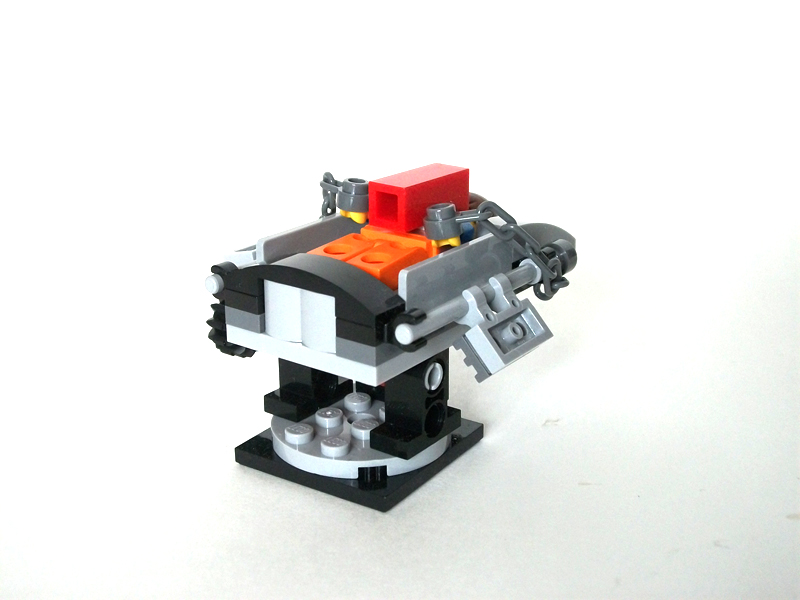
Some interesting techniques are involved in the construction of the chair itself and the rotating platform it sits on. The mechanism works nicely for a twofold interaction when coupled with the rotating function: a knob along the bottom of the chair allows for vertical adjustments where the chair can sit lying flat or standing at an angle at either extreme.
Just a regular, non-threatening swivel chair...with chains.

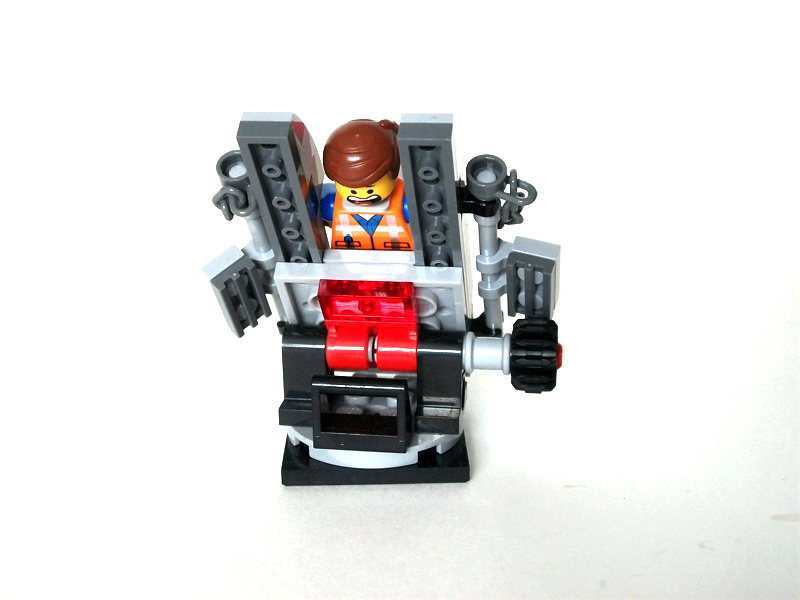
The reverse-facing, swiveling chair is designed in such a way that Emmet will be standing (securely placed) with his face looking outside the main area and chain studs on either side of the chair attached to his hands. Everything latches together nicely and the physical execution works well on the whole.
If you couldn't tell...I'M FREAKING OUT RIGHT NOW!
On the opposite end of the main base is a terminal for the laser, with a folding piece that allows you to position the device dead-on or further out. The machine prompted curiousity during the build, and when it's complete, the neatest aspect to it is the vacuum machine-like coil that serves as a connector between the top and bottom of the device.
Is this thing on?
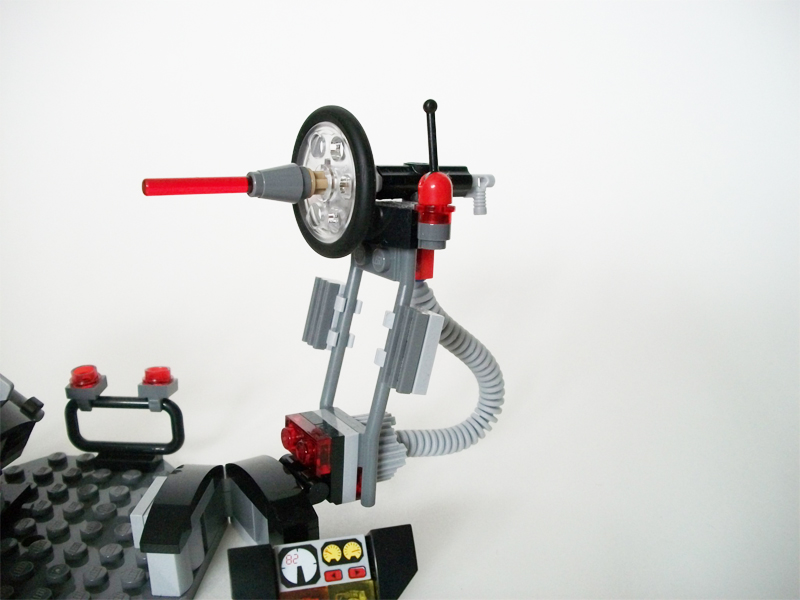
There is a gizmo to the side of the contraption with reading levels and transparent orange and yellow studs for lights. There is a question of whether or not it's a necessary detail, particularly because when the laser is away from the base, this small gizmo is out of reach for the minifigures. Even the box shows it detached and off to the side. So the integration could have been a bit better, but for the most part there will be some gratitude over this tiny extra.
Set laser to 'Exterminate'!
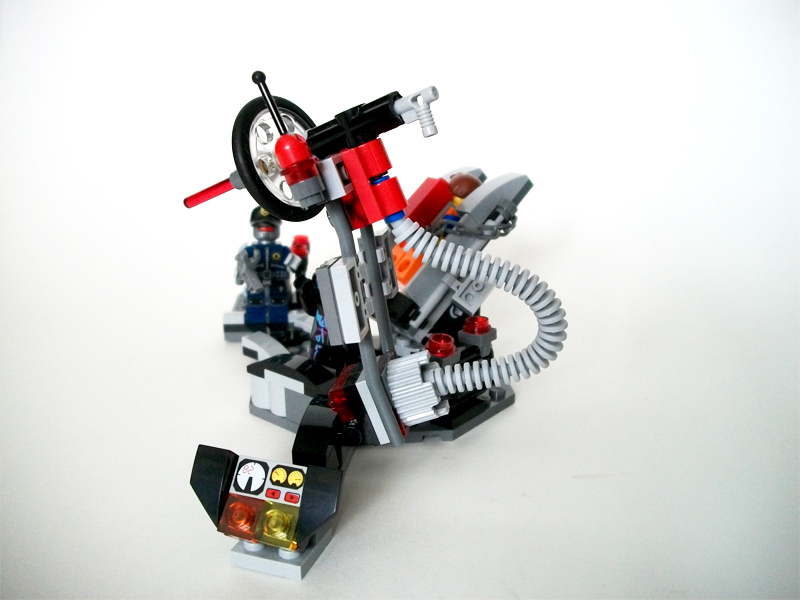
Being able to position the laser is a nice boon to the overall set, as it lends to some playability. After saving Emmet, why not fashion a new escape route...through the roof. Or maybe head underground, where your getaway vehicle awaits. Coupled with the rotating chair, it makes for a set with energy.
Conclusion
The Melting Room is an easy, time-friendly build and a good starter set for the rest of the theme, especially because there's potential for it to pair with Lord Business' Lair for a more complete experience. Failing that, it'll be seen as a quirky, compact display piece with some decent interaction to it. Compared to its closest counterpart (the Getaway Glider, for its identical price and similar piece count), the Melting Room, though still light, has more going for it in the way of play value and integration with other sets. On its own merits, it's a good depiction of the scene it's based on and there's just enough here for a mildly satisfying experience to be had. What's more, those into other sci-fi themes will want to pick this up for the main components — if an insane dentist isn't your thing, then mad scientist will do just as well.
Hold it, sister!
Design: 7
Good for what it is; interaction sells the set; decent integration of secondary components for one single unit; good construction on the chair; one or two interesting parts/elements such as the coil; minor flaws with stability and lonely gizmo.
Playability: 6
Decent for a small set of this calibre; scene re-creation; increases when paired with other LEGO Movie sets; fold-out laser allows for different positions; works for display purposes.
Value: 6
Average minifigure count; exclusive hood piece; chair is adaptable for other sets; PPP ratio is relatively on par; will get more out of it than Getaway Glider for the same price.
Overall: 63%
--
My, how the tables have turned!
-
A battle King Kong would be down for.
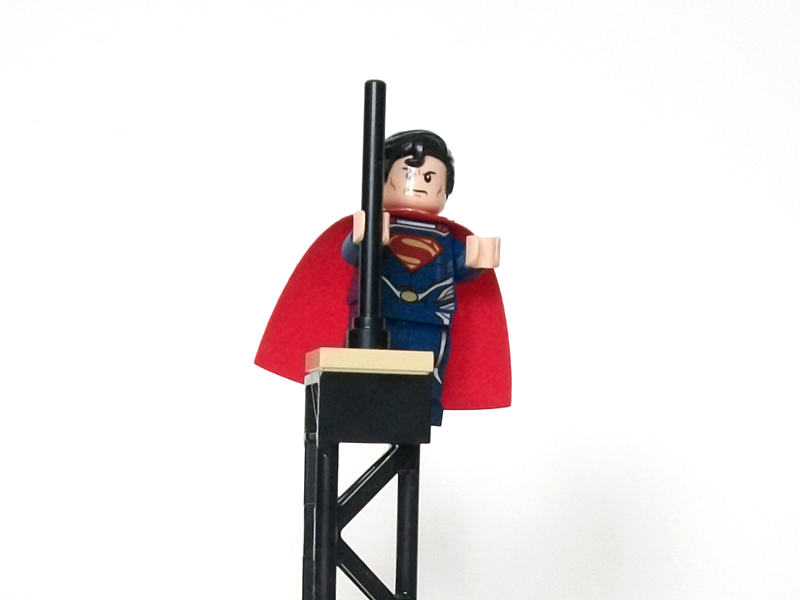
Usually when there's a showdown in a place like Metropolis, the safety of the innocent is bound to be compromised: couples out for a nightly stroll; workers at a standstill over the aerial disruption; nondescript bystanders looking on in awe over the charade. Superman is so super, so...concerned with the well-being of the citizens that there are no onlookers to speak of — they have effectively been evacuated and are far from harm's way, or so the scene suggests. But then who will document the affair? Well, that's what hidden cameras are for.
Name: Superman Metropolis Showdown
Set No.: 76002
Theme: DC Super Heroes
Year: 2013
Pieces: 119
Minifigs: 2
Price: $12.99 US / $15.99 CDN
Listings: S@H US / S@H CA / Brickset
--
Packaging
Front
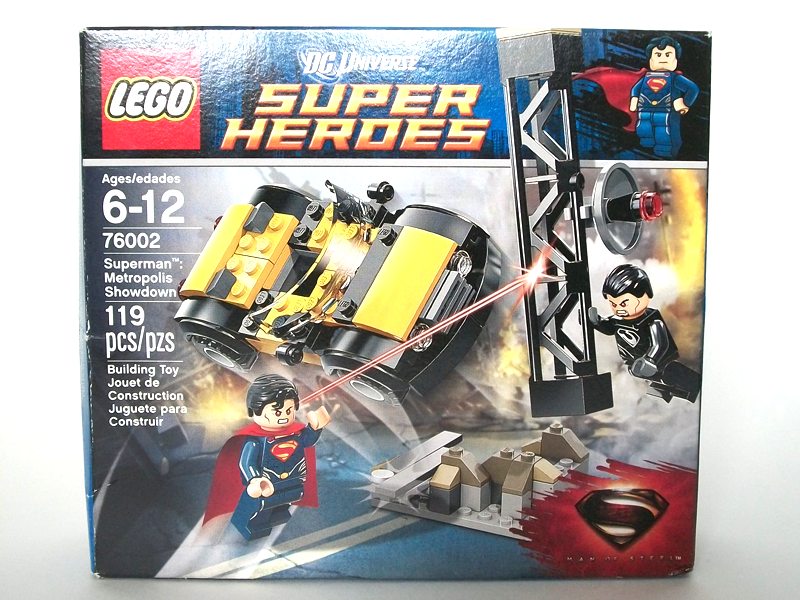
In what looks to be the aftermath of an ongoing battle, explosions and hints of rubble are used to simulate a backdrop of destruction caused by the warring adversaries. By the looks of it, Zod yanking the structural beam out from the ground isn't what started the fight; it's a snapshot of a continuing battle. (We probably caught him at a bad time, as he seems to be running out of tricks.)
I can only reason Zod wanted to take out security and broadcasting systems, but upon further examination, that "take out" operation seems more like a "fake-out" operation, what with Superman doing all the work and melting the structural beam (and, thereby, the attached satellite) with his heat vision. Objects don't count as casualties, so it doesn't seem to affect his sense of justice as much as it would if there were bystanders involved.
While all this is happening, a yellow car is milling about in the air. Going by the angle of the vehicle, it could well have been tossed at Zod from the background, rather than being flipped over as the added effects show.
On the bottom right is the Man of Steel logo, providing context for the scene.
Back
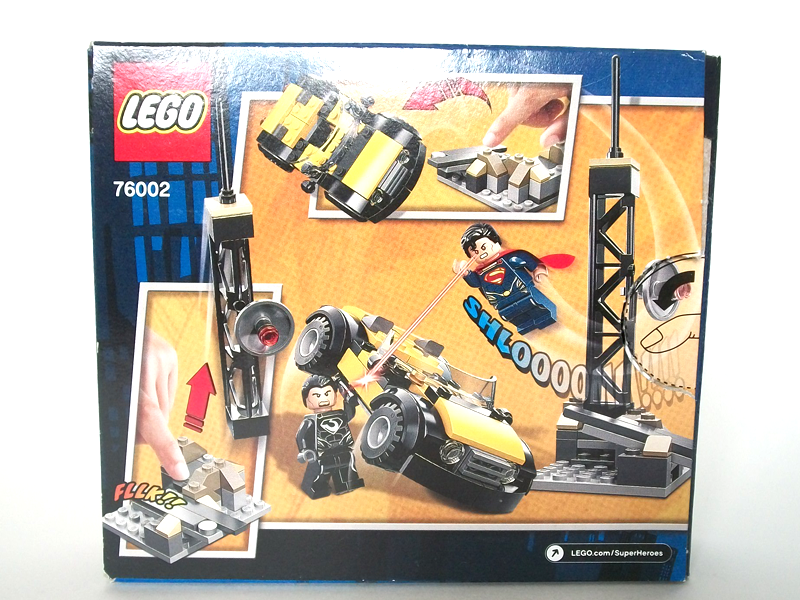
The two main play features of this set are given the spotlight at the back of the box, showing how to send the structural beam off its foundations with a flicking motion, while tapping a seesaw will send the yellow car flying.
The center image shows the car in a different position, where Zod is now using it as a shield (does he have issues with personal space?) while a swift-moving Superman tries to penetrate through the body with his heat vision.
Minifigures
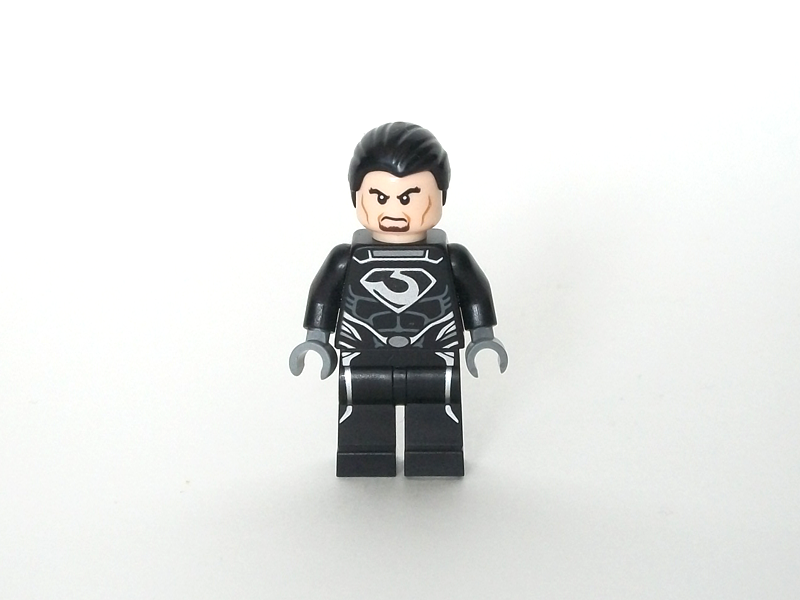
Superman
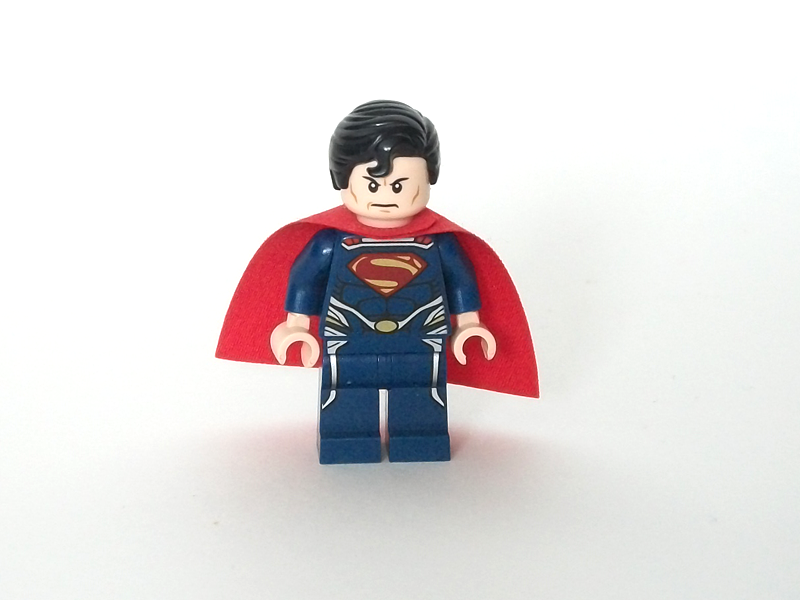
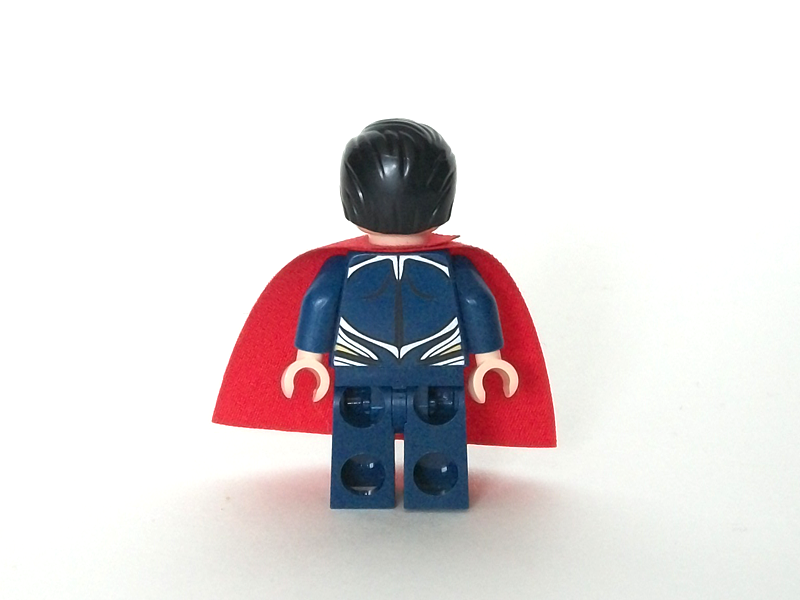
Superman's body print is bold, with the silver lines giving him an energized look. Also comes with a red cape, a cowlick-type hair piece, and an angry face print: all usual for Superman's standard appearances.
Note that the expression you see depicted on the box is for advertisement purposes only: Superman doesn't come with a second face print, surprisingly. That would've made this version more worthwhile than its counterparts. This same version of Superman appears in two other sets -- Battle of Smallville (76003), and Black Zero Escape (76009) -- and differs from the one included in the Superman vs. Power Armor Lex set (6862).
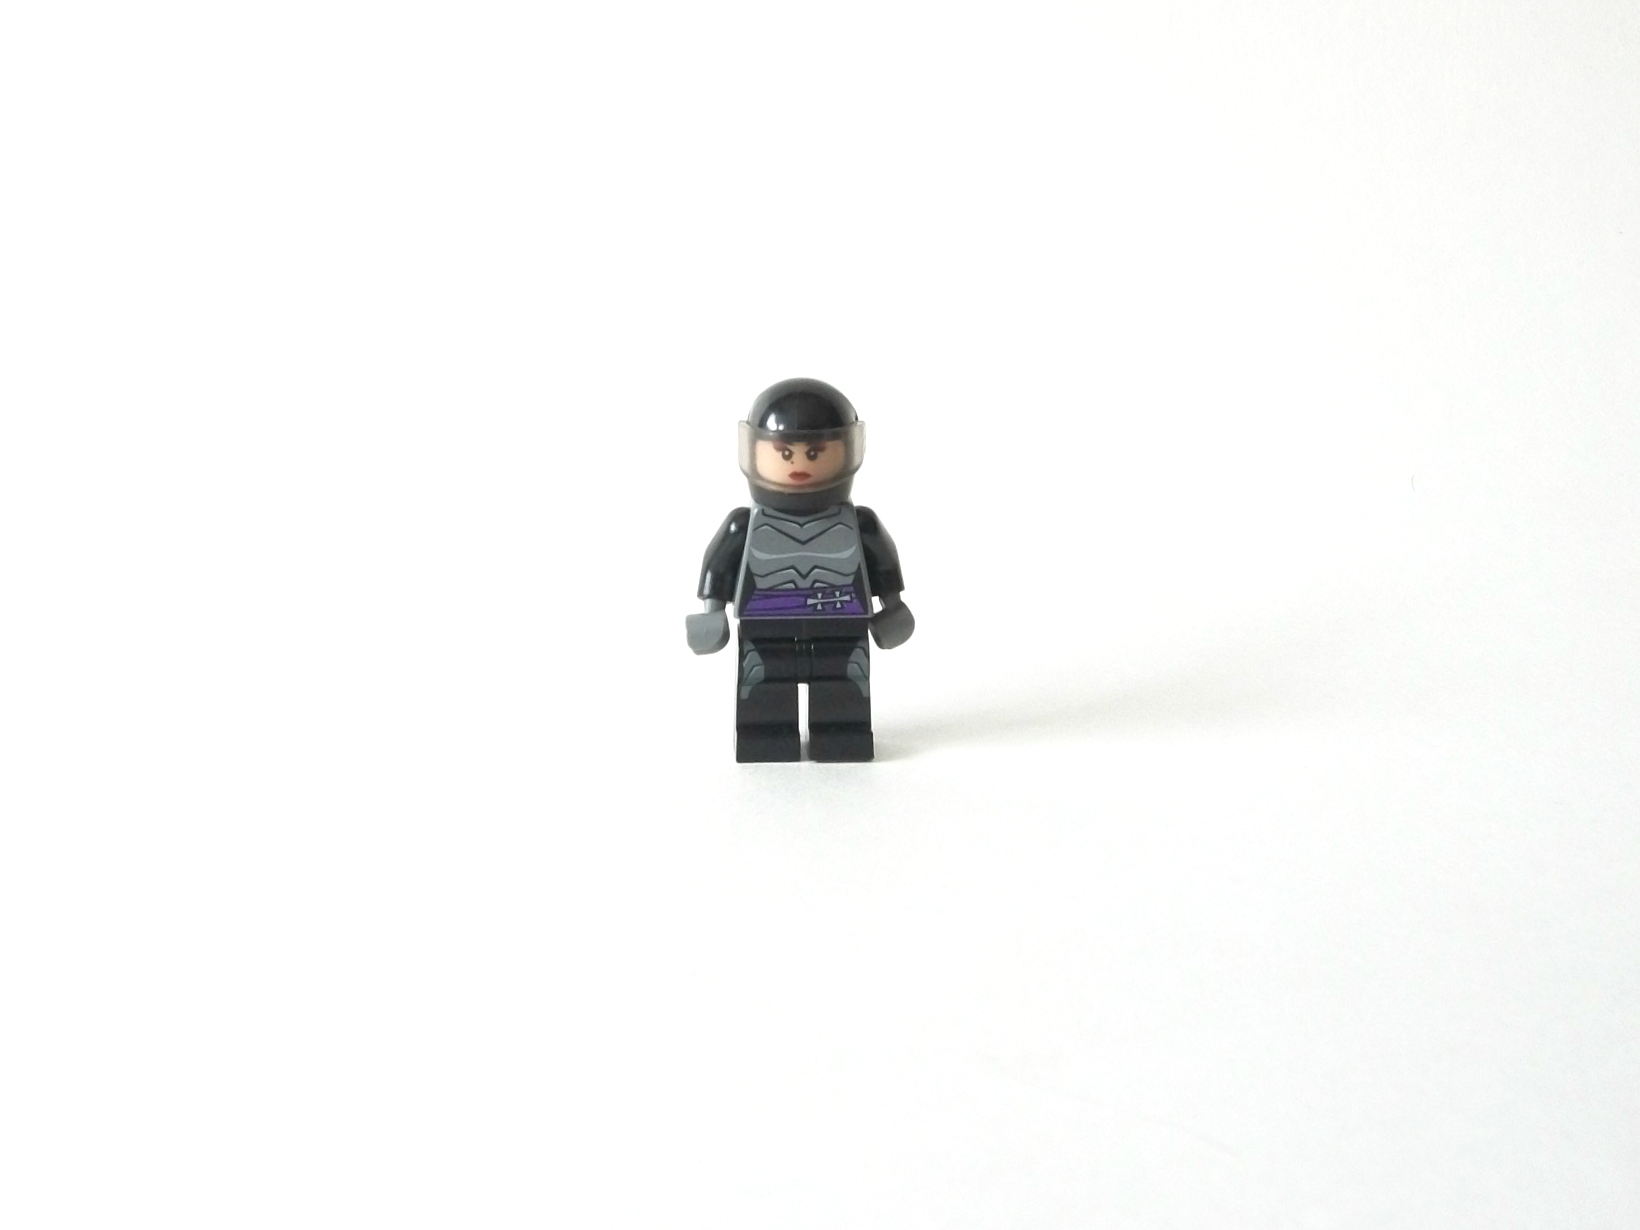
General Zod
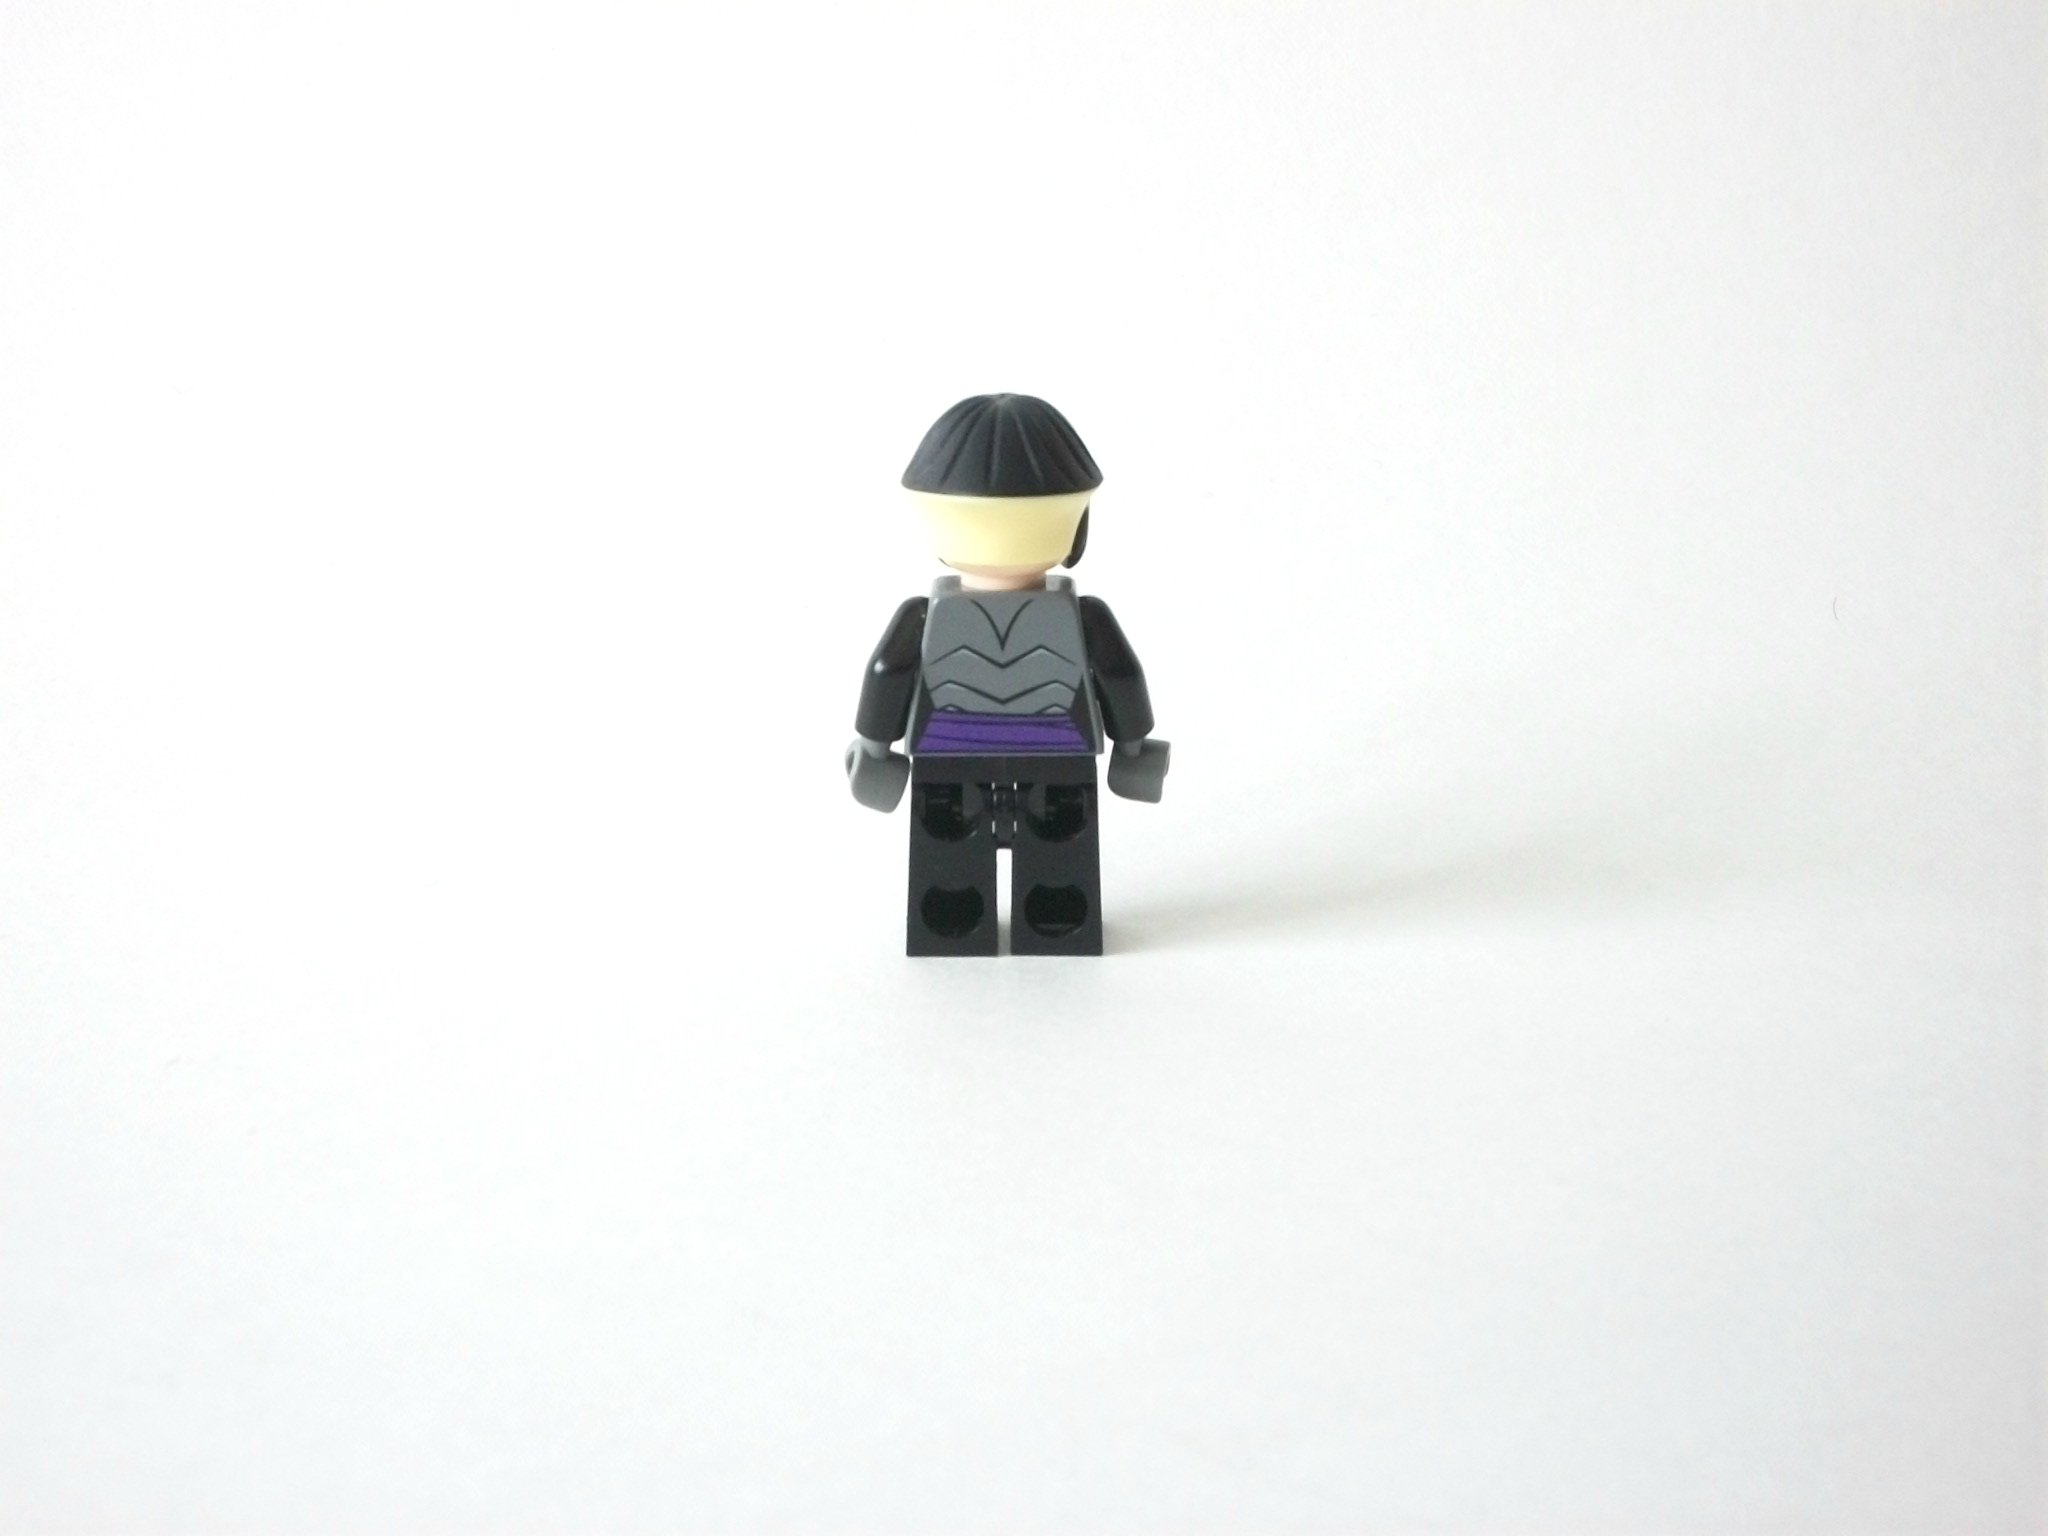
Even more of a bold print than Superman's, for the reason that Zod's body armour doesn't fade into the background. Every element stands out but without there being unwelcome competition.
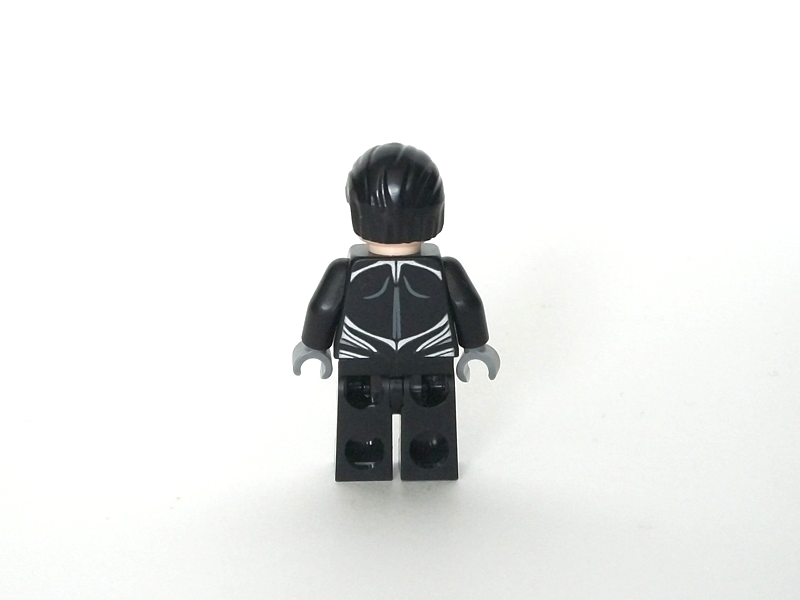
Zod shares the same back print as Superman (colours swapped), except his is immediately visible whereas Superman's cape conceals his.
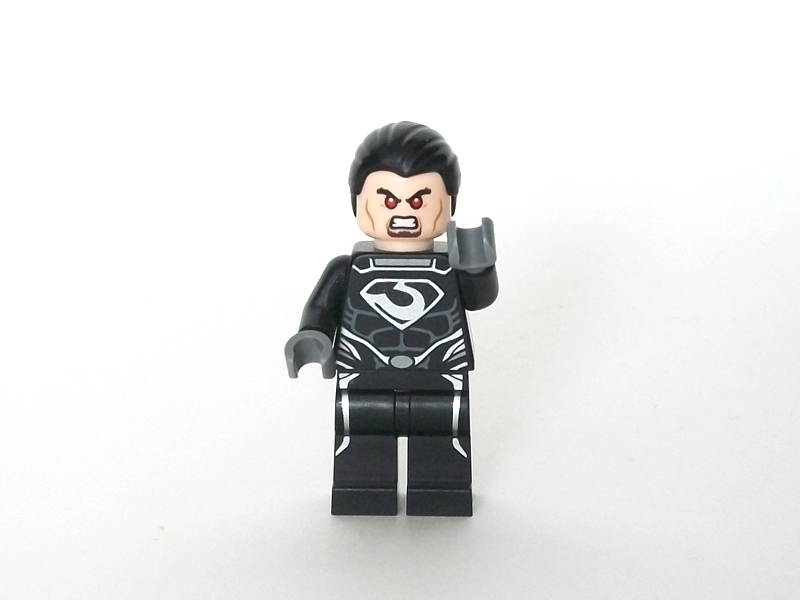
Unlike Superman, Zod comes with a double-sided face print, with the alternate being the same expression depicted on the box with red eyes and a furrowed expression. A small note: Onlookers won't notice this when he's positioned in a neutral pose but his beard peeks out from the bottom of his hair piece.
Build
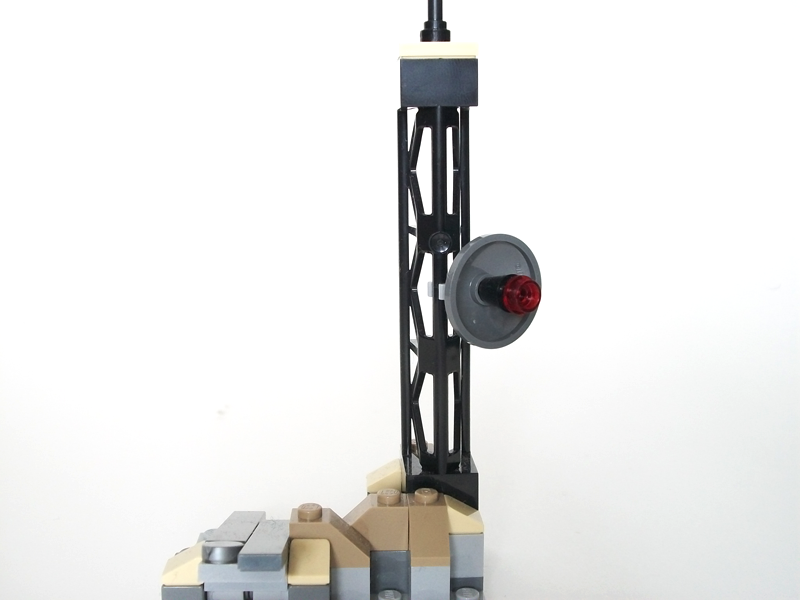
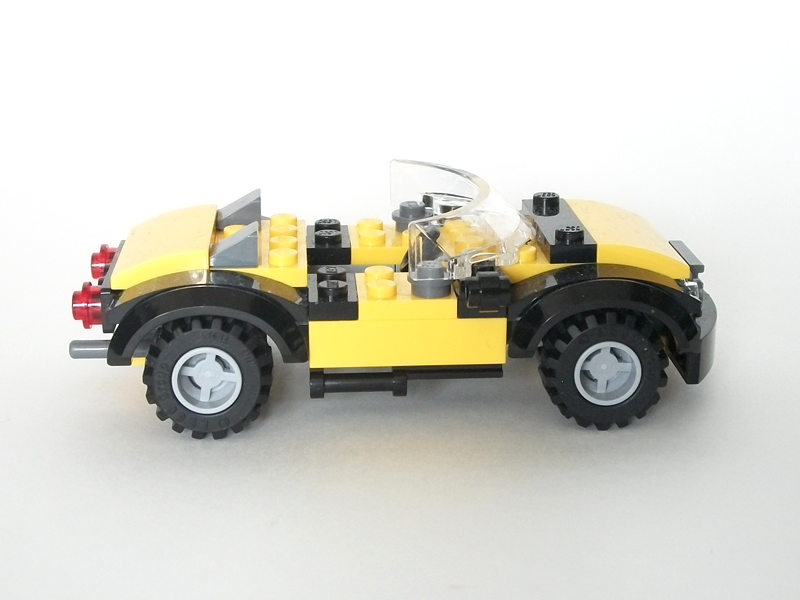
As the story goes, Zod is wreaking some level of havoc in the downtown core, but you couldn't tell as much from what you get in the set. The main build is modest, even meagre in stature. With a small rectangular base, you have what appears to be scraps and rubble not unlike what you might see at a construction site but still too organized for a junkyard scene. These act as two main platforms for the primary tricks of this set.The setting for this so-called showdown is not much to look at.
The first trick is a seesaw cast as metal bars, designed for the roadster vehicle to sit on top of the short end. By slamming down on the long end while it's raised, you can overturn the car and send it tumbling down a hill like Jill.
A shortsighted parking job.
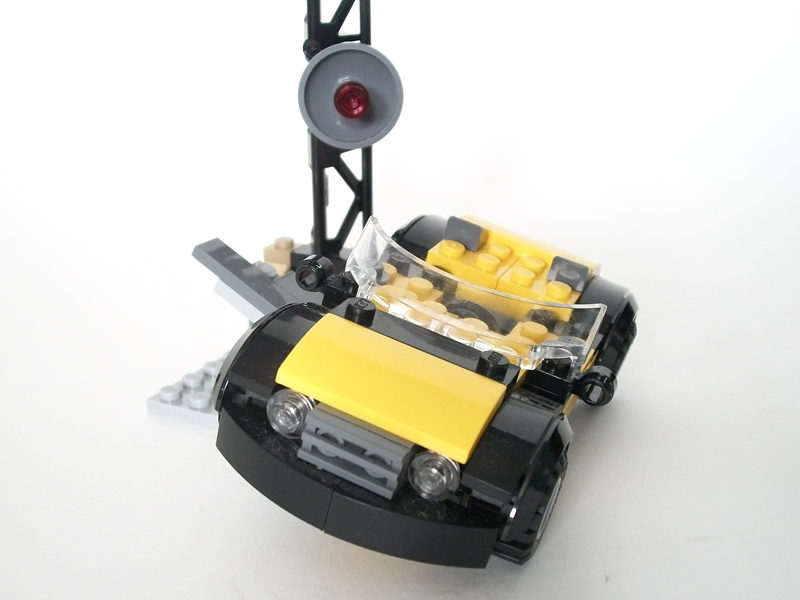
The second trick is a button of sorts, underneath what is meant to represent a skyscraper: the weight of your finger will send the whole structure over the edge. The "building" is a singular, wire-like tower piece with a 2x2 plate at the top, followed by an antennae piece, which acts as a grip for one of the two fighters (the beams by which the structure is held together can serve the same effect). More than likely, you'll need to remove it to attach a minifigure, due to instability.
In the middle of the structure is an attached satellite dish, with a transparent red stud on its front end as a sign of activity. It's not the most secure add-on, seeing as how the whole thing rests in the back of a 1x1 piece with a holder arm.
There goes the reception in the west district.
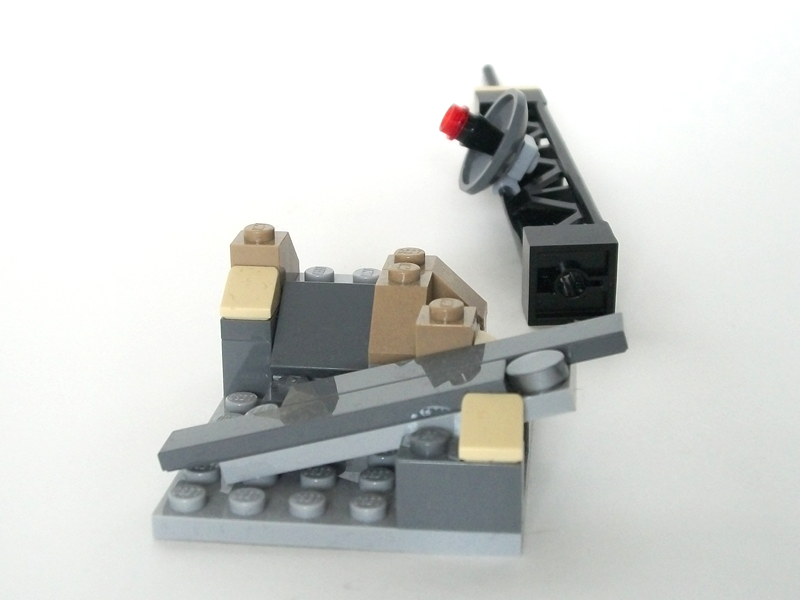
These two aspects of the set encourage variety for interconnected action sequences, but in practice what's present feels lacking and behaves more like a suggestion to what could be than what is. No citizens will be harmed in the making of these scenes, which gives room for experimentation when simulating actual scenes.
A clean earthquake if I ever saw one.
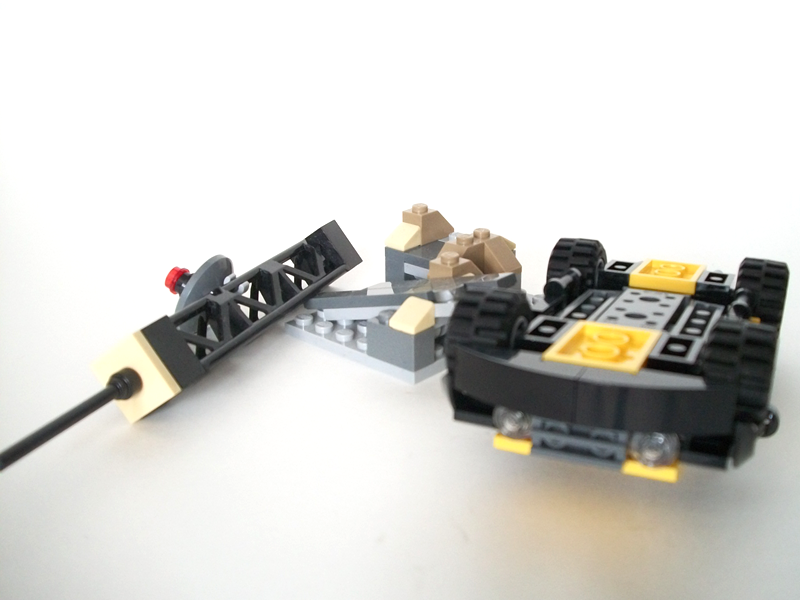
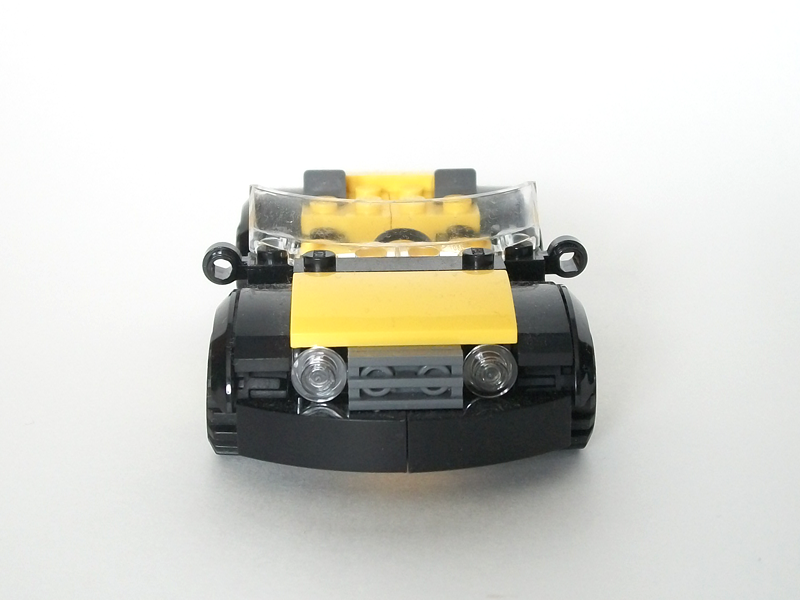
When it comes to the car on its own, I was surprised to find it an enjoyable build. The prevalence of yellow bricks does interfere with the sleekness contributed by the black, but that's where the front bumpers, side panels and arch pieces help mitigate what could be seen as a loss. These features lend to a sturdy vehicle, and being that they act as finishing touches, working from the chasis to these outer details does give a nice feeling.
Something tells me the windshield isn't Superman-proof.
The underside of the car is open in some respects, with the seat having a hole in the middle with white space to the sides. As a design choice, it does beg some alteration for a more complete hull. There are also hook pieces on either side for an unexplained purpose. The most understandable would be that they act as grips for Superman or Zod to grab onto and then toss, but perhaps they could also be used along grappling lines of some kind. With some extra thought, you can put the vehicle to creative use outside this set.
A skeletal underside that calls to mind Technic frames.
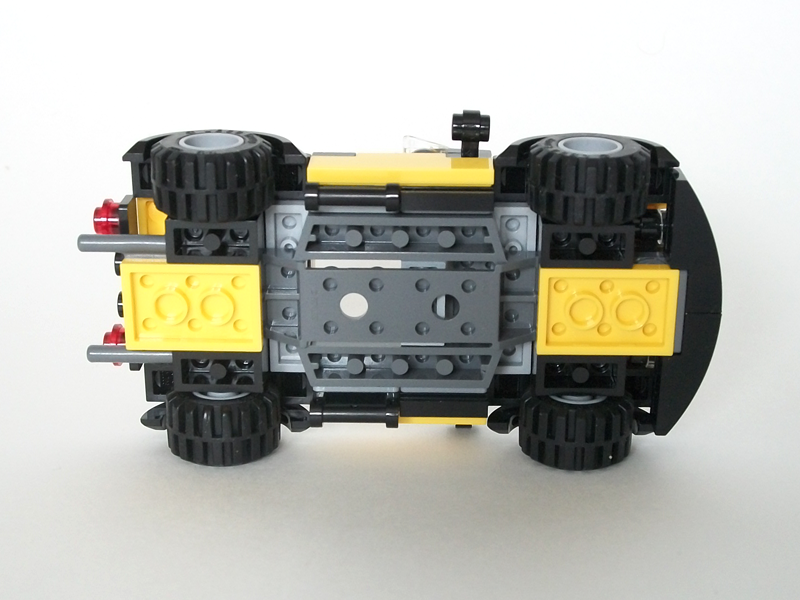
The fact that the topside doesn't feature any covering or exterior features like doors doesn't inhibit the overall design; it actually makes some sense if you were to seat Superman in the front, as it allows room for his cape to rest (albeit it'd be silly to expect him to drive to meet up with Zod). As well, it's not a perfect match: the two angled pieces near the back will likely result in a crumpled cape unless you remove them. So by that logic, perhaps we can reason the car is more Zod's style.
The sign reads, "Has dreams of becoming a convertible."
Conclusion
To be frank, this set is a hard sell. Superman isn't an exclusive inclusion and can be found in sets that offer better value; other versions of Zod can similarly be found in larger sets. On a design front, it doesn't fare well standing alone. The two play features aren't enough to make up for the sparing design, although the vehicle is a bit of a saving grace if you're a fan of that sort. On the one hand, the lack of interesting quirks makes this ideal for expansion. At the same time, that could also be used against this set, considering what it is intended to be: bearing the word "showdown," there's too much being left to the imagination. If the other Superman sets don't draw your eye and you'd like to get one of the two characters in some form, then I suppose you'll be able to make do. But there is a clear slimness to the design that makes you want more for the cost of the set.A temporary truce while we figure out where to re-locate.

Design: 5
Sparing on the whole; car has clean design and nice features that make it sleek to some extent; fans of vehicles may still desire a fuller design; some parts don't hold very securely in place; pleasing minifigure prints
Playability: 5
Not a great deal to play with; needs to make contact with other sets to be valued; play features work fine but the set begs for more action elements and creative scene setups
Value: 5
Not good but not terrible; can find Superman elsewhere; not worth paying full Canadian price; feels lacking for what you're getting
Overall: 50%
--
I'll take it from the top...or off the top, knowing my strength.
-
Need for Mutagen: Hot Pursuit.
At night is when the Foot Clan is on the prowl, usually following after some sinister plot. Tonight, though, the turtles are without a mission to thwart, joining the city in a rare period of rest. Meanwhile, Karai decides to use this window for some scouting, unhampered by tailing ninjas or meddlesome turtles. Can Karai accomplish on her own what Shredder's goons fail to in a group? She seems to think so.
At the other end of the city, Leonardo prepares to make use of his secret card: a hidden camera situated at the top of a skyscraper overlooking the docks. With the element of surprise on his side, he heads to the surface in stealth, careful not to tip off his brothers. Traveling on higher ground, he makes his way to a residential district where, just beyond the homes, he hears a familiar noise coming from a nearby alley. A quick look from a bumpy rooftop and... It's Karai — and she has a Mutagen canister with her! Before he can even plan an attack, Leonardo loses his footing and stumbles into the dark alley with a loud crash. "You!"
Karai boards her motorbike in haste and dashes out into the street. She's getting away!
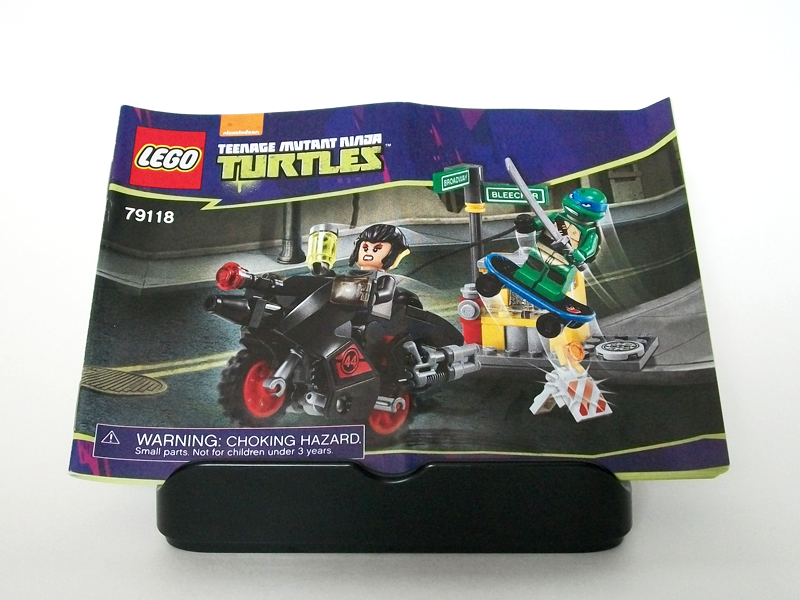
Name: Karai Bike Escape
Set No.: 79118
Theme: Teenage Mutant Ninja Turtles
Year: 2014
Pieces: 88
Minifigs: 2
Price: $12.99 US / $15.99 CDN / €14.99 EUR
Listings: S&H US / S&H CA / Brickset
--
Packaging
Front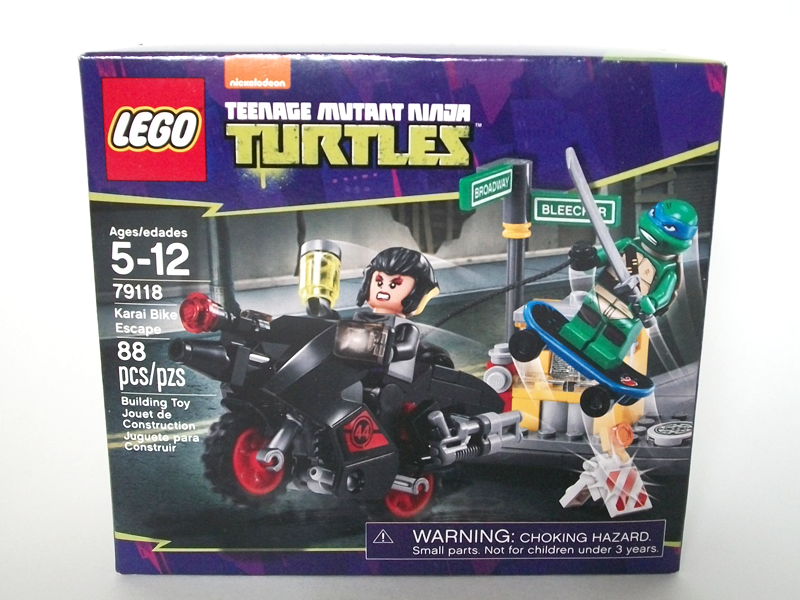
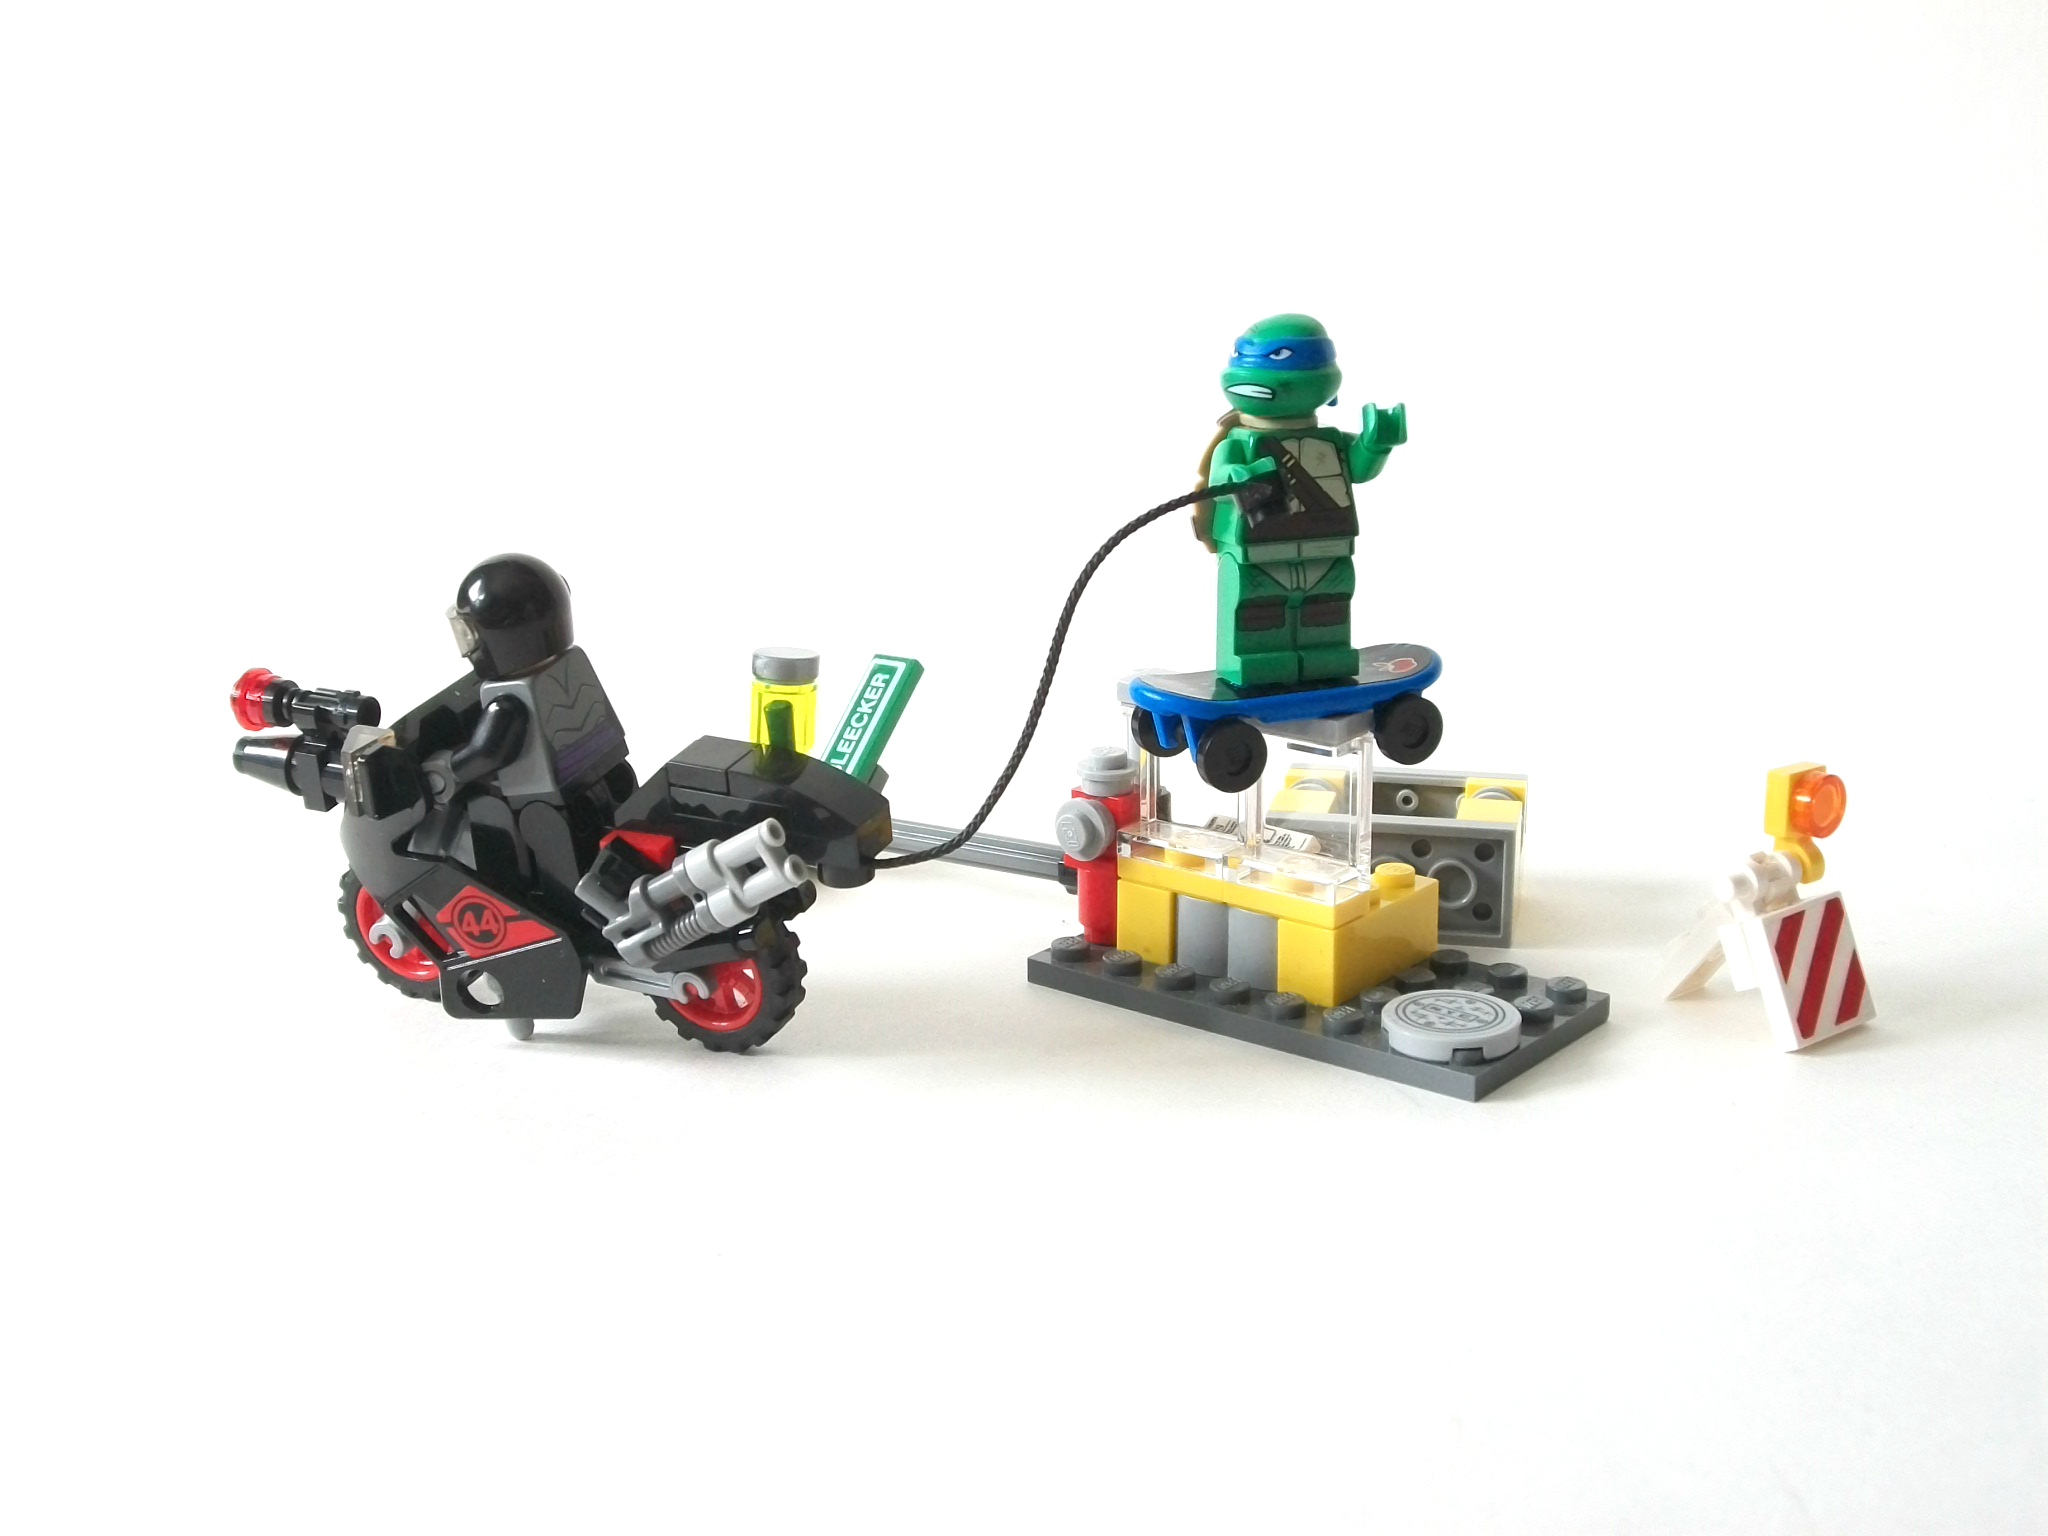
Appropriately, Karai takes center stage on the front of the box, seen riding her bike with a Mutagen canister in hand. Leonardo is shown in close pursuit, airborne and giving chase on a skateboard. No particular feature is accentuated (leave that for the back of the box to take care of), but there is good integration with the individual elements — including the construction sign, which could otherwise have been left off to the side.
Back
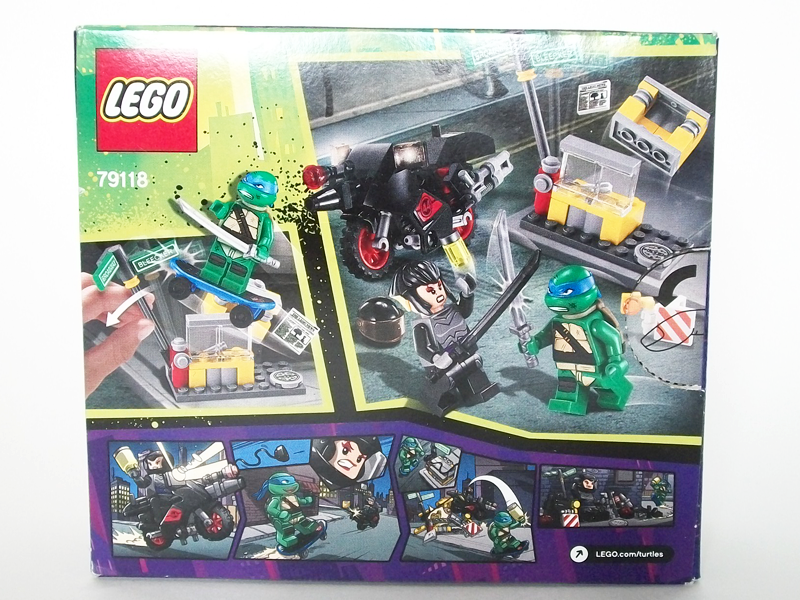
Running along the footer of the back is a fun little comic strip, which showcases the premise of the set from a less static perspective. Here, Leonardo is shown sneaking up behind Karai and attaching rope to the street corner, causing the bike to be completely dismantled and allowing him to make off with the canister. The main image shows Karai off her bike and doing battle in the streets with Leonardo, both equipped with weapons of their choosing. It's a fitting scene, considering the dynamic these two characters share on the show (but for realism sake, Leonardo really should have two blades). The smaller image off to the left shows the main play feature with the newspaper stand, albeit it shows both Leonardo and a human hand triggering the device — in reality, it's not so sensitive that ramming it with Leonardo would set it off.
Instructions
Note: Stand not included.Front
Parts Index
Identifying pieces in a pile shouldn't require much thought from what the instructions indicate. A majority of the included parts are distinct enough to tell them apart from others, including the elements that make up the bike. This partly is what makes this set a fairly quick build (i.e., around 15 minutes, maybe less depending on your experience with building).
Promo
Sample Page
A preview of how the newspaper stand trick works.
Minifigures
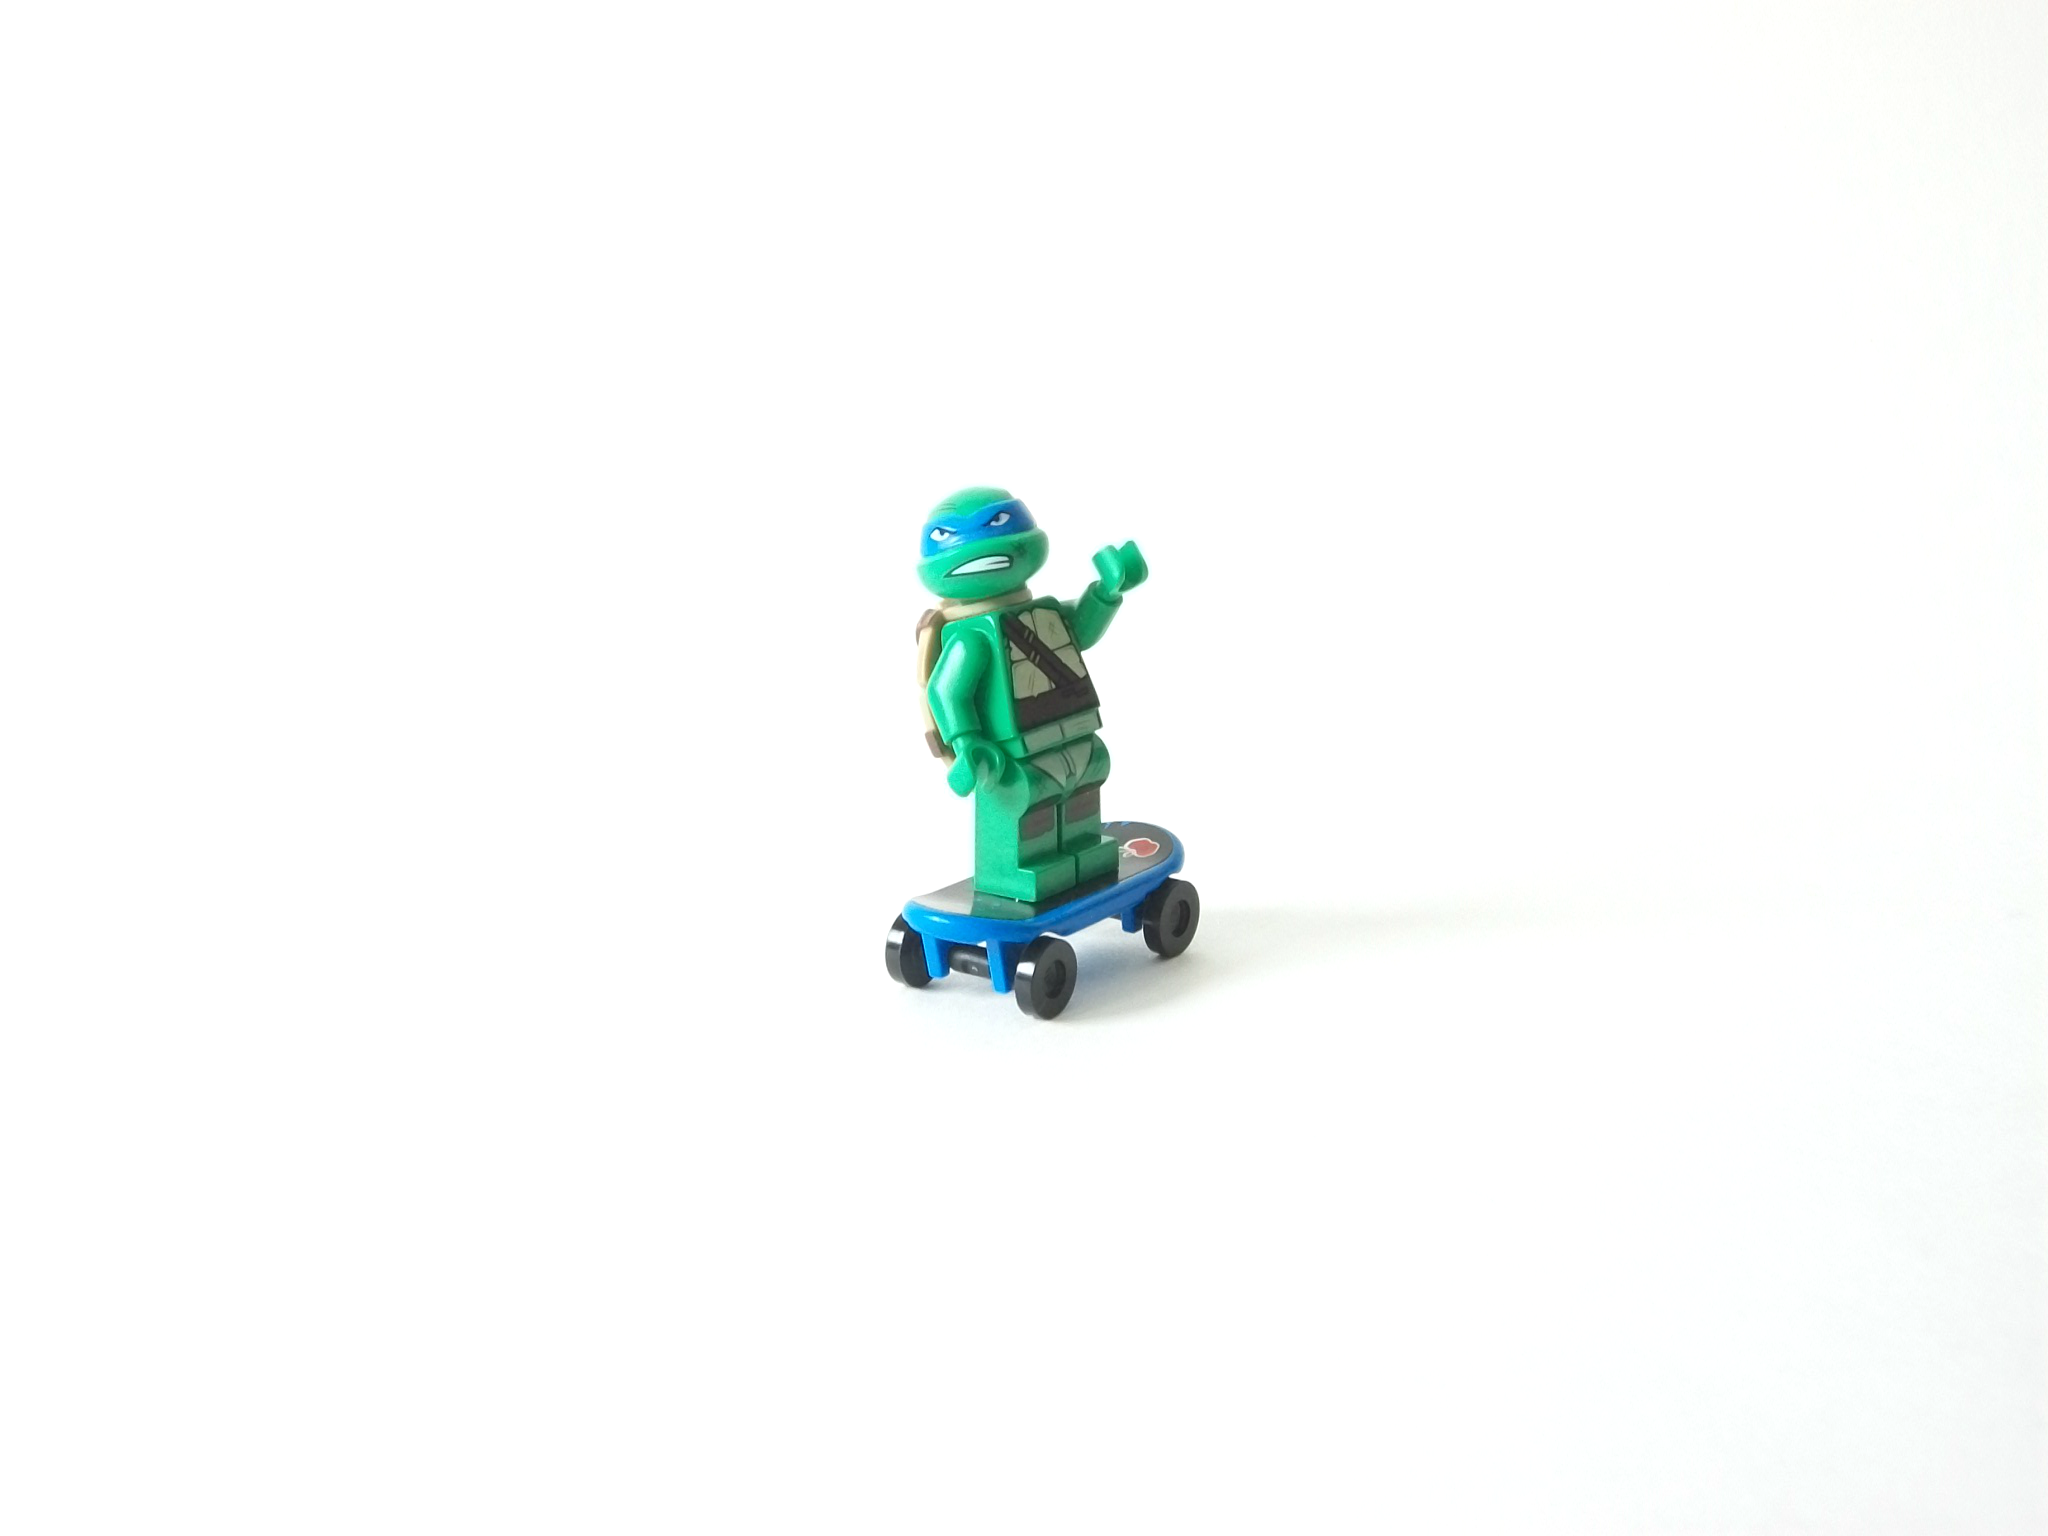
Leonardo (Front)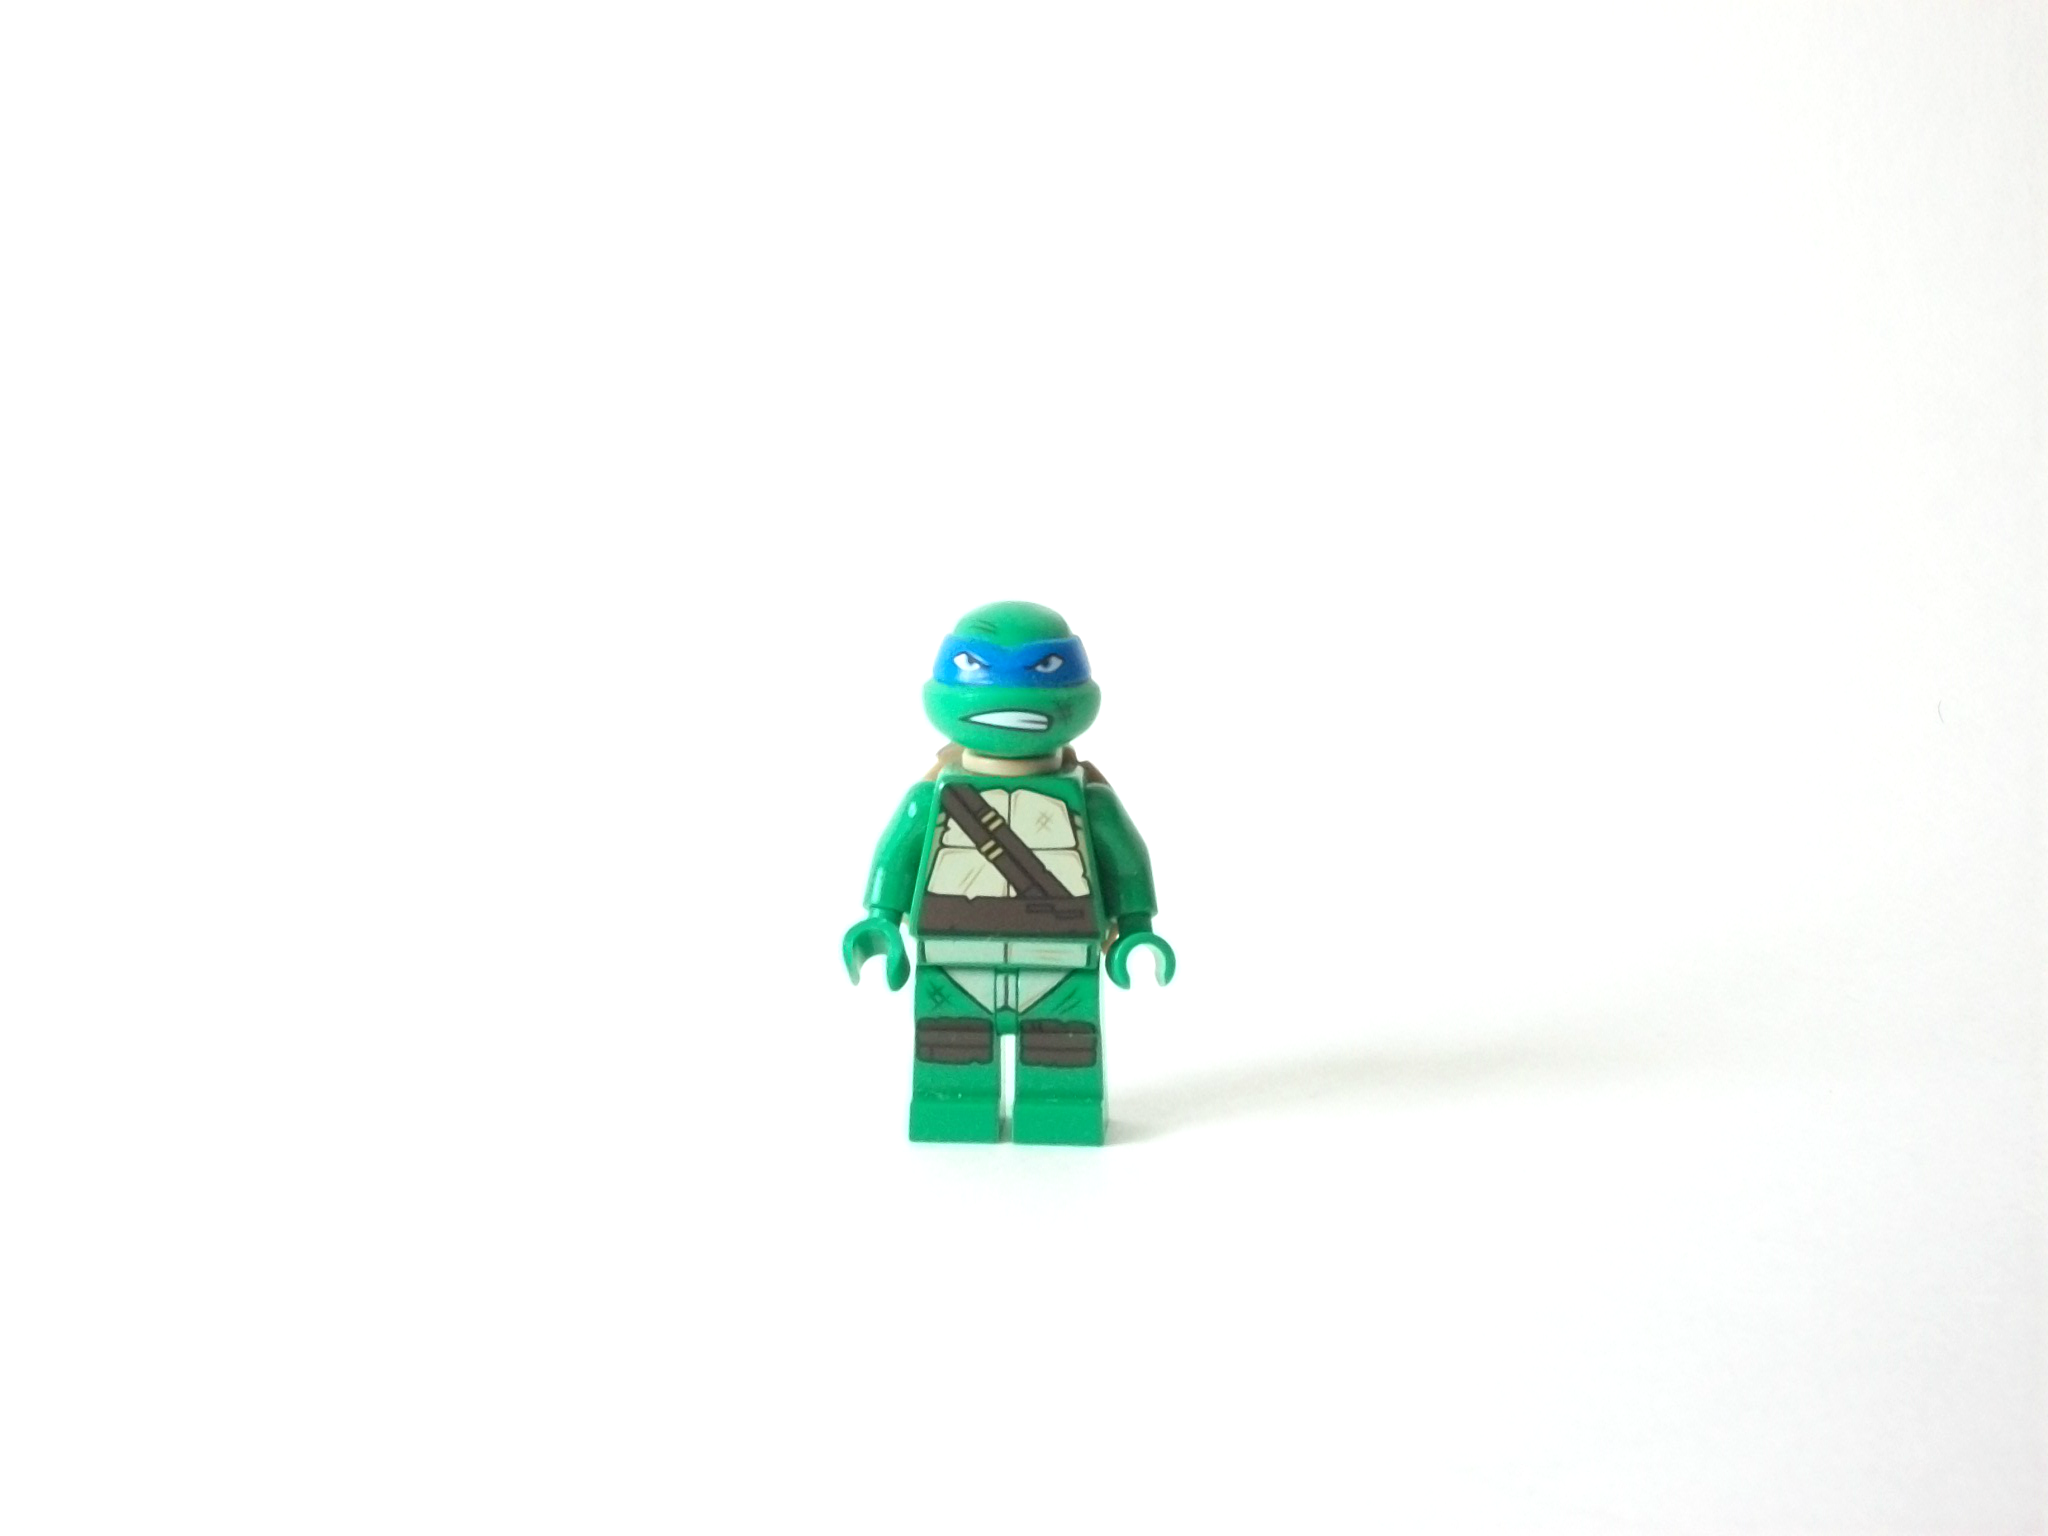
Leonardo looks like he's just recovered from an accident, with a rugged look brought on by scratches. Although the pursuit has already left him bruised, he's determined and ready to face whatever battles lay ahead.
Leonardo (Back)
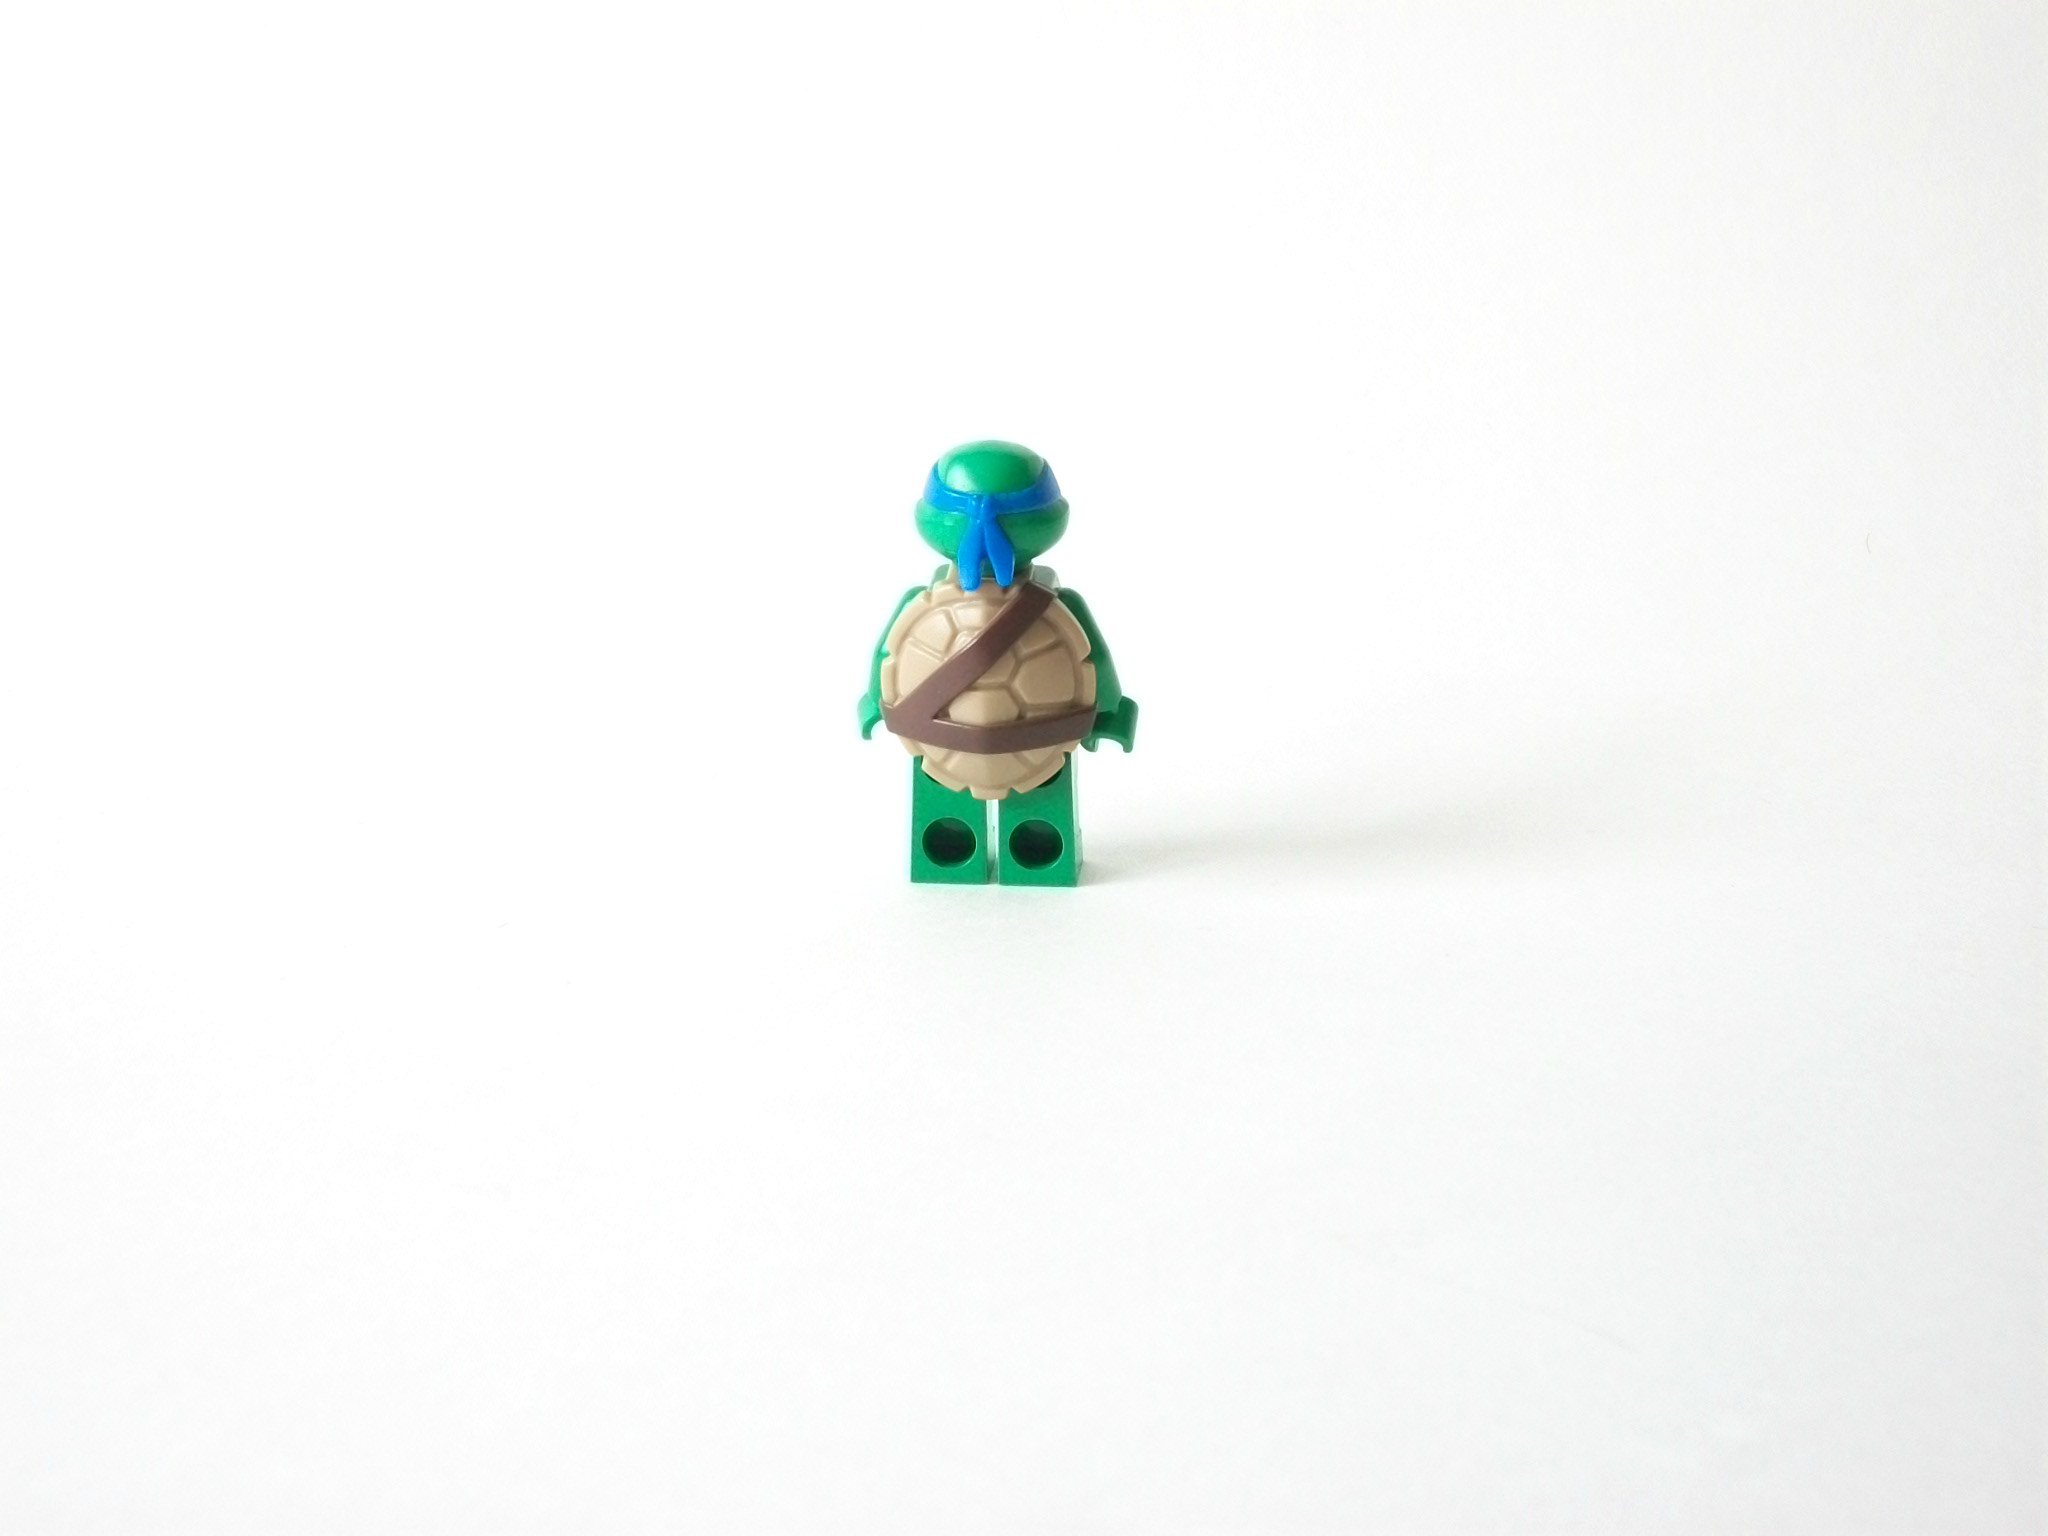
His torso printing has been seen before in Wave 1 sets such as the Turtle Lair Attack (79103), but his facial printing is different here, as are his legs (though by only a few extra markings). He comes with one silver sword to do battle with.
Karai (Front)

This is Karai's first appearance in the LEGO TMNT line, and I must say they did a great job in representing her. What really contributes to the accuracy is the exclusive hairpiece designed for her minifigure.
Karai (Front with Helmet)
When she's boarding her bike, you can switch it out for a black helmet seen in other recent City sets. You even get a spare helmet screen in case you lose the first. In the way of printing, she has two faces: angry and passive. When using the latter with the hairpiece, a sliver of the angry face peeks out at the back, which doesn't happen in the reverse scenario.
Karai (Back)
Her torso consists of her metallic body armour, with a purple cloth held together by two silver pins. Unfortunately, her bike suit — seen in 'Karai's Vendetta' from Season 1 — is absent here. Like Leonardo, Karai gets her own sword but in black.
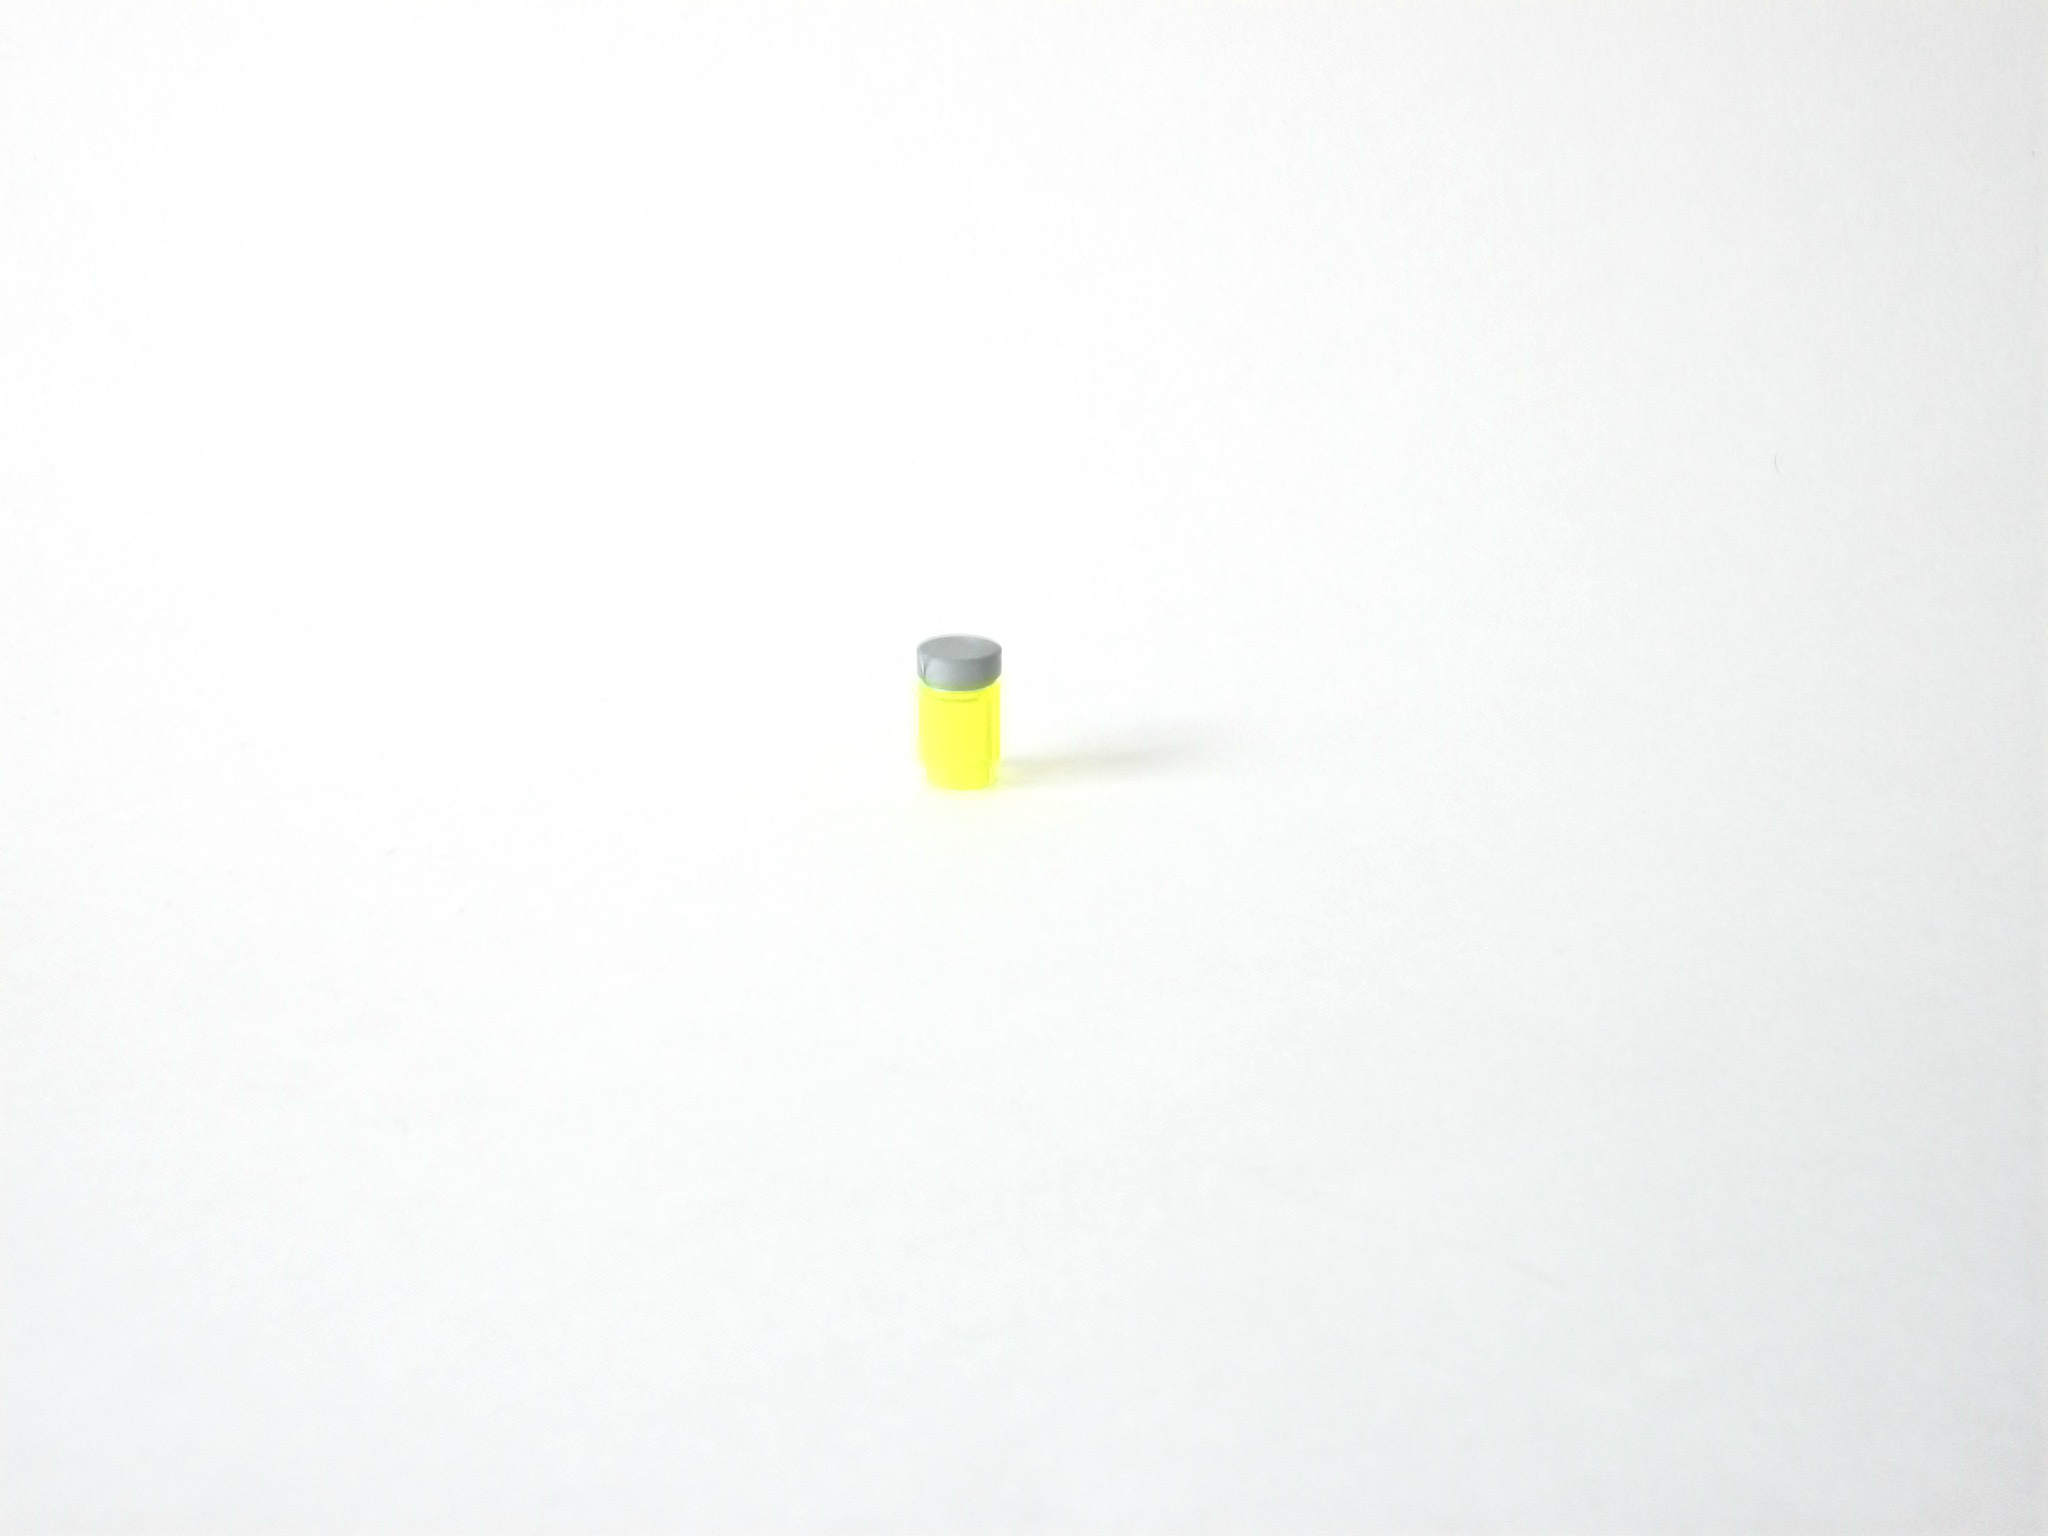
Also meant for Karai is a Mutagen canister, built from a small grey cap and a round light-green brick. At a Mutagen restaurant, this would be of the 'Small' variety while 'Medium' would be those seen in the Kraang Lab Escape (79100) set.
Build
Commencing with the bike as the first build, you're given the body as a single piece to work with, along with a small sticker sheet for basic applications on the sides with the '44' logo. This joins with the mechanical frame, which houses the front and back wheels, as well as faucet-shaped pieces to keep the vehicle leveled. Added to the front of the vehicle are two transparent light fixtures and a (display-only) missile launcher.Feast your eyes on the getaway vehicle for this operation.
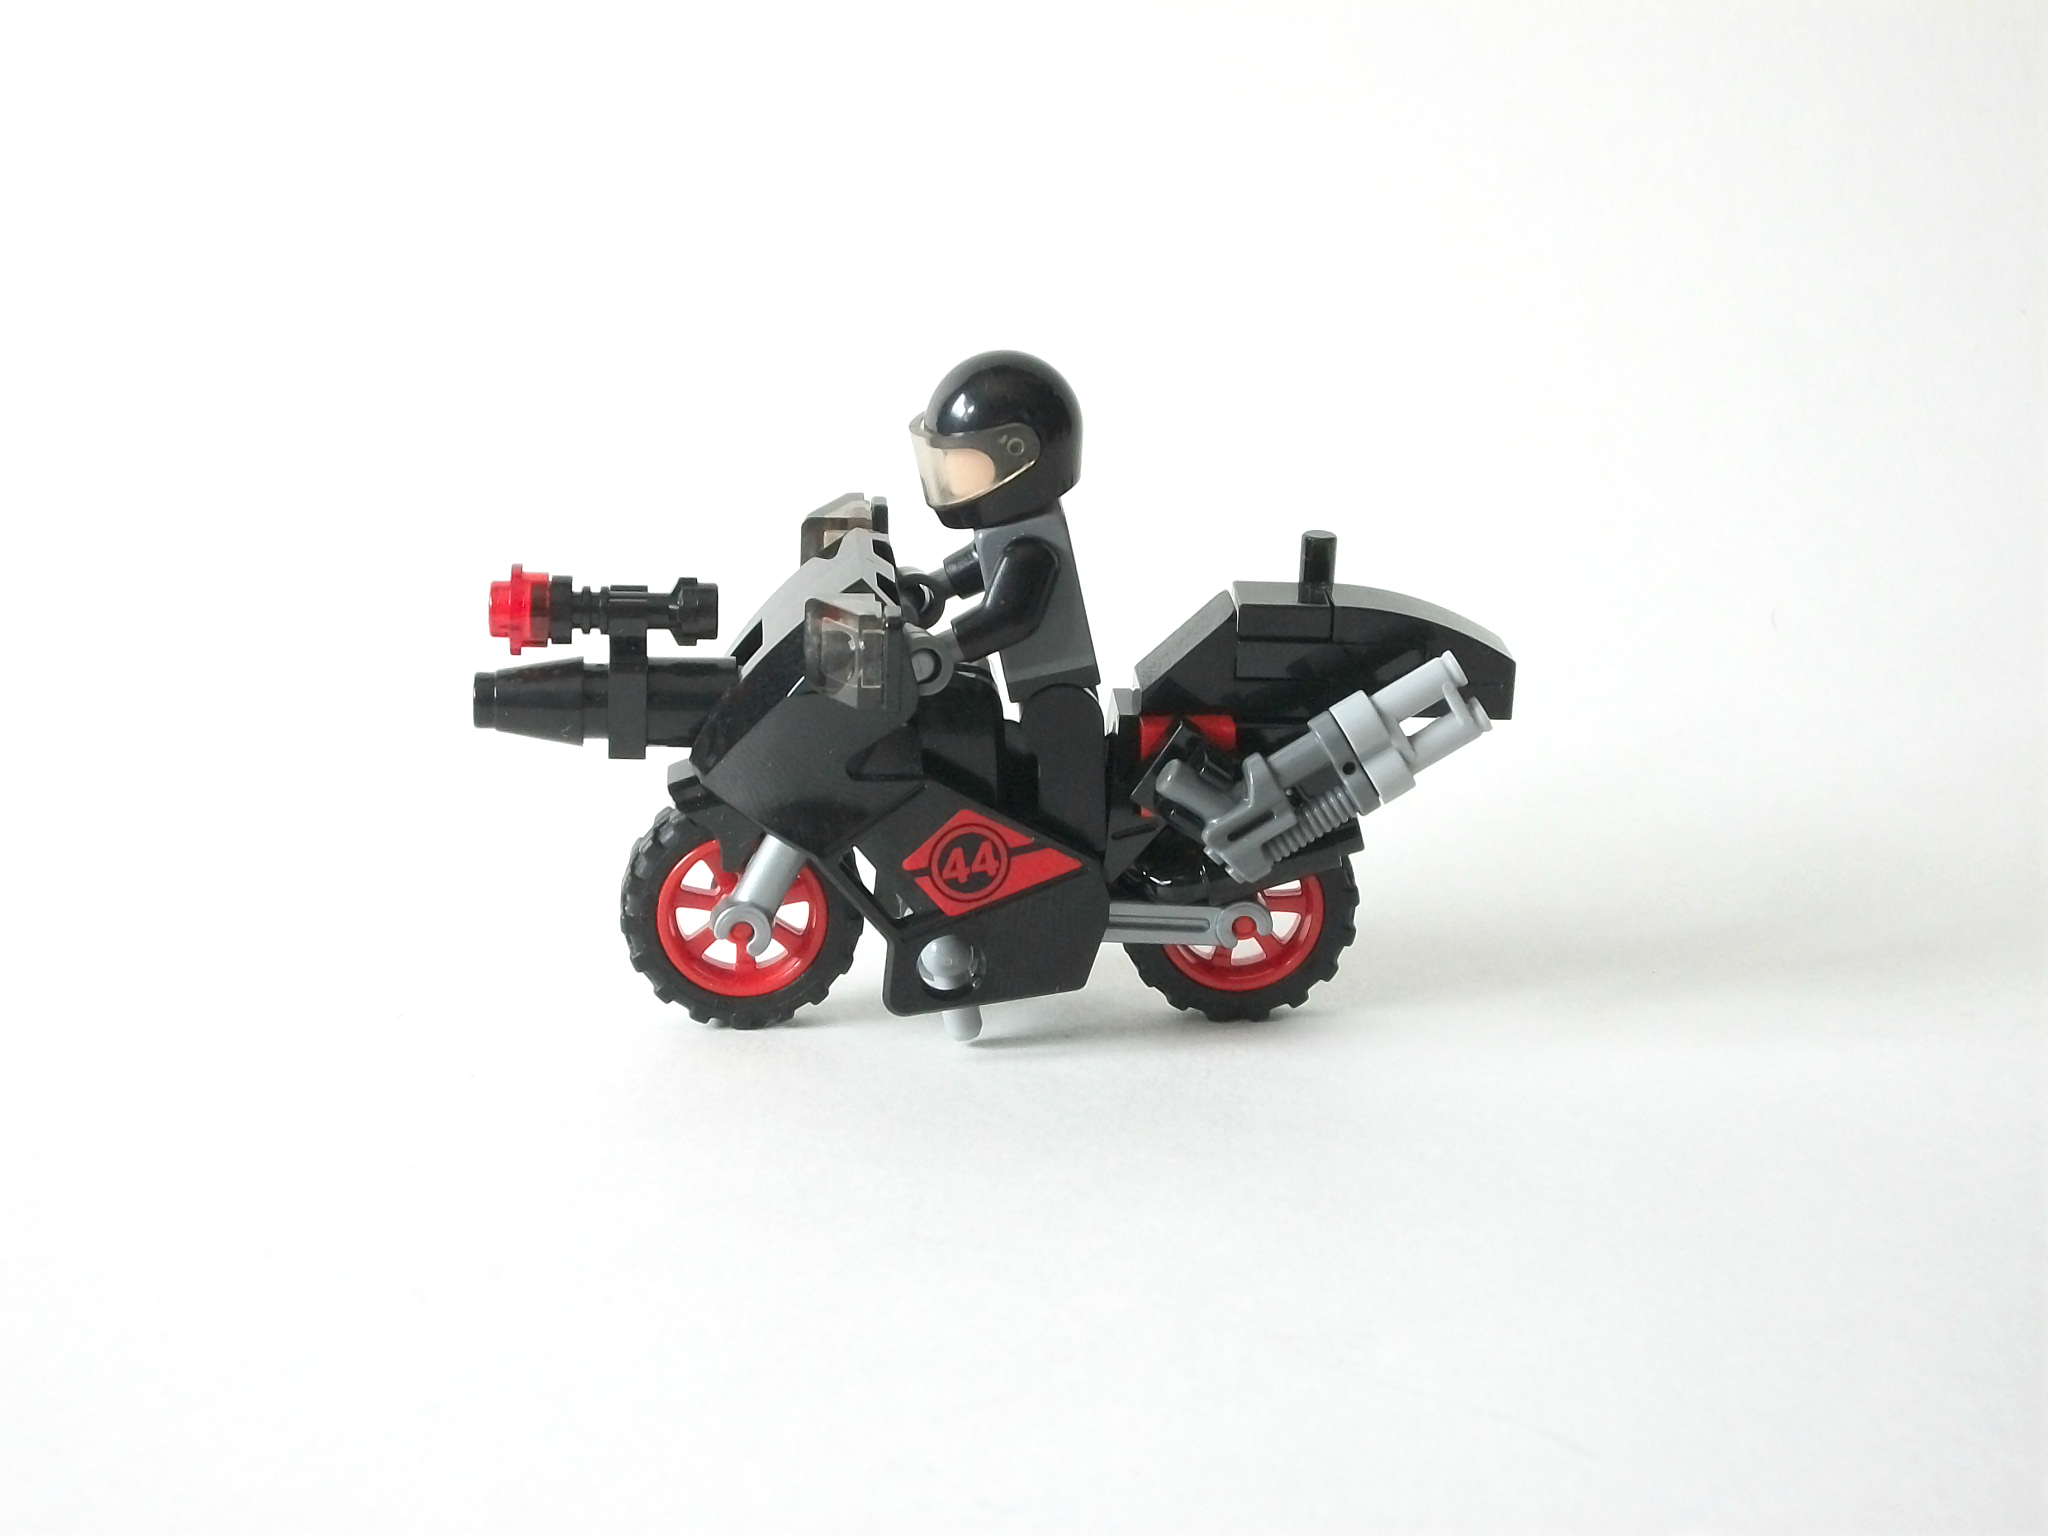
Towards the back you'll find a gun-shaped exhaust positioned at an angle, and a holder piece for the helmet that's held together by small bricks on top and underneath. It is by no means complicated to put it together, but as a finished piece, the bike looks stylish and can certainly hold its own. Karai fits well in the driver's seat standing up and you don't have to worry about it being too loose; the bike itself is similarly stable in a neutral stance.
Karai from the back — the view you'll see most.

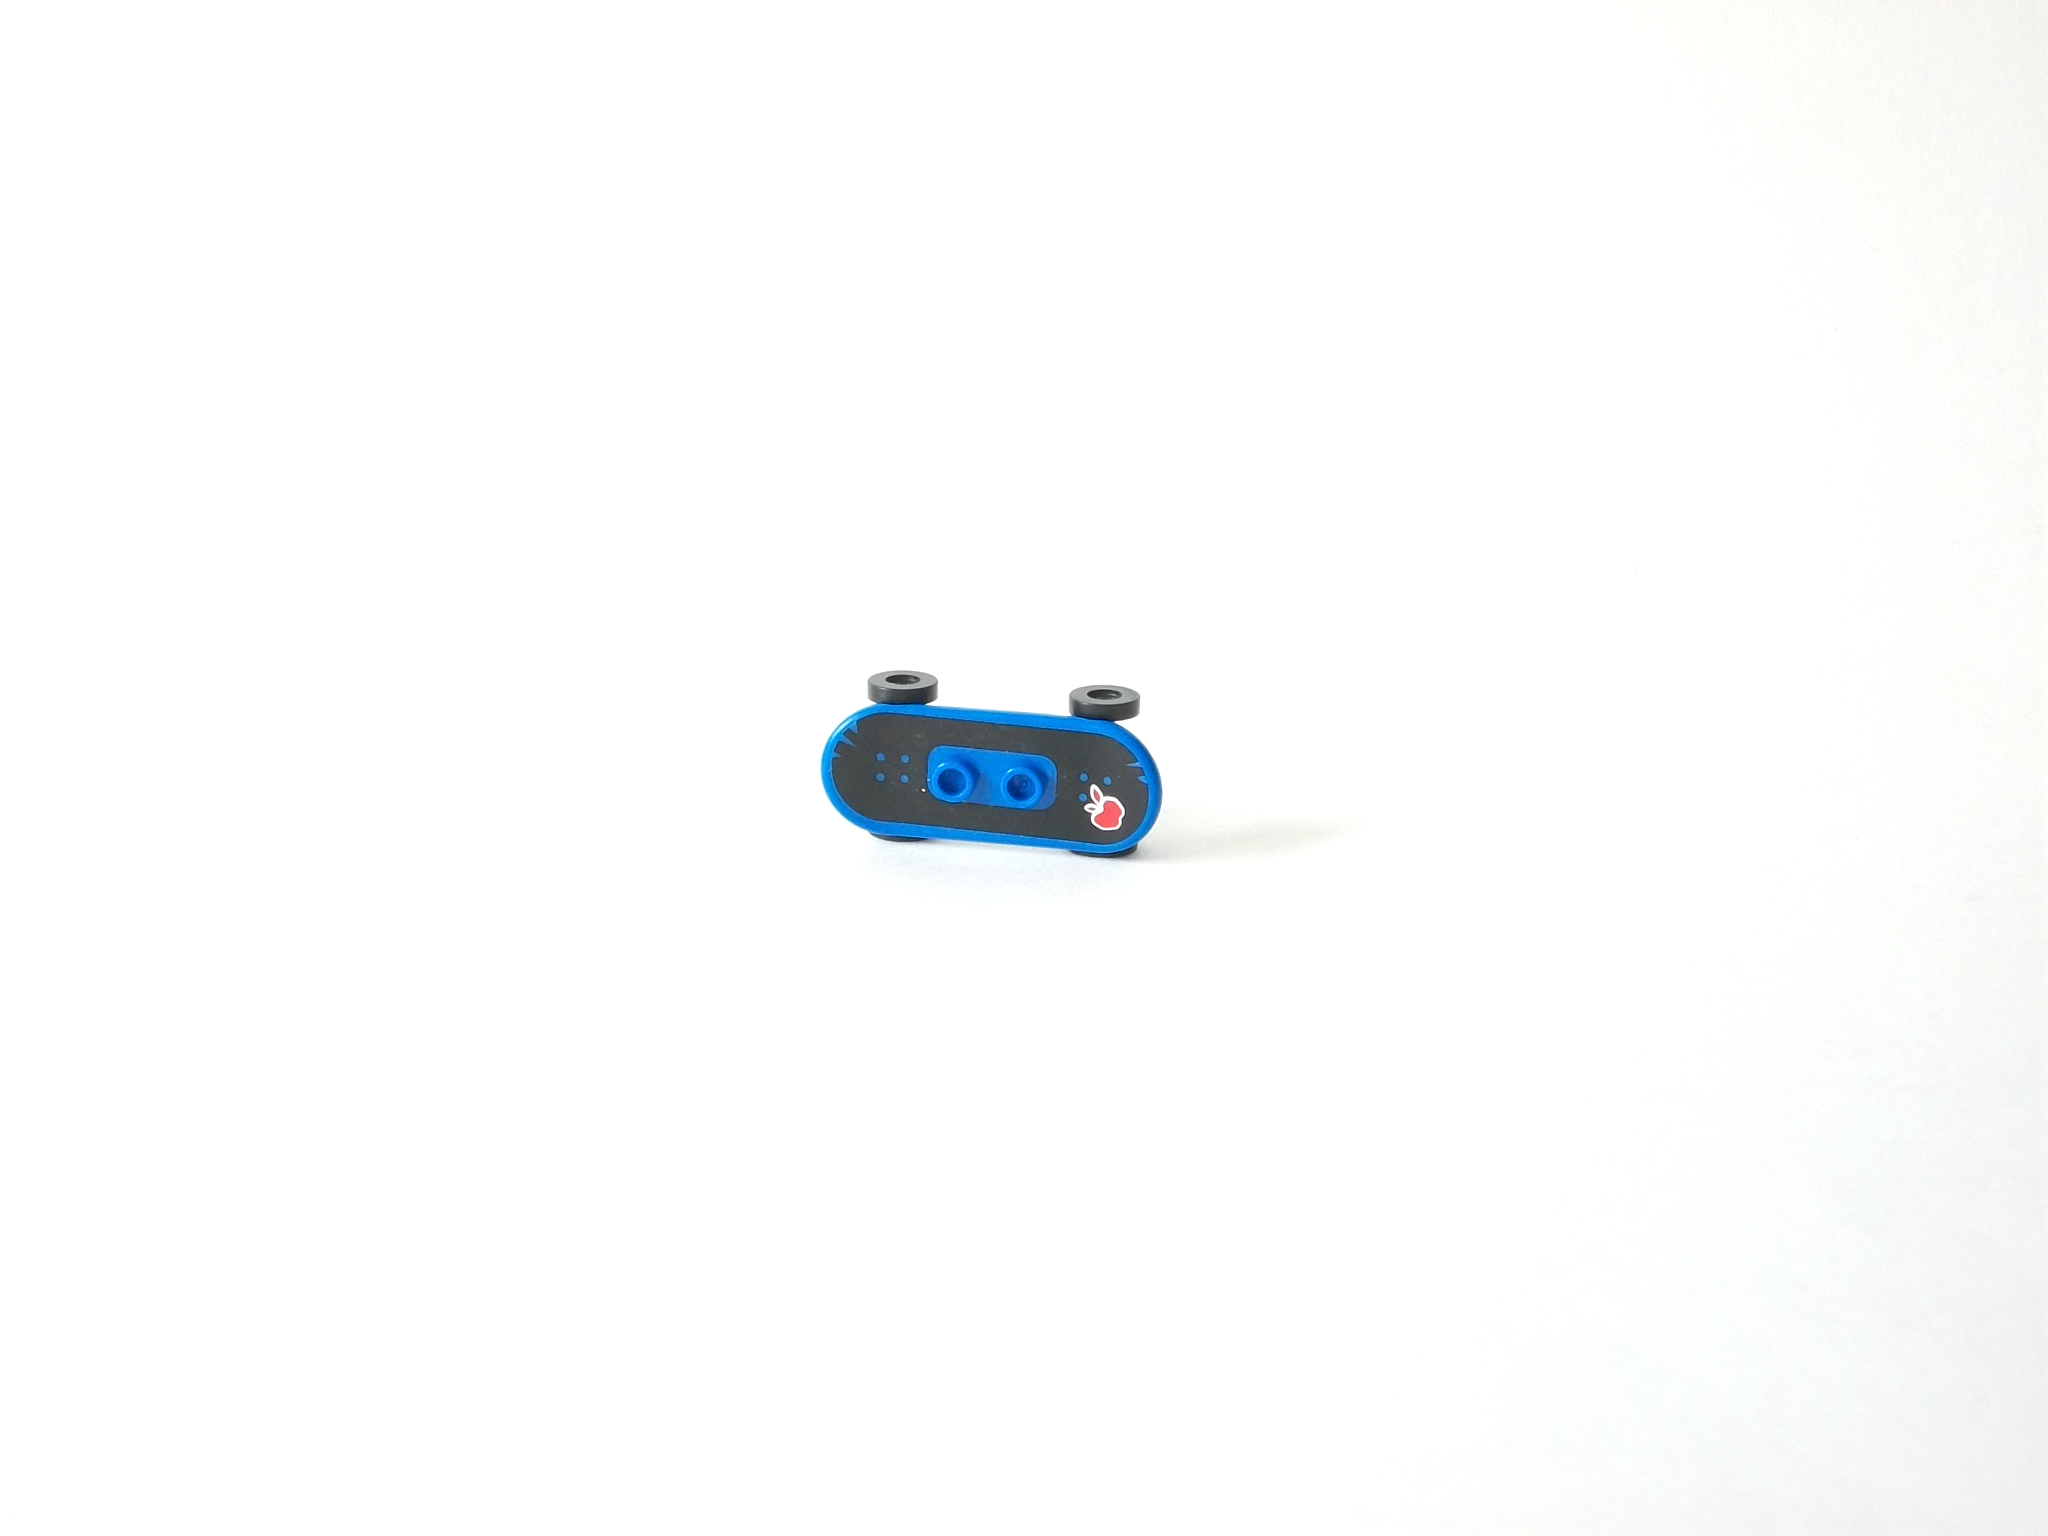
Leonardo's mode of transportation takes the form of a skateboard, and for that you only have to insert the two dumbbell-shaped pieces at the bottom to get it moving. There is a sticker for the top, with its most identifying feature being a small red apple in the back corner — an odd choice, as I don't seem to recall this being the case on the show (but I could be wrong).
At the risk of inviting further chastisement from Karai, you'd best keep one foot on the decal.
Once you have Leonardo on-board, you can attach the stud ends of the rope to the bottom of (a) one of Leonardo's hands and (B) a 1x2 rectangular brick that reaches just over the back of the bike.
Karai must be stopped — and I'm the one to do it.
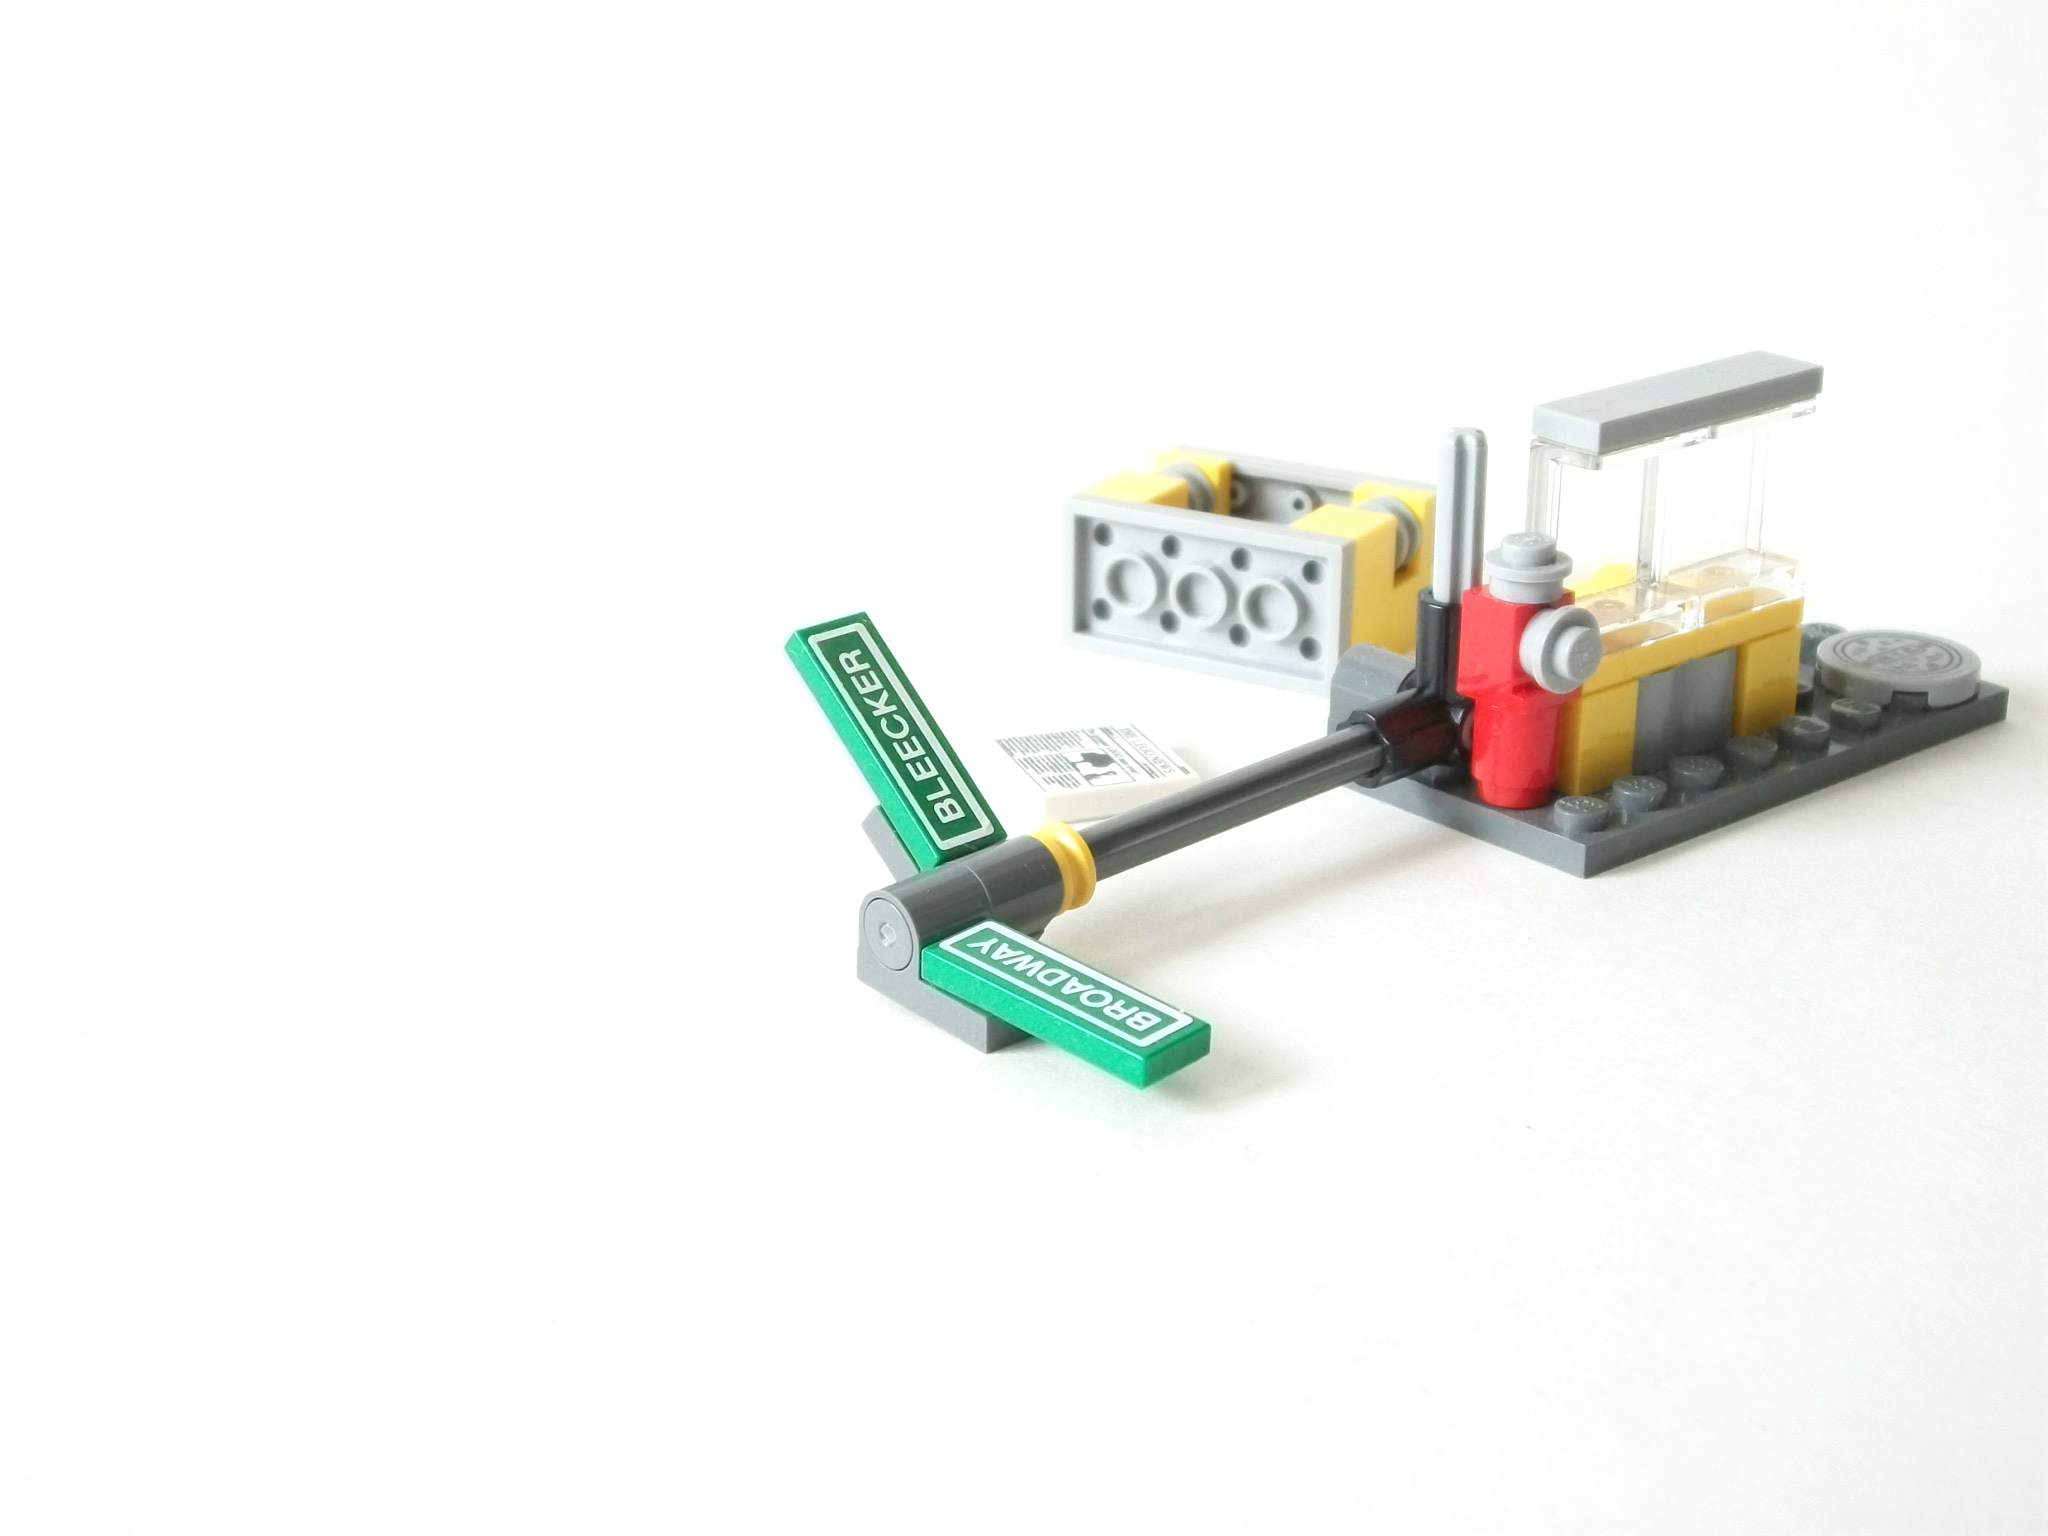
The setting build takes the form of a street corner, complete with a two-street sign post (signs have stickers), a simplistic yet recognizable fire hydrant, newsstand, and an NYC-engraved manhole cover (sticker, not printed). These elements sit closely together on a relatively small 4x8 plate.
The 'before' shot.
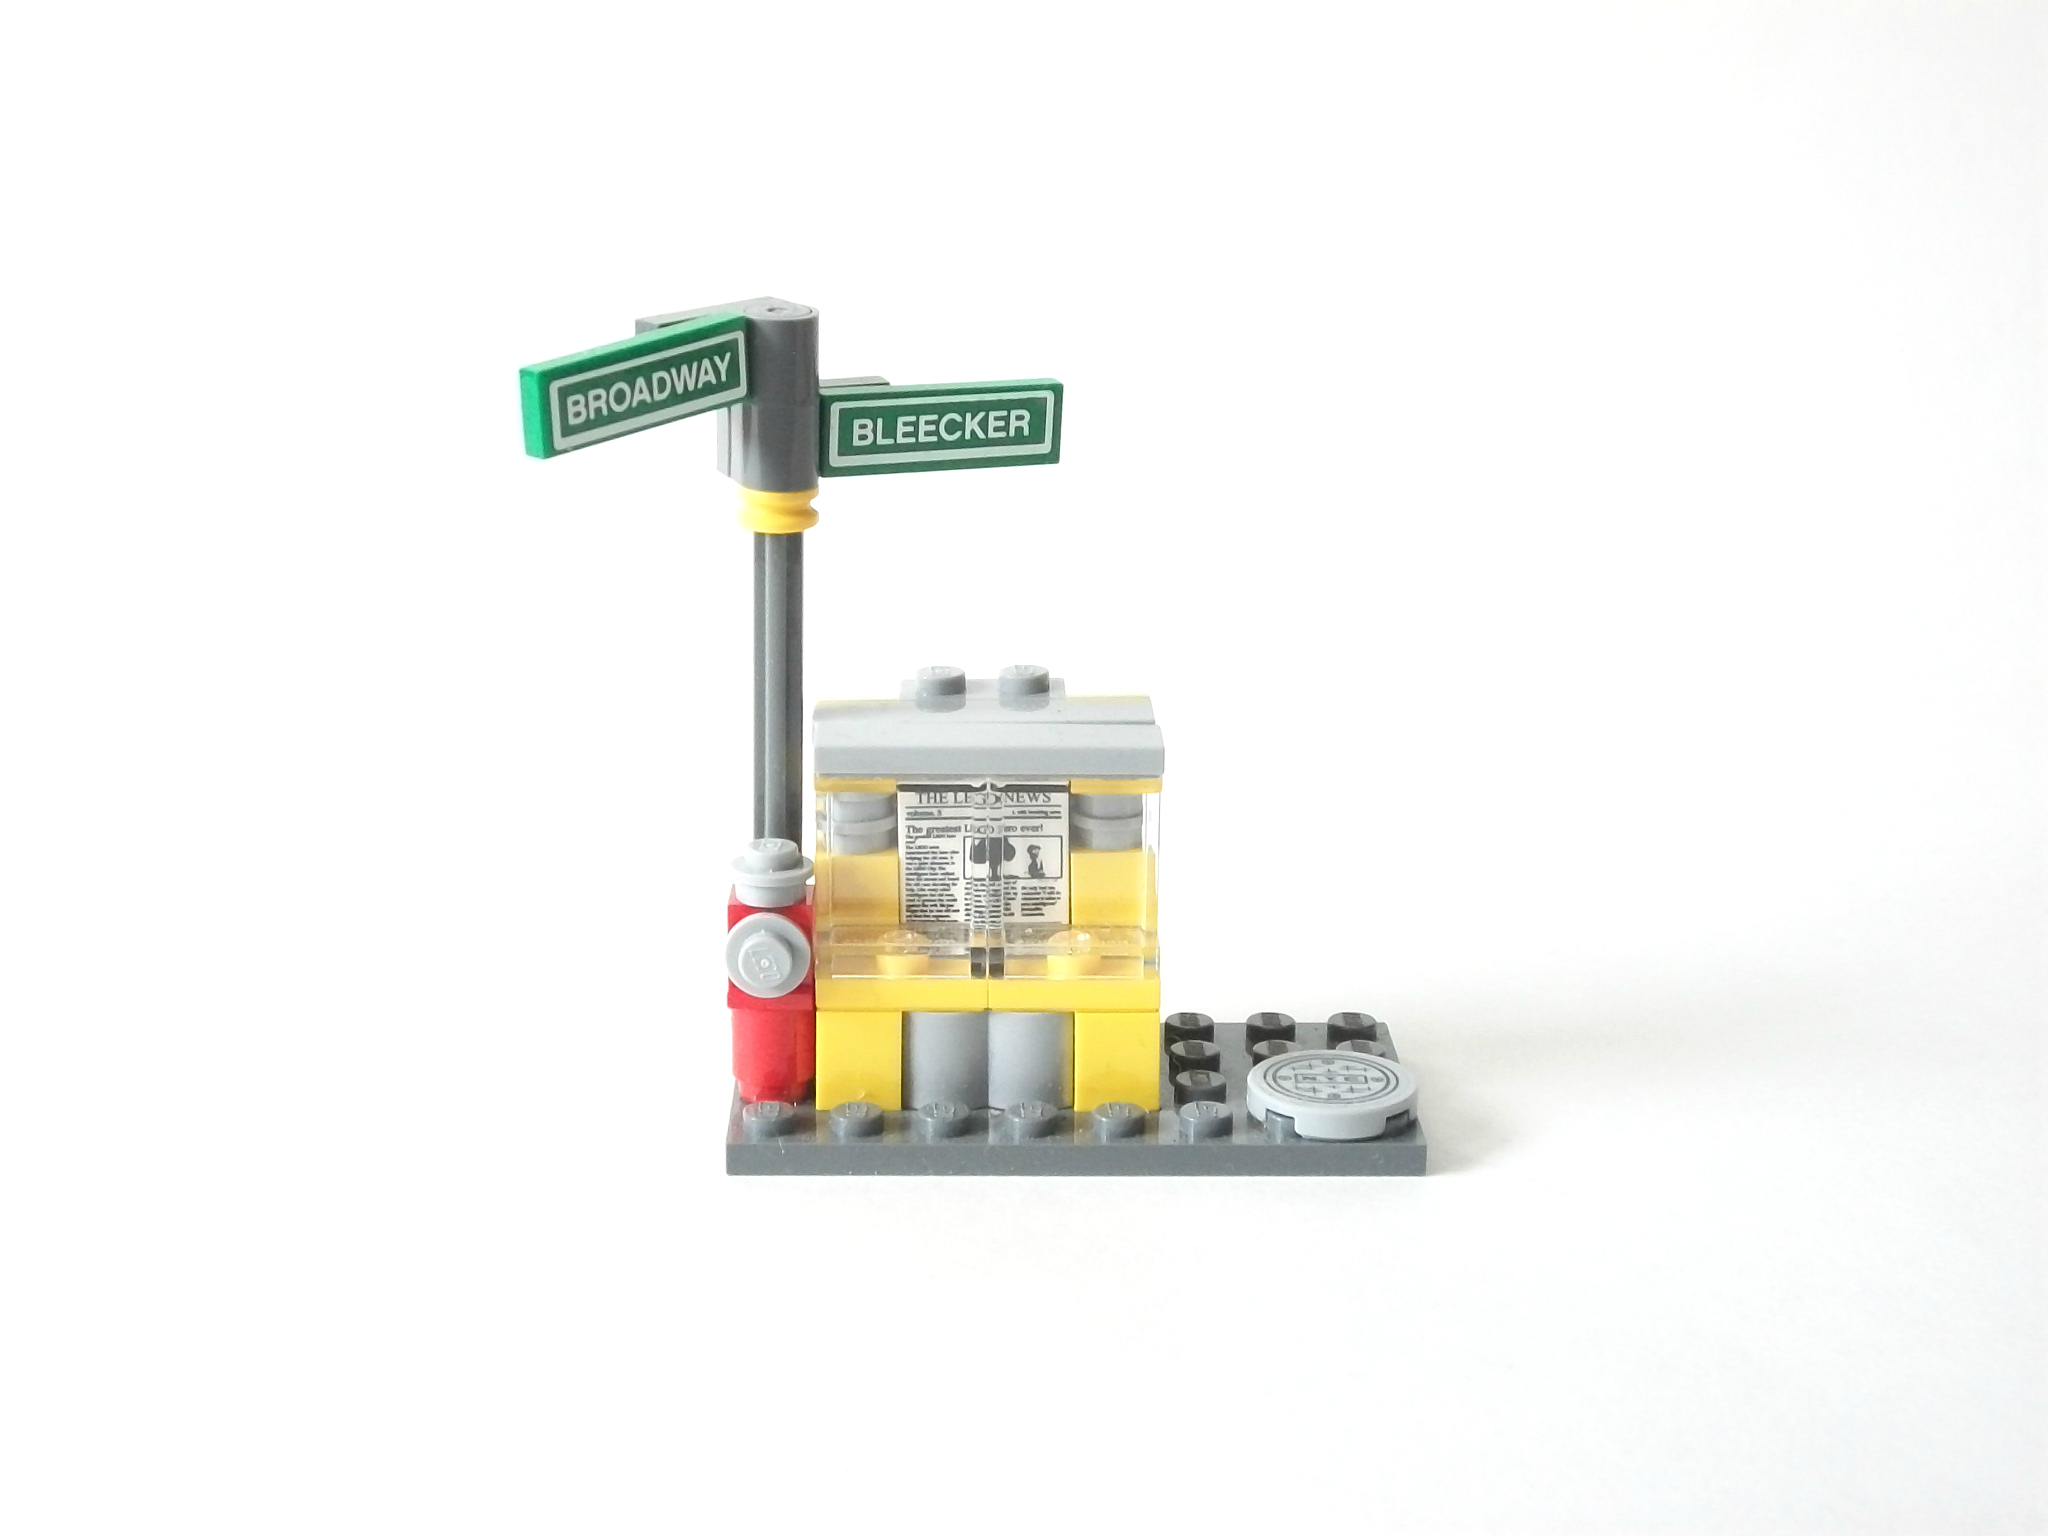
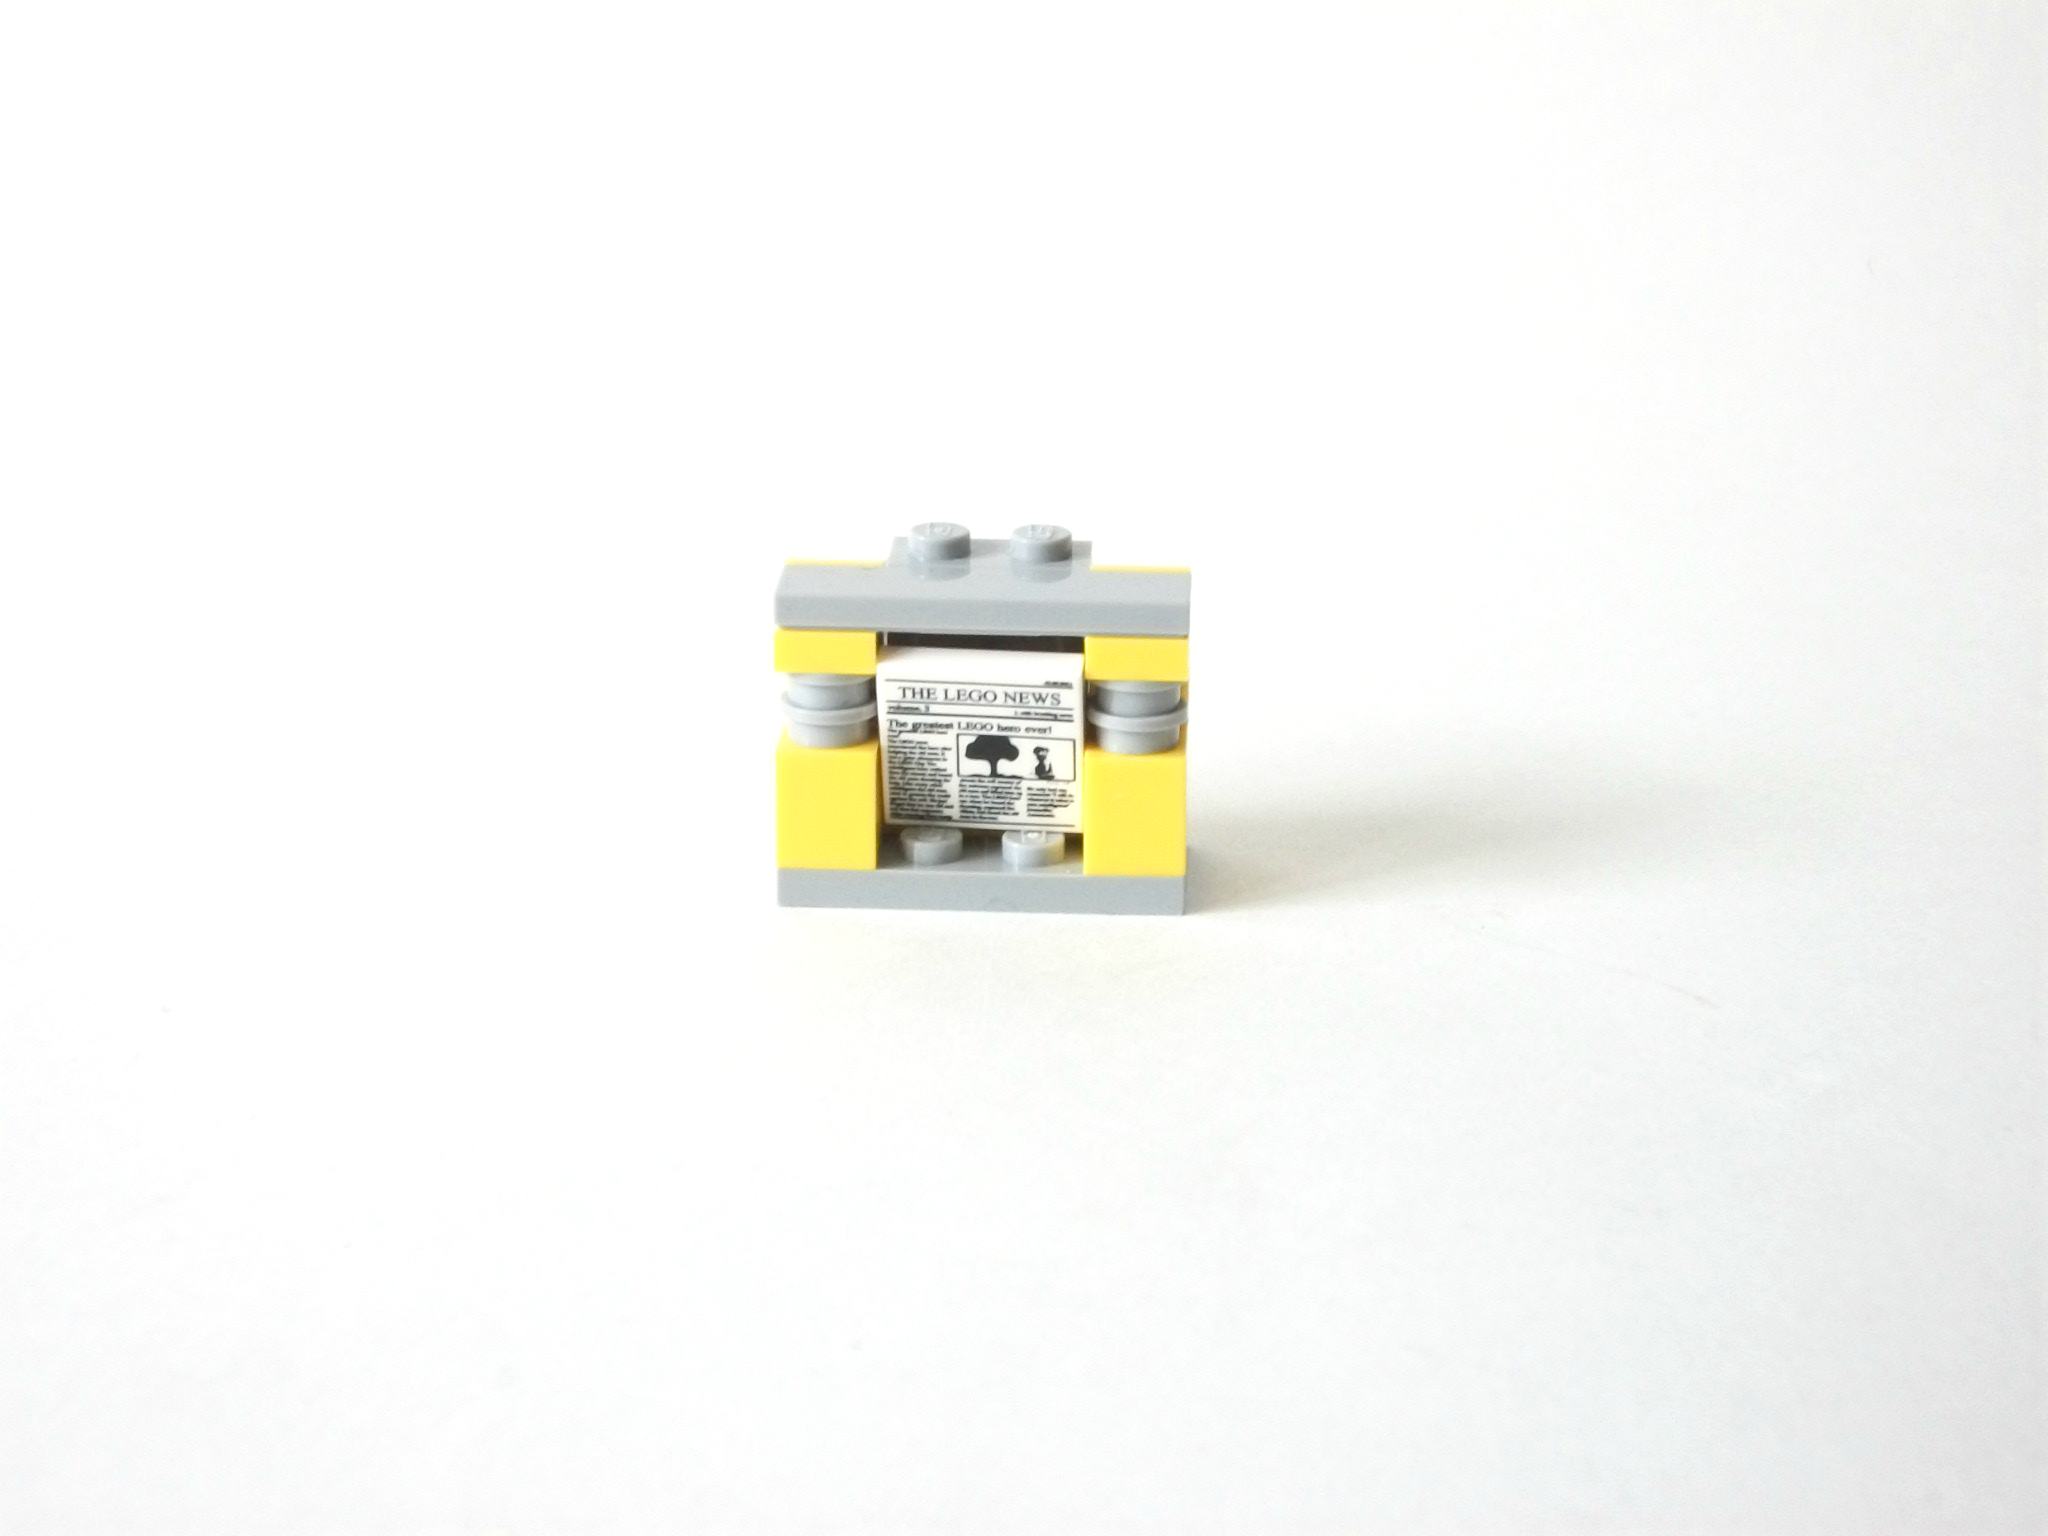
There is a fun gimmick at play here with the build of the newsstand, which is built on top of a small axle that attaches to the sign post with a connector piece. By pulling the sign to the left in a quick motion, the hidden rod will quickly shoot up, knocking the top part of the newsstand off and freeing the printed newspaper piece trapped inside the transparent casing.
Today's wreckage, tomorrow's news story.

The pole is light as it is, so it will take but a little weight for the trick to unfold. The way the signs are attached up at the top with a yellow ring holding them in place, it makes for a very loose device, and you may frequently have to adjust the ring to tighten the fit.
One final extra is the construction sign (extra in that it's not directly integrated into the street corner), designed as a ramp for the skateboard. Being that it consists of very few pieces, it shouldn't take more than a minute to create, albeit you do have a striped sticker pattern to place on the white tile.
They may need to borrow this for the street corner once this over.
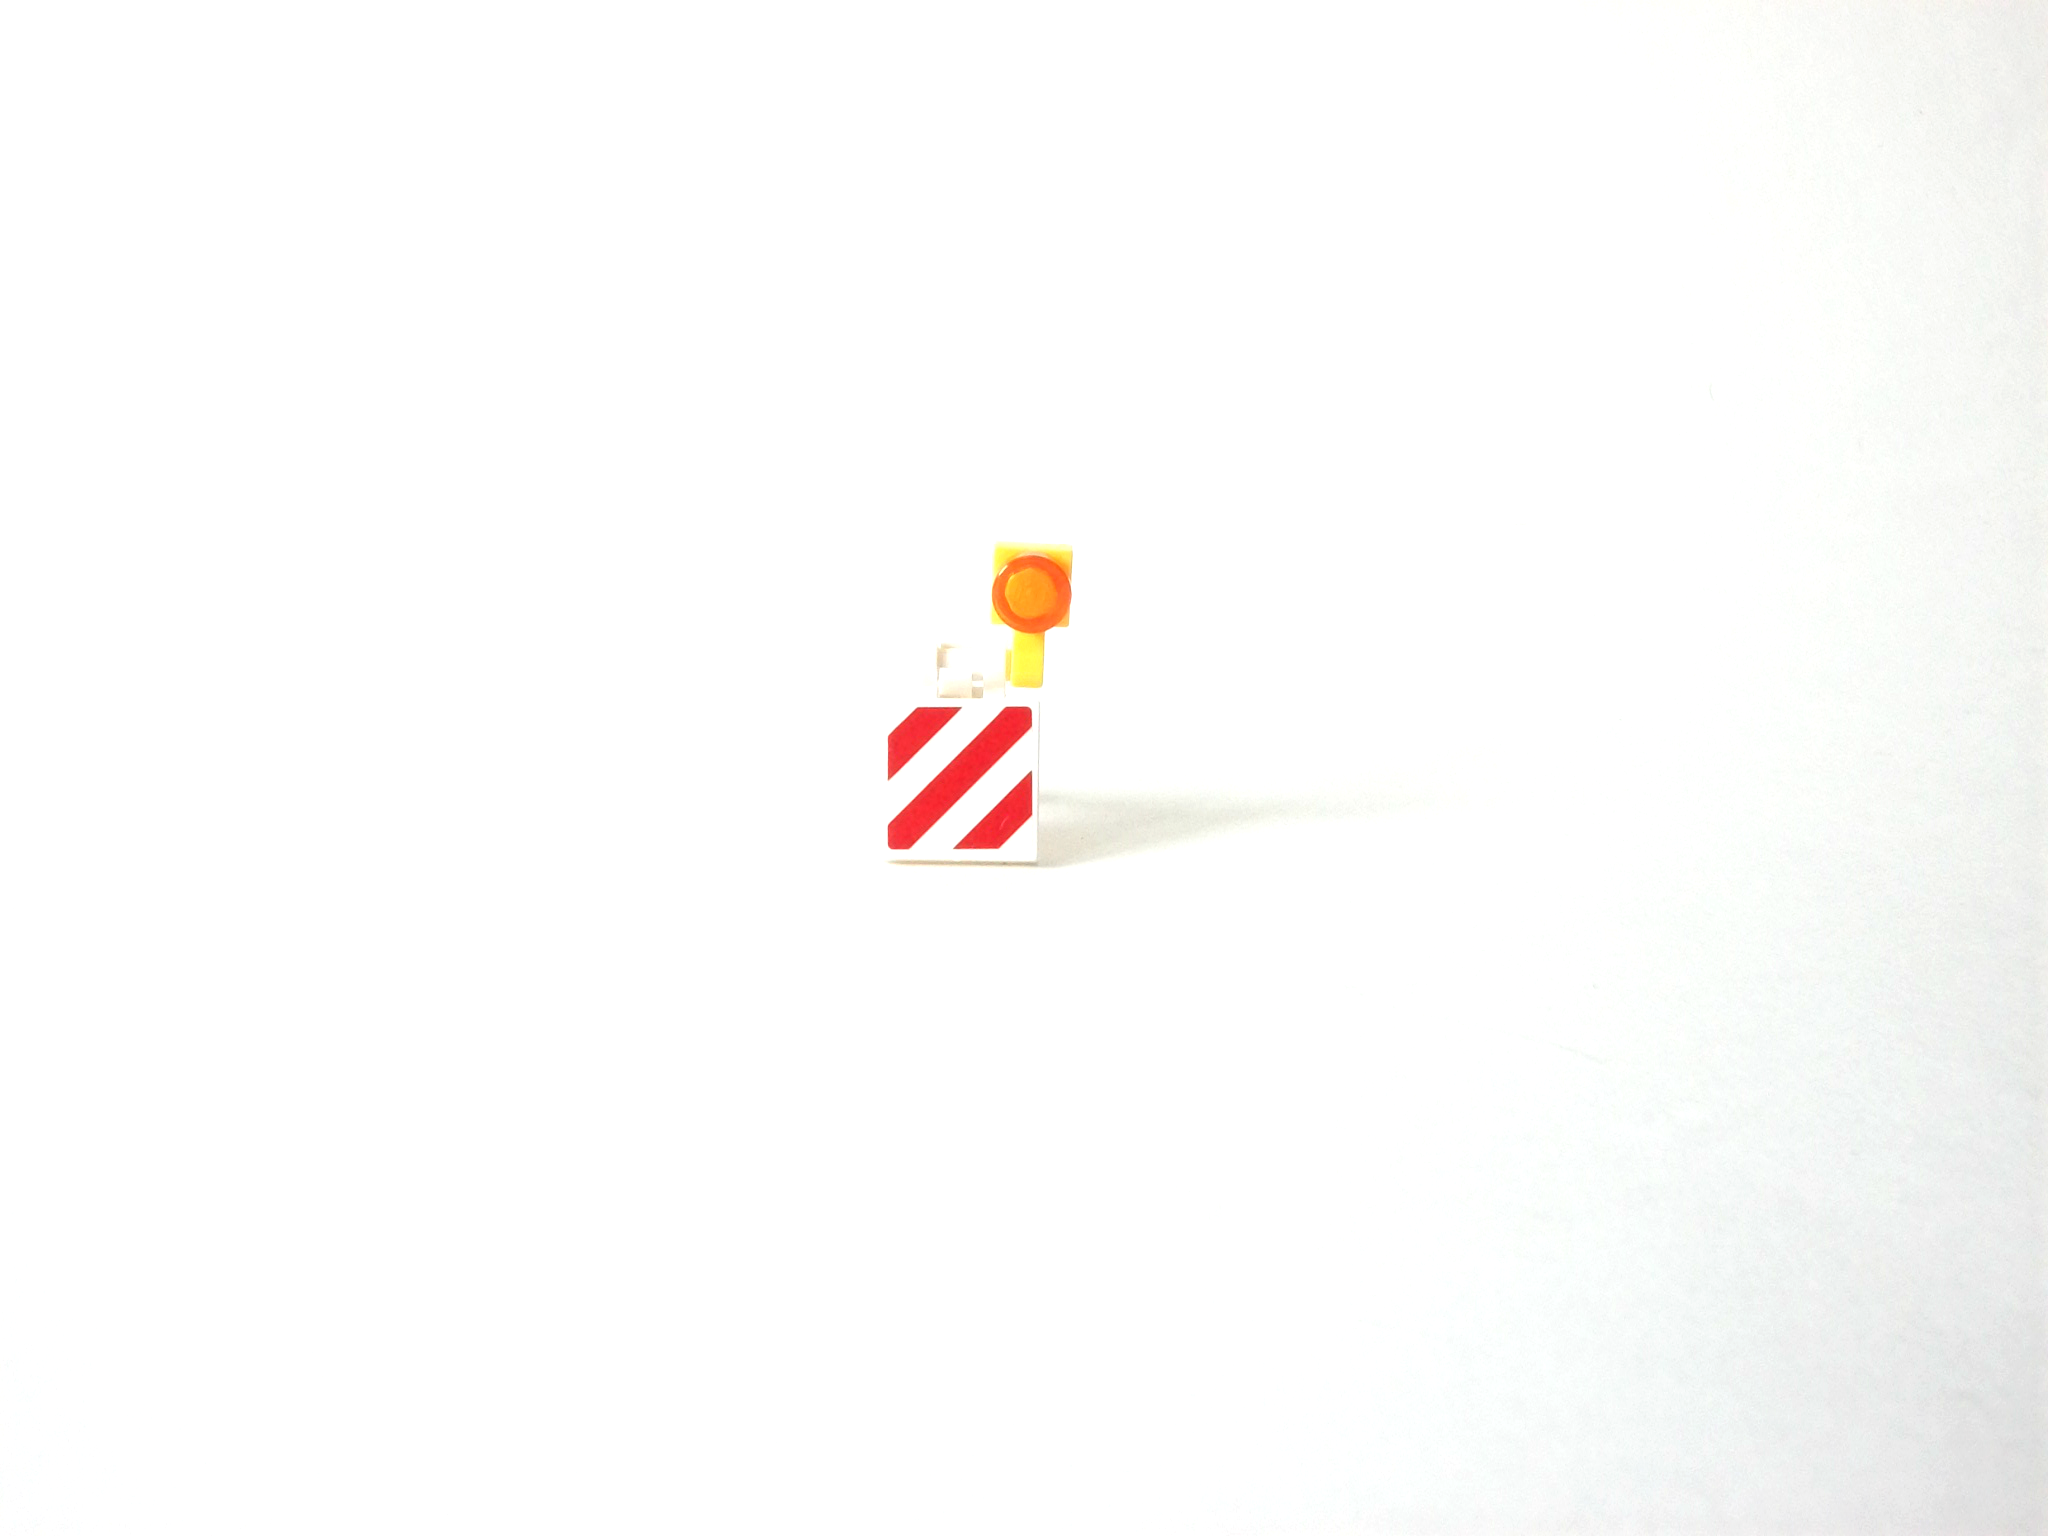
It's measly, yes, and the set could have benefited more from an actual stunt ramp (perhaps a small wooden cart, since a ramp at the back of a truck would have been an unlikely inclusion), but it the overall street atmosphere.
Conclusion
Despite having less than 100 pieces, the Karai Bike Escape set is a relatively satisfying buy for all that you get. Considering that the bike body and frame are single pieces and the whole vehicle is deceptively easy to build, I imagine this partly accounts for the lower piece count. At this time, Karai is exclusive to this set, and it most definitely pays to get her and her well-adapted hairpiece if you're in any way following this line. The street corner does have its share of minor quirks, but for the most part, the trick entertains and the elements integrate nicely for a small scene in conjunction with the main focus of an ongoing chase. Overall, a balanced selection, with pros that overshadow the non-ideal price-for-content evaluation.I'm not leaving without that Mutagen!
Design: 7
Bike steals the show; some minor annoyances with the scene build; construction sign as a ramp fits the scene but could have been a more thoughtful inclusion; attention to accuracy seen in multiple areas; cohesive on the whole
Playability: 7
Dragging Leonardo along can be entertaining with some imagination; the newsstand gimmick doesn't take much to pull off and can be fun on its own; definitely a mission to pair with other TMNT sets to create a turf war of sorts
Value: 7
Stylish bike model carries its weight in this set; exclusive Karai hairpiece; Karai herself is currently an exclusive minifigure and worth owning; few surprises, you get what you see; low piece count may give reason to pause (particularly with the Canadian price in mind)
Overall: 70%
So long as Leonardo's face doesn't make the front page...
-
A new video was released with some interesting information.
Transformed civilians, huh? Interesting notion!
-
The Flameship is a great idea and well-executed. Looking at all these entries has been nothing short of inspiring. Thank you for sharing your clever solutions!
-
A fun solution to the challenge. Well done!
-
The Submersible Base and the Hot Rod Shop are clever!
-
^ Nicely done!
-
This does very little to excite me. For a Toy Shop, this hardly looks the part in its overall aesthetic -- although I admit the box shot doesn't offer a full perspective. On the other hand, I'm intrigued to see a close-up of the first alternate build. Likely will be overpriced with not enough detail to match the cost.
-
Glad to see Microfighters are returning and in top form. These look to be great improvements over the first wave's offerings.
-
Right, so still absent. Are they not ready to show them off? Odd, seeing as one has already been revealed. Unless one is a yet-to-be announced exclusive like the Sea Cow? That's the only explanation I could think of.
-
Creator strikes again!
The Go-Kart and the Beach Hut (one version reminiscent of the Small Cottage, which I love) are very exciting additions to the line! Future Flyer looks promising also as a step up (in articulation) from the robots featured in the Power Mech and Thunder Wing sets. And glad to see animal representation continue after the two successes (from what I've seen and heard) of Forest Animals and Furry Creatures, this time with a rainforest motif.
Love this theme!
Have you ever felt judged for liking LEGO?
in Community
Posted · Edited by Fritzy
Waiting to read tips from a male AFOL who buys Friends sets on the regular.
Marketing has a lot to do with it.