
ScottishDave
-
Content Count
364 -
Joined
-
Last visited
Everything posted by ScottishDave
-
Inspired by some of the other excellent threads on this forum, I decided to have a go at lengthening my First Order Transporter: I've added an extra 16 studs, twelve of them in the troop compartment: it can now take a total of twenty stormtroopers. I have rebuilt a lot of the details: I have also shortened the cockpit and moved it back. It is accurate in profile and still fits a minifig. Finally, I've lengthened the engines and added some greeblies to the space between them. Sourcing another 16 stormies was fun but expensive: Battle of Takodana + 2 batle packs + 2 Bricklink orders. Special thanks to our very own Lobot for his rapid and friendly Bricklink service. Many thanks also to Vodnik, deskp, Veynom & Solscud007 for their inspiration. If anyone wants to build this mod, I've created a Lego Digital Designer file: (LXF) This file is slightly different to my "real bricks" version, due to Lego Digital Designer being a crotchety old block. Bonus fun - Spot the differences! To build the version in the LXF, you will need a 75103 First Order Transporter and about 470 extra parts: (XLS). Having an extra 75103 on hand (£40 on ebay with no minifigs) cuts that down to 300 parts: (XLS).
-
"Reverse engineering" Razor Crest MOC
ScottishDave replied to Midlife-crisis's topic in LEGO Star Wars
This is looking really nice. I’m very interested to see what you do with the curved front of the cockpit. I haven’t seen a perfect solution for that yet. -
[MOD] First Order Transporter mod (with LXF)
ScottishDave replied to ScottishDave's topic in LEGO Star Wars
@Bigdwazda I'm not at all sure why you're hijacking my thread instead of making your own. The model you've posted looks nothing like mine, and - no offence intended - I'd rather that people didn't think that it was. I've lost the photos I made of my old physical model, but the LXF file is still available on my dropbox. The link on the first post works, but here it is again: ScottishDave's ACTUAL First Order Transporter Mod Just to make sure no one gets confused, the actual subject of this thread looks like this: I do share this model freely with the community. Please feel free to use this as the basis of any redesign you decide to do in future. -
[MF-MOD] "I've added some special modifications myself"
ScottishDave replied to DarthTwoShedsJackson's topic in LEGO Star Wars
Thank you for the kind words. I'm also looking forward to seeing more of this model, and i agree with @LEGODrongo01 that the mix of studs and tiles looks awesome. Thank you also for sharing pictures of your other hobbies. They look fabulous! -
[MF-MOD] "I've added some special modifications myself"
ScottishDave replied to DarthTwoShedsJackson's topic in LEGO Star Wars
This looks great. So much better than the stock version. My favourite bit is the front half of the saucer - I think you did an excellent job there. The blast damage near the dish looks great! -
Lots and lots of hinges, like so: Also take a look at the three year old LXF I posted earlier in this thread:
-
Beat me to it! Also @Frenk512 has a good Explanatory photo on Flickr which is more like what I actually used:
-
@caperica I really like that list of "To Dos". You seem to be thinking along the same lines I did. Apart from a small disgreement over the beauty and appropriateness of studs . Feel free to ask me questions about my mods directly, either here in the thread or by PM. I'm in the process of documenting my design prior to taking it apart and I'm more than happy to share info with anyone who wishes to take these ideas forward. A few thoughts... I found some pictures and other resources which might be useful you, and to anyone seriously accurising their UCS Falcon, on the site http://falcon.maruskadesign.com. Of particular note is the "2D layout for the 32" ESB Studio model" in the "Files" section. It's a very basic 1:1 schematic for the Falcon studio mdoel, and I used it to get my Falcon's geometry as accurate as possible. To reply to a few of your specific questions, using these plans as reference: According to the plans, the gun turrets should be 12mm tall, and on the Lego model they are 16mm tall (2 Lego bricks thick), so you are correct: they are 4mm too tall. Another thing making them look too tall is the fact that the docking arms are too short vertically. I decided to fix that as opposed to wrestling with making the turrets 1.5 bricks thick. By the time I'd added detail to the docking arms, I thought that the turrets looked fine. The actual model mandibles have an angle on the outer edge of about 60 degrees. There is also a shallow angle on the inside. The old space plates I used match the cumulative angle perfectly: but my mandibles splay out slightly. I haven't yet reworked the frame to match the inward angle. If you decide to copy my design, that's an improvement which could be made. If you ignore the inner angle, the new 4 * 6 wedge plates you mentioned are perfect. It's just a pity they don't exisit in Light bluish gray.
-
I do like stud.io @TravisH44. I just had a play with it for the first time in ages. I was able to position the engine grilles, including the tires: and it was actually pretty easy. Colour me impressed. However, I will be sharing the LDD file, as most people can import or open LXF in their tool of choice. There will just have to be a few photos to explain my weird build techniques, 'cos that's how I roll.
-
Hi @Frenk512 - thank you very much for your kind words. I'm glad I've provided some inspiration! I wish I had a Lego room... I keep a lot stashed in my 12 year old son's bedroom (oddly, he doesn't seem to mind). The Falcon occupies the only other uncontested Lego space in the house: the spare desk in my study. Stud.io version 2 (which I just installed) can import LXF files quite handily. I plan to keep using LXF files for basic compatibility, but you can import the files into Stud.io if you wish! I did base a lot of my most recent changes on the ESB version, as it happens . The engine deck I'm planning to post next, the docking rings and the mandibles were all modeled closely on the ESB 32" Falcon: so feel free to use as many of the ideas as you like.
-
Thank you for the kind words @Jerry McGlade. @Chewbricca That's looking really good. I hope to have an LXF of my latest engine deck mods soon which might help you. In the meantime: as promised is my mod of the turrets. Fixes: Improved the position and size of the markings on the upper turret made the window the proper size (8 studs wide) relative to the size of the turret Added more detail to the gun platform made the quad cannons more accurate. LXF FILE BRICKLINK XML PARTS LIST This is a mod of the original lego turret, to keep the number of extra parts down. To hold the window in place, I used four mining hands and 8 short pieces of cut 3mm tube. This technique cannot be reproduced in Lego Digital Designer, so here are some photos to guide you. For each arch, you need a minifig hand (preferrably Light bluish gray in colour) and a couple of short lengths of hose. In total you'll need 8 minifig hands and about 16L of tube. I've included these in the parts list attached. First drop one of the pieces of tube into the underside of the arch to act as a wedge: Then push the minifig hand firmly into the other piece of tube, and wedge it into the underside of the arch: The 8x8 dish is then placed in the hands during assembly. Once assembled, the dish and the hands are quite solid. To make the red markings in front of the window I used stickers, cut from the sticker sheet for the republic cruiser (7964). I’ve included the relevant sheet in the parts list. Here is a template for cutting out the stickers: BTW here is a sneak peek at the next mod I’ll be posting, hopefully this coming weekend:
-
Hi! I'm the author if this model. I do indeed have pictures on how I made it. If you look in the rest of my flickr photostream you will find plenty of progress pictures in older albums, especially in: https://www.flickr.com/gp/11988796@N02/e0379Z Also, here on Eurobricks I do have an older topic (but it still checks out): This LXF file from that topic is essentially the "Full external upgrade kit" circa 2017, right before the new UCS model came out: _Falcon.LXF No promises as to when it will get done, but last night I started in on documenting my more recent mods: This is a mod of the UCS 2017 turret, with a properly-sized window (8 studs wide), and an improved quad-laser design. I'll be posting this mod, including the LXF file, in this topic once it's finished.
-
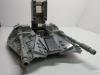
[MOC] 1 metre Imperial Class II Star Destroyer - Avenger
ScottishDave replied to mortesv's topic in LEGO Star Wars
That's my exact plan @Rubblemaker. In fact, it was your post here which pushed me over the edge. So thanks for that. -
Thank you once again for the kind words. @m4st3rt3ch, no smoking involved. Old grey pieces and lots of sunlight!
-
[MOC] 1 metre Imperial Class II Star Destroyer - Avenger
ScottishDave replied to mortesv's topic in LEGO Star Wars
Drat it. I'd just decided to build Raskolnikov's model, and you guys dig this one up? ... actually, I counted the studs visible in the photos, and it's only a few studs bigger than Rasalnikov's. It also uses a lot of similar techniques. If the detail is what is attracting you to this one, you could build Rasalnikov's and then go hog wild with the greeblies. -
Sharp eyes, @TravisH44! I forgot that I wanted to demonstrate that here. It's a genuine mod, and quite simple. Parts: The stickers came from set 7964 (Republic Frigate). I also used the dark red areas from that sticker sheet on the turret. Partly assembled: Side view. This is the money shot, showing how the levers fit into the old hinge plate and go through the grille tile: Final assembly. The minifigs "sit" on the two visible studs on each side. There's plenty of room for them.
-
The front is sagging a bit. I only noticed when i was reviewing the pictures. It was probably walked on by a Giant Space Cat (which sometimes passes through the Tabletop Spaceport on it's way to somewhere else). The UCS model is built like the proverbial brick outhouse, so it probably doesn't suffer from saggy mandibles. Thank you - too kind. This started out as a mod of the 2007 Millennium Falcon. It may have exceeded it's brief just a smidge but honestly I'd still call it a mod. The interior stumped me. That curving corridor on the port side just doesn't actually fit inside the hull. I'm done with this model for now - hence the pics. I'm about to take it apart in order to build a Star Destroyer. The Tabletop Spaceport only has room for one verssel at a time. Thank you! Studs versus tiles is very subjective. I like it OK as it is but I may change my mind next time.
-
This is not your typical mod... I've been working on my own heavily modified UCS Millennium Falcon for about ten years now: on and off as the mood takes me. I have an old thread over here which I haven't updated for years. During the last round of changes I incorporated entire sections of the new UCS, and some ideas I saw in this thread. I suppose that means that it fits here . Many thanks to @Frenk512 and James Shields for the docking ring designs, and to @marshal-banana for the engine vents. More photos available in the flickr album
-
I just finished bricklinking a 10212 UCS Imperial Shuttle - the last order arrived today. Obviously, I plan to modify it. I'm hoping to add: - motorised wings - boarding ramp - folding (motorised?) landing gear For one extra wish, I'm also hoping to cram in an interior: but as I have not yet passed the advanced course in trans-dimensional engineering, I may have to settle for just the motors. I recall that back when the shuttle was released, there were a few people on this forum who were planning to put in motors... has anyone done so? Would they be willing to share construction pictures? Also, does anyone have any other good mods for this set? As a starter for ten, I have found some nice mods already: All studs replaced by tiles. It's an easy win, so I'm doing this first! Cockpit shortened and heatsink/grille added under nose. I'm not convinced by making the nose shorter, but the grille under the nose looks really good. Lowlead's engine mods. Much, much better! DMAC's Imperial Shuttle - not so much a MOD, as the original AFOL design which Lego based the UCS model on: but it contains some good ideas. (BTW, before anyone gets too excited: Lego used DMAC's design by agreement, it was all very friendly. ) On a similar vein, Cavegod's model, which he based on DMAC's... BTW Cavegod, if you are reading this: I know you recycled your model, but do you happen to have pictures of the internal workings of the landing gear mechanism? it looked really cool, and I bet it would fit the UCS kit. Thanks in advance!
-
Oh, wow. This is brilliant. I'm in the middle of a geeky re-watch of B5 just now, and every time I see it on screen, I've been wondering, "how do I build this out of Lego?". I haven't planned anything the size of your project though - this is massive. I love the way you offset the panel lines on the cylinder - very true to the original.
-
Well, nobody seems to be contradicting you, so here goes. I hate this part... as a programmer, documentation is my Kryptonite. Parts To make a set of four cannons, you will need the following parts from Jerac’s original design: Four grey round hollow studs Four spoked wheels Four 16L 3mm rigid hoses. Twenty Technic half pins: six of them blue, the rest grey. Plus the following new parts: Four minifig hockey masks 93561 Twelve train axles x1687 Twenty 14mm wheels 11208 Four thin cogs 4143 Four timing wheels 32060 Four motor pulleys 2983 Four rigid hoses, each 6 studs long - e.g. 75c06 (to make up a length of 22L) The colour of these hoses is unimportant as only the very ends will be visible but I suggest grey or black. Eight 1 cm lengths of grey rigid hose Four 8mm lengths of grey rigid hose (These are the middle support of the cannon). To rebuild the wingtips to accommodate the new cannons, you'll need the following, either in white or grey depending on the colour of the rest of your X-Wing. Consult the photo in the post above for placement. Eight round hollow studs 85861 Eight "L" shaped tiles 122806 Four 1 x 2 tiles Four stud jumpers Part Notes The thin cogs and timing wheels are optional but I do think that they add something accuracy-wise: especially the thin cog which neatly mimics the 14-spoke part used in the X-wing studio model. Before anyone asks, the door rails pictured in my first post on the cannons are completely optional - they are there to reproduce a detail from the studio model. You can use the original 1 x 4 plates without issue. Certain parts can be either white or grey as you prefer. The 14mm wheels, spoked wheels, rigid hoses, technic half pins and round hollow studs are available in white, and would look good on a white X-Wing: but the pins and rigid hoses much rarer and more expensive than the light bluish grey ones that I used. Building The cannon tip is a train axle, with 2.5 cm (or 1 inch) showing. The rest is shoved into the rigid hose for strength. There are another two train axles per cannon: one immediately behind the first, to combat sagging between the technic pins and the tip of the cannon, and the other joining the original 16L hose to another 6L length to make a total of 22L, which passes through the centre of the cannon body. Here are the parts, before I threaded the axles into the hoses. The axles are shown in their final positions within the hose: And here is the finished reinforced hose, with cannon tip: You then simply thread the parts onto the reinforced rigid hose in order. There should be enough friction to hold everything in place. Some parts will be looser than others. The important parts are the technic pins and the motor pulleys, as these keep everything else together. The end of the reinforced hose should be flush with the end of the motor pulley: The “splashback” - the curved part just behind the tip of the cannon - is made of a hockey mask and a hollow round stud. It takes a bit of effort to get the hockey mask over the end of the hose, but it will go. Cannon Supports As in the original studio model, the cannons are attached to the wing using three supports. These are very accurate, and therefore also the weakest, dodgiest part of the build. The supports consist of three short lengths of rigid hose, slightly squashed at one end to fit into slots in the wheels. To repeat the photo, in context: The outer two supports are 1cm long. The middle one is 8mm. It is shorter than the outer two because it attaches to a jumper plate instead of to round hollow studs. Use a pair of pliers and very gentle pressure to squash half the length of the support hoses to about half the original diameter. Do not overdo it,or they won’t grip the wheels properly. Then push them into the slots in the wheels. In this photo I've put two in, and you can see the slot in the last wheel before the pulley: If done correctly the join is strong enough for display purposes: but don’t hold the model by a cannon or your X-wing will crash into the Death Star. I hope that's clear enough, but please shout if I've missed something.
-
So... yeah. About that warranty? Since mine was well and truly voided, I thought I might as well crack on. I got it finished last weekend. I made a lot of subtle changes, which I won't bore you all with until I've taken better pictures. The biggest change is an upgraded cannon design, based on @dmaclego's amazing work. All credit to him. This design differs from Dmac's original in that it uses wheels with a larger diameter. This doesn't require a rare variant on an old cog to hold it together, and I believe it is a better fit for the scale. I can go into more detail on how to build this if anyone is interested.
-
What a surprise.... I’d love to see the paperwork on a Rebel warranty claim: ”Vehicle history: repeatedly damaged in firefights with law enforcement officers of the Imperial Navy. Extensively upgraded and repaired by the customer on-site using non-standard and unapproved parts. All internal DRM removed or overridden by a cranky astromech unit.” ”Reason for claim: cup holder broken.”
-
Thanks :-). The 2 x 3 plates are now pushed out slightly at the top. The engines would therefore be slightly angled down, but the new wheels are wider. The door rails push up on them, compensating neatly for the slight angling of the 2 x 3s.
-
Thank you Jerac for publishing the instructions to this wonderful build: they were worth every penny, and I'm now considering some of your TIE fighters as well. I also built a white version of Red 5. I'm still fiddling with the colours. I think I need more grey, tan and sand green. The build went quite smoothly. I am very impressed with the solidity of this build: the fuselage especially. I made a few changes: I used 20L tubes for the guns (for better length) and a different cog beind the wheels. In order to create a secure join between the engines and the rest of the ship, I replaced the yellow axles with 8L technic axle with stop (55013). The "stop" end goes through the Plate, modified 3 x 2 with hole (3176) to hold the engine securely in place. To accomodate the longer axle I replaced the truncated cones with 55981 wheels.