ust60

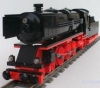
Take the (PF-engine 8866), on the old 9 volt rails

Recommended Posts

Hello forum community,

The old 9-volt motor

5300-1.jpg

is too expensive for you? And get very bad?

You want a PF traction motor

8866-1.jpg?0

(Which has a greater torque, and is faster)

Item no. 8866, at the LEGO pieces to € 12.99

on the old 9-volt rails go?

2159-1.jpg

And with the transformer,

4548-1.jpg

Taxes?

not for purists! only for pragmatic and hobbyists!

270665_106490482780810_100002595774308_54972_869672_n.jpg

264810_106490586114133_100002595774308_54975_118866_n.jpg

270575_106490736114118_100002595774308_54979_7684826_n.jpg

A soldering iron, you must not use

269990_106490782780780_100002595774308_54981_7741910_n.jpg

5mm "screws with hexagon socket"

261555_106490842780774_100002595774308_54984_7038735_n.jpg

262195_106490892780769_100002595774308_54985_458948_n.jpg

268205_106490922780766_100002595774308_54986_1664128_n.jpg

Non-violent, destructive, screw gently with feeling

The result you can see here

Sincerely, Udo

Share this post


Link to post
Share on other sites

Hi Udo,

That's a great MOD, great work and some nice trains in your collection!!

I love stuff that bridges the train eras, I don't have any 9v track but may well get some ME Model track when it comes.

I have some questions which I don't quite get from the pictures.

1. You say motor 8866, but that is the RC motor and not the PF motor which is 880002?

The PF motor is preferable as that has much better torque.

2. Related to the above, I notice you are using the 9v decorative sides rather than the PF decorative sides, is it advisable to use the 9v ones or will the PF decorative sides do and did you shorten the axles to make this possible?

3. Can you give us some example brand/make/suppliers you are using for sourcing the brush wire as well as the screws?

4. It would be nice to see a picture from above the motor bogie so we can see better how you have spliced/attached the wire. Do the 5mm screws also attach the cable from the motor or is that solder?

Thanks and Welcome to Train Tech!

BnB

Share this post


Link to post
Share on other sites

Good work!

I've been thinking of using something similar solution with solid copper sliders, but I think the soldering 'copper-wire' stip is better because it is softer and easy to replace.. :thumbup:

Nice idea.

Share this post


Link to post
Share on other sites

I had slot-cars when I was a child that used exactly the same system. They worked really well. I'm going to keep this idea in stock for when my (very) small supply of 9-volt motors dies out on me. As an extra bonus, your idea does away with those metal wheels that always bothered me with the 9-volt motors. Thanks for the idea!

Dan-147

Share this post


Link to post
Share on other sites

Hello b n b

To 1) It is true what you write, sorry, my mistake is correct, it is this:

Power Functions Train Engine Item: 88 002 Price € 13.99.

88002-1.jpg?1

Here you can see why this engine is better

http://www.philohome.com/motors/motorcomp.htm

To 2) it is not important. Which part you take.

2871b.1312055215.jpg

RC / PF Decorative Side

or

2871.1081053140.jpg

Decorative side, I still had these parts in the basement

only in this part, 3706

3706.1085634427.jpg

Must you have the axle, make shorter, with a sharp knife. Or better with a fine iron saw

On 3) The copper band. Comes from a shop for electronics - accessories (electronic components).

There are very fine copper wires, they are woven, braided. it is to absorb, if solder is liquid at soldering.

On 4) The latest version

293151_123694254393766_100002595774308_139989_5665252_n.jpg

205824_123694287727096_100002595774308_139990_1210094_n.jpg

295252_123694351060423_100002595774308_139992_5816338_n.jpg

let's see. tomorrow if I can make new images. from above

PS

It's just like Dan 147 writes : I had slot-cars when I was a child that used exactly the same system.

See here: http://www.carrera-toys.com/en/

But it is Expensive.in the shop for electronics - accessories (electronic components)Can you 5 meter for 2.-€ or 3, - € Buy

But now I say good night. tomorrow is another day.

Udo mfg

Share this post


Link to post
Share on other sites

that is....wow....i truly am in awe of your ingenuity,

most people would go with a system of using metal wheels (not sure where) and obtain pick up from there.

you my friend, wow, its just amazing that resource and sagacity arises from the lack of a marketable 9v train motor...

Because it is more reliable and will not wear your track etc, that is why. But it is a nice option. I'm not sure it will be reliable enough for digital signals though?!

Share this post


Link to post
Share on other sites

Because it is more reliable and will not wear your track etc, that is why. But it is a nice option. I'm not sure it will be reliable enough for digital signals though?!

for JopieK

The advantage for digital is. You need the expensive and rare expectant 9 volt motors not open

A digital decoder will not be installed in the drive unit

Hello forum community and B n B

for better understanding.

More pictures.

I hope you know that to appreciate. :-)

The daylight pictures.

I've made ​​at zero degrees outside temperature the images

I had only boxer shorts and a sweater.

It was refreshing between my legs. :-)

402657_183273145102543_100002595774308_326186_1545869207_n.jpg

374297_183273195102538_100002595774308_326187_569066434_n.jpg

403865_183273278435863_100002595774308_326189_1838679068_n.jpg

379992_183273328435858_100002595774308_326190_1622947271_n.jpg

390425_183273351769189_100002595774308_326191_1928808366_n.jpg

384880_183273388435852_100002595774308_326192_333742743_n.jpg

395323_183273405102517_100002595774308_326193_733098292_n.jpg

Sincerely, Udo

Edited by ust60

Share this post


Link to post
Share on other sites

for better understanding.

More pictures.

I hope you know that to appreciate. :-)

The daylight pictures.

I've made ​​at zero degrees outside temperature the images

HI Udo, thanks for taking the additional pictures at zero degrees and helping our understanding!

Truly awesome! The new version looks even neater.

BnB

Share this post


Link to post
Share on other sites

I haven't 9 volt rails but this solution is great ...great work! :thumbup:

But you're going to PF 9 volt plastic rails? Or?

I think, I've seen on Brickshelf

Sincerely, Udo

Share this post


Link to post
Share on other sites

This idea is great!

I was wondering if you need always two motors or one is enough, sorry maybe it is a silly question but I'm not very good in electronic!

Cheers!

Share this post


Link to post
Share on other sites

This idea is great!

I was wondering if you need always two motors or one is enough, sorry maybe it is a silly question but I'm not very good in electronic!

Cheers!

I'm guessing you need two for the two pair's worth of converted decorative sides/pickups.

Without that you'll have problems with point switches/cross tracks/dead spots, like on 12v you need a pair at least for smooth motor running.

Share this post


Link to post
Share on other sites

This idea is great!

I was wondering if you need always two motors or one is enough, sorry maybe it is a silly question but I'm not very good in electronic!

Cheers!

There are no stupid questions,

only stupid answers !!

Look at the original LEGO

The drive units always have two pairs of pantographs

For 12 volt system from the bottom two couples,two right side ( - ), two left side ( + )

The 9 volt system, right side two Wheel ( - ), left side two Wheel ( + )

wheels

You need two pairs to the switch

408754_183427405087117_100002595774308_326651_58062351_n.jpg

This part is without electricity

Sincerely, Udo

Share this post


Link to post
Share on other sites

Hello community,

unfortunately my English is not always better. So I have to use the Google translator.

I deliberately "brought from the bottom up" this old post. Even though, now missing all pictures who wants to see the pictures again, here you can watch it again:

The name of the album is in German: " Antriebsumbau auf PF 88002 " (Drive Conversion to PF 88002)

http://www.flickr.com/photos/ust60/sets/

New video is here: " LEGO locomotive drive of a different kind VII "

Enjoy the View

Best regards Udo

Share this post


Link to post
Share on other sites

Hello community,

So the copper cables to supply that should not be the final solution, but when I had the wheels on the axles, it has given me so much itching in the fingers to see 88002 ride on the rails, which I unceremoniously the leads to the motor have from isolated.

Career in the coming days, under appropriate thin copper plate looking to then cut reasonable sliding contacts (pantograph) of it, but the copper wire proves how simple can solve the problem.

I wonder if it makes more sense to use a harder metal than aluminum, so that the sliding contacts do not wear the ALU wheels, but intended it still requires some testing on the lathe to the moment I'm not sure if I the geometry of my tires already like. Otherwise would probably be harder alloy wheels damage the 9 volt rails and in the longer term too expensive.

Best regards Udo

Share this post


Link to post
Share on other sites

I wonder if it makes more sense to use a harder metal than aluminum, so that the sliding contacts do not wear the ALU wheels, but intended it still requires some testing on the lathe to the moment I'm not sure if I the geometry of my tires already like. Otherwise would probably be harder alloy wheels damage the 9 volt rails and in the longer term too expensive.

Hi Udo,

from my personal experience, I would use aluminium tires. They do wear (slowly), but machining replacement ones is easier than making new pickups or new tracks. What grade aluminium are you using?

As for the geometry, I've had success with a 5 degree taper on the tread, and a 22,5 degree angle on the flange. If you use a DCMT insert (55 degree), you can get both these angles without repositioning your cutter.

Good luck!

Share this post


Link to post
Share on other sites

Hello Alain,

I get the feeling that speaks to me a professional , the rolling tires made ​​of aluminum are currently only a test . My lathe is more than twenty-five years old, the angle of the wheel flange , I tried from original Lego wheels " off take" ( to copy ), the angle of the tread is created only by "gut feeling ," he is at the moment too large.

And also to aluminum quality, I can not really tell you something . A good friend of mine is self ( he himself is the boss in his company ) he produced there model components made of aluminum , with him I get to talk some aluminum off-cuts , unfortunately the rest of pieces because the CNC lathes work getting smaller as economically as possible .

What aluminum alloy it is, I do not know , I have to read my that the , or a high , " SILIZIUM " share , is responsible for the hardness.

Since you come from Antwerp , the city ESSEN in Germany is reachable for you , look sacrament here on these pages : http://www.wmh.de/produkte.html

I found this on the fast :

Available materials / aluminum alloys

EN AW 5083 Al Mg4 , Mn0 5 , 7

EN AW 6082 Al Mg Si 1 Mn

EN AW 6061 Al Si Cu Mg 1

EN AW 7020 Al Zn4 , 5 Mg1

EN AW 6023 Al Mg Si Sn Bi

EN AW 2007 Al Cu4 Pb Mg Mn

EN AW 4032 Al Si12 Mg Ni

Aleco 62Sn

I think there will be something there , what concerns me at the moment , how much of your experience after the copper sheet for the sliding contacts should be? I think about 0.2 or 0.25 mm at the time, I have in the basement just a piece in the thickness of 0.5 mm , and that's me too stiff ( too thick)

The rolling tires are a great thing , I became aware of it for the first time in 2011 , as a member of this forum has made me aware of this fellow :

http://www.brickshel....cgi?m=mirekend

or you know the work of Mireck already :

senzor_10r.jpg

Hopefully the picture forum is compliant

Best regards Udo

Share this post


Link to post
Share on other sites

Not at all professional, but fully self-educated :grin:

I use a 2011 alloy myself (contains copper), but I've read that 6000 alloys are also easy to machine. You could try to ask your friend if any of the listed alloys have specific characteristics which are better (or not) for model railroading. I have some 'Neusilber' on order, which I was told was the material LEGO used on their 9V train motors.

On one of my locos, I used some commercially available copper sliding contacts. Unfortunately, they proved to be too unreliable for feeding a DCC chip; they are good enough for wagon lighting, though. In any case, I would say thinner is better.

I saw Mireks work on Brickshelf some time ago. His wheels look great, and he told me that he had them custom made on a CNC lathe. The only 'issue' I could see, is that the wheels are not insulated at the axle (I.e. you cannot use the train wheel holders, because the axle has to be split). For my trains, this would limit their usefulness.

Share this post


Link to post
Share on other sites

I'm VERY interested in all this. I've just put up a vid I took last year, which is a proof of concept. Using BBB med size ALL plastic wheels, and a track pickup via piano wire through 3mm LEGO tube (to look like a brake or sanding pipe) and an old 9v motor....really intended to do a DCC 08 shunter. As you can see from the vid, it works, but its only using 1 pick up on each side of the track, so points, cross-overs, etc would be a problem. However, I planned on making this using 2 pickups each side to compensate for this, BUT, I would rather go for a metal tyre over the wheel if possible. I've never gone any further with this yet as other projects took over.

Are either of you guys able to get over to the O2 in London, U.K. this may?

Edited by Bricktrix

Share this post


Link to post
Share on other sites

Here is the current and final design of my modded 7760 (with tapered treads and 'LEGO-friendly' flanges; the actual pickups are spring-loaded and push against the back of the flanges):

12294251986_3791ea576a_b.jpg7760 with aluminum tires by alainneke, on Flickr

The decoder has been replaced since taking this picture; it's now sound-equipped and I was also able to squeeze in a capacitor, too:

12294253976_d08888753a_b.jpg7760 wire mess by alainneke, on Flickr

@BrickTrix: no O2 for me this year, but feel free to PM me!

Edited by alainneke

Share this post


Link to post
Share on other sites

Create an account or sign in to comment

You need to be a member in order to leave a comment

Create an account

Sign up for a new account in our community. It's easy!

Register a new account

Sign in

Already have an account? Sign in here.

Sign In Now

  • Recently Browsing   0 members

    No registered users viewing this page.