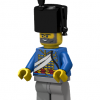
woody64 Posted August 20, 2010 (edited) During the last months I've seen some more people working with 3d printing. Additionally I got a couple of questions about materials and colours. Therefore I've collected my first series of printing and post processing tips. Building Tip 1: White & Flexible - Glossy Surface This picture shows a White and Flexible French Hat, sprayed black. Afterwards I've applied a coat of gloss varnish.The bigger part of the picture shows the achievable result of the surface, whereas the smaller part gives an impression how that would look like in real Minifig size. French Shako White & Flexible: http://www.shapeways...o_1809__s_.html Tamiya spray black Eberhard Faber gloss varnish White & Flexible is the standard material I order my items the first time. It's very flexible and durable. Although it looks a little bit fuzzy. Especially if you take a larger photo from nearby. Therefore I've searched for a solution to give the items the correct colour and more gloss. The best results achieved so far were reached with Tamiya colour sprays and a coat of gloss varnish. On the bigger pictures you still see the porosity of the material. But if you take a look on the screen in a size comparable to the size of a Minifig the result is rather good. Building Tip 2: Black & Flexible - glossy surface In this photo you see on the left side a Bavarian Helmet ordered in Black & Flexible. I've only added a coat of varnish gloss. Bavarian Helmet in Black & Flexible: http://www.shapeways...ian_helmet.html Eberhard Farber glossy varnish: http://www.tamico.de...oss/TA85006.jpg Whereas White and Flexible is the standard material there' s also the option of coloring this material. Black seems to be a very demanded color therefor Shapeways didn't change it so far. If you take a look on the results you get the impression of a smoother surface compared to the original white. That's true for all colors and seems to be a result of the penetrating colour process. As I have seen so far they use the same process (RIT colours) as also described in Brickjournal02 from fineclonier. The colour itself is matt and not as intensive as the spray used in tip 1. You can compare that with the 2nd Minifig on the right side of the picture. At the end I've also added some gloss varnish. For all people who won't do coloring themselves it's a great option for all black parts. Since coloring also results in an additional fee per piece I've started to provide packs cosisting of 10 pieces for a lot of my items. That reduces the price a lot. I wish that shapeways would offer more colours ... References: Brickjournal 2/2/2008/p.61ff: http://www.finecloni...ements_-_Paints,_Dyes,_&_More.pdf Building Tip 3: Brodie in Transparent detailed - glossy Surface In this picture you see a Bonnie helmet in transparent Detailed, sprayed in gray and coated with glossy varnish. Brodie helmet in transarent detailed: http://www.shapeways.../brodie_wd.html Tamiya spray grey Eberhard Faber glossy varnish Since many user demanded a material with smoother surface I started tu try the detailed material. For that I had to change several designs since the detailed material has a minimal wall size of 1mm. The transparent material already results in a much smoother surface. This can be seen on my flickr page. In the next step I sprayed it grey and added a varnish gloss. References: Flickr: Brodies in transparent: http://farm5.static...._246ae60373.jpg Flickr: Brodies sprayed grey: http://farm5.static...._47bd0252eb.jpg ---------------------- I will publish some further hints on my facebook account and add some more pictures about the steps here. Woody64 Edited August 22, 2010 by woody64 Share this post Link to post Share on other sites
michaelozzie Posted August 22, 2010 Indeed this is useful tip Woody. Ive found it works well and it also serves to protect the paint too. Also a question for you, do you believe you could make 2 items with Shapeways. The first is a undress or forage cap worn by the French, and also a backpack without the greatcoat rolled on its top? link to a few pics on a thread below My link Cheers Share this post Link to post Share on other sites
woody64 Posted August 22, 2010 (edited) Also a question for you, do you believe you could make 2 items with Shapeways. The first is a undress or forage cap worn by the French, and also a backpack without the greatcoat rolled on its top? link to a few pics on a thread below Indeed the undress/forage cap is an item which is missing. I already had a look on it and some prework done.ackpack http://www.shapeways...__test_v2_.html You mean picture 24) here: http://i710.photobuc...01/img305-2.jpg You mean nearly the same backpack without the roll/greycoat on top? I think, both could be done. Woody64 P.S.: I've added building tip2. @Michael: Any new projects on your plan. I was already asked when we can expect a new Napoleonic topic from you. Edited August 22, 2010 by woody64 Share this post Link to post Share on other sites
woody64 Posted August 22, 2010 Also a question for you, do you believe you could make 2 items with Shapeways. The first is a undress or forage cap worn by the French http://www.shapeways.com/model/148071/forage_cap__test_.html Share this post Link to post Share on other sites
Baylego Posted August 22, 2010 These are pretty cool! You should make more than pirate related ones. Also, can somebody tell me why this is called 3D printing? I don't quite understand. Share this post Link to post Share on other sites
Aanchir Posted August 22, 2010 These are pretty cool! You should make more than pirate related ones. Also, can somebody tell me why this is called 3D printing? I don't quite understand. It's called 3-D printing because instead of using a custom-carved piece or custom-carved mold, a digital 3-D render of the piece you want is sent to a printing service that generates the piece. 3-D printing works layer-by-layer, with a back-and-forth motion similar to an inkjet printer. But instead of using ink, it uses a modeling material that builds up into a 3-D product. Share this post Link to post Share on other sites
woody64 Posted August 22, 2010 (edited) These are pretty cool! You should make more than pirate related ones. Also, can somebody tell me why this is called 3D printing? I don't quite understand. In the last months I've added a lot of other stuff (some of them by user request): - Brodie, M1, MKIII, German, Russian, ... - Kar98 - Bobby, Bowler, Marching Band Hat, ... - Pauldrons, SciFi Helmet, - ... take a look on the pages below to get some further impressions. Woody64 P.S.: Take lso a look on Building tip 3. Edited August 22, 2010 by woody64 Share this post Link to post Share on other sites
michaelozzie Posted August 23, 2010 Indeed the undress/forage cap is an item which is missing. I already had a look on it and some prework done.ackpack http://www.shapeways...__test_v2_.html You mean picture 24) here: http://i710.photobuc...01/img305-2.jpg You mean nearly the same backpack without the roll/greycoat on top? I think, both could be done. Woody64 P.S.: I've added building tip2. @Michael: Any new projects on your plan. I was already asked when we can expect a new Napoleonic topic from you. Hey Woody. Yeah the figure 24 is the one thanks. My project at the moment is some pre empire figures. Im making a revolutionary demi-brigade so the undress caps would be great. I think i will need to order some of your british artillerymen helmets as they were worn by many frenchmen too. Most of my lego is still in boxes waiting for our move overseas. Share this post Link to post Share on other sites
Baylego Posted August 24, 2010 It's called 3-D printing because instead of using a custom-carved piece or custom-carved mold, a digital 3-D render of the piece you want is sent to a printing service that generates the piece. 3-D printing works layer-by-layer, with a back-and-forth motion similar to an inkjet printer. But instead of using ink, it uses a modeling material that builds up into a 3-D product. Ah, thanks. I saw an article about something like this in Popular Science. It was a kit you could buy online to make a printer like that for a couple hundred dollars. I might want one now! Also, that is pretty cool that you make items other than pirates ones woody64! Share this post Link to post Share on other sites
woody64 Posted August 25, 2010 Ah, thanks. I saw an article about something like this in Popular Science. It was a kit you could buy online to make a printer like that for a couple hundred dollars. I might want one now! Also, that is pretty cool that you make items other than pirates ones woody64! I've also seen that. I think it's the makerbot or something similar. But not sure if the resolution and quality is enough. Woody64 Share this post Link to post Share on other sites
woody64 Posted August 25, 2010 (edited) Also a question for you, do you believe you could make 2 items with Shapeways. .... and also a backpack without the greatcoat rolled on its top? http://www.shapeways...ack__test_.html the question is, if we should make it more french like this to have a difference: http://i710.photobuc.../Brun12_480.jpg http://www.shapeways.com/model/149122/french_backpack__test_.html Edited August 25, 2010 by woody64 Share this post Link to post Share on other sites
woody64 Posted October 4, 2010 Also a question for you, do you believe you could make 2 items with Shapeways. The first is a undress or forage cap worn by the French, and also a backpack without the greatcoat rolled on its top? link to a few pics on a thread below My link Woody64 Share this post Link to post Share on other sites
woody64 Posted June 23, 2013 (edited) Some days ago I've received the results from another printing company providing more colors for WSF: The picture shows polished orange. The company offers (green, black, blue, brown, red, yellow, orange, pink, black?). I'm awaiting another package with brown and green. Additionally you can see some design changes after having switched to blender (why the hell didn't I do that earlier ... ) Edited June 23, 2013 by woody64 Share this post Link to post Share on other sites
woody64 Posted June 25, 2013 Here are some colors now possible with Sculpteo polished plastic: Share this post Link to post Share on other sites