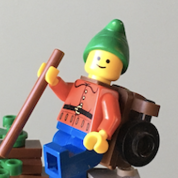
Supplement_Creatif Posted June 21, 2022 (edited) After a little big short absence, I would like to present my first completed (for now at least) MOC. This is a GE 44-ton switcher which is quite close to home. Before going over the model, here’s a little back-story. The city of Winnipeg, in building the aqueduct which would supply fresh water to the city, built the Greater Winnipeg Water District Railway, the GWWD. This would be a 164 kilometer long railway to assist in the construction and maintenance of the aqueduct. The railway was built between 1914 and 1916. The aqueduct was completed in 1919. After the completion of the aqueduct, the railway continued to operate, providing passenger service for workers and carried freight to and from Shoal Lake, the lake from which the aqueduct draws its water. Mixed train service stopped in 1981, and today the railway still operates as freight only and continues maintaining the aqueduct. I came to know this little railway one day driving through St. Boniface in Winnipeg and thought it was such a cool thing. After buying the book ‘’The Muskeg Limited’’ which describes the life of the railway, its locomotives and more, I decided I had to try my hand at modeling something of this railway. I settled on the GE 44-ton locomotives, 4 of which were in service from around 1946 to as late 1994 when they were mostly sold to the Ontario Southland Railway. The railway operated a couple RS23’s, and an MS13 and MS10 however in the present day, the railway still operates a restored GE 44-ton locomotive as well as its RS23’s. A bit of story on the GE 44-ton locomotives. These were produced by General Electric in direct response to new union laws trying to protect fireman jobs in the transition days from steam to diesel. The new union laws made it so any locomotive weighing above 45 tons would require both an engineer and a fireman. Therefore these switchers were produced at 44 tons, therefore not requiring a fireman to operate, reducing operating costs. The locomotive I decided to model is number 101. Purchased new in 1946, it was retired in 1990 and sold to the Ontario and Southland Railway in 1994. It sports a great black, yellow and grey livery. I started modeling this prototype in the fall of 2020. Colour availability for some of the parts and not knowing how to fit in internals to make it move stopped me and I decided to try and model other things. A few WIP’s projects later, I was perusing bricklink, and the parts I needed in the colours I needed were now available. At the same time articles on this forum started to appear about circuit cubes. I had everything I needed now. The parts ordered and arrived, I assembled the model in the early summer of 2021. At this point my Sudio file was sent to Andy at OKBrickworks and I started hunting for suitable tubing to make the railings. At this time I also started attended a Seamanship School in the east coast and was only able to get back to the model when I’d be back home in the prairies in December. Back home for the holidays, I eagerly applied the decals and the hunt for railings began again. I finally found electrical wire of the colour I needed, however its diameter is a little shy and therefore the railings are too flimsy for my taste, however for now they do the job. I hope you enjoy the photos and my ramblings. I have also added some renders of a Union Pacific Livery with the normal hood which is seen on all but the Greater Winnipeg Water District units. Lastly big thanks to Andy at OKBrickWorks. Having seen his other work I knew I wanted him to make the decals I needed and they look absolutely fantastic. They take a pretty square looking model and elevates it incredibly! Any and all comments and suggestions (especially for a rigid 3mm tube substitute in yellow) are always welcome. Cheers, Edited June 21, 2022 by Supplement_Creatif Share this post Link to post Share on other sites
DMRR WOLFE Posted June 22, 2022 What a great locomotive! Nice work with some clever engineering to capture the shape and details! I grew up in Winnipeg and didn't know a thing about this! Thanks for the history! Oops! Bit of a misspelling of 'Winnipeg' but a cut and slice would correct that "E" easily enough! Share this post Link to post Share on other sites
Asper Posted June 22, 2022 Great work on the shape! Share this post Link to post Share on other sites
Feuer Zug Posted June 22, 2022 Nicely done. You captured the essence of the GE 44-ton locomotive. Integrating the motors in really adds to this MOC. Share this post Link to post Share on other sites
zephyr1934 Posted June 22, 2022 Nice job recreating the common 44 tonner Share this post Link to post Share on other sites
bogieman Posted June 22, 2022 Nice work. That prototype is just begging to be modeled with a 5 wide hood with a grille tile on each side of the headlight but it's nice how you've fit the circuit cube motors in a 4 wide hood which seems closer to scale and improves the look at the cab doors. Always compromises to make. Share this post Link to post Share on other sites
Supplement_Creatif Posted June 22, 2022 Thanks for the kind words everybody! 13 hours ago, DMRR WOLFE said: What a great locomotive! Nice work with some clever engineering to capture the shape and details! I grew up in Winnipeg and didn't know a thing about this! Thanks for the history! Oops! Bit of a misspelling of 'Winnipeg' but a cut and slice would correct that "E" easily enough! Nice spot! Funny that after looking over these decals for so long I hadn't even realised! Well atleast it's spelt like its pronounced haha. Your absolutely right that a little slice would rectify it, but I have to admit I'am a little scared to mark up the bricks underneath, to slice or not to slice, that is the question. 2 hours ago, bogieman said: Nice work. That prototype is just begging to be modeled with a 5 wide hood with a grille tile on each side of the headlight but it's nice how you've fit the circuit cube motors in a 4 wide hood which seems closer to scale and improves the look at the cab doors. Always compromises to make. Thanks bogieman. When modeling the hood there was definitely a back and forth whether or not to make it 5 wide to have the grille tiles. The front shape was definitely something that I was going back and worth on for a long time. The prototype having that slight angled front was a cause of many a headache. Ultimately I went for a the curved piece on the model which I think approximates it and keeps the feel of the locomotive. I am quite new to this hobby and I was wondering if anybody could give a suggestion at all for running this loco. Since up until recently I only owned some straight sections of track for display, and that I figured I am probably a good 5-7 years down the line of actually ever making a layout, I never really designed this loco to run. I did design a few alternatives to make it more runnable as seen in the UP livery render. But I definitely designed this the wrong way around for it to run, very much more designed as a display. The addition of the circuit cubes was for me to run it eventually and to go back and forth on my display stand. Also the size on the cube made it the perfect fit, although looking at some of the creations here, its incredible the even tighter spaces people end up fitting it in. Recently I bought some R104 curves and switches. I would like to eventually run a train around the Christmas tree and so that my nieces can play with it, instead of going back and forth on my display stand as fun as that is. I tested it out and it runs very nicely around the curves however I can't seem to make it through the switch. I definitely have more testing and observing to do to see where the wheels might rub on the undercarriage and ladders, but I was wondering if I was missing something obvious with my Drive Train that would make it difficult to navigate the switch. I will be doing more research looking at the various drive trains on this forum but I was wondering if there was a quick spot that would be obvious. For loco's this scale, do I need a diff? Is the fact that all 4 axles are driven are creating rubbing which makes it harder to navigate? Should I be only powering the wheels on one side? The attached photo shows one of the bogies. Both are identical and are powered directly each with its separate motor. Thanks for any comments, and suggestions. cheers, Share this post Link to post Share on other sites
Ropefish Posted June 22, 2022 Wonderful! i have a similar motor setup design for the GE 70 tonner! though im having trouble battery placement.... regardless its nice to see more switchers, such cute lil guys! Share this post Link to post Share on other sites
LEGO Train 12 Volts Posted June 22, 2022 Very good work and beautiful final result! Share this post Link to post Share on other sites
zephyr1934 Posted June 23, 2022 20 hours ago, Supplement_Creatif said: Nice spot! Funny that after looking over these decals for so long I hadn't even realised! Well atleast it's spelt like its pronounced haha. Your absolutely right that a little slice would rectify it, but I have to admit I'am a little scared to mark up the bricks underneath, to slice or not to slice, that is the question. Doh! I'd suggest just ordering replacement stickers. Or if you want to hold off doing so until you can include additional artwork for other projects. Since this is black printing, you could make your own temporary stickers to tide you over. 20 hours ago, Supplement_Creatif said: I never really designed this loco to run. I did design a few alternatives to make it more runnable as seen in the UP livery render. But I definitely designed this the wrong way around for it to run, very much more designed as a display. The addition of the circuit cubes was for me to run it eventually and to go back and forth on my display stand. Also the size on the cube made it the perfect fit, although looking at some of the creations here, its incredible the even tighter spaces people end up fitting it in. Recently I bought some R104 curves and switches. I would like to eventually run a train around the Christmas tree and so that my nieces can play with it, instead of going back and forth on my display stand as fun as that is. I tested it out and it runs very nicely around the curves however I can't seem to make it through the switch. Your trucks look pretty standard, but you might want to put 1 and 1/2 bushings on each axle to keep the bevel gears from popping off (put the 1/2 bushing on the side with the gear to maximize blockage of the central axle gear). But I doubt that has anything to do with your switch problem. Delivering power to the truck through the central mounting axle will rotate the truck so that it always pushes against one side of the rail, but your design is a common one and R104 switches should be very forgiving in that regard, so here too I doubt it is the source of your problem. I'd suggest making a setup on a high table or a shelf where you can comfortably look at the wheel/rail interface at eye level to diagnose the problem. Run it slowly (easy to do with a circuit cube) back and forth and figure out which wheel is the first one to leave the track and where. I bet it will turn out to be either that your wheel spacing on the axle is either a little to wide or a little too narrow, or that you need a few extra guard rails on the switch. If you do need extra guard rails, a plate + tile is all you need, but maybe follow that up with rounded ends if it solves your current problem but creates a new climbing problem. Meanwhile, this small loco should do fine on R40 curves, at some point you might want to pick up a cheap city train as a parts pack (well, cheap is a relative term with lego). Share this post Link to post Share on other sites
Brickwolf Posted July 2, 2022 Excellent 44-ton locomotive! Share this post Link to post Share on other sites
Paperinik77pk Posted July 5, 2022 Immediately recognizable , and faithful to its prototype!!! Great job!!! Ciao! Davide Share this post Link to post Share on other sites
XG BC Posted July 5, 2022 looks very good! i like it! Share this post Link to post Share on other sites
icemorons Posted July 29, 2022 On 6/22/2022 at 1:58 PM, Supplement_Creatif said: I was wondering if I was missing something obvious with my Drive Train that would make it difficult to navigate the switch. I will be doing more research looking at the various drive trains on this forum but I was wondering if there was a quick spot that would be obvious You'll want to check that the 1x4 plates at the bottom of each bogie aren't protruding too far downward. They may clear the outermost part of the wheel flange, but the switches are sensitive to any protrusions that would go below the level of the traction tires. My bet is that the lowermost plates of the bogie are catching on the switch as the rails diverge. Share this post Link to post Share on other sites
Supplement_Creatif Posted October 5, 2022 Thanks for all the positive comments and advice with regards to solving my switch problem. Since July I have been away from my collection and therefore could not look into it further however once back home in mid November I should be able to take a look and apply all the feedback received. On 6/23/2022 at 3:19 PM, zephyr1934 said: Doh! I'd suggest just ordering replacement stickers. Or if you want to hold off doing so until you can include additional artwork for other projects. Since this is black printing, you could make your own temporary stickers to tide you over. I have a few projects on the go right now which will need some decals and will get a new set with proper spelling. I was so excited to get these when it came to checking them over I didn't take that good a look. On 6/23/2022 at 3:19 PM, zephyr1934 said: Your trucks look pretty standard, but you might want to put 1 and 1/2 bushings on each axle to keep the bevel gears from popping off (put the 1/2 bushing on the side with the gear to maximize blockage of the central axle gear). But I doubt that has anything to do with your switch problem. Delivering power to the truck through the central mounting axle will rotate the truck so that it always pushes against one side of the rail, but your design is a common one and R104 switches should be very forgiving in that regard, so here too I doubt it is the source of your problem. I'd suggest making a setup on a high table or a shelf where you can comfortably look at the wheel/rail interface at eye level to diagnose the problem. Run it slowly (easy to do with a circuit cube) back and forth and figure out which wheel is the first one to leave the track and where. I bet it will turn out to be either that your wheel spacing on the axle is either a little to wide or a little too narrow, or that you need a few extra guard rails on the switch. If you do need extra guard rails, a plate + tile is all you need, but maybe follow that up with rounded ends if it solves your current problem but creates a new climbing problem. Meanwhile, this small loco should do fine on R40 curves, at some point you might want to pick up a cheap city train as a parts pack (well, cheap is a relative term with lego). Thank for the advice, I will definitely look into putting some bushings to prevent the bevel gears from going anywhere as well as taking a close look at eye level to see any areas which could cause the friction. In terms of getting a city train pack, I definitely have my eye out on second hand markets (kijiji and market place) to hopefully get something. I recently ordered another half circle of 104 to go around the Christmas tree this winter. I am still new to this but forgot how much fun it is to watch a little train go around something, or for now at least for myself, go back and forth a straight piece of track ahaha. On 7/29/2022 at 4:41 AM, icemorons said: You'll want to check that the 1x4 plates at the bottom of each bogie aren't protruding too far downward. They may clear the outermost part of the wheel flange, but the switches are sensitive to any protrusions that would go below the level of the traction tires. My bet is that the lowermost plates of the bogie are catching on the switch as the rails diverge. Thanks for the heads up icemorons. I will look at the interference with those plates... as I said earlier I am away from my home therefore I'm not sure how much those plates are holding up... hopefully if they are the problem my trucks are going to start falling apart Lastly I just wanted to ask a question with regards to old threads. I imagine this isn't the ideal place but it is topical seeing that I am answering to this a few months after the last reply. How long would a thread be considered "dead". I imagine with big projects which last a couple years there would be time periods of possible months were no reply is made. Is there a certain amount of time where it is no longer deemed acceptable to post a reply to a post? thanks and cheers, Share this post Link to post Share on other sites
Murdoch17 Posted October 5, 2022 (edited) @Supplement_Creatif If it's a topic you (as in, the author of the topic) created, I usually hold off on updates after a year or two especially if it's nothing major to say or the'res been no replies in-between then and now. With other peoples posts / threads it just depends. If it's something relevant, like poster asked a question question about how to do something in March, and nobody really answered until now in October, it *should* be fine to answer back and say, "this is how to fix XYZ problem". If you're posting a comment to say "Cool MOC!" on a model that's no longer on the first page of a sub-forum, that's generally not a good idea. Also, asking for instructions is usually considered rude too, unless the author offered it to whoever wanted it. @JopieK anything I'm forgetting or getting wrong on forum rules and regulations? Edited October 5, 2022 by Murdoch17 Share this post Link to post Share on other sites
Toastie Posted October 5, 2022 6 hours ago, Murdoch17 said: If it's a topic you (as in, the author of the topic) created, And then the "I created this topic, so I can necro-bump it" tune chimes in, doesn't it? Regardless of what the volume of the update is? Best, Thorsten Share this post Link to post Share on other sites
Murdoch17 Posted October 6, 2022 (edited) 2 hours ago, Toastie said: And then the "I created this topic, so I can necro-bump it" tune chimes in, doesn't it? Regardless of what the volume of the update is? Best, Thorsten I do that, yes. But I'm not sure if it's proper or not... we need a MOD to chime in on this one! Edited October 6, 2022 by Murdoch17 Share this post Link to post Share on other sites
JopieK Posted October 6, 2022 17 hours ago, Murdoch17 said: @Supplement_Creatif If it's a topic you (as in, the author of the topic) created, I usually hold off on updates after a year or two especially if it's nothing major to say or the'res been no replies in-between then and now. With other peoples posts / threads it just depends. If it's something relevant, like poster asked a question question about how to do something in March, and nobody really answered until now in October, it *should* be fine to answer back and say, "this is how to fix XYZ problem". If you're posting a comment to say "Cool MOC!" on a model that's no longer on the first page of a sub-forum, that's generally not a good idea. Also, asking for instructions is usually considered rude too, unless the author offered it to whoever wanted it. @JopieK anything I'm forgetting or getting wrong on forum rules and regulations? I don't think it is that clear-cut, but at least some people won't appreciate if you bump topics that are older than a year just to say "Cool MOC!" I guess. @Toastie: well if you have e.g. your own topic on your layout and make some update even after some years that would be totally legit I think. Or you could just create a new one and link to the old one. Most problematic are new users that ask for instructions :) Share this post Link to post Share on other sites
FreeBee Posted October 6, 2022 Great build! You really captured the felling and looks of the original. I like how you made it. There are a phew small things: I am missing the "cowcatcher" I don't like striping done with stickers. I like it better when it's a brickbuild solution. Is there a horn in front of the cab of the real one? And maybe yellow and red dots on the "trainbase" It's your train so don't take above list as negative. Grtz Freebee Share this post Link to post Share on other sites
Supplement_Creatif Posted October 6, 2022 @Murdoch17, @Toastie, and @JopieK, thank you for the replies in terms of the question I had about thread posting. I appreciate the information and will try to keep such questions to the TRAIN TECH Help, General Questions & Talk to the Staff thread in the future. 7 hours ago, FreeBee said: Great build! You really captured the felling and looks of the original. I like how you made it. There are a phew small things: I am missing the "cowcatcher" I don't like striping done with stickers. I like it better when it's a brickbuild solution. Is there a horn in front of the cab of the real one? And maybe yellow and red dots on the "trainbase" It's your train so don't take above list as negative. Grtz Freebee Thanks for the comments Freebee, definitely didn't take any of it in a bad way, it's always great having more eyes looking at things. In terms of the "cowcatcher", the reference photos that I found of the prototype seem to have multiple different front ends, some with cowcatcher, some with snow plow, some without anything at all. I decided to model based on the second photo which I posted with the model in the first post. I opted for that version as the cowcatcher seemed a bit too daunting of a task. You're absolutely right that there is a horn, I omitted the detail my first go around but might add it in later. Same with the red and yellow dots allow the base. In terms of the stickers, I find it mind boggling the brick built solutions people on this forum come up with for stripes. I'l stick to stickers for now, maybe one day I'l get there. Thanks again for the comments everybody. cheers, Share this post Link to post Share on other sites